Easy beautiful nail designs for beginners. Beautiful patterns on nails - do it yourself
Today, a beautiful manicure has become an obligatory component of well-grooming and good taste for every lady, because a man pays attention first of all to a woman’s hands, as well as to the figure and hairstyle of a representative of the fair sex.
That is why any self-respecting woman takes care of her nails, each time choosing original manicure ideas to create unique stylish looks.
Although a single-color manicure is as relevant as before, manicurists suggest women take a break from monochrome solutions and pay attention to a fashionable manicure with a pattern.
Stunning manicure with patterns is a mega current and fashionable trend today. A beautiful manicure with a pattern has gained popularity due to its uniqueness, new ideas, and, undoubtedly, versatility, because a manicure with a pattern can be done both for every day and for a special occasion.
Patterns on nails are not a new technique in nail art, but recently manicure with a pattern has become so perfect and unique that even artists can appreciate the beautiful, skillful patterns on nails created by professionals in their field.
Even if you are not a specialist, a beautiful manicure with a pattern can be quite easily done at home with your own hands, if you stock up on ideas, patience and desire.
The News In Time team decided to bring to your attention a wonderful photo collection on the theme “Manicure with a pattern”, where you will find interesting patterns on nails for a manicure for every day, and also choose a beautiful manicure with patterns for an evening, prom and even wedding dress.
And now about the trends that determine what a fashionable manicure with a pattern will be for 2019-2020.
Fashionable patterns on nails: a beautiful manicure with a pattern is an impeccable nail art trend
To make a manicure with a pattern, manicurists use needles, toothpicks, special brushes, varnishes of different colors and textures, creating a wide variety of patterns on nails of different lengths.
A beautiful manicure with an abstract pattern is in fashion, which will make your look interesting and unusual.
A stunning manicure with a floral pattern will complement any romantic look, making it even more tender and sensual. Floral patterns on nails are especially relevant in spring and summer, when everything around will be in harmony with your nail design.
Floral motifs will decorate a manicure with a variety of twigs, leaves, and their combinations.
Both in warm seasons and on cold days, a manicure with a pattern of curls, smooth lines, stripes of different thicknesses, which does not require a clear design, but still looks very original, will look stylish.
This manicure with a pattern can be performed on both glossy and matte surfaces. 
To make the patterns on your nails look beautiful, a manicure with patterns should be as neat as possible, even if you are doing an abstract manicure with a pattern.
Beautiful manicure with a pattern: what patterns you can draw on your nails - ideas
A manicure with a pattern for a professional is a huge field for realizing your fantasies and ideas.
A beautiful manicure with patterns can embody both traditional solutions in nail art and be innovative in terms of the choice of design.
Traditional, but no less beautiful in spring and summer, will be a manicure with patterns depicting poppies, roses, daisies, cornflowers, forget-me-nots and other elegant flowers.
Geometric patterns on nails in the form of regular horizontal and vertical lines and geometric shapes are the perfect solution to a discreet nail design.
A geometric manicure with patterns will complement a business look, decorate everyday outfits, and look stylish in a luxurious holiday look. 
Today, fashionable manicures with swirl patterns and openwork patterns on nails are at the peak of popularity. Curls on nails are most often made with contrasting colors of varnish on a plain or colorless base.
You can create a spectacular, elegant manicure with swirl patterns using black varnish, and white or pastel-colored swirls will help you create a gentle, unobtrusive, romantic and very elegant manicure with a pattern.
Those who want a chic manicure with a pattern will be interested in nail patterns that combine matte and glossy designs in one nail art.
The nail plate can be coated with glossy varnish, and the patterns on the nails can be made in a matte texture.
If you want an even more unusual and original manicure with a pattern, then the pattern itself can be made not only using varnish. Nail designs that combine patterns on nails with rhinestones, beads, microbeads, and sparkles are considered more complex.
In this case, a manicure with a pattern can be on all nails, or only on one or several nails; the remaining nails can be covered with a single-color varnish or decorated with a French manicure, smiles, ombre, moon manicure.
Those who like funny manicures with patterns will like the original manicure with cartoon, animalistic patterns, as well as manicures with patterns in the form of butterflies, bows, hearts, the notorious polka dots, blots, checks, zebras, newspaper manicure with a pattern. 
Recently, manicures with ethnic patterns have gained great popularity. Also an unusual solution in nail art was a manicure with a pattern in the impressionist style.
Incomprehensible designs on nails in an impressionistic manner actually have a deep meaning that only a few can comprehend.
But even if high fabrics are not your thing, a manicure with patterns in this embodiment will be an original accent to your stylish look, so this idea is worth trying.
Here we have briefly presented the main trends that determine what a fashionable manicure with patterns will be like.
Whatever patterns on your nails you prefer, the main thing is that they match your style, your mood, your personality, and make you bright, spectacular, and unique.
And now our photo collection on the theme “Manicure with a pattern.” Look and choose original nail patterns for your loved one.
Doing a manicure with patterns - photo ideas


A bright, memorable manicure is the dream of every woman, especially on the eve of a family celebration or upcoming holidays. It is not at all necessary to seek the services of expensive professionals - with due perseverance and imagination, you can create magnificent nail art yourself.
Using an ordinary needle, you can draw unique, exquisite patterns on your nails.. This method of drawing is quite popular, but many consider it too complicated.
This is by no means true: it is enough to master a few simple techniques and even a novice master can bring to life a real work of nail art. The main thing to do is to constantly improvise.
Necessary tools and materials
First of all, you need to decide on the color of the varnish and choose a needle. You can use either a sewing one or one purchased at a professional store for manicurists - it has a long, comfortable handle. In principle, you can use an ordinary pencil with a needle inserted as a tool.
as a tool you can take a regular pencil with a needle inserted
 The main thing is the thin tip, which can be used to draw elegant patterns. In addition, you should take care of purchasing:

Note!
- Before you realize your fantasies directly on your nails, you should practice on other materials.. Glass or tiles work great. The main secret to successfully applying a pattern is speed and attentiveness. Only thanks to the “wet”, not dry surface, designs on nails with varnish and a needle are ideally beautiful.
- You should carefully monitor the movements of the needle, because it’s quite easy to damage the nail plate, but it will take a long time to restore the health of your nails.
- Smooth yet clear patterns require some skill. The needle should be at an angle of 90⁰ relative to the nail - only in this case the pattern on the varnish will be perfect and will appeal to even the most demanding fashionistas.
- Don't forget to clean the needle tip regularly nail polish remover - this will help avoid the appearance of lumps that can completely ruin the entire composition.
Simple beautiful patterns in 10 minutes
Beginning craftswomen should start with the simplest patterns. They allow you to create original designs on your nails with polish and a needle in a minimum amount of time. 
On the Internet you can find many schemes that do not require much experience, but are extremely effective for creating a stunning manicure. For example, by painting the sides of the nail with two contrasting varnishes and making zigzag movements with a needle in the center, you can get a unique stylish design similar to a “water” manicure. 

It is important to know!
To create the most beautiful patterns, a fairly thick layer of varnish is required. As a result, the coating may take longer to dry. 

To speed up the drying process, you should use a special top-end product, which can be purchased at any cosmetic store. The topcoat will also extend the life of the manicure.
The most impressive patterns
A manicure, complemented with various decorative elements, looks truly stylish and festive. 

Popular nail decorations include:
- glitter;
- rhinestones;
- beads;
- foil;
- feathers;
- lace;
- "broths".
Nail designs with small but vibrant details will look truly impressive. For a stronger fixation of decorative elements, you can use special glue, and it is better to lay out such tiny details as beads or broths with an orange stick. 
The most beautiful designs on nails with varnish and a needle undoubtedly require at least minimal experience, so it’s worth moving on to additional decorations after mastering the basic skills.
Master class on creating nail art with a needle
Before you start creating a masterpiece on your nails, you should do a hygienic manicure. Giving your nails a neat shape, removing dry cuticles - all this is necessary for the ideal appearance of your hands. It is also necessary to prepare in advance all the materials and tools that will be used in the process of creating nail art. 
Step 1. For the base coat, the surface of the nail must be dry and free of grease. The base will protect the nail from the appearance of a yellowish color and strengthen the plate itself.
Step 2. After the coating has dried, you can apply the first layer of varnish and dry thoroughly.  Step 3. The second layer is applied quite thickly. On it, without waiting for it to dry, you can apply neat drops of contrasting varnish in accordance with the direction of the future pattern (dots are also suitable for this).
  Step 4. Using a thin or gypsy needle (the choice depends on the desired thickness of the pattern), you need to draw along the nail the lines indicated on the selected pattern. Movements must be made quickly and accurately so that the varnish does not have time to thicken.
Step 5. The final stage is covering the created nail art with a finishing layer. It can either impart a glossy shine or matte the surface of the nail - it all depends on the artist’s idea. 
Interesting fact!
If applying a pattern to your working hand is difficult (for example, it is difficult for right-handed people to draw with their left hand), you can do nail art on only one finger, and cover the rest with a single-color varnish. The bright pattern on the nail of the ring finger looks interesting.
Drawings on short nails
A short manicure is by no means an obstacle to creating an interesting, memorable pattern. The main thing is that the designs on the nails with varnish and a needle are not too overloaded with details. In addition, large, heavy elements should be avoided.
Small lace patterns are what you need to highlight the beauty and well-groomed hands
 It is undesirable to use more than three shades of varnish and too much glitter. In fact, there are no more restrictions for owners of short nails.
Most suitable drawings:
- Diagonal stripes applied with varnish - they visually lengthen the nails; with a needle you can add “marble” stains and other patterns. On such a coating, small touches made with sparkles would look appropriate.
- Contrast points in the form of peas - applied at the edge, they will also make the nail longer.
- Ethnic and any color drawings, made with varnishes of neutral shades.
How to decorate long nails
Long nails give complete freedom of imagination. Any pattern will look harmonious on them. The use of various decorations is encouraged, for example, nails with an original pattern and complemented by a tiny piercing on the free edge look stylish and unusual. 
In any case, don't limit yourself.– constant bold experiments will help you choose the most suitable design, which will maximally reveal the bright personality of the owner.
How to make drawings using “wet” varnish
Drawings on “wet” varnish require speed and high precision. That is why Before starting nail art, you should carefully consider the future design. You shouldn’t limit yourself to diagrams from the Internet, because unique designs you come up with yourself can look much more interesting. 
- A velvety coating can be applied to a pattern of “wet” varnish. Simply pour a special nail flock onto the coating, wait a few minutes and brush off the residue with a dry brush. As a result, the drawing will acquire an unusual texture that is pleasant to the touch.
- With “wet” varnish you can create not only floral patterns, but also small scenes - New Year’s motifs, an unusual safari design, or cute drawings of animals.
- Try to add small strokes - special painting varnishes with a long and thin brush are ideal for this. Thanks to such nuances, the drawing will look more “alive” and textured.
 You need to know that for beautiful, blurry lines you should select products with a certain structure. For example, a perfect drawing will never be achieved if the varnish is too thin.
A few secrets will help make the manicure process easier and more convenient.

Many girls, having tried to make a drawing with varnish and a needle with their own hands, note with surprise that it's much simpler than it seemed at first glance.
The main thing is to do such a manicure more often - after all, the more practice, the better the patterns will turn out, and constant experiments will help you find the very design that will maximally demonstrate the taste and sense of style of your owner. 
Well-groomed nails certainly guarantee your attractiveness and demonstrate elegance, but it is unlikely that you will be able to truly surprise someone with nails painted in one color. Beautiful patterns on nails that create the impression of sophistication and elegance will help you make your manicure original and inimitable. Don't know how to draw? Consider yourself a newbie to nail art? It doesn’t matter - you can easily create beautiful patterns on your nails at home, knowing the secrets and techniques of applying the ornament. All that remains is to choose the shades and theme of the drawing.
If you make beautiful patterns on your nails yourself, it is important to be careful and strictly follow the suggested instructions. The article offers photos and several ideas on how to make a beautiful manicure yourself using simple techniques that are accessible to everyone. Look at the photo of the beautiful patterns on the nails - making them yourself is not at all difficult: 


You can make adhesive stencils yourself!
Such a stencil is a paper or polymer fragment with certain outlines cut into it. Using adhesive stencils is quite easy, the cost is quite affordable, and the choice is simply huge.
Let's start creating the manicure of your dreams - choose a design that will show off on your fingers. These can be different patterns for each finger or the same one. Select the desired shades of varnish. Paint your nails with one of your chosen colors and wait until the polish dries. Fix the stencil on the nail plate - this is very easy to do thanks to the adhesive base. Take a contrasting shade of varnish and fill in the holes in the stencil. After some time, carefully peel off the stencil; the varnish must dry well, otherwise it will smudge during this procedure.
It is better to apply the varnish to the stencil not with a brush, but with a foam sponge, so that the layer is even and does not stand out in relief against the background of the base varnish.
You can make similar stencils of the simplest shapes yourself from ordinary stationery tape, or you can create a geometric pattern using thin strips of tape glued to the nail in the appropriate order. 

Stencil stamping
The stamping technique is reminiscent of creating and using a stamp or seal. A stencil stamping kit costs some money, but the result can rival the work of the most meticulous jeweler. Beautiful patterns on nails are more clear and sophisticated than when using adhesive stencils.
As in the previous case, you should start by applying base varnish to all nails. Then we need to prepare our seal. To do this, select an ornament and paint it with varnish of a contrasting shade. We correct excess varnish with a special tool such as a scraper. Next, we transfer the design to a convenient stamp, pressing it tightly against the plate with the ornament, and using the stamp we transfer the image to the nail.
Of course, such a procedure will require attention and perseverance, but the result is worth it. Once you get the hang of it, you can make patterns on all ten fingers in just a few minutes. The resulting pattern must be secured with a colorless coating or a special drying varnish. 


Dot patterns are not difficult
Putting a colored dot on the surface of the nail is not difficult. You can use a toothpick or a wooden stick, a ballpoint pen without ink, or a special tool - a dots, which allows you to create the most accurate dots. You can use dots to create flowers, beautiful abstract patterns of dots on your nails, or themed images using several shades of polish. And if you put not flat dots, but voluminous droplets, they can be beautifully connected using the same toothpick or sewing needle. This is how leaves and flower petals, waves, hearts and similar images are drawn. 


Artistic brush painting
A brush is the most complex manicure tool. To ensure that the lines and strokes are clear, of appropriate thickness and configuration, you need some experience. Artistic brush painting can become an exciting hobby. Start with simple geometric shapes, stripes, zigzags, then master schematic images of flowers and plants, celestial bodies, waves, flames and other natural phenomena. With enough practice, you will be able to depict the faces of animals, cartoon characters, and even entire landscapes and still lifes on your nails. 


To create a manicure with beautiful patterns on your nails, you can use not only varnishes, but also acrylic paints and even gel pens. Fantasize and conquer others with your impressive manicure! 

Hands are a woman’s calling card, and a flawless manicure is the final touch in creating a stylish look. Many women who want to get an elegant and unusual manicure go to a beauty salon, believing that they cannot cope with such a task on their own. This is a misconception; even at home, without special tools, you can reproduce exquisite patterns. In order to surprise others with your original design in the future, you must first master at least the simplest patterns on your nails. Drawing on nails is an extremely exciting process. However, in order to achieve a high level of skill, a girl should be prepared for the fact that she will have to constantly experiment, mastering new drawing techniques and materials that can be used to create them. In our article we will look at various nail patterns for beginners step by step with photos.
Drawings on nails step by step can be done quickly enough without professional skills. To make a puzzle manicure using the step-by-step method, you need to prepare four contrasting polishes and one black. Divide the nail into 4 equal parts and paint each of them a different color. Using black varnish, draw a vertical and horizontal stripe, which will emphasize the boundaries of the multi-colored parts. After this, put a black dot on the side of each multi-colored part, imitating a niche. In the middle of this point, draw another point with the same varnish, the color of which will match the color of the adjacent part. To make a snake design on your nails, use regular tulle. Varnish of any color is applied to the entire surface of the nail and a piece of tulle is immediately applied. After 2-3 minutes, the tulle is removed from the nail, and an unusual pattern similar to snake skin remains on the surface.

A set of accessories for painting nails for beginners photo
Simple patterns on nails for beginners can be drawn using available materials. To apply drawings you will need:
scotch;
needle;
foil;
glitter sprinkles;
thin brushes;
varnishes of various colors;
toothpicks;
cotton swabs;
nailfile;
nail polish remover etc. etc.


Patterns with a needle on nails for beginners photos
Very often there are situations when you urgently need to get a bright and beautiful manicure. And in this case, exquisite and unique designs on nails with a needle will suit us. This design is not at all difficult, but requires a little perseverance and experience. But then, when you master this technology, you will always have a stunning, unique and unique manicure. To do this manicure you will need several varnishes of different shades and a regular needle. Please note that when choosing a color you should choose, if not contrasting, then as different shades as possible. Otherwise, the patterns on the nails will merge. The second indispensable tool is, of course, a sewing needle. Although you can buy a special needle with a handle in professional stores, you can also use, for example, a wooden pencil with a needle. Keep in mind that to get fine lines and a graceful design, you need to use a fine needle, usually a size 90 needle.


2017
Nail patterns for beginners using varnishes photo
Simple designs on nails for beginners can also be done with varnish, choosing, in addition to the base, a special product with a thin brush. True, this option has a significant drawback - a beginner may encounter some problems directly in the process of painting on nails. The most common technique for simple nail designs is painting with nail polishes. To do this, choose two or more contrasting varnishes, one of which will become the base, and the second - the varnish for applying patterns. The problem with nail polishes is that most often the texture is quite thick and applying thin, even lines is quite problematic for a beginner. However, large figures without small elements can turn out to be of quite high quality using ordinary varnishes.


Patterns for beginners using tape photo
Scotch tape is another universal tool that we use everywhere in the household. So it is not surprising that over time our women have found use for it in creating designs.
When starting to do a manicure using tape, prepare polishes of two different shades and a clear coat. Apply the polish to the nail, when it dries, cut out a stencil in the shape of rays from a piece of tape. First, put some tape on your hand to get rid of excess stickiness, then on your nail. Apply black varnish, after it dries, remove the stencil. We glue the tape again and emphasize the pattern with silver varnish, remove the stencil.


Patterns for beginners using acrylic paints photo
Another popular method used to create simple but extremely beautiful patterns is painting with acrylic paints. This method of creating nail designs for beginners is no more difficult than painting with varnish. And for some it’s even easier and more convenient. And to make sure of this, we offer you schemes for creating a pattern with acrylic. Most often, such a manicure is performed in a salon, but it is quite possible to do it yourself. The paint dries quite quickly on the nails. Acrylic paints provide a wide range of colors and possibilities. You can create patterns with them using a dot or a needle, but some decors allow you to limit yourself to ordinary painting brushes. Often, beginners need a little more time to complete a design. In this case, the paint can be diluted a little with water. It can also be used to correct the drawing. Simple acrylic paint designs are easy to create on your nails, making them ideal for beginners.


Patterns for beginners with heart photo
A nail-biting Valentine's Day look is an absolute must, so choose one of the heart nail designs inspired by this romantic day. The stencil can also be cut from soft but dense fabric. For example, in the shape of a small heart. A layer of pink varnish is applied to the surface of the nail, then, when the enamel has dried, the fabric is applied to the nail and a layer of white varnish with glitter is applied to the heart. Hearts can also be made using a toothpick or a special dot (a tool with a small ball at the end that allows you to make even dots on your nails). For such a design you will need nail polish of your favorite color (but it is better to take pink or red), and a toothpick or a special dots.


2017
Designs on nails using photo stickers
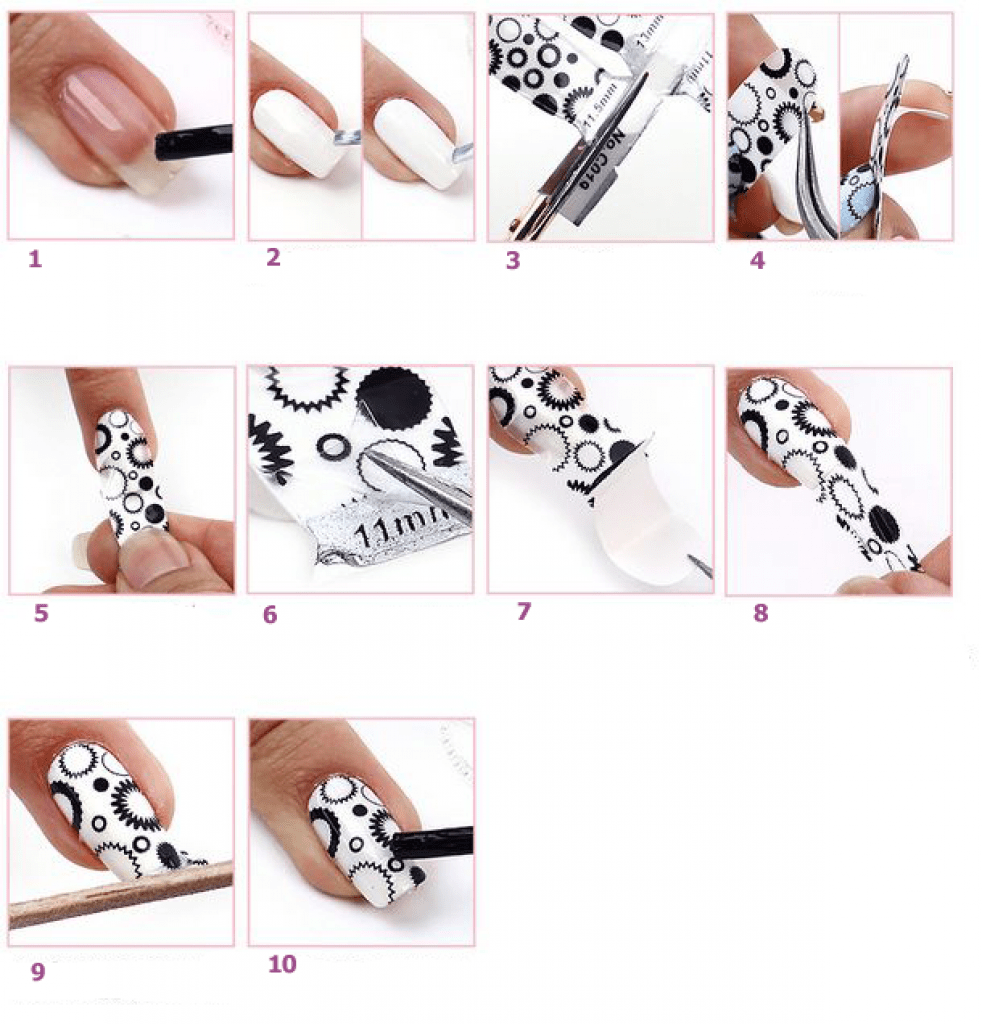
If you have not yet learned how to draw patterns on your nails with a needle or a thin brush, and you have very little time for a spectacular manicure, special nail stickers can help you out, of which, fortunately, there are a great many on sale. Slider transfer stickers are a thin film that is usually attached to a white or colored paper backing. It is fixed on the surface of the nails after soaking in water. The film itself is most often translucent and is suitable for partially decorating or completely covering the nail plate. Depending on what varnish you will use as a base and fixer, one or another technology for applying the sticker will be determined.
- The nails are painted in the main color and the varnish is allowed to dry completely;
- Separate one image for the purpose of fitting;
- The sticker is immersed in warm water for 20-30 seconds;
- The image is placed on the desired area of the nail, excess moisture is removed with a napkin;
- The sticker is secured with a topcoat.
This manicure takes an average of 20-30 minutes and lasts on the nails for 3 to 7 days. As you can see, even beginners can decorate their nails with beautiful designs.


Nail design, especially if it is created with your own hands, is a great idea in terms of self-expression and creating an image. The simplest decoration method is simple nail designs. Making them is not at all difficult; there are many ideas that have already been invented before. But there will be even more of them if you use your own imagination. You should start with the simplest techniques and gradually improve your talent and capabilities.
Simple drawings for new masters
At first, not everything will be as smooth as we would like. It's because:
- Firstly– you are worried, afraid that you won’t succeed;
- Secondly– you haven’t gained experience and dexterity yet – it’s a matter of time and diligence;
- Thirdly– you probably don’t quite understand what you can use to draw with and how exactly it’s done.

If you follow the main rules, the self-learning process will be more effective:
- Before work, you need to remove the cuticle from the nail plate. A simple warm bath in which your hand is placed for 10 minutes will help with this. This way it will be easier to lag behind the nail.
- Using a wooden stick (or a toothpick) and nail clippers, cut off the rough dermis (skin) around the nail plate.
- Next you need to polish the nail plate. By the way, this should be done not only before applying a manicure, but also for prevention, at least once a month. Instead of polishing, if you don’t have a special nail file at hand, simply degreasing with nail polish remover will be sufficient.
- In principle, the marigolds are ready to be painted. But there is one caveat. Before painting, you should apply a base. The drawing fits more neatly on it, and the drawing process becomes easier. The manicure as a whole will look neater.
- After applying the base, wait approximately 20 minutes.
Now that’s all for sure, you can safely start drawing.

What tools and materials should be on hand
Before the drawing procedure, prepare materials and tools for work; their list and varieties will depend on what you plan to work with, what material you know how to use best, decide on the theme and color parameters.
Nail polishes
You will need the following in your work:
- clear nail polish;
- fortified;
- medicinal;
- varnish fixative;
- glitter;
- glitters;
- decorative powder;
- several different shades of varnish.

Tools
It is impossible to imagine drawing without tools, so everything will be listed below that may be useful in one case or another:
- stickers;
- ready-made stickers;
- template plates;
- brushes;
- needles;
- toothpicks;
- ordinary or decorative tape;
- foil;
- dots;
- acrylic paints.
The simplest drawing ideas for beginners
Having prepared your nails for work, you can apply a design on them using any tools, even handy ones - those that every girl absolutely has at home.
Working with a needle
Original and even simple drawings here and there can be created using a needle. How to use it:
- You don’t need to draw on your nail right away, try doing it on paper. Firstly, you will understand how it works, and secondly, this way you can choose the proportions as close as possible to your nail.
- Apply the base (transparent base) to the nail plate, wait until it dries completely. The base is always applied in 1 layer.
- After the first base layer has dried, you will need to apply another layer - the background layer. Choose the color of polish that will accent the nail, for example, white.
- There is no need to wait until the second layer dries. You can continue working right away.
- Somewhere in the middle of the plate, drop three small dots of, say, red varnish onto a white background, forming a triangle or alternately one after another along the nail.
- You can draw with a needle by immediately poking it in the middle of the highest point, stretching it to the bottom, and so on to all of them, one by one. The result will be an ornament like the one in the photo.
- You can drop, for example, the same white varnish into the center of a red drop, then when stretched, a white stripe on a red background will follow the needle.
- You can stretch the varnish from side to side, and then you get an unusual pattern.

The color palette in such simple drawings has no specific boundaries. The author himself decides what to combine with what.
You don't need to work on all your nails at once. Draw them in order from the very beginning to the victorious finish. Otherwise, you definitely won't succeed.
Painting with a brush
This drawing technology is a little more complicated, but with a great desire, any novice master will cope with this task.
Practice, for starters, using artificial nail plates - this will be a very good workout. If you don’t have them at hand, draw a nail on paper that is approximately the same size and shape as yours.
Drawing technology:
- First, as always, a base coat of clear or medicated varnish is applied to prepared nails.
- Leaves the nail to dry. In this technology, all layers must dry completely as they are applied.
- After the base has completely dried, apply the background layer. The color in this technique should be chosen so that it contrasts with the future painting. First, in one step, the brush is moved from the center towards the cuticle, then the left side of the plate is painted, then the right. If you notice, you should only get 3 strokes of the brush.
- Further work will require a very thin brush. Dab it into the varnish, be sure to remove the excess. And, as they used to do at school, start drawing an element of the pattern or the drawing itself.
- The final step should be the fastening procedure. That is, the nail is completely covered with colorless varnish, along with the design.
For clarity, here are photos of simple drawing ideas.

This technology uses a different number of colors. First, try drawing hearts, simple flowers, lines and other geometry. If you feel the strength to draw a more complex pattern, feel free to get down to business.
Simple painting on nails with acrylic paints
These paints are respected by professionals and those who know how to paint with them. Their peculiarity is that they do not spread during operation, are easy to apply, dry fairly quickly, and last a long time. In addition, they are not dangerous to human health. On sale:
- colorless;
- translucent;
- opaque (overlapping the previous layer);
- pasty.
Can be diluted with water without any problems. They mix easily with each other. After drying, you can safely apply another design on top of them without fear of damaging the original layer. The coating is breathable and looks very attractive and bright.

According to the drawing technique there are:
- Oily. It is used in paste and undiluted form. They are called that because they resemble paintings done with oil paints.
- Pasty. The consistency is similar to liquid dough. The composition is not diluted and is used in the form in which it was purchased. You can only add pigments to it if the idea of the drawing requires it. Paint in the form of thick strokes. When the paint dries, it looks similar to gouache painting.
- Watercolor. Water must first be mixed with the binder, only then watercolor is added. The drawing in its pure form is similar to a watercolor pattern. Characterized by high quality.
- Sliding. You can mix this composition with structural nail gel. The difficulty here is that it will be quite difficult for a novice master to predict the end result. But after a few trainings you can learn this too.
- Glazing. You need to work with this material carefully. All layers that will be applied must be very thin, almost invisible.

You can paint with any type of brush that you know how to work with. For training, it is enough to purchase 6 basic shades and white in order to correct any mistakes in time. To understand them in action, you must first draw a checkerboard-shaped field on paper.
For 6 colors you will need 6 squares of approximately 2x2 cm. Apply the purchased paints to this field one after another (alternately) - paint the entire square with one pigment, then draw them with horizontal lines of a different shade, and finally with vertical lines of a different color. You should end up with 36 colors.
Painting with a brush using acrylic paints
Paint a twig with acrylic paint:
- Choose a very light color for the background (then choose a dark color for the drawing) or vice versa. In our example, it is lilac.
- Draw curved lines in yellow. Choose the location at your discretion, not necessarily exactly as shown in the photo.
- On this arc, draw leaf-shaped figures of the same tone using curved lines.
- Make the veins inside the leaves lighter.
- Secure the result with a transparent fixing layer.

If this drawing seems too easy for you, try recreating these simple ideas. In the first photo the drawing technique is depicted in pictures.

Learn to draw with dots
From the simplest designs to very complex patterns, professionals draw with dots. The simplest techniques are a combination of dots, commas, rulers, and so on of different sizes. The tool needs to be soaked in paint or varnish and begin to paint with it as with a regular brush. During the work, the amount of coloring agent decreases, this can be seen in the ingredients on the nail ornament, which makes the design more natural and realistic.

You can draw your nails with dots however you like. With it you can draw:
- flowers or animals;
- modify the traditional version of French manicure;
- It’s easy for them to create New Year’s motifs;
- personify the seasons on your nails;
- You can draw very stylish abstractions using dots.

Drawings using regular tape
Regular household tape can greatly help in creating nail designs. With its help you can make very different shapes, drawings and even compositions. Geometry is the easiest to do - it is based on lines, and cutting them out with tape is very easy. The cut strips can be applied to the nail plate in any order or sequentially if you want to create a specific shape.
Techniques for working with tape:
- As in all previous cases, the nail is first prepared.
- The first layer is the base layer.
- After drying, apply the background - at your discretion.
- While the varnish is drying, cut a few thin strips from the tape (about 1 mm wide, it can be thicker if you want it yourself), the length should be greater than the size of the nail, so that later there will be no difficulties in removing the strips.
- If the background layer is dry, apply the tape sheets to the nail the way you want it.
It is very important that it is thoroughly high. Otherwise, when removing the strips, you may damage the background layer if it has not dried well.
- On top, cover the entire surface of the nail with varnish of a different shade or several - this is also your prerogative in choosing.
- Allow a few seconds for the polish to begin to dry, but not completely dry.
- Peel off the pasted strips and see what you got.
You can leave everything as it is, or you can further refine the drawing with a thin brush or dots. Adding sparkles, circles and other elements with a different color of varnish.

Today there are many types of decorative tape on sale; it can also be used to create drawings. Here there is no need to cut the strips yourself. It can also be used in terms of decoration. Glitter on nails always looks beautiful, and with decorative tape it looks excellent and unique.
Toothpick drawings
Simple but unique patterns on your nails can be made with a regular toothpick. It is an indispensable attribute of every home, always at hand, and can always help in creating a complete image. If you have already learned how to work with a needle, then there will be no problems with applying designs with a toothpick. The drawing technique and sequence are similar here, only the drawings are slightly different.

Other methods for creating simple nail designs
In addition to drawing with your own hands, you can use ready-made drawings - stickers, stencils, stockers, template plates.
Stickers
Choose a specific color for the base. Paint your nail plates with it.
Once completely dry, stick your chosen sticker on top. They come with an adhesive base.

There are also those that need to be placed in warm water before gluing. After 10 seconds, it is taken out, the figure is carefully grabbed with tweezers and transferred to the nail.

Another type of stickers


