DIY gifts for March 8th schemes
A universal selection of gift ideas for any occasion and occasion. Surprise your friends and loved ones! ;)
Good day, dear readers of my blog! Today’s post is entirely devoted to the topic “Do-it-yourself gifts for March 8th,” because such a gift is always the best due to its originality.
I turned to Yandex and it found 146 million results for this query, which indicates the enormous popularity of the topic. Today we will touch on only a small part of the information presented on the World Wide Web! And we’ll start the review with the thing in which we usually receive gifts on March 8th...
DIY gifts for March 8th: the best ideas
You can’t even imagine what you can do for this wonderful day!
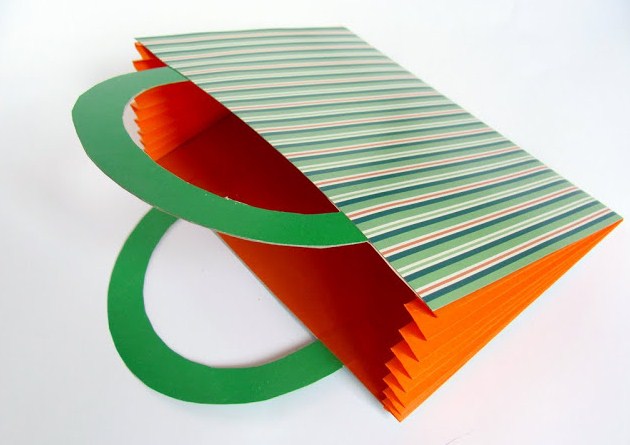
How to make a paper bag for March 8?
You can easily make a paper gift bag using the elegant models that we offer this collection.
It's simple: choose a ready-made template for the handbag you like, print it on paper (as thick as possible). Now all you have to do is cut out the resulting stamp and glue it strictly according to the instructions. The bag is ready.
By the way, it is not necessary to choose a template with a ready-made design. There are also clean layouts; your child can design them.
As a result, we get original and practical items for gifts.
Another interesting option for a paper handbag is this model:

Of course, you won’t go to the store with these, but it’s just right for giving a gift for International Women’s Day.
Wonderful tulip pencil holder
This gift is also easy to make with your own hands. you will need the following materials:
- thick cardboard;
- colored paper;
- scissors;
- glue.
At the first stage, we draw a template for our future pencil and cut out the details from it.
 Next, bend the template along the dotted lines.

Now you need to connect the sides with high-quality glue.

At the final stage we glue the bottom. This pencil holder can be given as a gift to teachers and kindergarten teachers.

Bookmark for a book - a simple and necessary gift
Also obtained from paper material. I will offer two options that are easiest to make. So, we need thick cardboard, preferably colored, bright wrapping paper, scissors, glue and everything else you want to decorate your craft with.
First option. We cut out a 10x10 centimeter square from our cardboard. Fold it diagonally 2 times. After this, cut the finished figure into 2 parts, as shown in the picture.

The resulting corner needs to be glued and decorated with sparkles, rhinestones, beads, ribbons or some kind of applique.
Manufacturing second option Even elementary school students can make bookmarks. First, a 10 cm strip with a width of 6 cm is cut out of cardboard. It is folded as shown in the pictures.
The ends of the resulting “envelope” are either left as they are, or cut out in a semicircle or in the shape of a heart. We connect the two halves using applique.

I think girls will like this bookmark.
Elastic band-kanzashi
They can diversify and decorate the everyday hairstyle of those with beautiful long hair. But you don’t have to buy hair ties in the store; you can make a unique thing yourself. It will be much more interesting. The beauty you see in the photo is made from scrap materials.

To sew an elastic flower we need:
- cardboard;
- textile;
- scissors;
- threads;
- rubber;
- beads;
- needle.
So let's get started. First, we make 3 types of cardboard circles with diameters of 5, 6.5 and 8 cm.
We apply the templates obtained in this way onto the selected fabric base, outline it with chalk and cut out the details - 5 circles of each type.

1) Now take one circle and fold it in half (see picture).

2) We repeat the procedure one more time, folding the previously obtained semicircle in half.

3) Now we have in our hands a part that resembles a petal. We need to stitch it from the bottom with the needle forward.

4) By analogy, we make petals from the remaining 4 circles of this type and collect them on our thread. Having finished, we tighten the thread and we get such a cute flower.
5) In a similar way, we make flowers from all the circles.
6) We connect the resulting 3 flowers together.

7) A regular one is sewn onto the large lower flower.
8) Decorate the small top flower in the middle with a bead of a contrasting color or a pebble.

A great gift for mom - a photo frame
Despite digital technology, traditional photographs are still popular. Agree, it’s nice to look at pictures on photo paper. And if they are, then it becomes double pleasure. Perhaps this is why a gift for March 8 in the form of a hand-made photo frame, which literally anyone can make, is relevant these days. The technology consists of two steps. It is also universal in terms of giving: it can even be used as a children's gift.
First you need to prepare a paper base - it should be dense, so it is better to prefer cardboard. You determine the size yourself, as well as the shape - the future frame and holes for pictures. The latter can be made completely different: a rectangle or a square, a rhombus or a circle, in general, any other shape.
Are you ready? Now use your imagination to design the base. The base of the photo frame can be wrapped with ribbon or colored fabric strips, or decorated with beads, buttons, shells or pebbles. By the way, any of these decorations can be painted over with gouache or watercolors, choosing an interesting color scheme.

When making a photo frame, do not forget to immediately decide on the issue of mounting - will it hang on the wall or stand on the table?
Double surprise - double the joy
A woman will be doubly pleased to receive a sweet gift if it is presented in an original frame. Even ordinary candies. For example, in such an amazing heart-shaped frame that resembles a pink bouquet.

To make it you need to stock up on the following materials:
- white hard cardboard;
- double-sided red or burgundy origami paper in A-4 format;
- candies that are to be framed;
- a regular toothpick;
- glue stick;
- narrow transparent tape;
- ruler and compass.
In the first stage, we prepare the base: carefully cut out a heart from cardboard - 20 cm in diameter is enough. On its reverse side we draw two straight lines - one divides the heart in half, the second is its height. We mark the intersection of lines with a dot. We take a compass and draw a circle 5 centimeters in diameter (marked with a dotted line in the figure). Stepping 1 cm down from the center, draw an arc - a diameter of 4 cm. The result is a figure like an oval.

Using this sketch, we also cut out the inner oval circle.
The next stage of work is preparing roses using the quilling method. We cut 30-centimeter strips of paper, half a centimeter wide, and screw them tightly onto a toothpick. It is necessary to produce 40 pieces.

We slightly loosen the resulting spirals so that they “move apart”, and glue the free end to the parallel side.

From the resulting blanks, we select 28 pieces and make “petals” out of them, squeezing closed spirals on one side. Then, from the remaining ones, we select 3 pieces and prepare “eyes” - the spiral is compressed on both sides. In addition, you will need 6 more “closed” spirals.
We put these details on our heart - decide for yourself how. Try different options, and only when you decide, glue the roses to the cardboard.
Fur keychain is a cute and pleasant thing
To make a fur keychain, we need a small piece of fur, great if it is an arctic fox, a piece of leather or leatherette from an old bag or gloves. You will also need fishing line, which is used when weaving beads, or strong threads, and a standard key ring. Tools include scissors and a needle.
- A piece of fur is folded with the fur inward, and the edges are stitched. Just leave a hole to turn the workpiece inside out.
- We use an identical method to make a leather strap. If you want to make a thinner strap, you can immediately sew the workpiece on the right side, bending its edges.
- We pass the strap through the ring.
- We need one more leather piece. Cut out a rectangle
- We also sew it by folding the right side inward. We fix the strap in it.
- The base of our bag needs to be folded inward with its edges.
- We return to the fur blank: we tighten it with threads on the base.
- Now you decide whether or not to use decorative elements and move on.
- Let's move on to the final stage. We place the fur ball in a bag and sew it on, at the same time attaching beads in case of decoration. Upon completion of the work, we hide the end of the fishing line (or thread) in a bag. Our keychain is ready.

Origami - beautiful and touching
It’s quite easy to prepare holiday flowers for your mother or grandmother with your children. The Japanese technique of origami comes to our aid. How and what to do is clear from the following diagrams. 

Useful videos
Since I wasn’t able to cover many ideas, I finally decided to make links to useful videos that I wanted to write about in today’s review.
If you are interested in creating a topiary, a small original tree of happiness, then watch this video:
If you watch this video, you will quickly learn how to sew without sewing.
Sincerely, Anastasia Skoracheva
Hello everyone, hello!! Today on the agenda is the expected topic of everyone - crafts for International Women's Day. After all, immediately after February 23, we begin to prepare for March 8. Therefore, dear educators, teachers, parents and children, let’s quickly start viewing this post, choose a gift and start making things!!
Let me remind you that there is already a selection for making spring cards for March 8, so if you missed it, take a look. Well, in this article we will look at the most popular DIY crafts and it won’t just be flowers!!
We will start with the newest ideas for making congratulations. After all, on this wonderful spring day we so want to please our mothers, grandmothers, sisters, girlfriends, teachers. Therefore, for you a small photo selection of the most interesting things for the current year!!
How do you like these green horseshoes for good luck, decorated with flowers made of ribbons and beads?! Isn't it very beautiful!!

Or such voluminous flowers made of beads?? But this will require special beadwork skills.

But gentle eights made of felt are also very useful.

Look what a delicate basket with flowers made of satin fabric, it looks very festive!!

Volumetric eights made of paper are always in place, especially if you know how to work with such delicate patterns.

Well, this beauty is made using quilling technique, it looks amazing!!

A stunning firebird that brings happiness to the home!!

Or a simple chamomile in a pot. This gift is easy to make and very harmonious in appearance.

And what lovely button lilies of the valley, I think you will definitely surprise those around you with such a gift.

I also really liked the idea with the pincushion, and we get not only a pincushion, but also a jar for storing various small items. Look how easy it is to do!!

Of course, the female sex is very fond of sweets and flowers. I decided to combine these preferences and make such a nice present.
- Basket of flowers
We will need: a candy box (preferably with candies), colored paper, cardboard, colored table napkins, scissors, glue stick.
Manufacturing process:
1. Use a whole box of rectangular chocolates as a background.
2. Take two sheets of colored paper in different shades of brown, cut them into strips 1 cm wide.
3. Now intertwine stripes of different shades perpendicular to each other (Fig. 2).

4. Cut an oval 13 cm long and 10 cm wide from cardboard of any color.
5. Glue this oval to the wicker rug from the wrong side (Fig. 3).

7. If you have ends protruding from the canvas, tuck them in and glue them to the oval from the wrong side. You should get our basket.
8. Stick it on a box of chocolates.
9. Now take 6 napkins of different colors and, folded, cut out circles with a diameter of 4-5 cm. Glue these circles together and make a circular cut.
10. And from yellow paper, cut out circles with a diameter of 1-1.5 cm and also make a circular cut. These centers need to be glued to the center of the flowers.
11. Using the stencil given below, cut out 9-10 leaves and stick them on the basket (Fig. 5).

12. Glue flowers between the leaves and your congratulations are ready!!

How do you like this idea?! In my opinion, it was very excellent and original, since they made it with their own hands and also treated them to sweets.
Crafts made from paper and cardboard from the first to the senior kindergarten group
I cannot leave aside creativity for our children. As always, popular materials are paper and cardboard, and various additions. In general, I won’t languish you for long, now you’ll see everything with your own eyes!!
Excellent butterfly flowers made from folded paper like a fan; the background can be decorated with watercolors.

But for the original bouquets, make a tube base out of green cardboard and glue the cut out buds and leaves onto it.

Or such cute hearts. For pots you can use sour cream jars.

Here is an interesting clearing made from ordinary juice tubes and colored paper.

And these eights are made from a toilet roll, cut off, glued to a cardboard bottom, and decorated. By the way, if you don’t connect the circles, you’ll end up with little boxes.

A craft made from paper plates looks very impressive.

Well, what about voluminous postcards, I think you’ve already learned how to make them!!

These beautiful paper flowers can be framed to create a painting.

Again, cute, amazingly beautiful pots!!

Or you can make cards from colorful napkins.

And don’t forget about origami, the picture shows a diagram of folding daffodils.

And if you want something special, then I suggest making a paper cake like this.

We will need: colored photocopier paper, colored paper napkins, beads for decoration, stapler, glue.
Manufacturing process:
1. Make the cakes out of paper by folding them like an accordion, then folding them in half and gluing them together. One cake will require 6 sheets.

2. Make three cake layers in total.

3. Make flowers from napkins.

4. Large peony.

5. And little roses.

6. Connect everything together by decorating with beads.

This is such an inedible beauty!!
We create souvenirs with our own hands from corrugated paper
Also, don’t forget to make crafts from corrugation, it makes all the actual bouquets look like they’re alive, real!!
I won’t give a detailed step-by-step description, but if you’re interested, go to the article, you’ll find master classes on bouquet and floral products there. And now a small selection and video story.


And as promised, a short video on how to make a bouquet of roses with your own hands from corrugated paper.
The most beautiful crafts for March 8 made from felt
Well, those who love to sew and are familiar with such an amazing material as felt know that there are a huge number of different souvenirs for the spring holiday. Look at what I liked, maybe you can sew something from the suggested options.
- Multi-colored flowers

- Cute birds

- Heart-shaped keychains

- Cheerful bouquet

- Red eight

- Adorable ladybugs

- Photo frame made of flowers

You can also sew the following potholders:

Or make a pincushion in the shape of this bug))
We will need: red and black felt, threads, cotton wool or padding polyester for filler, threads, needles.
Manufacturing process:
1. Cut out the template and transfer it to the fabric. Make blanks from felt.

2. Sew all the pieces together, leaving a small hole.

3. Fill the cow with stuffing and sew up the remaining part.

4. Your pincushion is ready.

And here is the template for making it:

Master class on making a gift for mom from salt dough
Do you remember that I once told you about making it and that you can make a large number of souvenirs from it, including for March 8th?! So, if you missed this article, then be sure to go and have a look, maybe choose some interesting ideas for congratulations.
Well, now I suggest you make these cute gifts for our mom and remind you of the technology for producing salt dough. 😉
- "Gift for Happiness"
We will need: flour - 2 tbsp., salt - 1 tbsp., water - 1/2 tbsp., gouache, colorless varnish, ribbons, templates.
Manufacturing process:
- Make salt dough according to the recipe above.
- Roll out the mass and cut out a heart and a horseshoe according to the template.
- Design souvenirs according to your imagination.
- Next, let the crafts dry. Ideally, leave them for 5 days.
- Then paint with gouache and let dry again.
- Cover with clear varnish and insert a ribbon.

Let's see what else you can make from this excellent material for creativity.
Multi-colored eights, decorated with flowers and sparkles, can be glued to a magnet and make a great gift.

You can make a bouquet of any flowers, which is also always relevant.

Heart with an inscription, decorated with buds of your favorite flowers.

Simple photo frame. This kind of work can be done even by small children.

Spring suns, very funny and warm!!

Real picture!!

But this is an awesome candlestick, it looks incredibly beautiful!!

Or maybe you like adorable cats or a bunny?!


Or these angel girls?!

How do you like this doggie with a gorgeous bouquet?!

In general, everything here depends on your imagination, and the rest will work out!!
Video about how to make roses from cotton pads
And no matter what you say, the main gift on International Women’s Day remains flowers, and most often they give roses and tulips.
It turns out that beautiful bouquets can be made not only from paper, but also from cotton pads. And this is done very, very simply, I think you will see this when you look at the following story:
Well, were you impressed?! Now we’ll see what types of flowers can still be made from this available material.


I would never have thought that such masterpieces could be made from ordinary cotton pads!!
DIY children's crafts made from beads
You know, I also remembered how as a child I wove various baubles, bracelets, chains and pendants. And I thought that beads could be used to make unusual and festive souvenirs.
I scoured the Internet and it turned out that the most popular thing in beadwork on March 8th are flowers, who would doubt it!! I have selected the prettiest job options for you.
You can weave such a bouquet of mimosa from thin wire.

This is a figure eight of ribbons, decorated with blooming flowers.

This is such an original decoration.

Or a cute heart-shaped topiary.

A simple card: apply glue to the design and lay out beads.

You can also weave such a basket, it turns out to be a real gift.

Floral applique option.

What do you think of these cute decorations?! Wonderful for spring!!

A bouquet of unbloomed tulips!!

Here is such a charming selection of beaded crafts!! Beauty in one word!!
Interesting ideas for congratulations made from threads
While still writing this article, I came across some very magical and soft-looking works made from threads. Mostly fluffy threads are used for knitting. The manufacturing technology is simple, it is either appliqué or joining into a bundle and cutting to the desired shape.
Here's a look at how you can make this yellow dandelion step by step.

Based on the cannons, you can also make a mimosa sprig.

Or applique: draw a plot on the base, and wind the threads and glue it along the contour.


And if you know how to knit or crochet, then make such a lovely box and decorate it with beads.

DIY craft templates for March 8
According to the tradition that I have developed when preparing similar articles, I conclude by offering different options for stencils and templates. So hold, trace and create!!
- Paper flower

- Wreath with butterflies

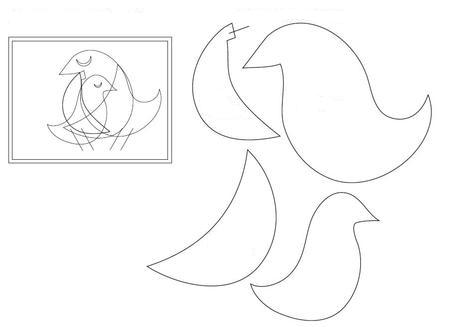
- Birds. Can be made as an applique or sewn from felt
- Flower vase

- Postcard in the form of an apron

- Flower card-mug

Well, that's it, my dear friends and lovers of creative works. I hope you liked the ideas for crafts dedicated to the holiday of March 8th. Write your reviews, I will be glad!! And see you later!!
Tue, 06/03/2018 - 13:45
March 8 is already very close and men have probably already racked their brains, thinking about what to give to their beloved, mother or sister. Of course, there are a number of gifts that men usually give on International Women's Day. But if you think that flowers, jewelry or a toy are too banal and boring and you want to show your creative side and do something with your own hands, then we have prepared for you a collection of gifts for March 8 that you can easily bring to life.
White chocolate truffles
An exquisite dessert option for wonderful sweet lovers. Don't forget to pack the truffles in a beautiful box.
What do you need
220 g white chocolate;
70 g butter;
3 tablespoons whipping cream;
a pinch of salt;
vanillin - on the tip of a knife;
60 g powdered sugar.
How to do
Grind 170 g of chocolate, add butter, cream, salt and vanillin. Microwave for 1-2 minutes, stirring the mixture every 30 seconds. Remove the mixture from the microwave and stir again until smooth. If necessary, warm it up a little more.
Cover the container with foil and refrigerate for a couple of hours until the chocolate mixture hardens.
Then use a teaspoon to form the mixture into small balls. Roll them in powder and use your hands to give them an even shape. Place truffles on a parchment-lined plate and refrigerate for at least 2 more hours.
Chop the remaining chocolate, melt it in the microwave and stir until smooth. Using a fork or skewer, dip the cooled truffles into the chocolate coating. While the glaze is still wet, you can sprinkle the truffles with coconut, chopped nuts or confectionery sprinkles.
Place the candies on parchment paper and refrigerate for 10–15 minutes.
Tea bags with photos

Tea is a rather banal gift, but tea in homemade bags with your favorite photographs will be remembered for a long time.
What do you need
sewing machine;
delicious small leaf tea;
photo paper or thin cardboard;
thick white threads or thin rope;
white paper coffee filters;
How to do
Cut two small identical rectangles from coffee filters. Using a sewing machine, sew them together on three sides, leaving a few millimeters from the edges.

Fill the resulting tea bags with tea, fold the corners and machine sew the top. If you decide to make round bags, then leave a small hole in them for tea, and then simply sew it up without bending anything. Make a few more bags in the same way.

Select your favorite photos, reduce or crop them in a graphics editor so that they are the same size. Print on photo paper or cardboard, cut out and make holes in them with a needle. Cut several threads 10–15 cm long and thread them through the holes in the photo.

If your tea bags are rectangular, then attach the threads with a stapler by bending the top edge of the bag. And if they are round, then sew them to them. All that remains is to choose a beautiful package for your gift.
Paper tulips

Make a bouquet of paper flowers, glue it to a card or place it in a small flower pot.
What do you need
1 sheet of double-sided pink, red or yellow paper measuring 15 × 15 cm;
1 sheet of double-sided green paper measuring 15 × 15 cm.
How to do
Detailed instructions for making paper tulips:
A vase for flowers
You can put artificial or paper flowers in it, or insert a bottle of water for fresh flowers.
What do you need
pencil;
several sheets of A4 double-sided green paper;
a skein of twine;
glue gun;
some thick white cardboard.
4 spools of tape;
several sheets of double-sided paper in different colors;
How to do
Lubricate the edges of the reels with glue and glue them tightly to each other. Cut sheets of paper into squares measuring 6 × 6 cm. Flowers will be made from them; 10–13 such squares will be enough for a vase. Fold them in half diagonally, then again, draw a petal on the fold and cut it out. Use scissors to slightly curl the edges of the petals. Press a pencil into the middle of the flower and glue a bead there.
Then make leaves from green paper. To avoid mistakes, watch the video. It shows in detail how to do this.
Wrap the twine around the bobbin blank, gluing the ends with a glue gun. Trace the bottom of the blank on white cardboard, cut it out and glue the circle to the bottom. Then glue the flowers and leaves to the vase.
Bouquet of pompoms

A beautiful bouquet that will never fade.
What do you need
several thin branches;
white spray paint;
glue gun;
green felt;
white lace braid;
pink ribbon;
yarn in white, beige and pink shades;
How to do
Wrap three fingers with yarn of the same color 50–75 times. You can make pompoms of different sizes by wrapping two or four fingers. The more yarn you use, the more voluminous the flowers will be. After cutting the pompom thread from the skein of yarn, cut another thread 20 cm long.

Pull this thread between your fingers and tie a knot, securing the pompom as shown in the photo.

Carefully remove the pompom from your fingers and tie it again with a tight knot. Cut the resulting loops in half.

Fluff the pom pom and trim any loose threads to create a perfect ball. Make a few more pompoms in the same way.

Paint the branches with white paint and leave them to dry. Then glue the pompoms to them.

Cut out a double leaf from felt for each flower. Glue the leaves to the stems.

Cut strips of braid, ribbon and twine to the same length and tie a bow on the bouquet.
Photo frame made of paper tartlets

This photo frame with children's photographs will delight your mother or grandmother.
What do you need
a sheet of colored cardboard in A5 format (¹⁄₂ of A4 sheet);
a sheet of white A5 paper;
green paper or felt;
photo;
paper tartlet.
How to do
Trim the cardboard 1-2 cm on each side. Round corners or carve edges. Glue the cardboard to white paper. Cut out the stem and leaves of a flower from green paper or felt.
Cut a circle from the photo to fit the diameter of the bottom of the tartlet. Glue the photo to the tartlet and the tartlet to the stem.
You can make several flowers with your favorite photos. And on the reverse side, sign who this beauty is intended for.
Volumetric postcard
What do you need
pencil;
purple felt-tip pen;
purple pen;
pink marker;
1 A4 sheet of purple double-sided cardboard;
some yellow and pink cardboard;
glue-based rhinestones;
white braid.
1 sheet of A4 double-sided pink paper;
some double-sided yellow paper;
How to do
Cut six identical small squares from pink paper, and one from yellow paper. Fold them in half diagonally, then again. Using a pencil, draw a petal on them, as shown in the video, and cut out along the contour.
When you unroll the piece, you will have a flower with eight petals. Color six of them as shown in the video and cut one blank. Lubricate the second one with glue and glue the adjacent petal to it.

Then glue the flowers to each other. The video shows in detail how to do this. Fold the purple cardstock in half and round the corners. Glue the flower in the middle of the card, close it and press it with a book until the glue dries.

Decorate the outside of the card with strips of colored cardboard, rhinestones or something else, and on the inside with beautiful white braid.
Fabric bracelet

A stylish gift for a lover of unusual jewelry.
What do you need
8 strips of knitted yarn of different widths, approximately 15 cm long;
wide clasp for bracelet.

How to do
Weave three strips into a braid. Place the remaining strips to the right and left of it and fasten the ends with a clip with a clasp. By the way, instead of knitting yarn, you can use strips of fabric from an old T-shirt.
Salt dough pendants

Such a gift will require a minimum of money and effort, but it looks very impressive.
What do you need
3–5 tablespoons of water;
stamps (instead, you can use boxes, frames and other carved objects);
silver paint;
black water-soluble paint;
some water;
brush;
paper towel;
holders for hanging;
black ribbons.
How to do
Mix flour and salt. Add water and knead the dough. It is better to pour in water not immediately, but gradually to achieve the required consistency. The dough should be plastic and not stick to your hands.
Roll it out into a layer 5–7 mm thick and cut out the pendants. You can make pendants in the form of hearts, squares, circles, droplets, flowers and much more. Leftover dough can be wrapped in cling film or placed in a container with a lid and left in the refrigerator for several days.
Using stamps, make a design on the pendants. Make a small hole at the top for the ribbon. Place the pieces on a baking sheet and bake at 100°C for 1–1.5 hours. The dough should be completely hardened.
Cool the pendants and paint them silver. You can use regular or spray paint. After the pendants have dried, dilute the black paint with water and paint the patterns on the decorations with it. Then wipe off the paint with a damp paper towel. This will give the pendants a rare look.
Insert the holders into the holes and the ribbons into them.
Felt earrings

Two stylish options for true fashionistas.
Feather earrings

What do you need
small carnation;
2 gold connecting rings;
pliers;
2 small gold chains;
2 gold-colored hooks;
beads - optional;
fishing line is optional.
a piece of cardboard;
pencil;
some felt in contrasting colors;

How to do
On cardboard, draw a template for the earrings in the form of a feather. Use it to cut out two pieces of felt in different colors. Connect them to each other, and drive a nail on top to create holes for the hooks.
Bend the rings with pliers and insert them into the holes. Attach chains and hooks to them. You can attach beads to the end of the chain using fishing line.
Earrings with stones

What do you need
glue gun;
2 connecting rings;
2 earrings.
some felt in a neutral color;
How to do
Cut two identical ovals from felt. Lay out a pattern of rhinestones on them and glue them to the felt.

Make small holes on the top of the earrings and insert connecting rings into them. Attach nails to the rings. If you were unable to find suitable earrings, then glue beautiful rhinestones to ordinary ones.
Hair combs

If you cannot find exactly the same materials for these beautiful accessories, then be inspired by master classes, use your imagination and transform the combs in your own way.
golden comb

What do you need
ribbon made of golden leaves (look for it in textile stores);
-
black, transparent and gold beads;
glue gun

How to do
Cut two strips along the length of the comb. Thread the line through the needle and tie the ribbon tightly to the comb, threading it through the teeth. Tie a second ribbon on top so that the leaves face in the opposite direction.

Then decorate the comb with beads by gluing them or attaching them with fishing line.
Comb with stones

What do you need
some black felt;
plastic or metal hair comb;
multi-colored stones, beads, rhinestones;
glue gun;
Description of work
My name is Kudryavtseva Ksenia, I am 10 years old. I live in Moscow. I'm in third grade. I love making crafts, drawing and delighting my loved ones with good surprises.
We will need:
-Styrofoam
-ceiling border
-illustration
-paints
- lace - 1 m each of black and red
- scraps of fabric
-sequins
-sewing carnations
-thread and needle
-beads
Progress:
1. Take an even piece of polystyrene foam 1.5-2 cm thick (from appliances or furniture). I have size A4.
2. We cut the ceiling border into 4 parts, 2 parts – 21 cm, 2 parts – 29.5 cm. We cut the corners so that the short and long strips fit at right angles. This is our frame.
3. We select an illustration; I didn’t find one that was suitable, so I made it myself. The background is a forest, the dolls are girls, and I combined everything in a Word program.
4. Assembling the base. We place the illustration on the prepared polystyrene foam and fasten it with a frame on sewing nails.

6. First girl. The shirt is white material. Sundress - I cut out the desired shape from a piece of blue fabric; it is better to take non-loose fabric. We put the shirt in place, the sundress on top and immediately lay out the sequins, attaching them with nails. We put on a kokoshnik - a piece of fabric and sequins.


7. Second girl. It’s more difficult here, since the fabric is not one-piece. We cut the lace 2-3 cm larger than the dress sketch. We gather each piece of thread to the desired size. For the pomp of the dress.

8. We dress the second girl. Dress, we lay out pieces of lace on it, alternating red and black, attaching with nails.

9. Decorate your hair. We string a piece of lace onto a thread and tie a knot, and glue a bead of a different color into the middle.
10. We decorate the frame by drawing the tree crown in the right place. We “plant” flowers.

Our picture is ready!


