Educational books for babies. How to sew a developmental cube for a baby Do-it-yourself educational toys from fabric
A soft educational book will help your child improve and learn new things. Mom will sew it from scraps, braid, and beads left over from needlework.
Developmental book design ideas

- Try to keep the pages of different colors so that the child can distinguish between them from infancy. It would be good if there were inscriptions with the name of the color. Then he will remember how these words are written.
- So that your child can develop fine motor skills and thinking, come up with tasks for him. So, the pages may have elements that are attached to the base using Velcro or buttons. For example, vegetables that need to be “planted” in the garden, apples and mushrooms, will be attached by the child to the hedgehog. Having removed the element with buttons, the child will see something interesting behind it. By unzipping the zipper, the baby will reveal the ladybug's wings.
- On some pages it is necessary to sew pockets so that the child can put objects of a suitable shape and size there. On others, sew a sneaker made of leather or fabric so that the child learns how to tie lacing, thereby gaining the necessary skill.
- So that he can braid his hair, sew several ribbons nearby. Show your baby how to do it.
- To help your child learn to count, number the pages by sewing a specific number onto each page in order.
- Each page of the book is dedicated to something. For example, one is garden-themed, another is animal-themed, the third is rainbow-themed, and the fourth is marine-themed.
How to make a cover for a soft educational book?
Its dimensions depend on what you want the soft educational book to be. Take fleece or felt with your own hands. These fabrics are soft and hold their shape. You can use both canvases at once, one for the top part of the binding, the other for the inside.
The rectangle should be of such a size that you can still add a 1 cm seam allowance and a 5 cm allowance on the central fold. If you will have appliques on the cover, then sew them on the front side first. Then fold the two sheets of the page so that the wrong side is at the top, stitch along the edge, leaving 15 cm free on the small side. Through this hole, you turn the workpiece right side out, insert into it a rectangle of padding polyester smaller than the cover.
Another option is to make separate pages, make holes in them with a special tool, attach rings here so that the pages can be laced together, connecting them.
You can combine them with a flap, one edge of which you sew to the first page of the binding, the second to the last. This flap needs to be basted to each page so that from the binding side they look like an accordion.

DIY soft book - master class
Now you know how to make a binding for it. Here's how to design one of the pages. Ask your child to place fruits and berries in the vase; they will be attached using buttons and Velcro.

You will need to make the page:
- rectangle of fabric;
- pieces of canvas;
- large buttons;
- needle and thread;
- buttons;
- Velcro;
- thin padding polyester.

Master Class:
- From thick fabric, cut out all the parts that you will sew onto the page. It's better if they are paired.
- Sew both layers of round berries using a zigzag stitch, also use a sewing machine to make a loop in the center and cut it. Sew a strawberry. Attach a green tail to it.
- Cherries can be crocheted in the round. On the reverse side, sew buttons to them, paired elements of this fittings, as well as buttons to the page of the book.
- Take a piece of fabric measuring 20 by 20 cm, and apply the same on it. These parts are placed right sides together and stitched along the edge, leaving a gap through which the resulting bag is turned right side out. You need to iron its seams, then insert a sheet of padding polyester inside, which is 1 cm smaller than the page on all sides. Sew up the gap on the arms.

If you want him to know the seasons well, then for such a soft book for babies, make 4 pages. To create them, you will need:
- base fabric;
- bright threads;
- scissors;
- tape measure;
- pins;
- needle;
- braid;
- threads;
- beads.

To create books, you can use the most unexpected materials, for example, fabric napkins, household rags. If they have a pattern, turn them over to the wrong side.
Cut out Christmas trees from a green napkin. Since they have this color all year round to show the winter landscape, cut out snowflakes and decorate the trees with colorful balls from napkins of a different color.

If a child spends the summer at the dacha, there is probably a fish pond there. Transfer this theme to a textile book by cutting out algae, fish, and aquatic vegetation from napkins or felt.

In spring, the ground is covered with bright green grass and flowers bloom. Tell all this to your child by making the appropriate application on the page.

In autumn, clouds appear more often, but the sun still shines. You can also sew a braid here to make it rain.

If you are satisfied with all the elements, then you can sew them directly onto the pages of the book. Sew large parts on a sewing machine, and sew small ones on your hands.

Where there is an autumn landscape, sew a thin braid on top, and firmly tie beads to these ribbons from below.
Since soft books for children contain quite a lot of small elements, attach them firmly, but do not move away from the child while playing with such an object.
If you want a car to drive across the cover of the book, then make small vertical slits in the center and insert a ribbon here. Sew the car to the base. Secure the edges of the tape on one side and the other of the cover.

This is what a soft educational book looks like from the inside.

It will be enough to tie it with a ribbon and you can close the book.

It will be interesting for kids to insert various objects, so sew pockets on the book in the shape of a steam locomotive. Make various animals out of felt. Let the child put these passengers into open carriages. Sew buttons in the shape of wheels and you can send the train on the road.

To help your child develop fine motor skills, sew threads in the form of a cobweb onto a book page and sew plastic rings here. Let your child thread the ribbon through them, creating a web.

Cut out a sneaker from fabric or leather, sew rings vertically in the center so that the child can thread a lace through them and learn to tie shoes. These skills will be very useful to him, as well as zipping.

For this book page you need to take:
- textile;
- lightning;
- wool threads.
For kids, we can recommend one more page, which will have a soft educational book. Children will be able to dress dolls with their own hands, thereby learning this simple activity.
To do this, a doll made of a thick base is sewn onto the book, and Velcro must be attached to it. Cut out the clothing items for this toy. Place a cabinet in the form of a pocket nearby. Put the doll's clothes there, on the back of which you will sew Velcro in advance. Let the child put on the doll in the correct order.

Children can be advised to make one more page of the book. Sew a thin elastic band here, pull it over beads, balls, buttons, securing them firmly. The child will probably like the proposed toy.

Playing with the first book in his life, the baby will learn to assemble a pyramid according to height and color. To do this, take:
- textile;
- filler;
- Velcro;
- needle and thread.
He will probably enjoy putting the bear to bed and covering it with a blanket. With such a toy, the child himself will soon fall asleep with company.

So that he knows that evening is coming and it’s time to go to bed, make a figure of the month on the next page. When the baby wakes up, he will look with pleasure at the sun, which will smile kindly at him.
DIY educational book for baby boys
Young gentlemen have loved cars since childhood, so use them to create a soft educational toy.

Take:
- colored fabric;
- buttons;
- small household sponges;
- markers.
We sew only on the right pages, the left ones will become a garage. Attach Velcro here, as well as on the back of the cars, so that the child can park his vehicle at night.
If children are small, it is better not to attach buttons to the lips, but to draw wheels. Or you need to constantly monitor children during such a game so that they do not harm themselves with small objects torn off.

For another baby boy book, use fabric in bright colors. Your child will love playing the fireman you create from fabric.
Let his car have a rising boom, this can be done by securing two elements with two buttons. Make a gate with a Velcro lock so that, if necessary, a child can open it and get into the building that is on fire. The braid will turn into a firefighter; the boy will enjoy playing with such objects and feeling like a fireman.

Soft books on the theme of home farm and vegetable garden
You can also make soft books on this topic. This is a wonderful experience for kids; they will learn the names of animals and know how to care for them. You will tell us what vegetables can be grown, how to collect and store them.
Let's start with the home farm.

The chicken and duck are cut out of felt, and other items in the book are made from the same material. Let the door in the house open; to do this, sew a button on it, and next to it an elastic loop. The window will also swing open; secure it with two ribbons.
A fence is made from rectangular strips of fabric; turn the green fabric into grass and into the crown of a tree. Edge the pages with folded strips of fabric. After which the soft book is ready, you can buy it, of course, but it is very expensive, and your own can be created from leftover material.
After all, to create vegetables for the garden you need very small scraps. Cut out triangles from orange ones, sew them in the form of cones, fill them with filler through the top hole, and sew green fleece tops here. Now the carrots are ready. To “plant” it in the garden bed, place the braid horizontally and sew it so that the root vegetables fit between the seams. Attach a large pocket nearby, this is where the child will put the harvest.
Place a bunny nearby, let the baby know that this animal really loves carrots. Also in such a book you can sew a flower in the form of a pocket into which a bee will fly and collect nectar.
The butterfly flutters over the flowers, so it would also be very appropriate here. You can sew a zipper between her back wings; when you close it, she will turn into a semicircular bug. By unfastening the snake, you will transform it back into a butterfly.

If you want your child to know that caterpillars appear first, and after pupation they turn into butterflies, then make the body of this insect separately in the form of a sausage. The child will insert it into the ribbon between the wings, thereby turning the caterpillar into a butterfly.
The bee is made of yellow fleece, black strips of braid are sewn across the body, and a ribbon needs to be attached to it.

The child will learn about the vegetable garden, pets, if the next book is made from fabric.

Sew characters from felt and attach Velcro to them on the back side. Then your beloved child will place them in the right order, gradually learning how to do this. At the same time, you will get acquainted with the fairy tale Repka.
Make secret corners in the book so that the baby gradually finds them. Let the hedgehog live in a mushroom house, only by opening the door will you be able to discover this animal, to the great joy of the child.

Children learn that chickens are children of hens by opening the hen's wing.

Tell the children how apples grow in the country. Make such an appliqué out of fabric in the book and place the fruit here using Velcro. Let the baby tear them off, place them on the hedgehog’s needles, and secure them in the same way.

The apples on the tree can be arranged in another way by sewing buttons on it and loops on them. The fruits themselves are made of red or yellow felt or other similar material.

Educational toy for girls
It's done in the same way, but it's a little different. The baby will probably enjoy dressing the doll, this was mentioned above. She will also be interested in hanging laundry on a line and taking it off.

To make such a book, you will need:
- felt;
- fleece;
- thin elastic band;
- clothespins;
- hairpins
Cut out various items of clothing from fleece and felt. Let the child hang them on a rope using real clothespins and bobby pins.
The next textile book is made in pink tones that girls like.

To make one, take:
- textile;
- beads;
- button;
- wax pencils;
- threads;
- beads.
You can sew a ladybug inside by making a slit in the center so that the baby insects can enter here. For a girl to learn how to braid, on the next page there will be an applique of a young lady with long hair made from yarn.

So that the girl learns neatness from infancy, attach an organizer for pencils and a handkerchief on the next spread. Velcro flowers next to the vase hint to her that she needs to place them in this container. The linen closet stores the dolls' clothes, which the child will be happy to put on them. But you read about this earlier; the young housewife will also like this kind of entertainment.

Perhaps she would like to become a doctor if she opens the next page of the soft book. The pockets here contain various animals made of felt; on the other side there is a cabinet, upon opening which the child will find items of simple help and learn to provide it.

Learning to count using a soft educational book
Just like that, in passing, the child will remember how the initial numbers are written, if you don’t forget to number the pages. To help him learn to count, make the following soft educational book. To create it you will need:
- base fabric;
- laces;
- large beads;
- marker.

As you move them along, count with your child. To help your child learn to draw numbers, make appliqués from fabric. Sew a pocket where the chalk will be stored. Then the child will be able to take it out and circle the numbers, thereby learning to draw them.

In the same way, you can introduce children to some letters, then make syllables and short words from them.
This is how, in a relaxed atmosphere, while playing, a child can develop and improve, learn new things. It is very important for parents to show him how to handle certain objects so that a soft educational book really becomes one.
To make it easier for adults to make it, we suggest watching a fascinating story.
You will learn how to make a page for boys so that they know what kind of transport exists in the following video.
The girl will be happy to play with a book made in the shape of a house, put the doll to bed, wash it in the bath, and wash things in the machine.
Educational toys are very useful for children of all ages. Let's learn to sew toys with numerous fasteners!
With all the variety of educational toys that are sold in the store, it’s so nice to make a toy for a child with your own hands! After all, here you can show all your imagination and do exactly what is ideal for your baby.
This is why the topic of DIY educational toys is so interesting for young mothers.
Today we will tell you how to make an educational toy with fasteners.
Examples of educational toys with fasteners
On the Internet you can find several options for such educational toys for children. The assembly principle is general: the toy is some kind of animal consisting of several elements: head, body, tail.
Dachshund

The elements are connected to each other using various fasteners: buttons, magnetic buttons, carabiners, lacing and adhesive (contact) tape.

The dachshund's head is attached to the body using adhesive tape

Body parts are connected using buttons


Lacing


In addition to developing fine motor skills, such a toy can be used to develop color perception (separate elements can be made from fabric of different colors, with stripes, checks, polka dots), as well as to develop tactile sensations (use different fillers and fabrics of different textures).
Look at the different versions of this toy made by different authors:
Crocodile


Lizard

Caterpillar - centipede

Dog and giraffe

As you can see, various beads are additionally sewn on the dog’s back, with which you can teach your baby to count.

Fish

The peculiarity of this fish is that on its back the fins are made of grosgrain ribbon with different patterns. You can offer your child a game: “Find the same ribbons” or simply string loops of ribbons onto the fingers.
Cat
However, the toy does not have to be long. The author of this cat made it round, consisting of several sections.

Key points in creating an educational toy
So, if you decide to make such an educational toy with your own hands, then the first thing you need to decide is what kind of animal you will make.
After that, we select the material. Optimal: 4–5 different colors. Put them side by side and evaluate whether they fit together.
- “What is its developmental property? - I ask the seller about the orange giraffe with incredibly long legs.
“This is not just a soft toy, its paws are made of fabric of different textures, its nose squeaks, and its ears rustle, the baby’s hearing is developing,” answers the polite seller.
Does a child need educational toys?
When my baby was not yet born, I was already with trepidation choosing not only rompers and diapers for him, but also toys. Developmental, of course! Our grandmothers could not even think that dolls and shovels should not only entertain, but also develop a child, but now it’s a completely different time. And this is not surprising! In the age of advanced technology, adults think about child geniuses from the very cradle. The children's goods industry sensitively responds to this request, endowing an ordinary rattle with functions of intellectual development. Not many parents realize that the benefits of such “developmental toys” are exaggerated.
“It’s a paradox, but one toy can be educational for one child, but not for another. Every toy, even a simple rubber ball, even wooden blocks or simple plastic rattles, will be educational if the child is ready for this development. But a toy with the prefix “develops” sells faster and is more expensive,” a teacher at a children’s clinic told us.
A child develops every minute, even if there are no toys nearby, he can play with a pebble, a spoon, his mother’s hair, this is also development, and expensive toys often do not even arouse interest in children.
“I poured out a whole bag of toys for the child, and he chose... a bag!” - this is a very significant example.
And if there is no difference, why overpay and follow advertising? After all, you can create educational toys yourself, using the simplest available materials.
How are homemade toys useful for a baby?
Washing, ironing, cleaning, the husband demands attention, the child did not sleep all night... what toys could there be? When to do them? Let this become your kind of relaxation, organize a family craft project or hand the baby over to dad, and lock yourself in the kitchen and create!
Homemade toys are needed not only by the baby, but also by the mother! This is her little “relaxation”, because needlework is so calming. The little rattle will be full of your love, and, therefore, the baby will like it.
Why is it worth driving away laziness and making a toy for your baby with your own hands?
- Many useful toys are not sold in stores. For example, a sensory box that develops fine motor skills of a baby’s hands so well.
- The youngest children enjoy a new toy for only a few days, and then lose interest in it, but a handicraft mother can create “new items” every day.
- This is simply profitable, because a toy made from improvised materials costs hundreds of times less than a store-bought one.
So let's get started!
Top 7 DIY toys for babies
- Balls, bagels, balls!
- Beads-gnawers
- Octopus in half an hour
- A funny snake...from a sock!
- Ring with ribbons
Balls, bagels, balls!
Soft fabrics are good for tiny hands, so we create wool balls, fur balls and fleece bagels.
What to do with them? Roll it on the floor, taste it, throw it and hide it, crush it with tiny fingers.
How to do it? Wrap a cardboard circle in fleece fabric and stitch it along the seam. You can take the ball from any of your own supplies, securely hiding the edges of the threads. And the balls can be felted from ordinary wool.
Advice: To prevent the balls and balls from falling apart, wash them in hot water and soap. This will protect the baby if he decides to taste homemade products.
Baby sling beads - a toy for walking
If you love to walk your baby in a sling, but the little fidget doesn’t agree to sit in a “cozy nest,” then it’s time for mom to buy some beads for herself. And not simple ones, but baby sling beads - an accessory that will distract the baby in the store or in the clinic.

What should the baby do with them? Fiddle with, sort out, move the beads, “ring” them, try them on your hand, and try them “by tooth.”
How to do it? Not every mother can make this toy; crocheting skills are required. Beads of different sizes must be tied with a hook and collected on a thread in the traditional way.
Note! The threads should be strong, quite dense, at the same time not bright and only from natural materials, the best option is cotton.
At the end of the article, you can download the 10 best ideas for creating a children's orthopedic rug with your own hands.
Beads-gnawers
And these beads will be a real salvation during the teething period, because they are created specifically for gnawing on them.
What to do with them? Rustle in the mouth, relieving pain in the gums during teething.
How to do it? Assemble bead bracelets from wooden beads, following important rules:
- Beads must be of high quality! The best material is wood, but specially processed.
- The thread for stringing should be very dense so that the child cannot tear or bite through it.
- Choose beads made from unpainted wood so that your baby does not “eat up” harmful substances. Paint doesn't stick well to wood, so avoid painted parts.
Little trick: To make the beads even stronger and to prevent the beads from spinning, tie a tight knot after each stringed piece.
Octopus in half an hour
Create a baby doll without using thread and needle? Easily! Such pupae are usually called motankas, or octopuses. This toy will appeal to the smallest, even newborn babies.

What to do with it? Go through the funny tentacles, try to grab onto several tentacles at once.
How to do it? Cut out a cross with wide “petals” from fleece, cut each of the 4 petals into many narrow strips, put a little cotton wool in the center of the square and assemble the figure with an elastic band so that you get an octopus. Decorate it with button eyes, but sew them securely! And for greater safety, you can draw eyes. Weave braids from thin strips - the tentacles are ready.
A funny snake...from a sock!
Let’s immediately make a reservation that this toy can only be used under the supervision of parents, as it has small parts, even if they are firmly sewn. To create a fun snake, you will need a long sock.
What to do with it? You can put her in a crib or stroller, she will become your best friend for walks, and also develops fine motor skills.
How to make it? Prepare a regular sock, preferably even knee socks, but do not use worn socks. Stuff the sock with peas or wheat and sew the edge closed with a tight stitch. Decorate the snake with buttons, threads and ribbons.
Another simple sock snake can be worn on a leg or arm. Just sew button eyes to the sock and sew a mouth, move your hand and the snake will move funny.
Ring with ribbons
Even an older preschooler brother can make this toy for a baby, and it will only take mom five minutes to make it.
 What to do with it? Touch, pull, try patchwork ribbons, try to weave or untangle them.
How to do it? Tie several ribbons of different thicknesses and textures to a thick ring made of wood or plastic, use an “inverted” knot or stitch them.
The first rattles from improvised means
Don't throw away tubes and small bottles of pills or food, they can be used to create fun rattles!
What to do with them? The same as with any rattle.
How to make them? Fill small jars with pebbles, cereals, and shells. To make them more attractive. Wrap each one in fabric, creating a kind of “candy,” and secure the ends with threads.
Watch (free at)
We told you about the benefits of homemade toys for the youngest children. Now you can easily create cute rattles or baby slings for your baby. You'll see, they will delight your baby much more than even the most expensive store-bought "educational" toy.
Now we will reveal to you seven ideas for original toys for children over one year old, which you can just as easily create with your own hands.
Top 7 DIY toys for children over one year old
“I couldn’t even imagine that our child’s first homemade toy would help us open our own small family business. My husband and I created our own busy board for our son, then friends asked us to make a similar one, now orders are booked a couple of weeks in advance, and our home “carpenter” only has time to create busy boards,” says young mother Alena Demidova about her unusual idea for a family business.
What is a busy board, and what other homemade toys for children are especially popular today?
Entertaining busy board
A toy with such a funny name may interest a child under one year old, but its advantage is that a child of two years old will not get tired of it.

What is a busy board? It's a wooden board with lots of interesting gadgets attached to it. These can be sockets, zippers, locks, handsets and cords, bells, buttons, latch, and everything that can be twisted, pressed and pulled.
How to make it? Making it seems simple only at first glance; in fact, it is purely a man’s work. The board must be well processed so that the baby does not catch a splinter; it is better to cover it with safe varnish, but not paint! All attributes for children's fun must be held securely! Neither a nut nor a bolt should fall into the baby’s hands.
At the end of the article, you can download the 10 best ideas for creating a children's orthopedic rug with your own hands.
Fun lacing
There are a lot of traditional lacings sold in stores, but children often don’t play with them. But this activity is useful for little hands. Let's try to keep the little one busy with a homemade analogue.

What is lacing? This is an item with holes through which you can thread laces.
How to do it? This is a task for dad; he will spend no more than 10 minutes on such lacing. During your next walk, find a fairly thick twig, with a diameter of five or more centimeters. Hand it to dad, let him plan it, make it smooth, and then drill several holes in it from different sides. Thread a cord through one of the outer holes and secure it with a large knot.
Note! What you need is a cord with a hard tip so that your baby can easily get it into the holes.
Sensory boxes
Planting carrots in a garden bed, weeding potatoes, grazing cows - all this can be done using a sensory box. The child will be delighted, because he may have his own field, farm, or even a pond with sea inhabitants.

What to do with it? Play in the city or in the pasture, and also study colors by selecting all the filling elements of the same color. You can also bury caps or other small objects in the box and look for them with a spatula or handles.
How to make it? This is one of the simplest to play, but at the same time exciting games. Simply fill a large box with sand, cereal, dyed rice or peas. Choose a theme for your box and fill it with “villagers.”

Happy Peas
The concept of small and large will be easily understood by your child thanks to the pea pod, which you will fill with bright peas of your own production.
What to do with peas? This game is unable to captivate fidgets for a long time; it is rather a choice for calm and diligent guys. You can simply collect peas into a pod, or you can arrange them by color in accordance with the color of the pod.
How to do it? First, sew the “pod” itself with a zipper or ties. Then knit or felt colored peas of different sizes. Let the baby learn to assemble and remove them independently by unfastening the zipper.
Bottles with filler
Every child has played with plastic lemonade bottles at least once, but to turn empty pampering into an entertaining game, simply fill them.

What to do with them? Knock, rattle, watch how the liquid contents of the bottle overflow and the dry contents pour out.
How to do it? Fill clear plastic bottles with shells, colored water, sand, and small pebbles. The choice of fillers is limited only by your imagination.
Another interesting idea for making toys from a plastic bottle: sew a cover for the bottle in the shape of an animal, the lid will be a mouth, open the lid and feed the dog or cat with grains. Let the animal have a tail, ears and eyes!
There are still a lot of ideas for creating educational toys, we told you about the most popular ones, and what toys would you create?
Today in children's stores you can find a huge number of different educational toys. However, not all parents are satisfied with either their price or quality. Yes, and I want such a toy to serve longer and not get boring for the baby.
There is an alternative to purchased toys - things made with your own hands.
First option
Such toys have many advantages that their commercial counterparts do not have. Firstly, such a thing can be modified as many times as desired. Your toy will grow with your child. Secondly, it will be cheaper than constantly buying new things for your baby. And also, in such an item you can put a piece of your soul, your love for the baby. While playing, he will be surrounded by your care for him.
What educational toy can be offered for a child so that it is interesting, useful, and even changes as the baby grows? Sew him a developmental active book. If you make it of a special design, where the leaves can be taken out and new ones put in, then your idea will last a very long time and will teach the young researcher a lot.
What do you need to prepare for your homemade product?
We will need fabrics of various textures and colors, thermal applications, padding polyester, non-woven fabric, rustling materials (cellophane bags), Velcro, buttons, cardboard and colored paper, laces, elastic bands, in general, everything that will help us with a creative idea will be useful.
Look in your closets and stashes - most likely, you won’t have to buy anything else in order to sew a book.
First, think over a sketch of your book, draw what you have planned on paper, and then start working with the fabric. Also decide on its size.
In order for the book to be taken apart and new pages added, sew loops on each leaf or make holes in them. Now the entire structure can be assembled onto a ribbon or curtain rings.
You will need to put a layer of synthetic padding into the pages to make them soft, and you can put cardboard in the cover and one will be dense. Glue small parts with non-woven fabric and stitch them to the background with a zigzag. For large designs, simply cut them out of the fabric and sew them with the same seam. If you want the individual elements to be convex, then leave a small hole and fill them with padding polyester.
In order to build “movable” elements, you need a cut-out glued with non-woven fabric, stitched to a piece of fabric, filled with padding polyester, cut along the contour, and attached with Velcro. Thus, you can make a page with elements that can be moved (starry sky, sun with clouds, numbers, letters...).
You can make an active page by attaching the cut-outs to the page with a string and sewing a string that you can use to pull and release the pictures. Using this technology, you can make an aquarium page with “swimming” fish, or a flower field where butterflies will “flutter”.
To develop fine motor skills, make a lacing page. To do this, attach a picture of shoes with holes through which you can thread a lace.
Make a page with a pocket or purse with a button - let your baby learn how to button and unbutton it. You can put a key on a string in the pocket.
On some pages, sew rustling elements, or you can put cellophane into the sheets themselves. You can make any picture three-dimensional and fill it with cellophane. Using this method, you can make a grass clipping that rises, and a bug sits behind it. Such a game will attract the child’s attention and help develop fine motor skills.
You can make a house page in which everything will open and close, and the figures behind the windows and doors can visit each other (elements with Velcro). You can also attach a section of the top from a plastic bottle with a neck on which you can screw the cap.
Make a page with geometric shapes of different colors (circle, square, triangle).
The page on which the zipper is sewn will teach the baby how to use it.

To make figures that can be moved and moved, it is better to use non-flowing fabrics such as fleece or felt.
Sewn on various buttons will help your baby become familiar with sizes and colors.
Elements made from fabrics with different textures will develop fine motor skills and attentiveness.

It is worth keeping in mind that children really like various hidden figures, for example, you lift a leaf and there is a bug under it, you open a window and a bunny sits behind it.
So we ended up with an assorted book. However, you can come up with a toy with a certain plot: seasons, clothes, going to visit, the animal world, numbers and letters. Although such a craft requires time, patience and effort from you, it will be an excellent gift for your child.
Such a book will develop the child's development and will also become very useful on a walk or, for example, in a clinic, when, while waiting for an appointment, you need to keep the child occupied with something.
Second option
This is such a voluminous book. Inside the pages there is 10 cm foam rubber.
A rustling tree with fruit buttons and berries hidden in grass pockets; 2 – a rustling apple, the leaves also rustle and are attached to buttons...
The sun is soft with rustling rays and a three-dimensional ribbon rainbow sewn on one side (Every Hunter Wants to Know Where the Pheasant Sits - to study the colors of the rainbow); a house made of soft fabrics, the door opens with Velcro and a Cheburashka peeks out.
Butterfly with voluminous wings with Velcro on the edges and with different squares; ladybug - a pocket with a zipper, you can hide something in it.
A flower with petals made from ribbons of different colors; soft shiny voluminous star with buttons around it.
A ship with smooth rustling sails, you turn them aside, there is a duckling captain; denim locomotive - buckwheat inside, for fingers
The fish rustles with voluminous fins and a Velcro tail, the tape is thin like seaweed, buttons are like pebbles; whale - thick fabric, soft cotton fin and tail, fountain from a bag.
The back cover of the book is a side feeder. You can not sew the book, but cut out the loops and tie them with ribbon, so the book will turn out to be a transformer, and you can add or change pages.
Third option
It’s easy to sew a book that develops a soft toy yourself: sheets of pages - double material with a layer of padding polyester - are sewn together, forming the most ordinary book, it is unusual only in that everything in it is made of fabric, and therefore is easily washed, does not tear, and you can play with it from the moment the child began to grab something with his little hands.


The theme of the applications can be absolutely anything - animals, berries and fruits, cars. I made my book from what I found at home, and I found a piece of calico from a sheet. It showed a cheerful score. A number and a picture for it. Three kittens, five hedgehogs and so on. This is what I took as a basis.
I sewed cut-out appliqués in a zigzag pattern, sewed on beautiful baby buttons in some places, and added Velcro and bows in others.
If you don’t have beautiful material with different pictures at home, then you can buy thermal appliqués, their only drawback is the price.
 DIY toys photo. DIY soft book. How to sew a soft educational book for a child." />
The main goal is to make the book bright, interesting for the child, with clear drawings, use different materials to develop fine motor skills, it would be nice to insert a squeaker or a fishing bell somewhere, if possible, of course.
Page 1 – an elephant, the sun can be pulled by its rays, flowers can be put on a button with a ladybug.
Page 2 – a bear with a pocket; in the pocket you can hide small toys, cookies and candies for the bear.
Page 3 – example 2-1=1 I made it in the form of flowers, one flower with Velcro, the second with a button. It is clearly visible that there were 2 flowers, one was removed. How much is left? Simple and clear teaching of counting
 DIY toys photo. DIY soft book. How to sew a soft educational book for a child." />
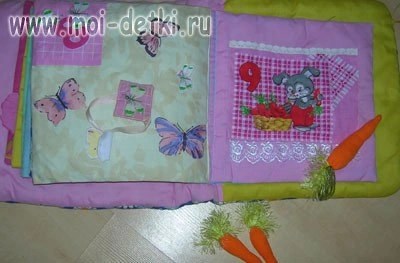
Page 4 – a pocket with two bunnies, and in the pocket there are 2 carrots. The carrots are soft, sewn on with an elastic band. The tail of the carrot is “grass” thread, the carrot itself is made of orange knitwear. It is very useful for little children's fingers to feel fabrics of different textures, so rest assured that all your efforts will not be in vain! You can pull the carrots, the rubber band stretches and, if you let go, the carrots fly apart.
Page 5 – example 5-2=3 made on the basis of bows. Of the five bows, two are untied, the rest are simply sewn on.
 DIY toys photo. DIY soft book. How to sew a soft educational book for a child." />
Page 6 – three kittens and three cherries. Cherries are bright and develop color perception in a child. Cute kittens generally evoke a lot of positive emotions in children. Well, besides, we again repeat the count and how pussies meow.
Page 7 – 4 ducklings and 4 pears. We count ducklings and pears, touch small button pears with our fingers. And at the same time we teach that pears grow on trees, and ducklings quack, “Quack, quack.”
 DIY toys photo. DIY soft book. How to sew a soft educational book for a child." />
Page 8 – applique: elephant (cut from fabric (calico) and sewn in a zigzag along the contour to a flannel base), again developing fine motor skills and the sense of touch. The birch tree and the mushroom are simply cut from fabrics of different textures. I embroidered black dots on a birch trunk with black thread.
Page 9 – just 5 chickens and 6 apples.
 DIY toys photo. DIY soft book. How to sew a soft educational book for a child." />
Page 10 – pocket with a bone for a dog. A bone made of white knitwear, stuffed with padding polyester. The bone is sewn on with an elastic band so it doesn't get lost. In general, I made a conclusion for myself - as for the book, it is better to sew on all small and potentially lost objects (carrots, seeds, butterflies, flowers). Everything that is not sewn then has to be collected throughout the apartment. When I was sewing this book, such a thought did not occur to me, and therefore when my daughter began to play with the book (chew it, sit on it, try to tear it in every possible way, etc., etc. - well, everything that a child of six months or a year can do), I I had to urgently revise and complete the book. This is how carrots on an elastic band and a butterfly on a string appeared.
Page 11 – a boat and 4 fish of different colors (children’s buttons)
 DIY toys photo. DIY soft book. How to sew a soft educational book for a child." />
Page 12 – 8 butterflies, one of which has Velcro, you can tear it off and tug. As I wrote above, initially the butterfly was not sewn on a string. This is an already modified, so to speak, version, corrected by circumstances. Yes, yes, after each reading of a book, try playing hide and seek with carrots and butterflies throughout the apartment. This is a fun game for “bored” mom and dad.
Page 13 – pocket with carrots for the bunny. There is a fishing bell inside one of the carrots; the carrot rattles loudly, delights the baby and develops sound perception.
 DIY toys photo. DIY soft book. How to sew a soft educational book for a child." />
Page 14 – bright fruits and berries, cut from fabrics that feel different to the touch.
I made the cover for the book from delicate chintz with daisies, glued a cute Dalmatian dog onto the cover and quilted it with padding polyester.
The book turned out to be voluminous and soft, you can cuddle with it, sleep, and play with it. You can also play an interesting game. For example, hide a piece of candy or a small toy in one of the pockets of a book and ask the child to find it.
Fourth option

For ages 0.5-1.5 years. The book is sewn from fabrics of different textures and colors, with buttons and beads; plastic napkins are placed between the pages so that they do not bend and keep their shape. Everything can be crushed, chewed, washed.
First spread:

The cat, the dog's ear and tongue are knitted, the mouse is fluffy, all the eyes/noses/claws are beads/beads, the whiskers, ear, and mouse tail can be pulled, sewn on only one side. The bone is made from a tube of Blend-a-honey :)
Second spread:

The petals of the flower are also not fully sewn, in addition, they have beads sewn into them, so you can knock on them, but they will rattle a little. The stem and leaf are also beads of different textures. You can pull the rays of the sun. Clouds are like a terry towel.
Third spread:

Knitted caterpillar, velvet cherries, bead cuttings. Butterflies, I confess, are purchased appliqués, but they are beautiful and bright.
Fifth option. Educational book – Numbers

The number of flowers on each page corresponds to the number. Each page contains rustling cellophane. Thanks to this book, a 2-year-old child learned all the numbers!

Sixth option
The book consists of 12 pages and a cover.
The total size of the book is about 25x25 centimeters. The edges of each page are finished with colored satin bias tape. The cover of the book is fastened with a loop and button. Inside the pages and cover there is padding polyester.
Cover (front side) – the bunny is made in the form of an applique (I cut out a design from printed chintz), the inside of the cover – an applique with a bear cub.
Page 1 A girl in the form of an appliqué made of colored pieces of fabric, embroidered parts of the face, a voluminous nose, filled with synthetic padding, and bead earrings sewn on the ears. The hair is made of yellow braid, sewn to fly away so that you can braid, you can learn to weave a ribbon. A button in the shape of a shiny handbag or wallet is sewn onto the palm, and a thermal replica of a kitten is glued next to it.
Page 2 Lilac page with elements for counting - beads, buckle, ribbon and cord clip for training finger muscles.
Page 3 The shoe is made in the form of an appliqué, so you can learn to lace.
Page 4 The blue flower is made in the form of an appliqué; the leaves are made of satin ribbon. You can count and study colors.
Page 5 Tulip with a bee. On this page, the tulip is sewn so that it is empty inside and you can hide a bumblebee there. The bumblebee is sewn to the braid. The sun is made of yellow fleece, the clouds are made of white fleece with Velcro, they can be detached. A small butterfly, white flowers and strawberries are embroidered iron-on appliques.
Page 6 Penguin page. All details of the page are appliqués. Penguin - embroidered thermal appliqué.
Page 7 Sea. The boat is made in the form of a pocket - you can “carry” your favorite toys, it moves left and right along a satin ribbon on the “horizon of the sea”. The sea is made in the form of a pocket in which there are fish - separately sewn parts, 2 shells, in the middle of one there is a pearl - a large mother-of-pearl bead. Shell on the button.
A seahorse button is sewn on the foreground.
Page 8 Tree. A padding polyester is inserted into the tree crown for volume. There are apple buttons sewn onto the tree. (from can be counted), there are flower buttons on the grass. The butterfly is a separately sewn piece with Velcro.
Page 9 Christmas tree with padding polyester inside for volume. There is a star button sewn onto the top of the tree. Toys – colored plastic sparkles. Next to the tree there is a bunny - a separate detail on the button and an applique gift.
Page 10 Snowman. All parts of the snowman are made of white fleece with Velcro. You can build a snowman. Month --yellow fleece.snowballs - thermal application.
Page 11 Present. Gift applique with zipper, satin yellow ribbon can be tied in the form of a bow. Put something inside the pocket.
Page 12 Seven-flowered flower. Petals made from multi-colored pieces of fabric. with Velcro. You can learn colors, or you can play a game: make a wish and tear off a petal.
The inside cover has a pocket with a button. The back cover has an apple appliqué.
Seventh option


Eighth option
Pages 30X20, inside there is batting.
1. COVER. The words BOOK and FOR are in braid, the name is embroidered with beads. And I embroidered a little with ribbons, I decided to try it for the first time.

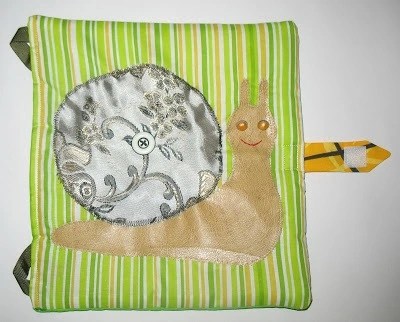
2. SNAIL– there are beads inside the shell, you need to roll them with your fingers.
3. FLOWER- a bee is hiding, a butterfly and a spider are hiding under the leaves. The leaves are rustling.


4. BUTTERFLY– turns into an impudent caterpillar or vice versa. The wings are rustling, there is a package inside.


6. 7. GIRL and BOY We study the fasteners and braid the girl’s hair.


8. LADYBUG AND BUTTERFLY. A butterfly flies from flower to flower, a ladybug also tries to fly away.
9. HEDGEHOG. Carries supplies - on Velcro.


10. GILT. We put our hands in and hide little differences. Raccoon – applique.
11.BOOTE there must be lacing, the workshop is closed on weekends and did not install eyelets.

12 POCKET. The last page is for varieties, sweets. Learning to deal with lightning.

Ninth option

I made this soft educational book as a gift for my friend's son. The book is made of individual pages with loops, you can play with each page separately. All pages are soft - padding polyester inside.
On the first page there is a pocket with a zipper. The base is chintz, the pocket is calico.

The next page is the house. The smoke from the chimney is soft fluffy threads for knitting. The windows and door are closed with Velcro. Materials: calico and chintz.

There is a bear hiding behind the window, and a monkey behind the door.
The next page is a flower. Petals - different fillings - buckwheat, rustling bag, beans, holofiber. Material – calico, flower – satin of different colors.

The next page is a butterfly. The butterfly has a soft body (holofiber inside), sewn to the page only with the back, the head is not sewn, the horns are ropes, the wings are sewn only on the back, they bend, buttons of 3 colors are symmetrically sewn on the wings - learn the colors, look for the same ones. Material: butterfly body – satin, wings – chintz, back of the wings – teak. The calico base is blue with flowers and butterflies. On this page you can count butterflies, count buttons on wings, look for identical buttons, get acquainted with the concepts of big-small, symmetrically (buttons on wings)

Next to the butterfly is a Velcro flower.

The next page is a Christmas tree. The base is chintz, the Christmas tree is calico, the gift bag is knitwear, the appliqués are flannel.
There are multi-colored buttons sewn onto the tree, on the top there is a button with a star, a string with buttons and beads - you can finger them, on the branches there are rings (small ones for curtains, sold at hardware stores), and you can learn how to lace. Another fluffy sparkler. A bag with gifts on a drawstring. Velcro appliques of a cat, a mouse and a dog dance in a circle under the Christmas tree. On this site you can search for identical buttons by color, shape, and learn how to lace.


The last page is a snail. The base is calico, the snail's body is leatherette, the eyes are buttons, the mouth is embroidered, the shell is material for curtains, smooth, inside the shell there are beads of different sizes (two circles), in the middle there is a button. You can move the beads around with your fingers.
The cover is calico with a pattern from the cartoon “38 Parrots”.
The book closes with Velcro.

When studying with a book, you need to pay the child’s attention to the color of the parts, their position (top, bottom, right, left, inside, outside, etc.), the properties of the material (smooth, rough, soft, etc.).
While playing with a book, the child will gain ideas about color, develop fine motor skills, tactile perception (the toy parts are made of fabrics of different textures), attention, speech, imagination, and all this, of course, with the help of a loving mother.


