How to make Santa Claus under the Christmas tree with your own hands. Master class with step-by-step photos. Handsome Santa Claus made from scrap materials, fabric, nylon tights, plastic glasses and bottles, step-by-step photos. Making your own Santa Claus costume
A toy Santa Claus with his own hands will bring a holiday to any home. Whether you believe or not in a magical old man with a bunch of gifts in a bag, every interior is full of his images. But children believe in him unconditionally, therefore, when making a craft in the form of Santa Claus, they are probably expecting a real one, bringing them a whole mountain of long-awaited gifts. Give your children a real fairy tale and make with them a doll, paper, plasticine - any Santa Claus that your imagination can draw. And if our photographs with interesting ideas add inspiration for your creation, then even better.
DIY Santa Claus
We will devote our entire article to how to make Santa Claus with your own hands. After all, in fact, crafts can be very diverse: sewing, felting, knitting, appliqué, painting and modeling. Well, we'll start with decoupage.
This plate with the image of Santa Claus is made using the decoupage technique. A beautiful napkin with a pattern needs to be divided into layers; you will only need the top one, the one on which the pattern is applied.
If you are decorating a plate or any object whose surface you will not use, you can use PVA glue for the work. But in this work, we used the reverse decoupage technique, that is, take a transparent glass plate and stick the napkin on the back side, and on the front side it will be visible.
So, put a napkin on the back surface, degreased with alcohol, and moisten it with water. Make sure that the napkin is well soaked, but does not come apart. Be sure to remove excess water with a cotton swab. While the paper is still damp, coat the surface of the napkin with acrylic varnish in a thin layer. It should be applied with a narrow brush, moving from the center. The varnish should dry for quite a long time, about twelve hours. If desired, you can apply another layer, also allowing enough time for drying. Patterns and ornaments are applied to the clean surface of the plate using acrylic paint; you can also paint over the entire surface of the plate. Another layer of acrylic varnish will complete the craft.
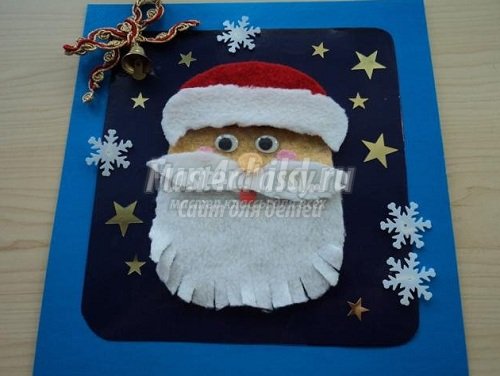
DIY felt Santa Claus

And such a Grandfather Frost can decorate your New Year tree with his own hands. It is made from felt, and you and I already know that it is completely simple to make.
To sew a toy you will need small pieces of white, beige and red felt. Of course, it’s a pity to buy large pieces to make such crumbs out of them, but you can make a lot of these Santa Clauses and give them to all your friends and acquaintances.
- On paper, draw a pattern for your craft; you will need five elements - head and beard, face, edge, hat, mustache.
- From beige felt we cut out one element - the face, from red felt - two elements of the hat.
- From white we cut out two elements of the head with a beard, the edges and a mustache.
- Now we create a mustache and a hat, sew the elements together not completely, and fill them with filler.
- We glue a beige face onto one part of the head using Moment glue, sew the two parts of the head together, and fill them with silicone filler.
- We put the hat on the top of the head, secure the bottom with a pin, put the edge along the bottom and sew it on with hand stitches. At the same time fixing the hat.
- You need to sew the edge on both the front side and the back side; we cut out two elements for you.
- A voluminous mustache, beaded eyes and a nose made from rolled felt with silicone are sewn onto beige felt.
- The end of the hat is crowned with an elegant bell with braid for hanging the toy.
You can also make a simple felt card with Santa Claus. You don't even need a pattern - just use your imagination and creativity. For beginners, we recommend that you first make a paper sketch of the craft, and only then transfer it to felt fabric. Use glue to connect pieces of fabric together.
DIY Santa Claus made from plywood


DIY Santa Claus made from paper

New Year is a wonderful occasion to make an application on a greeting card. And who can decorate our applique better than Santa Claus with his own hands made of paper? You can glue either simple pieces of colored paper or strips folded using the quilling technique. In the second case it will be more effective. If everything is more or less clear with the figure of Santa Claus, then we will tell you in more detail how to make a Christmas tree. You will need sheets of double-sided colored paper. Cut out strips from it, but not even, but with small sides of two centimeters and a centimeter. Using scissors, cut the fringe strips on one side and use a wooden skewer to roll them into a roll, starting from the narrow edge. When you have rolled up the entire strip, secure the straight edge with glue and carefully straighten the fringe so that the element becomes as flat as possible. You will need a lot of such patterns; you will need to lay them out and glue them onto paper in the shape of a Christmas tree. Decorate the centers of the elements with folded multi-colored stripes.

Using thick paper or cardboard, you can make other important attributes, for example, make Santa Claus's sleigh with your own hands. This could be, or you can use rolled up newspaper tubes for the base, but we suggest you make a sled based on an old car from which the body has already been removed. You need to cut out four elements from cardboard - the sides of the sleigh, the back and the front. You can color the sleigh with pencils and paints, and rhinestones or shiny stickers will add a snowy winter texture. You can put not only Father Frost and the Snow Maiden in your sleigh, but also put a bag or box with a gift in them.
Sew Santa Claus with your own hands
Using fabric you can make toys that you would never buy in a store. You can sew Santa Claus with your own hands and your child will simply be delighted with this toy. Santa Claus tilde has gained enormous popularity.

A distinctive feature of these wonderful dolls is a sweet facial expression, but at the same time very small facial features, as if simply outlined, rosy cheeks, plump tummy shapes, long legs and arms. Natural, soft fabrics, which are always used for sewing tildas, are welcomed by all mothers, since it will be both pleasant and safe for the child to play with such toys.

You can not only sew a figure or Santa Claus costume with your own hands, but also knit it. A knitted figurine will be a favorite toy, and if it is not stuffed with stuffing, then such dolls can be used for a homemade puppet theater.
How to sew Santa Claus with your own hands

But Santa Claus can be not only a toy, but also a decoration for a bag of gifts. We'll tell you how to sew Santa Claus with your own hands and place him on packaging for New Year's souvenirs, which we can then give to our relatives or friends. You can embroider the face of Santa Claus using satin stitch or cross stitch, you can make a fabric one using glue, or you can make a crocheted element, which you will then sew on a bag. It is done quite simply - the first row of loops is closed into a ring and tied with single crochets. When the circle is already of sufficient size, tie it with several circles of snow-white threads, then change the thread to red and knit a hat. Thread long white threads into loops into the bottom row, and then trim the resulting beard with scissors. Also make a red nose, like the real Santa Claus, from threads knitted in a circle. The resulting element is sewn to the finished bag quite tightly. It is better to tie the top of the bag with an elegant ribbon.

For the simplest Santa Claus, do-it-yourself patterns will also be the simplest. These are two large balls - one for the body, one for the head. Having cut out the circles, fold each of them in half, baste the bottom with thread not all the way, and when we have already filled the fabric with padding polyester, tighten the thread so that we get a ball. Santa Claus will also need an elegant hat with a pompom, made from fabric swatches. We connect all the elements together, sew the eyes onto the face, outline the mouth with red threads, and make a nose from a small ball. We create a beard and mustache from padding polyester, and we also use it to make the edges of a hat and a fur coat. You have Santa Claus ready for your New Year's composition.
Making a real Santa Claus doll with your own hands will be more difficult, because this is an entire art. ? For such crafts, a combination of modeling and sewing is most often used. With the help of skillful stitches, you can “sculpt” a face for a toy, and a fur coat, hat, and boots are simply sewn from fabric. This combination is called sculptural textiles.

For Santa Morse, you need to create a frame using the technique of sculptural textiles. For these purposes, we will use a small plastic bottle into which a wire is inserted in a loop into the place where the head will be attached. The same loops will serve as hands; they will not be visible at all under the mittens. We paint a face made of fabric, glue on eyes, and attach a beard made of artificial fiber. A fur coat, felt boots, an elegant sash - we make everything, even Santa Claus’ staff, with our own hands.

If you are familiar with the technique of felting wool, otherwise called felting, then you can make this variation of the fairy tale wizard. This technique is very difficult, but at the same time, dolls created using the felting technique always look original and complex. The base material is wool, which is repeatedly pierced with a special needle until the material becomes dense and the fibers tangle together, forming a dense structure. Since such a craft is hollow inside, it will not require a lot of material from you, but if you put such a Santa Claus under your New Year tree, then the delight of everyone you know is simply guaranteed.
We hope that we have provided you with enough options on how to make Santa Claus with your own hands. Don't forget to please the New Year's old man by making his granddaughter - the Snow Maiden!
Key news tags: ,
Other news
Surely every person has made something at least once in his life. It could be some kind of craft for a school assignment or something done on one’s own initiative. Moreover, for some, such work was a burden, while for others, on the contrary, it was a joy. Many could even connect their lives with creativity. That is, make crafts not for yourself, but for sale.
However, only experienced needlewomen can come up with ideas for creativity on their own. Although even they sometimes need hints or peculiar hints that can push the thought process in the right direction. Beginners require step-by-step master classes.
New Year's Santa from a bottle
Crafts based on vessels containing alcoholic beverages for adults and bottles of lemonade for children look very unusual. It’s not at all difficult to do such a fun and interesting thing at home. You can start with an easy option, as in the photo above, but the one we describe below is much more original. For this you need to prepare the following tools and materials:
- corrugated or wrapping paper is best red;
- paper ribbons for decoration;
- a sheet of white paper;
- felt-tip pens or colored pencils;
- ordinary cotton wool;
- PVA glue;
- scissors;
- a bottle - both empty and unopened will do.
How to make Santa Claus with your own hands? The algorithm of actions is as follows:
- First you need to cut out a rectangle from corrugated or wrapping paper. Its size should be determined by the bottle. The height should be equal to the distance from the bottom to the base of the neck, and the width should be the circumference of the bottle + ten additional centimeters.
- We will also need three more rectangles - fifteen by ten centimeters. We fold two of them lengthwise and twist them, like candy. And the remaining one is in width. And we twist only one side.
- Now we put a large rectangle on the bottle and wrap it around the middle several times with decorative tape. You can even make the ends hang down. Then they should be twisted with scissors. To make your own handmade Santa Claus look as impressive as possible.
- At the base of the neck, the paper also needs to be carefully collected and secured. But hide the ends. Attach a strip of cotton wool on top. After all, Grandfather wears a warm sheepskin coat with fur.
- Next, cut out an oval from white paper and draw the face of New Year's Grandfather on it. Moreover, it is important not to forget about rosy cheeks.
- Then we glue cotton wool, imitating a beard, and use glue to attach Frost’s face to the bottle.
- We put on a hat and glue a cotton pompom to the tip.
- The last thing we attach are the hands - the previously made “candies”. If desired, they can also be decorated with cotton wool.
And so we managed to make Santa Claus with our own hands!
Postcard "New Year's Grandfather"

Most of all, kids love to make various crafts. And that's very cool. After all, such tasks are very useful for them. Because the process itself is incredibly fun and exciting, and it also has a beneficial effect on the child’s fine motor skills and, accordingly, on his intelligence. And finally, when kids do something together with their parents, they become closer, begin to understand and feel each other better. And this is especially important for maintaining warmth in relations between two generations.
So, to make an unusual postcard with the image of Santa Claus with your own hands, you will need a completely affordable set of tools and materials:
- colored paper in red and any contrasting color;
- scissors;
- PVA glue;
- a simple pencil if necessary;
- paints, gouache is best;
- artistic brush;
- plastic eyes - they can be purchased at any craft store;
How to make an original postcard:
- The first step is to fold a sheet of colored paper in a complementary color in half. Moreover, it is important that the fold goes along the long side.
- Now the fun begins. The kids will be indescribably delighted from the following manipulations. Dip the brush into white gouache and generously paint the child’s palm.
- Afterwards, the child must attach it to the front side of the card so that the fingers point down.
- Then we let the paint dry, and we thoroughly wash and dry our hands.
- Next, all that remains is to complete the image of Santa Claus. You can create a real masterpiece out of paper with your own hands! So, cut out a hat from red colored paper and glue it above the palm print, retreating about four centimeters.
- Finally, we attach the eyes and a small circle cut out of paper - the nose.
- And then we take the paints again. The kid dips his finger in white paint and places dots along the bottom edge of the hat, imitating fur, and along the top edge - a pompom.
- In the same way, you need to outline the pink cheeks and mouth.
And the “Santa Claus made from paper” postcard is brilliantly made with your own hands!
Mask "New Year's Grandfather"

Even children can handle one more elementary idea. But the process itself will take a little time, but will bring a lot of pleasure. So, let's talk about the necessary materials and tools:
- colored cardboard red and white;
- a simple pencil;
- scissors;
- PVA glue;
- thin sewing elastic band.
In addition, one more important nuance should be noted. If the reader draws well, then he can independently sketch a sketch - a silhouette of the face of Grandfather Frost. Or you can print the template we offer. But in this case you will need a printer. After the part is cut out of cardboard, the printing device can even be used in black and white.
So, how to make a Santa Claus mask from cardboard with your own hands:
- First you should prepare the parts - cut them out from a printed or drawn template.
- Then transfer them to cardboard. It is important not to mix it up, because the hat should be placed on a sheet of red cardboard, the pompom and the main part of the face on white. You also definitely need to add additional fields at the gluing points.
- Now all that remains is a very simple job: cut out the cardboard parts and connect them in the correct order to each other. If the suggested template was used, then the pompom and mustache should be placed on top of other parts.
- Finally, you just need to measure the elastic band to the desired length. To do this you will need to try on a mask.
- And then attach it.
And the original DIY cardboard “Santa Claus” mask was made very successfully!
Fabric mask “New Year's Grandfather”
Using the principle described above, it is very easy to make a fabric mask. Its main advantage is that its texture is much softer. This means that wearing an interesting accessory will become more comfortable. In addition, the mask will fit much tighter. Then it can be used to create an original New Year's costume.
Christmas tree toy "Santa Claus"

What else can be done for the New Year is quite difficult to answer. After all, in this matter everything is limited only by the imagination and desire of the performers. In this paragraph, we propose to consider the option of a toy that can be hung on a holiday tree.
In order to do it, you will need:
- packaging of colored paper;
- one sheet of white paper;
- PVA glue;
- scissors;
- paper hole punch;
- a pair of black beads or seed beads;
- spool of sewing thread.
So, we make a Christmas tree toy “Santa Claus” with our own hands. How to do everything right? Follow the instructions - and you will succeed!
- First, you need to cut out an even circle from light-colored colored paper - Grandfather’s face.
- Then from red or blue - a semicircle of the same size. This will be a hat.
- Using a hole punch, we make many small balls - confetti - from a white sheet of paper.
- Then we put the parts together: we glue Frost’s head and hat.
- Attach a pompom and make a beard out of confetti along the edge.
- We complement the face with beaded eyes and a fastening rope.
The DIY Santa Claus craft is ready. All that remains is to decorate the holiday tree with it.
Paper figurine "Santa Claus"

This handicraft option will also appeal to little children. To perform it you will need:
- red colored paper;
- white album sheet;
- a simple pencil;
- compass;
- scissors;
- PVA glue;
- markers or colored pencils.
How to do:
- Draw a circle on colored paper, divide it in half and cut out only one part.
- We twist and glue to form a cone.
- Draw a random blot on a landscape sheet.
- Closer to the edge we mark a hole in the shape of a semicircle.
- We cut out the “blot” completely and the hole, leaving one side untouched.
- Now we draw the face of Santa Claus on the prepared part.
- We attach the “blot” to the cone by smearing glue on the uncut part of the hole, which must first be bent inward.
As you can see, making Santa Claus with your own hands from paper is not at all difficult.
New Year's Grandfather using origami technique
The following idea will be a wonderful and rather unusual gift idea for the main holiday of the year. It is very simple to implement. But let's not get ahead of ourselves. First let's talk about the material. Because it is he who makes the idea presented in the current paragraph original.
Let's not beat around the bush, but let's say right away that we are talking about a banknote. After all, kids can draw or glue together an interesting thing with their own hands. Most adults give money for the holidays. But they are designed in an unusual way. And we would like to offer one of the creative options:
- To complete the craft, you will need a banknote of any denomination.
- We fold it in half, and then follow the graphic instructions “How to make Santa Claus step by step with your own hands from scrap materials.” The photo is presented below.

Painting depicting New Year's Grandfather
In honor of the most “tangerine” holiday, we are used to dressing up and decorating our home. A great idea, developed specifically for such an occasion, would be a painting depicting Father Frost. It’s very simple to make, but you’ll have to rummage through the needlewoman’s makeup bag and find a lot of buttons there. Most of them should be red. Their size may be different. However, it will be more convenient to handle those that do not have legs.
What’s interesting is that, if you wish, you can easily develop a painting template - the composition of the Santa Claus craft - with your own hands. Or find the desired option on the Internet. Well, then it’s a matter of little things. We take glue in our hands and glue the buttons in the order corresponding to the picture.
Santa Claus made of plasticine
The next master class is also very simple. And, by the way, it is worth noting that children can make a New Year’s Grandfather from plasticine. But adults shouldn’t sit idly by either. They can create original and tasty crafts from mastic. It is very easy to make at home.
So, regardless of the chosen material, the performer must perform actions similar to those depicted in detail in the following photo.

Pillow “Frosty Grandfather”
If our reader thinks that almost anyone can make Santa Claus out of paper with their own hands, and therefore this idea is not original, another craft option will suit him. For this you need to prepare:
- the material is red or blue, you can even take a regular waffle towel;
- a piece of white fleece fabric;
- derived color satin ribbon;
- scissors;
- chalk or a piece of soap - if necessary;
- a ball of white knitting thread;
- two small beads;
- half a glass of brewed black tea;
- blush or red colored pencil;
- needle and thread.
How to do:
- We cut out two stars of the same size from a red cut.
- From white we cut out two parts: a beard, a mustache, one each: a face and a small circle - a nose.
- We need to soak our face and nose in tea leaves for fifteen minutes, and then dry without rinsing.
- Now we sew the beard and mustache.
- Then we fasten both parts together.
- Then we sew on the face and nose - we assemble the circle according to the cut, stuff it with the rest of the fabric and tighten it.
- Further instructions on the topic “How to make Santa Claus with your own hands” are quite simple. After all, the matter remains small. From scraps of red material we cut out a small semicircle - a mouth. We sew it and bead eyes.
- Then we attach the muzzle to the body and mask the joints with satin ribbon.
- We complete the original craft by adding pompoms made from knitting threads.

Santa Claus from a napkin
On the eve of New Year's Eve, complete confusion begins in every home, which brings incredible pleasure to the household. At this moment, the most delicious and unusual dishes and drinks are prepared, and the table is decorated. Moreover, the last point of New Year's affairs is especially important. After all, if the owners make their table too ordinary, the spirit of the holiday will disappear.
Therefore, we would like to offer the following option for New Year's table setting. Even children can be trusted with the process.
So, to make the next Santa Claus with your own hands from scrap materials, you will need:
- packaging of red napkins;
- nail scissors;
- stencils “Face of Santa Claus”.
How to do:
- Fold the napkin into a triangle, bending the right and left edges in the opposite direction. This is necessary in order to get a beautiful cone-shaped triangle.
- Carefully cut a semicircular hole in the stencil.
- Then we put the head of New Year's Grandfather on a napkin.
- If desired, you can attach white confetti to the tip of the hat to simulate a pom pom.
We told you how to make Santa Claus from scrap materials with your own hands. Using a similar principle, you should make as many original napkins as are planned for the guests’ celebration.

New Year's Grandfather made from cotton pads
The following original idea is suitable for small children. After all, it will be very interesting for them to make Santa Claus from materials that are usually used for other purposes.
So, to perform the master class you will need to prepare:
- colored paper of red and any contrasting, as well as light color, preferably pale pink;
- two small buttons or beads;
- red paint, gouache is best;
- brush;
- PVA glue;
- scissors;
- compass;
- a simple pencil - if necessary.
For creative and savvy readers, a photo of the finished result will be enough to understand how to make Santa Claus with your own hands from scrap materials. But just in case, we will describe in detail the necessary manipulations in order to make the process more specific. Let's get started:
- Take a sheet of colored paper in a contrasting shade and fold it in half. The fold should again go through the long side.
- We place the card in front of us so that the fold line is on the left hand.
- Now on sheets of red and the selected light color we draw circles of the same size. It is important to note that both of them will then have to fit on the prepared postcard.
- Now we divide the red circle in half and cut out all the details.
- Using glue, first attach the light circle to the card, and then half the red one.
- We almost made one like the one in the photo below, Santa Claus. It’s not that difficult to make with your own hands, is it? All that’s left is to glue the cotton pads, simulating a beard and a pom-pom.
- Then add the eyes.
- Then cut a circle of a smaller diameter from a cotton pad, paint it with red paint and leave to dry completely.
- Finally, when the red circle was in its place, we can safely say that we managed to make Santa Claus with our own hands for the New Year.

New Year's Grandfather on the window
What else can be used to make the character studied in the article? For example, from plain white paper. Cut out the silhouette of Santa Claus from it and decorate the window with it. If you add homemade snowflakes, streamers, rain, multi-colored lights and other New Year’s paraphernalia to the picture, you will be able to achieve an original result. Which not only household members, but also passers-by will be able to admire.
So, let's start with what will help us make Santa Claus with our own hands. A pattern or, rather, even a template. Moreover, here too the range of ideas is limited only by one’s own imagination. You can choose the option we offer. It can be seen in the picture below.

Or come up with something of your own. More original and unique. Well, then it’s a matter of little things. We cut out the silhouette of Grandfather and attach it to the glass with tape. Decorate as desired.
This concludes our article. We hope that the proposed master classes will help even novice needlewomen make Santa Clauses with their own hands.
New Year is already around the corner! Do you feel the spirit of magic and emerging miracles in the air?
By the way, you yourself can take part in creating a miracle - sew your own Santa Claus for the New Year tree!
After all, every child and even adults secretly expect that when the clock strikes, the good wizard will bring a bag of gifts and an armful of happiness.
So, for work we will need the following materials and tools:
- Cotton white or beige fabric for the body base
- Cotton multi-colored fabric for pants, caps and mittens
- Fleece in two colors (white and red)
- Felt for applique
- Hollow fiber for stuffing and a piece of lining padding polyester
- Felting wool (combed tape)
- Foam rubber for boots
- Floss threads, buttons, beads, beads for decoration
- The wire is thick, holds its shape well, and thin copper
- Thick cardboard
- Acrylic paints, brushes
- Felting needle
- Pliers, wire cutters, utility knife
- Glue gun, Moment-Crystal glue
1. Preparing the pattern. First, we determine the diameter of the bottom of the cone and its desired height and, based on this, we build a scan in any convenient way. Calculation formulas and construction methods are easy to find on the Internet. We draw the pattern of the hands randomly.
2. We cut out a circle from thick cardboard, draw a line through its center, which we divide into three equal segments. At their joints we cut holes for the wire. We apply a padding polyester circle and a circle of colored fabric of a slightly larger diameter. We tighten the fabric around the cardboard.

3. We bend the thick wire in a U-shape and pierce it through the holes in the cardboard, padding polyester and fabric. We bend the ends of the wire at the “ankles” and make “feet”. We screw a thin copper wire to the jumper with a length longer than the height of the cone, about 10 centimeters.

4. Important! Carefully glue the wire to the cardboard with hot glue and glue the wire joint. At this stage, the structure should be well balanced and stable, the cardboard should not fall down the wire!

5. From colored fabric we cut out two rectangles approximately one and a half times longer than the length of the legs and about 4 centimeters wide. Fold it in half lengthwise, stitch it, turn it inside out. We stretch it over the legs and sew it to the bottom with a hidden seam.

6. We cut out a cone shape from cotton fabric for the body. Fold it in half and stitch along the edge, leaving the last couple of millimeters at the top unsewn. We bend the edge around the circumference and baste. Turn the resulting cone out of the fabric.

7. We put the cone on a thin wire, bringing its free end through the hole at the top. We stuff the body with holofiber. Make sure that while stuffing the wire remains approximately in the center of the cone. We sew the folded edge of the body around the circumference to the bottom using a hidden seam.

8. Cut out the soles from cardboard. Draw them arbitrarily, the main thing is that it is a little longer at the back and front than the wire loops. We glue the soles to the wire with hot glue, ensuring their stability.

9. Using scissors and a utility knife, cut out the “boots” from foam rubber. We cut a recess at the bottom for the wire and cut a slot at the back in order to insert the “ankles” into it. What is more important here is not accuracy, but the symmetry of the “boots”. We glue the foam rubber with hot glue.

10. We cut out two ovals from red fleece of such a size that it is enough to cover the foam rubber “boots” with a small margin. At one of the elongated vertices of the oval, we cut out a sector in the form of a triangle, put the fleece on the foam rubber, sew up the back with a hidden seam and tighten the fleece around the cardboard sole.

11. We also cut out two ovals from felt of a suitable color, slightly larger than the cardboard sole. We glue the felt to the sole with hot glue, cut off the excess, and sew the felt to the fleece with a hidden seam.

12. Draw approximate lines for the top of the jacket and the bottom of the cap on the body. There will be a face between them. We cut out a small circle from the fabric, put a ball of padding polyester inside, and tighten it along the edge. This creates a nose that needs to be sewn onto the face with a hidden seam.

13. Prime the face with white acrylic paint. We try not to go too far into the territory of future beards and hair, so that in the future there will be no difficulties with their fitting. What kind of face to draw is a matter of your taste and imagination.

14. We cut out a jacket in the shape of a truncated cone from red fleece, fold it in half, sew along the edges, turn it inside out. From fleece and colored fabric we sew handles in mittens, leaving holes for stuffing, turn it inside out, stuff it, sew up the holes with a blind seam.

15. We stretch the jacket over the body, sew it at the bottom and along the neckline with a hidden seam. Temporarily pin the handles to evenly distribute the applique. We cut out the parts from felt, pin them to the body, and finally think through the placement of the composition.

16. We first attach the applique parts to the fleece with a drop of Moment glue so that they do not move, and only then sew them on. If desired, we use buttons, beads, beads, and decorative elements. We sew “snowdrift” ribbons made of white fleece with hidden seams.
17. We cut out the boot cuffs and cuffs from white fleece, fold them in half, and sew along the edges. We stretch it over the arms and legs and sew it on by hand.

18. Using the same principle, we cut out and sew on the collar. To maintain the “snowdrift” style, the edge of the collar, cuffs, boot cuffs and cap can be made wavy.

19. We sew the arms to the body with a strong thread using a button fastening. We tighten the thread a little, tie a knot and glue it with Moment glue for strength.

20. We tear off about 10 centimeters of wool from the combed strip, collect it into a bundle of the required thickness and carefully roll it with a felting needle, like a beard. Then we tear off a tuft of wool, 2 times thinner and about 20 centimeters long, and roll it in the middle under the nose, like a mustache.

21. We tear off two more tufts of wool, equal in length and thickness to the beard, and roll them on both sides of the face. Using the back of a felting needle, carefully comb and arrange the wool into a full beard.

22. We also roll and shape the hair on the sides and back of the head. If necessary, you can trim it a little with scissors and spray it with regular hairspray to prevent the fur from frizz.

23. Based on half the cone, we cut out a cap that is very elongated and narrowed towards the top from colored fabric. The height of the cap should correspond to the length of the free end of the wire plus 1-2 centimeters for freedom of bending. We sew the parts, leaving the top open.

24. We turn the cap inside out, put it on the head, bringing the wire out through the top hole, and sew it along the edge to the head. Bend the end of the wire into a loop. We sew on a white fleece lapel and a pompom, hiding the end of the wire in it.

25. Santa Claus is almost ready. If necessary, we add decor to complete the look. If you want, you can additionally sew a bag with gifts, a Christmas tree or, for example, a symbol of the year in a pair.

Santa Claus is ready! More real miracles for you!
0 181930
Photo gallery: DIY Santa Claus craft from different materials, step-by-step master classes
A beautiful figurine of Santa Claus, made according to our master classes with photos and videos, is suitable for submitting to a competition and decorating your home for the New Year. We have collected a lot of instructions for adults and small crafters on sewing a toy from fabric and felt, sculpting it from salt dough, and assembling it from a plastic bottle, paper or cardboard. Step-by-step master classes will be clear to children from school and kindergarten and they can easily make Santa Claus with their own hands from various purchased and improvised materials.
Do-it-yourself Santa Claus using scrap materials for kindergarten - step-by-step master class with photos

Using various materials and fabric at hand, you can easily make a cute Santa Claus figurine for the New Year. For the youngest crafters, we have selected interesting instructions that tell you about the rules for making such a craft. Our next master class with photos will tell you more about how to make a cute Santa Claus from scrap materials for kindergarten with your own hands, step by step.
DIY materials for Santa Claus kindergarten
- multi-colored felt;
- silicone glue;
- juice can or cardboard toilet paper roll (for the base);
- lace;
- red and white pom-poms;
- scissors.
Master class on making your own Santa Claus from scrap materials
- Prepare materials for work.

- Cut out a rectangle from red felt according to the size of the cylinder to be glued.

- Glue the red felt to the base.

- From light pink felt, cut out a large face for the future figurine and glue it with glue, as shown in the photo.

- Decorate the edges of the face with lace: glue the lace along the contour of the light pink felt.

- Cut out a couple of eye circles from black felt. Glue on the eye circles and the red pompom nose. Cut out a couple of cheek circles from pink felt, and a smile from red felt.

- Glue cheeks and a smile to the figure.

- Cut a triangle out of red felt as shown in the photo. Glue the edges of the triangle together to form a cone-cap. Glue a white pompom on top. Then glue the cap to the previously prepared figure.

Do-it-yourself voluminous Santa Claus from nylon tights - master class with video

A funny craft in the form of Santa Claus can be made using ordinary nylon tights. They make interesting three-dimensional figures that can be submitted to competitions or used to decorate your home on the eve of the New Year. Our step-by-step master class will tell you more about how to make a beautiful Santa Claus out of nylon tights with your own hands.
Master class with video of making your own from nylon tights of Santa Claus
The following video discusses in detail the stages of making a voluminous toy from tights. It is important to follow all the author’s instructions, then the resulting craft will be beautiful and neat. You can use the finished figurine to decorate rooms for the New Year or simply plant it under the Christmas tree.
Cool DIY Santa Claus from a plastic bottle and spoons - master classes for kindergarten

Pasting and painting plastic bottles is a fairly simple task that can be easily completed by a student in the middle and senior kindergarten group. Therefore, for the New Year, we have selected interesting master classes on making crafts from such simple scrap materials for kids and their parents. In the following photo instructions you will learn how to easily and quickly make a large figurine of one of the main symbols of the New Year. According to our master class, Santa Claus is made from a plastic bottle and spoons with your own hands without much difficulty.
Materials for making a cool Santa Claus from a plastic bottle and spoons
- large plastic bottle 5 liters;
- plastic spoons;
- scissors;
- white and red tape;
- glue gun;
- rain;
- circle of pink fabric;
- cotton wool;
- white cardboard and black paper.
Master class with photos of making Santa Claus with your own hands from a bottle and spoons
- Start gluing the five-liter bottle with red and white tape.

- Cover the front center part with white tape, as shown in the photo.

- Use red tape to create a neat frame around the previously glued white tape. Also cover the entire back of the figurine with red tape.

- Cut off the handles of plastic spoons. Proceed to gluing the resulting blanks onto a five-liter bottle using a glue gun. In this way, glue the lid and make a strip of spoons on the neck.

- Glue the spoon blanks to the bottom of the bottle (under the white tape).

- At the bottom of the bottle, glue spoon blanks in several tiers, as shown in the photo (so that the bottle itself is not visible).

- Make eyes for the figurine from white cardboard and black paper.

- Make a spout filled with cotton wool from pink fabric.

- Use pieces of plastic spoon handles to make eyebrows for the figurine. Glue the eyes and eyes onto the prepared plastic bottle.

- Decorate the bottle with rain.

Video on how to make a cool Santa Claus from a plastic bottle with your own hands
You and your children can make a simpler, but no less cool figurine in the next master class. A detailed video will tell you how to make a cool Santa Claus from an ordinary plastic bottle for the New Year. The voluminous craft can be used to decorate a room, and it can also be placed under the Christmas tree. The original figurine is also suitable for participation in a competition at school or kindergarten.
Original DIY Santa Claus made from cotton wool - master class with video for school

A large number of toys were made from ordinary cotton wool in the USSR. At the same time, they turned out not only beautiful, but also very original. Now, using this technology, you can also make unusual decorations for the New Year. And with the help of our next master class with video, you will learn how to make a cool Santa Claus out of cotton wool with your own hands.
Video on making your own Santa Claus from cotton wool - for school
By following the author’s instructions in the next video, you can easily make a real toy out of ordinary cotton wool for the New Year. The finished figurine can be painted or varnished. This craft will look original and bright against the backdrop of modern store-bought toys. In addition, it can be used not only to decorate rooms, but also to decorate a Christmas tree: plant Grandfather Frost and Snow Maiden made of cotton wool under the tree and create a real festive atmosphere for the New Year.
Simple DIY Santa Claus made of paper and cardboard - templates for kindergarten and school

You can easily and simply make many different Santa Claus figures from ordinary cardboard and paper. The templates we have selected will help you and your children with this. All you need to do is print them out, and then start cutting and gluing the figure. And in just 10 minutes a beautiful craft for the New Year will be ready. You can choose a template for cutting out a bright Santa Claus from paper or cardboard with your own hands in our collection of pictures.
A selection of templates for paper and cardboard with Santa Claus for elementary school and kindergarten
The cutting templates we offer can be used both at home and for kindergarten or elementary school. From simple blanks, children will be able to make cool and cute Santa Clauses on their own. You can also submit such an original craft together with a child from the junior group of kindergarten to an exhibition held in honor of the New Year.


Do-it-yourself original Santa Claus made from fabric and cotton wool - very simple - patterns for beginners

Sewing three-dimensional figures and toys requires certain skills in working with fabrics and a sewing machine. But in our next master class you will find the simplest possible master class on making a toy from fabric. In it, the main task of the needlewoman will be to carefully redraw the workpiece onto the base and brightly color it. You can learn more about how you can very easily sew Santa Claus from fabric and cotton wool with your own hands in our next master class with patterns for beginners.
Materials for making your own original Santa Claus from fabric and cotton wool
- linen or cotton fabric;
- paints for painting on fabric;
- paper (for printing patterns);
- cotton wool or holofiber;
- scissors.
Master class on making your own original Santa Claus from fabric and cotton wool
- Print out the proposed patterns, transfer the contours of the figure (or both figures onto the fabric). Transfer the drawing itself to make an original pendant toy.

- Paint the front of the figurine with fabric paints.

- Make the back of the figures: redraw the outline again (turning the pattern over) and paint with fabric paints.

- Make the bottom part of the toys and paint them as shown in the photo.

- Cut the blanks with an indentation of 1-1.5 cm.

- Fold the blanks with the front parts and sew them using a sewing machine or by hand. Additionally, sew on a ribbon or decorative cord to hang the figurine.

- Turn out the workpiece.

- Sew the bottom part of the toy (not completely - half).

- Fill the toy with cotton wool or holofiber.

- Hem the second half of the bottom of the toy.

Video on sewing the original Santa Claus from felt - with patterns for beginners
The following video will help you sew a different Grandfather to decorate your home for the New Year. It tells you step by step how novice craftswomen can make a simple toy. The patterns offered in it are quite easy to redraw, so even middle and high school students can make the craft.
DIY funny Santa Claus made from salt dough - master classes with photos and videos

You can make many different cool crafts from salt dough for the New Year. This kind of work will definitely appeal to both kindergarten kids and primary school students. And with our next instructions, you and your children can make original pendants with painted handprints. A simple master class with photos will help you easily and simply create your own original Santa Claus from salt dough.
Materials for making a funny Santa Claus from salt dough yourself
- flour - 2 cups;
- fine salt - 1 cup;
- water - about 1 glass;
- rast. oil - 1 tbsp;
- foil;
- acrylic paints.
Master class with photos of making Santa Claus from salt dough with your own hands
- Prepare everything for making salt dough. Mix the ingredients and knead thoroughly until smooth.

- Roll out the prepared salt dough into a thin layer (no thicker than 2 cm). Cut out small ovals or circles from it (to fit a child’s hand and leave a neat side).

- Make imprints on the surface of the salt dough.

- Carefully trim off the excess dough, leave a border about 1 cm wide near the print. Make holes in the upper part of the workpiece with a tube for later threading the cord or ribbon.

- Place the pieces on foil and place it in the oven. Bake the crafts at 120 degrees for 2 hours.

- Paint the workpiece with white paint and let it dry. Then draw the face of Grandfather Frost and his beard. Thread a ribbon or string through the previously prepared hole.

Video on how to make Santa Claus from salt dough yourself
Your children can make a three-dimensional figure in the shape of Grandfather Frost in the next master class. A step-by-step video will help them create a very cool New Year's craft. It can be used to decorate your home for the New Year or to decorate a classroom at school or kindergarten. Simple and exciting work with salt dough is sure to please all children.
DIY bright Santa Claus for kindergarten - crafts for an exhibition with master classes

When making crafts with your child, it is not at all necessary to use only available materials. For example, in the following master class, a wooden blank in the shape of a man is used as a basis. You can easily purchase it in modern craft stores. The figurine itself with such a blank is obtained quite easily and simply, so every child will like working according to the instructions. The following master class will tell you how to make a bright and cool craft in the form of Santa Claus for the New Year with your own hands for an exhibition in a kindergarten.
Materials for making bright Santa Clauses for an exhibition in kindergarten
- wooden blanks "men";
- acrylic paints;
- yarn for felting (can be replaced with padding polyester);
- white and red felt;
- silicone glue;
- scissors.
Master class with photos of making a bright craft in the form of Santa Claus for an exhibition in kindergarten
- Paint the body of the wooden piece red.

- Wait for the workpiece to dry.

- Use felting yarn or padding polyester to make hair and beard for the figurine.

- Add a belt and buckle to the dried blank. Glue hair and beard with silicone glue.

- Draw eyes for the figure.

- Cut a triangle from red felt.

- Sew (or glue) a hat out of it.

- Cut a thin strip from white felt. Glue it to the hat as a frame.

- Place the cap on the finished figurine.

Video on how to make a bright Santa Claus craft for an exhibition in a kindergarten
You can make bright crafts in the form of Santa Claus yourself from other materials. For example, children and their parents can make a very interesting craft for the New Year from ordinary light bulbs. Moreover, such blanks can be painted in different colors, and you can also make various clothes and decor for them. But such work should only be carried out together with adults.
Do-it-yourself Big Santa Claus made of fabric to school for a competition - step-by-step master class

Our next master class will help you make a big and handsome Santa Claus for your school competition with your own hands. High school students can easily make a toy calendar using it. But for children in high school, such work will be quite difficult and their parents must help them in making the toy. A craft for the New Year sewn according to our instructions will very easily and simply help your children take prizes.
Materials for making a fabric Santa Claus for a competition at school
- a piece of red and black fabric;
- sewing supplies;
- white felt and ready-made white felt numbers;
- linen or cotton fabric of flesh-colored or light gray, light pink color.
Master class with photos of sewing Santa Claus with your own hands for a competition for school
- Cut a strip of fabric with a width of 11 cm and a length of about 100 cm. Carefully hem it on one side to prevent the fabric from fraying: fold it 1 cm and repeat the fold, leaving the edge inside. Sew the workpiece. Make folds as shown in the bottom photo: step back 4-5 cm from the edge, tuck the fabric under the bottom, making a 2 cm fold. Repeat until the end of the cut. All fabric bends should be ironed.

- Secure the folds at the top with clothespins and at the bottom with pins.

- From a large piece of fabric, cut a triangle with a height of about 80 cm and a width at the bottom of 50-60 cm. Sew the prepared strip with folds to the very bottom of the triangle.

- Completely cover the base triangle with folded pockets. It is recommended to attach the folds themselves to the base (1-2 stitches).

- Sew the connected parts. And then sew the head to them. Glue felt numbers onto the pockets themselves (to make a calendar).

Using our master classes with photos and videos, you and your children can easily make Santa Claus with your own hands from various available materials: paper, cardboard, plastic bottle. We have also selected simple instructions for sewing toys from fabric and felt with patterns. They will tell you how to make a Santa Claus figurine for a competition for school and kindergarten, as well as what decor you can make to decorate your home for the New Year.
We talked about how to make Christmas trees with your own hands in our last article >>>> As you know, it is customary to put gifts under the Christmas tree, and, of course, Grandfather Frost brings them. Therefore, in this section we will tell and show how to make another popular New Year's craft - Santa Claus from paper. Here you will find a large number of ready-made paper crafts for the New Year. All you need to do is print out the pattern you like, cut it out and glue the craft according to the instructions. Santa Claus-matryoshka, Japanese Santa Claus, dancing Santa Claus, Santa Claus in a reindeer harness, Santa Claus cap and beard, Santa Claus mask, Santa Claus finger puppet, Santa Claus bag, as well as Santa Claus's vehicles (sleigh, bus, train , airplane) - you will find all this in our article.
1. DIY Santa Claus made from paper (option 1)
Homemade Santa Claus - matryoshka. It consists of boxes of different sizes with the image of Santa Claus, which can be nested into each other according to the matryoshka principle. Very easy to make. This paper craft for the New Year can be used as an educational toy.
2. DIY Santa Claus made from paper (option 2)
Santa Claus in company with the Snow Maiden, Snowman, Sasquatch, deer and Elves.

3. Paper Santa Claus (option 3)

4. Origami Santa Claus (option 4)
For this New Year's craft, you will need a square sheet of paper, red on one side and white on the other. For detailed video instructions, see the link.

5. Homemade Santa Claus (option 5)
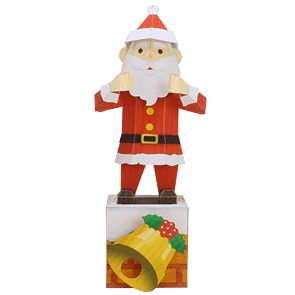
Miniature Santa Claus from our favorite website CREATIVE PARK from CANON. It can be placed on the table, or you can hang it on the Christmas tree as a homemade Christmas tree decoration.

Dancing Santa Claus from the same site. See link >>>>
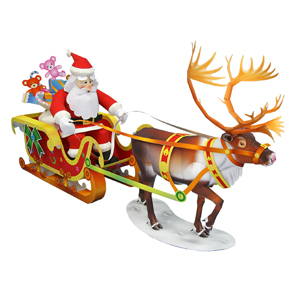
Santa Claus in a reindeer sleigh >>>>

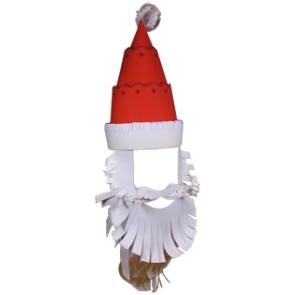
Santa Claus hat with beard >>>>
6. Homemade Santa Claus (option 6)
Paper Santa Claus on a sleigh >>>>

7. How to make Santa Claus with your own hands (option 8)
DIY finger puppet Santa Claus made of paper. On the same site you will find a Deer finger puppet. Now you can show a New Year's puppet show.

8. How to make Santa Claus out of paper (option 9)
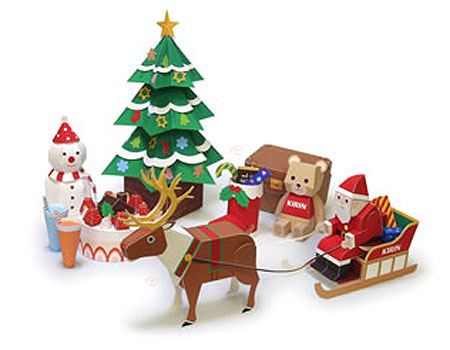
A whole New Year's scene from the Kirin website: Santa Claus in a reindeer sleigh, a Christmas tree, a snowman, a chest with gifts, etc.
9. How to make Santa Claus out of paper (option 10)
Another homemade Santa Claus made from paper. This paper craft for the New Year is very easy to make.

10. DIY Santa Claus made from paper (option 11)
New Year's paper craft - cheerful Santa Claus on a sleigh. You can download the craft diagram from the link >>>>

11. DIY Santa Claus made from paper (option 12)
The highlight of this New Year's paper craft is that the paper Santa Claus is in a sitting position. It can be placed on the edge of a bookshelf or table, for example. An original DIY New Year's craft from the Disney website FamilyFun.