How to make a tinsel Christmas tree with your own hands on the wall with video and photos. A variety of Christmas trees for the New Year. Christmas tree made of tinsel - in five minutes
Tinsel Christmas tree: a detailed step-by-step master class with a large number of photographs on how to make a tinsel Christmas tree with your own hands

On the eve of the New Year holidays, as a rule, we spend a lot of time shopping in search of gifts for family and friends. Meanwhile, the most original, sincere and memorable gifts are those that are made with your own hands.
Tinsel Christmas tree
This master class will tell you how you can make your own Christmas tree out of tinsel - an indispensable attribute of the New Year. We will use very simple materials that are found in almost every home. This tinsel tree can be given as a gift, or can be used as an effective addition to New Year's interior decor.
Materials for a tinsel tree
So, for work you will need the following materials: a piece of foam plastic, tinsel, an empty yogurt cup, plaster (alabaster, plaster), New Year's balls and decorations, decorative ribbons and cords, polysilk (can be replaced with any beautiful wrapping paper), hot melt adhesive, double-sided tape, wire.
First you need to prepare the future base for the tinsel tree. To do this, in a clean plastic cup, dilute gypsum powder (or any other binding material) with water in the ratio recommended by the manufacturer. The resulting mixture should fill the glass by about a third. We install the future tree trunk in the center of the glass. In this master class, an ordinary branch from a tree was used for these purposes (before use, the branch must be washed, dried and coated with acrylic paint). The branch can be replaced with a wooden skewer or thick wire. The glass must be left in this form until the plaster dries completely.

At this time, you can start making the Christmas tree itself. To do this, cut out a cone-shaped shape from a piece of foam plastic using a hot knife. If the tree is planned to be large, you may first have to glue together several sheets of foam plastic to increase its thickness and make the size proportional to the height.

Next, we glue a circle of paper onto the base of the cone, and cover the sides with polysilic (here it is most convenient to use double-sided tape). This is necessary so that the foam is not visible in the finished product in the future.

At the next stage, we glue small squares of double-sided tape along the entire side surface of the cone. The tinsel will be held on it in the future. Then we wrap the cone with rain (tinsel), starting from the top, while at the top of the head it is necessary to leave a small free tip to decorate the top of the tree.

Having wrapped the form, the free end of the tinsel must be carefully secured at the base.
To decorate the top, we insert a thin wire into the top of the cone (preferably dark in color so that it is not visible), bend the wire into an arc and wrap it with the remaining tip of the tinsel, fixing this position with glue. Then we make a loop from a small piece of ribbon or cord, hang a New Year's ball on it, and glue the free ends of the loop to the top of the tree.


It's time to combine the tree with the base. To do this, simply pin a cone-shaped shape on the tip of the branch (for better fastening, the branch can be pre-treated with hot glue).

Now let's start decorating the cup for the Christmas tree. Using tape, wrap it with a sheet of polysilic.

We fill the free space inside with foam plastic (this is necessary so that in the future you can place sweets on a stick in the cup by sticking them into the foam).

If sweets are not planned, the cup can be filled with other material (paper, sawdust, etc.) The foam plastic should be covered with decorative material (sisal fibers, for example).
To assemble a decorative bow for decorating a glass, sew the ribbon with thread, as shown in the photo.


Now we tighten the thread tightly until a bow is formed. You can glue a bead or bell on top of the bow.

Then we wrap the cup along its entire height with cord, securing the ends with glue. We decorate the top of the glass with a bow.


Tie several beautiful bows from ribbons; they can be additionally decorated with twigs, bells, and small toys.

Then distribute the decorations evenly over the surface of the tree, securing with hot glue.

Useful tips
For the New Year, you can surprise your friends and family by giving them a beautiful handmade gift.
Since the Christmas tree is one of the main symbols of the New Year, it is ideal as a gift.
You can make just a beautiful Christmas tree, or you can decorate it with candies, so you get not just a decoration, but a useful element of the New Year's sweet table.
On our website you will also find:
Here are some of the most interesting ways to make a Christmas tree from candies with your own hands:
Christmas tree made of candies and bottles of champagne

You will need:
Empty bottle of champagne or wine
Scissors
Lots of small candies
Bright ribbon.
1. Place a piece of tape on each candy.
2. Start sticking the candies to the bottle using tape, starting at the bottom and working your way up to the neck of the bottle.
*Make sure that one end of the candy touches the end of the adjacent candy.
3. Glue each next row slightly higher than the previous one so that the candies overlap each other - this will make the tree more magnificent.
4. There should not be more than 4 candies on the top of the head. You can also add a bow or tape a star on it.
5. Pull the curled ribbon down from the top of the tree.
Christmas tree made of sweets and tinsel (master class)

You will need:
Double-sided tape
Regular tape
Small candies
Cardboard and scissors (for making a cone)

1. Using simple tape, glue candies to the cone, leaving small spaces between the rows of candies for tinsel.
2. Place double-sided tape in the gaps between the rows of candies and begin gluing tinsel to it.
3. Glue 3-4 candies to the top of the cone and also wrap them with tinsel.
DIY golden Christmas tree made from candies (photo instructions)

You will need:
Cardboard and scissors (to create a cone)
Double-sided tape or glue (PVA or hot glue)
Candies wrapped in golden foil (other candies if desired)
Beads on a string.
1. Cut out part of a circle from cardboard, twist it to form a cone, and secure the ends with glue.

2. Using double-sided tape or glue, begin gluing (from bottom to top) the golden candies to the cone. They should fit closely together to hide as many empty spaces as possible.


3. The gaps between the candies can be covered with beautiful beads on a string or tinsel of a suitable color.

4. You can make a star and, if necessary, paint it or cover it with foil. You can add a bow.

DIY chocolate candy tree (master class)

You will need:
Thick cardboard and scissors (to create a cone)
Glue (PVA or hot glue) or tape
Scissors
Chocolates (truffles) in shiny wrapper.

1. Roll a cone out of cardboard and secure the ends. Cut off any excess so that the cone sits evenly on the table.
2. Using tape or glue, begin gluing the candies to the cone. Cover the entire surface of the cone with candy.

3. Start decorating the tree to your liking. You can use beads, tinsel, bows, ribbons, “rain”, and you can attach a star made of paper or foil to the top of the head.
How to make a Christmas tree from soft candies

You will need:
Foam cone
Lots of soft (jelly) candies of different colors
Toothpicks.

Use toothpicks to attach the candies to the cone.

You don't have to use the whole toothpick - you can break it into two pieces.
Simply insert one end of the toothpick into the candy and the other end into the cone and fill the entire tree with candy.
How to make a gift tree from candies with your own hands

You will need:
Several candies
Green cardboard
Scissors
Red ribbon
PVA glue.
Text instructions after the video.
1. Cut a strip of green cardboard measuring 25 cm x 5 cm.
2. Divide this strip into three parts, which will then need to be bent - make marks for future folds at 8 cm, 16 cm and 24 cm.
Also divide this strip in half lengthwise.
3. Fold the strip in half lengthwise, apply PVA glue to one half and glue both halves together.
4. Using the marks made in step 2, fold the strip into a triangle. You have now created a frame for your future candy packaging in the shape of a green Christmas tree.
5. We make shelves for candies inside the packaging:
5.1. Prepare a strip of paper measuring 25 cm x 5 cm, and make marks on it every 2.5 cm (i.e. 2.5 cm, 5 cm, 7.5 cm, etc.).
5.2. Cut the strip in half lengthwise.
5.3. Cut one of the halves in half crosswise at the 10 cm mark.
You will have 3 stripes: 10 cm, 15 cm and 25 cm.
5.4. Fold each strip as shown in the image (zigzag) to create several triangles.
6. Insert your shelves inside the frame (Christmas tree): the long strip is folded into shelves for the bottom row, the middle one for the middle row and the small one is folded into a triangle and inserted into the top of the “Christmas tree”.
7. Start inserting candies into the cells of your Christmas tree.
8. Take a ribbon 45 cm long and tie it to the Christmas tree.
If you wish, you can make a trunk for your Christmas tree out of brown cardboard. You can also put sweets in it (see video). It can be glued using double-sided tape.
*You can decorate the Christmas tree as you like.
A simple candy tree (step by step photo)

You will need:
Paper cone
Corrugated paper
Candies
Decorations to taste (ribbon, beads, artificial flowers, Christmas tree decorations).


In 1700, by decree of Peter the Great, the New Year celebration began to be celebrated on January 1. Since then, a decorated spruce has become an invariable attribute of this holiday. In addition to a beautiful New Year's tree, homemade Christmas trees can decorate your interior. This article will look at several master classes on how to make a Christmas tree out of tinsel with your own hands.
wall decoration
The holiday is just around the corner, but the dimensions of your home do not allow you to place a forest beauty at home. What to do? Dont be upset! The Christmas tree can be hung on the wall. It will give you a festive mood and will not take up much space.

To create a wall composition, you will need:
- green tinsel;
- power buttons;
- various decorations to suit your taste.
The process of making a tinsel tree is quite simple. At the intended location of the composition, you need to make a sketch in the form of a Christmas tree with a simple pencil. Then cover the outline of the sketch with tinsel.
In order not to damage the wall, it is better to do this using power buttons.

Decorate the Christmas tree as you wish.
If you want to make such a composition fluffier, then it is better to use a frame. The second Christmas tree will be made from tinsel and whatman paper. To make it, take:
- Whatman;
- Tinsel;
- Glue gun;
- Decorations;
- Scissors;
- A simple pencil.

Everything here is also quite simple. On a sheet of Whatman paper, draw the outline of the future Christmas tree. Cut it out. Using a glue gun, fill the entire space of the drawn Christmas tree with tinsel, starting from the outline. Decorate the finished Christmas tree to your liking. The advantage of such a Christmas tree is that it can be reused. You can attach it to the wall using buttons.
Floor herringbone
If you suffer from allergies and cannot afford to put a live tree at home, use the following master class to create an unusual artificial tree.
To work you will need:
- Several sheets of whatman paper (their number depends on the desired size of the product);
- Glue;
- Scissors;
- A simple pencil and string;
- Lots of tinsel in the desired color;
- Hot glue;
- Decorations.
First of all, you need to make a base in the form of a cone. Glue the sheets of whatman paper together with tape or glue. Using a pencil and string, draw a large circle on them. Using the diagram below, make a conical base.

When the base is ready, you can start decorating it with tinsel. It needs to be glued to the paper base using hot glue or PVA glue.


The finished Christmas tree needs to be decorated with Christmas tree decorations. A small Christmas tree made of tinsel and paper can decorate a window or a New Year's table, and a large one can be used as a full-fledged artificial tree.

Creative solution
If you want something unusual, try making a Christmas tree out of tinsel and wire. Guests will look at such a Christmas tree for a long time and be interested in your creative idea. To make a Christmas tree you will need:
- About a meter of thick wire;
- Hot glue;
- Scissors;
- Thin tinsel;
- Foam cone of desired size;
- Decorations.
It is most convenient to make such a Christmas tree using a foam cone. Take a cone and wrap it with wire. Make coils of the size you need. Using hot glue, attach the tinsel to the wire frame and begin winding it onto the wire blank. Do this operation to the very tip of the wire, gluing if necessary. Decorate the finished Christmas tree as you wish. Such an unusual solution can serve as an excellent decoration for a table or holiday corner, or as a very creative gift.

Or you can bring even more creativity into your home and make a floor composition in the form of a wire Christmas tree.

Gift for a sweet tooth
What's a holiday without sweets? Please your favorite sweet tooth with an unusual gift - a Christmas tree made of tinsel and sweets.
This unusual craft is based on a conical base. It can be purchased at art and craft stores. These cones are made from polystyrene foam; they are very light and stable. Or you can do it yourself. Simply roll up a sheet of cardboard, secure it with a stapler, and cut off the excess along the base of the cone.

The foundation is done, you can start working. For this craft you will need:
- Conical base;
- Scissors;
- Double sided tape;
- Candies.
A tinsel Christmas tree is probably the simplest Christmas tree that can be made with your own hands. This craft is perfect for get-togethers with your child, and will also be a great gift for your friends. It is small, only 20 centimeters, so it can be placed anywhere - in the office on the table, in the kitchen, on the window or anywhere else, it will not take up much space, but it will please the eye on the eve of the New Year holidays. So, now you will learn how to make a tinsel tree with your own hands; read the master class with photos carefully so as not to miss important details.
A tinsel Christmas tree is made from the following materials:
- a sheet of A4 cardboard, as a replacement - a regular A4 sheet;
- scissors;
- yellow and gold ribbons;
- beads;
- PVA glue or, better yet, a hot glue gun;
- stapler.
How to make a tinsel tree with your own hands
If you use PVA glue, you need to start by shaking it thoroughly and putting it in the refrigerator so that it is not liquid.
We twist a cone from A4 and secure it with a stapler. Trim off the excess with scissors. To make it even, connect the two sides, sort of fold them together and cut them evenly. 
Let's put the cone aside and start decorating the New Year's tree with tinsel.
Instead of a glass star, we will have a multi-pointed star made of gold ribbon, 1 centimeter wide. Forming a star. First, we secure everything with a stapler, and glue the last, top tape using hot glue or, if you don’t have it, sew it on the back side.
By the way, here is another version of the original DIY craft -.

Now let's decorate it with beads. They can also be attached with hot glue or sewn on with gold-colored threads or the color of the beads. 
We form bows from yellow ribbons, also 1 centimeter wide, securing them with thread. 
Then we will glue a bead to them or sew it with threads.
The decorations are ready. Now it's time for the Christmas tree. We attach the tinsel using glue and a stapler. We use the latter for the first, lower rows, and then we will glue it with glue - PVA or hot. If you use hot glue, then there are no special problems, just glue the rain with a zigzag from the bottom up. But with PVA glue you need to wait a little. Coat each row one by one, gluing one strip at a time and waiting for the glue to dry. 
If you choose, for example, the green color of rain, then the tinsel tree will turn out like a real one, then the decorations can be selected in absolutely any color. We do not advise you to attach anything heavy to such a Christmas tree; after all, it is based on paper. Beads and light satin ribbons are what you need!
First of all, we put on our star. 
And then we evenly distribute all the decorations around the Christmas tree. The DIY tinsel tree is ready; the master class with photos was prepared by Julianna Welner. 
We also invite you to find out how it’s done
It can be a nice New Year's souvenir DIY tinsel tree. Or you can simply make such a cute Christmas tree and use it in the festive decor of your apartment. These Christmas trees are quite cute, and they are quite easy to make.
The point is that a cone made of cardboard or foam plastic is covered with tinsel in a spiral and decorated with Christmas tree decorations. And although all this seems easy, in practice some difficulties may arise.
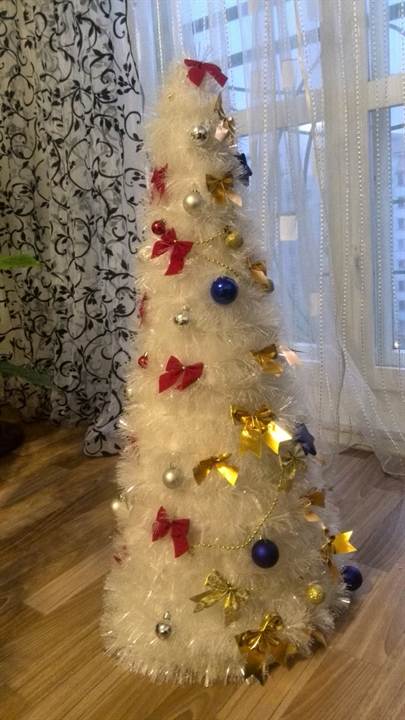
For the master class, I made a Christmas tree on a stand - this is a more complex option. You can do more with your children simple Christmas tree on a cardboard cone without a leg.
To do tinsel tree You will need:
- tinsel,
- foam or cardboard cone,
- double sided tape,
- a little wire (for a curved crown),
- a flowerpot, a small plate or any other suitable container,
- building plaster (if you are using a flower pot),
- 3 kebab skewers or several small ones - the trunk of a Christmas tree,
- hot glue gun,
- scissors,
- decor: a bell for the top of the head and suitable decorations (these can be tiny toys, small candies, Kinder Surprise toys, etc.).
Let's prepare the trunk of the Christmas tree and glue the skewers together. Let's secure them in a pot or, as I did, on a small cup from a flowerpot. If you are using a small pot, then it is more convenient to use building plaster (alabaster).


Skewers can be decorated with adhesive tape or satin ribbon.
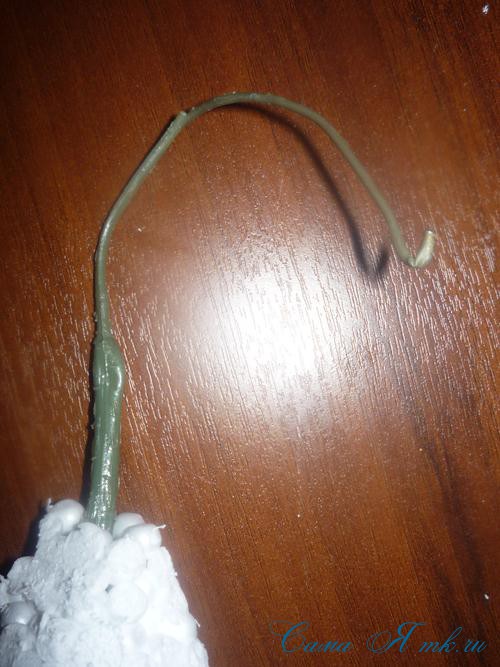
We stick a wire into the top of the cone and bend it as shown in the photo. There is a loop at the end for attaching jewelry.
We fix the cone on the trunk of our future Christmas tree.

We cover the bottom and top of the head with double-sided tape, and also glue several strips on the sides of the cone.

Starting from the bottom, carefully wrap the cone with tinsel.

We attach the decoration to the top of the head.


All that remains is to decorate!

We glue everything with a hot-melt gun. Apply hot glue to the decoration (NOT ON THE TINSEN!), otherwise it will melt. Spread the tinsel a little and fix the decoration on the cone.
If you attach decorative beads, you need to fix them on already glued decorations.
I made the stand in the style of a Christmas tree. I mixed water and PVA 1:1 and added silver glitter. I applied this mixture with a regular brush.
This is how the Christmas tree turns out!


DIY tinsel tree This is an excellent and inexpensive decoration. Such Christmas trees can be made for an office or a cafe (put them on every table). The Christmas tree can be made larger. To do this, use old wallpaper or whatman paper.
Everything is very simple, fast and accessible. And the result is very cute and original handmade New Year's souvenir.
I was glad to help!


