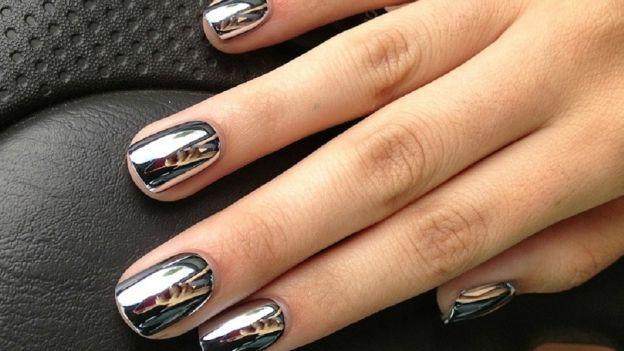
Stylish mirror manicure. How to do it at home? Mirror gel polish TNL
Unusual formats and shades of gel polish allow you to create a unique manicure design. A trendy new product has become a mirror shade; it also includes metallic colors, rich shades with shimmering shine and chameleon gels with shine. A natural mirror effect is achieved by applying gel polish, and the quality of the latter must be at its best; Film overlays are becoming an alternative to varnish, but they are a completely different story.
It’s not difficult to find real mirror gel polish; the cost of a bottle with a glossy miniature differs from standard ones; similar products are produced by budget and professional brands.
A more affordable version of mirror varnish is the metallic shade of the composition in cold or warm shades, but purchasing real varnish, which literally represents a mirror, is sometimes very difficult.
As a rule, nail artists use rubbing - a special powder to obtain a uniform shine where you can see yourself. But you can get a similar effect at home using nail polish with reflective particles.


Peculiarities
Mirror polish is a glossy coating for nails with tiny reflective particles - they give it a charming shine and shimmer. A high-quality varnish uses particles rather than hard gloss of various sizes.
When choosing a gel polish with a mirror effect, it is important to pay attention to quality: moderately thick consistency, lack of sour odor, smooth, dense brush and opaque bottle. This parameter directly affects the even glossy finish, the ease of distribution and obtaining the desired result. It is worth choosing a varnish:
- Without acetone, formaldehyde and toluene components in the composition. They are considered potential allergens and can lead to dryness of the nail plate, brittleness and delamination;
- With a thick dense brush;
- The consistency is medium in thickness, which rather tends to be liquid. A varnish that is too thick is difficult to apply, may bubble and thicken sooner, which will damage it;
- Uniform in texture. The separation of product layers, the formation of a layer of water and thick sediment indicates that the gel has expired or has been improperly stored. In addition, the mirror effect varnish contains no glitter, its texture is completely homogeneous.

Among the distinctive features of the composition with a mirror effect it is worth noting:
- It allows you to create an original design manicure and used as a single-color coating on all fingers or used to design individual ones;
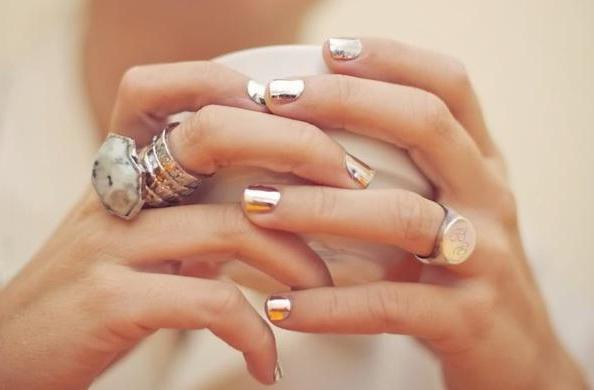
- Silver varnish with a cool metallic tone– a real trend of the current season, and in the future it will be no less relevant;
- Today there is a huge assortment mirror coatings from classic silver and gold shades to pearl, pink, lilac, blue, differing in color depth, saturation and shine;
- Mirror nail polish differs from each other: Some of them are metallized, others have a slight shimmering hue or shimmer when the direction of light changes, others resemble a chameleon and change shade under different lighting. The classic mirror composition is completely glossy and uniform in color;
- Before applying a mirror coating, it is recommended to prepare thoroughly and create the ideal base. Experienced masters create a new nail shape, shaping its curves and selecting the optimal length; this way the mirror shine becomes more noticeable;
- The only drawback of the coating is that it can highlight imperfections in the nail plate and even careless manicure. To avoid this, you should take the time to apply a thick base and first do a high-quality manicure.

The mirror coating on nails looks modern and original, the most important thing is that it can be applied at home without the help of a professional.


New items
Classic varnishes with a mirror effect are silver and golden shades with a uniform glossy sheen or tiny sparkles. They are used as a separate coating and even combined with each other in one design, which cannot be done with other similar compositions. Silver and gold create a trendy monochromatic nail design and look original, completing any female look.


Bronze, or “old” gold, is considered a stylish novelty.
Bronze shades in manicure are especially good in summer and perfectly highlight tanned skin, however, wearing bronze is also appropriate in winter. Chrome in the shade of varnish has been considered a trend for several seasons, but its natural shade cannot be achieved with varnish alone - you will need a special powder or rubbing with the smallest particles to create a uniform coating with a mirror reflection.
You will learn more about how to create a mirror manicure in the following video.
Brands
The production of mirror nail polishes began relatively recently. We can say that this product has replaced glitter. Let's talk about in which manufacturers' lines you can find a coating with a mirror shine:
- Avon "Mirror Shine"– a budget series of the brand, the name of which is translated as “Mirror Shine”;
- Maybelline with the "Mirror Image" collection;
- In the varnish palette Sally Hansen there are unusual mirror shades like rose gold, blue, lilac;
- The best among professional brands can be called the brand Zoya with products "Trixie";
- Lesser-known brands with mirrored new products - Layla, El Corazon, Briggite Bottirier;
- Among luxury brands we note Chanel in silver and golden shades;
- El Corazon "Kaleidoscope" presents a collection of 14 mirror shades, including crimson, blue, beige, green and others. The cost of the bottle is low; in terms of quality, this varnish is considered one of the most worthy.


The presence of a separate collection of shiny coatings indicates their high quality, thoughtful formulation, durability and the ability to choose shades.


How to apply correctly
Mirror varnish coating is no different from traditional application . To get a neat manicure at home, you need to follow these steps:
- Mandatory stage– nail preparation: removing the cuticle, shaping the plate. It is important to prepare the ideal base and treat the surface of the nail at the rollers, make the correct shape of the nail and choose the optimal length for yourself;
- Be sure to use a base before applying the coating itself. It will level the surface of the nail plate, smooth out minor imperfections such as cracks, scratches, grooves, protect the nails from penetration of pigment inside and ensure long-term wearing of the varnish;
- The application of a mirror coating requires careful execution: it does not tolerate errors or blots, since any of them “catches the eye.” Experts recommend distributing the varnish from the center of the nail: apply a little pigment to the middle and spread it downwards with stroking movements, then repeat the contour of the cuticle;
- Be sure to “seal” the end of the nail;
- The coating should be applied in 2-3 layers;
- Be sure to use top afterwards. The final coating will even out the texture of the varnish and create a glossy shine on its surface.


Mirror polish looks good on nails with an ideal, anatomically correct shape.
Design ideas
Mirror polish is often used as a single-color coating on all nails. This design looks stylish, original and goes with almost any style of clothing. It is also used for the design of individual nails, options for which we will consider below:
- Geometric design- the most relevant this season. It involves applying strict patterns or simple lines to the surface of the nail. As a base, you can choose any dark shade (black, gray, purple, red) and apply the shapes on top with silver or mirror varnish. You can use a shiny base and draw shapes with a single-color glossy or matte pigment; the latter looks very original.
- Lunar. To diversify your manicure, it is enough to add variety to it in the form of mirror holes. For black and red coatings, both silver and gold are suitable; for white or any other shade of nude, you can use colored holes with glitter - pink, turquoise, green.
- French. The classic design can be diversified by replacing the usual white stripes at the end of the nail with mirror ones.
- Patterns. Contrasting patterns in black, gray or white can be painted on a mirror base. At the same time, you should not decorate each nail in this way; it is enough to make a design on the ring and middle fingers.
- Plain coating. One cannot help but mention it, since the metallic glossy shine on all nails looks stylish, regardless of the length and shape of the nails. There are no restrictions on the shade of mirror varnish - they can be classic silver or gold, bronze, pink, blue, green and others. Uniform shine combined with careful application is the main accent that every woman can add to her look.
No matter how simple or complex the design using mirror varnish, craftsmen strongly recommend using one shade and allow you to combine gold and silver.
Another possible bold design– covering a separate nail with a separate shade of glossy varnish with a shimmering effect, but not an outright “mirror”.


Always in trend, it is not surprising that more and more interesting ideas for its design appear. Relatively recently, such a concept as a mirror manicure appeared.
Manicure for all occasions
Nails with a mirror finish will not go unnoticed, because they are original, bright and stylish. This type of manicure is perfect for a special event and will be an excellent addition to a strict business style. Mirror manicure can be done in beauty salons, relying on the professionalism of the master, or on your own, having mastered this technique.
Features of mirror manicure
This manicure can be done in several ways. The easiest one involves gluing a reflector film onto the nail plate. You can do this kind of work yourself. What is needed to do a mirror manicure at home? To do this, you should take care of the following materials in advance:
- Special transfer foil that has a reflective effect. It is worth noting that the color range of foil is quite diverse, but silver and golden colors are considered the most relevant. This foil can be purchased in stores that sell nail art products, or you can order it online.
- The color of the varnish should match the color of the foil.
- Basic basis.
- Glue for foil, which can be replaced with colorless quick-drying varnish.
- Special
Doing your own nail art
This one attracts the attention of others. How to make a mirror Before you start working, you should pay attention to traditional manicure. Nails must be perfect, otherwise a mirror manicure will not correct the situation, but, on the contrary, will focus attention on it. Absolutely everything is important: working with the cuticle, neat nail shape, smooth nail plate and even well-groomed hand skin. Mirror manicure provides ideal smoothness of the nail. If there are problems with this, then you should replace the foil with a shiny tape that has a slightly convex pattern. Thus, the tape will hide the unevenness of the nail plate.
How to make a mirror manicure? Let's get to work. So, cover your nail plates with base coat. In addition to its intended purpose, the base coat protects nails from delamination and harmful effects.
Apply colored polish to your nails. As mentioned above, the varnish should match the color of the foil. This is important, since the foil does not always lie evenly on the nail, and the varnish will prevent the formation of damage.
Proceed to gluing the foil. This work is quite painstaking, requiring endurance and skill. Each nail is processed individually. Apply either colorless varnish to the nail. After a few minutes, glue the shiny ribbon. To do this, place it on the sticky layer of the nail and press gently. An orange stick will help you gently smooth the foil over your nail. Remaining film should be removed quickly. In this way, all nails are treated. A final coat is not necessary here, as it can affect the shine of the nails.
Other technologies for creating mirror manicure
It turns out that such a manicure can be done using a hairdryer. It is necessary to degrease your nails with a special solution. You should first try on the metal plates on each nail. You need to correct the shape in advance, since it cannot be corrected on your nails. To secure the plate, use a hairdryer - a stream of warm air will melt the foil and allow it to stick to the nail plate. Before gluing the film, remove the protective layer from it. Repeating this technique is not difficult, but to achieve perfection, you need to practice. This type of manicure has no drawbacks, the main thing is that it is harmoniously combined with the image.

Manicure with MINX coating
This technology is similar to the previous one, but instead of a hair dryer, a special lamp is used. All imperfections are removed with a nail file.
Also, a stylish mirror manicure looks beautiful on artificial nails. In this case, mirror tips are used. You can also diversify this type of manicure with various designs. The French jacket looks great with additional mirror elements. In addition, foil can be not only basic shades, but blue and green. When choosing this type of manicure, you should pay attention to the decoration. It is not recommended to combine mirror manicure with massive rings and other flashy jewelry. These nails are a decoration in themselves and do not require additional accessories.
If, after receiving the information, you are not confident in your own abilities, you should contact a salon, where a master can easily and beautifully do a mirror manicure, which is also known as a Hollywood manicure.
The choice of nail polishes is very large and is becoming larger every day. New lines and types appear all the time, with various effects, designed to create a bright, catchy image. One of these varnishes can be considered mirror nail polish, which often attracts the eye with its shine. Mirror polishes are glossy and usually have a metallic (gold or silver) tint.
Types of mirror manicureBeautiful mirror nails can be achieved in several ways. This is the usual painting with varnish with a mirror effect, the use of film varnish () or the extension of thin metal plates on the nails. The last method can only be performed in a salon by an experienced manicurist, but the first two are quite accessible at home.
Using film varnish is considered the simplest and fastest way to achieve a brighter metallic shine. For this manicure you will need the varnish itself, which can be purchased at a cosmetic store, and a heat lamp (you can use a hairdryer).
- Prepare your nails and give them the desired shape. If there is an old coating, wipe it off with an acetone-free product and degrease the nail plate.
- Select pieces of film of the appropriate size (in some cases, you can trim too large a piece with nail scissors).
- Separate the film from the base and heat it. You need to heat it until it starts to curl slightly.
- Apply the film to the nail, starting from the base, and smooth it out thoroughly.
- Wait a few seconds and trim off any excess film.
How to choose a mirror varnish?
If you decide to go with the most classic version of nail coloring and use varnish, then the first question that arises is how to choose it correctly.
- Carefully study the composition of the varnish. It should not contain formaldehyde, toluene, dibutyl phthalate - these substances are toxins. The issue of composition is especially relevant if you are going to purchase a cheap, rather than professional, mirror varnish.
- Look at the brush. It must be smooth and rigid, otherwise it will not be possible to apply the polish evenly on the nails.
- Study the consistency of the varnish. The drop from the brush should fall quickly. If the varnish flows slowly from the brush, it will not convey the mirror effect well.
- The varnish should be a homogeneous liquid, without inclusions or delaminations.
Mirror nail polish is exactly the same as regular nail polish. First, the nail is covered with a base so that the paint layer goes on evenly and the nail plate does not change color, and at the end a fixative is applied.
Brands of mirror nail polish
Among professional products, the most popular among consumers are mirror varnishes from Chanel, Sally Hansen and OPI.
- Sally Hansen- the most expensive, but high-quality option, which not everyone can afford.
- Chanel- another good product in the highest price category, but sometimes there are complaints about the brush being too thin.
- O.P.I.- products that represent a reasonable compromise between price and quality. Quite easy to apply, but sometimes difficult to get an even color. It takes a long time to dry.
In addition, varnishes such as El Corazon and EVA are widely used.
- El Corazon- in addition to the standard colors for mirror nail polishes, gold and metallic, it offers a wide palette of other shades. The mirror effect of additional tones is not so pronounced, but is present.
- EVA- a budget option. Easy to apply and dries quickly, but not long lasting, lasts a maximum of 3-4 days. Once opened, it can be stored for no longer than two months.
- Avon. It goes on smoothly, dries quickly, but stays on very poorly. According to reviews, manicure loses its appearance within the first or second day.
 |
Mirror nail polish is one of the most stylish and elegant manicure options. And it is no coincidence that mirror effect or, more simply put, mirror nail stickers have been extremely popular for a long time.
The effect of colored or mirror fragments on nails can also be classified in this category. Appeared as a fashion idea in Korea - and quickly spread among fashionistas around the world thanks to its design that plays in the rays of light.
Well, one of the freshest and most interesting ways to make nails mirror today is the “chrome manicure” - created using mirror pigment or shiny powder. And gel polish, onto the surface of which this powder rubs well.
The pigment for mirror manicure in imported versions can have different names - be it Mirror Powder, Chrome Powder, Chrome Pigment, Glitter Powder and others. Its essence is the same: it is the finest aluminum powder, intended for rubbing into the surface of the varnish base - and giving it shine.

The shades of the pigment can also be different: most often it is silver and. But, if you set a goal, you can also find colored versions of powder for metallic manicure on sale. And even chameleon shades, playing on the nails with different tones of blue, green, purple and pink.
The price of the product depends on the place of purchase and configuration. A 1-3 gram jar of glitter powder for chrome manicure can cost $15 - $20 in American or European online boutiques, and $1.5 - $3 on popular Chinese trading platforms. With the same quality - or even with the same name.

As for the color of the base coat - gel polish, when creating a classic mirror manicure it is deep black. Providing the best background for a shiny finish.
However, no one forbids experimenting with white or other colors, even bright ones, as the stylists of the Polish salon Nails Company did (pictured above). Although the mirror effect in this case turns out to be blurry and implicit.
How to make a mirror manicure with glitter powder at home yourself?

The technology is quite simple.
- Apply black gel polish to prepared nails with a base coat in two layers, drying each of them under a lamp.
- Sprinkle a separate nail with a cosmetic sponge for shadows or even manually, generously, right above the jar, with our mirror powder.
- Shake off the excess powder, rub the remaining powder with light movements into the surface of the varnish until a mirror shine is obtained.
- We repeat the procedure with all nails one by one.
- We cover the nails with a transparent finishing gel polish and again send them under the lamp to dry.
A fashionable mirror manicure using chrome pigment is ready!

Video instructions for applying mirror manicure with powder
Based on materials: youtube.com/user/nailscompany3
P.S. 07/29/2016
Canadian stylist Christine Rothenberg posted a couple of her own experiments on creating a rainbow manicure with multichrome powder on her Simply Nailogical video blog. The same girl who recently amazed and shocked many with 116 layers of colored and 134 clear varnish.
In this case, Christine used several different shades of polish - and sparkling chrome powder for a chameleon-effect manicure.
In the video, the girl demonstrated two options for a chrome manicure: a standard one with gel polish in the first half. And with a regular black varnish coated with a water-based “finish”.
It turned out quite interesting - except for a small dip in the second half of the video, when the chrome powder did not want to be rubbed onto the water-based finishing coat at first. Then the topcoat on the same water base refused to adhere to the layer of powder.
And also the fact that a water-based coating is naturally not resistant to subsequent moisture - and after washing your hands, a chrome manicure based on regular varnish turned out to be ruined. We conclude: water-based coatings for manicures with a mirror effect should not be used.
Today, mirror manicure is the most preferred choice for any situation. Whether it's a business meeting or a party, this nail design will look appropriate. You can do it yourself, at home.
There are several ways to do a mirror manicure:
- Manicure with gel polish.
- Make up with powder.
- Manicure using reflective film.
Mirror manicure with gel polish
What you will need:
- Varnish base.
- Gel polish with mirror effect.
- Manicure tools.
- Ultraviolet lamp.
Instructions:
This is the easiest way to make a mirror surface of your nails. First you need to prepare the nail plates. This is standard procedure. The surface is completely cleaned, cuticles are removed, and the nail is given a beautiful shape.
After this, you need to degrease the surface. To do this, use a buff. The nails are dried and a base coat is applied to them. It will provide maximum adhesion to the base varnish.

This procedure is impossible without a UV lamp. After applying the mirror effect varnish, you should place your fingers there for two minutes.
Little trick! In order to get the perfect result, manufacturers of mirror varnish recommend applying it in two layers and using a topcoat. It will protect your manicure from damage and preserve it for a long time.
Mirror manicure using rubbing
What you will need:
- Powder with a shimmering effect.
- Manicure tools.
- Leveling base.
Instructions:
Standard techniques are used to prepare nails. The nail is cleaned and degreased using a buff. Then you need to make the nail plate perfectly flat. This is necessary when using mirror rubbing. To do this, apply a leveling base.
Next, powder is applied to the nail. It will look good only if it is evenly distributed along the entire length of the nail. Therefore, you need to use a special brush. To consolidate the result, the nails are covered with a top coat.

The powder contains crushed aluminum powder. Its particles have a reflective effect. This looks amazing on any nail shape.
Mirror manicure using reflective film
What you will need:
- Transfer foil with reflective effect.
- Base coat.
- Varnish of a suitable color.
- Special glue or clear varnish.
- Manicure tools.
Instructions:
Applying a mirror manicure using this method requires careful preparation. You should do a hygienic manicure, take care of the shape of the nail and smooth its surface. If this is not done, the reflective film will lie unevenly. This will ruin the look of the mirror nails.
After carrying out preliminary work on the nails, you can proceed to the main part. To do this, you need to cover your nails with colored varnish. The color of the varnish should match the color of the foil to avoid the formation of holes. This happens when the foil is not completely printed.
After the varnish has dried, you can apply the foil. You need to work with each nail separately. Glue or clear varnish is applied. After two minutes, you can carefully glue the foil. It is evenly distributed over the surface, pressed with a finger and the remaining film is sharply removed.
Do this with each nail separately. With this method of applying a mirror manicure, a final coating is not used. It will ruin the result.
Color selection

Every woman is individual. To choose the right color for a mirror manicure, you should take into account individual characteristics. These include the shape and size of the nail plate, skin color, and the shape of hands and fingers.
There are several universal colors that will suit almost any nail. These include pink color with a delicate pastel shade. It is neutral and will look discreet and neat. Especially suitable for those with dark skin.
Important! Black color with a mirror manicure will look great on any skin color. Attention should be paid to the shape of the fingers. A contrasting manicure will look good only on slender, neat fingers. The same rule applies to red.
For short nails, a fashionable brown color is suitable. It goes with any outfit and is a universal option. Brown nail polish is chosen by girls who prefer classics. The color is relevant at any time of the year.
Mirror manicure color selection table:
| Thin fingers | Average finger thickness | Full fingers | |
| Light | Black, red, blue, shiny, pink, beige, brown. | Any colors will do except scarlet, green and yellow. You should avoid bright flashy colors. | Brown, pink, raspberry. Bright hues. |
| Beige | White, black, silver. Shades of red, green, blue. Cool tones. | Dark colors. Grey, blue. Cool tones. | Grey, pink, brown. Bright colors should be avoided. |
| Dark | Red, black, peach, bed colors, all shiny. | Delicate bed colors, brown, beige. Not bright colors. | Delicate tones. Bed pink, beige, peach. |

Important! It is worth paying close attention to the condition of the skin of your hands and nails. The varnish will not look neat if the skin of your hands is dry, there are wounds and burrs. Nails should be hard. If they are soft and break easily, the polish will not last long.
To care for your hands, you should use special masks. Salt baths strengthen nails. They are made in warm water, no more than fifteen minutes.
Little trick! The manicure will remain intact if you avoid frequent contact with water. When doing household work, you should use rubber gloves. They will protect the varnish and skin of your hands.
Frequent contact with water makes the skin of your hands dry. Use nourishing cream after washing your hands. Avoid direct sunlight. This will prevent premature skin aging.
Useful video
- Related Posts


