Products made from plastic corks with your own. Crafts made from plastic bottle caps: bright and original decor
at 05/28/2017 120,981 Views
You can make many useful things for your garden and dacha from plastic bottles
While lovingly arranging our city dwellings, we are no less touching about our summer cottages. We try to improve them, create comfortable conditions for ourselves and add special notes of attractiveness to the even rows of beds and berry bushes. Many summer residents have chosen the most accessible and flexible material for their creative experiments - ordinary plastic bottles. We will talk further about what products can be made from it for the garden and dacha!
- House made of plastic bottles
- Country crafts from plastic bottles step by step: palm tree made from plastic bottles
- Master class from plastic bottles step by step
Plastic crafts: some tips

Wonderful hanging cactus pots made from plastic bottles

Resourcefulness in ways to place many plants in the garden area

Plastic bottles in skillful hands will become a wonderful decoration for your landscape

Beautiful flower made from plastic caps
Crafts from plastic bottles step by step: from flower pots to fairy-tale towers
The idea of making useful devices and decorative items from plastic containers is not new. The first attempts led our grandparents to build low fences for paths. Having appreciated the plasticity and low cost of the material, craftsmen from among the people moved on. And now the summer cottages are decorated with full-fledged fences, funny figures and unusual devices made from plastic bottles.

Your children will definitely like this beautiful ostrich from a pet container!

Thanks to imagination and such excellent material as plastic bottles, we have almost limitless possibilities for creating crafts for every taste, any complexity and direction

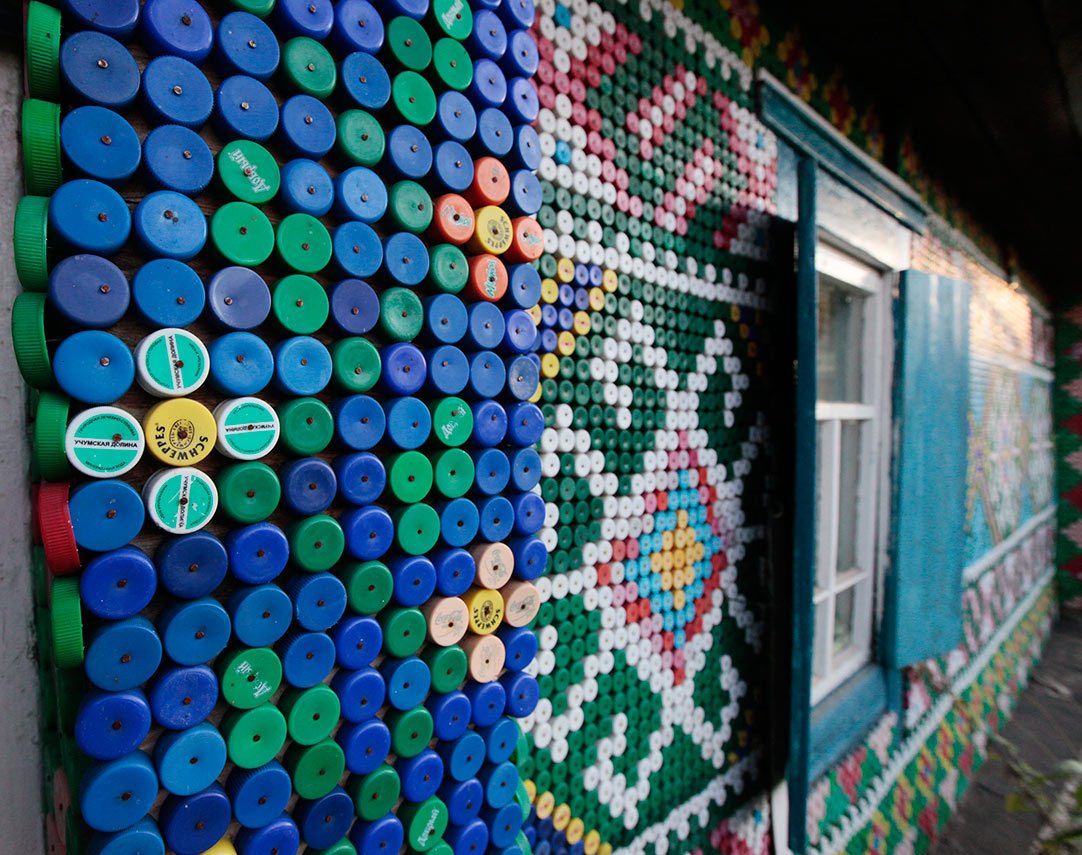
Paintings made from the caps of plastic bottles and other containers have grown into an entire art movement.

Plastic bottles have long been in great demand among gardeners

Gorgeous orange flowers from pet containers
Crafts and decorations for the cottage and garden made from plastic bottles do not require the use of complex tools and specialized skills. The main thing is to have time and desire, as well as enough material. Those who have both have convincingly proven the limitless possibilities of such handicrafts, and we have prepared a review of the best examples of crafts.
DIY furniture, flowerpots and a vase made from a plastic bottle

Comfortable and very stylish chair made from plastic bottles
A sheet of plywood, sixteen one and a half liter bottles, adhesive tape - and a comfortable and durable coffee table will appear on your site. Plywood can be replaced with plastic or hardboard, an old countertop or plexiglass. From the same materials, slightly changing the design, you can make a garden bench. Some diligent and patient craftsmen manage to assemble full-fledged sofas and armchairs from bottles.

You can even make the basis for a full-fledged sofa from plastic bottles if you fasten them firmly and carefully

Hanging flowerpot or base for flowerpots
DIY ottoman made from plastic bottles

How to make a pouf from pet containers
House made of plastic bottles
Among the summer residents there are also real builders who know that they can build whatever their heart desires from plastic bottles. They collect gazebos, toilets, sheds and even from plastic bottles. The only difficulty with such structures is not in their assembly, but in collecting the required number of bottles.

House with a roof made of 7,000 bottles

Plastic bottles are a good base material for building the walls of a summer house, greenhouse, shower, toilet or other partitions

Greenhouse walls made of containers on a wooden frame

Bottoms from plastic bottles will help you decorate garlands for the garden
Children's playground: flowers made from plastic bottles and toys made from plastic bottles

Crafts made from plastic bottles will help decorate the playground
All kinds of crafts made from plastic bottles (photos of their various variations for the garden can be easily found on our portal) are especially attractive for decorating a children's playground. Absolutely safe, they can become the basis for toys, fun decorations, and for creating story compositions. Funny elephants, bees, bunnies and hedgehogs, bright flowers, cheerful lanterns will turn the country island of childhood into a fairy-tale kingdom.

A whole plot for a children's playground from the caps of plastic bottles and canisters

Together with children, you can make small crafts and large plot mosaics from the caps of plastic bottles
Plastic bottle doll

Examples of a variety of crafts that will help the gardener with placement, easy transportation and care of plants

Piglets from large plastic bottles - stable stands for germinating seedlings or small plants

Craft for garden or lawn decor: parrot from pet container
Crafts for the garden and useful little things

Multi-colored turtles will be an excellent element of your garden decor.
You can see how easily the “crazy” hands of summer residents transform used plastic containers into useful summer cottage devices by walking through suburban areas. Here, on the trunk of a tree, a washbasin was nestled comfortably, and in the next yard, the gazebo was decorated with multi-colored, fragrant primrose and ampelous geraniums. We have also prepared for you several descriptions of crafts made from plastic bottles for the garden.
DIY bird made from plastic bottles

DIY painted garden owl lanterns
Birdhouse made from a plastic bottle

It’s very easy to make a birdhouse from a plastic bottle

Plastic bottles cut in half will become cute flower pots; it is important to carefully paint them. It is also advisable to take opaque bottles for this.
The ever-tangling and stuck twine for tying seedlings will stop tormenting you if you hide the ball in a plastic bottle. Just cut the bottle in the middle, insert a ball into the top, pass the end of the twine into the neck, connect the parts, secure the cut with tape - and your convenient storage is ready.
Drip irrigation from plastic bottles
Your seedlings will not wither, even if you go away for several days: install semi-automatic watering. Once again, plastic bottles come into play. We cut off the bottom of the bottle, about 2/3, drill 4-8 holes in the cork, close the neck, bury the bottle upside down, pour water - and the seedlings are provided with moisture during your absence. A similar garden made from plastic bottles (photo confirms this) will significantly save your time and money.

Automatic watering "Aquasolo" - these are conical nozzles on a bottle with a thread that do not require wasting time on drilling slots, digging into the ground, and so on.

Anthurium with a convenient automatic watering system "Aquasolo"

Maximum space saving: plastic bottles suspended one above the other with a cut tube with water passing through them
- For the same seedlings, plastic bottles make excellent containers. After cutting the bottle in half and taking the bottom, pour the prepared substrate into it, plant the plants and place them on a shelf made of wooden planks. This design is also suitable for decorating your home with flowers.

Beautiful hanging pots made from plastic bottles will not only decorate the interior, but also make it unique

Excellent flowerpot made from a shampoo bottle with your own hands

Arrangement of compact placement of seedlings or small plants at the dacha
Bird feeder made from a plastic bottle
Some crafts made from plastic bottles for the garden amaze the owners with their ingenuity. By placing a bottle on a hose and making many holes in the bottom, you will get an excellent diffuser for watering your garden. From a five-liter container you can build an elegant lamp for the veranda, and a mineral water container is suitable as a bird feeder.

Bird feeder made of plastic container

A simple and convenient hose sprayer for garden watering
- Plastic bottles will help you save trees from pests. Cut the bottle lengthwise into two halves, fill it with a mixture that is attractive to pests and add insecticides, and bury it at the base of the trunk.
- From bottles you can make a magnificent decorative all-weather and all-season flower bed. Just paint the bottoms of the bottles in different colors and make a wonderful carpet out of them by sticking them open side into the ground. The carpet pattern can be pre-reproduced on paper.

Decorating flower beds with pet containers has become very popular
- One Brazilian engineer did the calculations and built a solar collector from plastic bottles. The structure can be placed on a summer cottage, connected to a storage tank, and you will always have a warm shower.

Construction of a solar collector made of plastic bottles

Automatic watering of seedlings and ornamental plants in your absence using a plastic bottle dug next to the roots with small holes drilled in the neck or cap

Cut plastic containers suspended one above the other are the fastest and most economical way out of a situation when you need to germinate a lot of seedlings in a limited space

Making an owl from a plastic bottle with your own hands

Vertical garden of bottles for germination and winter overexposure of plants - an opportunity to save space and provide good irrigation and drainage
Products made from plastic bottles: artistic masterpieces

Magnificent dandelions from pet containers will never cease to delight you and your guests
The imagination of folk craftsmen is so diverse that it leads to the appearance of outlandish animals, fairy tale and cartoon characters, exotic plants, and original thematic compositions in summer cottages.

We cover the bottom of a plastic bottle or cup with dry twigs and get an unusual candlestick, protected from the wind.

Rainbow decor for a garden, workshop, garage: a fountain of spirals cut from multi-colored plastic bottles

Plastic bottles are used not only to decorate the garden, but also to decorate the home.
Country crafts from plastic bottles:
If you have a small pond on your site, you can decorate it with a plastic palm tree. It's not at all difficult to make. You will need:
- 10-15 brown plastic bottles (for the palm trunk);
- 5-6 green bottles (preferably long);
- iron or willow rod;
- an awl or drill for making holes;
- sharp knife or scissors for cutting bottles.

A palm tree made from plastic bottles looks very beautiful
Now let's start making the decoration.
- Cut all the brown bottles in half. We take the lower parts and use an awl to make holes in the bottom of each of them, equal in size to the diameter of the rod.
Advice! You can also take the tops of the bottles, then you won’t have to make additional holes.
- For green bottles, cut off the bottom by about 1 cm. Leave one of the blanks with a neck, cut it off for the rest to make a loop.
- Carefully cut the green bottles lengthwise into three equal parts up to the loop.
- Cut all the brown bottles in half. We take the lower parts and use an awl to make holes in the bottom of each of them, equal in size to the diameter of the rod.

Making palm leaves


Connection of trunk and leaves

Assembling a palm tree from plastic bottles
Using several rods of different lengths, you can create a real oasis. As you can see, making garden crafts from plastic bottles with your own hands is not so difficult; the main thing is to find a sufficient amount of material and take one of the proposed ideas as a basis.

Part 1

Step-by-step guide: making fabric pots on bases from plastic bottles. Part 2

Hedgehog from a plastic bottle and twine rope: growing seedlings and small creeping plants
Crafts for the garden from plastic bottle caps

You can create real masterpieces from plastic lids
Don't throw away bottle caps. Decorative crafts made from caps from plastic bottles for the cottage and garden can also be beautifully integrated into its landscape. They will serve as an excellent mosaic material for decorating fences and walls of a country house.

Bright compositions made from plastic lids will help make your landscape design more fun.
Video master class (from plastic bottles of standard capacity):

A path made of plastic covers is not only economical, but also very beautiful

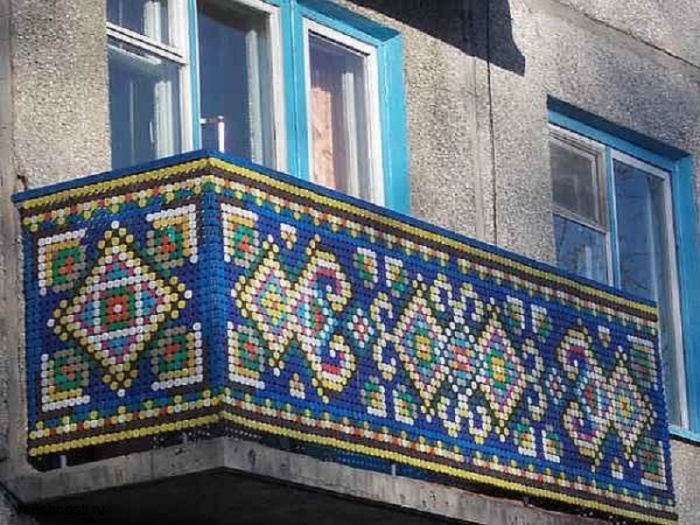
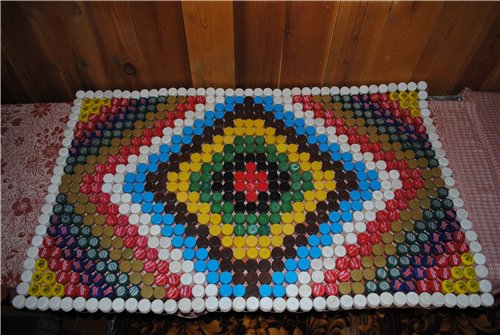
Large-scale red and blue mosaic of caps of different sizes
Having tinkered a little with the pattern, painted and drilled holes in the sides of the covers, you can use them to assemble a curtain for the door. An excellent option for protection against insects!
The lids can be turned into a beautiful tabletop or a practical doormat. Use them for decorative finishing of the interior space.

Gorgeous door curtains made from plastic covers

Carport that diffuses sunlight

Beautiful lanterns in Hawaiian style
Before starting work, remove the labels from the bottles and wash the container thoroughly.
For stability of vertical structures, fill the bottles with sand or small pebbles.

Dragonflies made from corrugated plastic bottles

An ingenious device for collecting fruit from trees

Hanging pots made from pet containers with images of animals will fit perfectly into the interior of a children's room
Choose plastic bottles of different softness for crafts. For example, for the body of a dog or elephant, take a strong base, but for the ears it is better to use softer plastic.
Master class from plastic bottles (step by step):


Crafts made from plastic bottle caps. What can be made from plastic bottle caps? Plastic bottles are a familiar material, and you won’t surprise anyone with crafts made from them. Another thing is the caps, which many people unknowingly throw away along with the bottles. But you can make so many useful and interesting crafts from them, including mosaics, refrigerator magnets, wall panels and massage mats! Plastic cork magnets You will need: Lids; Small magnets; Glue or double-sided tape; Medical alcohol; Markers. Instructions: Degrease the plastic cover with medical alcohol, glue a magnet inside. On the front side, draw a funny face. If you glue special decorative elements with a moving bead in a plastic shell to the lid, the eyes in the image will turn out to be more alive. Mosaic made from plastic corks: manufacturing rules Greater skill requires a mosaic made from plastic corks, which can be either an independent craft or a decorative element. Thanks to the strength of the material, you can decorate your garden patio or the facade of your house with this product. During manufacturing, the covers are fastened together using a special glue for gluing polyethylene BF-2 or BF-4. For more complex drawings, it is worth making markings on a primed sheet of plywood in advance, and then using acrylic paints to draw the desired figure. When the paint has dried, you can begin gluing the corks using a glue gun. To make a cork mosaic you will need a large amount of material of different colors and some drawing skills. If you decide to make a mosaic on the surface of the wall, the technology for its implementation is somewhat different. First you need to choose a pattern or design that will be applied to the surface of the wall. After selecting a surface, it needs to be marked. When marking, place marks at the height and width of the pattern. It is also necessary to divide the proposed wall into equal squares - this will help control the shape of the pattern and design. Additionally, you can mark the colors of the plugs that will be attached in the marked squares. After applying the markings, you can begin placing the plugs. You can nail the plugs to the wall with the front or the inside. If you decide to attach the plugs with the front side, you will encounter difficulty in cleaning the wall surface, since debris and dust will collect in the plugs. Fastening with the inside is convenient because after work you can mask the mosaic seams using cement-sand mortar. If the wall on which you plan to lay the mosaic is concrete or brick, it is recommended to use special compounds for fastening. The wall surface is plastered at the same time as the covers are applied. After completing the mosaic, wait until it dries, then you can eliminate any defects. Nailing is considered the optimal method of attachment to wooden structures. You can use self-tapping screws or regular nails. How to make a rug from plastic bottle caps? You can make a massage mat from corks quite quickly. The finished product looks beautiful, especially if you use multi-colored lids. You can get a lot of benefits from a lid massage mat. Firstly, it is wonderfully relaxing. Secondly, doctors advise walking on such mats every day for about 10 - 15 minutes. It improves health. The effect of a massage mat made from lids is explained by the fact that the feet have a large number of sensitive nerve endings that are responsible for different organs and systems of the body. During the massage, the whole body is charged. You will need: Plastic bottle caps; Awl; Thick and durable line. Instructions: There should be approximately 10 - 15 caps on each side of the hexagonal mat. To correctly calculate their number, you need to multiply the number of caps on the 1st side by the number of sides and subtract the number of caps that are repeated. When you have collected the required number of parts, pierce six holes in each lid with an awl. All the extreme ones are collected on 1 strong fishing line. Then, the lids must be braided with a piece of fishing line so that they hold tightly. Thus, assemble the blanks into a hexagon, securing with fishing line. To make the massage mat beautiful, use multi-colored covers and lay out a specific pattern. You can design it in advance, and then just start assembling it.
Metal caps from bottles of beer, mineral water and carbonated drinks are an excellent material for crafts and decoration of various surfaces. A number of features make them a more convenient, beautiful and versatile creative material than plastic lids. Firstly, the metal can be bent, curved and used with a soldering iron, and secondly, the corrugated edges of the lid themselves look very interesting. We offer some interesting ideas on what crafts you can make from bottle caps for your interior.
Methods of decorating surfaces with lids
If you have managed to collect dozens or even hundreds of metal lids, pay attention to this project - inlaying any surface. You can decorate with lids an old coffee table or bedside table, a tray or drawer for things, a tabletop of a dining table or kitchen, the surface of a chest of drawers or a closet, even lay out a mosaic of lids on a wall or floor! The result may exceed all expectations!
The appearance of the finished inlaid surface depends on the chosen method of attaching the lids, as well as on the color scheme and laid out pattern. Let's look at the main ways to decorate surfaces with metal bottle caps.
Place on glue
The most obvious and frequently used method is to attach the lids to glue or liquid nails. With this method, the caps protrude above the main surface, creating a voluminous corrugated pattern. For gluing, use high-quality thick glue, liquid nails or polyurethane foam. Make sure that the adhesive mass does not protrude beyond the edges of the caps and at the same time securely fixes each one. If desired, the entire surface can then be covered with varnish.

In terms of the design of the surface inlaid with lids, you can completely trust your imagination. No rules or restrictions. Try using original caps with the names of drinks, spray painting them in a specific color, or manually applying a design with acrylic paints. You can also lay out any pattern, ornament or image from the caps, like a mosaic. On a large scale, such decor with metal lids will look very impressive!

The adhesive gluing method is used for decorative tables, mirror frames, furniture walls, that is, for surfaces that will not be used frequently, such as dining tables or floors. For them, it is better to choose the second method, which will be discussed below.
Place on glue and rub seams
If you want to decorate the tabletop of a dining or work table, the floor or the “apron” above the working kitchen area with lids, then it is advisable to fill the space between the lids with grout to prevent the accumulation of dust, grease and dirt. To do this, glue the lids in the same way in the chosen order, let the glue dry and then fill the space between the lids with grout or primer using a rubber spatula. It is very important to keep the caps of the lids clean, so at the same time as grouting, clean the lids with a damp sponge.


There are options when cement mortar is used to lay the caps on the floor area. While the poured cement has not yet completely dried, the caps are carefully pressed into the solution. This method is quite labor-intensive, requiring you to act quickly with a confident hand and without hesitation. After complete drying, the surface is varnished.

Fill with epoxy resin (acrylic water)
This method is suitable for surfaces with edges, such as a tray, drawer or countertop with a recess. Epoxy resin (acrylic water) can be used as a fixative and grout for the lids. Since this chemical solution is liquid, we need sides. Place the caps on the surface, and then fill the mosaic with epoxy mortar according to the instructions for it. It’s very convenient and quick, because you don’t need to glue each lid, or then rub the seams between them.

By the way, almost the same effect can be achieved if a sheet of glass is placed on top of the lids, this is especially true for countertops.

Nailing
The lids can simply be nailed to a wooden surface with small nails. The nail cap will spoil the design a little, but in principle it can become the highlight and unifying element of all the caps. As an option, the lids can be pre-painted in a single color, then the middle in the form of a nail head will look natural and harmonious. To bend the lid itself when driving a nail, place a piece of plywood and a nut of a suitable height under each.

Ways to connect caps together in crafts
Metal bottle caps can be used not only to decorate surfaces in the interior, but also to make individual crafts - decorations, magnets, coasters and toys. How to assemble the caps into a single structure?
Holes and wire
Use a thin nail or drill to make holes in the embossed sides, and then connect the caps to each other using wire or fishing line.

Soldering iron
You can use a soldering iron and solder to securely connect the caps.

Adhesive and fasteners
Some crafts, such as jewelry, require the use of special parts. They can either be soldered to the lid or glued with super glue suitable for metal surfaces.

Bend, bend, straighten
Unlike plastic ones, metal lids can be bent in half, bent into a spherical shape, or completely straightened with a hammer. It is easy to use these blanks to make decorations, costume jewelry, Christmas tree decorations and other decorative elements.


Decor and crafts from bottle caps
Now let's see what original crafts and decor can be made from the caps.
Tables


Chairs


Floor and walls


Other crafts made from bottle caps


Plastic bottles are a waste material, and you won’t surprise anyone with crafts made from them. But what about the caps of these same bottles? Usually, without thinking, we send them to a landfill, but in vain! Making original crafts from plastic bottle caps is both easy and interesting. And most importantly - no costs. Well, maybe glue or screws.
At first glance, it may seem that it will not be possible to make any large-scale products from plastic corks, since there is nowhere to get them. But this opinion is wrong! If you set out to collect a lot of caps, involve your friends and acquaintances, then in a month you will be able to fill a bag with them.
What can you do with plastic caps? Anything from simple refrigerator magnets to large drawings, rugs and wall panels.
Simple and creative!
Do you want to decorate your refrigerator with an unusual magnet?
We will need:
- caps;
- small magnets;
- glue;
- markers.
We degrease the plastic lid, glue a magnet inside, and draw a funny face on its front side. You can make the eyes more “alive” by gluing special decorative elements with a moving bead in a plastic shell. That's all!
It’s also easy to make a stand for a sign with the guest’s name. To do this, attach five small ones in a circle to one large cap, and place the craft on a stand using wire twisted in a spiral and attached to the “core” of the flower.

Plastic fantasies
More skill requires drawings or mosaics made from plastic bottle caps, which can be either an independent craft or a decorative element. Thanks to the strength of this material, you can decorate your yard without fear, because plastic is not afraid of rain, frost, or snow. The technology remains the same: the caps are fastened together using glue (BF-2, BF-4).
You can make unusual pictures from the caps of plastic bottles by turning them over with the rim on the front side. In this case, it is better to fasten them with small screws, screwing the plug in the center to the surface.
For more complex drawings, it is worth making markings on a primed sheet of plywood in advance, and then using acrylic paints to draw the desired figure. After the paint has dried, start gluing the corks using a glue gun.
Make the head of the butterfly out of foam rubber, and screws can become the eyes. Ready!
Nowadays it is quite popular to do handicrafts. Thanks to imagination, accessible materials and skillful hands, folk craftsmen create amazing things. At the same time, you can make a thing that will decorate the decor or make it special from the most ordinary and unpredictable option. Let's take plastic bottles, for example. These are simply excellent raw materials; from them you can create a variety of crafts and useful things for the household. Elements of furniture, garden products, pots, feeders, decorative elements - this list can be continued for a very long time. And the main thing is that such production is waste-free. The entire bottle is used in its entirety. After all, traffic jams that seem unnecessary at first glance can be used to create beautiful pictures.
Pictures made from plastic bottle caps look original and beautiful. And the main thing is that anyone can create such a product from corks. How to do it? What is needed for the work? What examples of paintings are there on the Internet? This article will answer these questions and also help you do it yourself.
Advantages of plastic stoppers
We can say that this is simply the ideal raw material for work. For many years this method has been popular and decorates the homes and gardens of many residents. What are the advantages of using plastic stoppers?

Indeed, the material has a lot of advantages. This is why corks are so popular in art. The good news is that everyone can start creating. All you need is desire, a clear pattern of the design and a large number of multi-colored corks. Let's look at some techniques for creating cork paintings.
Mosaic of traffic jams
The main challenge in creating cork paintings is finding the right amount of material. Sometimes it is possible to collect a lot of corks within a few months. That is why it is recommended to involve your friends and acquaintances in the search. Then everything will be much faster. This is especially important when it comes to large mosaics. Often compositions are made specifically as room decoration. This could be an old hut or agricultural buildings. You don’t see this kind of finish very often, but it all looks very nice. You can see this in the photo below.
To create a similar picture on the walls, you cannot do without a detailed diagram. After all, you can’t just create an image by eye. If we are talking about beginners, then it is recommended for them to first choose simple schemes in order to master the technique and “get better.” At the same time, you don’t need to immediately take on larger sizes. It is enough to start with a small mosaic that is easy to make. Here is an example of such a simple scheme.
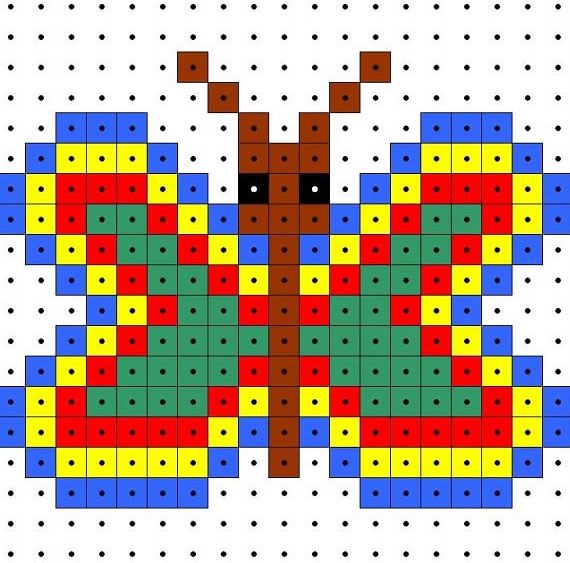
Having done it, you can start creating new drawings. If you have a printer, then just print out one of the diagrams and get to work. It is clear that there are not many similar schemes for paintings on the Internet. But you can print any other one to create a semblance of a picture. Having studied one technique, you can move on to another. After creating a simple mosaic from bottle caps, you can take on a new one, more complex and larger.

There are several directions for making mosaics. It all depends on the location of the pattern and the method of its formation. Mosaic from corks is made as a panel or as an independent pattern that is not attached to the surface. To create a mosaic of corks, there are several main stages of work, which can be divided as follows:
- To begin with, a detailed diagram is applied to cardboard or paper, which is used as a guide in the work. By the way, there is one trick: you can use ready-made cross stitch options as a pattern.
- After which the corks begin to be formed according to color, preparing for work.
- That's all, all that remains is to place the plugs in their places, fixing them to each other with glue, which is intended for this purpose.
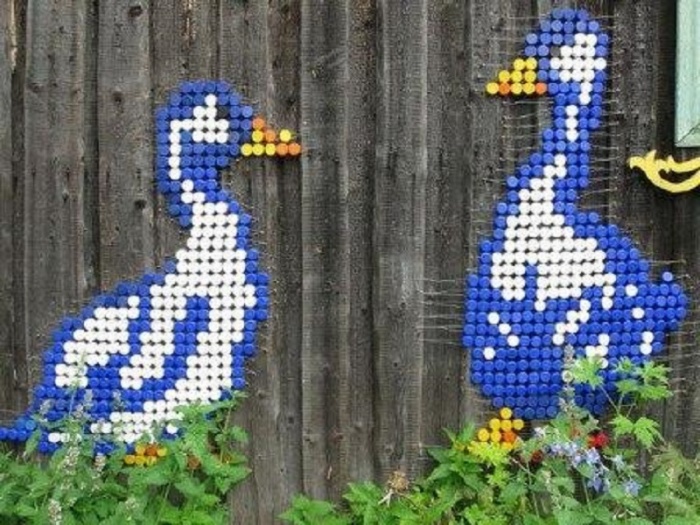
Interestingly, this technique is not used often. Many people believe that it is much more practical to fix the plugs immediately on the surface that is planned to be processed. One of the options for implementing a mosaic is to make it on a wooden fence. It is considered an ideal surface for such tasks. You can work directly on the fence, or first make a picture on wooden plywood and then place it on the fence. As an option, simply install a picture with a drawing on the site.
Note! Residents of apartments in multi-storey buildings often adopt similar tricks, thereby decorating their balconies. A pretty good method to make it original and highlight it against the general gray background.
However, cork mosaics have gained the greatest popularity for decorating a summer cottage. The decoration method is very simple, fast, cheap, original and beautiful. Just right for a dacha. The drawings are made in different ways. Some can serve as an ornament and be repeated at intervals, while others are full-fledged designs. If we talk about the fence, there is another option for fixing the mosaic:
- Pictures made from plastic bottle caps, namely diagrams, can be made on cardboard or directly transferred to the fence. To give the painting a deeper look and brightness, the outlines are applied with colored paint that will match the palette of the image;
- The corks are sorted by color and secured with nails. Their length is selected taking into account the height of the plugs and the thickness of the fence or plywood;
- Parts can be fixed both internally and externally. It all depends on the desired result.

Advice! If you have chosen the option of fixing the plugs with the bottom to the surface, then you need to be prepared for the fact that the recesses between them and inside them may become clogged. And this will ruin the whole surroundings. Therefore, from time to time you will need to clean the surface with water from a hose. Otherwise, it is better to fix them with the bottom up.
Cork rugs
Another popular option for using corks is to create rugs with different images or patterns. This invention is not only practical, as it can be used on the farm, but also useful. They can massage tired legs or back, relieve muscle tension and relax the body. Few people know that the feet contain unequal endings that are connected to all internal organs.

If this idea of creation interests you, then the work will require very little material, time and effort. The process is as follows:

A visual video will help you see exactly how to do all the work. It clearly shows exactly how to implement the idea of a cork rug with a specific pattern.
Note! Garden paths made from cork can be similar to this. Look at the photo how original it looks.

Let's sum it up
As you can see, plastic bottle caps are a universal material that can be used to decorate your dacha, apartment or house. There are a lot of options for using a roof. This could be a mosaic on the walls or fence, beautiful paths made from plastic bottle caps leading to the garden or to the gazebo, rugs for the feet, back or hallway. But that's not all. Some even create incredible paintings from lids that they simply hang on the wall. The creation technology is practically the same. The same scheme is taken as a basis, and the plugs are fixed in place. You can see similar products in these photos.


