Angels made of fabric. DIY angels made from different materials. From egg packaging
Alla Ivanovna Kogotkova
During production folk doll, put on folk costume: dress, sundress, scarf on shoulders. Light a candle - it will be "clean" space. A sheet of paper and a pen to write down thoughts that came to you while working.
Helpful advice: It turns out very beautifully if you trim the edges along the edge of the flap with curly scissors - it will look like feathers on wings Angela.
Materials for angel dolls:
Two square pieces of organza (or any other fabrics) size 1515cm
A piece of cotton wool to fill the head
Beige floss thread in several strands (15 cm and 25 cm)
Iris or cotton thread No. 10 (20 cm.)
A toothpick or a stick with a sharp edge for threading threads
Scissors for cutting threads, but instead of cutting the threads, you can burn them on a candle flame.
Step-by-step instruction
Materials

First step. We place a cotton ball in the middle of the shred, then with both hands we collect it from all sides fabric and make a neck.

Second step. We wind the neck in one direction with the working thread. Hold the short part of the “tail” with your thumb and middle finger.

Third step. Take the second square piece and fold it diagonally. These will be the wings.

Fourth step. We collect a fold in the middle of the triangle and wrap it several times with thread.

Fifth step. The doll has its back to you. We hold the wings with the index finger and thumb of the left hand. We hold the working thread with our right hand and wind the thread under the right wing 4 times, then under the left wing 4 times, cross to cross.


Sixth step We connect the working thread with "tail" knotted at the back at the waist. We carefully hide the ends with a toothpick.

Seventh step. We tie a belt at the waist under the wings.

Eighth step. Take a thread of the required length and tie a knot on it, forming a loop. We put the loop on the wings, to do this we fold it perpendicular to the back. We release the loop down a pair of wings to the place where they connect to the back and tighten.

Angel is ready!

Take it in your hands. Feel its warmth. You will feel how you are filled with SOIL, JOY AND HAPPINESS.
LET YOUR AN ANGEL WILL GIVE YOU A MIRACLE!

Publications on the topic:
This is the Angel of Good we made with our grandson Radomir for our great-grandmother Valya for the day of an elderly person! I present to you a master class.
My children and I made guardian angels for our family and friends for the New Year. But, upon reflection, we decided that this craft is universal:
To make this craft I needed popsicle sticks. Required materials: ice cream sticks, PVA glue, white gouache.
Folk dolls were made from different materials: grass, straw, bast, twigs, sticks, and, of course, from scraps of old worn clothes.
The theme of the week was “My Ugra, my planet” in the kindergarten. I had a conversation with the children about the life, everyday life, and toys of the indigenous people of the Khanty people.
Spring is coming, and with it the brightest and most beloved holiday comes to our home - Easter. On this day all believers celebrate.
Voyakina N.D. Goals: 1. Expand teachers’ knowledge about Russian folk dolls, methods of making Kuvatka dolls. 2. Introduce teachers.
simplest DIY fabric angel created from a handkerchief or a piece of burlap, and is called a primitive. More complex figures are made using soft toy technology from full-fledged patterns. Knowing the principles of sewing souvenir angels, you can fantasize with patterns, decorate products with beads, decorative thread and rhinestones.
Methods for making textile angels
A primitive angel can be made on its own in a couple of minutes if you have a piece of fabric and filler material. Soft toys require more time, more painstaking work and special skills.
Primitive Angels
A budget option for a festive angel figurine are primitives. They got their name for the following reasons:
- waste from fabric cutting is used
- simple manufacturing methods are used
- the shape of the dolls turns out to be primitive, only the general appearance of a recognizable character is outlined
- workpiece– a square piece of 20 x 20 cm of textile (poplin, organza, tulle, linen, burlap, matting) for the body, 15 x 15 cm for the wings and knitting thread (best of all, with lurex, acrylic)

- edge decoration– 1 – 2 cm around the perimeter must be “swept” by extending the longitudinal wefts of the textile

- head– cotton wool or padding polyester rolled into a ball is placed in the center of the square (can be wrapped with thread), textiles are rolled diagonally

- neck– formed with a thread below the head, the “face” needs to be straightened, folds can be made on the sides to more clearly outline the contours of the face

- hands– the edge is bent inward by 2–3 cm, folded into an envelope, tied with thread, as in the bottom picture, the second brush is formed in a similar way

- wings– a small square is folded diagonally, then into an “accordion”, which is tied with a thread to the angel’s back with the long part of the accordion, as in the photo

The last operation is the most difficult; when attaching the wings to the body of the toy, it is necessary to gather it into a bun. Three turns obliquely are enough for normal fixation; the thread passes through the left shoulder under the right arm, then over the right shoulder and below the left arm.

Attention: The cross is made on the chest, the knot is tied on the back of the doll in the form of a loop for hanging the angel.

For the category of craftsmen who prefer sewing to the knitting technique, angels made of matting or burlap stuffed with soft material are more suitable. In this primitive, “recognizability” of the character’s appearance is achieved due to the shape of the blanks:
- piriform body
- round head
- graceful little wings
This option can be classified as soft pillows, toys, pendants and primitives at the same time. If necessary, angels can be hung on a Christmas tree, in the car interior, on windows and in any other convenient place.
Stuffed Toys
Depending on your drawing skills, patterns for soft toys in the shape of cute angels can be made in several ways. The main task of the master is how to make the figures recognizable; it is solved using the following methods:
- required attributes– the figurine may be completely shapeless, but if it has wings, a star and a halo, one can recognize it as an angel
- motion simulation– by giving the doll’s body an arc shape and sharpening the edges of the workpiece, you can ensure the swiftness and airiness of the craft, evoking associations with an angel on a subconscious level
- similarity of outlines– legs, torso, wings and arms are created from separate patterns, the figure is complemented by a star or halo, special symbols embroidered on the torso
By default, angels have miniature sizes for easy placement on key rings, inside car interiors, and on the branches of New Year trees. Therefore, simple pattern outlines for small thread stitches are preferable.
Pendants
The easiest way to sew a doll is with “humanized” contours, in which it is easy to identify an angel by the wings on the back.

Master Class for the manufacture of a primitive suspension looks like this:
- cut– 2 “head” parts, 2 “torso-dress” parts, 2 “wings” parts
- suspension– a fabric loop is sewn to one part of the “head” from the inside
- sewing– each “head” piece is sewn to the “torso” element with a transverse purl seam, then the halves are stitched to each other and turned right side out, a hole should be left in the lower part of the doll for filling the figure

- stuffing– made with padding polyester, foam rubber or cotton wool, the hole is sewn up with 1 – 2 stitches

12. Padding
- hair– can be made from threads, cotton wool, and other materials suitable for texture, gluing them in the form of a hairstyle

13. Hair, face and wings
- face– decorated with markers, paint or pencils
- wings– toys are attached to the back
- bow– pinned with a pin or sewn on with thread, decorated with rhinestones and beads on the figurine’s belly
Using this method, in a day you can build up to two dozen Christmas tree decorations with your own hands from the remaining textile scraps and scraps.
flying
An alternative to the previous “fat ones” are “floating” New Year’s angels made of light flannel. Their recognizable shape was made popular by author Sylvia Sartorio:
- the body is curved in the lower back
- arms spread apart at approximately 45 degrees
- the doll has no neck, but has a stylish hairstyle and beady eyes
- wings of equal length with arms are decorated with embroidery or rhinestones

- cutting and preparation of parts– the torso with the head, legs, arms and wings are sewn separately
- assembly– all elements are stuffed with soft material and sewn to each other, as in the bottom photo

15. Patterns
Following these principles for making soft toys, you can modify the shape and size of the patterns, use additional elements, and experiment with materials.
From a simple pattern
Do-it-yourself elegant Christmas angels are made from bright fabric using a very simple pattern:
- torso– a conical cap, the development of which can be made without special education
- stub– installed in the lower part of the cap so that the stuffing material does not fall out of it, the figurine has greater stability
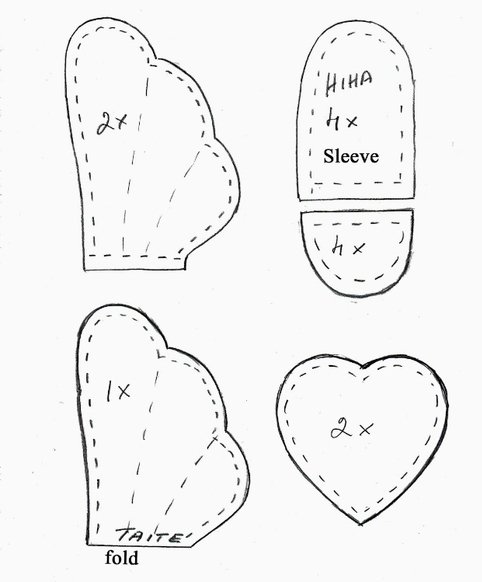
- wings– sewn from 2 parts of the same size in the shape of a heart

16. Step-by-step production
To assemble a funny figurine from fabric with your own hands, you need to follow these steps:
- the tip of the textile cone is wrapped with the seam facing outward, grabbed to the doll’s body with a stitch of thread, these will be the lowered hands of an angel, into which you can “put” (sew from below) a bell, a horseshoe, a bead, or any other decorative little thing, as in the bottom photo
- in the place of the bend, a “head” made of a large bead or a part sewn from textiles is sewn onto the doll

The templates for this doll are given below; there are no problems with patterns and sewing, even with minimal skills in working with a needle. A master class on making an original primitive angel is given in detail in the video:
Thus, there are quite a lot of options for making a textile angel for Christmas, Valentine's Day, New Year and other holidays. This allows you to choose the best option taking into account specific conditions.
Thank you for your attention! Happy New Year, everyone!
In this article we will show you how to make an angel for Christmas or Angel Day. Not only a child, but also an adult can make a Christmas gift with their own hands - a small souvenir can be used as an addition to the main gift, purchased or made by yourself, or presented separately.
In this case, a figurine of an angel will be a win-win option for a craft, since it is angels that symbolize the Christmas holiday. A whole collection of angels can be made with small children.
Original angels for Christmas are made from a variety of materials - the more unexpected the solution is found, the more interesting the souvenir looks. The easiest way to create an angel is to make it in the form of an applique. Our angel will look very interesting with a halo made of fluffy wire and hair made of yellow yarn.

Christmas angel applique
Previously, we looked at how to make an angel from a shell. The basis is usually a cone, which turns into an impromptu dress. We make the head from a small wooden, foam or plastic ball. We suggest considering the following craft options:
Musical angel with wings made of music paper. Its body is made of thick white cloth or felt (you can also use white cardboard), and from white cloth we make a small hat for the head. Simple and very original.

Golden angel with openwork wings. We glue the cone-shaped body from thick white cardboard, and from it we cut out a flat head with a halo, which we fix on the body. Cover everything with golden paint. We cut out the wings from lace, tulle or other openwork fabric, starch them well and glue them to the body. The angel turns out to be strict and noble.

Watch how to make beautiful angels in the video:
Angel with notes in hands. To a cone-shaped paper or fabric body we glue a ball - a head and handles made from fabric rolled into a tube. We throw a thin transparent “shawl” over the “hangers” and secure it. We give the angel notes cut from a piece of a music book into the hands of the angel. We make the wings from gold braid, decorate the head with a wreath of golden tinsel, and place the same tinsel on the bottom of the dress.

Air angel. To create it, take a piece of white fur or felting yarn. We form a dense lump from them - the head and - a little lower - the body. From the remaining material we make airy wings and a dress. You can use white knitted laces as handles.

Burlap angel. We intercept a square piece of burlap in the center with a thick thread, and fill the resulting “bag” with cotton wool. This will be the head. On the sides of it we form two more balls - handles. We pull the edges of the fabric back - you get wings, and the rest of the fabric becomes a dress. We decorate the angel with a wreath and glue a small chintz heart onto the dress.

Such an angel can also be presented as a gift on Angel Day; Even a child can do it with his own hands.

Using the same principle, you can make an angel from white fabric, and make wings separately from lace.

Watch the video on how to make an angel out of fabric with your own hands:
But it’s quite difficult to assemble an angel from beads, but the end result will more than cover all the pain. For the body, you need to string white beads on a strong thread and, laying them in a circle in gradually decreasing rows, periodically intercept the rows with a thin thread. The wings are formed from a chain of golden beads; For convenience, you can string them on a thin wire. The halo and hands of the angel are made from golden beads, and we use a large mother-of-pearl bead as the head.

No less beautiful angels are made from white fabric, decorated with original wings - for example, made from white feathers.

You can make angels entirely out of white lace by forming it into a cone or cutting out two halves of the dress.

Charming Christmas angels are made from paper napkins and large beads.

And even knitting yarn can be turned into an angel by shaping it into a body, head and arms and gluing on wings.

Angels made from embossed paper also look very beautiful. The body and arms are made in the form of cones, the wings are cut out separately. You can use a large bead as a head.

Angel made of embossed paper
A very interesting and simple idea - an angel made of paper and light transparent fabric. We cut out two silhouettes of an angel from paper and glue them to each other, gluing a wooden stick between the blanks. Glue on the angel a skirt made of light fabric. We close the upper part of the skirt with a delicate ribbon. All that remains is to decorate our angel festively. Sprinkle it with glitter and glue on delicate shiny sequins.

And the angels made of soft cloth, with hairs made of holofiber or felting yarn, look very homely and very touching. The main decorations of such figurines are golden satin wings and a wreath made of gold braid.

Here are just a few examples of how to make an angel for Christmas from a variety of materials. Inspired by the images they see, everyone can create their own, unique, charming angel.
You can draw a gentle funny angel

You can decorate a Christmas card with this angel.


Wrap yourself up in a warm blanket, watch your favorite New Year's movie, drink hot tea and admire an artfully decorated Christmas tree... What could be better than a winter weekend like this? And to make your New Year tree look even more attractive, decorate it with homemade angel pendants.

To make a Christmas angel, you will need:
- linen, calico or burlap,
- hair yarn,
- sewing threads,
- glue "Moment"
- needle and scissors,
- lace,
- halofiber,
- ribbons, beads, sequins for decoration (optional).
1. Print and cut out angel and heart pattern.

2. Transfer the patterns of the parts onto the fabric. Wings, legs and hands You can make it from other types and colors of fabric - choose soft and durable ones.

3. Sew the individual parts of the angel from the inside out, leaving a hole for the filling, and turn the fabric inside out. Fill the angel's head, torso, legs (not completely), arms and heart with halofiber. Sew up the holes.


4. Sew the head, body and legs of the angel. Sew lace to the dress. Put the dress on the pendant and tie it around the neck with a thread - this will be a collar.

Sew on your hands. Let the cuffs also be lace.

5. Make a wave out of the yarn and stitch in the middle using a sewing machine.

Using Moment glue, glue the yarn to the angel's head.
6. Use threads to sew up the mouth and eyes.

7. If desired, decorate the angel with beads, sequins, beads, and attach a bow to her hair.
Making crafts for the New Year with your own hands is pleasant and fun. Look, we have already prepared your main character - the Christmas angel.

And here is another pattern for a Christmas angel - made from burlap.


My friend, do you like making things with your own hands? Make such a handsome man for the New Year and give your family a great mood for all the winter holidays.
Master class on making crafts from fabric and cardboard with your own hands "Christmas Angel"
Lakhno Olga, studying at the Oryol boarding school, 12 years old.Supervisor: Miroshnikova Tatyana Viktorovna, teacher of the State Educational Institution RO Orel boarding school, Orlovsky village, Rostov region.
Description: This master class is intended for children in primary school (grades 3-4) and older, who like to create something with their own hands, for additional education teachers, educators, primary school teachers, and parents.
Purpose: The craft can be used as a figurine, as a Christmas gift, or as a Christmas tree decoration.
Target: Make a Christmas Angel craft with your own hands.
Tasks:
- Practice making cones from thick paper and cardboard, learn to make a simple pattern on fabric and cut fabric, work with scissors and Dragon glue, learn to make pom-poms from wool threads;
- Develop creative imagination, aesthetic taste, attention, eye and accuracy;
- Cultivate patience and perseverance.
We invite YOU, dear adults and children, to join us and create a Christmas craft with your own hands.
We will need tools: Regular and manicure scissors, pencil, felt-tip pens, compass, needle with a large eye.
Necessary materials:“Dragon” glue, yellow knitting threads, white non-flowing fabric, golden and pale pink cardboard, thick white paper, “rain” thread.

New Year's Eve
You just have to believe
You will see in the sky
Angels flight.
The moon will illuminate them,
And obedient children
Fairytale parable
The angel will bring it. (Author unknown)

Our Lord Jesus Christ, the Savior of the world, was born of the Blessed Virgin Mary in the city of Bethlehem.
“I see a strange and glorious sacrament,” the Holy Church sings with surprise, “Heaven is a den; Throne of Cherubim - Virgo; The manger is a container, and in them reclines the incontainable Christ God” (irmos of the 9th song of the canon). The Most Holy Virgin, who painlessly gave birth to the Infant God, Herself, without outside help, “took Him and laid Him in a manger.”
In the midst of midnight silence, when all humanity was enveloped in the deepest sleep, the news of the Nativity of the Savior of the world was heard by shepherds who were on night watch over their flock. An Angel of the Lord appeared to them and said: “Do not be afraid: for great joy is brought to you, which will be to all people, because today a Savior has been born to you, who is Christ the Lord.” And the humble shepherds were the first to be honored to bow down to the Descendant for the salvation of people. In addition to the angelic good news to the Bethlehem shepherds, the Nativity of Christ was also announced by a miraculous star to the sorcerers “star-speakers,” and in the person of the eastern sages, the entire pagan world, invisible to itself, bowed its knees before the true Savior of the world, the God-man. Entering the cave where the Child was, the Magi knelt down and bowed to Him, and presented their treasures, the gifts they had brought to Him: gold and frankincense and myrrh.

According to Christian teaching, all angels are ministering spirits. They were created by God before the creation of the material world, over which they have significant power. There are significantly more of them than all people. The purpose of angels is to glorify God, to embody His glory, to direct and embody grace for the glory of God (therefore they are a great help to those who are being saved), their destiny is to glorify God and fulfill His instructions and will. Angels, just like people, have a mind, and their mind is much more perfect than a human one. Angels are eternal. Most often, angels are depicted as beardless young men, in light deacon vestments (a symbol of service), with wings behind their backs (a symbol of speed) and with a halo above their heads.
In the angelic world, God established a strict hierarchy of 9 angelic ranks: Seraphim, Cherubim, Thrones, Dominions, Powers, Powers, Principalities, Archangels, Angels.

An angel flew across the midnight sky,
And he sang a quiet song,
And the month, and the stars, and the clouds in a crowd
Listen to that holy song.
He sang about the bliss of sinless spirits
Under the bushes of the Gardens of Eden,
He sang about the great God, and praise
His was unfeigned...
Lermontov M. Yu.
Step-by-step work:
1. On a sheet of white thick paper, draw a circle with a diameter of 20 centimeters.
Fold it in half and in half again.

Cut into four parts. We twist the quarter into a cone (“ball”). This is easy to do if you first stretch the part, pressing it against the edge of the table and scrolling it in a circle.

We apply glue along the edge of the part with a “thin thread” and hold it there a little. Glue the workpiece together, placing a pencil under the seam for a tighter compression. We get a cone.

2. Draw hands and a face on pale pink cardboard. I used pantyhose packaging. Pale pink cardstock can be made by painting white cardstock a soft pink color.
The position of the hands should be similar to when a person plays the pipe. The length of the arms is approximately half the length of the cone.

3. On scraps of white paper, draw a circle with a diameter of 5 centimeters. Inside it we draw another circle with a diameter of 1.5 centimeters. Cut out two rings with a hole in the middle.

7. Make a pompom from yellow knitting threads. We thread a thread approximately 1.5 meters long into the needle. The density of the pompom depends on the length of the thread. Holding the end of the thread on the ring, we wrap it around it twice, thus securing the end. We continue to twist in a circle until we fill the entire ring evenly and the thread runs out.


Carefully cut the threads along the outer edge of the ring.
Slightly move the rings apart and put another 10 centimeter long thread between them. Having twisted it tightly around the pom pom, tie it into two knots and cut the ends to the length of the pom pom threads. Remove the rings and straighten the pompom.


We move the pompom threads apart and find the place where they meet. Drop a drop of glue into the recess and insert the cone into it. Let it dry. We trim the resulting head for the Angel - we cut off the strongly protruding threads.

On the pompom we determine a place for the face, move the threads apart, drip glue into that place, wait a little, and then glue the face. We apply a little glue to the forehead, wait, and then bend a few threads from the hair - we get bangs.

4. From a piece of fabric we cut out a dress for the Angel according to the quarter of the paper circle we have.
Folding the dress in half, cut out the neckline, going 1 centimeter deep from the top.

We cut the dress folded in half from the neck down 1 centimeter, moving slightly from the middle of the neck arc closer to the fold line. These are the slots for the hands.
The hands can also be glued on top of the fabric without cuts, if it is not dense and can become saturated with glue.

5. Fold a piece of fabric measuring 6 by 8 centimeters in half, draw a wing-shaped sleeve on it, and cut it out. We cut out the second sleeve in the same way. The length of the sleeve should be equal to the length of the arm with the hand. We connect the edges of the sleeves by dropping small drops of glue on them, leaving openings for the arms.

6. Apply a little glue to the neckline, glue the dress around the cone, lifting the Angel’s hair. Apply glue to the floor of the dress with a thin thread or small, frequent droplets. We put the second floor on top. This joint should be at the back.

We insert the shoulders of the arms into the slits, smear them with glue from the inside and wait a little, press them in such a position as if an Angel was holding a pipe. We drip a drop of glue onto the shoulder, put the sleeve on the arm and glue it to the shoulder, let it dry.
At the point where the elbow is bent, make a fold on the sleeve. If the sleeve straightens, glue the sleeve on the inside at the place of the wrist.


7. Making a pipe. We used the glitter cardstock from the pantyhose packaging. Draw a circle with a diameter of 6 centimeters, cut it out, divide it into four parts. We press each part against the edge of the table, making a rotating movement. We layer the cardboard so that it is not so thick. If you don't have such cardboard, use foil.

It is important that the pipe shines on both sides, so we glue two quarters together and let them dry. We twist the cone, glue the edges, bringing them well together.

8. Draw the details of Angel’s face. You can do this earlier, but then it is important not to smudge the felt-tip pen. Glue the pipe by dripping glue onto the mouth and hands.

As an option, you can make an Angel with outstretched arms.

9. Draw the wings on white paper, draw the feathers. We did not make any cuts: solid wings seemed more delicate to us. I didn't like the tests with fluff either.
Glue the wings to the back, placing one on top of the other, giving the desired position.


10. We make the halo gold on both sides from the same gold cardboard. The diameter of the circles is 3.5 centimeters. We glue it on the head like we glued the face, only higher.


