Paper movable dolls - clowns, bunnies, dogs and more. Twitch toy "running dog"
Cardboard twitch toy: an easy way to make.
Twitch toys have been known since ancient times. These mechanical figures of people or animals, which, thanks to a simple articulated mechanism, have funny jerking arms, legs or paws, have always enjoyed special love among kids.
Initially, jerks were made of wood, in Rus' they were called "dancers". Subsequently, the manufacturing technology was greatly simplified due to the use of paper and cardboard. With the advent of color printing, twitch patterns drawn by artists began to be published in magazines, which made it possible for everyone to make colorful toys. Well, the Internet has made the possibilities for creating various twitchers almost limitless. I invite you to make with me a mechanical toy made of cardboard in the form of the famous fairy-tale hero - Puss in Boots, using ready-made templates. And at the end of the master class, another version of the twitch awaits you - the Monkey.

Master class: cardboard toy "Puss in Boots"
Materials and tools:
Sheets of A4 office paper (for printing templates);
- packaging microcorrugated cardboard (1.5 mm thick) or cardboard for children's creativity;
- a sheet of thick white A4 paper;
- standard (clerical) knife;
- scissors;
- awl;
- paracord (4 mm in diameter) or other fasteners;
- kapron thread, narrow ribbon;
- glue stick;
- glue "Moment Crystal";
- double sided tape.
So, we start with the preparation of cardboard parts for the base of the twitch toy.
We print contour templates on office paper. Cut them out with small allowances.
We stick pieces of double-sided tape on the wrong side and glue the templates to the wrong side of the cardboard.

In this case, microcorrugated cardboard with a thickness of 1.5 mm is used. But now I want to draw your attention: the contours of the parts here are quite curly, with small elements, so it can be difficult to cut out of microcorrugated cardboard out of habit. And here you can go two ways:
1. neglect small elements and smooth out the contours when cutting;
2. use thin cardboard (for example, cardboard for children's art; for greater rigidity, you can make 2 layers); the toy in this case will also be quite functional, below you will see an example of such a performance of a twitch.
Next, with an ordinary clerical knife, we cut out the details of the base. We immediately make holes for fasteners. I used a 4mm punch. If a punch is not available, you can cut holes with a knife or awl.
The diameter of the holes may differ from the original, depending on what kind of fasteners you will use.

On thick white paper (on the front side) we print out color templates of Puss in Boots. Cut out.

Alternatively, the cat can be colored with pencils or felt-tip pens along with the child. For this, a special set of templates is provided.
Using a glue stick, glue the colored parts onto the cardboard bases (on the front side of the cardboard).

We fold the paws in pairs (on top of each other). And with an awl we pierce small through holes on the upper edges, as shown in the photo. These holes will be used to control the paws.

For attaching the paws, a white paracord with a diameter of 4 mm is used here. Cut off 4 small pieces (the length is such that you can tie 2 knots).
We tie a tight knot at one end, melt the tip with a lighter. We pass the cord through the holes of the body and paws.

The legs should be under the body.

This is just one of many mounting options. For a movable fastening, you can use, for example, brads, buttons, wire, etc. - whatever you like best. The main thing is to make sure that the limbs of the twitch toy rotate freely in the same plane!
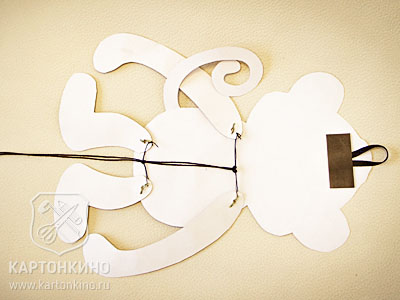
We proceed to the most important stage - the creation of a paw control mechanism. In fact, everything is extremely simple here. It is necessary to tie the paws in pairs with a nylon thread through small holes. With the thread stretched, the limbs should be in the lower position.

And now we tie a long thread (you can fold it in half) or a thin cord to the horizontal threads, both to the top and to the bottom, as shown in the photo.
We tie knots on the paracord from the wrong side of the toy. We check whether the paws rotate freely enough. We melt the ends of the cord.

We cut out 2 circles with a diameter of 2.5 cm from cardboard. If you are using microcorrugated cardboard, make a slit in the middle on the wrong side of one circle and place the end of the thread there.

We glue both circles with Moment Crystal glue.

Alternatively, instead of cardboard circles, you can attach a large bead - for convenience and beauty.
We glue a cardboard circle with a diameter of 3.5 cm to the head from the wrong side on a loop of a narrow ribbon. 
The cardboard twitch toy is ready!

Here is such a cheerful and agile puss in boots turned out. The kids will be delighted!


Actually, I don't really like jerks. But once I saw a picture from an old book, where there was a description of how to make a children's hanger - an Owl. She opened her eyes when clothes were hung on her. And I wanted to make such an owl-twitch.
Most of the time, this owl sleeps peacefully, but as soon as you pull the thread, it will open its eyes and flap its wings. And maybe even shout “Whoo!”.

Materials and tools:
Thick cardboard or packaging corrugated cardboard (boxes are made from it)
colored paper
Colored cardboard (yellow)
PVA glue
Scissors
Thick threads
Marker or marker
We cut out the body of an owl and two wings from cardboard (in mirror image).

Cover them with brown paper. Dry under pressure (put a heavy book on top). 


We glue the details of the head from colored paper, dry it.

Cut out a piece with pupils from yellow cardboard. We outline the location of the pupils and eyelids with a pencil.

Glue on it the lower eyelids of paper of the same color as around the eyes.

With an awl we pierce the shoulder and wing at the junction. It is convenient to do this on a hard rubber mat or on an unnecessary album (magazine).

We make a wing mount. You can use special scrapbooking clips, or make your own from a button and a piece of wire. We fasten the wings, they should move freely.

We stretch the first thread through the holes in the upper part of the wings and in the lower part of the part with the pupils. We stretch the second thread only through the holes in the lower part of the part with pupils.

We fasten the upper part of the part with the pupils with an elastic band. Securely sew it to the "ears" of the owl.

By adjusting the size and tension of the threads, you can tie them together. To the end of the thread we tie a button or a ball, for which we will pull.
With a black marker or felt-tip pen, draw feathers on the wings and finish drawing the eyes.


A4 pattern sheet.

Twitch toys have been known since ancient times. These mechanical figures of people or animals, which, thanks to a simple articulated mechanism, have funny jerking arms, legs or paws, have always enjoyed special love among kids.
Initially, jerks were made of wood, in Rus' they were called "dancers". Subsequently, the manufacturing technology was greatly simplified due to the use of paper and cardboard. With the advent of color printing, twitch patterns drawn by artists began to be published in magazines, which made it possible for everyone to make colorful toys.
Well, the Internet has made the possibilities for creating a variety of jerks almost limitless. :) I invite you to make together with me a mechanical toy made of cardboard in the form of the famous fairy-tale hero - Puss in Boots, according to ready-made templates. And at the end of the master class, another version of the twitch awaits you - the Monkey.
Master class: cardboard toy "Puss in Boots"
Materials and tools:
- sheets of A4 office paper (for printing templates);
- packaging microcorrugated cardboard (1.5 mm thick) or cardboard for children's creativity;
- a sheet of thick white paper A4;
- standard (clerical) knife;
- scissors;
- awl;
- paracord (4 mm in diameter) or other fasteners;
- kapron thread, narrow ribbon;
- glue stick;
- glue "Moment Crystal";
- double sided tape.
So, we start with the preparation of cardboard parts for the base of the twitch toy.
We print contour templates on office paper. Cut them out with small allowances.
We stick pieces of double-sided tape on the wrong side and glue the templates to the wrong side of the cardboard.

In this case, microcorrugated cardboard with a thickness of 1.5 mm is used. But now I want to draw your attention: the contours of the parts here are quite curly, with small elements, so it can be difficult to cut out of microcorrugated cardboard out of habit. And here you can go two ways:
1. neglect small elements and smooth out the contours when cutting;
2. use thin cardboard (for example, cardboard for children's art; for greater rigidity, you can make 2 layers); the toy in this case will also be quite functional, below you will see an example of such a performance of a twitch.
Next, with an ordinary clerical knife, we cut out the details of the base. We immediately make holes for fasteners. I used a 4mm punch. If a punch is not available, you can cut holes with a knife or awl.
The diameter of the holes may differ from the original, depending on what kind of fasteners you will use.

On thick white paper (on the front side) we print out color templates of Puss in Boots. Cut out.

Alternatively, the cat can be colored with pencils or felt-tip pens along with the child. For this, a special set of templates is provided.
Using a glue stick, glue the colored parts onto the cardboard bases (on the front side of the cardboard).

We fold the paws in pairs (on top of each other). And with an awl we pierce small through holes on the upper edges, as shown in the photo. These holes will be used to control the paws.

For attaching the paws, a white paracord with a diameter of 4 mm is used here. Cut off 4 small pieces (the length is such that you can tie 2 knots).
We tie a tight knot at one end, melt the tip with a lighter. We pass the cord through the holes of the body and paws.

The legs should be under the body.

This is just one of many mounting options. For a movable fastening, you can use, for example, brads, buttons, wire, etc. - whatever you like best. The main thing is to make sure that the limbs of the twitch toy rotate freely in the same plane!
We proceed to the most important stage - the creation of a paw control mechanism. In fact, everything is extremely simple here. It is necessary to tie the paws in pairs with a nylon thread through small holes. With the thread stretched, the limbs should be in the lower position.

And now we tie a long thread (you can fold it in half) or a thin cord to the horizontal threads, both to the top and to the bottom, as shown in the photo.
We tie knots on the paracord from the wrong side of the toy. We check whether the paws rotate freely enough. We melt the ends of the cord.

We cut out 2 circles with a diameter of 2.5 cm from cardboard. If you are using microcorrugated cardboard, make a slit in the middle on the wrong side of one circle and place the end of the thread there.

We glue both circles with Moment Crystal glue.

Alternatively, instead of cardboard circles, you can attach a large bead - for convenience and beauty.
We glue a cardboard circle with a diameter of 3.5 cm to the head from the wrong side on a loop of a narrow ribbon. 
The cardboard twitch toy is ready!

Here is such a cheerful and agile puss in boots turned out. The kids will be delighted! :)

A set of templates (contour, color and for coloring) for making a Puss in Boots twitch toy can be purchased at the Kartonkino store:
I already mentioned above that such toys can also be made from thin cardboard for children's creativity. These charming monkeys, created, are made in just such a way.

Please note that the monkey on the right does not use a string to control its paws, but a tail. Rather, the lace is also there, it's just glued between the halves of the tail. A very interesting option, you will agree.
And this is what the underside of the monkey looks like. Everything here is quite traditional.
The paws are attached with the help of brads. It looks very good, and the attachment process itself is easier than with paracord. Do not forget that when using brads, the holes need to be made smaller, it is enough to pierce with an awl.
It is worth noting that the tail on the side was not the best solution - it interferes with the movement of the paw. But there is a choice: if you want - do it with a tail on the side, if you want - from below or without a tail at all (not completely, of course, without a tail, it seems to be in the background and simply did not come into view).
Templates for the monkey toy-twitch can be downloaded here:
By the way, Anya Shidenko has many other interesting patterns for making various products for children, as well as holiday accessories. You can find them by clicking on .
Well, now you know a simple and working way to make a do-it-yourself cardboard twitch toy. By analogy, you can even draw the character you like on your own - some hero of a folk tale or cartoon.
Or use ready-made templates. I have already shown you two variants of the toy. And one more - Kitty - you will find in the 9th issue of the electronic magazine "Masterklassnitsa".

We wish you pleasant creativity, fun and useful games with children!
Yours, Inna Pyshkina and the Kartonkino team.
Actually, I don't really like jerks. But once I saw a picture from an old book, where there was a description of how to make a children's hanger - an Owl. She opened her eyes when clothes were hung on her. And I wanted to make such an owl-twitch.
Most of the time, this owl sleeps peacefully, but as soon as you pull the thread, it will open its eyes and flap its wings. And maybe even shout “Whoo!”.

Materials and tools:
- Thick cardboard or packaging corrugated cardboard (boxes are made from it)
- colored paper
- Colored cardboard (yellow)
- PVA glue
- Scissors
- Thick threads
- Marker or marker
A4 pattern sheet.

We cut out the body of an owl and two wings from cardboard (in mirror image).

Cover them with brown paper. Dry under pressure (put a heavy book on top).


We glue the details of the head from colored paper, dry it.

Cut out a piece with pupils from yellow cardboard. We outline the location of the pupils and eyelids with a pencil.

Glue on it the lower eyelids of paper of the same color as around the eyes.

With an awl we pierce the shoulder and wing at the junction. It is convenient to do this on a hard rubber mat or on an unnecessary album (magazine).

We make a wing mount. You can use special scrapbooking clips, or make your own from a button and a piece of wire. We fasten the wings, they should move freely.

We stretch the first thread through the holes in the upper part of the wings and in the lower part of the part with the pupils. We stretch the second thread only through the holes in the lower part of the part with pupils.

We fasten the upper part of the part with the pupils with an elastic band. Securely sew it to the "ears" of the owl.

By adjusting the size and tension of the threads, you can tie them together. To the end of the thread we tie a button or a ball, for which we will pull.


With a black marker or felt-tip pen, draw feathers on the wings and finish drawing the eyes.


