How to make patterns on nails with a needle step by step. Patterns on nails for beginners step by step photo How to draw nails with a needle in 2 colors
For a holiday or a family celebration, you always want to somehow please your loved ones. The easiest way for a woman to do this is to create some interesting external image.
In this sense, manicure is of considerable importance. After all, nails can not only be covered with varnishes of extraordinary colors, but also beautiful drawings can be made on the nails with a needle.
How to make drawings with a needle?
It seems very difficult to make at home such a difficult nail art as drawing with a needle. But in fact, this is not as impossible as it seems, the main thing is to prepare well for this and be confident in yourself. First of all, you need to prepare the necessary tools and materials.

- Buy a needle. You can use an ordinary sewing needle, but it is best to purchase a special needle with a comfortable handle that allows you to apply accurate and beautiful patterns, even for beginners.
- Two or three fresh varnishes, which can be mixed if necessary.
- A base varnish is also needed, on which the rest of the composition is applied and fixing, when the entire drawing has already been completed.
- And you definitely need a special corrector, in case the varnish goes beyond the boundaries of its intended action and needs to be corrected so that everything looks decent and beautiful in general.

You can make beautiful drawings yourself, but it is important to remember the following rules:
- before applying these drawings to the nails, it would be good to practice, for example, on glass or tile;
- during operation, it is necessary to periodically wipe the tip of the needle with nail polish remover, this is a guarantee that lumps will not appear during operation, but they can ruin everything;
- it is necessary to carefully monitor the needle so that it does not damage the nail, since such damage is very difficult to restore;
- you should follow this rule - the needle in relation to the nail should be at an angle of 90 degrees, this is the only way to ensure the desired slope and quality of the pattern;
It is also important to remember that a fairly thick layer of varnish is needed to create good drawings.
Step by step instructions from A to Z
Before applying the drawing, the nails are carefully processed, the excess cuticle is removed, the nail itself is cleaned, that is, all the necessary procedures that are usually carried out before applying the varnish are carried out as always. Then the drawing is applied step by step.

- The nail is degreased with a special tool and after it dries, a base layer is applied.
- Then the varnish is applied, which will become the background for the picture and this will be its first layer, and it will dry thoroughly.
- The subsequent layer is applied very thickly and after it dries, drops of a contrasting varnish, for example, black, are applied.
- While this varnish has not dried up, with the help of a needle we apply the pattern that was originally conceived. And while the varnish has not dried up, you can produce the most profitable options.
The pattern can be applied very different, but at the final stage it must be covered with a fixing varnish.
This will ensure that such a pattern will last long enough.
Video tutorials
What background to choose?
With the help of a needle, a wide variety of patterns can be depicted on the surface of the nail. But the background itself, on which these ornaments will unfold, is very important.
And this background must be matched to the entire external image of the girl, since a manicure cannot be a separate element of the image. If he sticks out against the general background, then he will ruin everything. To make sure everything works out well, here are a few tips:

- in a trend to make this type of drawing on one nail, paint the rest or arrange it in some other way;
- it is necessary to make superficial strokes so that the nail plate itself is not damaged, in general, one should always remember about the safety of the nail plate in this technique;
- the drawing begins to be done from the little finger in the event that, nevertheless, a decision is made to cover more than one nail with such a pattern;
- it is best to make such a drawing on a layer of one color, because it looks the most impressive and attractive;
- the golden rule is to make patterns on a thick layer of varnish, it will turn out well and there will be no problems.
And finally, you need to start with very simple shapes: stars, butterflies, peas. And gradually move on to more complex ones.
It is in this sequence, and not vice versa, otherwise an unimaginable cacophony will turn out on the surface of the nail, which will have to be thoroughly washed off with a product, which is not very convenient and correct.
Lessons and Reviews:
For those who make patterns on their own and for the first time, the main rule is not to rush and not immediately take on very complex patterns, and then everything will work out, as it was originally intended: there will be a beautiful pattern made by oneself, without any outside help.
In order to create cool hand-drawn designs on your own, you will not need much: first of all, you will have to stock up on free time and patience. Bringing to life beautiful drawings on nails for beginners with step-by-step photos is much easier than it might seem at first glance, you just need to arm yourself with a minimum set of tools and clearly follow the instructions.
How to learn to draw on nails
Most often, to create original nail designs at home, decorated with beautiful drawings and intricate painting, stickers with ready-made prints, as well as stamping stamps and stencils, are used. But bold and bright, delicate and elegant handmade nail art has a special, unique charm.
Surely every woman at least once in her life tried to create her own, unique nail design. Thanks to step-by-step video instructions for creating easy and spectacular nail art for beginners, today anyone can master art painting!
Drawing on nails in itself is an incredibly exciting activity. Starting as a simple hobby, the creation of original drawings for many girls has turned from a simple hobby into a good source of income.
Having mastered simple drawings on nails at home with the help of available step-by-step master classes, success can only be achieved by constantly improving skills, venturing into bold experiments and mastering new artistic techniques.
What is painted on the nails
Thanks to the rapid development of the modern nail industry, it will not be difficult to bring to life any, the most unusual and impressive pattern, because there are many special devices and tools for this, as well as available step-by-step photo tutorials and master classes for beginners.
Simple drawings on the nails can be done using improvised means - needles, toothpicks, a thin brush or ordinary tape.
Very simple patterns on the nails are also made directly with special varnishes, which manufacturers initially supply with a long brush.
Advice! Even for varnishes intended for artistic painting, the brush may not seem very convenient for novice nail art masters, so it would be useful to work out the drawing on paper or plastic tips beforehand.
By itself, the technology of painting with varnish, even for beginners, is quite simple and does not require special devices: the brush should be dipped in the product and you can start applying the pattern. This method is best for images, flowers and leaves, stripes and flirty polka dots.
When starting to draw on nails, it is worth preparing the workplace in advance - cover the table with cloth, paper or cling film so as not to spoil the countertop with paints and acetone. It is better to print interesting ideas for fashionable nail art in advance - so the patterns will be in front of your eyes, and the technique is guaranteed not to suffer.
Attention! Before you start to implement the invented drawings, it is worth practicing on paper or plastic blanks how to make a harmonious composition of dots, straight lines, geometric shapes and smooth curls.

masking tape
A simple nail art pattern can be created using paper-based masking tape and is a great alternative to ready-made nail stencils. Drawings consisting of several shades look especially advantageous, but restrained minimalism is still in trend. Well, you can’t do without a base and fixing coating here either. All you need to do is follow the step by step instructions:
- immediately apply a transparent base on the nails;
- the next layer is a colored base;
- strips of adhesive tape are glued to a completely dried varnish according to the intended image;
- free space is painted over with a contrasting varnish;
- the adhesive tape is carefully removed from the nail when the manicure is completely dry, depending on the complexity of the pattern, the strips of adhesive tape on the nail plate can be glued several times;
- at the end, a top coat is applied to each nail.
With the help of adhesive tape on the nails, it is very convenient to draw lungs, as well as paint over the edges of the plate in the moon and French manicure with a smile line directly outlined or drawn at an angle.


Toothpick
A toothpick, when creating fashionable nail designs for beginners in 2020, can be no less effective than professional tools. Its use also has its own nuances: since the toothpick is made of wood, not metal, more varnish is collected on it, but it rolls unevenly. It is not suitable for drawing thin lines, but for plant motifs and abstractions it will be just right. It will be convenient for beginners.

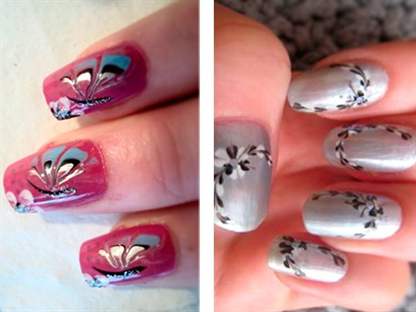
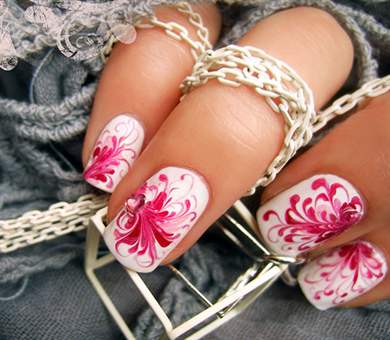
Needle
The simplest drawing on nails for beginners can be created using a thin needle - for this you need several varnishes of different shades. Manicure needles are sold in specialized stores - unlike sewing needles, they do not have an eyelet, but there is a convenient handle. with a needle, they turn out to be very elegant, openwork, it is ideal for working out small details of the picture. You can make a similar tool yourself by sticking a sharp needle into the gum of an ordinary pencil.

Comment! For applying patterns and drawings to the nails, it is worth choosing the most contrasting colors - this will make the design bright and expressive.
Covering the nails with elegant painting is not at all difficult - just follow the step-by-step instructions:
- first, cover the plate with a colorless base, the task of which is to protect the nail from damage by a sharp instrument and the penetration of bright coloring pigments;
- after the base has dried, the color that will become the basis of the entire design is applied to the nail in a continuous layer;
- then dots are placed on the varnish that has not yet dried out in different places and stripes of contrasting color are drawn;
- then, with a needle, points and lines are carefully pulled out, abstract curls or clearer geometric patterns are formed from them;
- the final touch is the application of a transparent top.


Dots
Dots belong to the category of professional tools used by beginners and experienced craftsmen to create fantasy nail art. At first, when drawing easy nail designs for beginners, it is quite possible to get by with a needle or a toothpick. Having mastered the simple elements, it will not be difficult to complicate the composition of the picture - and here the dots will come in handy: it is much more convenient for them to achieve amazing effects by displaying abstract patterns, exotic flowers and graceful silhouettes of animals on the nail plate.


brushes
Of all the tools that help beautifully and simply create spectacular nail art even for beginners, brushes require the most skill, which means that you will have to master working with them gradually. Today, cosmetic stores boast an excellent range of brushes for drawing on nails: thin, thick, wide, flat, rounded and square - they are easy to embody any wildest artistic ideas and fantasies. So, using a thin liner brush, masters easily perform exquisite openwork painting, it is convenient to draw plant elements (leaves, flowers, petals) with a wide flat brush, and for applying glitter and acrylic powder on nails, it is better to take a fan-shaped brush.


stencils
The easiest way for beginners to create unique nail art is to use ready-made stencils for nails. Convenient stickers amaze the imagination with a variety of patterns, patterns and textures, moreover, such a design does not require special skills for beginners, and the result is simply stunning.

What else do you need for simple drawings on nails
In addition to the listed tools for creating a simple nail design for beginners, step-by-step master classes use sponges, foam rubber sponges, cotton and wooden sticks, and even rods of simple pencils and ballpoint pens.

There is also an original application for special foil: shiny pieces are glued to the dried coating and lightly pressed with a finger. After removing the foil, luxurious sparkling drawings and patterns remain on the nail.

What can be painted on nails
What can be painted on nails? Yes, whatever - the scope for creativity here is truly limitless! Bright flowers and butterflies, lace and abstract patterns, strict geometric shapes and soft gradient tints, as well as stars, snowflakes, bows, birds, funny cartoon characters and unprecedented animals. Hearts, arrows, polka dots, funny faces and even tic-tac-toe look provocatively and playfully. Many beginners like to experiment.


With the help of a step-by-step master class, a novice master can decorate the nails with a chic gradient. To create such a spectacular design you will need:
- patterned stencil;
- foam sponge;
- eye shadow in different colors.
Drawing a picture includes several steps:
- the plate is completely covered with the base color;
- a patterned stencil is glued to the nail;
- on top, with the help of a foam rubber sponge, eye shadows of different shades are applied;
- the sticker is carefully removed, and the finished drawing is covered with a transparent varnish.
One caveat - it is worth rehearsing this design in advance to check if the shadows in the picture spread from contact with the top coat. If the experiment was successful, you can start drawing gradient patterns on the nails.


With the help of a wooden toothpick, predatory leopard prints are easily created on the nails, which do not require detailed drawing, which means that even a beginner can easily cope with them:
- the nails are covered with the main tone;
- a toothpick is dipped in varnish of a contrasting color;
- oblong spots are placed all over the plate;
- an arbitrary contour is drawn with dark varnish in each speck - the line should not be continuous, on the contrary, free unpainted areas should be left in it.


Another cool art that requires a minimum of effort and additional tools is a newspaper print. To create it, special artistic skills are not needed, because the drawing is made up of pieces of a real newspaper with text printed on them. An easy step-by-step master class on drawing a "newspaper" on nails is presented below:
- as a base, the plate is coated with white varnish;
- ten pieces are cut out of the newspaper according to the shape of the nails;
- for a few seconds, the printed fragments are dipped in alcohol, after which they are applied to the nail plate - this is how the pattern is transferred to the varnish;
- a transparent top is applied to the finished manicure - an unusual and stylish design is ready!


What patterns can be made on the nails
A beginner can draw a very gentle and romantic pattern on the nails using lace tulle:
- the nail is covered with a color that will become the basis of the future design;
- a piece of lace is pressed tightly against the dried coating;
- a contrasting tone varnish is applied on top of the nails;
- after drying, the lace is carefully removed, after which the plate is covered with a transparent top.

A simple and incredibly positive nail art will come out of the usual points:
- a bright monochromatic coating is applied to the nails;
- after drying with a dots or a needle, circles are put down, from which very simple or unusual intricate drawings and patterns are formed;
- finished manicure is covered with transparent varnish.


On a still dry coating, you can draw beautiful patterns by simply dropping varnish of a different color on top of your nails and stretching these droplets with a needle, dots or toothpick. It is available to beginners.


The real highlight of any fashionable look will be marigolds with amazing gel engravings:
- a light or colored varnish is applied to the plate - you can take one tone as the basis or, conversely, use a gradient of several shades;
- from above, the nails are covered with a thick layer of shellac of a contrasting color;
- patterns are drawn with a needle, pin or hairpin with a sharp tip, which must be soaked in nail polish remover;
- the resulting three-dimensional pattern is dried with a UV lamp;
- finish the design with a layer of gel with a reflective effect.
Another stylish special effect that is perfect for extended nails is the imitation of cracks on the surface of the varnish:
- the nail plate is painted over with the main color;
- droplets of colored varnish are applied to the sticky side of the adhesive tape;
- adhesive tape is glued to the nail, after which the paint spreads smoothly under it;
- the sticker is removed, and the resulting pattern is dried under a lamp;
- then a topcoat is applied and dried again.


Easy drawings on nails step by step for beginners
To create beautiful drawings on nails, schemes for beginners will help, where the whole process is demonstrated step by step. So, to apply the popular “Twigs” pattern on the nails, you will need acrylic paints - it is much easier to draw with them than with ordinary varnish, so this technique is ideal for beginners. The drawing looks good in yellow-green colors, but in other color variations it will look no less impressive. "Twigs" are drawn as follows:
- the plate is covered with the main color - light pastel shades are ideal;
- one or two wavy lines (twigs) are drawn from the lower corner of the nail to the upper one;
- neat leaves are drawn with acrylic paint along the entire length of the branch with the same color;
- the middle of each leaf is drawn in a lighter tone;
- On top, the drawing is covered with a colorless varnish.
Important! When creating artistic masterpieces with acrylic paint using step-by-step master classes, you should remember about a transparent top coat that will protect the drawings on the nails, since this material is easily washed off with plain water.


Another simple, but very picturesque print is yellow-orange maple leaves. To depict them on the nails, following the step-by-step recommendations, is not so difficult:
- conditionally, a maple leaf consists of five axial lines - according to the number of its “petals”, therefore, first you need to mark the protruding edges of all the petals and their joints, so the image will be symmetrical;
- further draw a stalk;
- all points are connected by a smooth thin line, while trying to give the image a shape characteristic of maple leaves;
- you can start painting the middle of the sheet.

Photo schemes of drawings on nails with a needle are popular, and all because this method of decorating, despite the chic result, is very simple to implement. If you wish, you can learn and do high-quality manicure at home.
If you decide to experiment with drawing a sharp object on your nails, then you need to be patient, persistent, and confident in a good result. It is important to have all the necessary tools for work, and these are:
- needles of different sizes, the presence of a gypsy is mandatory;
- toothpicks;
- several multi-colored varnishes;
- fixative / just colorless varnish;
- paper napkins.
In order for drawings with a needle and varnish to turn out, you need to properly equip the workplace. Be sure to have a table, a chair, good lighting.
Lacquer has a special role to play. It should be of good quality, not too thick, but also not spread, because it is the main consumable. You will need napkins in order to keep your hands, the table clean.

Needle manicure - preparatory stage
Wanting to master the drawings on the nails with a needle, you must know where it all begins. This is a classic manicure, which involves giving the nails a beautiful shape, as well as removing / pushing back the cuticles with an orange stick. Drawing on nails with a needle will last longer if you first degrease the work surface (on which you will draw). Thus, good adhesion of nails and working material is ensured. You must thoroughly clean your hands.
It will not be superfluous to search the Internet for patterns of drawings on nails with a needle. Before you paint your nails, try to draw on glass, so you practice, mastering the technology, gaining skills. Once you see that your patterns are working well, you can begin to design.

Technology of drawing on nails with a needle
To master the drawings on the nails at home with a needle, you need to be patient. The best assistants in this difficult task are perseverance, accuracy, attentiveness, measuredness. But if you have a true desire, then you will not feel any special difficulties. Better yet, watch a video of a manicure with a needle at home.
- "Wet" - this technique is great for beginners. It consists in the fact that at first the nail plate is covered with colored varnish, then dots are immediately placed with another varnish and a pattern is made, for example, a flower. As you understand, it is not necessary to wait for the first layer to dry in this case. The secret of this method lies in the displacement of the main shade with a needle with varnish.
- “Dry” - in this case, a manicure with a needle is done only after the main color layer has dried. So you can make both light patterns and more complex ones. From ordinary dots set with varnish of a different color, you can draw even more original patterns.

Regardless of whether you do a wet or dry manicure, everything is always covered with a fixative / colorless varnish at the end. Experienced craftsmen advise to wipe the needle after each action, so the drawing will not be spoiled by a sudden stroke. It is not difficult to find simple and understandable video tutorials on the Web that allow you to understand the process of decorating nails. Each time the speed of work will increase, which is welcome.
How to draw with a needle on the nails, it has already become clear, now is the time to choose a drawing. Today it is fashionable to draw:
- cobweb;
- spikelets;
- day and night;
- images imitating animal skins;
- board for chess;
- blots;
- flowers, lights, feathers, dots, strokes and all that.
Everyone chooses a theme based on their own preferences and hobbies.

To create a truly original nail design, you must know and follow some rules. First of all, the details of the manicure are thought out, you can try to embody the idea first on the glass. Responsibly treat the choice of varnishes, their colors should be in harmony with each other, because sometimes the wrong combination of shades can ruin everything.
Patterns on the nails are made first on the non-working hand, going from the little finger to the thumb. Pay attention to the force of pressing on the tool used, this will not injure the nail plate.

The modern nail industry offers a huge variety of techniques and tools for creating a unique manicure, from classic varieties to the most unusual author's ideas. Among the popular trends are decorating with rhinestones, colored feathers, glitters, bouillons, transfer stickers, using metal foil, fimo - volumetric figures and acrylic paints. But the most popular way to decorate nails has been and remains drawings that allow you to create real small masterpieces on the surface of nails.
Easy nail designs for beginners

For those who have never had the experience of drawing on nails, this type of nail art will be somewhat difficult at first. Beginning manicure masters should constantly practice drawing in order to bring the technique of applying a pattern with a brush or needle to perfection. An experienced nail design master, unlike a beginner, does not need to turn to video tutorials and photo instructions, he is guided only by his own imagination and skills.
Before starting experiments with painting nails, it is necessary to prepare a "space" for creativity. The nails on which the drawing is planned to be applied must be pre-treated according to all the rules of a classic manicure: the cuticle and burrs are removed, the desired shape is achieved with a file. Nail art is a rather painstaking task that requires a lot of patience, so it is advisable to think over the future design in detail, and prepare all the tools, tools and accessories necessary for work in advance.
Nails drawings on nails of a novelty of 2016 french. Ways to make drawings


Once the nails are properly processed, you can proceed to the most interesting part of the manicure - painting the nails. If there is no specific idea, you can always peep ideas in the photo or in video tutorials on nail design.
Any nail art is a step-by-step operation, which basically comes down to simple tricks. With the help of photo instructions, the implementation of any, even the most complex design, will turn into a pleasure, because the photos suggest the sequence of applying different shades of varnish, and also reveal all the subtleties of the pattern. In them, the procedure for preparing and drawing a drawing is demonstrated in stages, which greatly simplifies the task for beginners.
Drawings on nails for beginners in stages, using a needle

photo of nails with drawings French novelties 2016 with a needle
If a particular idea for painting nails inspired so much that you want to recreate it immediately, then it is quite possible to use a simple tool at hand - an ordinary sewing needle. With its help, you can create original and very effective drawings.
Tip for beginners: before applying a drawing to the nail plate, it is always worth making a sketch and trying out the idea on paper. So you can immediately evaluate the final result, and it will be easier to perform a neat drawing after a short workout.


nail design photo 2016 modern with pattern
To decorate your nails, for example, with a bright floral ornament on a white background, you will need:
- base coat
- top coat
- varnishes of several shades
Making this design at home is quite simple. So, step by step instructions:


Simple drawings on nails for beginners with a thin brush
A thin brush is an indispensable and very popular tool for creating a wide variety of patterns on nails. It will not be difficult for her to draw even for those who have never painted nails. Using a brush, you can create, for example, a trendy geometric design. To do this, you will need a transparent base and top coat, as well as colored varnishes in two or more shades, for example, blue and black.
 Steps for creating a geometric pattern on nails:
- Apply base coat on nails and dry it.
- Mentally dividing the nail exactly in half along the length, paint over one half with blue varnish. Dry the varnish.
- Using a brush and black varnish, draw a straight thin line on the border of the blue and transparent coatings.
- The tip of the nail can be covered with black varnish, they can also make a contour around the transparent half of the nail.
- On the transparent part of the nail, apply a few thin black lines in arbitrary directions. You will get rectangular or triangular elements, which, if desired, can be filled with blue.
- Fix the finished drawing with a top coat and dry it properly.
Thus, with the help of minimal means, you can create a nail design that combines several fashionable elements at once: a geometric print, highlighting the tip of the nail in a contrasting color (color jacket) and areas with a transparent coating (the "negative space" technique).
Other ways to decorate nails
As you can see, there are now a huge number of educational materials for beginners on the implementation of various ways of decorating nails, from popular options with rhinestones, sparkles, crystals, acrylic paints and metal foil to relatively new techniques of “caviar”, “aquarium” design or experiments. with textures. Another new trend in the nail industry is Chinese painting. This is a more complex technique that requires certain skills, but a novice master can also master it with the help of video tutorials with step-by-step instructions.

 For modern fashionistas, it is no secret that the popularity of long and sharp nails is behind, today the current moderate length of nails. And this means that all the possibilities of nail art are quite feasible on short nails. Their owners should not give up the idea of decorating their nails on their own with a needle, a thin brush, ordinary varnishes and a variety of decorative elements.
Drawings on nails video tutorials for beginners
About the author: Site editorsWe want the site website gave you strength and inspiration every day, supported you with advice and helped you find solutions in difficult life situations.
Until recently, applying original drawings to nails was only possible for experienced craftsmen in the salon. In fact, simple methods for applying are known that do not require special knowledge and skills, it is enough to have several devices with sharp tips on hand so that you can bring out miniature elements, bitmaps, any other beautiful motifs, such as flowers, graceful rose petals. Let's consider what devices are needed for drawing simple patterns on nails, as well as techniques for performing elements that are quite affordable for independent manicure procedures at home.
What you need for drawings at home
To derive simple, but quite original models, you first need to be patient. The work is painstaking, but it's worth it. Also prepare nail polish remover, acetone, so that you can quickly remove unsuccessfully drawn drawings. It is desirable to create a calm atmosphere around you. It is convenient to do such a manicure, sitting on a chair, laying out the necessary accessories for home nail manicure on the table:
- , a tool with a small ball on the end. A needle with a bead or a ballpoint pen will do. Dots, dipping in varnish, it is possible to apply dots in a chaotic manner, from which the formation of interesting ornaments, for example, in the classic style using only two colors: black and white. You can peep a lot of all kinds of drawings on the Internet and depict an ornament in the form of funny little animals, New Year's motifs, other compositions from a photo: flowers, butterflies, playing with colors.

- sewing needle suitable for applying simple ornaments, pictures on plates, and on short or long ones. The essence of the process is to apply dots, lines by stretching them with varnish of any shades and in any order: in a circle, in a checkerboard pattern, with a snake. As a result, you can get petals, twigs of any configuration or colored creative lines. With a little practice by mixing several shades at once, you can achieve on your nails a variety of interesting motifs of flowers, butterflies, and other funny patterns.
- brushes. It is good to use with natural pile and have on hand a set of brushes of different lengths and thicknesses. You need to start with simple lines, drawing. You can use the usual simple pencil for manicure and first draw the desired pattern with it. Further, having adapted a little, it is not difficult to learn how to make different lines in thickness, also curls, moving on to more complex compositions as you acquire skills.

- Sponges or wet painting for applying gradient designs on nails, suitable in combination with loose eye shadow. First, the main varnish of light colors is applied, on top, after the layer has dried, partially - shadows in any order (splashes, randomly). Let the drawing dry. Apply the last, fixing layer on top. The technique is applicable in conjunction with a needle, brushes. The spraying technique is not complicated. If you get washouts, other defects, then you can always paint on it, but before the base dries well.

- to be able to apply geometric patterns using adhesive tape or in the form of strips, applying to the nail plates in a different order on pre-painted nails. The strips can be dyed in other colors on request. After removing them and drying the varnish, original pictures are obtained. It is enough to prepare the necessary stencils in advance by cutting out interesting shapes of flowers, petals, etc. The main thing is to apply adhesive tape or stencils on prepared plates, previously coated with a base layer.

- (2-3 different colors are enough to start). First, white varnish is applied as a base on the nails. Further, covering the skin with adhesive tape around the cuticle to be treated, a layer of varnish of a different color is applied: blue, red. With a needle or a plastic stick, you can simply spray the main color on the nail, and on top - a varnish of a different color. You will get multi-colored stains. After they dry, the top of the nail is covered with gloss. The end result is an excellent effect.

- Gels(paints) to create gel drawings with almost any tool at hand. Required . When applying a pattern, each layer will have to dry up to 1-2 minutes, otherwise the picture will be smeared. First, a base white layer is applied to the nails, then the main color pattern and the final layer of gel. After it dries, the sticky layer just needs to be carefully removed. The process is laborious, but the result is amazing.
- Lucky, by mixing 2-3 shades. First, the cuticle is processed, then the nails are covered with white varnish for a general background (preferably in 2 layers, without affecting the cuticle), so the patterns will look distinct and rich. After drying, you can, for example, put a few vertical dots with red varnish, then burgundy dots on both sides of the nail, in the center or whatever you like (parallel, horizontally). After the layer has dried with a needle, spiral movements can be carried out. At the end of the work, to smooth the surface, cover the nail with a fixing composition, on top with glitter, sparkles. Decoration on the nail plates will turn out just gorgeous.
- decorative elements. Any pieces of lace, washcloths (the effect of a fisherman's net is obtained), mesh fabric, sponge, crumpled cellophane for dipping into a shiny varnish and applying to the plates, adhesive stickers, for example, in the shape of a crescent, adhesive tape for cutting out figures and circles, are suitable for obtaining patterns, which will be applied to the nails and disguised as a varnish coating.

How to prepare nails
Preparation consists in leveling, filing the nail plate, in removing keratinized particles, as well. Next - applying a transparent base base in an even layer, after drying - various patterns with the tools at hand. Beginners should start with the same type of options.
Step by step guide for beginners
Drawings with needles. Special skills are not required. All you need is a needle and a few contrasting colors of polish. The technique is:
- covering plates with a base transparent color (scratches may remain from the needle);
- drawing varnish for the picture after the first layer has dried;
- affixing multiple dots or lines in any order you like;
- implementation a well-thought-out drawing on dots or lines using a needle;
- covering again with a layer of a colorless base after the pattern has dried in order to fix the ornament on the nail as best as possible for a long time.

Using dots. A technique for making dots or drawings with acrylic paints. First, the plate is covered with a transparent composition, then the tip of the dots is dipped, dots are formed on the nail. To get dots of different diameters on the nails, you can buy ready-made dots in a set or use handy tools: a cotton swab, a match, the back of a pencil with an elastic band at the end, a carnation (needle) stuck in an eraser.

Drawings with brushes. One of the simple drawings is made like this:
- cooking two brushes - medium and thin, also varnishes: black, white and pink;
- coating plates first with pink varnish;
- affixing white lacquer dots in the center;
- drawing the contours of the bow along the outgoing rays with a thin brush;
- shading a bow with a wide brush;
- decor contour in the middle of the bow with a thin brush and black varnish to make folds;
- tassel you can draw flowers, but of course, drawing lessons are still worth going through initially.
Having processed the nails with a base layer of varnish with a yellow brush, petals are drawn, flowers are formed, veins are light brown. Nearby, you can arrange another flower for a variety of design. For veins, use coral. So gradually, having mastered the basics of drawing skills, you can move on to more complex drawings and patterns, which are presented in the photo in a wide range.

With the help of ordinary adhesive tape, transparent varnish and two colored types, you can apply simple but original drawings, and here is one of the techniques:
- coating nails with colored monochromatic varnish;
- gluing on a plate of a pre-prepared stencil (the pattern can be cut from a wide adhesive tape);
- dense pressing to the nail after the first base layer has completely dried;
- removal adhesive tape after the applied pattern has dried;
- coating a transparent base to hide the resulting irregularities;
- with adhesive tape you can apply geometric patterns by gluing certain areas with them in order to process free (open) ones with a different composition, for example, red. They can also draw lines along the plate, on the sides, and form a flower in the center with apricot varnish. Of course, patience is needed. To draw them exactly on each nail at once, a lot of small elements will require some skill.

Sponge in the form of a porous sponge, suitable for performing manicure on nails using the ombre technique, or the effect on the nails is obtained by using the composition of fuchsia, coral, pale pink, cherry. First, the main color is applied to the plates, then:
- on the sponge varnishes of 2-3 colors are distributed in any sequence;
- dipped sponge into the composition, gently applied to the plate for impregnation;
- above- a fixing composition for smoothing out irregularities after applying the main tone. It is the sponge that will give the plates a glossy sheen. After the nails are dried, the remains of the composition around the cuticle are removed with a cotton swab. As a result, the color palette on the plates with chaotic transitions from one to another is ready;
- during the transition on the other nail, the color palette needs to be updated, i.e. each time paint over all the colors of varnish on the sponge.

Before performing any of the proposed nail manicure techniques, you first need to practice, draw models on paper. Next, prepare high-quality materials and tools. For a smooth, even coating, varnishes should be of medium consistency (not liquid and not thick).

Having studied all the techniques, choosing for yourself the best way of manicure to give elegance and grooming to your nails will not be difficult. It is quite possible to achieve original simple patterns on nails at home and without the help of masters.


