Frieze composition in the technique of applique spring flowers. Applications on the theme "Spring": interesting ideas for crafts. Making with Mom
A universal selection of gift ideas for every occasion and occasion. Surprise your friends and loved ones! ;)
Greetings to all gathered on my blog on this sunny (or maybe not so) day. If you want to learn how to make cool ribbon flowers, then I highly recommend reading this article to the end.
Flowers made of satin (and not only) ribbons can be used both for decorating gift wrapping and as a gift itself.
Especially if you collect such flowers in an elegant bouquet.
The most amazing thing is that sometimes the most beautiful of these plants are so easy to make with your own hands that it takes 10-15 minutes even for a beginner (believe my experience).
Recently, I have been making different flowers quite often and now I will share with you excellent workshops on making them.
DIY satin ribbon flowers
I'll show you 15 cool (and easy) ways to create amazing flowers. You can “take away” each of the photo master classes with you by copying the corresponding image.
Let's start, perhaps, with the most romantic and popular plants among girls - roses.
Ribbon roses
Stop buying expensive roses from the store! Let's learn how to make them ourselves and save the lion's share of the budget.
We have several roses today. The first of these is a rose, obtained by folding triangles as you progress. To make it, prepare a piece of ribbon at least 2 cm wide and at least 50 cm long.
unblown
Form the center by bending one tip as shown in the photo. Roll it up, fasten it up.

twisted rose
Remotely, in terms of the way it was created, it resembles the previous one (at least the beginning). After forming the center, alternately turn the ribbon, twisting it and applying layer by layer. Fasten at the end.

Kanzashi
The peculiarity of this rose is that all the petals are processed separately.

From braid
Finally, a rose, which is obtained by interweaving two wavy ribbons. After weaving, they need to be swept along the edge so that they do not fall apart. And then just roll over.

Flowers from kanzashi ribbons
In general, kanzashi is originally a “hair decoration” from Japanese. It has gone since the time of geishas, who differed, among other things, in the ability to skillfully needlework.
There are two forms of petals in kanzashi - round and sharp. The rest is subspecies. So all flowers to some extent can be attributed to this type of art.
Hibiscus
An exotic guest for which you will need a wide ribbon (about 5 cm wide), base and stamens.

Just a flower with 5 petals
To make spiky elements, sew the center. Fold the future petal in half and hem the inside. Prepare 5 pieces, then string on a thread. Decorate the center.

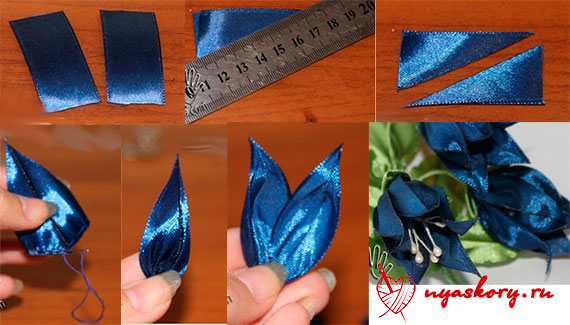
Bell
For the bell, prepare the petals according to the photo. To roll them, fold the petals with high straight edges to each other and sew the edge (glue the top a little). Pull the thread, collect the resulting parts, decorating with stamens or beads.
Semitsvetik
For it, you need to prepare 7-9 petals using the classic method used in kanzashi. Then all the petals are collected on a thread, if necessary, glued together on the sides.

Aster
Just a dream, not a flower in terms of ease of execution. To make an aster, take your ribbon and sew a line of running stitches in a zigzag across the entire width. Pull up, roll up. All

Peony
For a peony, take three ribbons: two for the petals, one for the green leaf.
Please note that the peony consists of two parts - a more closed bud and opening petals.

Master classes on flowers in video format
Not everyone likes to study photography, so I have prepared for you some flower-making tutorials in video format.
Chamomile
To create a chamomile, you will need many, many burnt petals (pieces of ribbon 0.6 cm wide and 3.5 cm long), as well as a base - a circle of cardboard.
callas
One of the easiest plants in this article. Easier, perhaps, only aster.
Sunflower
According to the principle of creation, it is very similar to a chamomile, but here you will have to tinker more with the petals.
Star
Elegant flower, consisting of 5 elements and the middle.
snow fairy tale
An unusually beautiful flower made from a wide ribbon. It was difficult to attribute it to some species, so let it be called that
A wonderful effect will be obtained if you combine several types of ribbons from the same series. This is easy to do with modern kits that include up to several dozen ribbons in the same style.
On this I say goodbye to you. See you soon! Be sure to tell me if you know any other ways to create flowers.
P.S. Subscribe and learn how to give cool gifts
Sincerely, Anastasia Skoreva
Anyone who loves unusual hairpins, jewelry, interestingly decorated things and at the same time loves hand-made - this article is for you!
Today I will tell you how to make a rose from ribbons with your own hands, so that it will turn out to be no less charming than a real one, and even with green leaves.
This master class with visual photos will help you understand the unusual way of making roses and create a really beautiful decoration.
So, let's figure out what materials we need to make a rose from a ribbon.
Ribbons
Satin ribbons are a material that will help the flower to keep its shape for a long time. No other tape has such qualities. Therefore, we choose a satin ribbon of any color (1 meter) - red, orange, pink, to create a flower, and green - to make leaves.
Needle, thread, scissors
These are the usual working tools of needlewomen, they are necessary for hemming the edge.
It is better to choose a thread to match the flower ribbon, the joints will be completely invisible.
Glue gun or glue
Needed for gluing the base to the flower. Such a gun can be purchased at any hardware store or scrapbooking department.

Basis for satin ribbon
For her, we take a dense plain fabric. You can glue the dark one, as in this master class, or you can pick up the ribbon to match.
Lighter
By burning the edges of the tape, we will be able not to overcast it - this will make the flower neater, and glue the correctly folded leaves together.
Now that we have everything on the table, let's get to work!
Step 1
We burn the edge of the tape so that it does not bloom. We do this carefully - it should remain even.

We bend the end with the satin side outward by about 2.5 - 3 cm and twist it tightly 3-4 turns - this will be the middle of the flower.

We grab it with threads to fix it properly.

Then we fold the tape again at the joint to the previous bend at about the same distance.

We fold at the junction and sweep. You don’t need to do a lot of stitches - this will create unnecessary thickness, the flower will still not bloom.


We move forward so step by step, tucking and sweeping all the folds, that at the end we get a spirally hemmed ribbon.

Step 2
Now we make a rose out of it.
We find a sour cream future center - it will help you orient yourself, and we begin to tightly twist the flower inside.

When we have a finished rose in our hands, we turn the end inward and put it on glue. Now let the flower rest, and we will proceed to the next step.

Step 3
- We take a green ribbon, cut off a piece of 8 - 10 cm,
- We fold it in half
- And then cut diagonally.
We still have a double triangle in our hand - we are not in a hurry to put it off!

We take a lighter with the other hand and gently burn the place of the cut.

If everything is done correctly, then the edges of the tape will stick together. Now it is enough to turn the resulting petal onto the face.

Step 4
We make several of these leaves, glue or sew them to the rose on the reverse side in the right order.
We cut out the base in the shape of a flower from the selected fabric and glue it to make the rose finally complete and additionally fix the leaves and petals.

Here is our wonderful decoration!

You can wear a satin rose anywhere: fasten it to a headband, attach it to a bobby pin, sew it to a ribbon bracelet or make a necklace of several colors - the choice is yours.
The main thing is that now you know how to make a rose from a ribbon with your own hands.
Ribbon rose (master class video)
Dear friends, I wish you good mood and successful crafts.
Always with best wishes Elena Skopich
Application is one of the favorite activities of all children. This is a great way to interest a child, spend quality time and just cheer up. Works made in the application technique always turn out bright, they can then be presented as a postcard to a grandmother or mother, or decorate a child's room with them.
Application is very useful. By cutting, gluing parts, the child develops fine motor skills, learns to use scissors, a brush, glue. In the process of making the application, it is easy to learn colors and shapes, and you can also practice in spatial orientation (top, bottom, right, left, under, above, etc.). Using various materials, develop the child's tactile perception. If you give free rein to the baby and allow him to do everything for his own consideration, imagination and fantasy develop.
Now spring is already actively coming into its own outside the window - a wonderful time of the year. Why not take the opportunity and create beautiful spring-themed applications with the children?
You will need:
- scissors
- ruler
- pencil
- colored and white paper
- colored and white cardboard
- threads
- napkins
- shreds of fabric
- your desire and imagination
And we offer you an excellent selection of spring applications. We hope they inspire you to create even better paintings with your child.


Preparation of materials and tools
A variety of flowers can become elements of spring applications - from crocuses and snowdrops emerging from under snowdrifts to daffodils and tulips growing in flowerbeds, flowering trees, melting snow, running streams and much more. And if when planning to do this type of creativity, you still don’t know exactly what you want to portray, then it’s best to stock up on all the tools and materials that you may need during the work. At the same time, if you will do spring applications with your child, it is important that there are two sets of tools. In this case, the little master will be able to repeat the necessary actions for you, for example, draw petal patterns, cut out stems or leaves.
Of the materials you will need colored paper, cardboard, preferably white and colored, standard sheets, corrugated paper, quilling ribbons, white and pink napkins. Now about the tools. You need comfortable scissors, glue (you can use both a pencil and PVA), a stapler, a simple one, and don't forget about a small towel with which you can wipe your hands covered with glue while making the application.

Application: a bouquet of spring flowers
In spring, forest glades and flower beds are full of a wide variety of flowers. These are bluebells, and tulips, and daffodils, and lilies of the valley, and snowdrops. So why not combine them all into one bouquet?
First you need to cut out. To do this, you can prepare cardboard templates in advance, which is especially important if, for example, you make lilies of the valley, or draw flowers directly on the back of colored paper. In addition, the application "Spring Flowers" implies the presence of stems and leaves. When all the details are ready, it remains only to glue them to the base in the appropriate order. It is important not to forget that the flowers must be arranged in such a way that they look like a bouquet. That is, they should be superimposed on each other, creating a volume effect.
Application "Spring Bouquet" will look even more original if the flowers are placed in a vase or basket. To do this, you need to cut out a container that you prefer from colored paper and stick it on top of the bouquet in such a way as to half close the stems.

Making spring flowers
At this stage, you need to decide what colors your spring applications will consist of. Most often in spring there are tulips, bluebells, lilies of the valley and snowdrops, so they will be discussed further. Let's start with the bell. To make this flower, you need to fold a sheet of blue paper in half and draw a half of the product on it, cut it out, and then spread it out. As a result of such actions, a symmetrical bell will be obtained. According to a similar scheme, you can create a lily of the valley. True, you will need white paper and on the application, unlike the bell, it should have a much smaller size.
Application "Spring flowers" from paper can also consist of tulips and snowdrops. It is worth noting that both of these flowers are cut according to the same pattern. The differences between them are their size, color and location on the stem. The first "look" up, and the second - down. In order for the child to understand more clearly what the application will consist of, it is worth preparing pictures with their image in advance. It makes no sense to demand maximum accuracy from a small master, the main thing is the manifestation of his creativity.
Making sepals and stems
Now sepals and stems. Cut them out of green paper. For the stems, the usual color is suitable. The tulip stem will be a straight strip 12-15 cm high and 1 cm wide. But for a snowdrop and a bell, it is necessary that their “heads” “look” down. To do this, the stem should have a slight rounding at the top. These two flowers also have sepals. They can be cut out of a square, about the same size as a bell or a snowdrop, as follows: fold the figure diagonally and make a triangular recess on one of its open sides with scissors.
As for the lily of the valley, its stem consists of several elements - one long, bent in the upper part, and 5-7 short ones attached to it, on which the flowers “hang”.

Leaves for spring flowers
Application "Spring Flowers" should also have leaves. For some plants, for example, lilies of the valley, it is better to cut them out of corrugated paper, since it is more reminiscent of real ones in texture, and ordinary colored paper is suitable for the rest. The snowdrop and bell leaves are pointed at the top, but the former are narrower, and the latter are wide. A leaf for a tulip should have the same height as the stem, be wide (2-3 cm) in the middle and pointed at the end. It can be attached to the base only with the lower part, and the upper one can be bent. Lily of the valley leaf resembles an elongated oval, slightly rounded at the top. For its manufacture, as already mentioned, it is best to use corrugated paper.
Volumetric application "Spring fantasy"
Spring applications do not have to consist of flowers. Indeed, at this time of the year there are many other phenomena that deserve attention. For example, melting snow or flowering trees. It is on them that you should stop your attention and create a voluminous application.

For the base you need cardboard. It should be placed horizontally. The lower part of the base will be occupied by snowdrifts, and the upper part by a flowering tree branch. To make snow notes, you need to take two white paper rectangles and a height of 5-6 cm and a width that matches the base. Both blanks must be folded together and, using scissors, give their upper part a waviness. First, a white part must be glued to the bottom of the base, and then, shifting slightly down, a blue one.
Now a flowering branch. It is necessary to cut strips from brown or gray paper, one 1.5-2 cm thick and 5-8 pieces 0.5-1 cm each. The branch should be glued on the right side of the base, and on it there are already flowers made as follows: white and pink napkins should be folded into a square and fastened in the middle with a stapler. Then draw a 5-petal flower on it, so that the staple is in its center, and cut it out. Next, straighten the product and glue it to the branch. Flowers can be as many as you wish. At the final stage, you will need to cut out leaves from green paper and place them on the same branch. Application "Spring Fantasy" is ready!


