Instructions for use of a manual portable sewing machine. The device and instructions for the sewing machine. Practicing making stitches

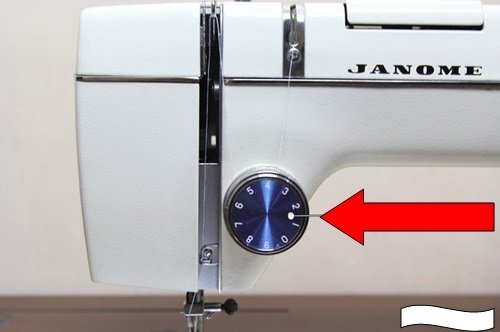
We turn to the tension regulator, which is a small wheel with a set of numbers. Thanks to this device, you can control the thread tension during operation. If the tension is strong, then the needle will slightly deviate to the side. If the tension is not enough, the thread will gather and tangle on the reverse side of the fabric being processed.
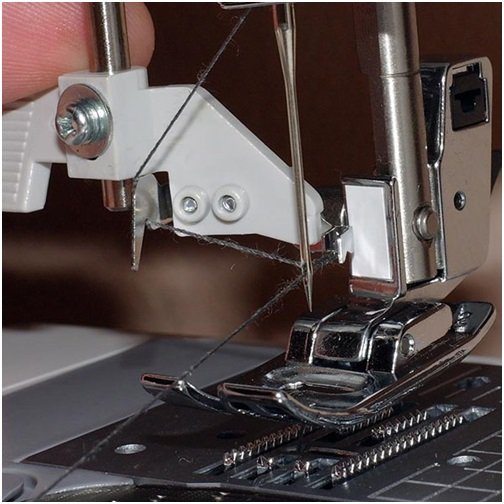
We begin to search for the needle holder screw, which securely holds the needle in the process. Usually it is located under the sleeve of the machine.
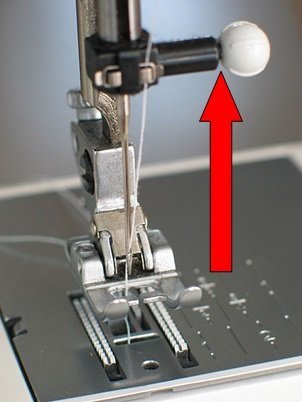
Next, you should find a foot that looks like small skis. Thanks to the foot, the fabric is securely attached to the machine and moves in a given direction. 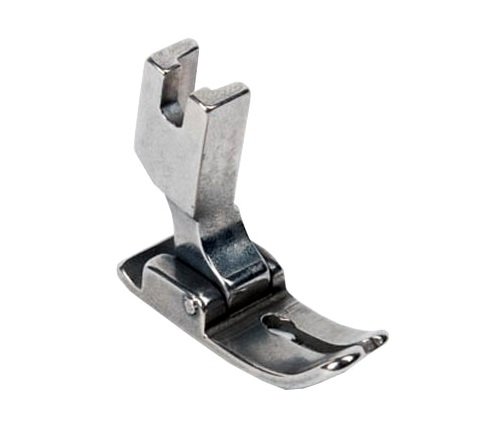 Using a special lever located behind or to the right of the needle, you can raise and lower the foot on the fabric.
At the bottom of the sewing machine is a small bobbin that feeds the second thread to the needle. You can find it under the metal plate under the needle. The bobbin is released using a lever or button. It is needed for filling the second thread.

So we figured out the simple device of a sewing machine. Now you need to learn in detail how to use the sewing machine correctly.
Setting up the sewing machine before starting work
The machine must be placed on a flat, stable surface so that the needle is on your left side. First you will need to check a few basic settings. Network connection is not yet required.
- Insert the needle into the machine: The flat side of the needle should point back and have a groove in the front to hold the thread while sewing. Insert the needle into the machine and tighten the special screw to hold it.
- Installing the coil. All machines use an upper thread and a lower thread. The threads in the spool must be placed on the upper spool holder, then the thread passes through the thread guide to the foot and is finally inserted into the needle. The lower thread must be placed inside the bobbin at the bottom of the machine: the thread is wound from the main spool with the help of a thread take-up onto the bobbin. To wind the thread, you need to start the winding mechanism, when the process is completed, it will automatically turn off. The bobbin ready for work must be placed in the space under the needle, and the tip of the thread should be left outside.


- Connect the pedal and place it in a convenient place for you.
- Now the device can be plugged into the network and try to make a few lines.

Learning to sew on a sewing machine
Before you start sewing on a new machine for the first time, you need to adjust the speed, learn how to start and stop the device.
- First you need to put the electric machine to idle.
- Try to set the device in motion by lightly pressing the ballast pedal with your foot.
- Increase the sewing speed by depressing the foot control more firmly.
- If you take your foot off the pedal, the machine will stop working.
It is best to repeat the above steps 2-3 more times.
Now you can proceed directly to work.
- We prepare the fabric: we fold it in half, sew it on our hands, and then use chalk to draw a variety of broken and curved lines.
- We put the machine in the workplace and refuel it.
- Sew the fabric along the marked lines.
If you succeeded, congratulations! Now you can try to sew something more serious.
In order for the equipment to serve properly for many years, it must be looked after and properly operated. Here are the basic rules for caring for an electric sewing machine:
- The machine must be stored in a cool dry place. Dampness spoils the mechanism.
- Keep the device away from dust, which contributes to the hardening of the oil and sluggish operation.
- If the machine has not been used for a long time, then it must be thoroughly cleaned of dust, dirt, and then the rubbing units should be treated with oil.
- After a long “downtime”, it is imperative to change the needle to a new one, as it can become rusty and begin to tear the thread.
Video instruction
Using the machine is easy if you follow the instructions and our recommendations. For a more accurate understanding of the threading process, watch the video instruction.
What you will learn from the video:
- Removing the bobbin case from under the bottom panel of the threading machine.
- Winding thread on a bobbin.
- Inserting the bobbin into the bobbin case.
- Attaching the bobbin case to the bottom of the sewing machine.
- Threading the upper thread through the first thread guide, thread tensioner, second thread guide to the needle.
- Pulling up the bobbin thread and getting ready to work.
In contact with
The old mechanical sewing machine broke down, and I wanted to replace it with a new, electric one from China. And without knowing it, he took for review "the one from the Teleshop on the couch."
What came of it, read the review.
At first I wanted to take the most sophisticated one with 7 types of stitches, but the manager replied that it was not available and suggested the simplest one. Following the proverb “even a tuft of wool from a thin sheep” agreed.
I boasted to my brother about the upcoming acquisition, and here for the first time I heard about the advertisement of the typewriter from the Teleshop. It sounded pretty troubling to me.
Dispatched pretty quickly. After 20 days I received the parcel by the post of the Netherlands.
The box is quite normal. A little wrinkled along the way.
Dimensions 23x21x13.5 cm. 

The kit includes: a spare needle, a needle threader, two empty bobbins and two with threads - black and white. 
The machine also comes with a large manual in English. 


There is a possibility of control by means of a foot pedal.
The pedal itself is quite small, 88 mm long, 57 mm wide.
The cable length is 150 cm, the plug is very similar to an ordinary 3.5 mm minijack.

Powered by either four AA batteries or mains power.
Power adapter with European plug.
Cable length 110 cm.

Claimed characteristics.

Both adapters are connected to the corresponding ports on the stern of the machine.

The photo above shows my first disappointment. We get the cars out of the box and it is immediately clear that it is cheap. Flimsy plastic. Gaps between parts, etc.
The length of the machine is approximately 19 cm, the height is also 19 cm. It weighs only 640 g without batteries.


Width 97 mm.


At the bottom is a compartment for batteries.


Now let's get acquainted with the control of the machine.
Power button.

To the left of it is the operation speed switch, Low-High, respectively.

At the top of the back is the flywheel.

In the middle of it is a peg for winding the thread on the bobbin.
The hairpin is put on the peg, and the coil on this retractable rod.


Then, throwing the thread over your finger or pencil, you need to start the machine idle and you can wind the thread.
There is a bobbin holder on the front.

From it, the thread goes to the upper thread tension regulator.

The presser foot lifter lever is located on the back of the machine. Made of plastic and quite thin, there are big doubts about its reliability.

On top of the front of the machine is a small light bulb.

And also a small blade for cutting the thread.

The hole in the needle plate is small, oval in shape.

The lower bobbin is hidden under the translucent cover.

It is held in the recess with a weak magnet.

I didn’t manage to disassemble the machine, since the screws are at the bottom of deep “wells” and I needed a long screwdriver.
After receiving and inspecting the machine, I decided to read the instructions, but I did not want to translate from English.
I started searching for information on the internet.
I did not find the instruction in Russian. But I found that this machine is sold under many different names - Tailor, Sinbo, Irit, Fanghua FHSM-203, etc. And almost all the feedback from users was negative.
Then, in search of instructions, I went to Youtube. The program “We destroy the sewing machine from the TV store - Advice from Everything will be kind - Issue 407” did not leave a stone unturned from hopes for high-quality sewing. And the last nail in the coffin is the ROSTOV. The Truth About Mini Sewing Machines by a Master Sewing Machine Repairer.
The information that everything inside is plastic and cannot be repaired frankly did not please.
But still, the opinion of strangers is one thing, and your own is another.
Let's check the machine in action.
I don’t see the point of inserting batteries inside, so I connected it to the network. Used to control the pedal. It is quite normal, only it is small - I literally had to press it with my big toe.
The backlight is not very good.

Let's start with a simple thin fabric. I found an old cotton shirt sleeve.

Seems not bad. Only the seam pulls the fabric, it is necessary to adjust the thread tension.
Front side.

Reverse

Stitched fine.

Tried to stitch the cuff. The machine stopped and the thread flew out of the needle.
Now a piece of knitted T-shirt. Look at the backlight at the same time.

On the front side, just a loose seam. Note that the fabric does not pull.

But on the other hand, a complete failure.


It is necessary to adjust the tension of the lower thread, but the device does not have such an opportunity. Absent.
And finally - the control shot. Two layers of heavy denim.

The front seam is small, looks good.

But on the reverse side, the thread is just straight, it cannot even be called a seam.

Thus, the machine can sew, but needs to be adjusted, but there is no such possibility. Pulls on thin fabric. When sewing on thick fabric, there are problems with the lower thread, and sometimes the machine just stops, cannot sew.
As they called it in the program - a machine for handkerchiefs.
It could be recommended for very undemanding users, if not for the price. For this money, the machine will not work either for handkerchiefs or for a child to be pampered.
Once again, the goods from the Teleshops have shown their unsuitability for use. Bypass them.
That's all.
Thank you for your attention.
update. It turned out that the upper hairpin with a thread was installed on the contrary.
Turned over, tried to adjust the thread tension. It only got worse. Now the thread flies out of the needle all the time. The machine does not sew.
The product was provided for writing a review by the store. The review is published in accordance with clause 18 of the Site Rules.
I plan to buy +9 Add to favorites Liked the review +67 +99Sewing machine PMZ class 1-A, produced in 1952. This instruction is suitable for all lockstitch machines PMZ of the plant named after. Kalinin with hand and foot drive, up to the latest produced models with an electric drive. The text of the instruction is left almost unchanged, in the original version of the PMZ plant.

Sewing machine PMZ:
1. Screw for adjusting the foot pressure. 2. Thread take-up lever. 3. Front cover fastening bandage. 4. Front cover. 5. Nut for adjusting the tension of the upper thread. 6. Thread take-up spring adjuster. 7. Thread take-up spring. 8. Tension washer. 9. Thread guide. 10. Thread cutter. 11. Presser bar. 12. Presser foot screw. 13. Sliding part of the needle plate. 14. Fabric engine (rake). 15. Needle plate. 16. Platform. 17. Coil rod winder. 18. Winder tension regulator. 19. Needle bar. 20. Needle holder. 21. Screw for fastening the needle holder. 22. Needle bar thread guide. 23. Sewing machine foot. 24. Sleeve sewing machine. 25. Coil rod sleeve. 26. Latch winder. 27. Flywheel. 28. Winder pulley. 29. Winder spindle. 30. Friction screw. 31. Stitch regulator cover. 32. Regulator lever for straight and reverse stitching. 33. Stitch adjuster screw.
The purpose of the sewing machine PMZ
1. The machine has a center bobbin shuttle.
2. The highest number of revolutions per minute - 1200.
3. The stitch pitch is the largest - 4 mm.
4. Material feed in forward and reverse direction.
5. Flat platform measuring 371 x 178 mm. 6. Machine head weight (without manual drive) - 11.5 kg.
2. Sewing machine PMZ. General operating rules
1. According to the instructions, the flywheel of the machine must rotate in only one direction - towards the working person. Do not rotate the machine in the opposite direction (away from you), as this may cause tangling of the threads in the hook.
2. When the machine is not in operation, the presser foot should be raised.
3. Do not start the machine without a fabric under the presser foot, so that the teeth of the feed dog (rails) do not become dull and the bottom surface of the presser foot is not damaged.
4. Do not pull or push the fabric with your hands while sewing. The needle can be bent or broken. The necessary advancement of the fabric is carried out by the machine itself.
5. While sewing, the front sliding plate above the hook should be tightly closed.
3. Bobbin case and bobbin of the PMZ sewing machine

In order to replace the bobbin in the bobbin case, you must first move the front slide plate that closes the bobbin, then grab the latch "A" with two fingers of your left hand and pull the bobbin case out. When the latch is open, the bobbin cannot fall out of the bobbin case, as it is caught by the latch hook. To remove the bobbin, you need to release the latch into place, turn the bobbin case open side down, and the bobbin will fall out.
4. Winding the bobbin
To wind the bobbin, a special winder is attached to the back of the machine sleeve near the flywheel. The winder works in conjunction with the lower thread tension device located on the right corner of the platform. When winding the bobbin, the mechanism of the machine should not work. Therefore, before starting winding, you must first turn off the flywheel so that it rotates completely freely, without causing movement of the machine mechanism. To do this, you only need to turn the round knurled head of the large friction screw located in the center of the flywheel. The bobbin is installed on the end of the winder spindle so that the stop pin of the spindle enters the slot in the bobbin. Put the spool of thread on the spool pin. The thread from the spool is pulled down, under the washer of the tensioner. Then up onto the bobbin through the hole on the left side.

The winder frame, in which the spindle with the bobbin rotates, is pressed down by hand so that the rubber rim of the pulley comes into contact with the surface of the flywheel. The free end of the thread on the bobbin must be held by hand for some time until a sufficient number of turns are wound on the bobbin to secure the end of the thread, after which this end is cut off. After the bobbin is fully wound, the winder frame turns off automatically, moving the bobbin away from the handwheel. If the rubber rim does not come into contact with the handwheel when winding the bobbin, the bobbin winder frame needs to be adjusted. To do this, unscrew the screw in the slot of the winder adjustment plate, press the winder frame down to the flywheel and, holding it in this position, fix the screw with a screwdriver in a new position on the plate. With the correct winding of the thread on the bobbin, the turns fit evenly and tightly to each other. If the winding turns out to be uneven or irregular in shape, you need to adjust the position of the lower tensioner on the platform, slightly move the tensioner bracket along the platform slot in the desired direction. To do this, with a screwdriver, you must first release the screw of its fastening.
5. Threading in the bobbin case of the PMZ sewing machine

The wound bobbin must be taken with two fingers of the right hand, making sure that the free end of the thread runs off the bobbin from right to left. The bobbin case is held with the left hand in such a position that the oblique thread slot on the edge of the cap is on top, and the bobbin is inserted into the cap.
Pull the thread with your right hand through the slot on the edge of the cap to the left under the tension spring, then into a small slot at the end of the spring. The free end of the thread should hang to the left of the cap setting pin.
6. Inserting the bobbin case into the sewing machine

The threaded bobbin case must be put in the machine. To do this, take the bobbin case by the latch with two fingers of the left hand, put it on the central rod "H" of the hook so that the finger "K" of the bobbin case enters the slot of the overlay plate on the stroke body. Release the latch and press the bobbin case inward until it locks on the central rod of the hook. Leave the free end of the thread hanging and close the hook by sliding the front plate.
7. Installing the needle at the sewing machine PMZ them. Kalinina

The needle must be inserted at the highest position of the needle bar, which is achieved by turning the handwheel. The flat side of the flask on the needle should be turned to the left, i.e. outward, and the long groove on the needle blade to the right, i.e. inward to the base of the sleeve.
Pay special attention to the correct installation of the needle, because if the needle is incorrectly installed, the PMZ sewing machine will not create a loop and gaps will appear. In the indicated position, the needle is inserted into the needle holder "E" and moves up to the stop, and then firmly fixed with the screw "1".

Before threading, turn the handwheel of the machine toward you by hand so that the thread take-up lever with the thread eyelet comes to the upper position. A spool of thread is placed on the spool pin on top of the sleeve and the thread from the spool is carried out in the following sequence:
1. Forward to the left through the rear left thread cutout "1" on the front board and down to the tensioner.
2. Between the washers "2" of the tensioner and up behind the tab "3".
3.Into the eye of the thread take-up spring"4".
4.Up through the eye of the thread take-up lever "5".
5.Down into the thread guide "6" on the front board.
6.Down into thread guide "7" on the needle bar.
7. From right to left through the eye of the needle "8". Pay special attention to threading the needle. You need to refuel only from right to left, i.e. out.
9. Preparing the PMZ sewing machine for sewing products

Before you start sewing, you need to pull the bobbin thread out. To do this, take the needle thread by the end with your left hand, without pulling it. Then turn the handwheel of the machine towards you so that the needle first drops into the hole in the needle plate, grabs the lower bobbin thread and then rises again to its upper position. After that, you need to pull the needle thread at the end and pull the bottom thread up through the hole in the needle plate. Then the ends of both threads, upper and lower, are pulled back and placed under the foot. The presser foot is lowered onto the underlay and the machine is ready to sew.

The manual drive is installed and fixed on the rear ledge of the sleeve, located under the machine's flywheel. The manual drive consists of a housing "1" with two toothed gears (large and small), a drive lever with a leash "2" - for engagement with the flywheel of the machine and a folding handle "3" - for rotation by hand.
After removing the wooden case of the machine, the hand drive handle - "3" is usually folded down to the idle position, and the leash - "2" is disengaged from the flywheel.
To bring the drive into working position, the handle "3" must be turned and brought into the socket of the latch "A" on the large gear, having pulled the previously round latch head, without which the handle cannot be brought to the proper position. Having installed the handle, release the latch, which locks. Leash "2" must be turned in such a way that the leather gasket enters between the flywheel matches. A special latch holds the leash in working position.
Having fixed the flywheel of the machine on the working stroke, by means of a friction screw and lowering the foot on the lined fabric, they begin to evenly rotate the handle of the manual drive with the right hand, always only in one direction - away from you. The flywheel of the machine will then rotate towards the working person.
11. Work on the PMZ foot sewing machine
The foot machine is set in motion by alternately pressing either socks or heels on the footboard of the machine. With proper work, both legs of the entire foot should lie on the footboard, and the left leg should be located slightly behind the right. The footrest of the machine should be rocked as evenly as possible.
The drive wheel should only rotate in one direction - towards the seamstress. Beware of the wrong direction of rotation, as this can lead to tangling of the threads in the bobbin. The inclusion of the machine in the course is made by a friction screw in the same way as for a manual machine.
12. Instruction PMZ. End of sewing

Stop the machine in a position where the thread take-up lever is up and the needle has come out of the material. Then, raising the lever "P", raise the foot, move the fabric away from you with your left hand and cut the threads at the end of the line on the edge of the thread cutter located above the presser foot. For further sewing, the ends of the threads 8-10 cm long are left. The thread tension in the PMZ sewing machine is of great importance for the quality of sewing. The interlacing of the upper and lower threads should occur in the middle of the material to be sewn. The stitching on the front and on the bottom side should have the same look. If the upper thread tension is too tight or, conversely, the thread tension is too loose, the threads will tangle on the upper side of the material. The car winds up. It turns out fragile and ugly seam. To eliminate this phenomenon, you need to loosen the tension of the upper thread or increase the tension of the lower thread.
If the upper thread tension is too loose, or vice versa, the lower thread tension is too high, then the threads will be tangled on the underside of the material - the machine will loop from below. The seam is not durable. In this case, you need to increase the tension of the upper thread or loosen the tension of the lower thread.

Upper thread tension must be adjusted with the presser foot lowered. The amount of tension is increased by turning the nut "K" to the right and vice versa is weakened by turning counterclockwise. By noticing the appropriate position of the pointer, you can quickly navigate to the correct tension setting. The bobbin thread tension is adjusted by screw "A" on the bobbin case tension spring (see the figure above). When turning the screw (with a small screwdriver) to the right, i.e. clockwise, the bobbin thread tension increases. When turning the screw to the left, i.e. counterclockwise, the tension decreases. If the bobbin thread tension has been set correctly, it rarely needs to be changed; in most cases a good stitch can be obtained by simply adjusting the upper thread. Too much tension may cause the thread to break.
In addition to the correct tension, the quality of the stitch also depends on the correspondence of the needle number to the thickness of the material to be sewn. For the sewing machine, needles No. 70, 80, 90, 100 and 110 are used.
The thicker and rougher the material, the higher the needle number should be and the lower the number of threads used, i.e. the needle and thread should be thicker. On the contrary, the thinner the material, the lower the needle number and the higher the thread number, i.e. the needle and thread should be thinner.

The stitch length, i.e. the distance between needle pricks, for ordinary materials is provided in the range of 1.5 - 2 mm. For thin materials, the stitch should be more frequent, for thick materials - less often. The longest stitch that can be produced on the machine is 4mm. The required stitch length is set by the regulator "B" according to the scale numbers, which are printed on the cover of the regulator and show the approximate stitch length in millimeters. When the regulator lever is set to the highest division of the scale, which passes in the middle of the cover and does not have numbers, then there will be no fabric feed at all.
When the machine is running, lever "B" must be in the down position. The lower the regulator lever is lowered, the less often the stitching will be, i.e. the stitch length will be longer. On the contrary, the higher the regulator lever is set, that is, the closer to the upper division of the scale, the stitch will be more frequent or the stitch length will be shorter.
When the regulator lever is lifted up from the center line, the machine will reverse the direction of the material feed, i.e. when the machine is operating, the material will move to the worker.
In order to change the stitch length, you need to move the regulator lever to a new scale division corresponding to the desired stitch length.
The transfer of the regulator lever to a new division is carried out as follows.
Let the regulator lever "B" be at any division of the scale and it must be moved down to a larger stitch step. Lowering the regulator lever down is prevented by an internal limit plate located under the regulator cover and clamped by the left head screw. "A" in the left arc slot of the cover. In order to be able to lower the lever lower, you must first release the specified screw "A" and move it along the slot to its lowest position. After that, set the regulator lever to the desired scale division, move the left screw "D" up the arc slot to a stop and fix the screw "A". To obtain a more frequent line, the lever of the regulator "B" is moved up to the corresponding division of the scale, after which the screw "A" is released, moved up to the stop, and then fixed again.
14. Reverse material feed direction
The PMZ sewing machine can sew in both forward and reverse directions. With the reverse feed direction, the material during sewing will move towards the worker. In order to switch the machine to reverse, you only need to move the regulator lever "B", which is in the lower position at a certain division of the scale, up to a stop. The stitch length remains unchanged. Switching the machine to reverse feed can be done without even stopping sewing or removing fabrics.
15. Material presser foot pressure adjustment
The amount of presser foot pressure rarely needs to be changed. But when sewing silk or light fabrics, it may be necessary to slightly reduce the pressure, for which the screw is turned two to three turns to the left, that is, counterclockwise. When sewing thicker materials that require more pressure, the screw "K" is turned two to three turns to the right, that is, clockwise. The pressure of the presser foot on the material should be sufficient to ensure uniform feeding of the material and to prevent the material from lifting along with the needle. Too much pressure only makes the machine difficult to move and spoils the material,

To ensure easy running of the machine and to prevent wear of rubbing parts, all places of the machine indicated by arrows should be lubricated daily with a few drops of oil in each place if the machine is running continuously. For lubrication of hard-to-reach parts, the machine has lubrication holes. In order to lubricate the needle bar hinge, you must first remove the front cover by releasing the screw securing it. The direction for the shuttle in the travel housing is lubricated with one drop of oil. The place indicated by the letter "A" must be lubricated when the needle is in its lowest position.
Device and repair of a manual sewing machine Podolsk. Each photo of the units and mechanisms of the sewing machine is commented by the master.
The PMZ sewing machine is a fairly reliable and "hardy" machine, but over the years it has had "backlashes" of many nodes that need to be eliminated. It is necessary to adjust the needle bar, check the gap at the nose of the hook when it meets the needle, etc. On our website you will find a lot of materials on how to make repairs with your own hands, including for PMZ sewing machines.
The most dispersed machine. Probably every house or country house has such a sewing machine. The Podolsk machine got its name from the city in which the PMZ plant is located. The first letter in this abbreviation means Podolsk. Read this article on how to repair PMZ sewing machines on your own.
Sewing lockstitch machines PMZ have one unique property. They practically do not skip stitches. Even with a gap between the nose of the shuttle and the blade of the needle is almost 1 mm. they stitch reliably. But, nevertheless, it is with such a "breakdown" that they most often turn to the master. It takes exactly a minute to eliminate it, because you only need to correctly place the needle.
Does your machine break needles? You may just be using a very thin needle when sewing thick fabrics. But there are a number of other reasons as well.
The first PMZ models have a foot and manual drive. For information on how to repair a foot drive used for any brand of cars, read this article.
Sewing machines PMZ equipped with a manual drive, which very often requires repair. The handle dangles, the drive rattles and rotates tightly. This article provides recommendations on how to independently repair a manual drive for a PMZ sewing machine.
The bobbin for any machine plays an important role, especially for old PMZ. The fact is that over the years of use, notches appear on metal bobbins from needle strikes, and the lower thread, clinging to them, often breaks and winds.
Good afternoon
I love creativity, I often sew small crafts, and also sew for household needs, I decided to order a sample, I’m not afraid to order a word - a miracle of technology - a manual sewing machine, I called it Portable Needlework Cordless Home Sewing Machine Quick Table Mini Handheld Manual Single Stitch Fabric Clothes Sewing Machine, but this is the same machine with Aliexpress, so there may be slightly different names due to different sellers
I didn’t believe that the machine would sew at all, ask why I ordered it then, honestly out of interest. The machine went for a long time, but I didn’t really need it so much, so I didn’t languish in anticipation.
Came in a box, the needle was intact - this is the first thing to check, it happens that they break on the road, carefully open the box so that a piece of the needle does not fall.

I had a whole needle, most often the machine comes ready for sewing, but still you need to make sure everything is right.
- There is a little thing in the box to insert the thread quickly, as well as a wand for your narrower bobbin.

Let's start by inserting the thread and start sewing.
- First, check that all the threads are on the bobbin, and not in the opening between the bobbin and the stick on which the bobbin stands. When winding the thread, make sure that you do it on the bobbin, and not in the gap between;
- We thread the thread into a plastic ledge as in the photo;

- Next comes the thread tensioner, it can be adjusted and sometimes it doesn’t work to sew, because the thread is either too tight or vice versa it’s weak, but there’s no single answer, you need to try to carefully adjust the tension, but for now, don’t adjust anything until you try to sew, DO NOT MAKE A LOOP WITH A THREAD, you don’t need to make a whole turn around the tensioner, the thread for you to understand should roll down the hill and then it goes into an imperceptible at first glance - a loop - a hook ok, as in the photo, we pass it through this hole as in the photo:

- Here is the hook under the tensioner:

She stepped on the hem of her skirt with her heel, her husband ripped off his trousers at a friend’s wedding, and the child’s dress came apart at the seam before the performance. What to do? A manual mini sewing machine is your indispensable savior in such a situation.
Content
Sewing mini-machine: how to use it correctly? Are there any differences from the usual
The mini sewing machine is designed for minor repairs of clothes, curtains, tablecloths, bed linen, etc. It is effective to use it on the road, as well as at home in the absence of a stationary sewing machine. But what about in a house without a machine for repairing and sewing things up? If you don’t know how to sew at all, or you don’t have enough money or space for a stationary model, then a small sewing machine will become a worthy substitute for a needle and thread and a good helper in everyday life.Advantages of mini sewing machines:
- mobility - such models weigh from 100 to 300 grams, are small in size and fit exactly in an ordinary women's handbag. You can take them with you on a visit, trip or business trip.
- ease of use - the device is very simple. It is enough to insert a thread into the needle, and you can start sewing. Easy even for a child
- versatility - can sew fabrics of different thicknesses (from chintz or cotton, to denim or leather in several layers)
- variety of stitches - such devices perform up to 70% of the types of seams of conventional models of stitching machines. They can sew even stitches, bounce stitches, buttonholes, simple decorative patterns and chain stitch finishes.
How to thread a mini sewing machine

Unlike conventional machines, the stitcher works with only one thread. You will not have to difficultly thread the top and then the bottom thread, use bobbins, check the thread thickness, etc.
Any sewing thread is suitable for the stitcher. To properly fill them, you need to clearly follow the instructions.
Advice! If the instructions upon purchase turned out to be in a foreign language or difficult to write, remember and mark for yourself the layout of the already threaded thread in your new model. You can easily repeat it.An example of the threading sequence for the Handy Stitch machine can be seen in the figure.
Depending on the thickness of the fabric, you should choose the right size needle and insert it not deep into the needle groove.
With a special screw or switch, you can adjust the length of the stitches or their shape. For example, stitch, zigzag, buttonhole, etc.
Here, perhaps, and all the difficulties of refueling. Further, by pressing the handle (like a stapler), you can sew the details of your product.
Rating of the best and cheapest mini sewing machines

Now in online stores you can find a huge number of mini-sewing machines from various manufacturers. Which one to choose? Let's consider further...
Zimber Mini Cars
Characteristics:- weight does not exceed 305g.
- maximum stitch length is 4mm
- the model is capable of performing 8 different operations
- body made of plastic
- equipped with an electric motor that runs on AA batteries (four pieces) or a rechargeable battery (500mAh). The battery is charged from the mains through the adapter. The device can also be operated directly from the mains
- the package includes 3 spools of thread, a threader and instructions in Russian
Mini Handy Stitch Machine
Characteristics:- weight - 305g.
- Operates with AA batteries. They need 4 pieces
- Comes with 3 bobbins with thread, 2 needles, thread guide
- body made of plastic
Jaguar Mini Cars
Jaguar has long been known among customers for its lightweight, but practical and functional models of stationary sewing machines. The smallest model is the Jaguar 281.Features of the Jaguar 281 car model
- The body is made of plastic, the functional parts are metal
- Lightweight small model. Does not take up much space in the house
- Powered by an electric motor
- Adjustable stitch length from 0 to 4 mm
- Performs a simple line stitch and different types of zigzag
- The kit includes extra needles, shuttles, bobbins, needles
If you do not need to take the device with you on vacation, and you plan to use it at home, then this model is “on top”.
At the moment, the Jaguar 281 mini-car is not being produced, but it can be successfully bought on the used equipment market with a cost of about 4 thousand rubles.
Mini cars with aliexpress
The cheapest way to buy a small sewing machine of a modern type is at the aliexpress site. The minimum price of such products starts from $ 2:- DIY brand machines from $2
- 2017 mini models - about 7 - 9 $
- stationary mini sewing machines Dual from $18
- embroidery machines - from $ 21, equipped with an overlock
Advice! Manual mini-sewing machines will not replace stationary sewing machines for you. They can only help to quickly repair parts, perform minor repairs to clothes and bring undoubted convenience on the road. It is impossible to compare their work with the work of stationary machines, these are completely different devices.


