How to make an angel out of white paper. Kind paper origami angel
How to make an angel with your own hands
A DIY Christmas angel is a great decoration for your home during the holidays, which you can make according to your preferences. You can make figures of the required sizes from different materials - it can be not only textiles or paper, but also colorful decorative ribbons. After reviewing several master classes, you can combine certain materials and create completely new crafts. For decorating crafts, use whatever you like. The main steps look like this:
- selection and preparation of materials, tools.
- production of component parts of the figurine with subsequent connection.
- decoration - the head of an angel can be decorated, for example, with a ribbon or chenille gold wire.
Angel with your own hands
A master class on making Christmas angels will be of great interest to primary school teachers, teachers of additional education and all those who are fond of crafts and souvenirs. Among the options offered, there are both relatively simple ones and more complex ones that will require some skills from the performer. Angels from:
- fabrics;
- paper;
- thread;
- plasticine;
- tapes;
- beads;
- test.
Angels can be sewn with your own hands from fabric using such types of textile material as burlap, calico. A synthetic winterizer or cotton wool is used as a filler. You don't have to do any complicated patterns. Prepare:
- white calico;
- cotton threads;
- synthetic winterizer;
- a ribbon or chenille wire of gold color;
- satin ribbons 0.6 cm wide;
- scissors.
Prepare two squares of white fabric measuring 20x20 cm and 15x15 cm, a rectangle of the same material - 9x15 cm. Manufacturing steps:
- For the head and body of the angel, take a square of 20x20 cm, fold it diagonally.
- You can add volume to the head if you put a piece of padding polyester in the middle of the folded square. As a result, a ball should form, which should be wrapped with a thread.
- To form handles, fold the corner inward along the edges and tie with a thread.
- Then mark the waist, which should be tied with a thread.
- For an angel skirt, take a rectangle 9x20 cm. Gently fold the material around the waist in folds, tie it.
- Make wings from a 15x15 cm square (make the edges in the form of a fringe). Fold the material diagonally, and collect the wings in the middle with a thread.
- Attach the resulting wings to the body by crossing the thread on the chest.
- You can decorate your head with a gold ribbon or chenille wire. Tie a pair of satin ribbons around the waist. Do-it-yourself fabric angels can be decorated with any decor if desired.

Paper angels can be presented to guests at a children's party or hung on a Christmas tree. Making them is easy, so connect your kids to the creative process. Prepare:
- scissors;
- glue or stapler;
- disposable paper plates;
- colored paper;
- felt-tip pens or pencils;
- adhesive tape, aluminum foil.
You will need some skill to draw the wings and arms that will need to be cut out for the figurine. There is no need to fold anything:
- Cut a paper plate in half and fold one of the halves to form a cone. Fasten it with a stapler or tape.
- From the second half you need to cut wings, arms. Then glue them to the body.
- From colored paper, you need to cut out palms, face, hair - glue all these details to the angel. Draw the nose, mouth, eyes.
- To make a halo, use a strip of aluminum film 12.5x9 cm, which must be twisted with a flagellum and rolled into a ring.

You can even make original New Year's angels with your own hands from threads. For this you will need:
- cardboard template 5.5x8.5 cm;
- thick paper for the cone;
- braid (red for a bell, silver or gold for a halo);
- yarn;
- glue "Titan";
- accessories (bells, snowflakes, branches of an artificial Christmas tree);
- material for wings - lace braid, tulle or organza.
To start, wind the yarn around the template and cut the threads on one side. Then divide into 3 parts. For hands, count 9 threads, for tying - 8. Leave the rest for the head and torso. Then:
- Take a bundle for the body with the head, tie in the middle.
- Fold the bundle in half, outline the neck and tie.
- Tie a bun at one end with a thread, braid and tie at the other end. Connect the pigtail into a ring, tie with a thread and cut off the ends. Insert the resulting hands into the middle of the body. Additionally tie a thread on the belt.
- For the palms, you need to fold the pigtail in half, and then tie the thread. Pass the ends of the threads under the pigtail, tie from the back on the belt.
- Glue a paper cone with a base diameter of 2.5 cm and a height of 3 cm. Glue it under the skirt, trim the bottom of the latter. Glue a halo on the head. You can make hair from threads of the desired length.
- Glue the ribbon to the bottom of the skirt. From braid or organza, make a rectangle 3x6 cm, tie it in the middle and glue the resulting wings to the body. You can glue a snowflake, a bell, etc. into the hands of an angel.

Plasticine angel can be used not only as a decoration, but also as a charm. To prepare such an angel, prepare:
- plasticine;
- a stack and a knife for the mass;
- a couple of toothpicks or one skewer.
Decide on the color scheme in which the figure will be molded. To sculpt the arms, legs and head, prepare the flesh-colored material, and the rest of the details can be made from plasticine of any shade you like. For example, make dresses from blue mass, hair from brown, and wings from light blue. Roll all the pieces into balls, and then:
- A cone-shaped blank is created from the blue mass. At the same time, press the lower part to form a skirt. Do the same for a couple of sleeves.
- Roll up the head, then connect it together with the dress and sleeves with toothpicks or a piece of skewer.
- From body plasticine, mold 2 large and 10 small balls. Then attach them to the bottom of the dress to form the legs. Then create the palms and connect them to the sleeves.
- On the face of the angel, make a couple of indentations with a stack. Glue black balls-eyes inside, not forgetting to make highlights. Next, attach the round nose and create a smile.
- Make oblong cakes from the brown mass, fix them on your head - this will be hair, draw curls with the tip of a toothpick. Complete the figure with ears.
- Attach wings of 12-14 thin white "sausages" to the back, which need to be flattened.
- At the end, attach a halo of a thin yellow “sausage” to the crown. You can place flowers in your palms. Draw fingers, eyebrows, eyelashes.

From tapes
Angels can even be made from ribbons. They can be used as spectacular decorations or decorative elements. For this you will need:
- decorative tape 6 cm wide with a wire edge;
- decorative lace;
- big bead;
- stapler;
- ruler;
- scissors;
- glue gun.
First, prepare a couple of pieces of tape 22 and 25 cm long. After that:
- Take a long ribbon and make an accordion. On one side, cut the wire edge, secure with a stapler, and then straighten it - you get a skirt.
- For the wings, take the second tape, from which you also make an accordion, then fasten it with a stapler in the middle and gently straighten it.
- Glue the skirt and wings of the angel with a glue gun.
- Thread a string into the bead, tie it and glue it on top - you get the head of an angel.

From beads
You can also make delicate angels from beads with beads. The result is beautiful, original figures. For this you will need:
- white beads (5 g);
- silver beads (3 g);
- blue bead (1 pc.);
- fishing line or wire with a diameter of 0.3 mm (50 cm).
In addition, you will need patterns for weaving an angel and wings. Follow these steps in accordance with them:
- String a large bead on one end of the wire, and thread the other end into it, but only in the opposite direction, i.e. crosswise.
- Move the bead to the middle of the wire and string 15 beads on either end of the latter. Pass the end of the wire through the bead crosswise, making a loop.
- Tighten, and then twist a couple of wires with each other a few millimeters down. The result is a halo.
- Make the wings by stringing 19 beads onto the wire. Move the nearest one to the edge, and pass the wire through the second one.
- String 22 beads, twist the wire at the top of the wing. In the same way, make the second winglet, then twist the ends of the wire with each other.
- In the next step, you need to string one white bead onto the end of the wire, the other end of which should be threaded through the bead in the opposite direction.
- Make handles on the same row by stringing 4 beads (white), 1 bead. After skipping the bead, thread the wire in the opposite direction through 4 beads (white) and tighten. Weave the second handle in the same way.
- At the end, you need to make several rows of white beads that will make up the body of the figure: 2, 3, 4, 5, 6, 7, 8, 9. At the end, the wire will remain to be fixed with several turns, cut off the excess.

You can make an angel yourself, as in the photo of different thematic catalogs, from dough. For this you need:
- salty dough;
- rolling pin;
- molds (stamps for modeling);
- foil;
- notches for cookies;
- paper clips;
- garlic press.
It must be said right away that the parts are fastened with a wet brush, and the figures need to be baked at a temperature of 50 degrees for 1-2 hours. For the dough, you will need 1 glass of flour and fine salt, and a little warm water (how much flour will take) - mix all the ingredients thoroughly. Stages:
- Roll out a little dough, cut a glass of mugs that need to be cut in half. On each half, make notches on the cut line with a toothpick. Next, poke holes all over the area. This is how you get the wings.
- For the dress, also roll out a piece of dough into a layer, along the lower edge of which you need to trim the irregularities. Make a pattern at the bottom using mold. Raise the layer, then lay the folds.
- Wet the folds with a brush, connect and also glue the wings from below.
- Make handles from small “sausages” - sculpt carefully. For the head, roll and flatten a small ball, mark the nose, mouth.
- Put a small piece of the mass into the garlic press. The end result is hair. Moisten the joints of the hands, head and hair, then glue them.
- Prepare feet from small cakes, then glue them to the dress. Put the toy in the oven to dry. Finish with paint or varnish.

Video
In any religion, angels play the main role, since it is these creatures that are closest to the deity. Images of angels, in addition to religious books and icons, can be seen on Christmas cards, rooms and lush green Christmas trees are decorated with their figures at Christmas, so many people associate this holiday with these white-winged creatures.
Figurines of angels- A wonderful decoration for Christmas, which can be easily made with your own hands. This can be done by both adults and young children, so crafts can be done by the whole family. In addition, such a Christmas angel can be a great gift for relatives and close friends. A paper angel is the most popular figurine for Christmas, because everyone has paper at hand, and he himself the process of creating an angel won't take much time and effort.
Volumetric angels are more suitable as a paper figurine that can be put on a festive table or decorate a room with it, and if you stick a string, such a craft can be hung on a Christmas tree. To make a three-dimensional paper angel, you need to follow the following instruction:
- The first step is to cut out two truncated cones, one of which should be smaller than the other in size. These cones will become the dress for the angel.
- Another sheet of paper needs to be folded in half and draw on it the outlines of the face and neck of the future angel. In front, with a felt-tip pen or pencil, draw the face and bangs of the figure, and you can draw hair in the back. Cut out the figure without separating the two pieces at the top of the head.
- Make a circle with a hole made of paper, preferably yellow. This yellow circle will become the figurine's halo.
- Bend a long paper rectangle in half and from the top corner on the fold side, start drawing a triangle with rounded ends. After cutting out, straighten the resulting sleeves. To them it is necessary to cut and glue the palms.
- According to the template or cut out the wings of an angel yourself.
- Now you need to assemble the figurine. At the very end of the cone, “put on” the head of an angel, attaching it with glue. A halo is glued to the head, and just below the top of the cone, where the angel's neck ends, you need to attach your hands. The wings must be folded in half and attached to the back of the figures. If desired, you can thread a thread into a halo and hang a craft on a Christmas tree.
If it is not possible to draw necessary elements on your own, you can use a specially prepared template that can be printed.
Gallery: paper angel (25 photos)


Paper Christmas Angel
 The easiest way to make an angel out of paper is available to all ages. To make the next Christmas angel, you only need scissors and an A4 sheet. The resulting figurines can decorate the room by hanging them on windows, walls or even on a chandelier. To make such interesting decoration you can use a special angel stencil, with which cutting will become faster, or show your imagination and create your own unique angels. Whichever method is chosen, there is only one instruction for making crafts:
- A sheet of paper of the selected format must be folded in half and on one of the received sides draw a half of an angel: a wing, part of a halo and a dress.
- The dress and wings of the figurine, if desired, can be decorated with small stripes at the ends, which can later be wound on a pencil and make the angel more voluminous. There are no restrictions on the choice of the shape of the wings: it all depends only on the imagination and skills of the person involved in the manufacture of crafts.
- After cutting out the details, unfold the sheet and lower what should have been a halo down. Thus, the halo will turn into hands folded in front of the angel's face. The resulting decoration will look interesting along with several more of these angels flying on a string under the chandelier.
You can also hang near the chandelier waldorf angels, whose stencils can be easily obtained on the Internet or drawn by yourself. In such angels, a small incision is made in the back area, as well as on the wings, which are subsequently connected, and the angel looks voluminous. For making crafts cardboard is usually used, which is famous for its higher strength, but paper can also be suitable for a Waldorf angel.
Paper angel figurine
 Cute angel figurine can become beautiful Christmas tree toy or perfectly fit into the Christmas interior. Making such a craft is easy if you use a template or draw your own, similar to the one shown in the photo.
- Transfer the drawing to paper or print it on paper from which you are going to make a craft.
- Cut out the shape following the marked lines.
- Bend the resulting figure so that you get an angel with spread wings.
- Make a small hole in the angel's head with a needle and thread a thread to hang the ornament on the Christmas tree.
Among all Christmas decorations, angels are the most popular. Their figures are easy to make at home from paper by the most common cutting. With this kind of work even small children can handle which makes making Christmas angels a fun family activity. The angel craft can easily decorate a house or a Christmas tree during the holidays and bring the spirit of Christmas to all family members.
One of the most inexpensive and easily accessible materials for crafts today, as always, is paper. At the same time, with a certain imagination and skill, you can make almost everything your heart desires from it: from the simplest products, such as snowflakes and boats, to practical masterpieces of art and incredible skill - paintings, three-dimensional figures using quilling technique, origami, and so on. Further. One of the great craft ideas that are available to both adults and children are do-it-yourself paper angels. Their diversity allows you to create decorations or gifts with your own hands for New Year, Christmas or other holidays. It is not scary if ideas for crafts are drawn from books or on the Internet. After all, the main thing is the result and a lot of pleasure from your own creativity.
Simple doesn't mean ugly
In order to make paper angels, you can use a variety of options, one of which may seem  quite clumsy, but very simple and attractive.
To work on the craft in this version, you need to prepare:
- A4 paper;
- small scissors with pointed tips;
- simple pencil
It is with the help of a simple pencil that you can display contours or paper angels on a sheet of paper, which you can then successfully use to create various compositions.
If you replace the copier paper with a denser option, which can be cardboard, a sheet of drawing paper or even a paper plate, then the crafts will gain significant stability, which will allow you to install them on a horizontal surface in any place you like.
Making do-it-yourself paper angels can eliminate the volume factor, then figures cut out of paper, regardless of color and configuration, can be successfully placed on the surface of a dark background, which will create a stunning panel. And after additional decoration of paper angels, stencils for which they were used, with sparkles or tinsel, you can get a surprisingly tender and heartfelt gift for dear people.
We create voluminous paper angels with our own hands
To perform an angel in the easiest way, it is worth folding the prepared paper sheet into grinds. On the one side  of a bent sheet, apply the contours of a figure with a halo above the head, drawing the details, and cut them out. As a decoration of the dress, it is worth cutting out small geometric and symmetrical elements on the fold. The type of wings can be made according to your own taste. The prepared figure can be turned around and the upper part of the halo is gently bent forward, thanks to which the angel will have hands, as if prepared for prayer. Glue is needed to fix the folds in the area of the shoulders and palms.
The simplest version of the three-dimensional figure of an angel can be a little more complicated if you experiment in the process of cutting out, adding openwork elements, and creating additional volume with a simple pencil, thanks to which you can successfully “curl” the edges of the wings and the bottom of the clothes.
To create a composition of three-dimensional figures, it is worth trying to cut a cloud out of thick paper, to which, using threads or ribbons decorated with sequins or beads, you can hang light figures, also decorated with sparkles. It is realistic to install such a composition not only under the chandelier, but even in the doorway or attach it to.
Angels as decoration for the Christmas tree
If you create angels for a Christmas tree from paper, then all family members can be involved in the process of decorating crafts. Christmas  decorations can be made with paper or paper plates, scissors, glue. The uniqueness and ease of paper crafts of angels lies in the use of templates from specialized books or the Internet. At the same time, the template you like in form and content must be printed or translated using a carbon copy, independently determining the size of the craft. Then the template is transferred to paper or a plate, outlined and cut out along the proposed lines.
How to make paper angels for a child yourself? He should use the proposed templates or colored paper, from which a pair of truncated cones can be cut out for the dress of the future angel. If a template is used, then it is worth gluing the workpiece to give a cone-shaped “body”.  You can make a face out of beige paper, using felt-tip pens to draw the necessary facial features. For the wings, two blanks are needed, which, connecting with each other, are fixed on the cone. For a halo, you should use yellow paper. Two blanks should have a round shape with an empty center. Sleeves are made from rectangles folded into neat cones. The palms are also cut out of beige paper.
At the end of the assembly, you can attach a ribbon or thread so that the crafts can be easily hung on the Christmas tree. For a wide variety and attractiveness of the figurines, it is worth using curly scissors and paper with different colors and textures. Paint can also come into play.
Origami angels, in the style of quilling ...
There will be no question about how to make paper angels for those who are fond of origami. There are a lot of performance options. One of them is the kusudama style. It is quite complex and requires time and manufacturing skills. The same can be said in the case when do-it-yourself paper angels are made in quilling styles. Here, children can not do without the help of adults with the necessary knowledge and skills.
IDEAS PACK AND TEMPLATES


Homemade Christmas decorations have been relevant and popular at all times. After all, it is precisely such a thing, created in a single copy with warmth and love, that can not only decorate the interior, but also bring warmth, comfort and peace to the house. These are figurines of animals made of papier-mâché, and various hand-painted balls, and, of course, paper angels. A master class on creating them using several well-known techniques is presented below.
Flat paper figures
This is the easiest technology that even toddlers can master. You will need white paper, a simple pencil, acrylic paints, brushes and a silhouette of an angel. You can draw it by hand, buy a ready-made stencil, or circle it using a book. Before cutting out an angel from paper, you need to draw a contour with a simple pencil. The finished figure can be left snow-white or you can draw a face with paints and paint wings. An angel is hung on a chandelier, glued to a window or decorated with a Christmas tree.
To make the figurine more openwork, the edges of the wings are figuratively cut off and an ornament is applied from holes using an awl or a thin needle.
"Fan" angel
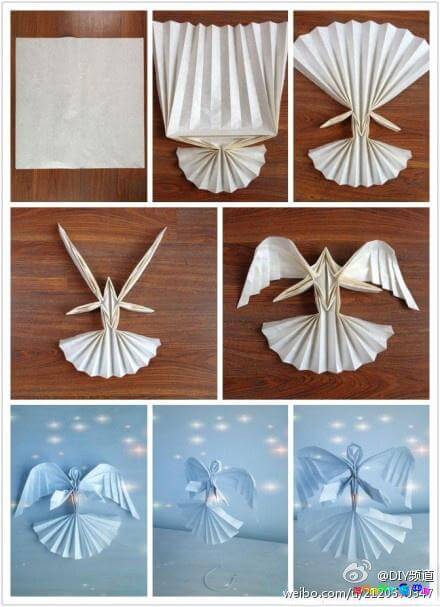
This technique is more often used when making a “bird of happiness” out of paper. But the angels, assembled from paper with their own hands according to this principle, turn out to be very cute. They are hung on chandeliers, Christmas trees or just on a carnation in the wall. Thanks to the voluminous wings, it creates the feeling that the figure is floating above the floor. Any paper will do, but the most interesting option will be from an openwork (but dense) napkin. Its edges should not be even, but intricately carved or decorated with ornaments. 2 napkins (or 2 pieces of paper) are folded alternately in opposite directions, getting 2 fans. One of them is fastened in the middle with a thread or sewn (these will be the wings), and the second is attached to the edge (the body). Then they are connected together. A face is made from thicker paper or cardboard. At the end, the figurine is decorated with beads, paper flowers or other elements and a thread is attached to it. With a little fantasy, you can detail the angel by adding arms, legs, a collar, or attaching a halo of wire.

little magic
It turns out that the most ordinary paper napkins can turn into a desktop angel. To do this, you need a minimum of effort, glue and a little imagination. Thick napkins in pastel colors (not necessarily white) will do. Before making an angel with your own hands from paper according to this scheme, a circle is drawn on it (or you can take openwork coasters for coffee and tea cups). Then, having removed a segment approximately equal to a quarter of the entire area, the remaining part is folded and glued along the edge, getting a cone. If the paper is thick enough, the workpiece will hold on to a flat surface without assistance. Wings are glued to it by cutting them out of the second napkin (you can combine different colors). A head is attached to the top of the cone. It can be just a cardboard circle, a small ball, or a funny baby face cut out, for example, from a postcard. In the presence of spray paint of golden or silver color, you can add shine to the finished composition.
Acting according to this scheme, disposable cardboard plates, napkins, paper coasters and, in general, everything that bends, sticks together and has a round shape are easily turned into angels.

Origami
This ancient Japanese technique, which allows you to create animals, people and other objects, will help those who are thinking about how to make an angel out of paper with their own hands. It should be noted right away that this art is not simple. So without experience and preparation, making an angel will not be easy. But with perseverance, patience and a certain skill, everything will certainly come out.
Paper is needed white or colored, moderately dense, for example, a square-shaped sheet. It is folded in half, and then doubled again, but already like a book. Opening its edges and pressing them down, form a trapezoid. Further, its upper part is lowered down, receiving the letter "T". This is the preparation of the future angel. It needs to be bent along, and then wings are symmetrically formed by repeated deformations. For beginners, it makes sense to stop at a few folds. Such do-it-yourself angels come out of paper easily. In doing so, they will be quite recognizable. Those who have more experience should continue and form additional folds, and then a head.
Papier mache
How to make an angel out of paper with your own hands to make a real sculpture? Occupation, it must be said, is not an easy one. And it will take much more time to create one figure than in all previous versions. But the result will be completely different.

Any paper will do, but you also need glue (PVA or other available), water, acrylic paints, wire and paper clips. And, of course, patience. Before you make an angel with your own hands, a mass is prepared from paper. It is torn, crushed and poured with hot water. And then boil or soak for about a day to soften it. At the end, squeeze well and, adding glue, bring to the consistency of the dough.
A base is formed from the wire, which is covered with papier-mâché. As a result, the wings are made of wire, from paper clips or bird feathers. After the sculpture dries (about a day), it is covered with paints, a face is painted and decorated with decorative elements.
A paper angel can be created using any technique for working with this material. Both children and adults can do this. The most important thing is to work with a good mood, putting a piece of warmth into each figure. Then a real guardian angel will come out, who will bring light, peace and joy.
How to make an angel with your own hands is a timely question, since there are only a few days left before Christmas. In this article I will tell you how to make an angel with your own hands from various improvised materials.
The Christmas holiday is one of the most beautiful winter Christian holidays with two thousand years of history. He returned to our homes in all his solemn splendor.
A long tradition of the Christmas holiday is to decorate your home and Christmas tree with figurines of Angels - symbols of the Bearer of the Good News. Angels have supernatural powers and can bring happiness to a home. Anyway, I believe in it!
Delicate angels will decorate the forest guest on Christmas night, give us a feeling of joy, warmth and light. You can make them from various materials, and each Angel will be good in its own way.
Angel with your own hands
napkin angel
Such cute angels can be made from ordinary pasta.

We will need: pasta (different), glue, wooden balls or large beads, paints, satin ribbon. Glue pasta together, as in the photo. Glue on the wings.
 Decorate an angel. Angels are associated with white as a symbol of purity, warmth and, of course, Christmas. Therefore, we will paint the blank with white paint. Draw eyes and hair with a marker.

So that the toy can be hung on the Christmas tree, we glue the tape. The Christmas angel is ready.

As you can see, you can make such an angel in just half an hour and give it to your loved ones. Seashell Christmas Angel

 For making you will need: a flat seashell, a large bead, transparent Moment glue, organza braid, glitter glue, lace, sequins. From the braid we make a bow and fasten it with a stapler in the middle.

We thread the lace into the bead so that a loop is obtained on one side. Tie knots on both sides of the beads.

Gently glue the bead to the shell. (To make it easier to glue the bead, leave a piece of lace on the side opposite the loop).

Now glue the bow in the center, closer to the bead.

We take glue with sparkles and squeeze it onto the convex part of the shell. Smear the glue on the shell. While the glue has not dried, you can additionally sprinkle the shell with sparkles.

Let the toy dry completely for 2-3 hours.


To create such a gentle creation, we need only 1 cotton cosmetic pad, a toothpick, glue, scissors with a zigzag effect
We divide the cotton pad into two thin ones and we process the edges of one of them with scissors:

In the center of the disk with "cloves" we form the head:

Spreading wings...

We fold the second half of the disk in half, form a cone and glue it around the toothpick

Then glue the wings to the cone:  Now it remains only to decorate our angel to your taste.
 fashiony.ru

To create this cute Christmas angel we will need: 3 coffee filters (or appropriately sized round napkins) 9 cm high cone (can be cut out of Styrofoam) 1 toothpick Styrofoam ball with a diameter of 2.5 cm 30 cm of gold braid White thread glue Gold color plastic ring Making an angel: "We put on" one filter on the cone. We fix it on top with a toothpick so that three quarters of the toothpick go inside. We put a ball on the remaining quarter of the toothpick outside - this will be the head of an angel. We “put” the second filter on the ball, tie it with a white thread along the “neck” line. Tie a gold ribbon around your neck. Fold the third filter in half and tie in the middle to make wings. Glue on the back. Glue a golden plastic ring on the angel's head. It is very easy to make Christmas angels from ordinary fabric. Just look at what beauty is obtained in 1 hour of work. Draw a pattern on paper and boldly cut it out of the fabric, the seams can be made external.

 On Christmas Eve, God sent a little angel to earth:
“How will you go through the spruce forest,” he said with a smile,
- You will cut down the Christmas tree, and the little one is the kindest on earth,
Give the most affectionate and sensitive, as a memory of Me.
(F. M. Dostoevsky).
Please your family, give everyone your guardian angel! We hope that we were able to answer the question "how to make a paper angel with your own hands."


