Beanie hat made from an old sweater. How to sew a hat from an old sweater
Here are some good tips for upcycling old sweaters, and they're not just sewing projects. Almost all of these ideas can easily be swapped out for hot gluing when the instructions call for it. And felting - when something wool "shrinks" when you use hot water in the washing machine, something you've probably avoided your whole life - but this is what will make the fabric thicker and reduce the chances of the knit unraveling.
Bonus tip: Don't use sweaters that someone else has hand knitted for you, or they'll never talk to you again.
When cutting the sweater, be careful not to let it unravel. For most thin store-bought machine-knit sweaters this will likely be fine, but for larger, bulkier sweaters you will need to use the hem and cuffs where possible. If there is no way to avoid the raw edge, you can fold it over and secure it with hot glue. If you are more craft oriented, you can stitch with a stiff stitch, leaving about a half inch from the edge of the cut.
1. Sweater Bracelets:
Keep your wrists warm.
Source: organizeyourstuffnow.com

2. Or try this option that requires a little sewing skill.
Source: rebekahgough.blogspot.com

3. Sweater mittens:
You can use a glue gun if you don't know how to sew (and if you've always wanted to learn, this is an amazing and easy project to get started with. And if you get stuck, you'll still have plenty of fabric left over for future attempts)
Source: abeautifulmess.typepad.com

4. And this option is for those who prefer fingerless mittens:
There is a very simple method: simply cut thumb holes in the cuffs of two sleeves and shorten the sleeves to the desired length.
Source: pinterest.com

5. Sweater Pillows:
Prepare to never leave your couch once you make these pillows.

6. Pumpkins:
Very easy option and perfect for Halloween.
Source: confessionsofaplateaddict.blogspot.com


7. Simple Sweater Covered Wreath:
This wreath can be decorated to your liking.
Source: craftylittlegnome.com

9. And leggings:
You can decorate these leg warmers in different ways.
Source: madebylex.com

10. Covers for cups or glasses:
This method will help keep coffee and tea hot.
Source: sweetcsdesigns.com

11. Soft Bag:
This bag can be used as a reusable shopping bag.
Source: perchedonawhim.com

12. Knitted Basket:
This basket is best used to store all your yarn.
Source: marthastewart.com

13. Lampshade
Source: pinterest.com

14. Knitted vase
Source: lunareeceart.blogspot.com

15. Place for animals:
This project will definitely take more time and effort as it requires felting and sewing. But the joy of a dog, or a cat, or an iguana, or any other animal you own makes the result worth the effort.
Source: craftinggreenworld.com

16. This option does not require felting, but still requires sewing. But just look at this little face!
Source: womansday.com

17. Cover for heating pad:
An old sweater works great as a cover for a heating pad.
Source: nikkishell.typepad.com

18. And this version is very cute too.
Source: bornagain-creations.com

19. Notebook Cover:
If you plan to hot glue the edges together rather than sew them, use a second layer of glue to reinforce the edges and make sure they are as strong as possible. In any case, this won't save your computer if you suddenly lift it, but it will make it a little more comfortable.
Source: artsyants.blogspot.com
20. Wine Bottle Case:
This stunning, easy project requires no skills other than cutting and pinning (and drinking).
Source: brassyapple.blogspot.com

21. And almost the same easy option with felting.

22. Rug
Source: homeworkshop.com

23. Gift wrapping:
Cut the cuff and wrap it around a small box.
Source: youtube.com

24. Knitted headband
Source: alisaburke.blogspot.com

25. Amazing Chair Cover:
All of these options require pins or a stapler.
Source: apartmenttherapy.com

26. If you are ambitious enough, and you have a chair with upholstery, then you can try to cover it too.
Source: pinterest.com

27. Make slippers from sweater sleeves
Source: amymorby.com

28. Or simply cut out shoe insoles to replace the ones you have
Source: mayamade.blogspot.com

29. Ring Scarf:
Sewing here can again be replaced by hot gluing. You may even be able to get by without finishing the edges at all, especially if you want an aged look.
Source: borganic.net

30. Covers for mugs, vases, ottomans, table legs, pillows and dogs.
1. Sew a chair cover from an old sweater.
2. Make a coaster or book cover from an old sweater.
3. Sew an old sweater into a bag.
Making a hat from an old sweater:
1. Wash the sweater in warm water with powder (even if the item is clean, but has been lying unused for a while, it is better to refresh it).
2. Lay it out on a flat surface and dry the sweater. 
3. We choose which part we will sew the hat from. I decided to use the “back” of the sweater, as opposed to the front, it had a more “fresh look”. 
4. Cut out an even rectangle with the expectation that the elastic at the bottom of the sweater will be the edge of the hat. I cut the rectangle before the armholes begin. 
5. Sew our hat. Everything is simple here - we sew our rectangle along its entire length from the inside out using a machine or by hand to make a “pipe”. We process the edge of the hat in a way convenient for you so that it does not “crumble” and tighten it. You can tie the tightened edge with a lace and leave it like that (the effect of a tied bag).
6. We are thinking about how we will decorate the hat. I knew my daughter's weakness for natural fur, so I decided to make a hat with a fur bubo. This fur was taken from a small jacket. Plus it was... pink, well, what girl wouldn't like that? On the front of the hat I sewed a small bow from a piece of sweater and also decorated it with a little fluff.
It turned out to be a lot of fun. 


From an old sweater you can make hats and other models:
It could be a hat - damn it. 
These can be neat hats according to the size of the head. If you want, cut out and sew “ears” to such a hat. 
It could also be a hat with no bottom. This model can also be worn with a turn up. 
What else can you make from an old sweater?
The sleeves make excellent leg warmers for girls. They can be decorated with drawcords and tassels.
- The part with the neck can be used to make a cozy case for a heating pad. The heating pad in such a case is more pleasant than in the form of “bare rubber”. This can be a stylish gift - you will spend no more than half an hour making it, and there will be no additional costs.
- You can use a sweater to make a couple of decorative pillows for the sofa.
- From the sleeves of a sweater you can sew homemade socks and slippers. To do this, you need to sew up the cut edge of the sleeve (in a semicircle), sew on a sole made of felt or leatherette and decorate your slippers. Slippers in the shape of bunnies look original.
- It’s very easy to make fashionable “mittens” from the sleeves of an old sweater. 
In our case, they will have to be done without the thumb. But you can always hide your entire hand in them. Teenagers really like this kind of stuff. In addition, these mittens can complement a hat from the same sweater. Well, if the leftover sweater is enough for a small scarf, you are guaranteed an ultra-fashionable set.
- Pieces of an old sweater make great soft toys. These things have been gaining popularity lately. Even when decorating Christmas trees, cute knitted bunnies and snowmen are increasingly being used.
- From small remnants of a sweater, sew a couple of pincushions. Pincushions in the form of hats, decorated with flowers, look beautiful. But the most interesting option for me is the one from childhood - in the shape of a hedgehog. Even a child can make such a pincushion with your help. The hedgehog's eyes and nose can be embroidered or made from buttons. I'm sure your child will love making such a gift.
If we sew small-sized jeans from ours, we will get a good bag for every day, and if we use men’s jeans, then, depending on their size, we can make a stylish and durable bag for walks and picnics or a durable, huge beach bag. It's very simple; cut off the legs (which can be reshaped into handles for a bag) and sew the jeans along the bottom, inserting the bottom or not, depending on the amount of free time.


You can insert a belt into the preserved belt loops: bright, with rhinestones, leather; or a colored silk scarf.
In jeans with wide legs, flared jeans, you can use not only the upper part, but also the legs, to create an extraordinary messenger bag.

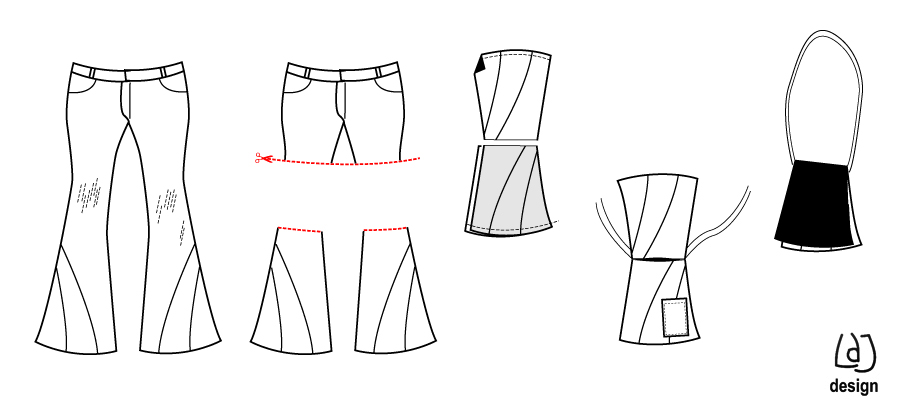
It also makes a wonderful pant leg yoga mat cover. It is enough to sew up one end of the trouser leg, and the other
insert the tape to tighten it. Attach a handle for carrying over the shoulder.
Jeans photo camera case.
- Wallets and cases for gadgets.
The presence of pockets on finished jeans makes it easier to create stylish, functional hand-made accessories.
Interior items. All kinds of potholders, blankets, rugs, baskets, for sewing, containers, etc.


- Or make ribbons and intertwine them with the simplest weave, creating an elastic base for a bed (like reinforced mesh, but not creaking) or for a chair.

- The best material for making a homemade ottoman is, of course, jeans.


Finally, if there is still something left from the jeans, tear these remains into narrow strips - you will get original shoelaces.
There are so many things you can do with them.

Nobody wears them anymore, and it’s a shame to throw them away. Common situation?
If you are planning to dismantle your wardrobe, this does not mean that your old sweater, which has already served its purpose, needs to be thrown away. If you love knitted things, you can decorate your home and yourself for the cold season, creating warmth and comfort around you. And all thanks to your sweater.
I bring to your attention 10 wonderful ideas that will make you feel like magicians in some way. Choose the “transformation” you like!
1. Cute hat
One or more old sweaters - for example, ones that children will no longer wear because they have outgrown them - can be made into warm hats for the winter.
You can also use additional fabric to insulate or shape your new hat.

A warm sweater can make 2 options for a winter headdress.

Place a hat of the desired size on the sweater, trace the outline (taking into account the seams). Sew 2 parts of the hat using a sewing machine or by hand.

Or this hat is very easy to make and will take about 10 minutes. 
The sewing algorithm is simple:
1. You will need: an old sweater, scissors and an old hat that you usually wear to measure your size.
2. Cut the bottom half of the sweater to the desired length.
3. Cut this part of the sweater along the seam.
4. Use an old hat to measure the size you need and cut off what you don't need.
5. Fold the resulting part into 3-4 layers.


6. Cut an arc at the top.
7. Sew the two edges of the hat.
8. Sew the top arcs.
9. Trim off the excess along the seam, turn it over and the hat is ready!

Here is a similar video instruction, only instead of using a glue gun, we will not glue, but sew the seams.
2. Warm mittens or mittens
All you need: a sweater, scissors, needles and thread (or a sewing machine).

Cut the mittens so that you can use the “elastic” (the bottom part of the sweater). Before cutting, take measurements from your hand or take a mitten from the person you are making new mittens for. Now all you have to do is sew the parts of the mitten from the inside out and turn them right side out. Ready!

Do you want to have mittens made with your own hands in a matter of minutes? 
Follow the next steps in the photo and read the instructions below to make sweater mittens: 
. Prepare the sweater: A wool sweater (at least 80% wool, but preferably 100%) works best for this idea. Wash the sweater with warm water, then dry it on a hot radiator to clump the wool fibers together so they don't fall apart when you cut. Your sweater will shrink significantly after drying. Tip: Wash your sweater in a mesh bag to avoid clogging the machine from wool fibers.
. Turn it inside out sweater inside out and place it on the table. Place your hand on one of the side edges of the sweater and trace the shape of the mitten around it. Add about an inch around the entire perimeter to ensure a seam. Don't forget to leave the bottom for cuffs.
. Cut out along your contour a mitten.
. Secure front and back layers with a few pins along the edges.
. Sew: Thread the needle through the floss and make simple stitches along your outline. Make sure the bottom of the mitten is wide enough for your hand to fit easily. Remove excess fabric. Be careful not to cut too close to the stitching as it may fall apart.
. Now comes the fun part! Turn the mitten inside out to see the finished handmade product.
. Decorate: Use buttons, colorful threads and other embellishments to add interest to the mitten.
. Repeat all steps on the opposite side of the sweater for another mitten.
It’s even easier to make warm mittens: 
These mitts are very convenient for using a smartphone in winter.
- From the edge of the sweater, cut a rectangle 30 cm high and 20 cm long. Cut along the seam so you have two pieces.

- Fold both pieces lengthwise with the right sides facing inward. Mark a hole about 6 cm wide for the thumb using pins, 5 cm from the edge.
- Then stitch, leaving a hole for the thumb and making a hem at the bottom.
Or like this: 
- Cut the cuff from the sleeve.
- Determine your preferred glove finger length. Add about 2 cm to this length and cut off the sweater sleeve.
- Secure the sleeve cut on a sewing machine with a zigzag stitch or overlock stitch.
- Wrap the ends into the sleeve 2 cm and sew with a needle and thread.
- Put the glove on your hand and determine the desired location for the thumb hole. Cut where you want the hole to be. Carefully unravel the stitching threads until the hole is a comfortable size for your thumb. Then secure the hole with a thread and a needle so that the threads do not continue to unravel.
- Since the sleeves are a little looser than gloves should be, you'll need to reduce the diameter a bit. To do this, put gloves on your hands, pinch the excess fabric along the length of the sleeve, and secure with a few pins.
- Take off your gloves. Hand secure the trim and seam with needle and thread using a backstitch.

3. Elegant lampshade
You can use any sweater for a lampshade, but if you want an original and beautiful decor, then it is better to look for something cute among unnecessary things.

Next, you need to stretch the sweater over the lampshade and trim off the excess material at the top. At the same time, leave about 3-4 cm of material to fold and hot glue the edge along the top of the lampshade. Just a sight for sore eyes!

Or make something like this:

4. Gift wrapping
Your fall or winter gift can be soft and cozy! Cut strips of fabric from an old sweater and create a stylish package of your own. You can use yarn for decoration (bubo, fringe). Or you can wrap the entire box and make a bow at the top. I wish you bright ideas!

5. New Year's wreath on the door
Warm greetings to everyone!
You can take a circle made of straw as the basis of the wreath. You will also need: a sweater (preferably red, green or shiny for the New Year), a glue gun and decor.
Cut the seam of the sweater sleeve to wrap the sleeve around the wreath piece. Glue the material at the joint and cut off the excess fabric. Take the remaining fabric and finish the next section of the wreath in the same way. Once the wreath is trimmed with fabric, add the desired decoration (letters, sparkles, pine cones, etc.).

6. Sweater for your beloved dog
For small dogs, you can use just the sweater sleeve, but make sure the dog fits in it before you get started.

You can make a sleeveless vest or sweater with three-quarter sleeves. Your dog will look stylish and will not freeze on a walk or in a cold house.

Simple overalls for dogs
Before you decide to sew clothes for your pet, you need to take accurate measurements. This is done according to the scheme. A dog jumpsuit does not require a lot of measurements. You only need to know the distance from the middle of the neck to the tail and the length of the limbs.

Well, if you decide to accurately adjust the clothes to the size of your pet, you will need to take more measurements: neck circumference, chest volume (at the level behind the elbow bends), the length of the hind and front limbs, the distance from the neck to the tail, as well as from the bottom of the neck to the navel. All measurements must be done with your own hands using a special tape with millimeter divisions.

Explanation of values:
A - neck circumference;
B - distance from the middle of the neck to the tail;
C - distance between the hind and forelimbs;
D - length from collar to sleeve edge;
E - chest circumference behind the elbows;
F - girth of the hind limb at the widest part;
G - girth of the forelimb at the widest part;
H - muzzle circumference.
Elementary pattern: 
In order to make a pattern, you should determine the size from the neck to the tail of the dog, then divide it into eight parts. One part will become the cell of your diagram. Next, using the cells, you can draw the details of the product, which will subsequently need to be transferred to the fabric of the sweater.
7. Cozy flowerpots, mugs
This is an easy way to decorate plastic pots. For example, an idea for the finishing touches when decorating the house at the last minute for a holiday party.

Sweater sleeves are suitable for decorating flowerpots. Measure the height of your pot and cut off part of the sleeve, leaving about 4cm of extra space. Place the fabric over the flower pot and, if necessary, trim the edges (sew, glue, etc.)

A simple but interesting touch to your interior: 
Using the same principle, you can dress vases, mugs, etc. in winter clothes. 

8. Pet bed
If you made a pillow for yourself, take care of your four-legged friend too. Sewing a bed from an old sweater is probably even easier than sewing an ordinary pillow.
To do this, simply insert a pillow into the sweater itself (preferably a thick one so that it does not press under the weight of the animal), tightly stuff the sleeves with any fabric material, fasten them together so that they frame the resulting base and act as a side. That's it, the bed is ready.

If you are not good at needlework, it will most likely not turn out very smooth, but believe me, your pet will still be grateful to you, especially since this bed will smell like you, and pets really appreciate things with the owner’s scent.

Want to make it more accurate? 
1. Sew the neck of the sweater, turning it inside out, and sew the sweater at the height of the necklines
for the sleeves to create a single side.
2. Fill the side with holofiber, synthetic padding or other material.
3. Sew the sleeve cuffs together.
4. Place a round pillow inside the rest of the sweater and connect everything to the sleeves.

A comfortable bed in front of you!

9. Thought pillows
One way to decide the fate of an old sweater is to sew decorative pillows from it for a sofa. Thus, those who do not know how to knit at all will have the opportunity to decorate their home with unusual knitted items.
To make the pillows look more original, choose plain sweaters with complex knitted patterns, braids, “bumps,” or sweaters with Scandinavian patterns on a white background.

First, let's look at an old sweater. Does it match the color of the room design, does it combine with existing accessories? The sweater should not be too worn, otherwise it will not turn out to be a nice, neat new item. As a last resort, we use only well-preserved parts of it.

Place the pillow on the sweater and mark the size you need. 
We cut off the top part of the sweater with the neck and sleeves and cut out a pillow cover of the size we need.
Sew the sides and top.


You can make a button closure on the bottom part or simply sew it up after the pillow is placed in the cover.

It will take a minimum of cutting and sewing work, but such pillows will delight the eye for a long time and create a warm and welcoming atmosphere in the home.
You can decorate them as you wish with buttons, flowers, or other decorations.

10. Plaid
To make your own blanket, collect all the woolen sweaters in the house. I think every housewife has things that have not been worn for a long time, but still look quite decent and can serve as excellent material for a future blanket. Think about what color scheme you would like your blanket to be in. For my blanket I used about 10 sweaters in blue, gray and cream. But you can use more. Some of my sweaters I bought on sale, and they cost me only $1, or you can visit second-hand stores that sell fairly high-quality items at a reasonable price. Ask your friends, they might be happy to give you their unwanted woolen items!

Pre-prepare your sweaters: open seams, remove buttons, snaps, zippers. Sort fabrics by color and wash them separately by color to prevent them from fading.
Place sweaters in an old pillowcase to prevent lint from clogging up your washing machine. Then wash them with detergent in hot and then cold water, finishing with a spinner.
This is necessary in order to see which of the sweaters shrink more during the washing process, and which do not change their original shape at all.

To do this, you need to prepare a template of the desired size from cardboard. 
After making the squares, figure out how they will be arranged by laying them out on the floor. 
You can start sewing. I used the largest straight stitch on my sewing machine. Leave an allowance of about 1/4 inch. Sew all the pieces together, gently pushing the fabric, if necessary, slowly drag it through the sewing machine. After sewing, the sewing machine will have to be thoroughly cleaned, as a lot of lint remains.

Here are the large pieces I finished with before making the final seams. 
From the inside it looks like this: 
I also made a wool lining for my blanket, you can use flannel which would also make a great lining. I also rounded the corners of the blanket using the template.

As for the finishing, I do it by hand using a closed overlock stitch. I really like the look this stitch gives to the blanket. This is exactly how I imagine a warm and cozy blanket at home. I hope the photos help give you a better idea of how to make the stitch.


Imagine how useful it would be to have such a blanket handy on the sofa on cool winter evenings. 
Based on materials from theyou.ru, designadecor.blogspot.ru
Now your favorite sweater can stay with you for several more years!
New life for old things.
In the closet of each of us there are, if not a couple of skeletons, then certainly a certain amount of clothes that you will never wear and would be a pity to throw away.
Oddly enough, the top spot in the ranking of unnecessary/unfashionable/moth-eaten items is occupied by sweaters. If you have found such a character on the mezzanine or in the depths of your wardrobe, but for sentimental reasons you cannot throw it in the trash can, give the item a second chance. Turn an old sweater into a cute, fashionable hat.
How to make a stylish beanie from an old sweater
The on-trend DIY beanie may become your go-to accessory this spring. Or a cute gift for girlfriends on March 8th. If you have enough sweaters and an hour of free time. By the way, the ability to hold a needle and thread in your hands is not required in this case. But what you need is:
1.An old sweater (preferably with an elastic band at the bottom);
2. Glue gun;
3. Measuring tape or tape measure;
4. Scarf for visual measurement (although a “centimeter” can be used for the same purpose);
5. Sharp scissors;
6.Marker or chalk. 
1. Tie the scarf around your head, secure it so that it is comfortable: not tight, but not too loose. 
2. Remove the scarf without untying it and apply it to the elastic band/edge of the sweater. The length of the scarf from edge to knot will be the width of your hat. 
3. Attach a measuring tape to the middle of the scarf and measure the height of the future hat. Rely on your taste or take measurements from your favorite hat of a similar design. The average height of beanie hats is in the range of 24-29 cm. 
4. Draw the shape of the future accessory. Don’t be afraid to stain the fabric with a marker - as a result, the measurements will not be visible at all. 
5. Now – cut. The main thing is to grab both layers of fabric at the same time. Therefore, the scissors must be really well sharpened. 
6. After the two halves are ready, take a glue gun and connect them, gluing along the very edge, as shown in the photo. Don't forget to leave the bottom unsealed, otherwise you won't be able to put on the hat. 
7.After the hat has already begun to resemble a hat, it’s time to take the scissors again and trim the top a little. This step is necessary so that the beanie fits better and does not resemble the “cockerel” familiar to many from the days of happy childhood. 
8. Fold the hat as in the photo below and glue the edges of the resulting “figure eight”. 

9. Now turn the hat inside out and put it on boldly. All seams, traces of glue and minor defects are reliably hidden from prying eyes. 

Even if the first hat pancake comes out lumpy, don’t be afraid to experiment and get better at it until you become a real master or destroy all the old clothes in the house. By the way, you can make leg warmers from the sleeves of a sweater, like the girl in the video. Waste-free crafts.
The method of converting a sweater into a warm skirt is quite popular, but frankly speaking, such a thing is not suitable for everyone, since thick fabric visually enlarges the hips. We suggest making more practical things from an old sweater - a hat and mittens.
Some people simply cut out two parts of a hat from the sweater fabric and sew them together, but this is wrong, since the shape of the hat will look ugly. The neatest hat that fits exactly on the head is made from 3 or 5 petals. This applies to both male and female models.
1. Cut off the sleeves from the sweater and set aside, now you will only need the chest and back.
2. Cut out 5 petals from the main fabric. To determine the width of the petal, measure the circumference of your head with a centimeter and divide this number by 5, add 1-1.5 cm on each side for allowances.
The length of the petal depends on the model: if the hat should fit tightly on the head, then the petal is equal to the length from the eyebrow to the middle of the crown. If you want an elongated model like a beanie hat, then the length of the part should be 10-15 cm longer.


3. Sew all the petals together using a machine. It is better to zigzag the inside seams to prevent the threads from fraying.

4. The final step is to sew on the elastic strip. If you cut out the details for the hat in the middle of the fabric, then the edge will be raw, so you need to sew an elastic strip there, which will serve as a border. If you cut the petals close to the bottom of the sweater, that is, together with the bottom finished edge, then you do not need this step.
So, cut out a strip of fabric from a sweater, equal to the circumference of your head, 6-5 cm wide, and sew it into a circle. We bend the edges and, as it were, wrap the bottom edge of the hat with this strip. Sew with a zigzag.


That's all, using this simple sequence of actions you can sew a hat from an old sweater with your own hands. The work takes from 30 minutes to 1 hour.
Sweater mittens: master class
So, the main part of the sweater went to sewing the hat, but the sleeves remained. Therefore, you can make excellent mittens from a sweater. To do this, you will also need lining fabric, such as fleece - then your mittens will be very warm.
1. Cut the cuffs from the sleeves and open the seam. Cut out all the pattern pieces in 4 pieces: 2 from the main fabric and 2 from the fleece.
VERY IMPORTANT: for parts 1 and 2 - you need to cut 4 pieces as shown in the pattern, and 4 pieces in a mirror image.


2. Place the two parts of the inside of the mitten with right sides facing each other and sew the thumb area (no need to sew the sides).

It should look like this:

3. Attach the upper part of the mitten to this part (right sides facing each other) and sew along the perimeter except for the side where the hand will enter.
4. Do the same for the second mitten and for the lining parts. You should end up with 4 mittens: two from the main fabric and 2 from the lining. Don't forget that lining mittens are sewn with the seams facing inward.
Insert the lining mitten into the main one so that all the seams are inside.
5. From the top, face down, sew the previously cut cuff to the edge of the mitten.

6. Now it’s time to see how the sweater mitten turned out - turn the product inside out.

Now fold the cuff and sew a button on top.

We hope that the sweater hat and mittens will delight you for a long time! So don't throw away your old sweaters, but rather give them a second life!

In the closet of each of us there are, if not a couple of skeletons, then certainly a certain amount of clothes that you will never wear and would be a pity to throw away.
1:787Oddly enough, the top spot in the ranking of unnecessary/unfashionable/moth-eaten items is occupied by sweaters. If you have found such a character on the mezzanine or in the depths of your wardrobe, but for sentimental reasons you cannot throw it in the trash can, give the item a second chance. Turn an old sweater into a cute, fashionable hat.
1:1392 1:1397
2:4
The on-trend DIY beanie may become your go-to accessory this fall. Or a cute gift for girlfriends. If you have enough sweaters and an hour of free time. By the way, the ability to hold a needle and thread in your hands is not required at all in this case.
2:526 2:531But what you need is:
2:591 2:5961. An old sweater (preferably with an elastic band at the bottom);
2. Glue gun;
3. Measuring tape or tape measure;
4. Scarf for visual measurement (although a “centimeter” can be used for the same purpose);
5. Sharp scissors;
6. Marker or chalk.

3:4
1. Tie the scarf around your head, secure it so that it is comfortable: not tight, but not too loose.
3:190 3:195
2. Remove the scarf without untying it and apply it to the elastic band/edge of the sweater. The length of the scarf from edge to knot will be the width of your hat.
4:927 4:932
3. Attach a measuring tape to the middle of the scarf and measure the height of the future hat. Rely on your taste or take measurements from your favorite hat of a similar design. The average height of beanie hats is in the range of 24-29 cm.
5:18355:4

4. Draw the shape of the future accessory. Don’t be afraid to stain the fabric with a marker - as a result, the measurements will not be visible at all.
6:738 6:743
5. Now – cut. The main thing is to grab both layers of fabric at the same time. Therefore, the scissors must be really well sharpened.
7:1493 7:1498
6. After the two halves are ready, take a glue gun and connect them, gluing along the very edge, as shown in the photo. Don't forget to leave the bottom unsealed, otherwise you won't be able to put on the hat.
8:886 8:891
7. After the hat has already begun to resemble a hat, it’s time to take the scissors again and trim the top a little. This step is necessary so that the beanie fits better and does not resemble the “cockerel” familiar to many from the days of happy childhood.
9:18289:4

8. Fold the hat as in the photo below and glue the edges of the resulting “figure eight”.
10:662 10:667

12:4
9. Now turn the hat inside out and put it on boldly. All seams, traces of glue and minor defects are reliably hidden from prying eyes.
12:242 12:247

Even if the first hat pancake comes out lumpy, don’t be afraid to experiment and get better at it until you become a real master or destroy all the old clothes in the house. By the way, you can make leg warmers from sweater sleeves. Waste-free crafts.
14:1703


