Kusudama paper balls for beginners. How to make a paper kusudama ball? Master class to help the beginner. Amazing crafts in the interior
Kusudama is a three-dimensional figures assembled from a large number of paper modules. This art direction originated in ancient Japan, when kusudama balls were used to mix dried herbs and incense. Today, these balls are popular among designers and handmakers who use pieces for decoration interiors.
Simple patterns for beginners
It is believed that kusudama is a kind of origami, although in fact this is not entirely true. A distinctive feature of true origami is that no glue is used when folding paper. But the modules in clusters will have to be glued together to get a three-dimensional figure.

Photo assembly in pieces
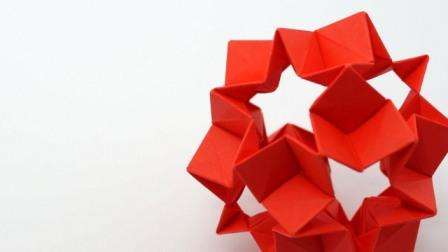
One of the simplest types of kusada is called, which means “cookie cutters”. Its elements are reminiscent of iron molds, which used to extrude figures on dough. In order to make a similar figure, you need to prepare 30 identical squares of paper measuring 7 * 7 cm. Give preference to thick paper so that the form holds well. Start manufacturing with simple modules, which are then interconnected.
How to collect kusadamu flower look at the assembly diagram for beginners:

Scheme of assembly by pieces

A simple kusadama scheme
You need to bend the side corners and end up with a rectangle from a square. Wrap the lower right corner up, bending so that it turns out to be the side of a parallelogram.
Cookiecutter assembly step by step on the diagram:

Fold the top left corner down. As a result, you will get a full-fledged parallelogram. Now you need to hide the corners with the pencil inwards.
After that, the module is turned over, folded in half and diagonally. A double triangle should form inside the module. It remains to bend the corners on both sides up and the module is ready. From all the squares you need to make such modules, and then collect them into a Kusudama Cookiecutter ball.
Watch the video: Cookiecutter master class
Master class with a photo: a ball with Kusudama flowers
An original and bright decoration made of paper can be made not only by an adult, but even by a child. You need to prepare the following materials:
- colored paper
- PVA glue
- Scissors
- ruler

Cookiecutter assembly diagram
One ball will consist of 12 ready-made flowers, each of which is assembled from small modules. Cut the colored paper into 7cm x 7cm squares. Since you need five squares per flower, you will need all 60 squares. You can make them in different colors or combine 2-3 colors.

Scheme of assembly by pieces
Each square is folded diagonally twice to highlight clear lines and the center. Fold the square diagonally into a triangle, and then fold the edges towards the center so that you get a rhombus.
Now you need to unfold the corners and bend each of them inwards. As a result, the triangles will decrease and you will get a figure as in the photo. It consists of three leaves, so it can be called a shamrock.
Bend the corners of the resulting shamrock, and then fold the module so that the triangles are inside. Press only the edges to make the figure voluminous. You have one module ready for making a kusudama flower for beginners.

When you make several of these modules, you can assemble a flower out of five. Connect the modules together with glue so that they hold well.

Photo of balls in pieces

As you can see diagrams for assembling kusudama balls simple enough for beginners, so you can make original shapes. Learn new paper art techniques and make or decorate the interior of a school, kindergarten or home. Kusudami is not just an art, because with its help you can unleash your creativity. Working with small modules has a positive effect on hand motor skills, so try making kusudama balls with your children.
Many original arts and crafts techniques came into our life from the cultures of the countries of the East. They have a special charm and are designed to bring harmony to the decor of the house or your wardrobe. For example, things made in accordance with the kusudama technique are still considered healthy in Japan today. If you believe the judgments of the Japanese themselves, these composite balls can concentrate positive energy and drive away negative energy.
Making a simple element

Kusudama is a composite art. Crafts are assembled from individual elements. The element below is the most commonly used.
You will need medium-weight cardboard or heavy paper. Choose interesting solutions in this regard: glossy or matte surfaces, multi-colored colors, you can even take paper with a pattern, pattern, stains, and so on. Next: quick fix glue, stapler and sharp scissors.
Make a lot of square blanks. 
Lay the workpiece upside down. Fold it diagonally to make a triangle. In origami, such a bend is called a scarf. 
Next, fold the left and right corners down to the middle to make a square. Remember to make clear folds. To do this, you can leave blanks under the weight of, say, books, for a couple of minutes. 
After that, fold the left and right corners down so that the edges of the cardboard meet, and bring the flaps together.
In origami, this technique is called "squash". 
Now fold back both corners. 
Carefully open both folds and fold inwards. 

Now wrap the sides. 
Connect the sides. You can use glue or a stapler. 
In accordance with the same technique, make the remaining five petals for a complete simple kusudama. Then you can combine them into a flower. 
And already from ready-made flowers you can collect more crafts. 
The hearts of the flowers can be decorated with beads or buttons by planting them on glue.
Christmas ball

To create a New Year's Electra ball, you will need:
- colored or plain office paper;
- scissors;
- PVA glue;
- thread.
The process of creating a Christmas ball:
Preparation of modules. For the module, you need to take a square of paper. In this example, the size of the square is 14.5 centimeters. We mark the lines of all possible diagonals of the square, as shown in the picture, and add a “double square” along them.


On both sides of the module, you need to bend the corners so that they become blunt.

The result is a module with two acute and two obtuse angles lying parallel to each other. 
Assembly of modules. The sharp corners of one module are smeared with glue and inserted into the obtuse corner of the second module.

We connect the modules together until the figure to be glued takes the form of a ball.
You can add colored segments to the finished ball. It is necessary to glue 5 modules of an additional color and paste them into a ball. 
The ball can be hung on a thread and used as a decorative element or a Christmas toy.
Ball kusudama lily

To create a ball with lily pieces you will need:
- colored or plain thick paper or thin cardboard;
- scissors;
- PVA glue;
- thread.

The process of creating a ball with lily pieces:
Prepare first the ball of "electra", the description of which is provided above.
We make flowers. To collect one flower, you will need 4 rectangles of green paper and 8 rectangles of the main color of the future lily. You can choose the size of the rectangles yourself.
Each rectangle must be folded in half lengthwise and the corners bent on both sides, as shown in the photo. 

We connect pink green blanks. We put one on one without glue. 
We tie the folded modules in the middle with a thread. It will turn out like a bow. We straighten the edges (future petals). 
All petals must be carefully turned out. Top direct upwards, forming a cup of a lily. 

Green leaves do not need to be bent up. 
Glue the finished lily flowers onto the electra ball. 
We present to your attention a variety of workshops on modular origami making paper pieces. These wonderful crafts are called “medicine balls” in Japan for a reason. In the old days, healing herbs were put inside paper balls, consisting of several parts, and kusudamas were hung over the patient's bed.
Today it is an element of festive interior decoration, which, moreover, is very pleasant, easy and interesting to make in your free time. In the publications of this section, colleagues share the features of this hobby.
Paper can blossom into fancy stars and buds in the right hands.
Contained in sections:Showing publications 1-10 of 31 .
All sections | Kusudama. Kusudama paper balls
Master class on Origami "Kusudama-Ball of happiness" Master class on Origami « Kusudama - ball of happiness» Hello dear colleagues, I want to tell you about origami. The literal translation of origami is folding paper, is an ancient art that has its roots in ancient China. For a long time this kind of art was available...
Master class "Postcard Kusudama" How to make flowers paper kusudami? Simply and easily! Kusudama- occupation for creative people. Origami art and kusudama came to us from Japan, where children are taught to make crafts from childhood paper birds, animals, boats, lanterns, and so on. As it turns out, many things are possible...
Kusudama. Kusudama paper balls - Paper craft. Kusudama
Publication "Crafts from paper ..." Kusudama is a Japanese paper craft. The ancient tradition of making kusudama balls, which originated in Japan hundreds of years ago, is still popular all over the world today. Kusudama "flower ball" is both beautiful and simple. It is not difficult to make it with your own hands. It only takes a little...
 MAAM Pictures Library
 Today I will tell you how to fold a beautiful and fairly easy to assemble kusudama. Kusudama or balls of happiness - this is one of the sections in the art of origami, which one way or another all beginner origami try to master. Kusudama or medicine ball is a paper model, usually...
 A few years ago, I was engaged in origami with the children of the preparatory group. We folded planes, boats, hats, even tried to fold furniture - a sofa, for many children it turned out the first time. We made flowers - tulips, lilies, of course with my help. It was exciting...
 Mommy - your eyes, Like a bright star, Illuminate my soul. I am grateful to you. I want to hug you and kiss you all over! The art of kusudama is not only cute and bright paper balls, it is also interesting themed crafts. For example, they can be made in the technique ...
Kusudama. Paper balls in the technique of kusudama - Short-term educational practice "Kusudama flower ball in the style of origami"
Relevance of practice: Preschool age is a bright, unique page in the life of every person. It is during this period that the child's connection with the leading spheres of being is established: the world of people, nature, the objective world. There is an introduction to culture, to universal values ....
 Kusudama "Bells" takes pride of place among the representatives of its series in terms of beauty and elegance, while it is assembled quite easily and quickly on an adhesive base. Now let's try to collect it. To do this, we need: 1) paper squares, in our case, there were ...
One of the components of the origami art that is popular today is the classic kusudama, which we will describe in detail how to make it with our own hands. Initially, these balls of paper elements folded in a certain way were used for medicinal purposes. Crushed medicinal plants were poured into the ball, and then tied up in the house. Today, the classic kusudama scheme is used to make various crafts that serve as decorations and decor components for gift wrapping.
We offer you a kusudama master class for beginners, thanks to which you will learn how to make the main element of the craft. Having made several of these paper elements, you can create balls and entire compositions using the Kusudama technique.
We will need:
- paper;
- glue;
- scissors.
- We fold a square piece of paper (you can use sheets for notes) in half diagonally. We should get a triangular shape element. Then bend its two lower corners to the top. Now the part has turned into a square.
- The sides that we folded to the top in the previous step should now be folded in half again. As it shown on the picture. In this case, the lower part of the part is still a square.
- We straighten the resulting triangles on the sides so that a finger can enter them. The opened folds in the form of pockets will give the detail a look reminiscent of the facets of a diamond.
- Turn the piece back to you. Turn both side triangles outward.
- Apply glue to the front side of one of the flaps. Connect the left and right flaps to make a cone. Since the glue needs time to dry, secure the cone with a paperclip.
- We need at least four such details. The more of them you make, the more voluminous the craft will be.
- Next, apply glue to the seam of each part and alternately connect them in the shape of a flower.
- Once you are sure the glue is completely dry, remove the staples. Kusudama flower is ready!


 |
 |


If you make 12 of these flowers according to the instructions of this origami master class, then by gluing them together, you will get a kusudama ball, which will be a great decoration for your home. It is not necessary to use single color paper. A ball made of multi-colored parts will look more fun.
 |
 |
- The kusudama ball can not only be hung. If you fix it on a stem (wooden or plastic rod), you get an impromptu bouquet that will please the eye for a long time.
- It is not recommended to use rubber or super glue to make kusudama. Despite the fact that they dry faster than PVA or stationery, the craft may look sloppy.
- Try to make the folds on paper more clear and sharp so that the kusudama looks neater.
- Crafts made of thin paper will look more elegant. It is easier to work with it, as the glue dries faster. In addition, thin paper will make the ball more fluffy, as more details will be needed.
- Cover the work surface that you will use when creating the craft with paper or a tablecloth so as not to stain it with glue.
Having mastered the classic kusudama, you can start making more complex options: and electra kusudama.
You can make a magical kusudama ball out of paper or banknotes. A master class and 80 step-by-step photos representing each stage of work will help you with this.
Paper kusudama ball: how to make a beginner

Check out a beginner's class to learn the basics of this interesting Japanese art. Here's what's required:
- paper;
- scissors;
- glue.

Now the bent corners need to be bent as follows: right to the right, and left to the left.

Next, the resulting two folds need to be straightened.

Turn the blank so that the reverse side is now looking at you and turn the newly created side triangles outward.

Here's how we continue to create a paper kusudama ball: turn the blank over again with the front side towards you and bend the corners, focusing on the existing lines.

Now you need to make a cone from this square part. To do this, apply a little glue to one bent triangle and connect it to another - on the opposite side.

Make several identical parts. The more of them, the more magnificent the ball will turn out. In this case, there are 5 of them.

It is necessary to connect these blanks in order to give these petals the shape of a flower. To do this, glue their side faces with glue and connect them together.

To ensure that the blanks dry in the correct position, use paper clips to fix the petals. When the glue dries, they will need to be removed.

For the kusudama ball, the master class on the creation of which you are viewing, you will need 12 of these flowers. When you glue them together, you will get a beautiful product, for example, like this.

When making kusudama balls, it is better not to take superglue or rubber, as the product may be damaged by traces of these solutions. It is better to take PVA.
Watch the following tutorial to make a kusudama ball.

Such a product will be the result. Before you start creating, take:
- rectangular paper blanks 1 and 2 colors, 30 pieces each, 5 by 10 cm in size;
- glue;
- artificial pearls.
Take the first paper triangle and fold it in half. Point the corners of this workpiece to the center.

These manipulations are needed in order to mark the lines on the workpiece. Expand it and you will see them.

Fold the rectangle in half again, but along its long side.

Expand the workpiece again, its right and left small sidewalls will be attracted to the center. After that, the rectangle must again be brought to its original position, but the following lines will clearly appear on it.

They are needed so that now, focusing on these bends, you can fold this workpiece along the lines. Here is her front and back view.

And here is how this element looks from above.

In the same way, you need to draw a rectangle of a different color. Expand it, and place the workpiece made earlier in the center.

Bend the corners of the second piece diagonally and stagger them through the corners of the first piece.

You need to work a little more with these two elements so that you get the detail, as in the next photo.

Now you need to assemble a Kusudama ball from these modules. Let's take 3 blanks. The first has a kind of pocket. This is where you put the corner of the second workpiece.

Next, in the corner of the second thread the corner of the third. You should end up with a pyramid like this.

This is how kusudama is created. Following the scheme presented, you need to continue to add modules.

You will connect four blanks, and where to put the fifth one is shown by an arrow and a small blue triangle on the right.

Now each pair of petals needs to be combined, creating a pyramid.

Give the petals the desired shape by fixing them with glue. Also, the bonding mass will help fix the pearls.

Prepare several such modules, after which the kusudama ball can be hung to decorate the room with it.

Kusudama - money flower
Such a present is a great gift for a birthday or any other holiday. If you want, then you can make a flower out of them. Depending on how much you have, this will be the size of the bills.
If you just need to bring an inexpensive present, then purchase banknotes that resemble cash. These can be cut if you want to decorate your paper flower.
To make a kusudama ball out of money, take:
- real or souvenir banknotes;
- scissors.

If this is souvenir money, then cut off two of these corners, removing the middle.

If the bill is real, then you need to bend the corner inward to get a square. Bend it in half diagonally to make a triangle. We proceed in this way. We bend the corners of the workpiece up. Here's what you get.

Next, pull the right corner to the right, the left corner to the left. Fix in this position.

Bend inward 1 and 2 small protruding corners.

If the bill is a gift, glue the small sidewall with glue, bend the opposite side to it and make such a bag. If the money is real, then you can fix the workpiece in this position with a transparent paper clip.

You will need 5 similar modules that need to be connected to each other with glue or paper clips.

Here you will get such a beautiful flower from a bill. If the money is a gift, then you have trim strips left, fold each one in the form of an accordion and decorate your work.

Did you like the presented Japanese technique? Try to make the following origami craft using the acquired skill.
How to make a paper ball with your own hands - a master class
The diameter of the finished product is 12 cm. It consists of 12 flowers, and each such blank is made of 4 modules.

Cut out a 10 cm square from a sheet of paper and fold it diagonally. Then again, already on the second diagonal.

Flip the square over and fold it in half for another stripe. Then fold it in half so that this line is in relation to the first at an angle of 90 degrees.

Based on these markings, make a double square by pulling the fold to the center.


