Patterns for tapestry embroidery. Tapestry stitch embroidery: we master the technique by studying a step-by-step master class using diagrams, colorful photos and video materials. Tapestry seam: execution schemes
There are more and more types of embroidery today, some of them are complex, and there are quite simple embroidery techniques, for example, tapestry stitch embroidery. Tapestry stitch is used quite often , they decorate clothes, tablecloths, embroider pictures and so on. Despite the simplicity of making seams, beginner needlewomen need to prepare for their implementation, collect information on the correct execution, learn the secrets of perfect seams, practice the technique of execution and choose the right materials.
Tapestry embroidery is very loved by needlewomen because it makes it possible to create pictures of incredible beauty. Meanwhile, the execution technique is not as complicated as it might seem when looking at the finished product - it's just a counted cross that needs to be embroidered according to certain rules: the tapestry surface turns out to be even and beautiful if all the stitches are made in the same direction. When you make embroidered pictures, you cannot use knots to secure the thread - they will distort the canvas. As you can see, embroidering a picture with a tapestry stitch step by step is not so difficult if you are attentive and diligent: the main difficulty is not to get confused in the count. Educational videos and MK can be found for free on the Internet, for example - in our article.

Also, additional devices can be used in the work, for example, a canvas holder, an organizer for threads and needles, a magnifying glass and others. In work, you can do without them, but they greatly simplify the process, make it faster and better. For example, a thread conditioner helps protect the thread from chafing on the fabric and needle. And the pattern holder helps to set the pattern at eye level and the embroidery itself, so as not to be constantly distracted from the process and refer to the pattern.
 As in any other needlework, in tapestry embroidery there are implementation options. Shovchiki can be performed in different ways. Using different techniques for making stitches and their varieties, you can make voluminous, expressive and colorful embroidery.
Plain tapestry the seam looks like a half cross in the technique of counting the cross. It can be done in two different ways, while the front side will be the same, but the wrong side will have short or elongated stitches. The needle is brought out from the wrong side in the lower left corner, and brought out inside out in the upper right corner, then again inserted into the lower left corner and so on.
Or you can bring the needle to the front side through the upper right corner, thread the needle inside out through the lower left corner, then insert the needle into the upper right corner of the next cell and back to the bottom left corner. This method of tapestry stitching helps to prevent warping of the fabric when the thread is pulled, but the fabric must be tightly hooped or hooped.
A straight tapestry seam looks like vertical stripes, while there will be diagonal stitches on the wrong side. With this method of embroidering a tapestry, the needle is inserted into the upper part of the cage and brought inside out strictly under the thread in the lower part of the cage, then the needle returns to the top of the cage of the neighboring square and again falls vertically. You can start from the bottom and sew from the bottom up.
Long seam can be used for covering large areas, for example, a solid background, it helps to speed up the process and emphasize the uniformity of the sewing. Moreover, the length of the stitch can be chosen independently, taking into account the length of other stitches and the harmony of the whole picture. The shovchik starts in the upper right corner of one stitch, goes up skipping a few cells, and ends in the lower left corner of the required cell. Then the thread is lowered and inserted into the upper right corner of the cage, which is located next to the beginning of the first seam.
The exciting tapestry stitch is made in the same way as the long stitch, but keep in mind that the horizontal rows of stitches should overlap each other halfway. This method helps to get a denser and more textured stitching.
In order for the embroidery to look most beautiful, it is necessary to take into account some features of the technique and, of course, the tapestry seam has its own characteristics.
Secrets of making a tapestry seam:

Embroidery master class
 It is necessary to start work with the preparation of all materials: the selection of a scheme, fabric for embroidery, determine the types of seams, choose the shades of threads and their number. Then it is worth determining the center of the material. It is recommended for beginner needlewomen to start embroidering work from the center of the scheme, in this case there is less chance of making a mistake with the calculations on the canvas. When the center is determined, you can stretch the material on the hoop or machine, for ease of use. Now you can get to work. The work is carried out sequentially.
After the process is completed, it is necessary to perform all additional seams, for example, lay the seam back with a needle to emphasize the contours. Now you can start washing. Do not wash tapestry embroidery with hot water, it can shrink and deform. Gently hand wash at 30 degrees with added powder. Then rinse well and lay out on a soft towel, you can not squeeze the work, it should dry on a towel. Dry work can be used for its intended purpose or the tapestry can be framed.
There are a large number of master classes for this type of embroidery.
Making paintings has always been and will be a fine art, no matter how the drawing is created - with paints and a brush or thread with a needle in embroidery. The tapestry stitch is one of the methods of creating beauty along with the counted cross, satin stitch, carpet technique and many others. Learning this technique will expand the needlewoman's ability to make beautiful home furnishings.
From time immemorial people have been engaged in weaving. This mainly applies to fabrics for clothing. However, carpets and tapestries also come off the loom. Strictly speaking, tapestries are lint-free wall hangings made using the technique of cross-weaving threads.
The manufacture of tapestries, or tapestries, involves the use of a loom or a special frame on which the warp threads are stretched. Then a canvas is created, which is used for hem or as seam allowances at least 1 cm wide with the same threads as the warp. A drawing is sewn or pinned to it, and then a pattern is made with colored threads.
Tapestries are also called paintings embroidered with tapestry stitches, which adds confusion to the minds of craftsmen and laymen.
Let's break it all down
At present, the concepts of “tapestry”, “tapestry stitch”, “carpet embroidery” and “half-cross” are so intertwined that they are often confused. It is important to understand the difference between these products and embroidery elements., as each of them is beautiful in its own way and suitable for creating cozy things.
Embroidery in carpet technique
This type differs from the others in that, as a result, a three-dimensional picture is created, made with loops (pile). For such creativity, you will need a soft fabric, yarn or thread, a pencil or fabric marker, a special hollow needle. The canvas is embroidered according to the sketch drawn on the fabric, while work to the last stage is carried out on the wrong side of the product.
Counting semi-cross
This embroidery element is often used in paintings to emphasize the background. . It is performed very simply:

The execution technique may vary depending on the direction of embroidery or the preferences of the master: from left to right or right to left, the usual left or right slope of the crosses. However, the selected scheme should be followed throughout the entire embroidery: from one corner to the diagonally opposite + vertical transition along the wrong side up or down. Thus, on the front side, oblique stitches will be obtained, and on the wrong side, vertical ones.
Embroidery with such stitches implies full stitching, that is, the canvas in the finished work should not be visible . There are several types of seams:

Each of these types can be made with a thread or, as they say, the “block” method. Its essence is that before performing a line in the middle of a row, a thread is laid out and sheathed on top. Let's take a closer look at how to embroider with a tapestry stitch and what you need for this.
In this technique, not only excellent paintings are created, but also individual parts when cross-stitched. The background is filled with a tapestry seam when there is a danger of warping the canvas, since the counting semi-cross pulls the base fabric together.
The principle of stitching
The tapestry stitch is similar to the back stitch, only diagonally. We conditionally accept that the row is carried out from left to right, the stitches are tilted to the right. The order is as follows:

With a vertical transition without changing the sewing direction, the algorithm is saved: from the lower left corner to the upper right. For a vertical transition with a change in the progress of work, the order of stitches changes: from the upper right corner to the lower left.
Operating procedure
The technique of tapestry embroidery is quite simple, a needlewoman of any age can easily cope with it. But the work requires care and patience. At the first stages of learning, it is worth using ready-made embroidery kits. These sets usually include:
- small hard canvas;
- blunt embroidery needle;
- a set of woolen threads or floss;
- embroidery scheme.

The seam is mainly used oblique. It has variations in the form of mosaic or diamond and is the easiest to perform, so it is suitable for beginners. This master class gives general recommendations for the work and technique of embroidering a tapestry bias stitch.
 To get started, stretch the canvas over a frame or hoop. Prepare the thread of the length that you are comfortable working with. Next, fasten the yarn. It can be in various ways: by grabbing the tip from the inside or by a loop. When embroidering with tapestry stitches, it is best to avoid tied knots.
Now carefully consider the scheme: the order of work will depend on the number of stitches of a particular color. If there are very few elements of the same color and they are scattered around the drawing, it is advisable to complete them first. Do not be afraid of long broaches from the wrong side of the work: taking into account the characteristics of the seam, they will not be visible. Having decided on the color, they begin to embroider.
For beginners, this tapestry embroidery technique will be enough. As you gain experience, you can experiment with stitch lengths, bevels, and different mosaic stitches. A real masterpiece with a three-dimensional effect can come out from under the hands of a real master.
The tapestry stitch belongs to the bulk embroidery and has a rather rich and attractive appearance. Masters claim that this technique is easier to perform than cross-stitch, so learning this skill is not difficult.
The tapestry stitch is much denser than ordinary embroidery, so it should not be used on thin fabric, so as not to get a bad result, which will disappoint and discourage all desire to work.

The most acceptable option is to purchase special kits, which include:
- Special dense fabric for embroidery - canvas;
- Certain threads - for beginners, a floss in 6 layers is suitable, and experts use carpet threads;
- Special needle with a large eye;
- Diagrams of drawings.
The most popular threads are floss, but wool is also often used. It is better not to use yarn with a long pile, the image will not look aesthetically pleasing.
Cross stitch tapestry stitch: rules for embroidering pictures
It is not difficult to achieve an excellent result, you just need a little effort, perseverance and patience, when embroidering with a cross, needlewomen are familiar with such requirements. Each embroidery technique has its own characteristics, whether it is satin stitch, cross stitch or tapestry stitch.

To achieve an excellent result, you must adhere to the rules inherent in each type of embroidery:
- Mosaic weaving is used to create ornaments or to fill a certain background with a seam. With this technique, only three types of stitches are used - two short and one elongated. Embroidery is from right to left.
- Checkerboard stitch - this technique is similar to mosaic weaving, but differs in the types of stitches - there are seven of them.
- The catch stitch is used if you need to create a smooth transition, it is performed with both short and long stitches, and the interception of threads is also very clearly visible.
Tapestries: cross stitch and technique features
This technique is ideal for creating paintings, carpets, certain types of clothing, various panels.
For the correct execution of this technique, it is necessary that:
- The seam was even, and all the stitches fit tightly to each other, without gaps and retreats, then you get a whole picture that delights with its beauty;
- Each stitch is a half-cross;
- First, stitches are laid from the upper right corner to the lower left, the next row runs in the opposite direction;
- To avoid the curvature of the picture, it is necessary not to tie knots on the back of the fabric.
The stitch length should be no more than one or two cells in height to look nice, harmonious and not rough.

When creating pillows or paintings, you can adjust the length of the seam, its slope or direction. If you gradually change the length or width of the stitches, you can adjust the foreground and background, but for this you need to learn a little, the first time rarely does such an image game come out. Experts advise before starting work - to process the edges of the fabric, then it will be easier to embroider, and the threads of the material will not roll. The only negative that separates the tapestry stitch technique from others is the high consumption of threads, because this results in a three-dimensional image.
For novice beginners, experts recommend having working cardboard cards that show examples of all stitches, they allow you to create masterpieces in the future. The best place to start is to practice working with each stitch individually to better control the needle and thread, and then take turns combining two and then three stitches. After such training, it will be possible to try your hand at creating paintings, first small, and then larger and larger.
Additionally, for work, it is better to purchase a high-quality magnifying glass, it will allow you to correctly see the seam and understand the desired color.
Unique cross-stitch: large-sized tapestries and their use in the interior
There are several techniques for embroidering tapestries, even large ones.

- Looped way;
- Oblique seam;
- Half cross;
- Semi-cross with a laying thread;
- Elongated and exciting seam;
- Straight seam.
All these techniques together are able to create a beautiful and exclusive picture, striking the imagination with beauty and grace. Large-sized tapestries look most harmoniously in country houses, old-style apartments or in the country.
Buying ready-made kits from Riolis or Levron, you can get a free short master class, as well as embroider a picture of any size at your discretion.
Unique tapestry stitch in cross stitch (video)
Tapestries in the house give the room warmth and comfort, reminiscent of childhood. Pillows with an embroidered pattern using the tapestry stitch technique are quite a beautiful and practical product, if you choose the right colors, they will decorate not only the classic style, but will also complement and emphasize modernism, Provence or minimalism. In a modern style, a rug or a picture of natural motifs made with a tapestry seam adds a twist to the room.
Who and when began to decorate their outfits, and then create whole canvases with the help of embroidery, of course, is unknown. This is one of the oldest types of needlework. Today there are many embroidery techniques. With satin stitch, cross stitch and tapestry stitch, the craftswomen manage to create whole masterpieces that delight everyone without exception. But those who are just starting to master embroidery should not rush to do big work. You need to practice on small items first.
Required Tools
Before you start even your first drawing, you must first master the basics of embroidery. One of the first may well be a tapestry seam. A master class on working with it will perfectly help a novice needlewoman. With any embroidery, it is important to initially correctly select all the equipment necessary for work.
For the manufacture of a tapestry, a fabric or canvas with a clearly visible weave of threads is suitable so that they can be easily counted. You also need a special needle with a blunt end, floss threads in several additions, as well as a hoop with a screw and scissors. For some types of seam, a special hook for such needlework may be required. When choosing threads, preference should be given to a floss with at least 6 additions or wool for embroidery. This is necessary in order to create a dense, without gaps, pattern.
Tapestry stitch embroidery technique

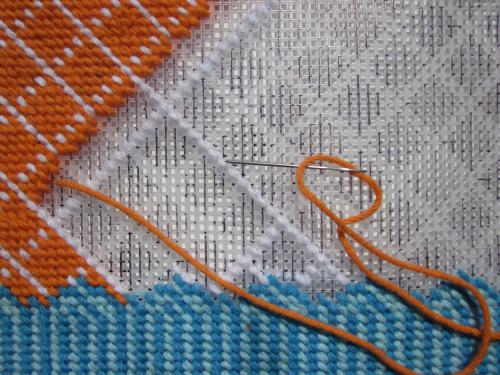
After everything is ready for embroidery, the workplace and the pattern you like are selected, you can start needlework. It is important to understand that you need to fasten the thread without knots, since the paintings made with a tapestry seam are thinner and more elegant. This can be done in the following way. Separate the floss from the common thread 2 times less than indicated in the attached instructions for the diagram. Pass through one of the weaves of the canvas, connect the ends together and thread through the needle. The resulting thread is then embroidered, as shown in the figure.
The embroidery technique itself is as follows. It is necessary to pass a needle and thread from the upper right corner to the lower left. Then repeat the stitches as many times as you want to embroider with this color according to the pattern. It is important to remember that when working with tapestries, the reverse side must completely repeat the pattern on the front side. Once the work is finished, secure the thread from the back by simply threading it through a few stitches. It is important that the embroidery is dense, and the pattern lies flat.
Little tricks
To make embroidery with a tapestry stitch the first time, you can use the tricks of experienced needlewomen. It is most convenient to start work from the middle of the canvas. This is necessary so that the canvas does not warp, and wide margins remain at the edges. It is advisable to make them at least 4-5 cm. If you plan to draw up the work also in a passe-partout, then you need to increase them even more.
Beginning needlewomen often confuse a tapestry stitch with a half-cross. However, these are two fundamentally different techniques. When using the second seam on the wrong side, the stitches will be vertical, and the first creates the illusion of a woven fabric on both sides. In addition, the tapestry requires 2 times less threads. Pictures made with a tapestry seam are lighter and more airy. So don't replace one with the other.
Tapestry is a three-dimensional embroidery that looks very impressive and expensive.
Today we will learn the technique of tapestry embroidery. Many craftswomen note that tapestry stitch embroidery is easier and faster than cross stitch, and the result is no less beautiful.
Materials for embroidery with tapestry stitch
The tapestry stitch is very dense, so this technique is not used on thin fabric. It is best to start by buying special kits for such embroidery, with thick canvas or fabric.
There are several types of tapestry embroidery, and, accordingly, stitches. We will consider two of them, the most popular. For one type, it is enough to pick up a dense canvas for embroidery and a long needle with a wide eye and a blunt point. The second method, loop embroidery, requires a special needle and loose rough fabric.

This is the kind of needle you will need for the second version of the tapestry embroidery with a loop.
The thread in any case should be very dense: either thick woolen threads for a carpet, or floss in 6-7 additions.
Types of tapestry seams: master class
Tapestry stitch embroidery is quite simple to perform, but it requires accuracy and patience, because all the stitches are very close to each other and must be the same size. Each stitch is essentially a half-cross.
1. We thread the needle and thread into the upper corner of the square and pull it out from the diagonally opposite corner of the square.

It is in the direction of the stitch that the difference between the half-cross stitch and the tapestry stitch lies. The semi-cross goes from bottom to top, from the lower left corner to the upper right, the tapestry seam goes from the upper right to the lower left corner.
2. We also start the next stitch from the upper right corner to the lower left.

3. The result is a beautiful dense row of "strokes":

4. The next row can already be embroidered from right to left, the main thing is to follow the basic rule of the stitch, that is, sew diagonally from top to bottom.
From the inside, the product should look no less neat than from the front.
Front side:

Purl:

Tapestry loop embroidery technique
The loop seam looks like this:

For this tapestry stitch embroidery technique, you will need a special needle.
She has a long point with a slot:

And a very thick round eye for the thread:

The thread is inserted like this:
A knot is made at the end of the thread.
We stick the needle into the fabric (in our case, it is still the same rigid canvas) to the very foot. The knot on the thread will not allow it to go to the back side, but the needle will pull the thread so that a loop is formed on the back side.


