DIY Valentine's cards for Valentine's Day. Valentines: the best ideas and tips. Gift for lovers “Hearts connected by the golden thread of the fate of Moira Clotho”
Useful tips
A handmade postcard will be a wonderful, sincere and pleasant gift for your beloved mothers, grandmothers, sisters, daughters or girlfriends..
Simple cards can be made together with children, which will not only be a good surprise, but will also be a useful pastime.
You can also get some interesting ideas and add your own touches to these creative International Women's Day cards.
Three-dimensional postcard for mom on March 8
A simple postcard that turns into a 3D greeting will be an unexpected gift for your mother, grandmother, sister or friend. Although this card may seem complicated at first glance, making it is easier than it seems.

Materials:
· Multi-colored paper
· Glue stick
· Double sided tape

Cut out 7 squares of 10 cm paper in the desired colors. Fold the square into quarters. Fold one flap diagonally, flip over to the other side and fold the other flap diagonally, forming a triangle. Cut out a petal pattern from the triangle. Unfold the paper and cut out one petal from the flower. Close the flower by placing petals on each side and securing them with glue. Repeat with other colors.

Attach a piece of double-sided tape to the petals as shown by the dots. Connect the flowers to each other: flower B and C overlap the petal with A, petal D goes on top, overlapping A.

Attach flower E and F overlapping B and C.

Attach G on top, overlapping D. Cut leaves from green paper and use double-sided tape to adhere to the flowers.

Cut a 25cm by 15cm rectangle from a piece of cardboard and fold it in half to make a card. Place the folded bunch of flowers inside the card as shown, attach double-sided tape and press firmly. Open the card and repeat, gluing the other side of the flower bunch inside the card.
Postcardon March 8:flower pot (video)
DIY children's cards for March 8

You will need:
· White, green, brown paint
· Brush

Dip your finger into the brown paint and press it onto the paper. Use a brush to draw the stem.


Pos After the brown paint dries, dip your little finger in the white paint and make dandelion fluff. You can also create the effect of fluff flying away by leaving a trail of prints above the flower.
Origami dress postcard for March 8: master class

This card with a dress can be made in various ways, decorated with ribbons, sparkles or rhinestones.


Cut out a square of paper measuring 10 cm. This square will make a p l The paper is approximately 7.5 cm high. You can use any paper; paper with a pattern on one side and plain paper on the other will look beautiful.
- Fold the paper vertically and horizontally.
- Then fold the sides towards the center.


- Turn the paper over and fold the sides toward the center again.
- Turn the paper over again and open the top of the paper.


- Fold the top down about 1/2 inch.


- Unfold the left side that you folded. This will be the shoulder of the dress. Do the same with the other side.


On a warm spring day on March 8, we celebrate the holiday of the female half of humanity. On this day, every man strives to please and surprise, first of all, his family and beloved women. But the women around us, be they colleagues or just acquaintances, do not stand aside either. A holiday is not complete without bouquets of flowers and pleasant surprises.
Postcards are an important part of a gift. In them you can write wishes that will keep your soul and warmth for many years. After all, many people, I am one of them, like to put gift cards in a separate box. And then from time to time look into it and remember pleasant moments from life.
The stores certainly have a huge selection of postcards for every taste. But just think about how much warmth, tenderness and positive energy a postcard made by your own hands contains. How nice it is for a mother or grandmother to receive a postcard made by their children or grandchildren. This creative process will captivate anyone. There are a lot of ideas on this matter, I will offer only a small part of them today.
Making beautiful postcards for March 8th from paper - 5 master classes
Paper is a material that is always at hand. When choosing materials for postcards, paper, of course, comes first. For the base of the card, I recommend choosing thicker paper so that it holds its shape well.
Volumetric card “Bouquet of flowers”
A very cute and voluminous card. It’s not difficult to do, involve children in your work, they will be interested.

Necessary materials:
- Cardboard for base
- Colored and white paper
- Scissors
- Compass
- Markers or colored pencils
- Ruler
- Glue, glue gun
- Leg-split
The very first thing we will do for the card is flowers. To do this, arm yourself with colored paper, a compass, scissors and get started.
Choose the color of the flower. Using a compass, measure a diameter of 1.5 cm and draw a circle from the edge of the sheet.

Fold the sheet to the size of the circle 2 times to make an accordion and cut it out.
Then roll it again to the size of the circle 2 times with an accordion and cut it.
From the resulting square, cut out circles along the drawn outline.

You should have 9 circles. Each one needs to be cut in the middle from the bottom about 1 cm from the edge.
Glue the cut together so that you get a voluminous petal. It is not at all necessary to make them the same; overlap more or less.

When all the petals are glued together, cut out a few more circles of the same diameter from the remaining paper. They will serve as the beginning of the flower to make it look more flowing. There is no need to cut and glue them.
Glue the petals together in a chaotic manner, and glue the circles at the bottom along the edges.

Now let's get to the core. To do this, take a white sheet, bend it in half about 1.5 cm from the edge and cut it off.
The width of the sheet is 20 cm, 10 cm is enough for one flower. Therefore, we fold it in half and cut it off again.

For a natural look, use a yellow felt-tip pen to shade one side of the strip from the bottom of the fold.
Make frequent cuts from the fold side along the entire length, but carefully leaving a little space at the bottom. It will turn out like weed.
Roll it up and secure the end with glue.

Straighten the edges and glue the core to the center of the flower. Hold for a while until the glue sets. The first flower is ready, similarly make 2 more for the card.
Let's start with the base for the bouquet. Take a colored sheet of paper measuring 20x15 cm and bend it like an accordion. We will attach the bouquet to this base.
Then for the leaves you need green paper. Fold the sheet 4 cm from the edge and cut.

Cut the folded sheet in half and cut out a semi-oval from it, and cut leaves from it into thin strips along the edge.

Tie the base of the bouquet with a piece of twine and tie a bow.
Attach the base for the bouquet to the cardboard base of the postcard with glue.
Glue leaves to it, and glue flowers on top of them.

Glue rhinestones along the contour of the card. Glue rhinestones onto the base of the bouquet in a chaotic manner.
Wrap the tops of the leaves inward and glue them.
On the upper free part of the postcard, first use a simple pencil to write “March 8”, and then use a marker or black felt-tip pen to outline the outline.

Shade the inscription with colored pencils; using several colors the inscription will look more voluminous.
Draw a heart and color it.

This is such a wonderful postcard - it turned out to be a bouquet.
Postcards “Dresses”
An original postcard with outfits - dresses. Of course, this will be a congratulation for women. Such a postcard can serve as a congratulation on March 8, on Mother's Day or a birthday, as well as for an invitation to an event. I will present you with three options for making such a postcard; if you wish, use your imagination and make your own version using the same principle.

Necessary materials:
- Colored cardboard - the basis of the postcard
- Colored paper
- Scissors
- Satin ribbons, rhinestones, beads - for decoration
For the first option, fold a piece of colored cardboard in half and cut it. Fold half of the piece in half, this will be the basis for the postcard. You choose the color at your discretion.
For contrast, you can cut a rectangle from a white sheet inside the card and paste it on the side where the congratulation text will be.
Using a ruler on the front of the card, mark where the outline of the dress will be.

Using a simple pencil, draw the outline of the dress. Draw a wave at the bottom of the hem, and draw a neckline at the top.
Cut along the drawn outline of the dress.
In place of the belt, on the fold, make an incision with nail scissors.
Insert a satin ribbon, tie a bow and trim off any excess edges.

The card is ready, you can decorate it with stickers, glue rhinestones or decorate it. Or you can leave it like this. Write a congratulation and delight the recipient with an interesting postcard.
For the second option you will need dress templates. You can draw them yourself.
Transfer the templates onto colored paper and cut them out.
Using a ruler, bend the skirt template along the lines to create folds.

Glue the finished parts of the dress onto the base of the card in the center.
Decorate the belt with glue-based beads.

It’s very simple and quick, and most importantly, the stylish postcard will appeal to female representatives of any age category.
For the last version of a postcard with a dress, you need a mini CD or a compass, in general, whatever you have at hand.
Take a sheet of colored paper, preferably in different colors on both sides, this will add volume to the future bottom of the dress.
Trace the disk or use a compass to draw a large circle and a small one inside.
Draw petals inside this circle, then cut along the outline.
You need 2 of these blanks.

Fold the resulting flower in half so that the petals are not symmetrical.
Using scissors, fold the edges of the petals inward.
Repeat the procedure with the second part and connect them together with glue.
Cut the top into an oval shape so that the shape resembles a skirt.
Cut out the desired top of the dress, in our case it is a corset, and connect the parts together by gluing them to the card.
The final touch will be a bow made of satin ribbon; we glue it to the waistband of the dress.

Beauty is ready and waiting for its recipient.
Postcard “Field bouquet”
A very simple version of a postcard. It can be done quickly, and even a child can easily cope with this task.

Necessary materials:
- Cardboard for base
- Colored and white paper
- Scissors
Cut thin strips from colored paper of different colors.
Using a toothpick, twist the strips, leaving a small space at the end and secure with glue.
On the cardboard base of the postcard on the bottom right, glue curly ovals made of colored paper on the bottom and white on top. Make an inscription there.

Glue strips of green paper onto a postcard for a future bouquet.
Start decorating with curls of different colors, these will be buds.
Decorate the bouquet with a bow; it can be made of paper or satin ribbon.

A cute bouquet on a postcard looks very tender.
Postcard "Butterflies"
A simple, but at the same time very original and unusual spring card.

Necessary materials:
- Cardboard for base
- Colored and white paper
- Scissors
- Glue or double-sided tape
- Colored pencils, felt-tip pens
- Black marker
- Rhinestones for decoration
Draw butterflies around the edge of the card base. Let them have different slopes, it will be even more interesting. Use a simple pencil so you can correct any imperfections.
Trace the outline with a marker and to make the butterflies more beautiful, add a pattern on the wings, for me these are circles.
Trim the edge along the contour of the butterflies.
Glue a sheet of colored paper inside the card for contrast; it can be anything. Use glue or double-sided tape.

Now comes the most creative design process. Color your butterflies or let the kids do it. Decorate the middles of the butterflies with rhinestones.
Using a pre-prepared figure eight stencil, transfer it onto the card. A stencil is completely optional; you can easily draw the number yourself.
Trace the outline with a black marker and color it.

For a voluminous appearance of the figure eight, you can shade the sides of the figure eight with a pencil one tone darker.

A very interesting postcard, in my opinion.
Postcard “Spring tulips”
The last option for paper postcards will be made in applique style. Choose soft and pleasant colors for the background and flowers.

Necessary materials:
- Cardboard for base
- Colored and white paper
- Satin ribbon
- Scissors
Prepare all the necessary materials and get started.
Fold the colored cardboard in half, thus this will be our future postcard.
Now let's start cutting out the tulip buds. To do this, cut small rectangles, fold them in half and cut out the petals on top of the fold.
Cut flower stems from green paper.

Cut out the bottom of the bouquet separately. Cut the leaves.
For now, just lay out the details on the postcard to have an idea of what it will be like and if you need to add elements.
Cut small circles from white paper and place them over the buds.

When you are satisfied with the result, glue all the parts.
Decorate the bouquet with a satin ribbon bow.
Glue the inscription below.

Beautiful three-dimensional bouquets of tulips - as a symbol of spring and warmth.
How to make a postcard in scrapbooking style for March 8th - video instructions
Scrapbooking is a very interesting type of homemade handicraft. In this way they decorate photo albums and make folders for documents. In this style, individual photographs or drawings and a lot more are decorated. Scrapbooking helps turn ordinary and ordinary things into a masterpiece with its own story.
From year to year, this hobby begins to turn into real art. This is a great way to express yourself by expressing your imagination without the usual framework. To create things in this style, there is now a wide range of materials and decorations in stores, which greatly simplifies the task.
The video shows every step of creating a scrapbooking style card. Try to make such a postcard yourself and you will definitely succeed.
Volumetric 3D postcard - step-by-step technique
A voluminous postcard captivates with its unusualness, but not many people know how to make it. But nothing is impossible, the main thing is to want it. And my instructions with photos step by step will help you with this.

Necessary materials:
- Cardboard for base
- Colored or white paper - 9 sheets
- Scissors
- Pencil
- PVA glue
- Rhinestones with adhesive or regular
First you need to make a flower template. It's not at all difficult to make.
Take a sheet of colored or white paper, fold it in half and in half again.
Then fold the corner and fold the top one leaf in half again, you get a kind of triangle.
Draw a curved line with a pencil as shown in the photo.

Take scissors and cut along the drawn line.
Bend the leaf and trim along the edge as well.
When you unfold it you will get a flower like this.
Using this template, trace on the remaining sheets of paper folded in half and cut out the remaining 8 flowers. One of them will need to be cut in half.

Take colored cardboard - the base of the card and bend it in half.
Apply drops of glue to the petals of the first flower and glue them to the card along the fold line of the flower and the card.
The following flowers need to be glued to the flower alternating petals. A drop of glue will be enough.

When you have glued all 8 flowers, apply a thin strip of glue to the fold line and glue half of the 9th flower.
Apply drops of glue to the petals as well, alternating.
Close the card and hold it until the glue sets.
Decorate the card with rhinestones - glue-based drops.

The 3D 3D postcard is ready. Everything is simpler than you might think. Make your loved ones happy.
Original 3D 3D postcard for mom and grandma - video
DIY postcard ideas for children - congratulations to mother and grandmother on March 8
I want to share with you ideas for children's creativity. Children can and should be attracted to art, it helps them develop. These cards are easy to make and your kids will have a blast making them. And how nice it will be to give to your mother, grandmothers, sisters and, perhaps, a teacher or educator.
The first idea is to draw using fingerprints. Children will certainly appreciate this idea.

To create such cards, you can use both paper and felt. We make blanks and glue them to the base.

You can use thin strips of colored paper, roll it into spirals and make such beautiful appliqués. Or draw a bouquet of handprints, very cute.

Napkins rolled into small balls and an original mimosa bouquet on a card are almost ready, add leaves, a bow and beauty.
A mug with a flower also looks quite original.
Koala bouquet using cotton swabs.
And a very interesting idea - a flower on the palm.

The following card ideas are very simple. It will be nice to receive tulips in a bouquet from your son, and dad can very well help him with this.
You can make a cool card using cardboard, a needle and thread.
Or maybe you like the idea of a clearing with tulips? Does it really look like spring?

As you may have noticed, absolutely any materials can be used for cards and it will be a small work of art for you and your child. Believe me, you won’t spend much time on this. But what a surprise you will give to your beloved mothers, grandmothers, girlfriends or just acquaintances.

International Women's Day is a celebration of the fair half of humanity. Every woman expects gifts on this day, but this is not the main thing. The main thing is attention and that you congratulate her from the bottom of your heart. A DIY postcard will warm the souls of your beloved women and girls with its warmth for a long time.
Summary: DIY postcards. DIY postcard for mom. DIY postcard for grandma. Postcards for March 8. DIY postcard for March 8th. DIY gift for mom. DIY gift for mom on March 8th. DIY gift for grandma. DIY crafts for March 8th. Crafts for March 8th in kindergarten. DIY paper crafts for March 8th.
A DIY postcard for March 8th is a wonderful gift for any girl or woman. It is a real pleasure for children to make cards with their own hands for grandmothers and mothers, even with the participation of adults. The participation of adults in preparing the surprise is important in order to show the child an example of how to do it. Welcome any manifestation of imagination in the design of a postcard. Your ideas and creative examples will help the baby get his bearings and add something of his own.
1. DIY postcard for mom
The child will definitely like the idea of tracing his own palm, cutting out the resulting silhouette and using it to make a card for his mother.

Separately, cut out and glue a bouquet of spring flowers from colored paper. Glue your palm to the front of the March 8 card. Just leave your fingers unglued! Place flowers in them, bend them and only then glue them. Your DIY postcard for mom is ready!


From the silhouette of a child’s palm you can make another original postcard for March 8th with your own hands.
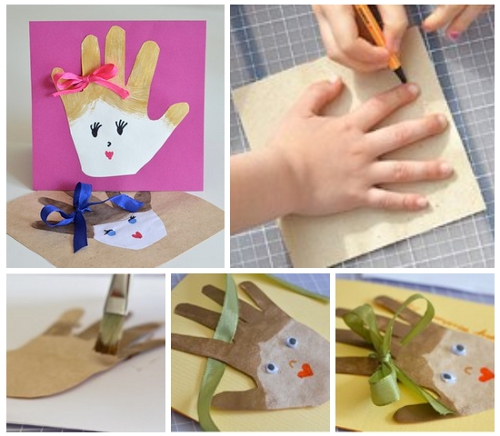
Here is another version of a postcard for March 8, decorated with a voluminous paper appliqué. A very kind, beautiful and gentle card. You can view the instructions and download the postcard template on Krokotak.com

Volumetric postcard "Vase with flowers". It's very easy to do. The flowers are made of colored circles of different diameters. The vase is made from a rectangular piece of paper glued to a postcard. For detailed instructions on how to make such a gift for your mother or grandmother with your own hands, see.

It’s easy and quick to make an impressive card for mom using a regular hole punch. To make this postcard for March 8th with your own hands, you will need blue and yellow paper. Link >>>>

Here is another interesting option on how you can make a voluminous card for your mother with your own hands. The flowers are made of corrugated paper and so-called. chenille wire. The card itself is two-layer. For more information on how to make such a voluminous card as a gift for March 8, see


3. DIY postcard for grandma
And the child can make this voluminous postcard together with his mother and give it to his grandmother or aunt. For detailed instructions on how to make a three-dimensional postcard for March 8th with your own hands, see the link >>>>

You can decorate a postcard for March 8 with your own hands with an original applique in the form of spring flowers made from circles folded in half. See link >>>>

Here is an example of another voluminous postcard with your own hands, decorated with an applique in the form of flowers made from circles of different sizes. Both the petals and leaves of the flowers on the card are made of two circles each: one larger, the other smaller.


A beautiful three-dimensional flower applique is also made from hearts folded in half. For detailed instructions on how to make this postcard on March 8, see.


Flowers applique
Here we would like to give a link to the book "Flowers. Simple application (for children from 2 years old)" by the publishing house "Karapuz". In it you will find many interesting and simple ideas on how to make a flower applique to decorate a postcard for March 8th. You don’t have to buy the book; all the illustrations from the book are posted on the Labyrinth online store website.

Continuing the theme of paper flowers for beloved mothers and grandmothers, we will share with you an interesting master class from the website maaam.ru DIY postcard for March 8th, decorated with a voluminous paper flower. How to make it, see.

This homemade postcard for March 8 is decorated with a voluminous appliqué made of colored paper. To make one tulip flower, you need to cut out two identical tulips using a template, bend them in half, and then glue them together with their sides. To add volume to flower leaves, bend each leaf in half and glue only one half of the leaf to the card.

A paper flower can be wrapped in a paper lace napkin. The result will be a very delicate spring bouquet. Link >>>>

A creative solution is to make a postcard for March 8th in the shape of a cup, inside which you put a bouquet of paper flowers. Please note that the front side of the card is decorated with flowers. Vytynanka is a type of creativity that is based on cutting out patterns from paper. For cutting, use regular office paper or sheets of whatman paper. You can cut it with a stationery knife or a special breadboard knife. Nail scissors are also often used to cut out protruding patterns.


An original flower applique can be made from colored pencil shavings.

You can also make flowers from paper cupcake tins or paper coffee filters to decorate cards for March 8th. The child can glue their photo to the center of the mold.

A rose-shaped imprint is left on paper by celery root if you first paint it with paint. Try making your own postcard with your child using this unconventional drawing technique.


Surely you are familiar with the technique of paper weaving. Using this technique you can create beautiful paper napkin mats. See link
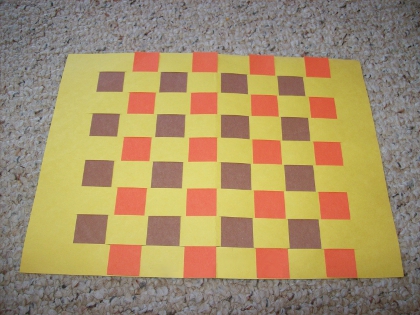
Having weaved such a rug from paper, you can then cut a basket out of it for your mother or grandmother. Be sure to decorate the finished basket with flowers. Link >>>>

The card in the photo below is decorated with flower petals made from crepe paper. How to make such an original three-dimensional postcard for March 8th with your own hands, see the link >>>>


Flowers can not only be cut out of paper, but also drawn with paints, pencils or felt-tip pens. Here's an interesting way to decorate a card for mom on March 8 >>>> First, very lightly outline the plot spot with a simple pencil. Then use watercolor paints on wet paper to draw multi-colored spots. When the paint is dry (you can dry the paper with a hairdryer), with a black thin marker (felt-tip pen) or gel pen, draw on the veins on the leaves, flowers, decorate and sign the card for mom. Another link on the topic.

A master class on making a postcard for March 8th with your own hands with a voluminous appliqué from napkins can be found on the website Country of Masters.

Quite interesting postcards are obtained if you use elements folded using the origami technique. You can make these elegant cards with your own hands for a woman using an origami dress. Such dresses can become both a decorative element of a postcard and an independent decoration, for example, a tag for a gift.


Master class on making origami dresses see link >>>>

And here is a simpler version of a postcard for March 8, decorated with a paper dress. Here the dress was made from a book page. The bodice of the dress was cut out and glued separately. We made a skirt separately by folding thin strips of paper like an accordion.

And one more example of a DIY postcard for March 8th, decorated with a paper dress. To do this, the dress is cut out separately and the skirt is folded from paper, and the bodice separately. Use a ready-made dress template. See link.


Finally, the simplest version of a voluminous postcard for March 8, decorated with a tutu skirt. The skirt is made from a strip of paper folded like an accordion.

A child can make an original applique from plasticine flagella (sausages) as a holiday gift for his mother or grandmother.
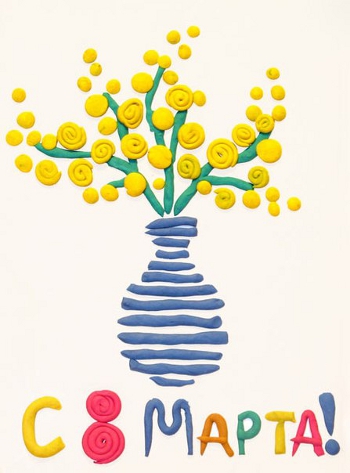
The basket with flowers in the photo below is also made from plasticine sausages. The result was a beautiful and original card for mom on March 8th.

Here is an example of another interesting postcard for March 8, made of plasticine using the applique technique.

A handbag is an indispensable attribute of every woman, so it would be appropriate to depict it on a postcard. For example, you can make an applique in the form of a handbag from colored paper, decorated with rhinestones and sequins. Link >>>>


And another obligatory attribute of a true lady is a lady’s hat. Complete your gift for your beloved mother with a small original card in the form of a hat. How to make this card for mom on March 8, see. It fits well on the table. Congratulations inside. Outside - any design you wish. You can come up with a wide variety of decorations for a hat: flowers made from napkins, flowers using the origami technique, quilling techniques, as well as buttons, lace, ribbons, and sequins.

If your mother and grandmother are big tea lovers, then you can make a postcard for March 8th with your own hands in the form of a cup with a tea bag.
Here is the simplest option.
Make an applique from colored paper in the shape of a cup and saucer. At the same time, glue the cup to the base of the card not completely, so that you can put a tea bag inside.

Here are two more interesting options for making a postcard for March 8th with your own hands, but they are also more complex.
To make a three-dimensional postcard as in the photo below, download the postcard template from the link. Print it out and let your child color it. Then you need to use scissors to make cuts on both parts of the card and insert one part into the other. For detailed instructions on how to make this craft for March 8, see the link >>>>

And this postcard is in the shape of a teapot. Inside you can put delicious tea bags and congratulations on March 8th. Template for making a postcard with your own hands at the link. To make this paper craft for March 8, you will also need a beautiful ribbon.


If you want to emphasize the role of your mother or grandmother as the mistress of the house, if your mother or grandmother loves and knows how to cook deliciously, then make a postcard for them for March 8th with your own hands, decorated with a paper applique in the form of a kitchen apron.


On the same site there is a section with voluminous postcards for March 8 with your own hands. A card in the form of a bouquet of flowers, or a cup of coffee or a basket of flowers. you will find all this and much more on the Creative Park website.


10. How to make a postcard. Postcard templates
The voluminous toy postcards from the site www.nika-po.livejournal.com deserve special attention. These postcards will occupy the recipient’s attention for a long time; he will roll a ball through a maze or watch the beads pour out. The main element of all these voluminous postcards with a window is a plastic lid from food packaging (for example, sour cream). For a detailed master class on how to make a postcard with your own hands, see. Here is another link to the book by the author of the site, the book is called “Entertaining Postcards”.

We offer a selection of ideas for creating cards for March 8 with your own hands. In this article you will find original templates, examples of beautiful work, useful tips and step-by-step instructions. Here you will see a variety of cards for children who want to congratulate their mother, grandmother, teacher, sister or friend. And some options will also appeal to adults who are also preparing for International Women’s Day and planning to make homemade cards.
We have collected for you the most popular master classes and ideas for inspiration. The article presents various applications, three-dimensional templates for creating 3D cards, origami elements and much more. A popular dress card, paper flowers, simple drawings and something else - there are many options, choose any one.
Palm card for mom
Such a postcard can be made by children of almost any age (primary school, kindergarten - even the smallest can do it). For them, this process will turn into an exciting game, so they will definitely enjoy the work. A child can make a craft by March 8 with his own hands, without outside help or under the supervision of an adult - this depends on the age of each novice craftsman.

We will need:
- colored cardboard;
- colored paper;
- twig;
- glue.
Fold a sheet of colored cardboard in half. On white paper we trace the palm and cut it out along the contour. Glue it to the cover of the postcard.

Glue a twig to the center of the palm. If you don't have good glue on hand, you can use tape.

Draw flowers and leaves on colored paper. And also the number 8 – a symbol of March 8th. We cut out the blanks.

Glue the decor to the branches. And we will glue the fingers of our palm inside: so that they protrude a little, and the card for mom will turn out to be voluminous.

Ready! All that remains is to add your wish. Now it seems as if the child is clutching flowers in his fist for his beloved mother. By the way, this card can also be given to a teacher - it cannot be called very personal, so it would be appropriate to congratulate the teacher in this way.
Postcard with lilies of the valley
This simple card can be made by children in elementary school. A beautiful three-dimensional appliqué can be done simply and requires almost no help from adults. With such a small craft you can congratulate a teacher, girlfriend or grandmother on March 8th.

We will need:
- colored cardboard;
- green paper;
- foam rubber or polystyrene;
- PVA glue.
To make a card, you may need a ready-made template or stencil of flowers. Flowers can be any, but lilies of the valley, lilac, mimosa, lupins - that is, elongated flowers with a lush “crown” - will look most advantageous.
We draw the stems of the plant with a felt-tip pen or pencil. And then we fill the space for the flower itself. To do this, crumble the foam into small pieces or cut the foam. It is very convenient to coat the base with glue, and then simply apply particles of material to it and press to fix it. To make the card more neat, you can help yourself with tweezers.
If you want to make a holiday card for March 8 with lilacs or lupins, the material can be painted with acrylic paint. If you don't have such paint, mix regular watercolor with liquid glue in a 1:1 ratio and apply the mixture to a sponge or foam.
You can make a beautiful border around the edges of the card. You can additionally decorate the image itself with sparkles or a beautiful colored spray (just spray the paint from the brush, moving it 30-40 cm from the cardboard).
Please note that you should write congratulations on March 8 and wishes for the woman to whom you are going to give this beautiful craft in advance. With glued decor it will not be very convenient. However, if you make a double card (with a fold), then you can enter a congratulation after completing the decor.
3D card with number 8
This card can be made by a child under the supervision of elders or an adult. An original three-dimensional postcard for March 8 will be appropriate as a gift not only to family members, but also to teachers, colleagues and friends. Unusual, beautiful, tender and airy - it will definitely please any woman.

We will need:
- a sheet of thick paper or cardboard;
- glue stick;
- nail scissors;
- paper cutter.
Making a postcard with a three-dimensional figure eight is quite simple, but we do not recommend this work for small children. If a kindergartener or elementary school student does this together with his mother or grandmother, that’s a different matter, but cutting it out on his own will not be easy for him, because this involves working with a sharp cutter and scissors. If you want to make this card with your child, trust him to cut out the figure eight itself (the large part) and paint the craft, and do the rest yourself.
The voluminous postcard consists of two parts. We offer you a ready-made template so you don't have to draw eights from scratch.

You can simply print out this stencil on plain or colored printer paper in duplicate, then decorate the figure eights to your liking and cut them out. For a more durable design, glue the templates to cardboard and then cut them out.
There is one more trick. If you don't want to decorate the paper and you have some pretty cardstock, glue the printed paper to the back of it. Then simply cut out the parts according to the template - on the front side on a beautiful cardboard you will get the desired design.
Use a cutter to cut out small parts on the template. Make a small cut, and then help yourself with nail scissors with thin, rounded ends.

Fasten two figure eights together at the top and bottom. For this we made special “hooks”. For reliability, you can fasten the parts of the future postcard with glue.

Shape the base to make it stable. By the way, you can additionally glue it with a strip of cardboard. This makes sense if the rest of the 3D card structure is made of paper.

You can leave the craft white. This color is airy, delicate and pure - an excellent symbol of women's holiday. Such a voluminous card will perfectly complement any gift for March 8th. At the same time, you will be original - few people are ready to make a postcard of such fine workmanship.
Postcard with 3D flowers
A voluminous bouquet inside a postcard is a great spring surprise for March 8th! Give your mother, grandmother, sister and friend such a card - they will definitely be delighted. The design is quite simple to assemble, so even elementary school children can handle making this postcard with their own hands.

We will need:
- cardboard for the base;
- multi-colored paper;
- glue stick;
- double sided tape.
We cut out 7 squares measuring 10x10 cm from colored paper of different colors. You can take paper in one color scheme, or you can make the flowers in the card bright and use contrasting shades.
Fold the square in half, then in half again. Next, we make a lapel on one side and the other - so that we get a triangle. Then with a pencil we draw a small rounding - a blank for the petal. We cut off the excess and straighten the part: we have a small flower in the shape of hearts. We cut off one petal and then fasten the structure with glue. As a result, we got a slightly raised cup of petals.
The first blank for the postcard is ready. All that remains is to cut out the remaining parts according to this pattern. We will also need to make two petals from green paper - we immediately attach small pieces of double-sided tape to them.
For the convenience of further instructions in this master class, the parts are labeled with letters in the photograph.
We begin to connect the flower. Flowers B and C are attached to A. In this case, D overlaps A.

Flowers E and F are attached to D and connected to B and C.

All that remains is to attach flower G on top. We put it on element D and glue it. We attach the leaves with double-sided tape to the petals themselves.

Our three-dimensional flower is already ready, all that remains is to attach it to the holiday card. To do this, we place the flower on its side and attach it to the inside of the card on one side. Smooth out and close the card. Then we open it, straighten the structure and do the same manipulation on the opposite side.

We have created a beautiful three-dimensional card for March 8, which any woman will enthusiastically accept. Just imagine how surprised a person will be when a gorgeous three-dimensional flower of extraordinary beauty literally grows on his palms. This is perhaps one of the best surprises for International Women's Day!
Simple card for mom
If you work with young children who need to congratulate their mothers on the holiday, or you have a kindergartener or schoolchild whom you are ready to help with making a card, this master class will be your lifesaver. A gift for mom, older sister or kindergarten - this applique is good for any occasion. The simplest holiday cards made of paper with flowers made from large parts using ready-made templates are what you need for creativity with children.

We will need:
- colored cardboard;
- multi-colored paper;
- printouts with congratulations;
- glue stick.
To make the texture of the card more interesting, you can add corrugated paper.
We bend the cardboard in half so that a congratulation can be placed inside. We will cut the flower out of colored paper. You will find the template below: you can print the stencil or draw it yourself.

Cut out the details. If you are making several cards at once, it is convenient to fold several sheets of paper together and cut out 3-4 flowers and centers at once.

We recommend adding butterflies to the card - this will make the craft for March 8 even more original. Elementary school children can easily cut out wings on their own. You can find ready-made butterfly stencils.

Congratulations can be typed into a text document and printed, or you can help your child write them by hand.

Decorate the card outside and inside - attach all the details with a regular glue stick or PVA. If the children are older, you can add more interesting glitter decorations. To do this, you need to coat part of the card with glue and sprinkle dry glitter on top, or simply paint the surface with ready-made glitter markers.
Card-dress: origami and with a napkin
One of the most popular cards for March 8th is a dress card. This craft looks very beautiful and original. It can be given to an older sister, a young mother or a friend.
Some people think that making a card with a dress with their own hands is quite difficult. Actually this is not true. The simplest origami technique is easy to perform, and even a schoolboy can handle it. We invite you to watch the video master class and repeat these simple step-by-step instructions.
Very often dress cards are made with napkins. To do this, you need to fold the top part of the dress, as shown in the video, and cut the bottom. Next, simply gather the unfolded napkin into an accordion shape, fasten it in the middle with thread and bend it in half. Glue the napkin to the central part. “Seat” the edges with glue, and leave the rest of the napkin free.

By the way, the shirt of the dress does not need to be folded. If you have a ready-made image of a fashionista or princess from a magazine, or a suitable photo of the person you are giving a card to on March 8th, simply cut and paste the image and then add a napkin.
Postcards with dresses are always received with special delight. They look very elegant and festive. Perhaps this is one of the best additions to a gift for March 8th.
Choose any of the proposed holiday cards and complement it with your own decor and warm wishes. Mothers, grandmothers, teachers, sisters, girlfriends, aunts and colleagues - everyone deserves attention on this day. And if you don’t plan to give gifts to women you know, delighting them with cards is not difficult. You will only need the simplest materials and a few minutes, but the person who receives your homemade postcard for March 8th will be truly touched and happy.
It is also worth noting that recently electronic greeting cards have become increasingly popular gifts for March 8th. They can be made very quickly in online services and sent by email or social network to your loved ones. For example, the Canva service allows you to create a unique greeting card in literally 10 minutes from a variety of ready-made templates for any holiday, and in addition to the electronic version, you can save it in PDF format for printing on a home printer or in a printing house.
Views: 47,585
A postcard with a little bit of soul and human warmth in it is much more valuable. This is a very pleasant and touching gift for our mothers and grandmothers, especially since the occasion is March 8th. We invite you to make some really beautiful and simple options with us: how do you like, for example, a cardboard card for March 8th?
Volumetric postcards for March 8
You will need:
- a set of multi-colored paper;
- glue (preferably a glue stick);
- tape (necessarily double-sided).
Let's get started:
For convenience, we have indicated the details of our future postcard in Latin letters. So, we start by cutting out seven squares from colored paper (each size is ten centimeters). Next, all the squares are folded into four. We fold one lapel diagonally, turn it over and fold the next lapel in the same way. This is how we get a triangle (look at the photo). Next, a petal is cut out from our triangle. Now you can unfold the colored paper and one petal. We close the flower and put petals on all sides, all this is held together with glue. We repeat the same thing several times - the number of flowers on the card can be at your discretion.
Now a small piece of tape is attached to our petals (we remind you that we only use double-sided tape). Now the flowers are connected to each other: flowers C and B should overlap the petal marked A. As for the petal under the letter D, it goes at the top and overlaps A. Flowers F and E overlap C and B.
Let's move on: follow the photo instructions. We attach part G on top and overlap it with part D. Now you can cut out several sheets of green paper. You can attach the leaves to the flowers with double-sided tape. Now we take a sheet of cardboard and cut out a small rectangle from it (approximate size - twenty-five by fifteen centimeters). We fold the triangle in half - this is how we get a blank for the future postcard. Our voluminous flowers are placed inside it, attached with tape, and pressed tightly. Now open the postcard and repeat the same thing. Congratulations, an excellent version of a postcard for March 8th for grandmother or mother is ready!


Complex, but very beautiful card for mom on March 8
You will need:
- sharp scissors;
- tape: knife (stationery);
- pencil; glue;
- some colored cardboard (pink and red);
- some scrap paper; a beautiful picture (in our version - a cute girl in a retro style);
- napkin (necessarily openwork);
- little things for decoration: a little lace, flowers, paper curls, feathers and so on.
- As you read in the subtitle, making this postcard will not be so easy - we will work in two stages. However, do not hesitate - the result will pleasantly surprise you! Follow the photo instructions carefully.

Let's get started:
Stage 1.
- A blank for the future postcard is cut out of red cardboard. You can choose the size yourself, we offer 16x17 centimeters.
- A rectangle is cut out of pink cardboard. Please note that this part should be several millimeters smaller than the red blank.
- A rectangle is also cut out of scrap paper. It is also smaller by a couple of millimeters, but narrower than the pink blank.
- All blanks are glued together, as in the photo below.
- Let's start decorating the card. To begin, glue the lace to the bottom of the card. Next comes paper curls and openwork napkins.
Stage 2.
- The main card is being put aside for now. Now we are making a “daughter”.
- The charming design you choose is pasted onto a red cardboard backing.
- Now pink cardboard is used: a small blank is made from it, as in the picture. It can be decorated with red patterns, which, by the way, can be elegantly drawn with an ordinary gel pen.
- The pattern on the backing is glued to a small blank. Glue small pieces of ribbon on both sides of the small card.
- The small card is glued to the big one.
- You can glue a couple of artificial flowers to the corner of the card. Ready! March 8 cards for a colleague or beloved sister can be so stunningly beautiful.


Spring cards for March 8 made of paper
You will need:

Let's get started:
We make a blank for the future postcard from colored cardboard. We cut out the parts from white and light green sheets of paper so that one ends up being slightly smaller than the other.
White paper is glued to light green paper, after which all this is attached to our main workpiece. As for white paper, you can safely tint it slightly or draw a pattern on it in delicate colors.
We make small labels from leftover cardboard and paper (see photo below). All labels are glued together, we make a hole in them. Now a small cut is made at the bottom of our future spring card. It is needed so that it is possible to thread a lace ribbon through it.
We can glue a couple of artificial flowers a little higher above the braid. It would be appropriate to add beads to the middle of the flowers. Finishing touches: we thread our string through the hole in the label. The rope is tied into a bow, and we glue it all to the card in the upper right corner. By the way, you can write touching words of congratulations on the label. If you are interested in postcard templates for March 8, then this lesson may be useful to you - there can be a lot of options on how to decorate such a postcard and in what color to make it!


Master class: postcard for March 8th with hearts
You will need:
- a set of colored paper;
- a sheet of thick paper;
- sharp scissors;
- good glue.

Let's get started:
Please note that you can draw hearts yourself, but it is important to remember some rules (discussed below).
- So, we start by removing the big heart from the middle (as you can see, it is located right on the fold).
- Now we cut out the hearts, but in no case do we touch their folds (as in the picture below).
- Cuts are made on the hearts in the indicated places. Please note that the gray lines are on the opposite hearts. This way you will be able to hold them together.
- The halves are glued to the base, the hearts are connected. Remember that the size of the hearts must be the same on both sides.


DIY children's cards for March 8th: a very non-standard option!
You will need:
- yellow petals (about eighteen pieces);
- two mugs (note that they must be different sizes);
- green sunflower leaves;
- a pot where we will “plant” a sunflower;
- a little straw, which will also decorate our custom three-dimensional card.

Let's get started:
On each petal we carefully draw a border of dark dots. The dots should look as natural as possible. To do this, the petals can be bent in half. Now we take a large circle of paper and glue nine or eight petals to it to begin with. This will be the first layer, all other petals are placed on top.
As for the small circle, it is glued to the center of our sunflower. We also need a stem. It can be done simply: for example, wrap a cocktail tube in colored paper of the appropriate color. Wishes to your beloved mother are written on sunflower leaves. Not a postcard, but delight!


Original postcards for March 8: nothing is simpler
You will need:
- paint in white, green and brown colors;
- brush;
- sheet of cardboard.

This card is made in just a couple of minutes! If there are children in the house, we recommend involving them in the process. When they say “it retains the warmth of your hands,” then this is definitely about this postcard, because we start by dipping our finger in brown paint and pressing it tightly to our paper. Carefully draw the stem of future flowers with a brush.
We do not proceed to the next stage until the brown paint has dried. Now take white paint and carefully dip your little finger into it. With the help of simple movements we make our dandelion fluffy. By the way, create a light effect of fluff that flies away or scatters in different directions - it will turn out very cute.


Postcards from March 8: mother bird
Just an incredibly gentle and simple card! At the first stage, we need to print and cut out the details of a sample of our future birds. All the necessary details are available at the link provided.
Now we take colored and white cardboard. You need to cut out rectangular parts from it, which will become the main background of the future postcard. Please note that the white piece should be approximately one centimeter larger than the colored one. Now we carefully glue our hugging birds, as shown in the picture below.
Finishing touches: our birds should have noses and eyes. They can also be made from yellow and black cardboard. Carefully glue the small parts to the birds. If you don’t want to cut out small details, then simply draw them with a felt-tip pen.


Do you know how to make beautiful cards for March 8th? Share with our users in the comments below the article
Photo: upon request from Yandex and Google


