Wreath of birch branches. Cones as the main decorative element. Interesting options for wreaths from improvised materials
Before the arrival of guests, everyone cleans up the house and hangs decorations. And among all the garlands, candles and gifts, of course, the Christmas wreath occupies a special place. It can be hung on a door or wall, put on the center of the dining table.
In stores on the eve of the holidays, you can see a large selection of wreaths of various designs: with ribbons, balls, candles. But to make it really special and unique, and also much cheaper, make it yourself. How to make a Christmas wreath with your own hands? Very simple! 
Here you will find step by step 5 master classes for making a Christmas wreath. Choose which one you like best: from balls, spruce, pine, from cones or even from a grid.
First, let's look at how to make a traditional spruce Christmas wreath, which can then be fixed on the front or interior door.

Tools:
- straw form for a wreath (size optional),
- balls (should correspond in size to the wreath: with the increase in the base of the wreath, the size of the toys also increases),
- decorations in the form of twigs with red and gold beads, a red ribbon for a bow, pine cones (large and small),
- spruce branches (thin, so that it is convenient to bend them),
- a few other branches (for example, pine),
- scissors, floral wire (preferably green),
- red and gold decorative flowers (three each).

Lay everything out on the table and get to work.

TIP: You can make this form yourself from dry grass and cling film. Additional wrapped with tape.
Step by step manufacturing
STEP 1: Making the base of the branches


- First, make a base out of pine branches. Lay them out in the same direction, for example, counterclock-wise, let the ends of the branches be on the right, and lay the soft tops of the branches to the left side. Attach them to a straw wreath, tying around with floral wire, tie down to the base.
- Keep adding more and more branches around the shape.
- look, are there any empty spaces, fill in all the gaps with smaller branches.
- So far, he looks a little disheveled and sloppy. Wrap a little more wire around to pull off any large branches that are sticking out. The wire should be hidden behind the branches. Now we have a uniform lush wreath - the foundation for further work.
Step 2: Decorate the Wreath


- Now add a few other twigs (in the same direction as the pine ones), distributing them evenly across the wreath.
- Attach a red bow. You can do without it, then the view will be more festive.
- You can add small pine cones if there were none on the branches themselves.
- Color distribution should be symmetrical(so that it doesn’t turn out that all the red decorations are in one place, otherwise it will look like a red spot). Divide the wreath conditionally into 4 parts, one of them has a bow, and add a branch with red beads to the other three.
In principle, it already looks good and you can leave it like that, you can finish it.
IDEA: Or hang the wreath first in this form, and after a week add decorations, so the wreath will definitely not get bored during the holidays
Step 3: Adding More Decorations

- Attach for contrast. several branches with gold beads.
- Attaching the Pine Cones: Wrap florist wire around the cone close to its base, attach to the wreath, locking well in place. Make sure the wire is visible, as less as possible. At this point, you can also stop, or continue to add balls.
- Attach three balls, given the same conditional division of the wreath into four parts
- Add three red and three gold decorative flowers.
You did it! It turned out a wonderful Christmas wreath, it remains only to attach it to the door to please yourself and your neighbors!
How to make an Advent Wreath

Following the scheme of operation just described, it is also possible to create an Advent Wreath.
By tradition, there are four candles on it: the first was lit 4 weeks before Christmas, each next Sunday they lit one more, so it was clear how the holiday was approaching.
Now a wreath of this type can be made with traditional and decorative purposes. In any case, it will help create a festive atmosphere.
So let's get to work:

- We create the base of the wreath from the branches, add small pine cones, as in the previous case.
- Fasten with hot glue gun candle holders(preferably with sharp pins at the bottom to insert into a wreath between the branches, but ordinary ones will also do), we insert candles into them.
- We decorate the wreath with large cones and decorative flowers (two red and gold each).
ATTENTION! Do not leave such a wreath unattended with candles lit!
Master class number 2: A wreath of balloons
To make such a wreath, you will most likely not even have to go to the store for materials. After all iron clothes hanger and Christmas balls almost everyone has. So choose a time to work and go!
You will need:
- 1 wire hanger, red Christmas balls (the quantity depends on the size of the balls you have at home),
- pliers, wire cutters (optional)
- bow ribbon,
- sprigs of pine or Christmas tree (or garland),
- wire or strong thread (preferably green).

Step by step execution:

Step 1:
- Use pliers to give the hanger a round look. Don't worry if it's not perfectly even, the balls will cover all the bumps.
- Unscrew the hanger, that is, disconnect it at the attachment point under the hook.
Step 2: 
- Place the balls on the wire. If its end is too sharp or uneven, cut with wire cutters. After you have strung all the balls, bend the hook with pliers to secure the circle.
- You don’t need to hang balls from above near the hook, as there will be a ribbon and coniferous branches in this place.
Step 3:
- Attach branches on top of the wreath on both sides of the hook (tie them with wire or thread).
- Make a ribbon bow and attach it under the hook.
- All is ready! Even the hook is immediately there, it remains only to hang!
Master class number 3: A wreath of cones
A Christmas cone wreath is very simple to make, but its main advantage is that it is stored for a long time and does not crumble, unlike a spruce wreath. It can be sent to storage until the next New Year.

Materials:
- Dry cones from 30 or more pieces, depending on the diameter of the wreath
- Base for a wreath (if not ready-made as in the photo, cut out a torus from thick cardboard)
- Glue gun.
- Decor is up to you.
Work order:
Stage 1: Laying the first round
- Using a glue gun, we attach the cones to the inside of the Thor or circle.
- Best inside attach smaller cones.
- The distance between the cones is 1-2 cm. They should not be fixed closer. Maybe even 3-4 cm.


Stage 2:
We do the same thing, but already on the outside of the circle with larger cones. Distances between them - 3-4 cm. They should lie freely - do not overlap each other.

Stage 3:
- And now fill in the middle row- he's like should be on top internal and external row. You can attach the cones not vertically upwards, but slightly directing them in different directions, filling the voids.
- We make decor with sprigs of berries or live spruce.


TIP: If you add a garland on top, it will be even more effective!

Master class number 4: From pine branches
“Simple and tasteful” is the most appropriate phrase for this method of manufacture. Christmas greens and minimal decorations. but nevertheless, when you look at the door with such a wreath, it immediately becomes clear that a truly festive atmosphere reigns here!


Materials:
- thick wire wreath mold,
- greens (real or artificial pine branches, other conifers are also suitable),
- cones, wire (for tying branches),
- glue gun,
- little bells,
- bow ribbon.
ATTENTION! When choosing the length of the wire form, keep in mind that after attaching the branches, the wreath will increase several times in size.
Manufacturing steps:
- Take some coniferous branches and fasten them to the mold with wire. First, fix the ends of the branches, then wrap them around the wire several times, wrap them with wire. Thus wrap the entire base.
- Make another ball of branches over the previous one, in the same way. You should get a uniform coniferous wreath.
- Attach some cones.
- Add 3-4 bells gold or silver to create a festive mood. Attach with a glue gun.
- Make a ribbon bow and attach it to the wreath.
Every time you open the door, you will hear the quiet ringing of bells and understand that the holiday is in the air around!
Master class number 5: Decorative mesh wreath
With such a wreath you will definitely surprise all the neighbors! This colored hemisphere will not leave anyone indifferent, just looking at it will bring a smile and a sweet anticipation of the holiday!

Materials:
- round base for a wire wreath,
- decorative mesh in rolls about 50 cm wide (several colors that can be combined with each other),
- fluffy decorative wire.

TIP: If you do not have such a base for a wreath, then you can cut it out of thick cardboard with a torus thickness of -10-15 cm. Then the mesh can be fastened with a needle and thread or a glue gun.
Manufacturing steps:
Step 1:


- cut off approx 25-30cm mesh and roll it into a roll. Squeeze in the center with your fingers. To make it more convenient, you can take someone as an assistant to hold the bundles.
- You will need many of these rolls, they don't have to be exactly the same length.
Step 2:

- group rolls together 4, connecting the centers, and tying them in this place with fluffy wire. Leave the ends of the wire for attaching to the base.
- Tie each such part to the base of the wreath.(the remaining ends of the wire). They should be close to each other, leaving no free space.
- Continue until the entire space is filled.


Ready! It turned out very colorful and festive! If desired, you can hang a toy on the wreath so that it is in the center. But look, do not overdo it so that it does not turn out “too much”, because everywhere you need to know when to stop.

Wreath Ideas
In the end, I want to note that here are several ideas for making wreaths. And, in fact, there are a lot of them! After all, it is worth replacing a small detail, making your own correction and you will get a new unique copy! Turn on your imagination and create! Involve the whole family in this process to make the process even more interesting and enjoyable!
Merry Christmas!!!


Designer wreaths 2019
In 2019, vertical wreaths come into fashion, which are mounted not on the wall, but on the ceiling, like a suspension. The principle of assembling a wreath is the same as described above. BUT
- You can place candles on top of them.
- Add hanging elements
Fantasy has no limit. The main thing is to have somewhere to hang it on the ceiling! If your chandelier is not very good, then you can just place it under it.


- A bit of history
- What do we need
- Subsequence
- Stage 1: preparing the base
- Stage 2: fastening branches
- Stage 3: decoration
- More ideas
Christmas and New Year wreaths, along with a decorated Christmas tree, are symbols of the upcoming holidays. The custom to create such compositions came to us from Europe, today in our country such decoration does not surprise at all, but on the contrary, it has a New Year's mood. How to make a New Year's wreath with your own hands - we will tell you in a detailed master class with beautiful photos of the process, we will throw in a few ideas and give practical recommendations.
A bit of history
Christmas wreaths originate in Hamburg in the middle ages of the last millennium. The Lutheran theologian Johann Hinrich Wiecher, who adopted several children from very poor families, came up with a kind of "waiting calendar" for Christmas. It was an old wheel, which the priest decorated with coniferous branches, and put candles to it: 19 small red ones and 4 white ones. Their number showed which day before the holiday now goes and how much is left. Every day, Johann and his children lit one red candle each, and on Sundays, one white one. So the guys were easier to endure the expectation of the holiday.
Today, a wreath of coniferous tree branches in Russia is associated only with the new year, the symbol of Christmas is still characteristic of the Catholic Church.
Symbolism of the wreath:
- The circle with candles is associated with the globe and the four cardinal points.
- The circle itself is the infinity of life.
- The green color of evergreen needles is a symbol of all living things.
Candles in Christmas wreaths fill the home with light, much like how the world lights up during Christmas.
A traditional New Year's wreath made of cones and branches can be bought in a store, but will it really be so symbolic and attractive? Oddly enough, such a souvenir rarely has pre-holiday magic, such are purchased for offices and places far from home. Even in an age of high pace of life, most people find a couple of hours to make a DIY Christmas wreath. It is quite simple, exciting and means such decoration is much more than just a symbol.
Wreaths of cones and needles are traditionally placed on:
- At the front door;
- Above fireplaces;
- On the table as a table decoration.

Accordingly, the design and method of attaching toys of decorations and accessories will differ.
To clearly show that making a Christmas wreath with your own hands is not difficult at all, the designers made a fascinating master class with a photo so that everyone can try to create their own Christmas decoration, while enjoying the process and the result. So, New Year's wreath: MK with step-by-step instructions.
Master class from creative designers
So many decor variations come up with the bright minds of designers, and the base always remains traditional - green branches of coniferous trees. You can decorate a spruce wreath with anything:
- Christmas balls;
- Tinsel;
- cones;
- Felt toys;
- Beads;
- Feathers;
- Beads and so on, not to list everything.
Our artists came up with a few ideas:
- Christmas wreath of cones and oranges;
- Wreath with cotton cobs, feathers and New Year's toys;
- And many more interesting combinations that you will see below.
What do we need
So, what did we need to create Christmas and New Year wreaths:
- Spruce, pine, fir branches. They can be collected in the forest belt or in the park. Choose beautiful young twigs with good uniform needles, it should last a month and a half in excellent condition. Of course, you can use artificial needles, but the effect will not be the same, and there will be no smell from this, and this is an almost obligatory wish;
- Fir cones. You can take cedar, pine, or whatever you like. Try to choose fresh ones - the old ones quickly crumble in a dry and warm room;
- Multicolored Christmas balls. Take those that you do not plan to hang on the Christmas tree, so you can also save money. Choose small toys to place on the branches themselves, you can take a larger ball for hanging;

- Colored bird feathers are sold in decor and hand-made stores, we took several varieties;

- Satin ribbons for bows;
- Rowan twigs with berries are an unusual solution, but organically fit into the theme of a real winter tree.
Do not be afraid to use food for work - gingerbread, sweets, fruits. The main thing is not to take perishable ones and watch their expiration date.

- The highlight of the program is orange rings. They will add brightness to the finished jewelry and will exude aroma. The smell of citrus and pine needles in the aggregate in any person is associated with winter holidays.
- Tools: scissors, pruner, rope, hot glue with a gun.

- The basis for the New Year's wreath is a circle cut out of thick cardboard. You can use newspapers, a hoop, a cut of a wide pipe - any round product.
Subsequence
Now we will tell you how to make a wreath on the door with your own hands in stages, because one of the components of successful work is the correct organization of the workflow.
Stage 1: preparing the base
This is the most important step, on the implementation of which the quality of the finished wreath and its strength depend. We took thick cardboard, cut out round blanks with a diameter of 30 cm from the outside and 25 cm from the inside. The width of the wheel turned out to be 5 cm. We wrapped the workpiece with a wide gold-colored ribbon - this solution will allow you to conveniently attach branches and decor, and random gaps through the needles will not be evident as something unfinished.

Instead of cardboard, a wreath of newspaper tubes at the base also holds its shape well. Creative minds even manage to create an independent composition by twisting sheets of the old press into cones and tubes, fixing them on the base. But this is not our case.
Stage 2: fastening branches
Attaching the branches yourself is simple:
- Insert them into the pockets of the tape at the base of the workpiece and tie with a thread;

- Intertwine with other branches;
- For fastening, stapler brackets or wire are suitable.

Pre-prepare the branches: cut off excess shoots and shorten the main one to the desired length. Work the entire perimeter of the ring.

Let some branches be with their native cones, this will facilitate the decorating process.

Stage 3: decoration
This stage is the most creative and interesting. Here we turn on all our imagination and create.

We used cotton cobs for decoration - the natural theme is always relevant, and such an unusual solution will definitely transform a hand-made wreath.

Imagine in advance the appearance of your product and select items for decoration that can be combined with each other. Let them be unexpected, then there should not be many of them.

Until the branches are covered with decor, reinforce them with a thin thread: it will pull the greenery to the base and visually decorate the product.
If the hand reaches for rowan branches - do not deny yourself. Fortunately, they can be harvested until deep frosts.
Cut the harvested branches with secateurs to the desired length, remove ugly and spoiled berries. Insert the branches into the pockets of the workpiece and tie them like spruce.


Now we attach delicious material - orange slices. It is better to fix them to the composition with the help of ordinary threads - the brackets will tear the delicate structure, and the glue simply will not grab the liquid juice. A fragrant reminder of the new year and at the same time a memory of a sunny summer.


Feathers are best fixed with hot glue. Why hot? - It immediately seizes and does not have to wait long for drying. In addition, it is colorless and will not make itself felt.


Decorating a wreath with your own hands with Christmas balls is as exciting as decorating a Christmas tree. We placed small balls on the branches in the same scale. It is better to fasten them with threads using a crochet hook through the branches.

Well, what about without various trinkets and toys?

A New Year's wreath on the door may contain a reminder of winter and snow. To do this, we use "liquid snow" in the form of an aerosol. With it, we apply frost to the tips of the needles.

Making a New Year's wreath cannot be put into one frame - there are as many decisions as there are hands starting to make this symbolic accessory.

One of the examples of what we have done.

More ideas
It is not at all necessary to make a Christmas and New Year wreath from living branches, you can make a composition from any materials for needlework:
- Felt wreath;

- Wreath of beads;


- Paper wreath;

- New Year's wreath of tinsel.

The choice of material is limited only by the scope of imagination.
The video reflects the process of work, which is very easy to repeat.
Hardworking - a bright light burns through life, lazy - a dim candle
DIY Christmas wreaths. Part 2 - rods.
visibility 2701 views
comment 0 comments
We continue the theme of Christmas wreaths, and this time we will focus on Christmas wreaths, twisted from branches and twigs. First, I will tell you how to make the basis for such a Christmas wreath, and then we will decorate it with bows, cones, toys, flowers, berries, notes and other smart stuff.

Material for the base of the Christmas wreath.
You will need tree branches or shrub twigs that are highly flexible, that is, they bend but do not break. If you live in the city, then in your case, the willow is the same tree that has the branches we need, bent so close to the ground that we don’t have to jump. Willows are found everywhere in the city, but most often they are planted along the riverbed. Therefore, go to the city embankment and stock up on a small bunch of branches there.
It is necessary to cut a tree not in one place, but selectively, as if thinning out the crown. Then no one will tell you that you are spoiling state property. To be honest, it's better to do this in the evening, when it gets dark, unless of course you have a jacket with the emblem of a housing and communal services worker.
In addition to willow, hazel rods bend well and ... I don’t know what they are called, but there are a lot of them in every city ... such shrubs with bright red long straight rods - usually planted along the paths of preschool and school institutions - they also bend well.
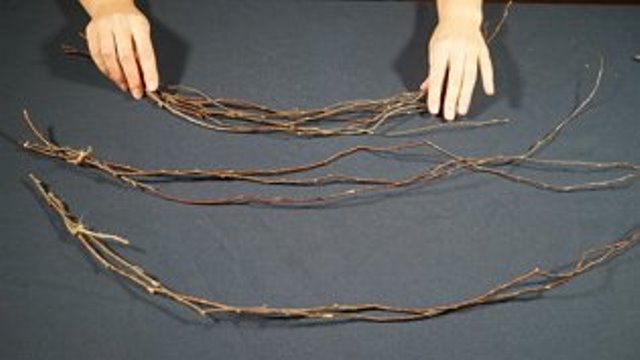
Do not rush to tear off the side branches from the rods, let them remain - they will give the wreath an additional lush volume (the wreaths in the pictures above are twisted just not from bare rods, but from branches with all of the side shoots).
If we want to make a twisted wreath (as in the picture below), the rods need to be soaked in hot water for an hour. Then they will be completely soft and easily twist into a wreath.

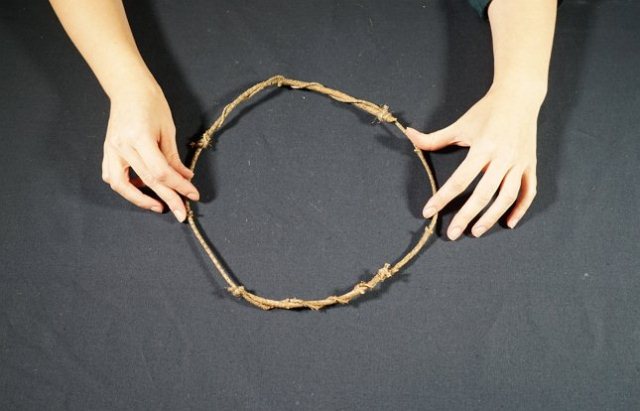
How to twist a Christmas wreath from twigs.
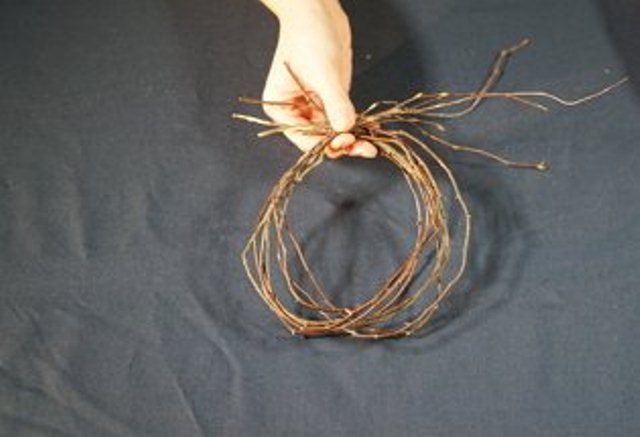
Take a small bundle of rods and at the base, carefully tie this “broom” with twine, without cutting the twine from the common skein. Now this “initial broom” of ours can be slightly spirally twisted as in the picture above (you can not twist it, as in the picture below).
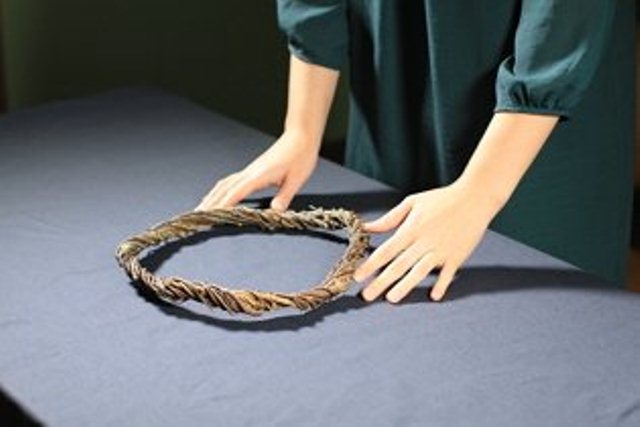
Now we will add new rods I will now explain how. We take a new bunch of branches and insert it into the middle of our first broom. That is, we moved the branches of the first broom tied with twine and between them in the center drowned our new bunch as deep as possible, and moved the branches of the first broom back together, and they just covered the trunk of our newly-created bunch. And so on the chain. And all this is fixed with a twine, which stretches from the beginning of the first broom and spirally wraps around all subsequent "brooms-beams". We select the string to match the color of the rods.
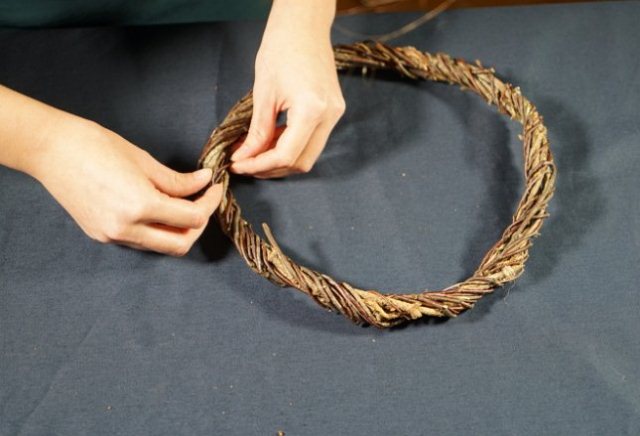
Closes into a ring our chain of brooms is simple. We move the branches of the last broom and hide the trunk of our first bunch in the center between them and wrap it with twine. Everything is simple, as you can see.
To be honest, such a system allows you to make a Christmas wreath with your own hands and from old birch brooms. And not necessarily here super-flexible rods. In short, take your pick. Well, now let's start decorating Christmas wreaths.
DIY Christmas wreaths - SMART BOWS.

A beautifully tied ribbon, some large beads or small Christmas balls - and voila! Starfish, shells brought from the sea - a wreath in a marine style - this is also original and beautiful.
DIY Christmas wreaths - NOBLE FLOWERS.

Such flowers can be twisted from thick white felt, velveteen, flannel, ribbons (and even toilet paper, if folded in half lengthwise).
DIY Christmas wreaths - BERRIES.

The role of berries will be performed by brushes of mountain ash, beads or large foam balls, stuck on protruding branches or glued to them. Such foam balls are sold in florist shops, as well as in stores selling all kinds of ornamental material, you can also pick up balls from foam packaging yourself.
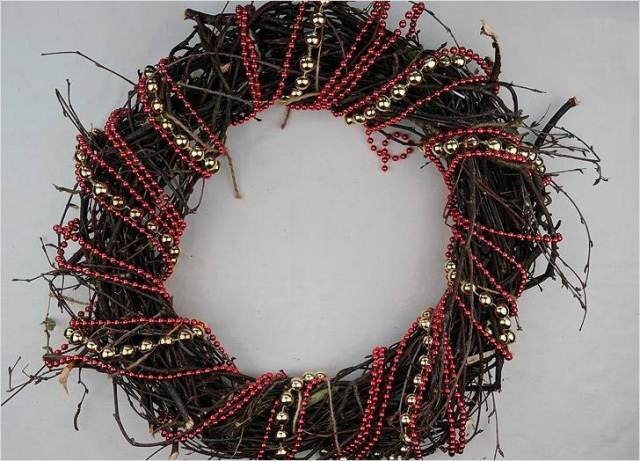
DIY Christmas wreaths - CONES.

We had a whole package of these cones in our house, my daughter collected in the forest. And I took it and threw it out on the street recently. This is me getting excited. You have to be more far-sighted. Which I advise you - after all, what beauty can be made from them. Plant on glue or tie with threads to a wreath, and you're done.
Well, that's all, in the next part of our series of articles we will talk about Christmas wreaths made of fabric.
Questions, wishes and photos of your DIY Christmas wreaths, I will be glad to see in the comments to this article.
Olga Klishevskaya, specially for the site.
On the eve of the New Year, it is customary to decorate your apartments and houses with New Year's decor. It is not always possible to put a Christmas tree in the house, but I really want to create a festive atmosphere. In this case, you can decorate your home with a decorative New Year's wreath of vine twigs, which can be hung on the front door or anywhere where the wreath will delight you and create a good mood. The advantage is that it is handmade and can be used with decorative elements that match your interior.
Many will have a question, “Where can I get a vine from which to twist a wreath?” Almost everyone has summer cottages, some live in private houses, everyone grows grapes, and if not, then ask your neighbor! I used a wild grape vine for weaving, its vine is thinner than ordinary grapes, but they are equally amenable to twisting. It is very good that this is a natural material, you will be sure that it is not toxic. You can involve children in the process, they will be happy to help you twist a wreath from a vine, or you can even weave a braid, the vine itself is very flexible, such a wreath will look quite original.
How to make a wreath of twigs with your own hands
For the master class we need:
- Vine (I have a wild grape vine, you can use a regular grape vine).
- Leg-split.
- Scissors.
- Glue gun (can be replaced with Titan silicone glue or Moment Crystal glue, it is odorless and transparent in color).
- Stick of glue.
- Decorative apples in sugar and ordinary decorative red apples (available at any flower shop).
- Small red beads on a thread.
- Snowman (I think that every house has a snowman, or you can buy it in any supermarket).
- Decorative bow in gold color.
- Decorative red bow.
- Christmas tree balls of small size, golden color.
- Red tinsel.
— Decorative snowflakes of golden color.

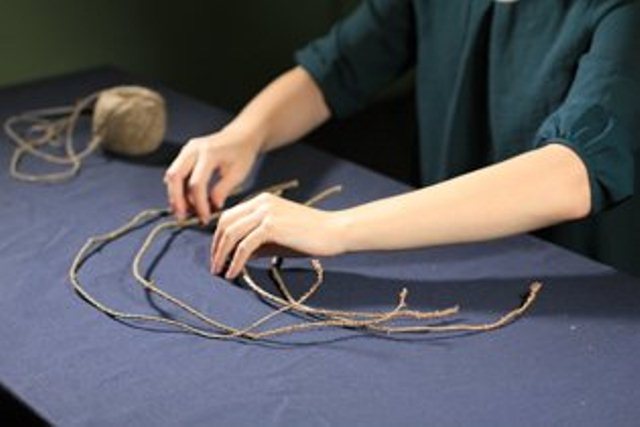
We fold the vine evenly to each other. You can adjust the number of branches yourself, the more vines, the thicker the wreath will be.

Now the vine needs to be twisted to give the future wreath a more beautiful look. To do this, take the vine with both hands and twist it.

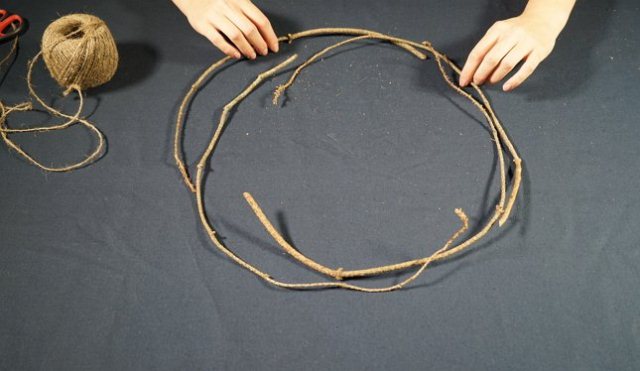
We create the desired diameter of the wreath and fix the vine with twine, leaving "tails" of about 15 cm.

We fix the right "tail" with twine.

The left "tail" is also tightly fixed with twine.

Thus, we get a blank from the vine for the New Year's wreath.


Glue apples in sugar in the upper right corner.

Below, between the clusters of apples, glue the red tinsel, winding it around the wreath.

We glue a decorative gold, decorative gift and a Christmas ball on the tinsel.

We give the snowman a decorative gift and a golden Christmas ball in the "hand".

We tie the snowman with twine to the upper central part of the wreath. From the twine we make a loop, on which in the future it will be possible to hang a New Year's wreath.

Glue decorative golden snowflakes to the wreath.

Glue a decorative red bow over the snowman to the vine.

That's all, our do-it-yourself New Year's wreath from a vine of twigs is ready. Create with love! Creative success and inspiration!
You can take any color scheme for the decorative elements of the wreath.


You can decorate your home for the New Year and Christmas not only with tinsel, needles and toys, but also with original wreaths. There are many ways to make your own Christmas wreath. You can prepare a classic wreath of spruce twigs or a beautiful wreath of cones, cool paper or unusual paper, orange circles. But if there was no suitable material at hand, we suggest going to the nearest park or garden to collect or cut twigs, twigs, vines. It is from natural materials that we will make crafts - a Christmas wreath. For needlewomen, the designers of the Zatusim website have prepared several detailed master classes that show how to make a Christmas wreath with your own hands step by step.
Making any Christmas wreath begins with the preparation of the base. Someone uses cardboard, others wire. We offer you to learn how to make a simple base for a Christmas wreath from birch branches with your own hands.
For manufacturing you will need:
- birch branches;
- Leg-split;
- Scissors
It is necessary to make a Christmas wreath from branches on the same day as you have collected them. Otherwise, they will begin to dry out and break during operation.
If it is necessary to postpone work, we bend the rods into a ring and tie them. Alternatively, they can be soaked in water before work.
We sort birch twigs by size and immediately remove excess leaves, side branches, knots from them.
We start weaving the base with thick twigs of medium length.
From the selected branches we form a circle. We lay out the blanks so that the thick edge of one branch coincides with the thin one of the other.
Tie twine to the end of one rope.

We braid the rope around the first branch.

We tie the thick edge of the second branch.

And we continue to weave the rods until we get a circle.
We got a not quite even frame, with which we will work. Its flaws will be eliminated in the future, so you should not try to give the frame an ideal shape at this stage.

We attach another branch to the frame and fasten it with twine.

We wrap the frame with a long twig.

We continue to weave a wreath of branches, attaching new long rods.

When the base becomes dense enough, you can interlace the branches without tying them with twine. This will create the impression that the wreath is woven from a single vine.
Now you can level the base, giving it an even shape. Branches must be handled carefully, as they, despite their flexibility, can break.

The finished wreath can be put under pressure overnight.
It remains to decorate the base for the Christmas wreath of twigs. To do this, you can use any available materials: needles, ribbons, bows, bells, beads.
Add some Christmas decorations.

Pictures of Christmas wreaths from branches will tell you how to colorfully decorate the craft.
DIY Christmas wreath of branches: video
How to make a Christmas wreath of branches more colorful is shown in the video:
Christmas vine wreath
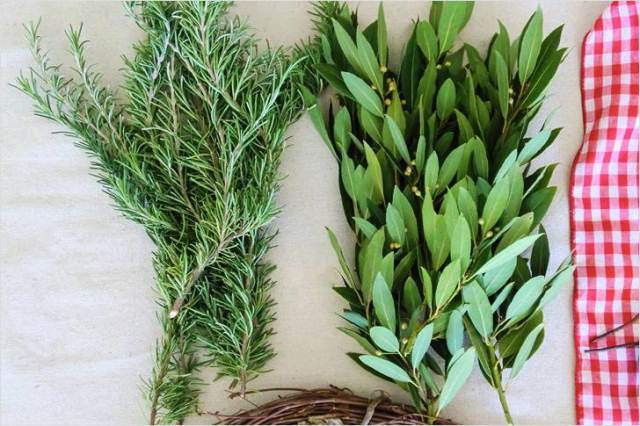
Original Christmas wreaths are obtained from the vine. Such material bends more easily, so weaving a wreath is not difficult. We offer to make a Christmas wreath from a vine with your own hands and decorate it with sprigs of laurel and rosemary.

To make a wreath you will need:
- Vine;
- Laurel branches;
- sprigs of rosemary;
- Fabric tape.
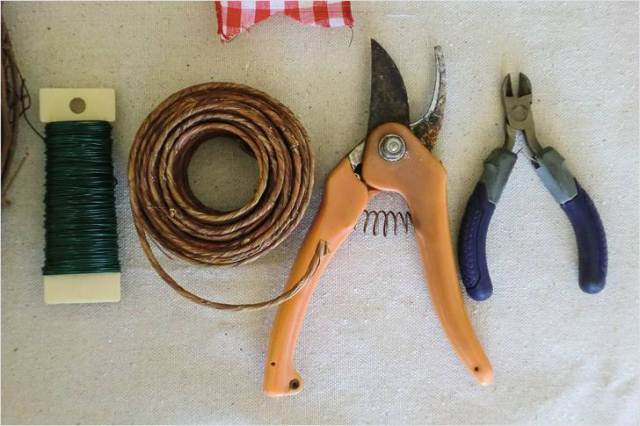
Tools and auxiliary materials:
- wire cutters;
- Side cutters;
- Wire;
- Colored wire.
We twist the base under the Christmas wreath from the vine.

With a thin wire we attach sprigs of rosemary and laurel to the frame. You can put the decor on the glue. But when using wire or wire for fastening, the decor can be removed after the holiday, and the base of the wreath can be used for decorating for Easter or the next New Year.
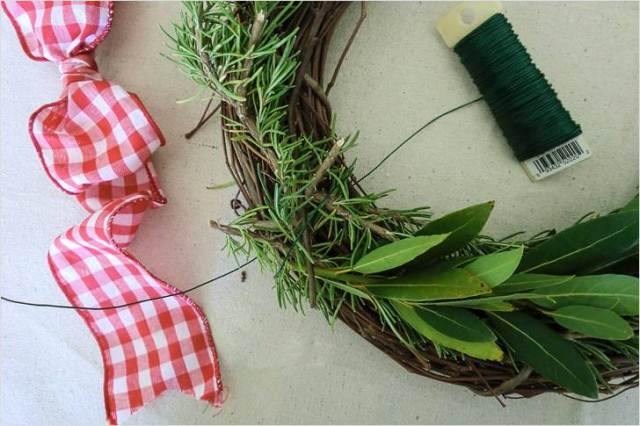
You can complement the decor with branches with berries.

It remains to paint the wreath with a bow. It can be tied with ribbon. Ribbon bows with wire inside look original and retain their shape well.
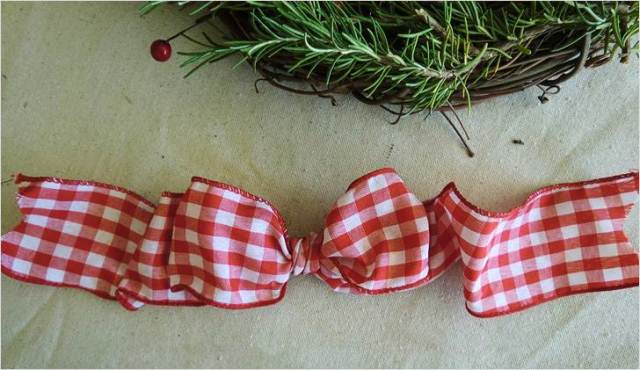
We fasten all the elements to the wreath and get such an original Christmas or New Year decoration.

Video: vine Christmas wreath
How to make Christmas wreaths based on vines is shown in detail in the video:
DIY Christmas wreath of branches and sticks: master class
You can use for crafts not only flexible branches of willow, birch or vine. An original Christmas or New Year wreath can be made with your own hands from branches and sticks.

To make a colorful wreath you will need:
- Sticks 5-8 cm long;
- Thick paper or cardboard;
- cones;
- Silver ribbon;
- New Year's toys.
Auxiliary materials and tools:
- Acrylic paints;
- tassel;
- Glue gun.
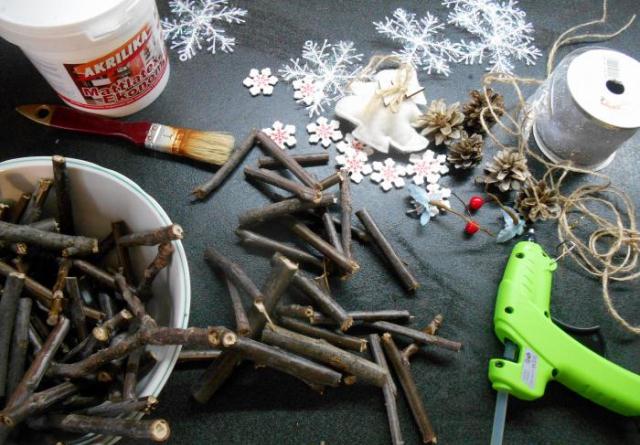
We begin to make a Christmas wreath with our own hands step by step from branches cut into a size of 5 - 8 cm. You will need both straight sticks and curved, forked, with knots.

Each branch is painted white with acrylic paint.

Leave blanks to dry completely.
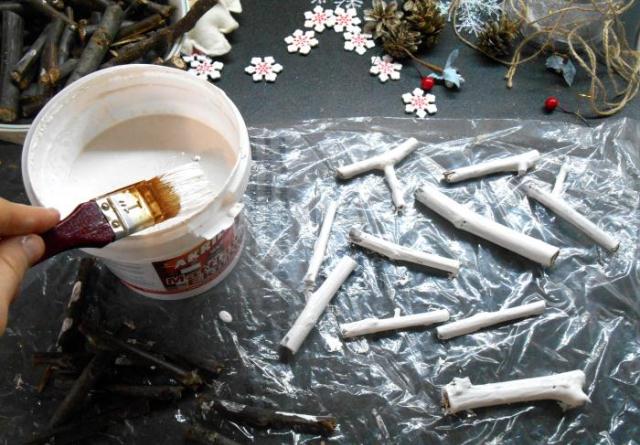
The branches will dry for about 1 hour.

On a cardboard sheet, draw a circle along which we will lay out the base of the wreath.

We spread the sticks of approximately the same shape and size in a circle.

You should get a neat wooden ring.
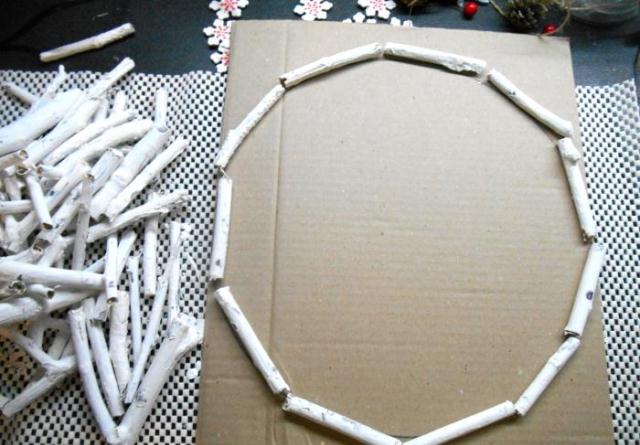
Now lay out the inner circle of a smaller diameter.

We connect the outer sticks and the inner transverse branches.

You can simultaneously place several transverse rods.

To keep the structure well, we fix the transverse blanks with glue.

We continue to glue the sticks, giving the wreath volume.

At the end we glue forked and uneven sticks.

We got such an original wreath of sticks and branches.

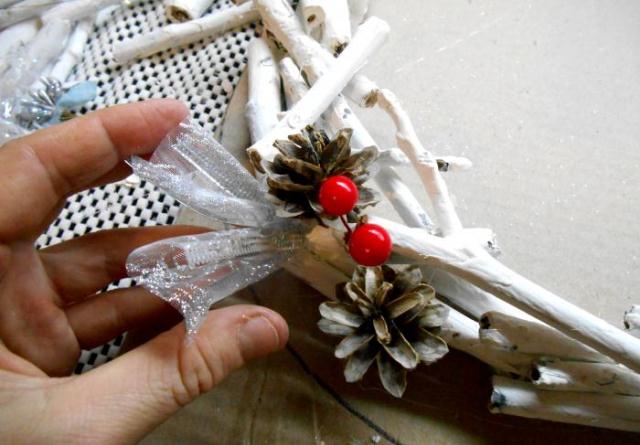
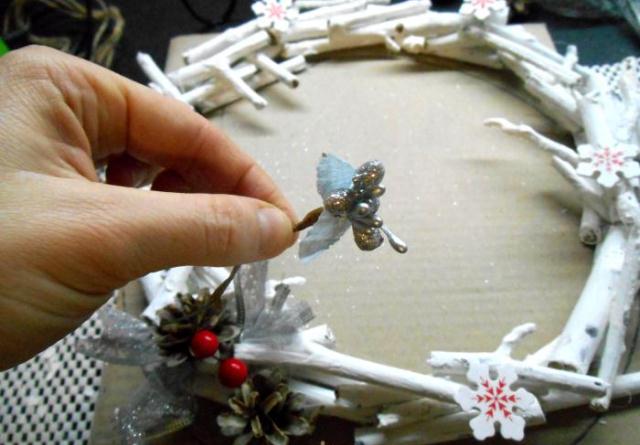
Let's start decorating the base of the wreath.

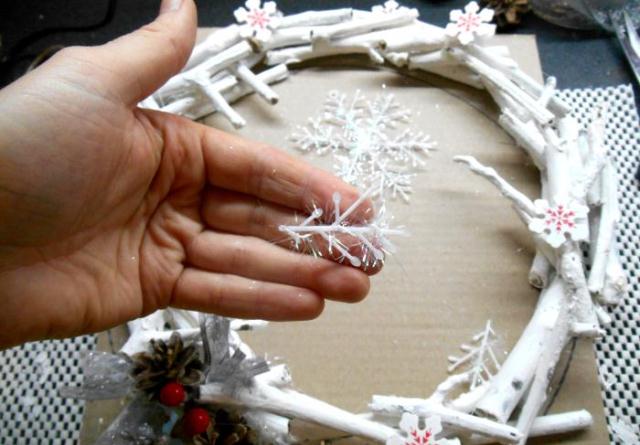
We glue snowflakes in a chaotic manner.

And pine cones.

It remains to attach a colorful bow, which can be made from a shiny braid or ribbon.
And decorate the craft with decorative elements.
Snowflakes.
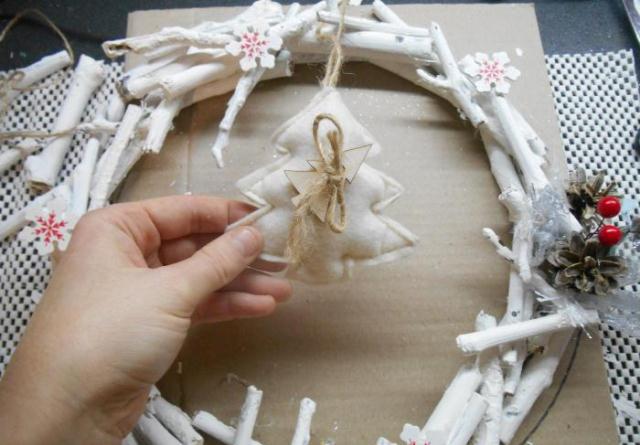
In the center we place a cool toy, which we tie with twine.
Unusual Christmas wreath is ready.
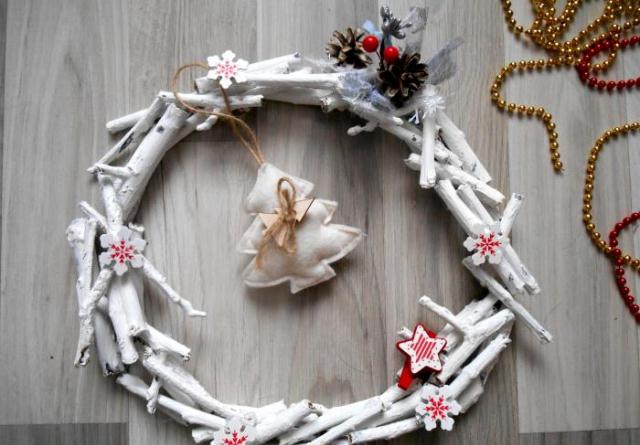
From sticks and branches, you can make unusual Christmas wreaths and other New Year decorations.
Video: master class of a New Year's wreath from branches
An unusual weaving of a wreath of sticks and birch branches using a wire frame is shown in the video master class:


