Patterns men's leather luggage bag. How to sew a leather bag. Finishing the top edge of the bag
We all love quality in things. However, more often than not, quality comes at a high price. Thus, we overpay a lot of money for those goods that we could get at a lower price. Most often this problem concerns accessories. Genuine leather products are highly valued in the accessories market. Therefore, it is very difficult to find a handbag made of genuine leather that will be sewn with high quality and fit any of your outfits. But if you have some sewing skills, making such a handbag yourself will not be difficult. In our article, we will tell you in detail how to sew a bag made of genuine or artificial leather quickly and easily with your own hands. Detailed descriptions of works and master classes will make the process of creating a bag easy and exciting.
We create a do-it-yourself version of the Furla candy bauletto bag from leather
This handmade leather bag is inspired by the famous furla candy bauletto bag. To complete it, we need 5 m 2 of genuine crocodile-embossed pigskin (you can buy it at any online fabric store), 30 cm of thin woolen fabric for lining (width 1.5 m), a metal zipper 30 cm long, 4 half rings for handles, waxed threads (black and beige).
If you have a sewing machine and have tried sewing real leather on it, then it will be easier for you. However, not all machines can pierce thick material the first time. In addition, if the machine cannot completely pierce the skin folded 2-3 times, then holes from the needles will remain on the surface of the material, which will finally nullify all your efforts. Therefore, if you are not sure about the capabilities of your machine, then it is better to sew by hand. The sewing time from this, of course, will increase, but then you can brag that you sewed the handbag “with these very hands”.
So, we start as usual - with a pattern. The pattern diagram is shown below. One cell of the scheme is equal to 1 cm.

After we cut out all the details from durable paper or cardboard, we apply the pattern to the skin and cut out all the details we need. Then we start assembling the bag.
Let's start with the most difficult - small details, namely the mounts for the handles. We fasten them to the main part of the bag with glue, Moment glue is perfect. After the glue has set, it is necessary to perform decorative stitching as follows: we make markings with a special marking tool, then we pierce the skin with an awl along the marked markings, then we take a waxed thread, put needles on both ends of it and sew the part. 
Then we connect the details of the top together, as shown in the photo. 
Lightning queue. We will also glue it first, and then we will sew it with threads. The whole process can be described as follows: along the perimeter of the stitching, we make the markings already familiar to us and punch holes for the threads with an awl, we do the same with part No. 3, then we glue the zipper to the details of the top and sew everything together.
After working with the zipper, we connect the details of the top and side parts. We wrap and glue seam allowances on the details of the top, and then we make decorative stitching.
In the same way, we connect the lower part of the leather bag, namely parts No. 2 and No. 5.
And now it's time to put everything together. We pierce holes for stitching along the perimeter of the upper part, then glue a leather strip on the inside and sew it with a decorative thread. The lower part is also sewn on. 
The matter remains for small - handles and lining. We start with pens. In order for the handles to have volume and shape, it is necessary to make an internal insert. For insertion, long thin strips of leather, twisted into a tube and glued so as not to unwind, are well suited. We put a handle detail on the resulting insert and sew it with decorative stitching.
Then we insert metal half rings and attach the handles to the bag.
We take a woolen fabric for lining and cut the inside of the product according to the main patterns. The number of pockets and compartments depends on your needs and desires, the main thing is that the bag is functional and comfortable for you.
Finally, the last step is to glue the lining. Gluing is carried out in the following places: in the area of \u200b\u200bthe zipper (so that part No. 3 covers the place of gluing) in the area of the bottom of the bag (gluing seam allowances together). 
That's all. Genuine leather bag is ready!
Here are some more leather bag patterns:


So, using the example of a master class, we showed you how to sew a leather bag. In the manufacture of such a handbag, the main thing is not the ability to sew, but rather brute force, because it is very difficult to pierce the skin. If you have a sewing machine that can perform this kind of procedure, then making a leather bag will be a breeze. And when you finish creating a handbag with your own hands, you can safely brag to your girlfriends that you did such a charm yourself, got a lot of pleasure from work and spent a minimum of money on everything. Perhaps you will even receive several orders for fashionable leather handbags from your friends and then you can not only do what you love, but also make good money. All in your hands!
A selection of video master classes on the topic of the article
It is quite difficult to sew a bag made of genuine leather with your own hands. Therefore, I recommend that beginners first sew a bag made of artificial leather. The technology of its sewing is not much different from sewing a bag made of fabric or jeans, with the exception of finishing the front seams.

A leather bag always looks elegant and fashionable, and the price of a genuine leather bag is always high. Maybe that's why many try to sew a bag or handbag, but, as a rule, unsuccessfully. The fact is that sewing bags and leather haberdashery is a separate direction in the sewing business, just like sewing shoes, therefore it is not surprising that many people cannot sew a bag with their own hands.
In this article, I will not explain how to sew a bag in stages. There are thousands of bag models and it is impossible to make a universal video or a master class in the form of a photo. But you can give universal advice on how to make a pattern of a bag model you like, to do this or that technological operation, how to install accessories with your own hands, etc.
How to sew a women's bag from genuine leather. Bag with lining and zip fastening. You will learn many useful tips on how to work with genuine leather.

It is difficult to sew any products made of genuine leather, especially bags that have a rigid frame. And this is primarily due to the special technology of sewing genuine leather, the presence of a special tool and a sewing machine, the use of special applied materials, and, of course, the presence of experience.

First of all, you will need a sewing machine capable of sewing leather. Modern models of sewing machines cannot be used for sewing such rough materials as leather, read the instructions carefully. The only option is to find an old typewriter like Podolsk from friends or relatives, you can even with a manual drive. By the way, you can even buy it on the ad, but not more than 1000 rubles.


A construction knife with a replaceable blade can also be used for cutting leather. Do not forget that the blade of such a knife is not only interchangeable, but segmental. Using pliers, gently break off the blunt section of the blade, and it will become sharp.
Paired with such a knife, you will also need a piece of plywood or a board on which you will cut out the leather parts of the bag.

If your bag model will have a lot of metal fittings, buy such a punch right away in the store. With it, it will be easy to make a neat hole for buttons, rivets and other accessories.

Instead of skin glue, you can use this sticky tape.
This is not the whole list of tools necessary for working with genuine leather, but the most important ones. Without them, you will not be able to sew a high-quality leather bag. In addition, look at the general photo, you will need a special hammer, awl, thread, sewing needles, etc.

In addition to the main details for the bag, you will also need a lot of small elements, which are quite difficult to take into account at once. As I assemble the bag, I will explain everything in detail. For now, just keep in mind that all skin scraps, even small ones, need to be saved, they can still be useful to us.

Make patterns for any parts of the bag immediately with allowances. Leather is a rather expensive material to forget about allowances and make other mistakes when cutting.
Seam allowances 0.7-1.0 cm.

The remaining parts are rectangular in shape and it is not necessary to make a pattern, in any case, use graph paper for them. However, it is possible that you will decide to sew just such a model from fabric in the future, then ready-made patterns will make your work easier.
Two options for a soft-shaped bag pattern

It is not necessary to build a paper bag pattern, but it does not hurt to make a pattern of the main parts. The fact is that it is almost impossible to determine the size and shape of a bag using a paper pattern. In the stitched state, the bag acquires volume and, therefore, changes its calculated dimensions and shape. Therefore, make paper patterns of the main parts of the bag, chop or glue them and make sure that the shape and size of the bag suits you. If not, then feel free to adjust the pattern and try it on again.

The consumption of genuine leather for sewing bags must be calculated accurately. Moreover, you should always buy more leather, because sometimes you have to "get around" various skin defects (wrinkled areas, holes, scuffs, etc.)
But on average, for sewing a bag made of genuine leather, a skin of 100-120 square decimeters or approximately 1.0-1.2 square meters is required.
Depending on the model, the presence of finishing elements, pockets and other details, and most importantly the size of the bag, you can keep within 180-100 dm / sq. But in any case, you need to lay out the details of the cut, since leather is often sold with defects (spots, holes, folds, dents, etc.)
Do not forget about the finishing details of the bag. Because if you do not have enough of a small piece of skin, then you will not be able to buy a small piece. Genuine leather is sold only in whole skins. By the way, sometimes it is the size of the skin that determines the model and size of the bag.
If you do not have enough experience, do not immediately undertake to sew a bag from new leather. Find an old raincoat or jacket in your wardrobe. Take it apart and try to pick up the remaining parts of the skin for the details of your bag. In extreme cases, such leather can be combined with pieces of artificial leather or fabric, such as velvet.

The connecting seams are ground with allowances of 0.7-1.0 cm. Remember to check the amount of presser foot pressure on the fabric and the height of the feed dog. Leather is a rather dense and rough material, and in order to avoid breakage of a household sewing machine, it is better to sew it on an industrial machine or an old manual sewing machine such as Podolsk, Singer.
To facilitate the piercing of several layers of leather, special sewing needles for leather can be purchased at the sewing accessories store. They have a special blade shape and such a needle does not pierce the skin, but cuts it.

Not always, but often, the allowances of the stitched parts of a leather bag need to be glued. For this operation, you can use ordinary rubber glue and a brush. But it is better and more accurate to glue the allowances with adhesive double-sided tape.

Tear off the paper protective strip and press the allowance.

To make the seams look even and smooth from the front of the bag, you will need a hammer. Tap lightly along the seam with a hammer or the handles of heavy metal tailor's scissors.

It is very difficult to make finishing stitches on the skin, since the usual foot will "slow down" the top layer of the skin, the stitch will "shrink" and even a rush of skin may form from frequent piercing with a needle. This is a responsible operation, treat it as responsibly as possible, since the skin cannot be scribbled twice. You must do the finishing line the first time without error and rework.
Therefore, be sure to change the regular foot to the Teflon coated foot. There are a number of other accessories for sewing leather, but this Teflon foot is the easiest and most inexpensive way.

And if you also play it safe and rub the seams with a moistened remnant, then the seam will be flawless.
See Decorative stitching in difficult area.

After the base of the leather bag is assembled along with pockets and other finishing elements, proceed to the manufacture of the belt. Decide what type of clasp you will use, what accessories and how to attach the belt to the bag.

Do not use accessories that are too expensive and difficult to install. Metal zippers, metal rings, rivets, holnitens, buttons are easy to install with your own hands. And they must be used when making a leather bag. Metal gives natural leather more solidity and attractiveness, emphasizing the noble properties of natural material.

And to install the fittings, you will need such a punch No. 3 or No. 4. You can even buy a set of these punches if you are a regular sewer of leather, especially bags.
When punching a hole in the skin, put a thick wooden gasket on the back side. It is impossible to punch holes on a metal surface, the blade of the punch will quickly become dull. And make sure that other parts of the bag do not accidentally fall under the punch.
You will need:
Crocodile-embossed artificial leather 0.70 m wide 135 cm; lining fabric 0.40 m wide 140 cm; rigid pad S 520 1.15 m, 45 cm wide; 1 metal zipper 20 cm long; 1 breaking block with a diameter of 11 mm; 1 carabiner hook 3 cm long; interlining formband; thread for overcasting loops for finishing stitches; "magic" tailor's chalk.Paper pattern:
Using the silk paper measurements below, cut the paper pattern pieces to life size or trace the details directly on the front side of the faux leather/lining fabric using a tailor's chalk and ruler.Bag size 43 x 36 x 12 cm
Clutch size 22 x 16 cm
Allowances:
The dimensions of all parts include allowances with a width of 1 cm. Cut out the details of the gasket without allowances.Cutting:
The layout plans show the most rational way to arrange the pattern pieces on the faux leather/fabric. Pay attention to the fact that the lines of the direction of the shared thread drawn on the details of the paper pattern are parallel to the edge / fold of the fabric.
Crocodile embossed faux leather:
a) 2 parts of the bag 53.5 cm long and 38 cm wide, including allowances;c) the bottom of the bag is 14 cm long and 38 cm wide, including allowances;
f) detail of a clutch 32 cm long and 22 cm wide, including allowances;
f) inside pocket (back side) 12 cm long and 18 cm wide, including allowances;
g) inside pocket (front side) 10.5 cm long and 18 cm wide, including allowances;
i) 2 straps for attaching a clutch bag, 35.5 cm long and 1 cm wide, including allowances;
j) zipper tape, 6 cm long and 1 cm wide, including allowances;
k) 2 facings 4 cm long and 1.5 cm wide,
including allowances.
From lining fabric:
d) 2 parts of the bag 36.5 cm long and 38 cm wide, including allowances;b) 2 side parts of the bag, 36.5 cm long and 14 cm wide, including allowances;
c) the bottom of the bag is 14 cm long and 38 cm wide, including allowances.
Lining:
a) 2 pieces of lining 43 cm long and 36 cm wide;b) 2 side lining pieces 34.5 cm long and 12 cm wide;
c) the bottom of the lining is 12 cm long and 36 cm wide.
Sewing:
When basting and stitching, fold the details of the cut with the front side inward. Bartack at the beginning and end of each seam. For seams, use normal sewing thread and a sewing machine needle that is appropriate for the thickness of the leather. To fix the seams and cuts, you can use pins only for artificial leather, which does not leave marks. For tough leather or leather with pin marks, use paper clips. The details of the cut made of artificial leather should not be swept away, and the seams should not be ripped open, as traces of the needle will remain. Sew stitches with medium-sized stitches - too small stitches can perforate the skin. To ensure that your sewing machine advances the skin well and sews evenly, use a Teflon foot. Or stitch through silk paper, which will then need to be removed. Artificial leather should be ironed only through a dry iron without steam, having previously tried it on an unnecessary flap.Interlining formband

At a distance of 9.5 cm from one short cut of each part of the bag (a), draw a fold line of the facing (1) with tailor's chalk.

Iron the interlining formband from the wrong side of parts a, b and g: to the parts, and iron the interlining formband so that the chain seam on the interlining is aligned with the marked fold line of the facing (1a), to parts b - respectively, along one short cut = upper cut bags, to detail g - along one longitudinal section = the upper edge of the pocket (the entrance to the pocket).
Iron hard pad

From the wrong side of the bag parts (a) (only up to the fold lines of the facings), the side parts of the bag (b) and the bottom of the bag ©, iron the corresponding parts of the lining. The allowances remain not duplicated by the gasket (2). Important: before gluing the gasket, pay attention to the manufacturer's recommendations. Pre-test on an unnecessary piece of artificial leather.
Side details of the bag

Allowance for one short cut of each side part of the bag (b) iron on the wrong side and pin. Place the side pieces of the bag on one piece of the bag (a) right side to the front side, aligning the bottom cuts and one short cut of each side piece with the longitudinal cut of the bag piece. Sew the side parts of the bag along the longitudinal sections with allowances 1 cm wide (3). Sew the other part of the bag (a) similarly to the other longitudinal sections of the side parts (b). Turn the allowances on the side upper cuts to the wrong side and pin. Unscrew the seam allowances for attaching the side parts to the parts of the bag (a) and iron. Sew the parts of the bag (a) with buttonhole thread along the seams from the upper edges of the side parts of the bag (b) with straight stitches (stitch length - 4-5 mm) close to the seams. Do not cut the threads of the stitches short, bring them to the wrong side and tie them with the lower threads of the stitches.

Turn the bag inside out (3a).
Sew the bottom of the bag

Pin one longitudinal section of the bottom of the bag © to the bottom section of one part of the bag (a) right side to the front side, while the allowances for the short sections of the bottom of the bag protrude. Stitch the bottom of the bag, starting / ending the line exactly at the corner (4). Turn out the bag. Sew the other longitudinal section of the bag similarly to the lower section of the other part of the bag (a).

Cut the allowances along the lower cuts of the side parts of the bag (b) exactly at the seams to a length of 1 cm (4a). Pin short sections of the bottom of the bag, respectively, to the side parts of the bag.

Sew by starting/ending stitches exactly at the corners (4b). Turn out the bag.
Inner pocket
Iron the longitudinal section of the front part of the inner pocket (g) doubled with a gasket to the wrong side to a width of 1.5 cm, on the front side, topstitch the upper edge of the pocket at a distance of 1 cm = pocket entry. Put the front part of the pocket on the back part of the pocket (f) with the wrong side to the front side, aligning the bottom and side cuts.
Sew the front part of the pocket along the side and bottom seams to the edge (5).
Clutch tape

Ribbons (i) fold with wrong sides, stitch the longitudinal sections to the edge. Thread one end of the tape into the half ring of the carabiner fastener, stitch the end of the tape (6).
Lining
Lay the side pieces of the lining (b) on one piece of the lining (a) right side to the right side, aligning the lower cuts and one longitudinal cut of each side piece (b) with the longitudinal cut of the lining piece (a). Stitch the side details of the lining, starting at the bottom of the line at a distance of 1 cm from the cuts. Another part of the lining (a) is similarly stitched to other longitudinal sections of the side parts (b). Iron the seam allowances. Sew the bottom of the lining as described in steps 4, 4a and 4b, do not cut seam allowances. Iron the upper section of the lining on the wrong side to a width of 1 cm.Sew on lining

Along the upper sections of the parts of the bag (a) at a distance of 9.5 m from the sections, draw the lines of the folds of the facings and allowances (7) with a tailor's or "magic" tailor's chalk. On one part of the lining (a) and on the inner pocket on the upper cuts, mark the middle with pins. Put the inner pocket on the lining part, aligning the marks and the top cuts. Pin. Pin the lining piece (a) with the inner pocket to the top edge of one bag detail (a) with the wrong side to the front side, aligning the top pressed edge of the lining with the marked seam line.

Stitch the lining piece with the inner pocket to the edge, bartack at the beginning and at the end of the seam (7a). Similarly, stitch the lining to the inner edge of the facing of the other part of the bag (a). Place the lining inside the bag inside out.

Unscrew the one-piece facings of the upper sections of the bag parts (a) along the fold lines to the wrong side and pin (8). Pin the free end of the fastening tape exactly in the middle of one side of the bag (b) and sew.

Chop off the upper sections of the side parts of the bag and the lining and sew to the edge with threads for buttonholes (8a). Sew the top and side edges of the bag details to the edge. Do not cut the threads of the stitches short, but bring the needle to the wrong side and fasten.
Pens

Iron the longitudinal sections of the handles on the wrong side to a width of 1 cm. Fold the handles in half lengthwise with the front side outward, aligning the ironed edges. Sew the handles along the contours to the edge, grinding the longitudinal edges (9).

Pin the ends of each handle to the part of the bag (a) at a distance of 8 cm from the side parts 5 cm from the top edge and sew by hand with buttonhole thread (10) or sew on with a sewing machine.
clutch

Pin the facings (k) to the ends of the zipper with the wrong side to the right side and sew to the edge with buttonhole thread (11). Pin one short section of the clutch (e) to one braid of the zipper with the wrong side to the front side at a distance of 3 mm from the teeth.

Sew the detail of the clutch to the edge (12). Sew the other short section of the clutch in the same way to the other braid of the zipper, for this, fold the clutch with the front side inward.

Cut off the side sections of the clutch with the wrong sides, stitch with threads for overcasting loops to the edge (13). Insert the zipper tape (j) into the slider.

Stitch the ends of the tape, while turning the slider to the side (14). Sew the ribbon at the slider by hand. In the corner at the end of the zipper on the clutch, install a block, capturing all the layers. Secure the clutch to the bag with a carabiner clasp.

Photo: Burda 12/2015
The material was prepared by Yulia Dekanova
Greetings to all gathered now on the blog! Today I will tell you about how to decorate your life and the lives of others with the help of such a simple item as a bag with your own hands.
A lot of shops sell bags, handbags, clutches, etc., etc. But it's so cool to make something like that yourself, to feel the process of creating a product, right? Many will agree with me, I think. Therefore, today we will make a bunch of handbags, cute and funny)
How to sew a bag with your own hands
First of all, I suggest you sew a cute fluffy handbag that you can give to a little girl or girl.
List of materials:
- artificial fur (for the outer part of the bag);
- fleece (for lining and for covering buttons);
- threads in the color of the fabric;
- two round buttons;
- two small white rhinestones or half beads;
- synthetic winterizer;
- pattern paper;
- needle;
- glue second;
- pencil;
- pins (for pinning patterns);
- scissors.
Patterns of the future bag you can download here: ear And the basis. Let's deal with them.
What kind of patterns are here:
- one-piece bag pattern (lid + back) - the entire area of \u200b\u200bthe pattern;
- the front of the bag is everything that is below the side insert;
- side insert width - we will sew the side part into the bag, this is its width. The length is the length of the contour of the front (without a straight top).
As for the side insert: it should consist of two equal parts, the direction of the pile of which will be directed against each other. But that's just for fur! From fleece, simply cut one strip of the required width, you can ignore the direction of the pile.
How to sew a bag: a detailed master class
First of all, we will work with the side of our product.
Take two pieces of fur side piece and sew them along the edge. Sew them so that the pile of pieces is directed towards each other.
Why do I suggest doing this? I answer: the fur has a long pile, which should go in one direction. And this can be achieved just by stitching two pieces
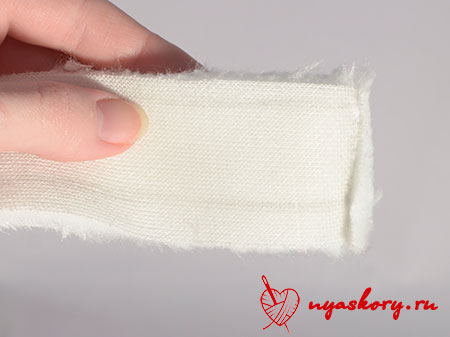
Trim off any excess. And sew the side part to the front of our future bag.

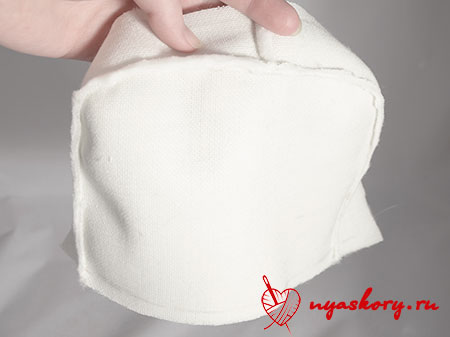
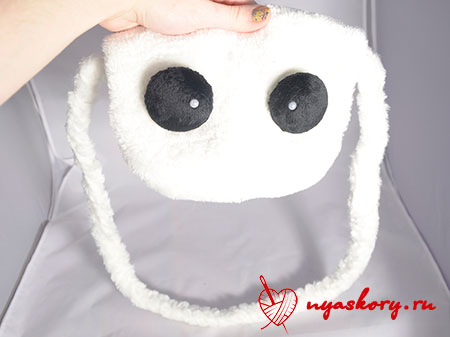
And now we sew the back of the bag! Already the lid is planned
Trim the edges of the seam allowances. See why:

By the way, here is the back view of the bag:

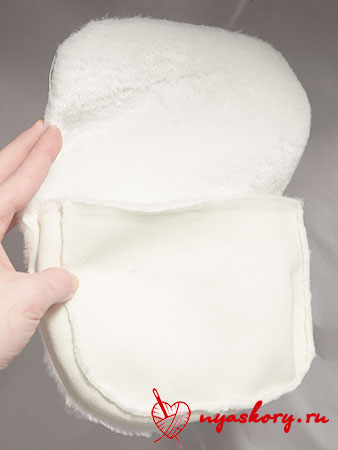
Sew a fleece "handbag" in the same way. This will be the lining - the inside of the bag.
How to sew a lining to a bag? First, attach the fleece and fur parts with the right side inward.
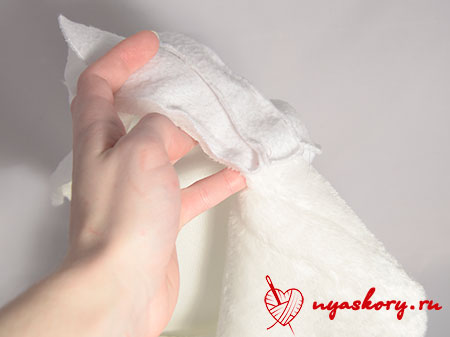
In this photo, it seems to be clearer

And just sew the covers of both parts.
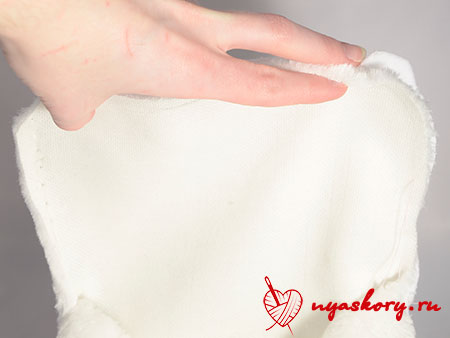
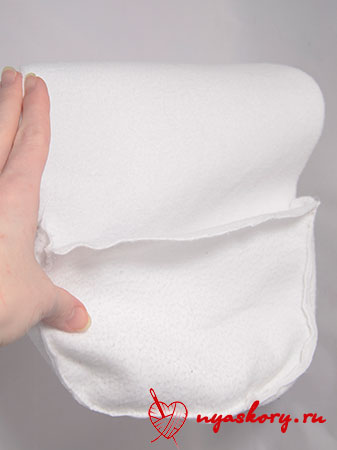
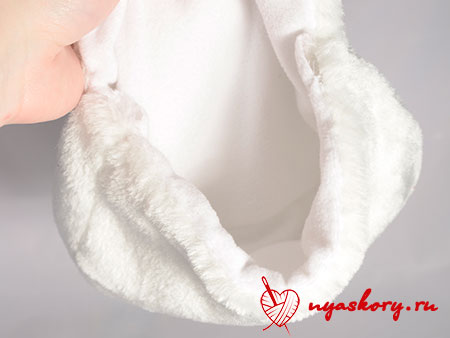
Screw the inside into the bag.


Sew the remaining edges with a blind stitch.
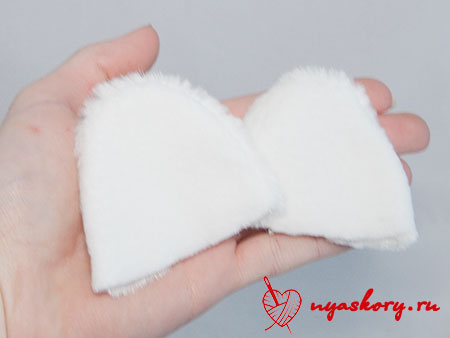
To decorate our bag, I suggest you cut out these ears:

This is how you should get them:
Now let's make a strap for the bag. To do this, cut three strips of fur of such a length that it would be convenient for you to then put on a strap of them on your shoulder. Weave a pigtail out of them (fix at the end and at the beginning so that it does not come apart).

Remember we left holes for fasteners? Now you need to insert them into them and carefully sew the resulting pigtail with a hidden seam.


But our bag doesn't have bindings yet! There are several options here: you can sew in a zipper (which is better to do earlier), you can use Velcro and buttons.
I decided to stick with the last option.
Cut two black circles larger than the button from the black fleece and take the button.

Put a little padding polyester on the button.
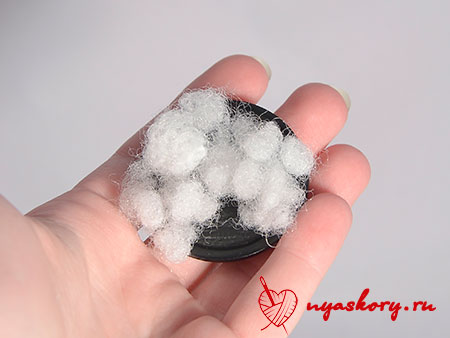
And in a fleece circle, along the edge of which walk with a running stitch without fastening:

Put them together.

And pull the thread.
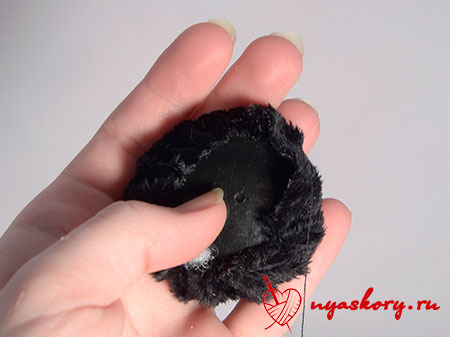
The button for attaching the bag to the back should look something like this:

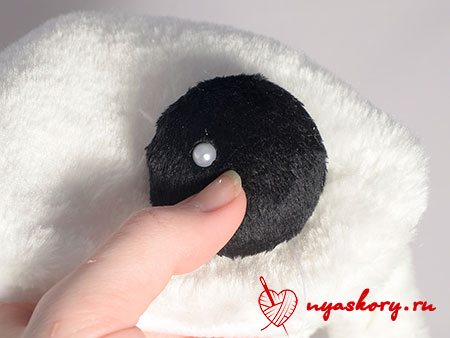
Glue a small rhinestone highlight on the front.

Now attach the clasp to the lid of the bag to see where you will need to make a notch for the eyelet.
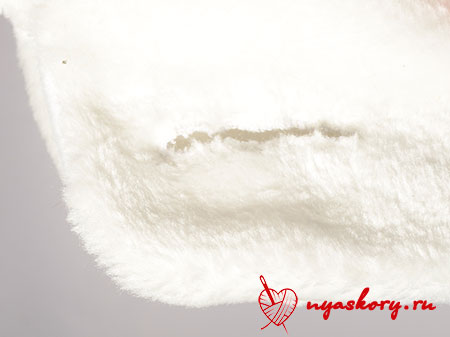
Draw a line down the center of where the button should be. Make a cut along the drawn line.

To keep the cut nice and neat, sew it with a buttonhole stitch so that each stitch fits as closely as possible to the previous one.

This is what the bag will look like after the lining:
Sew on the button eyes to the bag:
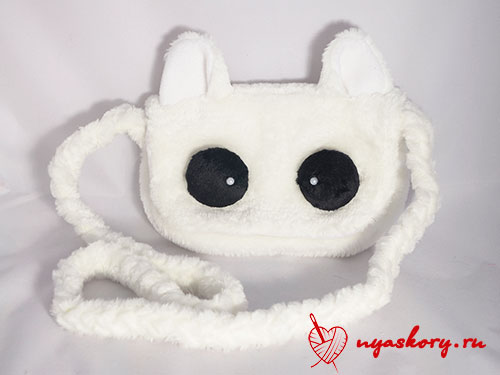
Now, back to the ears! Fold and hem their edges.

And sew them where you would like them to be.

Ta-dam! The bag is ready. It turned out to be a cute kitty)
DIY leather bags
Leather is one of the most interesting and durable materials for sewing bags. Therefore, I present to your attention several master classes from this material.
Bag - cat
For this simple but very cute model (somewhat reminiscent of the previous one), you will need leatherette, scissors, an awl, thread and a thick needle.
This can be worn by both a young girl and a small child.

The simplest leather bag
No, you definitely need to get one. You will need leather, scissors, a strap, tape, a marker and (optionally) a special tool for cutting several holes in a row (you can do without an awl). All you really need to do is cut out the circle, poke holes, thread the ribbon through, and attach the strap. All)

Envelope
Reminds me of a cat bag.

Chanterelle
Pretty model)) Prepare leather or thick leatherette, braid and rivets for her. Chanterelle can not be sewn, it is enough to glue along the edges and hide these places under the braid.

DIY jeans bags
However, the following models can be made from both jeans and old jeans.
Network
For her, cut the jeans into strips and weave the fabric, as in the photo. Sew it already with a bag (folding a piece of cloth in half) and sew on the handles.

Simple denim bag
There is a denim leg - go ahead to the production of the bag! You will also need a buckle, a leather strap, scissors and thread with a needle.

Delicate denim bag
Here you will need two trousers, scissors, thread with a needle and a zipper.

DIY bags made of fabric
Rectangular
For her, take a few pieces of cotton fabric, a zipper and accessories.

clutch
An interesting idea is to use thick pieces of processed cardboard for lining. I would recommend taking Fix Price plastic boards or juice packaging as a dense base.
Present such a handbag to your mother - she will definitely be delighted))

Clutch in a semicircle
Cut out two round pieces of cotton fabric and a circle of synthetic winterizer from the fabric. Fold them into a "sandwich" and sew several times at right angles. Sew around the edge with bias tape. Fold the workpiece in half and sew a zipper into the bag. Decorate.

Handbag
Cotton fabric, lining, clasps and floral decorations come in handy here. A young lady, say, 17 years old, will definitely appreciate such a gift.

Sportswear bag
For it, prepare a dense fabric, braid, scissors, pins, fasteners, zippers and threads. In addition to sportswear, you can also put hiking things in this bag.

Mini handbag
According to the scheme described below, you can make both a completely miniature accessory and a larger item.

Alteration of old things
For the first of the two photo workshops, you will need a long soft cloth bag, and for the second, an old T-shirt.


Photo of handmade bags
I want to show you how you can get a lot of bright and unusual products using the same patterns.
Sandwich bag
Cute bag made of fleece. She is quite simple! And such a design can be introduced into a cat bag.

panda bag
Cute panda design

Simple and elegant bag
The handbag is quite simple and is made according to similar patterns from the very first pattern.

Knitted bag
Although this bag is knitted, its design can be implemented and sewn from fabric.

Leather bag

Octopussy bag
The bag, again, is knitted. But it is very similar to the first one (at the beginning of the article). Only you need to add tentacles to it and remove the ears.

By the way, I bought fleece for the eyes of the "cat" bag Here. You won't find one like this in a store.
This article comes to an end. I hope you enjoyed looking at all the handbags and took note of something interesting for yourself. See you soon!
P.S. Subscribe to updates!
Sincerely, Anastasia Skoreva
Sewing a bag with your own hands is easy. In just a few hours, you can create a fashion accessory that is comfortable and beautiful.
How many bags should be in the wardrobe? Men will answer this question unambiguously: one or two. Women will think, and will not be able to say the exact figure.
A capacious bag, a clutch bag, a summer bag made of cotton fabric, a travel bag, a backpack, a purse bag for walking, an expensive bag of a famous designer. The list is endless.
Tip: Buying these fashion accessories every new season is expensive, but you can sew the products yourself. Spend a little time making a masterpiece, and your collection will be replenished with unique and stylish handbags.
Women's bag should be not only beautiful, but also roomy and comfortable. After all, it should fit a lot of different little things, ranging from cosmetics, and ending with a comb, money, some documents, a notebook, handkerchiefs and napkins.
Original DIY bags - ideas:
1.Stylish cat bag of two models
2. Felt bag - easy to sew, comfortable to wear
 Original bags with your own hands - without sewing
 3. Bright bag of patchwork zippers


4. Beautiful bag made of patches of leather in different colors
 Original DIY bags - interesting ideas
 5. Summer bags - new every day

 Original bags with your own hands - comfortable and stylish
 6. Clutches "Cute animals" made of felt

 Original DIY bags - cute clutch
 7. Shopping bag made of gray felt with an interesting ornament

 Original DIY bags - an interesting ornament
 8. Bag or sculpture? Beautiful and original


9. Fashionable burlap bag

10. Beautiful and unusual bag made of cotton fabric


All these bags can be sewn at home by yourself. A little imagination, the ability to sew and embroider, and a stylish accessory is ready.
Important: And it is not necessary to buy fabric and various elements to decorate the product - all this can be found at home.

Any bag usually consists of a front and back parts, a bottom, two side parts and handles.
Important: To sew an original accessory with your own hands, you only need to transfer the pattern to the fabric and sew all the details on a sewing machine.
How to sew a travel bag with your own hands? Patterns:


You can make such a bag so that the bottom and side parts consist of one piece. Fewer manipulations with the sewing machine, the accessory will be ready faster.


Three patterns of different bags: lady's travel bag made of cotton fabric, roomy travel bag and with drawstrings for safe storage of contents.

 How to sew a travel bag with your own hands - three models
 Tip: You can take measurements from your old or favorite bag, transfer them to the fabric, and sew on a new accessory.
 How to sew a travel bag with your own hands - a pattern for an old bag
 Pattern of another capacious bag.


Tip: Choose a pattern of your favorite bag for the road, sew an accessory and go on a trip. This will help you save money and spend it on the trip itself, and not on the purchase of items on the road list.

Do you want to be the owner of a unique and inimitable bag in which you can put everything you need to go to the beach? Sew it yourself - you get a stylish and spectacular accessory.
How to sew a beach bag? Detailed master classes in videos, step-by-step sewing instructions and just patterns can be found in the article about creating from different materials. Fantasize, sew with your own hands and always be fashionable!

What to do if a woman wants to please herself with a new thing? Running to the store for a new bag? No, sew a small shoulder bag with your own hands.
The scheme of this accessory is simple: two parts - front and back, a handle and a mount for it, a decorative belt.

- Cut out the details of the bag from any suitable fabric (leather, leatherette and any other dense fabric) without seam allowances
- Sew the handle, and while sewing the front and back pieces, insert the handle
- Decorate the bag with a decorative strap or other trim
- As a fastener, you can use a hidden magnetic button. For such a bag, it will be appropriate
You can sew a bag over the shoulder of the original cut according to the following pattern. This bag looks feminine and original.


The video shows how to quickly and easily sew a shoulder bag in just 1 hour.
Video: shoulder bag.flv


Leather is a durable material. Wardrobe items from it are spectacular and beautiful.
If the house has an old leather jacket, then you can sew a bag. If there are two jackets and they are of different colors, then you can combine the material for sewing or make leather trim in a bright color.
Sewing a leather bag with your own hands begins with a pattern. It can be done first on paper, and then transferred to fabric, or immediately cut out all the details from the skin.

 Sewing a leather bag with your own hands - pattern
 - Cut out all the details according to the dimensions indicated in the diagram, leaving no allowances for the seams
- Set your sewing machine to sew leather and get to work
- First sew the bottom to the two main pieces
- Then sew them, and process the top of the bag with a stitch and a large zigzag
- Sew on the handles and the bag is ready
Here is another pattern for a soft leather bag that can be sewn in 2-3 hours. It will be comfortable to carry in the hands and on the shoulder.

 Sewing a leather bag with your own hands - a gray leather bag
 The trend of the season is a bag made of fur. The designer shows how to sew such a bag with leather inserts.
Video: Predatory bag
Recently, burlap bags from famous designers have appeared on the world catwalks. At first, the ladies reacted to such an idea with incomprehension, but a burlap bag quickly gained popularity.
In order not to spend a lot of money on the purchase of the original, you can sew such an accessory yourself.


- Wash and iron the old bag, from which the main details will be cut out
- Find an old unwanted diary or book, peel off the cover. She will keep the shape of the future bag
- Attach the cover to the burlap and sew 2 pieces plus 7mm on the seams on all sides
- Tailor such details, only without seam allowances from any lining fabric
- Sew the lining, leaving only one side unsewn.
- Slip the resulting lining fabric bag over the cover. Sew up the one side that was left unsewn.
- Sew burlap fasteners to leather handles
- Using a glue gun, glue the handles with the stitched fasteners to the outside of the cover sewn into the pouch. Sew them with a needle and thread so that the handles hold tight
- Now sew the main vertical seams of the burlap pieces
- Decorate your bag with cut out letters, words and numbers or original prints
- Baste all bag cuts
- Put the burlap on the cover in the lining and glue all the joints of these parts. It turned out a beautiful and stylish bag
In the video, the designer shows what else you can sew a burlap bag. With such an accessory it will be pleasant to walk around the city or go on vacation.
Video: Smart bag with your own hands!
A woman cannot go out without a bag, as she needs to take a lot of different little things with her. But it often happens that you need to leave your hands free, so a backpack bag is useful.
Such an accessory can be sewn independently from fabric cuts that are in the house or from old outerwear. How to sew a backpack bag?

Follow these steps:
- Cut out the details of the backpack: the outer part (2 pieces), 3 harness handles, handle design, bottom and bottom of the sidewall, lining - 1 piece
- First sew the handles of the harness. If a long zipper is sewn to the handles, then it will be possible to wear the product both as a backpack and as a bag
- Now sew the bottom of the backpack - dock all the details. You need to sew “frames” to the bottom, into which handles will then be inserted
- Sew pockets inside and out to lining fabric
- Gather the outside of the bag by sewing in the handles of the harness
- Sew on the bottom of the lining fabric and connect the top to the bottom
- Insert the zipper and decorate the top of the handles
It turned out a beautiful and comfortable backpack-transformer. It will fit everything you need for a woman.
Denim bags, photo
It is not so difficult to sew a bag from old jeans or a jacket. Every woman can do this. The result is a stylish accessory with which you can go to the store, for a walk or to the beach. Denim clutch bags, photo 


Men also love new clothes, especially if scuffs have begun to appear on their favorite things. How to sew a men's bag? This question is often asked by needlewomen if they want to please their soul mates with a new stylish accessory.
Sewing such a men's tablet bag is not difficult. First make a pattern on paper.

 How to sew a men's bag? Pattern
 Now take these steps:
- Transfer the pattern from paper to fabric
- Cut the lining according to the largest detail
- Sew the details of the lining fabric
- Sew the main piece of fabric on three sides and sew on the lining
- Sew the handle if it is made from the same fabric as the bag. If the handle is made of a special inlay, then just sew it to the main part of the almost finished bag.
- Sew on the zipper - the bag is ready
You can decorate the product in different ways. For example, make a folding piece in two parts, as in the photo, or insert a zipper with interesting sliders. It all depends on your imagination and desire.
Video: "Handmade" DIY bag (03/20/2013)


