Application of the rules of the road from colored paper. Crafts rules of the road from plasticine. Scenario "The Adventures of Dunno in a Noisy City"
Crafts on the theme of the rules of the road - visual material that allows children to remember how to behave on the road. Make them with the kids.
Crafts traffic rules: 3 options to choose from

To make a visual aid for children, take:
- carton boxes;
- glue;
- scissors;
- colored paper and cardboard.

To make at home, cover the box with colored paper.

Get a box. Help the child draw rectangles of the same size on paper of a different color, using a ruler and pencil, which will become windows. These details need to be glued to the facade of the house.

To make them more accurate outlines, attach a ruler, circle with a felt-tip pen or a bright pencil.

Windows can be made flat rectangular or three-dimensional triangular. In the first case, the child will cut out this figure from paper, glue it on top of the house.

To implement the second idea, you need to cut out a rectangle, fold it in the form of a three-dimensional triangle, glue it so that the seam is at the top.
Make some more buildings with the kids. Let some of them become shops, others schools, and others houses. To mark the functional purpose of these buildings, write and stick signs to them. It will be written on them that this is a children's educational institution, a supermarket, and on residential buildings write the name of the street and the house number.
After that, make a zebra, that is, a pedestrian crossing. To do this, white strips are glued to a sheet of black cardboard, the width of which is 5 cm.

Then the roadway is made. For it, you need to stick strips of white paper 1 cm wide on gray cardboard. In the center there will be a dividing strip consisting of two segments. Short strips of the same width must also be glued to each of the sides of the movement of cars.

If you are planning to create a large rule of the road craft, then glue as many marked sheets of cardboard as you need to work.
Lay the road markings on a table or glue them to an upside-down flat lid from a large box, such as table hockey. Arrange houses, place cars on the roadway, put figures of people next to the pedestrian crossing. Then it will be possible to play with children, showing how to cross the road.
But this lacks another important detail - a traffic light. How to do it, you will learn by reading the next paragraph. In the meantime, check out 2 more ideas that will tell you how to make children's crafts of the rules of the road. After all, they may not be voluminous.

Let the child, under the guidance of adults, glue a house on a sheet of blue cardboard, make a road, a pedestrian crossing, a car and a traffic light next to the building. In the process of creating this work, you can help children learn the basic rules of the road.
Create a fabulous city together, where figures and houses will be molded from plasticine. This material will help make the road. To do this, knead the black plasticine well, grease it between the outlined contours. Thin sausages made of white plasticine are stuck on top to create a pedestrian crossing and a dividing strip for cars. Lawns, paths, people are created in the same way.
The house can be made from two blocks of plasticine of the same color connected together, or exchange this mass in your hands and coat a small box. Windows are made of plasticine of a different color.

You can take toy cars or also mold them from plasticine.

After you have familiarized yourself with the three options for making crafts for kindergarten, see how to make a traffic light. It can also be created from various materials, depending on what you have available.
How to make a traffic light with your own hands?
If there is a plumbing pipe lying around at home, and there are shoulder straps, a cap, a police baton, then you can make such a character.

If you do not have such traffic police items, then make them from colored paper and cardboard. So, to implement the plan, take:
- plumbing pipe;
- wooden stick;
- acrylic lacquer;
- whistle;
- acrylic paints;
- cap;
- shoulder straps;
- wand, and in the absence of this, colored paper and cardboard.
Cut the pipe in half crosswise. Draw with a simple pencil where the traffic light will have facial features, red, yellow and green circles. Paint it all with paints of the appropriate colors. Make two holes with a drill at the level of the character's shoulders, stick a wooden stick here, glue shoulder straps. Put a cap on top of the pipe.

Hang a whistle on one hand of the character, a wand on the other. Here's how to make a traffic light. If there are no ready-made attributes, then stick black stripes on white cardboard, roll this blank into a pipe, glue the sides from the large edge. You will get a wand. Shoulder straps are also easy to create, we cut them out of blue colored cardboard.
If we talk about how to make a traffic light, then for this the easiest way is to paste over a rectangular cardboard box with dark colored paper, glue here on each side a circle of red, yellow and green.

If you still have a box from a dairy product, this is just what you need. Cover it with black paper, and attach mugs of the appropriate colors to the sides. In order for the child to better understand that you should never cross the road on a red light, draw a sad emoticon on the circle of this color. Yellow will have a straight mouth, while green will have a smiling one, which means an invitation to move. Hide the top of the box under the cap, which is cut out of colored paper, its details are glued together.

If there is no such container, you can make a traffic light from a sheet of cardboard. The next photo shows how to cut it, what should be the dimensions.

Straighten the cardboard box, open it, cut out the circles.

Glue black paper onto cardboard, cut out squares from red, yellow and green. Glue them on a dark base. Roll it up. Cut out and glue the handle from cardboard, attach it to this roll. Insert this blank inside the glued traffic light. By turning the handle, you will change the color, thereby checking whether the children have mastered the lesson about the rules of the road correctly.

The next traffic light is made of very interesting materials, for this take:
- three laser discs;
- three juice caps;
- glue;
- lace;
- scissors;
- paints and brushes.
If you want to make a traffic light so that its elements are voluminous, then use the origami technique for this.

To do this, cut squares with sides of 5 cm from green, yellow and red paper, from which you need to twist the parts that are glued together.

Ready balls need to be attached to the stand, after which the work is over.

A very interesting traffic light is made of plastic bags.

For this craft you will need:
- garbage bags in red, yellow and green;
- cardboard;
- scissors;
- colored paper.
- To do this, first cut off the handles from the packages.
- Then, starting from the outer corner, cut into a long tape, as shown in photo number 2.
- After that, you need to wind this tape on the palm of your hand or on two identical cardboard circles, in the center of which there is a lace.
- Now the coils are cut from the outside. If you wound the tape around your hand, then tie the resulting blank in the middle with a piece of plastic bag, tighten it, tie it.
- To make a traffic light, you will tie these loose laces together, thereby connecting the structure. You can glue pens and a wand made of cardboard to the exhibit, eyes made of colored paper, make a cap from the same material.

If mothers know how to knit, they can perform this traffic attribute from threads. It is necessary to knit a black rectangle with knitting needles, wrap a bag of kefir or milk around it, sew it from the side, top and bottom.
To fit the bottom and top, knit rectangles the same size as these sides, sew them to the main fabric.
Crochet the circles, attach in place.

Cardboard and tinsel will also make a wonderful traffic light.

Scenario "The Adventures of Dunno in a Noisy City"
After the crafts according to the rules of the road are brought to kindergarten, it's time to start the holiday. On it, the guys in a playful way, with interest, will study the basics of behavior on the road.
To the music, the children enter the hall, sit on the chairs. The host greets them, their parents and says that we live in a beautiful city. There are streets, lanes, cars rush along the roads, buses drive. To cross the road in such busy places, you need to know the rules of the road.
- The name of the place where passengers are waiting for transport?
- With the help of what sound tool does the traffic police officer stop the offender?
- The silent tool of the traffic police officer?
- On what part of the road are pedestrians allowed to walk?
- What is the name of the part of the road where the traffic moves?
- Stop.
- Whistle.
- Wand.
- Sidewalk.
- Bridge.
The host says that the guys know the basic rules of the road, and now they will tell you how to cross the road. Then, in turn, the children come out, read poetry. The first says that the traffic light is a great helper, warns when you can go and when not.
The second child gets up and reads in poetic form that the color red indicates that there is danger nearby. In no case should you go across the road where the transport goes when this traffic light is on. Yellow urges pedestrians to wait, green lights up and invites them to cross the road. Then the guys tell a poem about a pedestrian crossing, about a zebra. After all, only on such a marking you can cross the pavement.
Next, the game begins, which is called "Collect the puzzle." Children are given large puzzles in which there are road signs or traffic lights. They must collect them. You can divide the guys into two teams to arrange a competition.
Next comes the mobile game with flags. At one end of the hall, children line up near the starting line. The teacher stands on the other side of the hall, holds a flag in his hand. If it's green, you're good to go. When the teacher raises the red one, the child should immediately stop. When the green attribute is raised again, you need to continue moving. The winner is the one who completes all the way the fastest without mistakes.
For the next competition, you need to make petals, a core out of cardboard, lay it all in the form of a flower on a table or on a carpet. On the reverse side of these blanks are written questions regarding the rules of the road. If the children do not yet know how to read, the parents will do it for them, but the children themselves must answer.
You can come up with other competitions to hold a holiday regarding the rules of the road. They can be studied not only indoors, but also on the street. When the snow falls, paint black stripes on the cleared path with a can of dark paint to make a pedestrian crossing. Put traffic lights on both sides of it. You will simulate the situation by “turning on” various colors.
You can also draw some road signs on the snow and study them with your children.
Such games will help the children to better learn the rules of behavior on the road, and crafts will become a visual material that contributes to the assimilation of the material.
If you want to see how to make a traffic rule-themed craft, the following story is for you.
Collective application in the middle group on the topic "Safe City" step by step with a photo.
Author: Parfenova Veronika Gennadievna, educator of MBDOU d / s No. 29, Kstovo, Nizhny Novgorod region.
Description: I bring to your attention the material, how interesting and informative it is to consolidate the skills of children 4 years old in the application. I carried out this work in my free time, in the evening, when there is more time not only to work with children, but also to talk with them about my hometown, about the sights of the city, its streets, and also to consolidate children's knowledge of the rules of the road and safe behavior on the street. This material may be useful to preschool teachers and parents.
Target: generate interest in creating a collective composition "Safe City".
Tasks:
- educate interest in the application;
- to consolidate the ability to cut a strip of paper in a straight line, cut corners, make an image from parts;
- develop a sense of proportion, rhythm;
- to fix the techniques of accurate gluing;
- develop the ability to work in small groups;
- encourage the manifestation of activity and creativity;
- to form elementary ideas about the street; draw the attention of children to houses, buildings for various purposes, sidewalk, roadway, pedestrian crossing, transport, pedestrians, etc.;
- to develop dialogical speech, to activate the dictionary.
materials: white sheets of paper A - 4, colored paper, old magazines, oilcloth, scissors, glue, plates, coasters, glue brush, rags.
Progress.
Before starting work, I suggest that the children be divided into small groups and prepare a workplace.
I show the children the blanks that I prepared in advance.


I ask: "What could it be like?" Children express their assumptions, at the end of the conversation we still find out that this is a road, a sidewalk and houses, but something is missing.
I suggest that the children cut the finished strips of colored paper in a straight line or cut corners to get windows, roofs and thin strips. And then add (glue) the missing parts of the images to the picture, while agreeing who will do what.


Let me remind you that children already know how to cut paper in a straight line and cut corners.
Children get to work with paper, cut it and glue windows, roofs, pedestrian crossing and road markings.


Let's look at what we've got. We say that these are the streets of our city.

I draw the children's attention to a plate with cut out images from magazines.

People.

Cars.

Fences, grass, flowers.

Trees.

I invite children to "revive" our streets. Children are happy to choose pictures and stick them.

At the end of the work, the children tell each other what appeared on their street, why they glued the images the way they did.
In the course of such a conversation, we once again consolidate the concepts of "city", "street", "road", "sidewalk", transport, "pedestrians", "pedestrian crossing" and the rules of conduct on the street and near the carriageway. We come up with a name - " Safe city". We conclude that we must always follow the traffic rules, as we did in our pictures.
All works are placed in our corner of creativity. Children are happy to talk about the work done and their parents.

This work is very popular with children. As a result, in a fun way, they reinforce not only the skills acquired in the application classes, but also learn to work in groups, compose whole stories.
Our works:


I hope you liked them!
Marina Shevelkova
"Traffic Laws". Application lesson in the senior group
Application lesson in the senior group « traffic rules and I"
Continue to teach children to make a composition from colored paper;
Strengthen the ability to cut out of paper;
To consolidate the skills of working with scissors, glue;
Develop attention and creativity.
Lesson progress
Today we will talk about traffic rules. You travel with your moms and dads on the bus, go to kindergarten, to shops and you often have to cross road. You are participants traffic, which means you should know Traffic Laws.
Guys, how cross the road correctly?
Children: At the traffic light.
What if there is no traffic light nearby?
Children: Let's go road along the pedestrian crossing.
The teacher demonstrates a mock-up of a traffic light.
caregiver: Guys, what do you think, what is a traffic light for?
caregiver: Well done! Right, the traffic light helps to regulate traffic and
caregiver: How many signals does a traffic light have?
caregiver: What color are they?
Children: Red, yellow, green
Well done boys. Now we will execute application"A car at a traffic light."
As part of the thematic week on traffic rules, applique "Car at traffic lights". The children were given a preliminary Job: looking at illustrations, talking, reading art. literature, mobile and didactic games "Red, Yellow, Green" "Traffic light", learning songs, poems, solving riddles.

Long-term planning of classes on art activity (application) in the senior group SEPTEMBER. 1. "Magic Flowers". Objectives: to consolidate cutting skills; introduce different ways of composing colors in the overall composition.
Natalya Efremova
Application on traffic rules "Traffic light" (second junior group)
Application on the rules of the road « Traffic light"in second junior group
Continue to introduce children to work traffic light, about signals for people and machines; learn to recognize signals traffic light;
Develop logical thinking, children's attention.
Activate in the speech of children words: traffic light, pedestrian crossing, carriageway, sidewalk.
to compose an object from several parts, observing a certain sequence.
Cultivate attention, skills of conscious use of knowledge traffic rules in everyday life.
Material and equipment: Layout traffic light, layout roads, models of cars, illustrations of street movements, audio recording, applique « Traffic light", details for traffic light(rectangle, three circles of the same size / red-yellow-green /, glue, brushes, napkins.
The children were talked about traffic rules. The children took an active part in applications.


An outdoor game according to the rules of the road "Traffic Light" Purpose: to continue to consolidate children's knowledge about the rules of traffic rules, to continue to learn to act on a traffic light signal. Develop attention. Material:.
Conversation on the rules of the road “All the guys need to know how to walk down the street” (second junior group) Topic: “All the guys need to know how to walk down the street” Purpose: -give elementary ideas about traffic; - to consolidate knowledge of meaning.
Synopsis of directly educational activities on the rules of the road "Traffic Light" (second junior group) Lesson on the rules of the road "Traffic Light" in the second junior group Program content: To form knowledge of the rules for crossing the street.
Abstract of the lesson on teaching the rules of the road "Our friend is a traffic light" (middle group) Objectives: Educational: to introduce children to the rules of behavior on the road, with the concepts of "pedestrian crossing", "traffic light". Refine views.
Summary of the lesson on the rules of the road in the preparatory group "Traffic Light" Summary of the lesson on traffic rules in the preparatory group "Traffic Light" Objectives: To repeat and consolidate the rules of the road among preschool children.
Layout according to the rules of the road "Senior Traffic Light" It is very important from early childhood to lay the foundations of safe behavior in children, in our case it is on the road. Such work must be carried out.
Master class on the rules of the road "Cheerful traffic light!" Master class on the rules of the road "Cheerful traffic light!" "Cheerful traffic light" For the manufacture of this craft "Cheerful traffic light" will be required.
Open lesson on the rules of the road "Traffic light is our best assistant" Dear colleagues, I present to your attention an open lesson on the rules of the road. Purpose: To define the concept of "traffic light"; to understand.
Entertainment according to the rules of the road “We will go, we will rush” (younger group) Tasks: organize the activities of children at the holiday, bring them joy, good mood; develop musical and rhythmic hearing, auditory.
Quiz on the rules of the road "Traffic Light" Quiz on the rules of the road "Traffic Light" Completed by the educator Shishatskaya Larisa Viktorovna Course of the event 1. Organizational.
Application on the topic "SDA"
Lyubov Fedosova
Application on the topic "SDA"

In our kindergarten, a competition was held for the best traffic rules application. My children and I also decided to do a team work.
Preliminary work done educator:
Black-and-white blanks of pictures of houses, animals, nature, cars were selected, subsequently decorated.
- on the drawing paper was drawn a crossroads with pedestrians.


A lesson was held with the children on the rules of the road, on the rules of behavior for pedestrians and drivers on the road, they repeated once again why a traffic light and a zebra are needed.
To work with children we it took:
Paper towels to remove excess glue when sticking


The children worked with passion, each glued their favorite picture. When the poster was ready and displayed in the group, the guys came up and showed their glued picture with pleasure. This work was very instructive for our children, because in the process of such a peculiar game, we discussed the rules of the road more than once.
Application collective from natural material on the theme "Leaf fall" (middle group) Collective application from natural material. Theme "Leaf fall" (middle group) Purpose: to teach children to create a collective composition from.
Application using cotton pads on the theme "Winter" Application using cotton pads on the theme "Winter" Hello, dear colleagues! I want to bring to your attention the application with.
Application in the preparatory group on the theme "Cockerel-symbol of 2017". Good winter evening to all colleagues. The outgoing year, the year of the monkey, is coming to an end and it is being replaced by a mischievous, loud, bright and perky one.
Photo report “Application in the second junior group on the topic “Bus” The theme of the week is “Transport”. Age of children: 2.3 years IMG] / Objectives: To learn to distinguish in appearance and name trucks and cars.
Collective application of paper napkins on the topic: "Mimosa" Goals and objectives: To teach children to crush small lumps with their fingers - flowers from pieces of a napkin. Learn to compose a composition from lumps. Develop.
Collective application on the theme "Fish in the aquarium" in the senior group. Program content: develop artistic imagination, aesthetic taste. Develop a sense of composition. Reinforce what you have learned so far.
Collective application in the preparatory group on the topic "Knowledge Day" Educational areas: cognitive development, social and communicative development, artistic and aesthetic development, Preliminary.
Synopsis of OOD on artistic creativity (application) on the theme “Flower for Mom” (postcard) Purpose: To make a card for mom for the holiday of March 8. Tasks: 1. Learn to create images using the paper-plastic technique. 2. Teach in advance.
Summary of the lesson “Healthy. Application "Vitamin plate" Summary of the lesson in the second junior group on the topic "Healthy" Application "Vitamin plate" Purpose: To form children's ability to work.
Mosaic application in a group of different ages on the topic “Transport. Boat» TOPIC: Transport. Ship. OBJECTIVES: repeat knowledge about modes of transport; learn to create an image of a boat based on ideas about the outside.
Crafts for children on the topic of traffic rules

The children went to school and they are taught what will be useful in later life - to read, write, count, draw, exercise, and also know the basic rules. In order for the child to better understand the rules of the road, it is necessary not only to talk about them, but also to show them with a good example. In this article we will look at how to make crafts on the topic of the rules of the road with your own hands.
A visual guide to the rules of the road for children
You will need: cardboard boxes, colored paper and cardboard, scissors, glue, felt-tip pens, a simple pencil, a ruler, toy cars, a traffic cop.
Master Class
Traffic light in the form of a traffic policeman

You will need: plumbing pipe, wooden stick, acrylic lacquer and paints, whistle, cap, shoulder straps, traffic cop's baton, jigsaw, drill, simple pencil, glue. If some materials are not available, do not despair! Make a rod, a cap, shoulder straps out of cardboard by cutting out the cardboard of the desired shape.

Do crafts with your child, trust him with work, suggest and help. Thus, you will have a useful and fun leisure time with your hands.
svoimirukamy.com
A selection of crafts on the topic: Rules of the road

Unfortunately, children often become participants in various accidents. And all this happens because many of them do not know the basic rules. Learning the rules of the road on the roads and streets of the city is easy. Parents and employees of educational institutions should help the child in this matter. In educational institutions, traffic rules lessons are often held. And these lessons end with the fact that children make various crafts on them. Therefore, in this article we decided to bring you crafts on the topic of traffic rules for children. Children can easily make these crafts with their own hands if they look at the photo.
What crafts to make on the topic: Rules of the road
A traffic light is a simple craft. Several variants.
The easiest craft option is a traffic light. Indeed, even a child who attends a kindergarten can do such a craft. In the process of creating such a product, do not forget to remind the child of what the colors of the traffic light mean.

As a basis for crafts, there will be a landscape sheet. It needs to be painted black. You can also draw a rectangle on the sheet and decorate it accordingly. Cut out circles from colored paper and glue them to your traffic light.
A traffic light can be made out of a box.

In addition, you can use old CDs to create a traffic light. A kind traffic light that expresses its emotions can clearly explain the rules of behavior at a traffic light.

The traffic light that has the head of a policeman looks very interesting. Attach handles and legs to the traffic light.

An old bottle is a great option for making crafts. You just paint it in the base color, draw traffic light circles on it. Don't forget to attach the legs to the bottle. Cut out pens from paper and insert the main attributes of a policeman into them.

Applications on the topic of traffic rules.
The next simple crafts are applications. Preschool children can also cope with this task. Applications can be made of colored paper and cardboard.

More applications can be made from plasticine. At the beginning, it is necessary to apply a drawing on thick paper, after which it should be decorated with plasticine.

Another picture from plasticine. She looks very unusual and bright.

Paper figurines.
Craft rules of the road for children should be interesting. From paper, you can make a wide variety of crafts on this topic. And they will all be interesting in their own way.

Complex applications.
It is worth saying that crafts about the rules of the road for children can be not only simple. And if the children use the help of their parents, then they will be able to make more complex applications together with them, which will clearly explain the rules of behavior on the roads.


Finally
As you can see, making crafts on the topic of traffic rules is very simple. In this case, the child fantasizes and remembers important rules that will later help him maintain his health and life.
Application with children of the senior group "Road signs"
Tasks :
To consolidate children's knowledge of the rules of behavior on the street.
Recall famous road signs - "Crosswalk", "Beware of children!".
Cultivate attention and observation in children.
Continue to teach children to make a composition from colored paper;
Strengthen the ability to cut out of paper;
To consolidate the skills of working with scissors, glue;
Develop attention and creativity.
Vocabulary: road signs, traffic lights, pedestrian crossing,"zebra" , warning signs, index signs.
Material: road signs, street layout, sheets of paper with road signs outlines.
Preliminary work: looking at illustrations, talking, reading art. literature, outdoor and didactic games, learning poetry, solving riddles.
Lesson progress:
Guys, you ride with moms and dads on the bus, go to kindergarten, to shops and you often have to cross the road. You are road users, and therefore must know the rules of the road.
Guys, how to cross the road?
Children : At the traffic light. And if there is no traffic light nearby?
Children : We cross the road at the pedestrian crossing.
caregiver : Absolutely right! Look at these signs, are they signs of a pedestrian crossing?
Children: (children's answers)
caregiver : Well done! Right!
caregiver : What is this sign? The teacher shows the sign "Caution, children!"
Children: (children's answers)
caregiver : Smarties! Where is this sign usually placed?
Children: (children's answers)
Educator: Right.
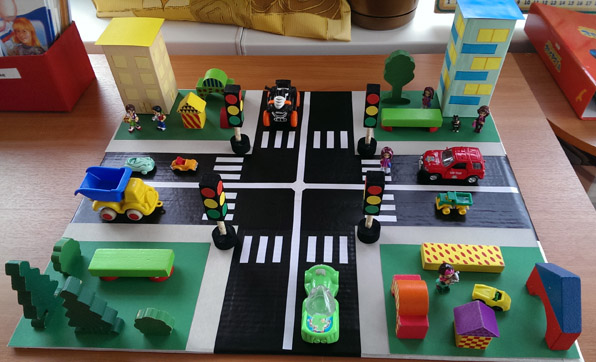
Master class for making a game layout "City Street"
Norkina Oksana SergeevnaTeacher MADOU kindergarten No. 21 "Rosinka" of the combined type of the urban district of the city of Kumertau of the Republic of Bashkortostan
The master class is designed for educators, but parents can also come in handy.
Purpose: training in game modeling, the formation of safe behavior on the roadway.
Target: making a model for game modeling in work with children of senior preschool age.
Tasks:
- to acquaint children with the rules of the road, the purpose and signals of traffic lights, with road signs, to expand knowledge about the rules for the safe behavior of children on the street;
- to activate children for independent activity in the corner of traffic rules,
The game layout can be used for the development of fine motor skills, visual perception, social orientation, orientation in space.
Description:
Stage I - the basis for the layout To make the basis of the “City Street” game layout, we need: 2 pieces from an MDF panel (I have them 53 cm each), a piano hinge, screws and nuts for fastening.

We drill holes in the MDF panels with a drill in the selected places, fasten the piano hinge with screws and nuts.

In order for our layout to stand at an angle of 90 degrees and not fall back, on one side we fasten the corner limiter (I have this part of the attachment from the old curtain), paint over the lower part of our layout with black paint.

Now we will draw up the upper vertical part of the layout. To design it, we take 2 pictures with the image of houses (I arranged these for myself).


We print the pictures in duplicate, laminate, if there is no laminator, then you can simply paste over with tape. The picture becomes brighter and it is easier to take care of the layout - to wipe the dust, for example.
We paste one copy of our laminated pictures, joining to the layout, that's what we should get.

Now we will give the card volume. To do this, we cut out the buildings at our discretion from the second copies, and paste them on pre-prepared blanks from the ceiling tiles - single background and double foreground, in my work I used the adhesive for ceiling tiles "Master"

Cut out buildings with a utility knife

We stick (I use the same “Master”) on the layout, our street has “depth”.

We turn to the design of the roadway. We take construction tape, highlight the pedestrian crossing, the dividing strip, that is, what we will paint over with white, close everything else.

In my work I use ordinary aerosol paints in a spray can, they are sold at any hardware store, they dry quickly, they are easy to use. Highlighted all the lines in white - remove the adhesive tape. The roadway and the crossing are ready.

Stage II - Paper machines. Now it prints templates for paper machines, there are a lot of them on the Internet, for example, let's take these.


The image is scaled down. Click to see original.
We laminate the printed templates (1 sheet of laminated film - 2 sheets of templates with cars), fold the sheets with the white sides inward. We laminate in order to make the cars more rigid, bright and make it possible to wipe them. When the sheet is laminated, we cut it along the contour and we get 2 sheets laminated along the colored side, the second side remains unlaminated (paper) - the paper sticks together better, and the laminated cars shine. This is what a laminated sheet with templates cut from 3 sides looks like.

Cut out car templates, glue.

Stage III - road signs. Now we turn to the manufacture of road signs.
Materials: it took me 2 sheets of ordinary white office paper, ceiling tiles (better washable), stationery knife, toothpicks, glue master, mosaic of 3 colors (red, yellow, green), laminated sheet with sign blanks, I used this one.

The image is scaled down. Click to see original.
We cut and paste 1 copy on the tile, cut it out with a clerical knife along the contour, on the other hand we paste 2 copies (if you wish, you can not stick the second part of the sign. We make a stand for our signs. Birch a sheet of white paper and cut strips of 4-5 mm along the long side sheet. For one sign, you need 5 strips.. Take one strip and wind it on a toothpick forming a tight "roll" - this is the upper part of the stand. Glue 4 strips into a long strip, twist into a "roll". On a large roll, put a small one on top, We dip the edge of the toothpick in glue, pierce our "rolls", pierce the blank with the road sign with the other edge of the toothpick. All our sign is ready.

To make the traffic light more voluminous, add a small mosaic of the corresponding colors to the lights, pierce the holes with an awl, insert the mosaic.

Our fleet

Our signs

Thank you all for your attention!


