Rubber bracelets. How to make bracelets from rubber bands. How to weave a simple bracelet from rubber bands without a loom on your fingers
If this is the first time you have picked up a set for weaving from rubber bands, then you need to start this hobby with the simplest patterns. This will give you the opportunity to try out the loom, get a quick result and try on the most beautiful and most beautiful one.
This weaving is the simplest and most fundamental; it teaches the basic technique of working with silicone rubber bands. Once you learn the simple steps, you can do all other weavings without any problems.
To weave a simple bracelet from rubber bands, prepare the necessary materials:

- loom;
- hook for weaving;
- 26 rubber bands of different colors;
- 1 S-clip for connection.
How to weave a simple bracelet from rubber bands?
Take the loom and position it with the closed side of the posts facing you. The columns should be staggered. This means that the middle row should be moved one column closer to you than the other two. Otherwise, you will have to do it yourself. To do this, remove the central row from the fastenings, move it and fasten it again.
Prepare colored rubber bands. If the bracelet is made of different colors, then for convenience, arrange the rubber bands in the order they should be located in the bracelet. This is very convenient because you will not confuse the colors.
In weaving a simple bracelet, only two rows of columns are used. It can be left and center or right and center - at your discretion, which side is more convenient for you.
Place the first rubber band on the first columns of the central and right rows.

Place the second one diagonally from the first right column to the second central column.

The third, again diagonally, from the second central to the second right.

Continue to thread different colored elastics on a diagonal until the end of the loom.

Place an elastic band folded into a figure eight on the last column. Like this:

Turn the machine with the open parts of the posts facing you. Take the hook. Insert the hook into the middle of the post, hook the bottom elastic band.

Pull out the rubber band and place its end on the column from which it was stretched.

Now insert the hook into the next column diagonally and repeat. Do the same with each column, moving diagonally.

When finished, hook the S-shaped clip onto the rubber band on the outer post and carefully remove the rubber bands from the machine by pulling the clip. From each column, pry the elastic bands with your fingers until you reach the last one.

Using the second hook on the clip, hook the last elastic band from the second end of the bracelet.

Straighten the elastic bands on the bracelet so that they intertwine beautifully without twisting. You can also put it on something of the appropriate size so that the bracelet will straighten out and look good.

That's all! A simple rubber band bracelet is ready! Wear it with pleasure!
From elastic bands, which can often be seen not only on children, but also on their parents. Many people buy colorful handicraft kits for themselves, but they don’t know how to weave bracelets from rubber bands. For such beginners interested in this art, ELLE has compiled several simple ways to weave bracelets from rubber bands for beginners with video links.
Bracelets made from elastic bands in the Rainbow Loom style, the most popular manufacturer of these needlework kits, which made a real revolution several years ago, are very easy to weave: the main thing is to master a few basic skills. They can be woven on a loom sold in a set, on a slingshot, or even on a fork found in the kitchen. With the help of video links, everyone will master the skill of weaving simple bracelets from rubber bands.

Fish tail
Any lessons in weaving with rubber bands begin with mastering the basic method using the fishtail technique. For such a bracelet you will need about 50 elastic bands of selected colors (beginners are recommended to start with one), a transparent clip to connect the bracelet from the set and two fingers.
First you need to separate three rubber bands - put the first on the index and middle fingers in a figure eight, and the second and third on top, without twisting. Then you need to remove the bottom elastic band from both fingers in turn, taking it by the edges - it will seem to hang on the other two, forming a loop. Then you can put on the fourth elastic band (all elastic bands, except the first, do not twist) and, accordingly, remove the third one from your fingers. Each time you put on a new elastic band, you need to take the bottom one by the edges and pull it up through your fingers. When the bracelet is finished, the edges need to be secured with a transparent clip, threading it through the outer elastic bands.
Zigzag
For such a bracelet you only need the hook from the set, as well as 50 elastic bands in two colors. This simple method will especially appeal to beginners, as it does not require much skill. First you need to take an elastic band of the same color and throw it on the hook in a figure eight. An elastic band of a different color must be thrown over the hook and pulled through the loops of the first elastic band, then throwing the second part over the hook so that two loops of the same color are formed on the hook. Then we take the elastic band of the first color again and insert it only through the first loop of the elastic band of the second color. We put the second part of this elastic band on the hook. After all these manipulations, there should be one loop of the second color and two of the first color left on the hook. At this stage, the entire structure should be rotated 180 degrees, holding the elastic bands with your finger and inserting the hook on the other side. Thus, the loops of the main color come first on the hook, followed by one loop of the second shade.
Every time after putting on elastic bands and creating loops, you must not forget about this 180-degree turn. When the bracelet reaches the desired length, it must be secured with a transparent clip.
Mermaid braid
Very beautiful bracelets made from rubber bands are made using the “mermaid braid” technique. To weave this bracelet you will need a machine and 60-70 elastic bands of two colors, a clip to secure the bracelet and a hook from the kit. The bracelet is woven on two adjacent posts. First you need to put an elastic band of the same color on two columns, twisting it in a figure eight, and on the right column - an elastic band of a different color, folded in half. Then put an elastic band of the first color on both posts without twisting. Using a hook, you need to pick up the elastic band folded in half and pull it to the side, then, without removing it from the hook, pick up the bottom elastic band (figure eight) and bring it towards the center. We repeat the same operation on the left column and then on the right - putting on an elastic band folded in half, throwing another one over two adjacent columns. Pull the double elastic band with a crochet hook and pick up the four lower elastic bands of two colors. Then you always need to pick up the four elastic bands located at the bottom and throw them towards the center. When the desired length is reached, you need to remove all the lower elastic bands from the left column except for the top one and hook them to the center. Do the same with the right column, then transfer the top elastic band from the right column to the left one and put a securing clip on the two elastic bands. Hook the other end of the bracelet onto the same clip.
Rubber bracelets are an indispensable summer accessory for fashionistas of all ages. And it’s not at all necessary to buy a stylish thing; it’s quite easy to weave it yourself using basic tools. Don’t rush to make an intricate decoration, learn from simple patterns, practice your hand, and then you can easily master intricate weaving.
How to weave a bracelet from rubber bands on your fingers
A simple way is to braid on your fingers, using a fishtail technique. Prepare: 50 multi-colored elastic bands, a fastener.
- Throw 1 elastic band, folded into a figure eight, over your index and middle fingers. Attach 2 more elastic bands on top without twisting.
- Pull the bottom elastic band by the edge, tightening it with a knot between your fingers.
- Put on the 4th elastic band and remove the bottom one from the edges. Continue this way until you reach the desired bracelet size.
- Remove the work from your fingers, take out the remaining two elastic bands and hook the hook into the last loop.
The bracelet is ready - fashionable, custom made, made by yourself. Dress up, show off, shine in front of your girlfriends and buddies.
How to weave a bracelet from rubber bands on a slingshot
It’s not difficult to make a shaped bauble on a plastic slingshot, which can be purchased at a craft store. You will also need 100 pieces of elastic bands of two colors, a clip to connect the bracelet. We make a “French braid”:
- take the slingshot with its horns up and its indentations towards you. Pull the red elastic band in a figure eight, then the yellow and red ones - without twisting;
- grab the bottom elastic band with a hook, lift it up and remove it from the post, and do the same on the opposite side;
- put on a yellow elastic band. On the left side, pull a red blank into the center of the bracelet, and from the right column, a yellow one;
- weave to the desired length, and when there are two elastic bands left on each column, hook the bottom elastic bands. Place the last elastic band on the opposite post. Attach the clip to both elastic bands. When finished, secure the other side with a clasp.


How to weave a bracelet from rubber bands on a machine
Weave a “Star” bracelet and get an ultra-fashionable piece for a summer outfit. You will need a special machine - sold in hobby stores, elastic bands, clip.
Step one - designate a rectangle
Place the device so that the concave side of the pegs is not facing you. Place a black elastic band over the starting pegs of the 1st and left rows. Tie all the pegs, except the last one, in pairs with black elastic bands. Get a selected rectangle.


Step two - base of the bracelet
We will work with the central pegs, each even one of which is the middle of the star.
- Use multi-colored elastic bands to connect these pegs to adjacent posts, starting from the 2nd post of the first row.
Important: work clockwise.
- Connect the 4th central column with the neighboring ones, forming an asterisk.
- Fold the elastic band of the main color into a ring and place it on the last column of the middle row. Complete the following details in the same way.


Step three - forming rays
Set the machine so that the last sprocket is the starting one.
- Grab the elastic from the middle post and place it on the post with the core. From the right column, counterclockwise, remove the elastic bands, throwing them over the rays. Work like this until the end of the workpiece.
- Take the black elastic band that connects the outer posts of the middle and left rows and throw it over the left peg. Combine the columns on both sides with rubber bands - 1-2, 2-3, 3-4 and beyond.
- Place the device with the cuts of the pegs facing you. Place the hook through the loop of the outer post using a black elastic band and tie a double knot.
The work is ready. Make a loop at the end of the bracelet and remove the item. Crochet a chain from the loop and connect the ends of the decoration with a transparent clip.


Use our tips, weave and enjoy wearing exclusive bracelets that will add bright colors to your everyday look.
Elizaveta Rumyantseva
Nothing is impossible for diligence and art.
Content
Weaving from rubber bands is a new, popular direction in creativity, which people in different parts of the world are interested in. The entertainment aroused particular interest among children and teenagers, since it is an opportunity to make original accessories from available materials to create a stylish look. From rainbow loom, after a little practice, even a child will be able to create unique products on the machine - bracelets, beads, keychains. The beauty of loom bands sets is that they include multi-colored elastic bands and all the necessary attributes.
Step-by-step instructions and patterns for weaving bracelets on a machine
Weaving luxurious products from rubber bands on a machine has its advantages and has deservedly won its admirers:
- Relatively low cost of materials.
- Wide range of rubber bands colors.
- An interesting, simple, exciting process of creating masterpieces.
- The ability to create a unique accessory using additional beads and figurines.
- Having mastered simple patterns and studied weaving lessons in different ways, it is possible to create complex, beautiful products, come up with new options and techniques for creating jewelry.

How to make Dragon Scales
To create an accessory, you will need to install the machine so that it is completely in front of your eyes. The procedure for creating the Dragon Scale decoration:
- We twist the elastic band in a figure eight away from us and put it on two posts.
- The next 3 are put on the nearest pegs, but twisted in a figure eight towards themselves, connecting 1-2, 3-4, 5-6, 7-8 columns.

- We put on the next row, twisting the elements towards ourselves, connecting the columns in this order: 2-3, 4-5, 6-7.
- For weaving, on pegs where there is more than 1 elastic band, you need to throw the bottom one up over the post. Manipulate all elements.

- For convenience, lower the elastic bands down a little.
- We put on loom bands of a different color, without twisting them, observing the order 1-2, 3-4, 5-6, 7-8. We take the bottom rows and throw them to the top.
- Next, 3 elastic bands alternate in rows, then 4, and for weaving, the lower elements are thrown up.
- A kind of mesh with a beautiful pattern is formed.

- To complete the elastic from three columns, we connect them to one, discarding the bottom row. We attach a fastener to the remaining loops. We carry out the same manipulation with the remaining elements.
Watch the video to finally understand the technique of creating a stylish decoration using the “Dragon Scales” technique:
Weaving a bracelet “Triple fishtail”
Try one of the fishtail braids. To weave a Triple Fishtail ornament, the loom must be adjusted so that the left row is one pin closer. A total of 2 strips of posts are required. Step by step execution:
- We take the elastic band, turn it over in a figure eight and put it on the pegs, connecting in parallel. So you need to put on 3 things, 6 pins are involved - three from each row.

- We connect the three columns of the left row with the main elastic band.
- We put on elastic bands of a different color, connecting two rows, as in step 1, but without twisting them. We repeat point 2.
- We put on the third layer of a different color, do not twist it, but connect the pins of the left row with one elastic band on top.
- We begin weaving: from the left row we drop the lower main elastic band into the center of the work. We drop the bottom layer from all the pins into the middle. It is important to remember one rule - from the right row we hook loom bands from the outside, from the left - from the middle.

- We continue to create a masterpiece: we put elements of the desired color on the posts, connect the pins of the left row with the main element and weave according to the pattern described above.
- To finish the product, you need to weave all the remaining elastic bands according to the pattern, without adding new ones. The remaining elements need to be transferred to the pins of the left row and fastened with fasteners.

Watch the video to see with your own eyes the decoration technique and try to make a similar masterpiece with your own hands:
We make a bracelet "French braid"
To weave a bracelet using the French braid technique, you will need elastic bands of two shades; in the example, light green and yellow were used. The order of making the bracelet:
- We put a green elastic band on the sled, twisting it in a figure eight.

- Next - yellow and green, put on without twisting.
- Use a hook to remove the first green element and put it on top of the other two, first on one side, then on the other. It turns out that the first elastic band hangs on the other two.
- We put on a yellow elastic band without twisting. We remove the green loom bands from the right peg with a hook and put it on top, and from the left - the lower yellow one and also throw it on top.
- The creation scheme looks like this: on one side the contrasting central elastic band is removed, and on the other (where two are identical) the lower one is removed. We weave a bracelet of the required length.

- At the end we attach an S-shaped hook-clasp, the decoration is ready.
Watch a visual video on weaving a French braid bracelet:
Bracelet called "Rain"
Let's learn how to weave a rain bracelet. Let's look at the execution sequence:

- We twist the Rainbow loom and put it on the 1st and 2nd posts, the second one, twisting it with a figure of eight on the 1st and 3rd pins.
- We put the next element on columns 1 and 4.
- We put on the second row of elastic bands in the same order, but do not twist them.
- When all the elements are in place, we start weaving: remove the bottom elastic from the first post and put it on top, then remove the very first one from the second pin and throw it up, do the same with the rest.
- In the same order, put on the loom bands again without twisting: 1 and 2, 1 and 3, 1 and 4 pins.
- We continue to weave by analogy, throwing the lower elements parallel to each other to the top.
- Having weaved it to the desired size, we attach the clasp, the next masterpiece is ready.
Watch the video to learn some secrets of making rainbow loom bracelets using this technique:
How to make a star style
Step-by-step instructions for making a stylish Star bracelet:
- We set up the machine: it is necessary to install it so that in the second row the columns are staggered relative to the first and third.
- We put blue rubber bands on the first columns of the left row, connecting them. We continue to connect the pegs until the end.
- At the end: connect the penultimate peg of the left row and the last of the central one.

- We begin to weave a star: put an orange elastic band on the second column of the left row and 2 central ones. We put on the rest of the rainbow loom in a clockwise direction to form a star. By analogy, we make a pattern to the end of the product.
- On the last column of the central row you need to put loom bands, twisting it in half with a figure eight. Place similar “eights” on the centers of the stars and the first column.
- We turn the machine so that the posts are hollow side facing.
- We lower the hook into the first column of the central row and, catching the orange elastic band, pull it out and put it on the second.
- We lower the hook into the middle of the star, remove the top orange rubber band and put it on the post from which it comes. Counterclockwise, pull out all the orange rubber bands in the same way. We weave stars to the end of the product.

- We weave the base of the bracelet: from the first peg of the central row, pull out the bottom blue elastic band and put it on the second pin on the left.
- Next, remove the loom bands from the second column of the left row and put them on the third.
- Carefully remove the bracelet from the machine and fasten the clasps.
To see the whole process in action, watch the video:
Bracelet made of rubber bands “Caterpillar”
Weaving Guide:
- We twist the elastic band of the main color in a figure eight and put it on the pins of the loom diagonally. We do the same with the second element.

- We put on the next 4 rows diagonally, without twisting.
- Let's start weaving: hook the bottom elastic band from the outside of the loom and put it on top of the rest.
- We carry out the same manipulation with all the elements that were initially twisted.

- We put on the 2 elastic bands diagonally, without twisting them, and remove the bottom row towards the center.
- We weave the accessory in this way to the required length. To fasten, remove all the rainbow elastic bands remaining on the posts onto the hook, pull and put on the fastener on one side, then on the other.
You can understand some points and see everything with your own eyes by watching a video with a detailed master class on creating an accessory in the “Caterpillar” style:
Video tutorial on weaving a bracelet from rubber bands on a mini-loom
In order to weave beautiful original accessories from rainbow loom you will need a little imagination, weaving skills using simple patterns and the desire to create a unique item. The methods of creation are somewhat similar, differing only in small nuances, which is why new designs and stylish bracelets are obtained. Master classes will help you learn complex techniques and the secrets of weaving. For an example of such a lesson, look at the video, where the sequence of execution is explained and shown in detail, so there will be no problems with weaving and the result will be excellent work:
Found an error in the text? Select it, press Ctrl + Enter and we will fix everything!Novice craftsmen who weave bracelets using fingers, pencils, forks or slingshots inevitably come to the conclusion over time that real masterpieces can only be created using the Rainbow Loom machine. It not only makes the craftsman’s work easier, but also significantly expands his capabilities, allowing him to create costume jewelry of amazing beauty.

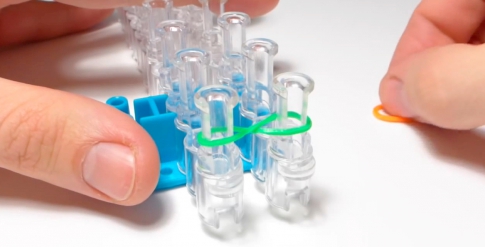
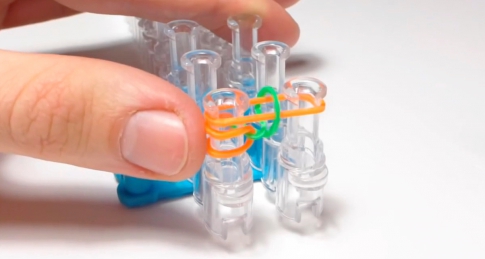
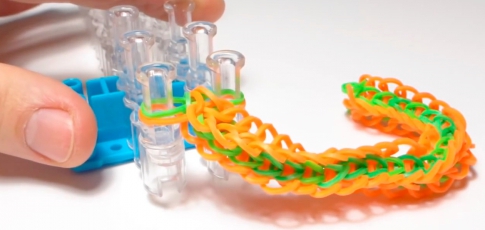
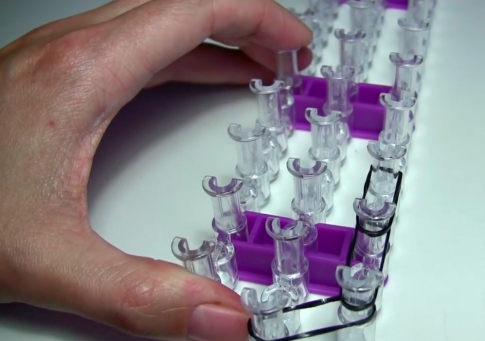
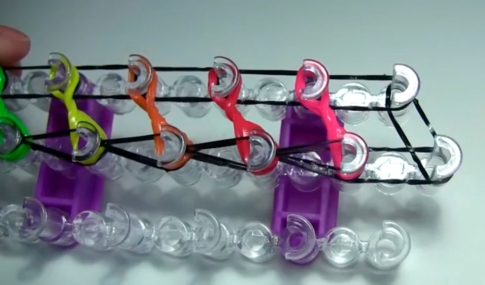
1. Prepare the loom by removing one of the rows (you will only need two of them) and turning it around with the cuts of the posts facing you.

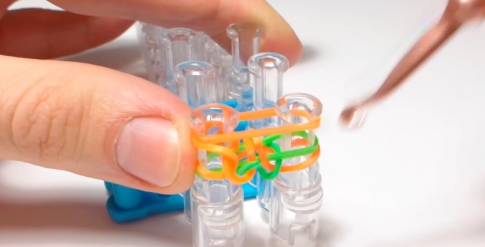
2. A light green elastic band, twisted in a figure eight, is placed over the two nearest columns.
3. The orange rubber band is put on the same pegs in the usual way.
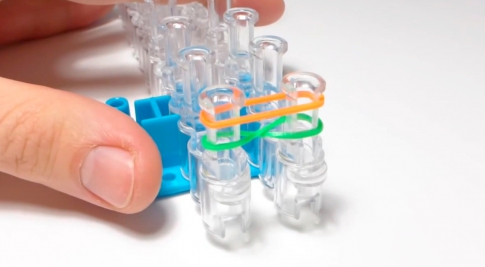
4. Hook the lettuce on the left post and throw it off the peg, leaving it hanging on the orange loop between the posts.

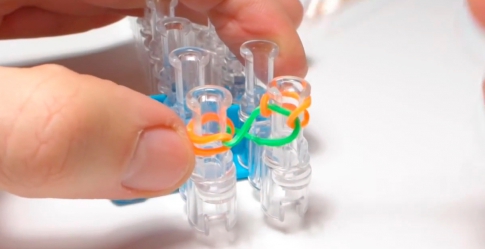
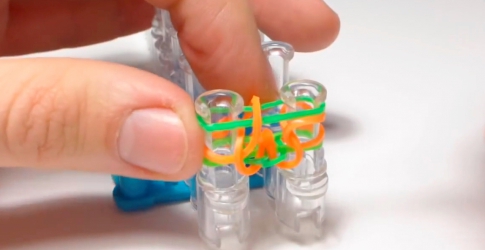
5. Holding the orange loop on the left peg with your finger, use a crochet hook to remove the orange elastic from the right post and transfer it to the left one. A double red loop is formed on it.
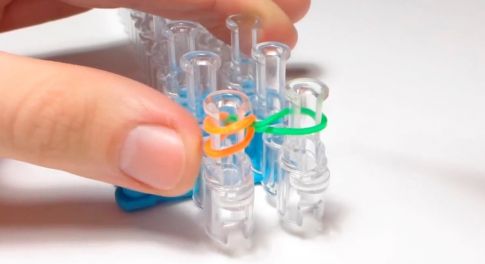
6. Take another elastic band of this color and put it on top of both posts.
7. We hook the lettuce elastic band on the right peg and throw it towards the center.
8. We return to the left peg: remove the top orange loop from it and transfer it to the right post.

What happened? Double orange loops are thrown on the posts, and between them there is a green elastic band twisted in a figure eight.
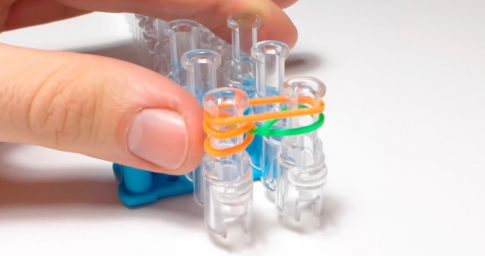
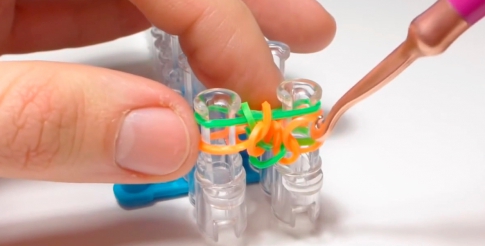
9. The lettuce elastic band is put on two columns, as was done in step 6.
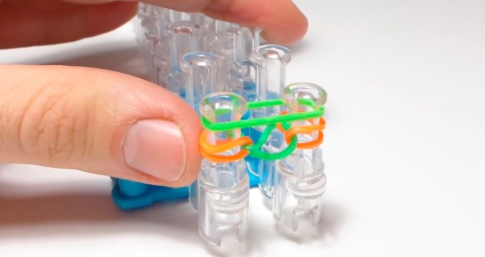
10. We hook the middle loops on both pegs and drop them to the center. Naturally, this needs to be done one by one.
11. Lower the elastic bands down and put the orange elastic band on both pegs again.

12. From this moment on, a series of actions begins that will be repeated cyclically. On the left column, hook the bottom orange loop and throw it to the middle. We transfer the top loop from the right column to the left.

13. An orange elastic band is again thrown onto both pegs, and the actions described in paragraphs 12, 13 are repeated, but only in a mirror image. As a result, we get 1 green and 2 orange loops on each column from bottom to top.
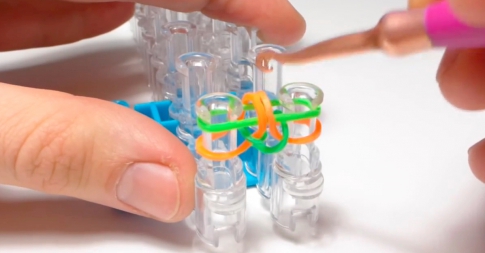
14. Take a new lettuce elastic band and put it on top.

Remove the top orange loop from the left peg, dropping it to the middle.
Then we do the same with the bottom green loop.
Repeat the same steps with the top orange and bottom lettuce loops of the right column.
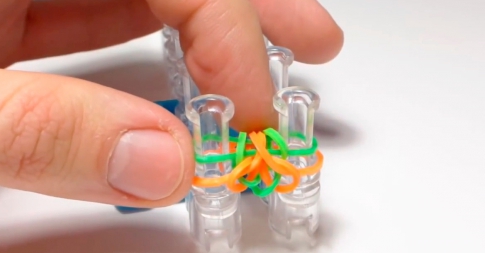
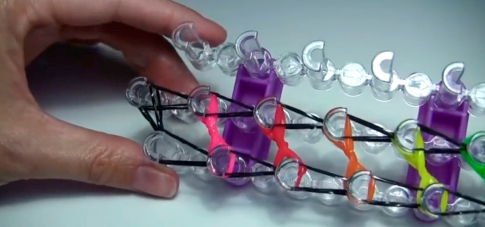
15. The manipulations described in paragraphs 11 - 14 must be repeated several times (depending on how long the bracelet you want to get). As a result, you will get a weave like this:
16. We finish weaving the bracelet on the machine: we drop the upper loops from both pegs to the center.
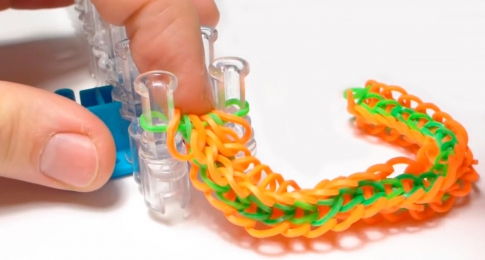
We throw the green loop from one peg to the next one.

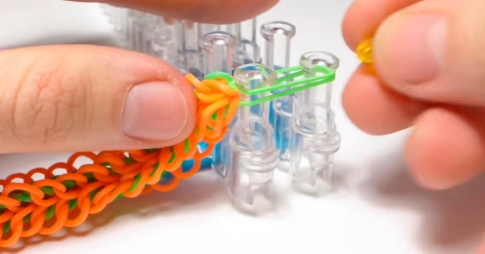
17. To make it easier for you to put on the clasp, stretch the double green loop into two posts and hook the clasp onto it.
Master class “How to weave a bracelet from rubber bands “Angel Heart” on a machine”:
How to weave a “Spiral” rubber band bracelet on a machine
To start weaving a bracelet from rubber bands, you need to first prepare the machine itself, three rubber bands of each color, elastic bands of the main color (ours will be black), and a hook.
1. Place the machine so that the cuts of the posts are directed in the direction opposite to you - this will make it easier to weave. We will use only two rows: central and right.

2. We create the base of the product by connecting the pegs of the right row in pairs with rubber bands of the main color.
3. We “dress” the second row with elastic bands in the same way. The last elastic on the far edge of the loom, closing the perimeter, will be used to secure the base.
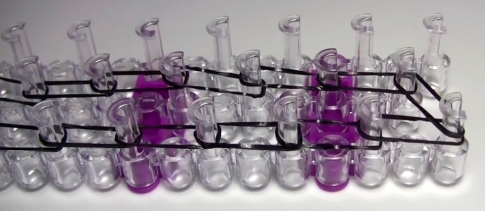
4. Place a double loop made from a new elastic band of the main color onto the outermost corner peg. And we return to the beginning of the machine.

5. We put three colored elastic bands on the second column of the left row.
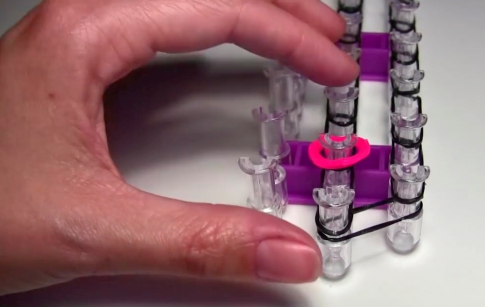
We hook them with a hook, turning it 360° (the direction does not matter), twist the elastic bands and put them on the adjacent post from the other row.

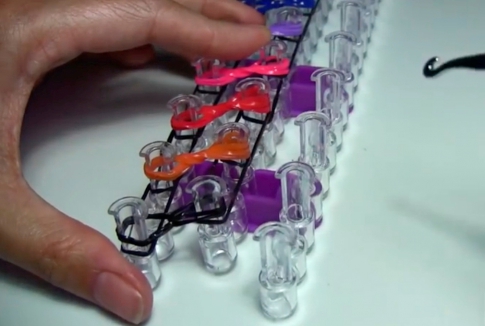
6. We perform similar manipulations with the remaining posts and elastic bands. We leave the last two pegs with black rubber bands untouched.

7. We unfold the machine, directing the sections of the columns towards us. On the extreme corner peg we hook the second loop from the bottom and transfer it to the adjacent peg from the second row.
8. On each of the posts we find a black loop, hook it up and throw it onto a nearby peg.
9. We perform the same actions with the elastic bands of the second row.
10. We thread the next black elastic band through the outer post using a hook, make a double loop, put it on the hook handle and remove the bracelet from the loom.

A bracelet made on a machine will be short. You can find out how to lengthen it from the video tutorial “How to weave a bracelet from “Spiral” elastic bands on a machine”:
Now many people have started weaving bracelets from rubber bands, but do not forget that beaded jewelry looks no less attractive. Perhaps we should try combining them?


