What can be made from chestnuts: various options for children's crafts. Crafts from chestnuts with their own hands on the theme of autumn
Do crafts from chestnuts The kids really like it, not only because of the end result. The fact is that chestnuts are so beautiful, so pleasant to the touch that working with them turns into a real pleasure. At the same time, while creating with a child, by all means praise all his successful actions, do not focus on failures, pay attention to the fact that with the help of the most trivial movements you will together create figures of various animals, insects, birds and people. Creating crafts with the help of such natural ingredients will allow the baby to see the beauty of nature and the unlimited possibilities that handmade opens up.
Crafts from chestnuts with your own hands
Bunny
To make a funny figurine, you will need to stock up on a couple of fruits, the smaller one will play the role of a bunny's head, the large one will be a calf. At the same time, keep in mind that the natural material must be fresh - only then will it be well pierced with toothpicks (they will be needed to attach other parts). However, you can also take dried specimens, only then mom or dad will have to make holes in them with an awl.
Insert a couple of toothpicks into the head and wrap plasticine around them to make ears. This measure is necessary, because voluminous plasticine parts themselves do not adhere very well to slippery chestnut surfaces. But you can try to stick the plasticine eyes, mouth and nose - they should not fall off.
Now go to the body - you will need to attach the tail and paws to it. Then, using half a toothpick, connect the head and body of the animal together. As a decor, you can also fashion a bright plasticine carrot for a bunny.
Make and - the child will certainly like it too.
birdie
Attach the eyes and beak to the chestnut-head of the bird, you can make them multi-colored - it will be more fun. Just like with a bunny, you will need to attach the bird's head to the body - for this you need to make holes with an awl in the appropriate places of the chestnut fruit. Connect them together with toothpicks. Now it remains only to make the wings.
If you wish, then from the plastic mass and dry twigs you can build a nest for the bird.

To make a horse, pick up large fruits. In the chestnut body, punch 5 holes with an awl - for the legs and for the head. Sharpen 4 matches and insert them into the leg holes. Do the same manipulations with the match for the head, only it will need to be sharpened on both sides. Connect the chestnut head and body.
The mane and tail are very easy to make - for this you will need to use woolen threads. Then they will need to be attached to the craft, wielding an awl.

A funny bug will turn out not only from the fruit, its peel will also be needed. Fasten the torso and head with a plastic mass. Make eyes using any suitable natural material, such as cereals. Legs and antennae are leaf petioles or thin twigs.
The kids will love it and - we bring to your attention a master class with step-by-step photos.

A spider is also made very simply, only for its manufacture it will be necessary to take a couple of fruits already. Connect them in a way that is already familiar to you. Cut eight plastic tubes (you can just halve 4 pieces), put them on plasticine - these will be the legs. Don't forget to sculpt your eyes.

Collect fresh fruits, they should all be approximately the same size. Drill them through with a thick awl, but if you have a small drill, then by all means use it to make your work easier. You can also make holes with a nail, driving it with a hammer.
Prepare small wooden beads in advance. You can do nothing with them - the wooden texture looks unusually harmonious, or you can paint it with acrylic paints of the color you need. After the acrylic has completely dried, collect the beads on the fishing line, alternating the "beads". Make a knot on the fishing line, and melt the ends, then they will not be untied. You can hang such decorative beads on the wall to create an autumn entourage in the apartment.
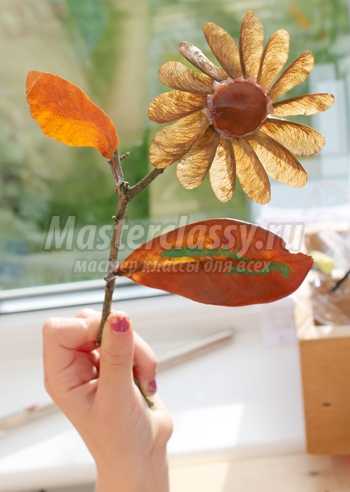
One more children's crafts from chestnuts and other natural material can be called a delightful flower. The middle chestnut with a glue gun will need to be attached to a branch of the desired shape. With the same tool, attach petals to the middle - maple lionfish, and leaves made from beautiful autumn leaves to the branch-stem.
Crafts from chestnuts with your own hands - photo:
Crafts from chestnuts and acorns
BearPut a small chestnut on a large chestnut - you get the body and head of a bear. You can use the same technique with toothpicks, or you can use some kind of plastic mass. Glue the ears to the head - a couple of tiny chestnuts.

Eyes for the bear can be made using two miniature buttons, roll up the nose and mouth using plasticine of the appropriate color. Attach to your head. Make paws for a bear cub very simply - put it on four acorn plushes, fixing it with plasticine.
If you would like to do crafts from cones and chestnuts, then you can plant a bear cub near a large pine cone, previously painted with green gouache. It turns out that the bear is sitting under the Christmas tree.
Cow
Our main material will act as the cow's body. For the legs, roll up four brown or black plasticine sausages, put the body on them. A thin plasticine sausage, fixed at the back, will imitate a ponytail. Attach a small plasticine cake cut with scissors to its tip.
A cow's head is an acorn without a hat, a pair of fashioned white horns, eyes and ears should be fixed on it. In place of the nose, a molded cake should flaunt - make two nostril holes in it. Attach the head to the body.
Mushrooms
Line the lid of the box with autumn foliage - it can be either fresh or dried. Using plasticine, connect together an acorn without a plush and a chestnut. Choose acorns that are not very thick, so that as a result it looks like a mushroom. Glue a few blades of grass or leaves on the surface of the hat, this will help to achieve greater realism. Put man-made mushrooms on the lid-clearing - and here you have it crafts from chestnuts "Autumn", unusually beautiful and harmonious. Or you can put a cute animal on such a mushroom clearing.
Crafts from chestnuts - photo:

Make others too, because this time of year gives us a sea of natural materials and ideas for turning them into real handmade masterpieces.
Crafts from chestnuts on the theme of autumn - topiary
You can create a stunningly beautiful autumn tree with your own hands, and we will tell you what exactly should be done to achieve the goal. This will be a real highlight of your interior or an excellent gift for friends.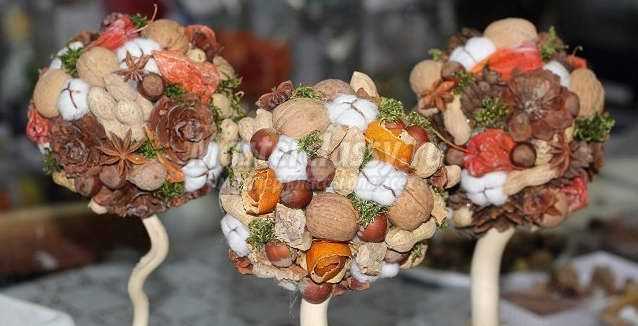
The basis of the craft will be a ball. You can use a variety of materials, for example, you can purchase a foam base from a craft supply store. We suggest you use the most common newspapers - they are quite inexpensive and are perfect for the workflow. Crumple them well and tie them with thread so that the newspapers keep their shape. The base ball should be tight, which is why it should be lightly smeared with glue. You can also mask the protruding pieces of newspaper sheets.
Put the base on the trunk. For the barrel, you can take both a wooden and a plastic stick. First, make an incision on the ball, through which you pierce the stick.
Pick up a pot for your topiary in advance - it can be ceramic, glass or plastic. Pour the gypsum solution inside, and when it begins to slowly harden, insert the trunk into the pot. Support the topiary until the plaster has completely set. If the container does not look very attractive, then now is the time to decorate it, for example, by wrapping it with twine or sticking rhinestones.
Sort your natural "treasury" by selecting flat chestnuts that will be more convenient to glue, in addition, they will look more attractive on the crown. Starting from the top, start gluing using a glue gun. Try, of course, to glue the fruits as close to each other as possible, but if there are gaps, then do not worry, because then they can be masked with sisal or tea. Tea or sisal is also useful for decorating a plaster in a pot.

Do you want to make the topiary fragrant? Then, in between, you can put crushed vanilla sticks, aromatic spices or herbs, tea with fruit additives. Fragrant decor can crumble, which is why it needs to be fixed - sprinkle the "master" with odorless hairspray.
You can decorate the crown with whatever you like - bows, butterflies, sparkles, decorative ladybugs.
In order for the "lifetime" of the topiary to be longer, you need to hold the chestnut fruits in a cool place after harvesting, this will allow them to dry naturally without undue acceleration.

To decorate the interior, especially for Halloween, you can also use a woolen web. The craft is so simple that even a three-year-old under the supervision of an adult can try to do it. To make it, six holes should be made in a large chestnut tree, insert a thick branch 10 cm long into each hole, putting it on glue for greater reliability. Wait for it to dry.
Tie the end of the woolen yarn of your favorite color to the first stick, then stretch the thread and wrap it around the next stick. Continue to do these actions again and again with all the "rays" of the web. If you want to change the color, then just cut the thread and tie a different color to it. When you finish the gossamer, then simply tie the thread to the last stick, leave the tip of the required length for hanging and cut off.

As you can see, there are many ideas that allow you to decorate your home and create a great mood, do it quickly crafts from chestnut cones, various animals and autumn compositions, because the service life of such natural material is not very long.
With the advent of autumn, mothers and grandmothers are waiting for another portion of trouble. And they are connected not only with updating the seasonal wardrobe and harvesting the summer harvest, but also with the organization of school leisure and extracurricular activities for children. After all, the beginning of the school year entails a lot of homework in the form of mandatory seasonal crafts made from natural materials - chestnuts, cones, acorns, leaves and plasticine - to school and kindergarten. Of course, such chores are many times more pleasant and more fun than tedious canning, but they require no less inspiration and effort with your own hands. After all, every mother wants her baby to win the chestnut crafts at a kindergarten competition or an exhibition of works by an older group. Considering the constant lack of free time for modern parents, we have selected the most practical master classes with photos on creating original autumn-themed products.
Simple crafts from dry chestnuts with your own hands for kindergarten: a master class with a photo

Well, we offer you the first and easiest master class with photos on using autumn chestnuts in fun DIY crafts for kindergarten. With the help of our clear instructions, even kids 5-6 years old will cope with the creation of a cute goat or a playful caterpillar. The main thing is a good mood and the help of parents.
Necessary materials for crafts from simple chestnuts to kindergarten
- chestnuts
- toothpicks
- acorns
- Super glue
- scissors
A step-by-step master class on creating elementary crafts from simple chestnuts for children in kindergarten

On a note! Dried craft materials are stronger and stick together faster, but at the same time, they quickly crack and crumble when you try to pierce or cut them.
- Divide the chestnuts into several groups: leave the largest chestnuts for the details of the “torso”, the smaller ones for the “head”, the smallest ones for the “paws” and other parts of the animals. Make a hole in the "head" with an awl and insert a cut toothpick, smearing its tip with super glue.

- In the body part, make 4 holes for the legs and 2 more for the neck and tail. Insert clipped toothpicks in place of the front and hind legs, don't forget the ponytail. Attach the "head" blank made earlier to the neck hole.

- On the muzzle of the animal, scratch the eyes, nose and mouth. Make two more holes and insert the ears (or horns).

- Similarly, you can make a bird. For example, a heron. Only instead of the front pair of legs, attach two wings to the body. And on the hind legs, fix a piece of chestnut so that the bird stands without support.

- And in order to create a caterpillar - the simplest do-it-yourself dry chestnut craft for kindergarten (according to a master class with a photo), connect several chestnuts in a chain. And attach the last detail "head" with eyes and horns with super-glue to the penultimate one.

Plasticine crafts with chestnuts for children 3 years old

After the melancholy note of farewell to summer and the transition to a new kindergarten mode, the kids need bright emotions and a riot of colors. Therefore, we suggest that you do simple creativity with children of 3-4 years old and create some fun plasticine crafts with chestnuts in the form of colorful snails and other characters. They will certainly amuse the kids and inspire new discoveries.
How to make the simplest plasticine crafts with chestnuts for children 3 years old, see the video tutorials:
Funny crafts from acorns and chestnuts for a competition for children 5 years old

As practice shows, children of 5 years old most of all love to create cute animals, little men, fairy-tale and cartoon characters with their own hands. And the easiest way to implement such an idea is to use the gifts of autumn nature of various sizes, colors and textures. Why not take a child's fantasy as the basis for a fun craft made of acorns and chestnuts for a competition in kindergarten. Perhaps the product will not be perfect, but it will certainly look atypical and childish directly.
Necessary materials for a fun competition craft from chestnuts and acorns
- chestnuts
- dry chestnut skin
- walnut shell
- acorns
- maple seeds
- glue gun
- thin wire
- scissors
- matches
- awl (corkscrew)
- small retainer

Step-by-step instructions for creating a funny craft from acorns, chestnuts, nuts with children 5-7 years old

Firmly fix all parts with hot silicone. While the Unicorn is drying up, take care of the next chestnut creature. 
On a note! Characters made from natural materials do not have to be realistic. Let them be mythical, fabulous or even existing in real life.

Original crafts with chestnuts and leaves: a master class with video

Again, while you are enjoying the warm echoes of the past summer, kindergarten teachers are already doing homework for their wards. Make a composition from a pumpkin, create a decoration from acorns, glue animals from cones ... Don't wait for the last day and get ahead of your expectations. team. Make an original craft with leaves and chestnuts according to a master class with a video so that everyone is surprised at the creative skills and flights of fancy of your child.
Crafts from cones, nuts, seeds and chestnuts to school (older group of kindergarten)

A cute autumn wreath for the front door or a wall stand is the optimal craft made of cones, nuts and chestnuts, which schoolchildren or kindergarteners can easily make with the help of mothers and tips from high-quality master classes. We have one of them for you.
Necessary materials for crafts to school from chestnuts, checkers, seeds, nuts
- assorted nuts in shell (walnuts, hazelnuts, almonds, etc.)
- chestnuts of various sizes
- acorns with hats
- peach pits
- small cones
- blank "circle for a wreath"
- brown spray paint
- silicone in a tube
- coating varnish
- stationery knife
- satin ribbon brown or yellow
A step-by-step master class on creating the best crafts from cones, nuts, chestnuts and other natural materials for a school or senior kindergarten group

On a note! To make the finished product look more impressive, some elements for decoration can be bleached. For example, soak the cones in chlorine or a solution of "Mole" with water (1: 1).
- Lay the styrofoam blank for the wreath horizontally on the work surface. Lubricate the part with silicone and immediately paste over the fragment with natural materials.

- Alternating large details with small ones, completely cover the entire front surface of the wreath. First, attach walnuts, chestnuts and cones to the missed fragment. Then close the clearings with acorns, hazel and other elements.

- When the front side is completely covered, proceed to pasting the inner and outer ends. So that when viewed from the side, an empty workpiece is not visible.

- If gaps still remain, fill them with brown silicone to smooth out the contrast between the color of the workpiece and the color of natural materials.

- At the penultimate stage, paint the finished craft with a brown spray. And then varnish. Leave the wreath on a horizontal surface for several hours to allow the coating to dry well.

- It remains to hang the decoration on a yellow or brown satin ribbon with a bow - and on this handicrafts from cones, nuts, seeds and chestnuts to school (older group of kindergarten) is ready!

Do-it-yourself educational crafts from chestnuts on the theme "Autumn": photo

The creative process can be not only exciting, but also rewarding. Especially if, as a result, an excellent preparation with the Russian or English alphabet appears at home for further educational games. How is this possible? Find out in our latest master class with a photo on how to create developing crafts from chestnuts on the theme "Autumn" with your own hands.
The necessary material for creating do-it-yourself developing crafts on the autumn theme from chestnuts
- chestnuts
- white corrector, acrylic paint or marker
- colorless varnish

Step-by-step instructions for creating a developing do-it-yourself craft from chestnuts on the theme "Autumn"

On a note! To teach your child the basics of counting and mathematics, draw numbers and signs on the chestnuts. And then - make up examples and equations.

On a note! With such a do-it-yourself chestnut craft on the theme "Autumn", you can come up with a variety of educational games for children. For example, add the names of popular characters from letters, pull out one letter at a time and name the plant or animal whose name it begins. Or write your own initials.
Or you can distribute an even number of chestnuts to the participants in the game and offer to add words from the letters that come across to each.

Do not spare time for creativity with children. Create fun crafts from chestnuts, cones, leaves, acorns and plasticine on an autumn theme. Let our step-by-step video tutorials bring some fun time together to your home, and a couple of new seasonal products for the school or kindergarten competition.
We offer you original and simple ideas that are suitable for both kindergarten and as crafts for school or to prepare for. People, animals, insects and much more that you can make from chestnuts with your own hands .
Chestnuts are a smooth little wonder, a source of joy and inspiration for creating educational crafts. Great idea: take a walk together in the autumn park, look for chestnuts among the fallen leaves, fill your pockets full of them, and fantasize about ideas for joint creativity on the way home. We will help with this. You won't be bored in rainy weather: get inspired and start creating!
To make crafts from chestnuts, you will need:
- chestnuts
- chestnut peel
- matches or toothpicks
- plasticine
- glue gun
- permanent marker
- cardboard
- wire
- threads
Figures from chestnuts: how to make a little man
Children love to recreate images of themselves, their relatives, their friends, heroes of books and cartoons. The resulting funny little men from chestnuts can be endowed with characters, give them names and even come up with role-playing games with them. You can add an entourage: settle the characters in a town of moss and branches, or dress them in clothes made of leaves and chestnut peel. And if during the walk you come across acorns, take them with you. We offer to make figures from chestnuts and acorns.
Little men from chestnuts and moss (photo)

Little men made of chestnuts and felt beads (photo)

Little men from chestnuts and acorns (photo)

Figurines from chestnuts: how to make little men from chestnuts and acorns (photo)

Little man, sheep, donkey made of chestnuts and acorns (photo)

Chestnut men dressed in leaves (photo)

How to make figures of men from chestnuts (photo)

How to make pupae from chestnuts (photo)

Figurines of little men from chestnut trees (photo)

Little men from chestnuts and plasticine (photo)

Figures of men and animals from chestnuts and acorns (photo)

How to make Smeshariki from chestnuts (photo)
DIY chestnut animals
Just a few chestnuts - and bizarre monkeys, deer, giraffes, lions come to life in the hands of a child ... These ideas are especially suitable for crafts in kindergarten, when kids study animals. You can tell where and in what conditions each animal lives, recreate their habitat from autumn leaves and other natural materials. Build animals using chestnuts, acorns, plasticine and open your own zoo.

Elephant from chestnuts, lion from chestnuts, horse from chestnuts (photo)

Monkeys from chestnuts, a lion from chestnuts (photo)

How to make a sheep and a bull from chestnuts (photo)

Animals from chestnuts: mice from chestnuts in a mouse house (photo)

Animals from chestnuts: giraffe and hedgehog from chestnuts (photo)

Animals from chestnuts: deer from chestnuts (photo)

Animals from chestnuts: do-it-yourself chestnut deer (photo)

Animals from chestnuts: a unicorn and a giraffe from chestnuts (photo)

Animals from chestnuts: lambs from chestnuts (photo)
Chestnut Insects: Crafts for Kids
With the help of chestnuts and plasticine, it is easy to make funny caterpillars, spiders and snails. Come up with different emotions for them, the colors of the bodies and horns, the number of paws: create and fantasize!

How to make a snail from chestnuts and plasticine with your own hands (photo)

Snails from chestnuts and plasticine (photo)

Spiders and an ant from chestnuts and wire (photo)

Caterpillar, snake, chestnut spider (photo)
Games with chestnuts for children
Smooth, pleasant to the touch chestnuts are an ideal material for creating. With their help, you can develop motor skills and sensory sensations in children. Even just sorting through chestnuts, looking at and sorting them by size is an exciting activity for kids.
And what a delight to draw the first masterpieces on them with markers! Older children can complicate the task: write numbers, letters on chestnuts and have fun learning to count and read. If you draw paired drawings, the game with chestnuts can be turned into an exciting process of finding identical images, and train memory and attention. We are offering to you .

By placing a chestnut in half of the peel, and decorating with a "sail" of a toothpick and colored paper, you can make a boat out of chestnuts (photo)

Games for children with chestnuts: draw different figures on a piece of paper and invite the child to repeat the drawing, laying it out with chestnuts

Games with chestnuts: write letters or numbers on the chestnut with a marker, the child will be able to lay out a word or the numbers you set from them.
Lay out letters and numbers from chestnuts with your child to learn the alphabet and number series.
simple chestnut decorations
Chestnuts are an excellent material for creating chestnut interior decorations for the home,. Decorations are simple and beautiful. You can decorate a candlestick beautifully, make crafts from chestnuts for the interior. You will need threads, a glue gun, and, in fact, chestnuts.

Topiary and chestnut candlestick (photo)

How to make a candlestick from chestnuts (photo)

How to make a wreath and beads from chestnuts (photo)

Beads from chestnuts and wire (photo)

Crafts from chestnuts in the interior (photo)

How to make mushrooms from chestnuts and acorns (photo)

Do-it-yourself mushrooms from chestnuts and acorns (photo)

Crafts from chestnuts in the interior with their own hands (photo)

Chestnut decorations for the interior (photo)

Heart for chestnut and wire decor (photo)
If you have ideas for crafts and decorations from chestnuts that you can make yourself, share them on our forum or write to us at editorial@website
Crafts from chestnuts in the interior
Chestnuts are a small smooth miracle! Chestnut crafts are a great way to feel like a kid again.
Crafts are best made from fruits that have recently fallen from trees. Such chestnuts are quite soft and easily pierced with an awl. It is much more difficult to make crafts from dry chestnuts. Although the shelf life of chestnuts is practically unlimited, it is important to know that they should not be stored in a damp place (they can become moldy) and in a very dry place (they can become hard as a stone). The dried fruit can be dipped in cold water for several hours, then they will become softer and easier to process.
Chestnuts are quite heavy material, so to keep them strong, they should be fastened to each other horizontally. In this case, you can use wire, sticks, matches for fastening. Why you need to first make a hole with an awl or needle. It must be done very carefully so that the fruit does not crack. Also, to give strength to crafts, chestnuts can be glued to a circle / strip of thick cardboard or other appropriate material.
chestnut tree
Recently, it has been very fashionable to make European trees from various materials, including chestnuts. Here it is desirable to select fruits of not large sizes. You can see how to make a chestnut tree.


Interior crafts from chestnuts
The options here are only limited by your imagination! From chestnuts, you can create large compositions, make, for example, a chestnut dragon or a whole house. You can paste over a vase or a candlestick with them, make a stylish wall panel.


Crafts from chestnuts with children
From chestnuts (as well as from acorns) you can make various animals, insects and little men together with your child. When creating crafts from chestnuts, you can use not only the fruit itself, but also the prickly peel. Below are just some of the options for chestnut crafts.
Chestnut fruits are beautiful and pleasant to the touch, and therefore it is a pleasure to work with them! And the crafts themselves will be a wonderful gift for relatives and friends. We offer several workshops on making beautiful crafts from chestnuts. To make our crafts, we need chestnut fruits of different sizes, plasticine and toothpicks.
Hare from chestnut
Take 2 chestnuts of different sizes. A smaller chestnut will be our bunny's head. We will make eyes, nose, mouth and ears from plasticine. Since plasticine does not adhere well to chestnut fruits, we will put the ears on toothpicks. If the chestnut has not yet dried up, you can make holes in it with the sharp end of a toothpick. In a dried chestnut, holes can be made with an awl. Since the toothpicks are too long, break them off, leaving less than half. Cover the toothpicks with plasticine, give them the shape of ears.

So, the bunny's head is ready, let's start making the body from the second chestnut. We make paws and a tail from plasticine. We connected the bunny's head to the body with plasticine, but for greater strength, you can also use a toothpick.

Add a plasticine carrot to the bunny - a cute chestnut craft is ready.

chestnut bird
Let's pick a chestnut for the bird's head, make her eyes and beak out of plasticine (we got it a little multi-colored, but we decided not to redo it - it's even more fun). We will attach the head of the bird to the body with a toothpick, for which we will make holes in the corresponding places of our chestnuts.

We connect both chestnuts and proceed to the manufacture of wings.


If the head of the craft is attached with a toothpick, then chestnut animals can turn their heads. My daughter enjoys playing with them, creating additional accessories for them from plasticine or natural material.
Here are some more of our chestnut crafts:

Losharik. To make it, we needed, in addition to chestnuts, toothpicks and plasticine, twigs (horns) and beads with wide holes so that they could be put on a toothpick. Toothpicks-legs and bottom beads had to be put on glue (super-moment) so that they would not fall out.

My daughter named this craft the elephant clown. She made this elephant with almost no outside help, it may not have turned out quite like an elephant, but the craft looks very charming.

The chestnut man. As a hat, my daughter put on a hat from an artificial mushroom :)


