What can you do needlework in kindergarten. Do-it-yourself group and reception room decoration in kindergarten. Do-it-yourself crafts for schoolchildren with trimming technique
share with their findings. All or almost all of us have to do crafts with children for kindergarten or school… You will also find fantasies here for home creativity with kids.
Let's start with trees...


And now pumpkins...


You don't have to do everything according to a specific master class... And strictly adhere to the proposed topic. Can just take a diy idea and remake it in your own way.
Candle fantasies...


Autumn Queen Accessories…


Papier-mâché… And not only…


Well I did not put the owls first again. And so they are always the first and most important with us ...


There are, in addition to owls, and other living creatures…


And again - handy material. Not only the one that was found in the forest ... But also "home" ... For example, pistachio shells...


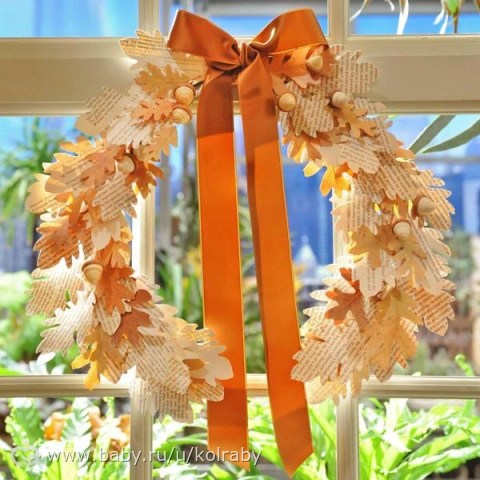
AND door (wall) wreaths… are good not only in the New Year and Christmas… In autumn they especially cozy and bright get...


And again pumpkins... Some have plenty of them in their dachas! I am not a country lover (no-no): my mother just gives me buckets of vegetables. But my godmother gave me a pumpkin last year. Ahhh... Maybe I'm Cinderella?


If you don't understand how cover with leaves or dough bowl from below, to get such beauty, look at the master classes ...


Lots of people make baskets these days. A very popular piece. On this topic "Gifts of Autumn"... Well, the baskets are really very colorful and juicy ...


And again leaves ... And again owls ... And a lot of art ...


In our kindergarten, Alice in the group is very talented, kind and hardworking teachers- Olga Grigorievna and Anna Sergeevna. They love children. And love with them make all sorts of things in the educational process ... Or draw ...


We have crafts for children in kindergarten educators left on a large panel- attached to paper clips that hang on fishing lines ... Now I will find a post in the magazine when we made such a panel (with owls, of course) for crafts ...


Some parents ignore creativity... They say that paints are a lot of dirt and stains - you can only get by with pencils or felt-tip pens ... Yes, and only kala-mala comes out ... And plasticine, they say, the child does not understand - rejects ... Start Small- just give the child the materials. In a couple of sessions ... Then again ... And then start gradually advise and help... To encourage creativity, to creation ... I also don’t really like dolls and LEGO, smeared with plasticine ... But accuracy, diligence and imagination... they won’t be taken from a child from anywhere if you don’t work. Daily.


Of course, there is never enough time. Of course, a lot of work and household chores. But child gets excited that his autumn work is also at an exhibition in a kindergarten or at school. This - pride yourself and your family...


Maybe this year... Maybe next... It is your work that will recognized at the exhibition as the best. Prize money even. It will be a beautiful day. In the meantime, let autumn candles warm family evenings, and photo frames decorated with leaves or acorns flaunt on the shelves ...
By the way, we once with a friend of papier-mâché just giant mushrooms made... All the children made with a palm height ... And we have ... Giants. Mutants ...)))


Who hasn't read my 100 ideas for autumn be sure to read. And apply - partially ...
We a lot of things with Alice and Shura have already been applied and done I'll tell you in other posts...
And I'll show you not today or tomorrow ... roller autumn… And pictures. By last autumn. We have such a beautiful there was a family shoot. It's just complicated for a video combination of video and photo… So I wait until Shura finish installation. As long as he has a lot of work to do.
P.S. Yes, I show you very few personal and family pictures. You will get tired of me otherwise ...


In the classroom in kindergarten, teachers, together with children, make various crafts. Often, parents are asked to do some things at home for the group or site. The presented ideas with photos will help to show imagination, please the child with a beautiful composition, picture or toy.
In kindergarten, teachers, together with children, often make various crafts from paper, cardboard, plasticine, clay, and waste material. These actions help to develop imagination, creativity, fine motor skills of hands. Often, parents are also involved in an interesting process, offering to make some toys or compositions in a group or at home. For those who do not know how to surprise or please a child, the ideas below will help what you can do at different times of the year with your own hands for an exhibition, a territory for walking.

seasonal crafts
When thinking about what crafts can be done for a child of three to six years old in kindergarten, you should take into account not only your capabilities, but also the seasons. Typically, caregivers give parents a rough sketch or theme based on seasonality. So, in autumn it is easy to make an application from bright leaves, dry branches, acorns, pine or spruce cones. In winter, you can make a feeder on the site, bring a picture or a poster with New Year's greetings. In the spring, many make birdhouses, but in the summer they use small stones, moss, mushrooms, fruits, vegetables, in their work.
Here are some options for autumn work in kindergarten:
- a house made of branches, leaves, stones or pumpkins;
- animal from vegetables or fruits (caterpillar, hedgehog, piglet);
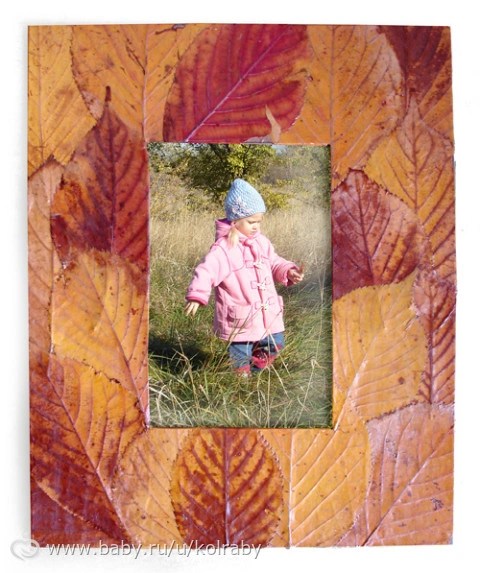
- a picture of dried leaves and flowers in a frame;
- a lawn of moss with mushrooms and trees from branches;
- bouquets of "roses" from red-orange maple leaves;
- figures from cones, acorns, fastened with toothpicks, plasticine.


Ideas for winter exhibitions in a group:
- three-dimensional winter picture on a substrate with clouds, trees, snow from cotton wool;
- penguins from plastic bottles and colored paper, glue;
- paper paintings, large voluminous snowflakes to decorate walls, windows for the New Year;
- cardboard or plastic;
- Christmas trees and snowmen made in various techniques.


Examples of spring crafts:
- birdhouse made of plywood or wooden boards;
- artificial flowers made of cardboard, felt, corrugated paper, sweets;
- spring picture from plasticine on glass;
- Easter tree from branches, ribbons, paper flowers;
- toys from disposable paper plates, cups.


Ideas for things to do in the summer:
- toys from bright caps from plastic bottles;
- beads from pasta, berries, flowers;
- a picture of pumpkin seeds, sunflower seeds, beans or lentils;
- application from colored paper, cardboard;
- a doll made of woolen threads or fabric;
- wreath, paper bouquet.


Ideas for site design
In the summer and in the summer, together with your parents, you can make not only wooden ships, trucks or stairs, but also cheerful flower beds, decorations for trees, large flowers and bright fences on the site in kindergarten. You just need to purchase materials, paint, bring your tools and blanks to the subbotnik. Some crafts for a sandbox or flower garden are easy to do at home, calling on children and other family members to help.
Here are some simple but interesting ideas for crafts for the kindergarten site:
- ladybugs made of painted stones;
- figures in the form of insects, butterflies, lanterns;
- toy wooden transport in the form of a car, plane, ship;
- garden house;


When thinking about what crafts to do, it is advisable to consult with educators, to find out the opinions of other parents. Together, parents can make various benches, tables and chairs from polished stumps, a steam locomotive with wagons from rails or boxes for the kindergarten site. It is easy to make windmills at home, flowers from five-liter plastic bottles. All these decorations will help to decorate the territory.
Examples of crafts in a group
Often in kindergarten, teachers ask parents to make some costumes, accessories for the holidays, decorations for the hall or foyer. And if boards, plywood, nails are required for the manufacture of items on the site, here you only need to purchase materials such as fabric, glue, paper. For example, for the New Year or March 8, it is easy to make a paper garland, snowflakes, cardboard flowers or fans.
Here are some interesting group decor options:
- photo frames made of fabric, branches, ribbons or shells;
- bouquets of branches glued with ribbons, cloth or pieces of paper;
- screens made of fabric, plywood or slats for puppet theater;
- themed toys made of felt, wood, fabric, thread;
- huge paper flowers on the wall in the hall;
- details for the concert;
- garlands of autumn leaves, lanterns or artificial flowers.


Some parents make beautiful pictures from dried flowers, leaves, make appliqués, make pictures from salt dough, ribbons. If there are dads in the group who know how to work with plaster, wood, you can ask them to decorate panels, frames, cut out a couple of original shelves with a jigsaw. Usually they respond to the requests of educators, many for the sake of the children agree to do some kind of work on arranging the group. In order to interest children and parents, competitions, exhibitions should be held in kindergartens, certificates and thank-you sheets should be issued upon completion.
Hi all! I am here, you are here. And I know who you are. Are you a parent of preschool children? And you came to this page to find a suitable craft for kindergarten. Apparently, you have been given the task of bringing to kindergarten, crafts made at home with the children. If crafts need to be carried on a given topic, for example, "Autumn", then I can immediately redirect you to I know What exactly you are looking for. Do you need a craft that will not require a lot of time and a lot of material (including money), which will not be ashamed to show. That is, your simple craft in the kindergarten should look like serious work and not the go-ahead "want - here." You have a goal: to show yourself as a creative parent and have time to do everything in 1 evening. If so, then you have come to the right site. In this article, I divided all the crafts for the kindergarten into topics according to the material from which they are made:
- Bulk crafts (from peas, beans, buckwheat, rice, seeds, etc.)
- Crafts from BOXES (installations, farms, river, forest, jungle)
- Crafts from disposable PLATES (birds in the nest, fox, shark, stork)
- Crafts from ROLLS from toilet paper (lion, clown, chicken, owl, dog)
- Crafts from corrugated board (giraffe, frog, tiger, monkey, peacock)
- Crafts from cassettes from eggs (chicken, crocodile, rooster, ship, flowerbed)
- Crafts FLOWERS (from rolls, from paper sockets, from cardboard, from paper)
The most important – there will be only SIMPLE CRAFTS with clear instructions, that is, I will tell you how to, and how not to do them. Where can you make a mistake, and how to avoid it - so that as a result you get the perfect craft the first time.
Idea Pack #1
Bulk crafts for kindergarten.
You have cereal in your house. We open the box, we look: brown (buckwheat), white (rice). Gray (oatmeal), light yellow (semolina), yellow (millet), red (lentils), green (peas). Ground coffee, tea leaves, corn flakes crumbled into fine dust are also excellent. Anything that crumbles is GOOD FOR THE WORK. What is not enough for a flight of fancy can be purchased in the store. And here are ideas for bulk quick crafts for kindergarten.
Craft GOOSE (bulk application for kindergarten).

We'll need PVA glue, a sheet of paper, cotton wool, corn flakes, pumpkin seeds. Draw the outline of a goose on a sheet of paper. In order not to spoil the background, first draw a goose on a draft. And cut out the silhouette that you like with scissors (as a template) and circle it on the background blue sheet.
Advice - the basis for bulk applications should be dense. A sheet from a sketchbook, a piece of drawing paper, or a sheet of colored paper pasted onto hard cardboard (cut out from a pizza box). A blue background can be obtained by painting the sheet with gouache (we dilute the blue gouache with water), dip a dish sponge into this liquid and draw it back and forth along the sheet - this way you will quickly and evenly tint the sheet in blue.
How to do . We fill with glue the desired part of the craft (for example, paws) and while the PVA glue is liquid, pour a bunch of small crumbs from corn flakes on it. Let's lie down (do not touch with your fingers, do not move, so that the glue grabs). And then we pour the excess on the table. We repeat this with other materials.
DOVE Craft - how to make it with your own hands from cereals is already clear. Exactly the same process as with the application GUS. You can use white rice, salt, flour (then sprinkle the flour with hairspray so that the craft does not get your hands dirty).

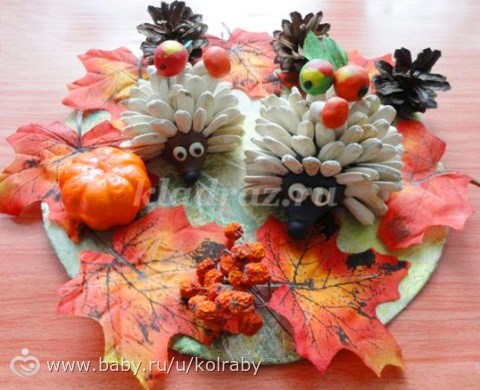
You can use dry natural material for crafts, shreds of hay, seed wings (as on the Hedgehog craft from the photo below). Such seed wings until winter (and winter too) hang on ash trees, right in large bunches. I plucked 5 such bunches and here's a whole bunch of hedgehog needles. You can also take a fir cone and tear out all the scales from it with tongs - they can also become a prickly fur coat for a hedgehog.

How to work with large seeds. We stick on Scotch tape.
If it seems to you that large, heavy seeds will not stick to PVA glue, you can use double-sided tape. Now I will tell you the whole process using the example of the STORK CRAFTS.

- We draw a stork on a draft sheet in full size.
- This draft drawing, from the reverse (undrawn) side stick with strips of double-sided tape(we try without lye).
- Further, without removing the protective film from the adhesive tape cut out the entire outline of the stork.
- We glue the paper side of the scotched stork with glue and glue the crafts on the main background (sky-colored cardboard).
- When the glue dries, we remove tape and we get a beautiful sticky surface of the whole stork, pasted on cardboard. And now we put the seeds on this stickiness where white is needed, where black is needed.
- Beak and legs sprinkle with semolina and then color it with a red marker or gouache.
- Nest at crafts, we form from blades of grass, branches, the contents of a pencil sharpener, tea brewing - in short, what is found in the house.
Medium-sized beans are perfectly placed on double-sided glue. Remember that the base for the craft must be solid, if your leaf bends, then the beans at the place of the bend may begin to bounce. Below we see the beautiful and simple work of DOG, OWL and COCK.
It is best to glue the beans on a hot glue gun.

Such an owl and dog does not have to be made from beans - white can be obtained from rice groats, yellow from millet or corn flakes, light brown from buckwheat, dark brown from coffee granules. After making the craft, you can protect it by SPLITTING IT WITH HAIR SPRAY.

The rooster will turn out bright if used in his craft red lentils, colored cornflakes, salt poured on the slurry of PVA and gouache of the desired color. Colored salt powder it turns out like this: dilute in a tablespoon of PVA 1-5 with a drop of colored gouache of the desired color - we get colored glue. We spread it on the site of the craft (on the feather of a rooster) and while the liquid glue is poured on it with salt (or sugar), the salt absorbs the paint and dries tightly with a colored salt crust.

Idea Pack #2
Crafts from cones
For kindergarten.
You can make a lot of crafts from cones on our website in the section of crafts from natural material, you will find many ideas from cones, in this article I want to show you unusual (not standard hedgehogs, squirrels and bears) but more gentle creatures of nature - WINGED BIRDS.
Craft for the garden - GOLDEN BIRDS.
We attach the head of a bird to a pine cone. The head can be a styrofoam ball, a plastic ball from a chocolate egg, or if none of this is available, a lump of newspaper covered with plasticine. If the newspaper is rolled into a round lump, wrapped with threads (for roundness and strength) and then coated with plasticine, then we will get a light ball - that is, the main thing in the ball is that it will not be heavy and will not pull the bird down. It’s even better not to crumple the newspaper, but a piece of polyethylene (food film), it is probably lighter in weight.
We coat the plasticine round head with PVA glue and put pieces of a torn paper napkin on the glue, again we coat it again. The head will become smooth white paper and it can be painted with gouache in any color.
We cut out the wings from cardboard or flat plastic. We paint the whole bird with gouache, it can be white, then dry it and draw feathers with different shades of gouache.

The hardest part is the wire legs. In theory, you need to drill a cone through and through it, insert a wire into it and shape the ends of the wire, bend them like spread fingers. But it can be tricky. So my advice is MAKE IT SIMPLE - no legs, find a strong branch and put a bird on it (on plasticine, tied by thread, or on a glue moment). Decorate the branch with paper leaves or paper flowers (or popcorn flowers). Yes, popcorn looks great next to paper green leaves - it seems like a flowering twig. And if you also paint the popcorn with white gouache, or pink (then the sakura will generally bloom in your hands).
Here are some more variations on the theme of cone birds. Hummingbird bird - the head is made of plasticine, a long toothpick (beak) is stuck into it. We coat the area of \u200b\u200bthe head and beak with PVA glue and put thin pieces of a paper napkin on the wet glue, covering it with PVA glue from above and smoothing it with a finger, crushing the wrinkles of the napkin. You can apply 2-3 layers of napkins (as you wish). Dry and paint with gouache.

Craft SWANS for kindergarten is done simply. We cut out a circle from the box, coat it with PVA glue and sprinkle with cereals (rice, semolina, millet - any). We wait for the glue to dry and paint over it with gouache (not very wet, so as not to soak the glue).

Cooking swan. You are thinking of molding the neck from plasticine (but then it will be heavy and will outweigh down). So that the neck is not heavy, you can do this. We twist a piece of paper (or cellophane) into a tube or flagellum. We bend this tube in the manner of a swan neck and wrap it with threads to fix this bend. Coated with plasticine. We fasten the neck to the bump. A good way to fasten this is to stick a hairpin or carnation into the cone and put the neck on this rod.
Now we decorate the neck- we apply PVA glue to the plasticine and put pieces of a torn paper napkin on the glue. We smooth the napkin with a wet brush with glue, put a layer of the napkin again until there is a flat surface of the swan neck. We paint both the bump and the neck white.
And if you have light airy plasticine, then you can mold the whole neck out of it and then there is less fuss with paper, threads, plasticine.
Craft EAGLE from scales from cones.
We take a cone, ordinary mites and peel the cone with mites - that is, we pull out the scales from it. We collect a bowl of scales - this will be the lining of our eagle.

Now we need to make an EAGLE FIGURINE, which we will glue with scales. It can be made entirely of plasticine (if you have a lot of plasticine) or first crumple an oval from a newspaper, wrap it with threads and then coat it with plasticine. That is, less plasticine is needed.
The figurine must be fixed on some BASE. It can be a stone, a piece of wood, a snag, or if you are very far from nature, you can make an artificial snag. We take a bottle of yogurt, pour sand inside (so that it is heavy) and coat it with plasticine, on top with PVA glue and pieces of newspaper or toilet paper, the shape of the driftwood will depend on the thickness of the layers of paper. We dry it, paint it with gouache - there is a heavy snag - now we put a plasticine figurine of an eagle on it.
Now we will cover the eagle with scale feathers. We start from the tail and up to the neck - as we lay the tiles. It's best to use hot hot glue from a gun. You can use epoxy resin, you can use something else .. We cover the head starting from the beak and down to the neck. AS AN OPTION, you can cover your head with white paper scales, or seed shells, or white rice. Try to your taste.
In the same technique, you can do this one bird CRANE. If you paint it pink and change the curve of the neck, then the crane will become a flamingo.

IN THE SAME TECHNIQUE, pasting a three-dimensional figure is also done craft OWL. It is probably already more complicated - or maybe you can do it quickly. Take on a job that you believe will succeed.

If the craft in kindergarten is not in a hurry, then you can divide the work into 2-3 days. So you won't get tired and you can make even very complex crafts with your own hands. When I made Santa Claus, I also divided the work into 3 days. One evening I crumpled up a newspaper and smeared it with plasticine. On the second day, I made a relief of the face and a relief of Santa Claus's fur coat from a paper napkin soaked in PVA glue. On the third day, I painted everything with gouache. And it turns out that not one of the days I had time to get tired or freak out.
Idea Pack #3
Crafts from paper sockets.
The housekeeping section of the store sells paper rosettes for cupcakes. If you are a cooking mom, then you have such things at home. Here's a quick and easy way to turn cupcake liners into a chic kindergarten craft.

By the way, the molds are perfectly painted with gouache or watercolor in any color. And at the same time they do not get wet, do not lose their corrugated shape. Therefore, you yourself can create the colors of the molds you need, according to the plan of your crafts in kindergarten.
Here is an OWL craft on a branch. The basis of the body is a cardboard roll. We take a piece of cardboard (half of an A4 sheet) and fold it into a wide tube (we fasten it with brackets from a stapler, or on adhesive tape). We bend the upper socket of the pipe from the front edge and from the rear edge. That is, we press our fingers on the edges of the cardboard tube and this edge is bent in front of the tube. We do the same at the back. And then along the edge of the cardboard tube - to the left and to the right, the corners of the bend stick out - OWL EARS.
Now we cut the paper rosette for the cake into three parts (namely, the relief layer) and stick it on the belly of the future owl - like a three-layer skirt. Cut out round eyes from above, draw pupils with a marker (or cut out pupils from black paper). Cut out the wings and glue them on the back.

You can make a corrugated fold from an ordinary PAPER FAN. And also use it in crafts with owls. Or you can make a FISH craft from a paper fan. Hang them on strings on a branch. Paint the branch white with white sea corals or red with alpha corals.
The fan fold is easy to make. Sheet A4 is sweetened with an accordion - vertically (so that it is long and thin). Then we fold this thin fan in half (bend in the middle) and as a result we get the shape of a fish. From the place of the inflection we slip the fins and the tail-fan from a tiny piece of paper.


Idea Pack #4
Crafts for kindergarten
FROM CORPORATED CARDBOARD.
In the stationery departments of the store they sell colored corrugated cardboard for children's crafts. You didn’t buy it before, because you didn’t really understand what to make of it. And now you have great ideas for creating quick and easy crafts. All you need is to cut a sheet of such ribbed cardboard into strips. And then wrap these strips in rolls, alternating colors if necessary.

So you get a lot of voluminous plump crafts. Beautiful and bright. Which are not ashamed to bring to kindergarten.

You can make various planar crafts using a technique similar to quilling from this thick rough material - and the crafts will turn out to be large and weighty. Here is an example of a PEACOCK Craft in the photo below.

And you can also take the usual PACKAGING GRAY CORRUGATED CARDBOARD - for example, a TV box. And make beautiful large crafts out of it. Then paint them with gouache and you get an interesting team of animals or dinosaurs. You can make a whole small farm. With a fence and lawns.

Plant trees around, arrange bushes and break flower beds. We make bases-stands for the silhouettes of trees and bushes from toilet paper rolls. Cutting it with scissors to the height we need.

And let's immediately see what can be made from rolls - toilet paper bushings.
Idea Pack #5
Crafts for kindergarten
FROM ROLLS.
Here is a UNICORN craft from a roll. It is done simply. In the upper part of the roll, we cut a SLOT with scissors - we insert the silhouette of the unicorn's neck into it. From the back on the ass, there is also an incision for affairs and we insert the silhouette of the tail there. We cut out the legs from another roll - like two arcs. And these arcs are glued down under the tummy of a magic horse.
The tree is made simply - the roll is cut into a triangle along the facade. It has a slot on the sides - we insert the silhouette of a tree crown from green cardboard into this slot. Everything is simple. We paint the roll in brown gouache.
At the bottom of the pizza box, we create grass, a stream, on the folded pizza lid we draw a landscape - mountains, hills, sky, sun. In this decoration we put a unicorn, a tree and other things that you come up with yourself. Imagine - there is a lot of space.

Here is a simple and quick OWL craft from a roll and cardboard. As we clearly see in the photo below, there is a gap on both sides of the roll. We thread the silhouette of an owl (head + wings) into this gap. Then we decorate everything with eyes, feathers and paws. The design of your decor can be anything - it is not necessary to copy this craft. Make it tougher. Cut beautiful paper feathers.

Here is the clown in the hat. On both sides of it are pompoms made of yellow and red threads. I already told you how to quickly make a pom-pom from a fork and thread.

If the roll is laid horizontally, then other crafts for kindergarten can be made. Hen in the nest. The principle is the same - cut into rolls, insert the silhouettes of the neck, tail. Put the wings on the side of the glue.

Here, a toilet paper roll serves as a body. lion. From another cardboard, we roll a smaller roll - this will be the volume of the head. Now we do this. We glue a flat silhouette of a lion's mane on the stomach and glue a roll-head on the mane. We attach the ears from above (a paper oval, folded in half, one half of the oval was smeared with glue and attached to the head, the second half of the oval sticks up - like an ear).
We glue the tail at the bottom at the bottom of the roll from the inside. Glue the paws under the lion's tummy. I'm quick and a simple do-it-yourself craft for kindergarten.

Here's a piece that I really like DOG IN THE BOOTH. You will be the coolest in kindergarten if you bring such a charm to the exhibition.

How to make a dog Cut out the silhouette of the asshole from cardboard (just half an oval, with an oval slot between the legs). Cut out the same silhouette for the front. And cut out round heads. And we cut out two ears, eyes, the nose of the muzzle from paper.
We glue the back and front on the roll on both sides. TO HOLD, WE DO THIS- put a crumpled newspaper into the roll - so that it is flush with the hole. That is, in a roll inside the newspaper, it sticks out on both sides of the roll and it is convenient to smear it with glue and press the silhouettes of the ass and front of the dog.
Next, on the silhouette of the head, we glue the ears, the eyes, the nose - and we apply the finished head on the front breast. It is possible, if desired, to make a gasket from a thick piece of cardboard between the breast and head - so our head will be slightly raised above the neck - torn off from the breast, to create a 3D effect.
HOUSE FOR DOG we make from a carton of milk or juice. We cut a hole (in the form of an arch. We sharpen the upper part of the box - in the form of a triangle in front and behind (that is, we create a triangular facade on which it will be possible to lay a roof). And cut out a cardboard rectangle with a width as the side of the box and with a length as the sum of two slopes roof (plus a margin for the eaves) and glue the roof onto the box-booth, covering the box with gouache.
The secret - if the box is glossy, then the gouache will roll off it and slide. Therefore, in front of the pokara, the box can be pasted over with a paper napkin on PVA glue. And on such a basis, gouache will lie better. After drying, gouache is always sprinkled with HAIR SPRAY to fix the color and it does not stain your hands.
There is another secret. If you want to paint something slippery with gouache, then you need to drop liquid soap into the paint. So gouache will lie down better and not gather into droplets on glossy cardboard.
Idea Pack #6
Crafts for kindergarten
CASSETTES for eggs.
If you buy eggs in cartons from the store, then you are in luck. You have an excellent base at home for creating a good large craft. This is no longer some kind of small thing - this is a real big bright thing, made by hand. It will look great on an exhibition in kindergarten. Here are some ideas for such a bright craft for kindergarten.
Rooster and hen - cardboard, colored paper, glue and gouache. Everything is simple and quick to do with your own hands. There is no need to even explain anything. Everything is so clear. Easy job.


By the way, for a similar craft hen with chickens you can use an ordinary white rubber glove, inflate and tie it tight with a thread. And it’s even better not to inflate, but to fill it with starch or flour, or semolina - and tie it up. So there will be no need to fear that air will come out of the glove.
Chickens are made simply with their own hands. We crumple 2 balls from the newspaper - a larger one (body) and a smaller one (head). We coat the lumps with PVA glue and glue them with a white paper napkin (or toilet paper), again we coat them again with pieces of a napkin. Again, we coat it with smooth fingers - let them lie down to dry with glue. We paint on top with yellow gouache. Spray with hairspray to set the gouache color. Well, then we collect the chicken.

Craft CROCODILE make the boys happy. To paint the crocodile evenly, use gouache diluted with water, moisten a foam sponge for washing dishes in this green liquid and blot the egg cassette from all sides, thanks to the sponge you will well soak all the cracks, bumps and roughness with paint.

An egg carton can be turned into a piece of the UNDERWATER WORLD. And if you have sand shells it will be great. To prevent the craft from pouring sand in your bag, put the sand on the glue. That is, we pour PVA glue on the bottom of the box and immediately sprinkle it with sand, leave it to dry, turn the box over, pouring out excess sand.

From a cassette and colored paper, you can make ships with sails, masts and flags.

Idea Pack #7
Crafts for kindergarten
From PLATES.
An ordinary plastic plate can become the basis for the application. The plate can be painted with gouache, so that gouache fits well on slippery plastic, add liquid soap to it. Or glue the plate with pieces of a paper napkin with PVA glue - a layer of glue a layer of a napkin, a layer of glue a layer of a napkin, and a layer of glue on top (then gouache will go well on a napkin).

On the basis of a disposable plate, you can make a variety of compositions and panels. For example, on the spring theme Birds in the nest.

Or on a marine theme, fish in the porthole. To create a porthole, you need 2 plates. One whole - the other with a hole instead of the bottom. We glue the plates together with the bottoms up. At the bottom of the lower plate we apply an application made of paper and natural material. If desired, you can make sizing with transparent cellophane on the second holey plate.

You can cut the bottom in the plate, leaving a little bottom on the edge. On this edge, cut holes with a hole punch and make a fun tangle-cobweb with threads and beads. Such a cobweb can be designed as a bright sun. Or like a black web with a spider. How to make spiders I told in the article

On the theme of the sun and the rainbow, you can make such a bright do-it-yourself craft in the garden. Simple and beautiful. You can even not buy colored paper, but paint the strips of white paper in the colors of the rainbow with bright gouache in many layers. Then SPRAY WITH HAIR SPRAY - and the gouache color will shine with a bright and thick shade.

And on the basis of the plate, you can make a craft-installation on any topic. Below is the topic REST ON THE SEA. A craft that will delight both you and the kindergarten teacher with its spa mood.

And if you cut the plate into pieces, you can make much more interesting craft options. Here is a DOVE carrying a branch of peace.

Here is a sly little fox. We paint the plate with gouache (according to the rules described above). Half of the plate is the body. And we cut the other half for the extraction of other parts - the head, tail, legs, ears.

To the plate, you can add elements of cardboard or thick paper for drawing along the edges. Such parts are attached to brackets with a stapler or to needle and thread punctures or to double-sided tape. Hot glue from a gun - no need, it melts the plate.


Idea Pack #8
Crafts for kindergarten
From BOXES.
Everyone at home has boxes. Large (from shoes) or not very large (from juice and milk) or smaller (from tea, biscuits, cream). These unnecessary things can become the basis for beautiful crafts PONY RAINBOW UNICORN.

- Wrap the boxes in white paper. We take a pencil in our hands, draw a nose with nostrils, an eye with eyelashes. We take gouache and paint.
- From colored paper we make ears, a rainbow tail and a horn-cone. We make legs out of toilet paper rolls.
- Assembling a beautiful rainbow pony unicorn. We glue the cone (we cut the edge of the cone onto the fringe, bend the fringe inside the cone - we smear the horse's head with glue and apply the cone to this sticky place. In the back of the box (on the butt) we make a cut with a knife and insert the tail iridescent plumage there.
- How to glue a pony leg. We stuff crumpled newspaper into the rolls of the legs. We spread the newspaper sticking out of the roll with glue and glue all the legs to the pony's tummy.
Craft SPONGEBOB SQUARE PANTS - also made on the basis of the box. The eyes are a styrofoam ball cut in half with a knife. Everything else is paper, cardboard and can be formiam (sheet material foamed like a sponge).

And if take a bigger box and open it, remove the lid - then we will get a small theater stage on which we can place any scenery for a fun game. It can be an ocean with fish, waves and shells.


It can be a base of penguins on ice floes made of thick layers of expanded polystyrene (insulation from a box with mom's boots).

You can take only the bottom of the box or the lid of the box and set up a small farm there, especially if you already have pet figures. This will be a beautiful big craft for kindergarten.

Or you can make a small yard with a DIY animal fence made from paper and cotton. How to make a box and a sheep out of cardboard was shown a little higher - also a good option for our do-it-yourself farm.

If you don't have pets in your toy collection, but wild or tropical herbivores and carnivores are abundant, then you can make a different habitat. Craft jungle or savannah.


And if there are no toy animals at all, then you can make cozy ones without them. patio houses.

Here is just a beautiful voluminous craft with a house, a courtyard, a fence, trees and bushes. The relief texture of corrugated cardboard allows you to create an imitation of a tiled roof, a log house wall and a wooden fence surrounding the yard.

The bush lines are attached to the bottom of the box with glue - the lower part of the bush is folded to the side, smeared with glue and pressed against the bottom of the box. And so, row after row, we glue all the layers of a shrub or flower bed.
A flower bed is a piece of gray cardboard, on which a scattering of flowers made of colored paper was pasted. Each scattering of its color on a separate cardboard box. And it turns out a voluminous flower bed with rows of flowers. The first rows are low, the back rows are high - this is how volume is created at the flower bed and all the flowers are visible, looking out for each other.
Idea Pack #9
Crafts FLOWERS
for kindergarten
A craft in the form of a bouquet of flowers made by hand always looks good. There can be a lot of options here.

VARIANT WITH AIR PLASTILINE. If you have airy light plasticine, then you can do this craft. From hard cardboard we cut hearts of two colors (blue and blue) - sprinkle with hairspray, sprinkle with sparkles on the varnish. From air plasticine we roll a lump round. We stick heart petals into it (with a sharp nose into the pulp of the heart). We stick a cocktail tube at the bottom - it can be wrapped with green paper or coated with green plasticine to match the color of the flower stem.
OPTION WITH FOAM. You can make the middle of the flower out of foam rubber. Then we stick the petals on the round cardboard, attach the shelf from the cocktail there (on glue or on threads with a needle, piercing a stick and cardboard in two places like sewing on a button). And on top of the center of the flower we put a round piece of foam sponge.
How to make flowers - TULIPS IN ACCORDANCE
- It is necessary to fold a sheet of paper with an accordion like a fan.
- Then unfold the accordion, flatten it on the table and put a tulip template on it, circle it with a pencil - cut it out.
- Bend the accordion again along the same lines.
- Make a hole with a hole punch (or scissors) - insert a cocktail tube into it.
- We stick flowers into a container (box) with sand. From above we decorate the sandy surface with beautiful pebbles.

You can stick a bouquet of flowers with your own hands into a vase with salt. Salt can be taken colored sea bath. Or paint it yourself with gouache and rub it with your hands so that the paint is distributed over all salt grains.

themselves TWISTED FLOWERS are made simply. We cut a strip of paper into a wide fringe, wind it on a skewer. Or we make the fringe spin by scraping it with a scissors blade. The leaves are also a strip of paper serrated into long teeth along its edge.

Toilet paper rolls can also turn into crafts - NARCISSUS . On one side, cut the paper roll into sharp cloves. On the other back side, the roll is cut into fringes (strips), which we bend inside the roll so that they are the paws on which glue can be applied and glued to the silhouette of a yellow cardboard flower.

And here are the crafts TULIPS which stand on long wooden skewers. The master class below shows everything. To create one bud, you need to cut out 4 identical tulip silhouettes. Fold each silhouette in half vertically. We glue each half between adjacent halves - as we glued the pages of a diary with a deuce. Insert a skewer inside the glue.

And here is the whole BOUQUET OF FLOWERS,craft from an egg carton on a wire. We need craft wire that bends easily.
The bouquet does not have to be so big - you can make a little bit of flowers using this technique.

All we need is a cardboard egg carton. We cut out deep cells from it. We cut each cell into rays. Each ray is rounded. In the middle we stick the wire in 2 places like a button.
We twist the wire legs with a coil. And it remains to paint the flower with gouache and glue the stamen-middle of paper into it to hide the ceiling jumper. A simple and beautiful craft for kindergarten.


These are the ideas of crafts for kindergarten you found today on the Family Bunch website.
Now you know for sure that you can do a lot of beautiful crafts with your own hands. in one day. And at the same time you will get only pleasure. Because all the steps are CLEAR AND SIMPLE. All you need to do is first take the first step well, then take the second step well, and then finish. Each craft is only three steps. Each step is not difficult in itself. So the whole craft as a whole is simple.
Walk. Go ahead. Create. And I will look for more simple and good solutions for you.
Olga Klishevskaya, specially for the site
If you like our site, you can support the enthusiasm of those who work for you.
Sooner or later, every parent has to hear from the teacher about the need to create crafts at home together with their child, whether he is 2 years old or 7 years old. Fortunately, today on the Internet you can find numerous photos of crafts for kindergarten that will help you come up with and bring to life a variety of ideas, for example: crafts from foil, paper, stones, wire and all kinds of seasonal crafts for February 23 or for Easter.
Many parents are interested, why is this even necessary? Experts unanimously say that this type of work is psychologically important for both the baby and the parent.

But also in the manufacture of various crafts, imagination develops and the motor skills of the fingers increase, which is necessary for the harmonious development of the child.

In this article, we will describe several interesting workshops for kindergarten that you can make with your parents at home with your own hands.


Applications
We all remember our childhood, when our mothers made origami out of paper or glued different elements on paper, recreating a complete picture. It's easy to make just about anything your heart desires!

For example, with the help of fantasy, you can create colorful flowers, cute postcards and even carnival masks from the most ordinary colored or corrugated paper.

You can try to create beautiful works in decoupage, origami or quilling technique, which are so easy to perform, and the result exceeds expectations.

For creation, you and your child will need nothing at all: a brush, glue, several multi-colored sheets of paper and scissors. Be careful that the child uses cutting materials only in your presence, or do all such work yourself.

DIY crafts from waste materials
Perhaps you could not even think what old bottles or egg trays will fit into? What we once considered “junk” material and useless in the household can be turned into almost a masterpiece!

For example, from improvised materials in the form of old unnecessary rags, you can make a charming fabric doll, and from a plastic bottle you can come up with a jewelry box.

"Plastic" caterpillar
You and your baby can easily make a funny caterpillar out of unnecessary plastic bottle caps.


For the manufacture you will need a small list of materials:
- green cardboard;
- PVA glue;
- bottle caps;
- colored paper;
- felt-tip pen;
- scissors.

Manufacturing instructions
To get started, take a "clearing" for the future insect - a sheet of green cardboard. Next, glue our lids on the background with PVA glue with the empty side inward in the form of a curved caterpillar and wait for it to dry completely.

Then cut out colored circles according to the diameter of the lids and randomly glue them onto the plastic tops. At the end of our caterpillar, draw cute antennae, paws and eyes.

Do you throw away toilet paper tubes? But in vain! After using a roll of paper, you can make a cute little man from the “sleeve” with your own hands or make a stand for all kinds of accessories. The surface of the product is decorated with painting, sticky paper, rhinestones or pasting over scraps of fabric.

colored pebbles
We bring to your attention the idea of making a rainbow craft, which is easy to make with your child for kindergarten. During the summer holidays, we advise you to collect pebbles and shells of different sizes with your baby, which will come in handy throughout the year.


To create fun crafts, stock up on several shades of acrylic paint and a brush. For example, you can make a frog out of a large flat stone, decorate it green, and after it dries completely, draw eyes, mouth and ears. By the same principle, you can make a chicken, flowers, etc.

Autumn crafts
In autumn, in the forests, you can find a lot of useful natural material for excellent crafts, such as cones. By combining just a few of these elements of different sizes, you can create a funny bear or hedgehog with your own hands. You can fasten the cones with the help of threads, thin wire.


You can diversify the design with the help of twigs, leaves, add plastic eyes or ears.

conclusions
Children's crafts for the kindergarten are those that the child must partially do with his own hands. If you have a toddler from the nursery group, then, of course, he will not do without the help of mom or dad.

The process of creating crafts in the family circle especially brings its members together, helps the child develop imagination and tactile perception, which is necessary for speech production and general development.


Do not forget on vacation, whether it is a park or a seashore, to collect useful materials: pebbles, beautiful shells, leaves, cones and acorns.

If you have the opportunity and desire, you can plant several small pumpkins in your garden, which are perfectly stored and act as an excellent basis for do-it-yourself crafts.

Turn on your imagination and stimulate your baby's fantasy, as a result, you will get not only an ideal psychological interaction, but also an original craft for the kindergarten, made by yourself.

Photo crafts in kindergarten


Children, as they say, are the flowers of life. And this saying is reliable and correct, because with the birth of a child, each person literally changes for the better. It becomes softer, kinder and more responsible. All families in which there is at least one baby are trying to surround him with care from both sides, parental love and warmth. But the time comes when the little ones grow up and they need to develop further socially by attending kindergarten. So that the kids do not feel a lack of attention, educators, in addition to drawing, sculpting, singing, dancing, physical education, games, are engaged in making crafts from a variety of improvised materials, either plastic bottles, paper, or cardboard, dried tree leaves, cones, etc. . If you, as a teacher, are interested in this creative work that is useful for children, then we advise you to visit our article. In it, we will provide 11 photos of easy craft ideas for kindergarten with our own hands made quickly, simply and beautifully. Prepared videos with step-by-step master classes, which contain an accessible description of all the works we have proposed, will reveal to educators the basics of children's applied art. They, in turn, will teach the kids to cope with the task on their own or with a little adult help. In one case or another, needlework will bring a lot of positive and skills to the younger generation, will allow you to know the world around you as deeply as possible.
paper bookmark
The most popular paper craft in kindergarten is the bookmark. It is easy to perform even with small children 4, 5, 6 years old. The bizarre muzzles of animals made by hand will look very organic. Below you can see the master class with step by step instructions.
You will need:
- colored paper, A4 size,
- scissors,
- pencil,
- glue.
Progress:
- To create a wonderful bright craft in kindergarten, you first need to draw a square on a sheet, measuring 20 X 20 cm. Divide this square with a pencil into 4 equal parts. You should get 4 squares, 5 X 5 cm in size.
- Divide the upper right and lower left square with lines so that triangles are obtained. You need to draw a line from the upper left corner to the lower right. The lines must be parallel. The outer triangles must be crossed out, they are not needed.
- We cut out a figure from paper with our own hands without taking into account the crossed out areas. Trim the top triangle. If the paper is laid flat, then in appearance it resembles a rhombus with two triangles glued.
- We fold each triangle in half and put it in turn on the base of the rhombus. The pocket that turned out is a bookmark. He puts on the corner of the page, thereby fixing it.
- On a pocket of colored paper, you can cut out any application and stick it. Here we have such an interesting craft for a kindergarten with our own hands. Use the idea we have proposed, and let the photo serve as a good example for you.
Video: bookmark for books "Panda" using the origami technique
Christmas ball of pasta
A great option for children in kindergarten is pasta crafts. There are many variations of such pasta works, because they are available and everyone has in the house. So you can make a Christmas tree decoration with your own hands - a Christmas ball. See the description below for detailed instructions on how to make it. 
You will need:
- balloon,
- glue,
- pasta,
- dye.
Progress:
- Inflate the balloon to the desired size and tie off.
- Then we apply glue to each pasta, gluing them together.
- After you have made a small blank of several pasta with your own hands, we attach the blank to the ball (for convenience, you can fix it with PVA glue by gluing it to the ball). Thus, we glue the entire ball with pasta, leaving a gap from one piece near the knot. Now we are waiting for everything to dry, with Moment glue the drying process will be faster, but if the craft is done together with the child, it is better to use PVA.
- When everything is dry, pierce the ball with a needle and pull it out through the hole, and then glue the remaining pasta.
- You can attach a string or ribbon so that your Christmas toy can be attached to the Christmas tree. Such a ball can be painted with paints, or you can leave it in its original form. Such a beautiful craft can be easily done with a child of 5, 6, 7 years old, both at home and in kindergarten, with the help of an adult. Remember our idea and the photo adjacent to it, it will certainly come in handy.
Video: do-it-yourself pasta Christmas balls
Plasticine cow
For kids of the younger group, you can offer to create a plasticine ladybug with your own hands. Crafts from this improvised material can develop not only the motor skills of the hands, but also the imagination of the child both at home and in kindergarten. A cool creation is designed for children 7, 8, 9, 10 years old, which can be done very simply on your own. In order to perform such creative work correctly, see our master class with step-by-step instructions and a photo idea. 
You will need:
- plasticine (red, black and white),
- plastic cover, diameter 10 - 12 cm,
- pen,
- white sheet of paper.
Progress:
- In order to get a colorful and fun children's craft made with our own hands, we need to mold a round body from red plasticine, and from a black spot on it. Also, black plasticine is used to form the legs and head.
- It is necessary to take a plastic transparent cover and draw a flower resembling a camomile on it with a pen.
- Place a white sheet under the bottom of the lid so that the outlines of the pattern are visible. Then, along the contour of the image, glue the flower with different colors of plasticine. Here in such a simple performance, you can create other types of crafts for such holidays as March 8, Easter, New Year 2018 and so on. Decorate exhibitions in kindergarten with them or simply become an original gift for friends and relatives.
Video: making a ladybug from plasticine with your own hands
Bee
The material for children's crafts, regarding our photo idea, can also be an ordinary plastic bottle with a volume of 0.5 liters. Such a good craft for children in kindergarten or at home will please everyone, because with your own hands, work will seem exciting and completely uncomplicated. In order to figure out how to do it, let's see a step-by-step instruction with a detailed and understandable description. 
You will need:
- plastic bottle 0.5 l and 1.5 l;
- colored paper;
- paints;
- scissors.
Progress:
- A 0.5 liter bottle must be painted with paints or glued yellow colored paper on it.
- In a similar way, make bold black lines on the bottle with your own hands.
- On the paper cover, cut out the eyes, mouth and antennae of the future bee.
- We cut out the wings from a 1.5 liter bottle and glue them with glue. The result is a pretty yellow bee from ordinary waste material. A good handmade craft for children in kindergarten. It will perfectly decorate any group, playground, annual themed exhibitions and more.
Video: making a bee from a plastic bottle
Vase
Another way to use waste plastic bottles in crafts is to make a vase with your own hands. Such a bottle can be transformed into a decorative vase with a cute muzzle of cats or other animals. The best photo idea for kindergarten children is presented in our article with a full description and step-by-step instructions. Help the kids create something similar and creative, give them the opportunity to be proud of themselves and their achievements. 
You will need:
- Plastic bottle,
- Paints,
- Sponge (for painting),
- Marker,
- Scissors.
Progress:
- To create DIY crafts, you need to cut the bottle in half and take only the lower part for creativity.
- We cut off so that the edges are even and leave two triangles so that we get ears.
- With white paint, using a sponge, completely paint over our workpiece.
- Draw triangles on the ears and nose with a brush in pink.
- With a marker we draw a muzzle of a cat.
- Our craft in the form of a vase or pot for fresh flowers is ready. She, if desired, can be placed in a kindergarten group, somewhere on the street in the yard, or presented to her mother on March 8 as an unprecedented originality. Such a value will be very dear and pleasant to her!
Video: do-it-yourself master class on creating a vase from a plastic bottle
Craft "Cipollino"
For handicrafts in kindergarten, you can use fruits and vegetables. From onions that have already sprouted, you can make the Cipollino craft with your own hands. Such a creation can be easily done with a child of 3, 4, 5 years. To correctly and without problems fulfill the idea provided by us, see the detailed description below with a clear photo. 
We will need:
- Small head of onion
- Jar (the hole diameter of the jar should be smaller than the onion),
- colored paper,
- Scissors,
- Glue,
- markers,
- Plasticine.
Progress:
- On the bulb itself, it is necessary to draw eyebrows, a mouth and cheeks with a felt-tip pen, and make eyes and a nose with your own hands from plasticine.
- Paste the jar with paper and draw the torso of the cartoon character on it.
- Insert the "head" of the craft into the jar. It turns out very nice and believable Cipollino. For kindergarten - this is a real find that will appeal to all the kids and teachers. Even if your baby is developing at home, you can diversify his leisure time with this creative work.
Octopus
Woolen threads can also be used as a material for children's crafts. Of these, you can make a fun octopus with your own hands, which your child will really like. This job is very easy to do and won't take much of your time. You can watch the master class with a detailed description of our proposed idea with a photo to create such a creation yourself. 
We will need:
- Woolen threads (60 threads, 35 cm long) and a little more for tying,
- Ribbon,
- Small plastic ball (for head)
- Colored paper (for the eye), or you can use ready-made ones from the store,
- Scissors.
Progress:
- To make crafts in kindergarten or at home, we take the chopped threads and put them together, tie them in the middle with a thread and put a ball under it. Wrap the thread around it and tie under the ball. This will serve as the head of the future octopus.
- From the remaining threads, weave pigtails in the form of his tentacles with your own hands.
- Draw eyes on paper, cut and glue, or use purchased ones.
- Tie ribbons on your head to decorate the craft. Our octopus from the available material at hand is ready.
Video: do-it-yourself master class on making an octopus from threads
Butterfly
One of the simple crafts in kindergarten or at home is a butterfly made of paper napkins, even a child of 3, 4, 5 years old can cope with such work. This article provides a step-by-step master class on this idea with a photo so that you can easily deal with it. Such a handmade butterfly will delight anyone, and most importantly, it can be conveniently fixed anywhere - in a group on curtains, flowers, or even at home as a creative unusual decoration. 
You will need:
- Napkins,
- Pin,
- colored paper,
- felt-tip pen,
- Scissors.
Progress:
- It is necessary to take napkins of two colors of different sizes and stack them on top of each other, with a smaller napkin on top. Gather in the middle.
- We place the napkins in a clothespin with our own hands, which will serve as the body.
- On a clothespin we draw a muzzle for our beauty, and we make antennae from colored paper and attach them to the clothespin. All our crafts in the form of a butterfly - beauties are ready. For kindergarten, this would be a wonderful idea.
Video: master class on creating a butterfly from a do-it-yourself napkin
Bug
From ordinary flat stones of a small size, you can make various bugs with your own hands together with children in kindergarten. To do this, it is desirable to be able to draw. Such a bug will appeal to everyone, without exception, both adults and children. And if you create them in large quantities, they will look great on a shelf or in a pot with fresh flowers. To complete this craft, below you can see the full description with step-by-step instructions. 
You will need:
- A pebble that resembles the shape of a beetle,
- Paints,
- Glue,
- colored paper,
- Scissors.
Progress:
- In order to create a beautiful craft for a kindergarten with your own hands quickly and easily, you need to cut out the base for the antennae and paws and glue them under the bottom of the stone.
- Paint the stone itself with paints in the form of a bug. That, in general, is the whole complexity of this creative work.
Hedgehog
You can make a hedgehog from an ordinary cone. This handmade Christmas craft decorate the Christmas tree in kindergarten and bring pleasure from the process of independent work to all children. Below you can see detailed instructions on how to make such a cute hedgehog. 
You will need:
- Cone,
- Plasticine.
Progress:
- We glue the muzzle on the sharp part of the plasticine cone, on the muzzle we also make eyes and the tip of the nose with our own hands.
- Now we make paws, also from plasticine. So we get a very cute and prickly hedgehog.
- Additionally, you can make a clearing by forming leaves from plasticine and molding a mushroom. Such a beautiful craft will be a great idea for getting children's skills in applied arts.
Video: DIY master class on making a hedgehog from cones
Mushroom "Fly agaric" from a plastic kinder egg

To make the stay of children in kindergarten more interesting and memorable, it is necessary, of course, to include lessons, so to speak, of labor in general classes. In addition to drawing, it will be exciting for children to make something with their own hands from cardboard, paper, plasticine, plastic, fabric, and more. Waste funds can also become improvised materials. Various boxes, bottles, magazines and much more that parents can easily bring for children's games. Today we want to offer you, dear teachers, to organize an unusual activity with children that will teach them how to create small mushrooms "Amanita" with their own hands, as in the photo idea, from a simple plastic kinder egg. They, of course, are found in large numbers in every home where there are kids. So, let's start creating crafts, referring to our provided master class with a step-by-step description of the course of action.
For work you will need:
- plastic kinder egg;
- cardboard or plastic cover for the stand;
- red cardboard for the mushroom cap;
- sequins for dots;
- stationery glue "Moment";
- satin or other ribbon;
- scissors;
- finished ladybug for decoration.
Process of creation:
- We want to warn adults right away that despite the simplicity of the work, your help and close attention will still be required. Since glue and scissors will appear in the work, and this is not so safe for the guys. We take our plastic base in the form of a kinder egg and glue a satin ribbon to its bottom, folded in such a way that it resembles green grass in its appearance.
- Flowers can be made from colored cardboard or use ready-made plastic blanks. We attach them with clerical glue to the grass, as in the photo.
- Then we will need to create a mushroom cap. Red cardboard will help us with this. We turn it in the right way and glue the edges. Instead of black dots, we attach sequins for a more expressive look, and on top of the fly agaric we plant a ladybug bought in a store.
- We make a fly agaric “skirt” from a chiffon piece of fabric and fasten it along the edges of the red hat.
- We install the finished craft on a plastic cover or cardboard using stationery glue. So our product is ready, which will serve as an excellent decoration for a group in kindergarten. With your own hands, you can create other types of originality that will expand the imagination of the kids.
Finally
So our article has come to an end, which has provided you with a lot of original photo ideas for do-it-yourself kindergarten crafts. We hope that some of them you still liked and you will certainly include them in your child development program even at home. Moreover, the materials at hand can be so diverse and accessible that your imagination will immediately play out, giving birth to completely new creations. Pass on your skills to children in an accessible way, teach them to love and respect art from an early age. This will allow the younger generation to be a little kinder to each other, more attentive to the world around us and its inhabitants, teach us to love and appreciate everything that is so beautiful and fragile around us.


