DIY baby booties. Baby booties with straps: we sew ourselves. Plain baby booties
Irina Boyko
Probably, there is not a single mother on Earth who would not like to dress up her baby. It is quite easy to do this now, as the stores have a huge selection of clothes for every taste and income. But sometimes you really want the baby to stand out from the crowd with its bright and exclusive outfit.
Of course, an unusual little thing can be sewn to order, but why not try to create something interesting on your own? For those mothers who dream of trying their hand at tailoring crumbs, we suggest that you familiarize yourself with a master class on making booties. Children's slippers will be sewn from various materials. So, let's begin!
We sew children's shoes: do-it-yourself original fur booties
Let's start our creativity with a warm version of shoes - let's talk about how to sew fur booties.
To create shoes you need:
If this is your first time sewing booties with your own hands, then you will simply need step-by-step instructions:
As you can see, sewing cute booties with your own hands is not as difficult as it might seem. According to the principle described above, you can create shoes not only for babies, but also for grown-up children. And thanks to various decorations, each pair will become truly unique.
We create booties from old jeans with our own hands
Most people have old jeans in their wardrobe, most likely they already have holes and lie in case “what if it comes in handy in the household”. Now is the time to give old trousers a second life and sew them into stylish booties for your baby.
In order to sew shoes and worn jeans, you will need:
Such baby booties can be sewn quite quickly. This model is for a child of 3-6 months, but it can also be sewn for newborns, and for older kids, these booties can be like warm socks to run around at home.
For booties, we need quite a bit of fabric. I sewed booties from blue and white fleece, and made the cuffs from a circular knitted fabric (you can use the cuffs from an old sweater, they stretch well and will fit the baby's leg).
Pattern of booties(in the picture, the cell size is 1 x 1 cm). The arrows show the direction of the shared thread, and the numbers indicate the points of alignment of the parts when sewing. And knowing the length of the baby's foot and the circumference in the ankle joint, you can increase or decrease the pattern.
Details:
1. The side of the booties - 2 children.
2. Sole - 2 children.
3. The upper part of the booties - 2 children.

Let's start sewing...
1. We cut out the details of the booties (it is better to take a natural, soft fabric).

2. We sew the upper part of the booties to the side, and then on the side we sew the seam at the back. It is better if there are no seams inside the booties, so I sewed with a finishing stitch with contrasting blue threads, all the details were folded end-to-end, so that there were no rough seams on the wrong side.


3. Sew on the sole.

4. We make cuffs. I sewed cuffs for booties from cuffs on the sleeves of an old sweater. We cut out 2 parts 12-14 cm long (it can be narrower, since the cuffs should fit the leg tightly, but not tight) and 14 cm wide.

Booties for sizes 20-30: foot length 12.5-18.8 cm, with patterns and many photos to clearly explain each step. Even beginners can handle this job!
You will need
- Patterns from thick cardboard (see photo below)
- Top cotton fabric (for the outer part of the booties) measuring 53 x 53 cm
- Lining cotton fabric (for the inside of the booties) measuring 53 x 53 cm
- Woolen felt 2 mm thick (preferably white so that it does not shine through cotton fabric) 45 x 45 cm or volumenfleeze H 630 45 x 45 cm
- Vlizofix size 45 x 45 cm - if you choose felt as a gasket
Attention: if volumenflyz will serve as a gasket, then you will not need flesofix.
- 2 buttons or 4 cm Velcro tape for fastening
- Interlining H 250 size 45 x 45 cm
- Thin rounded stick for forming roundings when turning out ()
- Sock Stop - latex milk that creates rubber bumps on the sole that prevent slipping (or other anti-slip agent)
- Fabric scissors ()
- Sewing machine
- Threads for sewing
- Tailor's chalk ()
- Dimensions: booties should not be tight, a certain freedom of movement should be given to the child's leg in them, therefore, after measuring the baby's leg, add at least 1 cm for freedom of movement and 0.5 cm for the seams in all sections.
- Fabrics: Thick cotton fabrics work best for baby booties. In no case do not sew booties from stretchable fabrics.
- Seams: when sewing, back-tack at the beginning and end of each seam: i.e. backstitch 2-3 stitches.
Description of work
Step 1: make paper patterns
Measure the baby's foot: the length and width of the foot, the height of the rise in several places. Re-cut paper patterns, enlarge to desired size, add seam allowance (0.5 cm) and allowance for freedom of movement (minimum 1 cm) and cut out. Cut out separately paper patterns for the upper and lower fabrics, while transferring the pattern direction marks on the fabric to the patterns with an arrow (Motivrichtung) ...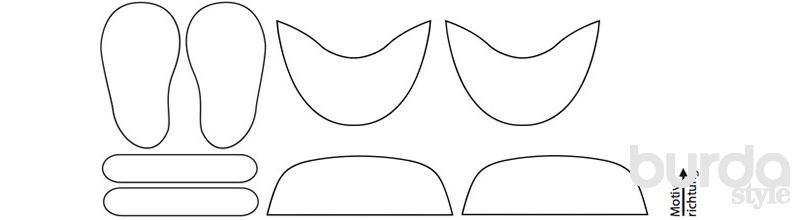
Similarly, make patterns for volumenfliz.

Or felt - they don't include seam allowances!

You will need to make the following number of pattern pieces:
- Sole - 1 piece
- Toe - 1 detail
- Heel - 1 piece
- Strap - 1 piece
Step 2: cut out the pieces
Fold cotton fabrics, as well as felt or fleece in 4 layers along a straight thread. First lay the paper patterns of the sole close to the fold, outline the contours and cut out 4 soles. When cutting from fabric with a fold, you get 2 identical soles in a mirror image. Don't forget about the direction of the pattern on the fabric. 4 soles should also be cut out of felt (voumenfleece) so that the lower part of the booties is dense and soft enough.If you are cutting soles from fabric in one layer, lay the paper pattern so that you get soles in a mirror image - that is, for the left and right legs.
If you use 2 layers of felt as a pad, then you also need to cut out 4 soles from fleece: 2 to connect 2 layers of felt to each other and 2 to connect the pad with a cotton sole.
All you need to cut out:
From cotton fabric for the top and fabric for the lining (cut out with seam allowances):
- Sole - 2 parts each from fabric for the top and from the lining (in mirror image)
- Toe - 2 parts each from fabric for the top and from the lining
- Heel - 2 parts each from the fabric for the top and from the lining
- Strap - 2 parts each from fabric for the top and from the lining
From felt or volumenfleeze - cut out without seam allowances:
- Toe - 2 parts
- Heel - 2 parts
- Strap - 2 parts
From interlining H 250 - cut out without seam allowances:
- Sole - 4 parts (2 parts in mirror image)
- Toe - 4 parts
- Heel - 4 parts

Step 3: iron the gasket
Iron the non-woven 250 pieces onto the matching top and lining pieces (except for the strap).
Further, if you have a felt pad, iron on all the details of the cut from the upper cotton fabric, the details of the fleece, placing it exactly in the middle of the details. After that, iron the felt parts to the cotton fabric, first from above, then from the wrong side. If you use volumenfliz instead of felt, then you can skip this operation. In this case, you iron the volumen fleece directly to the details of the cut from cotton fabrics for the top of the booties. 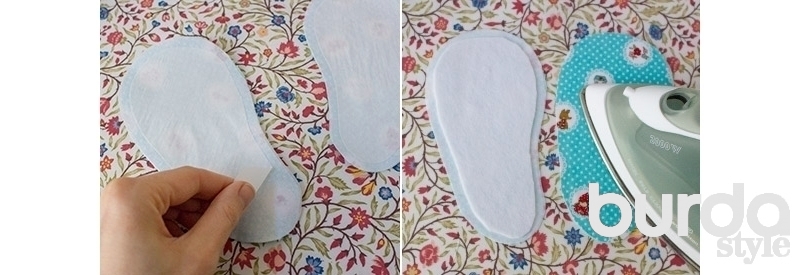
Step 4: Sew the sole, toe and heel pieces together
Fold the front to the front side of the toe and heel from the upper and lining fabrics and chop with pins. Fold the wrong side to the wrong side of the details of the soles for the right and left legs from the upper and lining cotton fabrics, also chop with pins.
Overcast the soles along the cuts together, the width of the zigzag stitch is 3 mm. 
At a distance of 0.5 cm from the cuts, stitch the details of the toe and heel along the rounded cuts. Cut allowances up to 2 mm.
Turn the toe and heel pieces right side out and iron the seams smoothly.
Attention: if you want to decorate these details with appliqué or anything else, do it at this stage.

Step 5: sew the straps
Fold the parts of the straps right to the right side and stitch along the outer contour with allowances 0.5 cm wide, start the seam in the middle of one of the long sides, leave an opening for turning approx. 2-3 cm.
Cut allowances up to 2 mm, with the exception of a segment for eversion. Turn the straps right side out using a rounded stick. Gently push the stick from the outside inward, slowly moving the fabric in the desired direction. 
Step 6: Sew Straps to Heel
On the straps, turn the allowances along the eversion hole inward and iron smoothly. Poke the hole for eversion with a pin.Now take your paper heel template and strap. Try on the child's leg and draw on the heel paper template the place where you need to sew one end of the strap and fasten the other end. Lay the paper template on the heel part in the center and pin with pins. Pin the straps according to the marks. 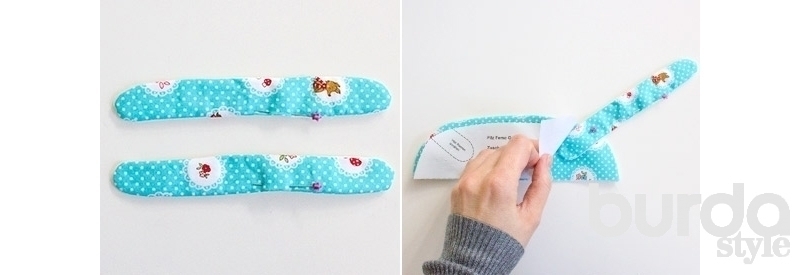
Attention: The strap for the left shoe is sewn to the right side of the heel to the upper fabric. The strap for the right shoe is sewn to the left side of the heel to the upper fabric.

Sew the straps to the edge at a distance of 2-3 mm from the ironed fold. Sew along the front (outer) side. Start the seam in the middle of the strap towards the free end, then sew the rounded seam by turning the sewing machine wheel by hand, then topstitch the inside out hole and finally sew the second rounded end to the heel as described above. 
Step 7: mark the middle lines on the details
Fold the soles, toes and heels in half lengthwise and draw the middle lines = fold lines with tailor's chalk.
Instead of tailor's chalk, you can use pins, sticking them in at the beginning and at the end of the line. These marks are very important: if they are not combined, then the booties will turn out to be “crooked”.

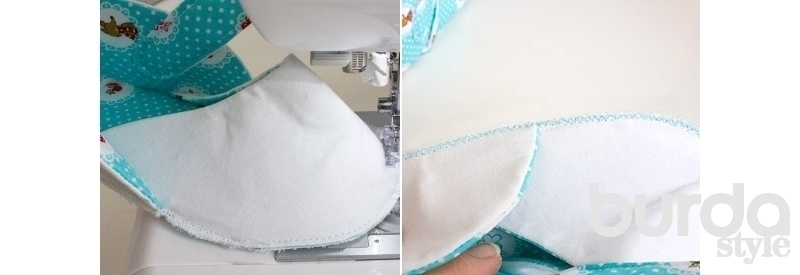
Step 8: Sew the Toes to the Soles
Prick one toe with the right side on the front side of the top of the sole so that the marks in the middle are exactly aligned. Pin both pieces at the end of the middle line with a pin.Start stitching from the bottom side (sole side), from the highest point of the round, with a seam width of 0.5 cm. Then you will need to make a second seam from the same upper point of the round, but on the other side, with the same seam width.

During sewing, you constantly combine the cuts of the two parts, that is, the cuts of the toe are constantly moving to the cuts of the sole. The easiest way is to make a few stitches, then stop with the needle in the fabric, raise the foot, rotate the sole of the booties to the desired position, lower the foot and make a few more stitches.

Step 9: Sew the heel to the sole
Attach the heel to the sole of the front to the front side and combine the lines of the middle.Pin the ends of the midline on the heel and sole with a pin.

For the right shoe, the strap should be on the right, for the left shoe, on the left. Please note that only after turning the shoes will they look “correct”, and not in a mirror image, as in the sewing process. At the time of sewing, they should look like in the photo.

After you have pinned the heel and sole exactly in the middle with a pin, you grind them in the same way in two stages, like a toe with a sole, see step 10. First from the middle of the sole to the right, then from the middle of the sole to the left - the seam width is 0.5 cm .

On the left rounding, you can scribble either again on the sole ...

... or turn the shoe over and scribble on top. Check out what works best for you.

Step 10: Finish the Edges of the Sole
Cut seam allowances along the edges of the sole to 3-4 mm. Overcast with a narrow zigzag stitch 2 mm wide or overlock.
For overcasting, take threads of a matching color to the color of the lining. For our sample, threads of a contrasting color are selected for clarity only. Next, carefully turn the booties on the front side, especially carefully turning and smoothing the rounding.
Step 11: Sew on Buttons or Velcro
The booties are almost ready, it remains only to punch the buttons or sew on Velcro tape so that they can be fastened. Tip: the buttons are best matched to the color of the outer fabric of the booties.
Do not forget to try on booties before punching the buttons and clarify the places for punching the upper and lower halves of the buttons.

A convenient alternative to buttons can be Velcro tape (not glued, but sewn on!). Such a clasp will allow, depending on which socks (thick or thin) the booties are worn on, to fasten them more or less freely.
First, 4 cm of each half must be cut: 2 cm for each shoe. Draw a template (see photo): circle the end of the strap, transfer it to the wrong side of the Velcro tape and round off one end. Then cut out the ribbon halves.

Now, according to the markup, sew the halves of the Velcro braid: one half of the braid on the inner end of the strap and the other half on the side upper part of the shoe. Sew with blind stitches without piercing the needle to the other side.
Step 12: Apply an anti-slip agent to the soles
So that the baby does not slip when walking, apply a special latex milk to the soles of the booties - an anti-slip agent: Sock Stop, Sockenstopp, Sockenbremse, etc. You can choose to apply a beautiful pattern by choosing milk in a tone or contrasting color, or simply apply dots along the outer contour soles.
Photo: BurdaStyle.
The material was prepared by Elena Karpova
Autumn is here, and with it rain and cold.
I can’t say that I don’t like autumn, it has its own little joys in the form of yellow fallen leaves and the autumn sun.
I can even say that I love her. Somehow especially. In my own way.
But autumn is autumn, and you need to warm up so as not to catch a cold and not miss this wonderful time of the year in bed, hugging a thermometer and a cup of hot tea 🙁
We have even stronger immunity, unlike children.
We have overalls for autumn, but there are no booties on the legs (they didn’t come with the kit).
It's still too early for us to wear shoes, because not yet walking.
And so I decided that I needed to sew warm baby booties.
No sooner said than done. It sewed up easily and quickly. Sheila from leftovers. Satisfied with the result.
Moreover, such booties can be easily sewn from fabric, fleece or fur. Material is seasonal.
I made the pattern myself. Yes, there is that pattern! I took it and re-shot it from the winter overalls.
Baby booties - pattern:
As I wrote above, I took the sizes from the finished booties.
First, I drew the sole on a piece of paper. It is 12 cm long and 9 cm wide.
This size is designed for children from 6 months to a year. Or until the moment they start walking, and they can buy full-fledged shoes.
Of course, you can buy shoes earlier, but I don’t see the point in such a purchase while the child is just lying in a stroller and not walking.
So, we decided on the width and length, and then the sheet (fold the pattern into 4 parts and draw an arc connecting these points). Cut out.
When we unfold the sole, we should get the shape of an egg.
This is what concerns the sole, and we still need the shaft. I won't write much. It looks like this:
Open booties.
We need the following parts (for one pair):
Sole - 2 parts;
Side wall (shaft) - 4 parts.
Don't forget to add allowances! I made allowances of 1.2 cm.
The pattern is given without allowances.
The materials from which booties can be sewn can be different, as I wrote above. They can be cut from a thin base and lining, as well as from fleece or fur (for the winter).
This is already looking at the season when you will wear it.
I used jeans as the top material, cotton jersey for the lining, and the thinnest synthetic winterizer as insulation.
For the fall, the most what you need happened. Materials do not float, but breathe. We also have overalls that are not synthetic, but cotton.
And now master class on the topic: "how to sew baby warm booties with your own hands."
1. We grind and iron the front seam of the shaft (the one that is rounded). Then we squander it (this is optional, I made zig-zag stitches with contrasting threads, otherwise it was necessary to make booties more fun).
After we need to pull the bootleg on the elastic band in the ankle area. To do this, we take a simple linen gum, and cut off a piece (I can’t say for sure the length, because it all depends on the gum - one “breaks” more from the line, the other less).
I took a piece 3 cm less than I needed in finished form (after stitching it turned out 21 cm). If you stitch the elastic in a zigzag, then the elastic under the line will stretch even more. I stitched with a straight line.
We draw a straight line along the front line, put an elastic band on the wrong side, pin it with pins, and scribble.
2. We chop off and grind the back seam of the shaft, folding both parts with the front sides inward. Then we pin (combining the center) the sole and stitch it.
3. We turn the booties on the front side. This is how it looks like:
4. Now we need to make the same boot from the lining. For convenience, I connect each part of the lining with a similar part from the padding polyester. Then we grind the front (we leave a hole in it for subsequent eversion) and the back seams. We sew the sole.
5. Then we put the booties from the main fabric into the booties from the lining. We chip off with pins along the upper cut and grind.
6. Turn the booties right side out through the left hole. We fix everything. The hole is sewn up by hand. The top cut can be fixed with a finishing stitch, but I did not do this.
That, in fact, is the whole tailoring of booties.
Difficult?
In my opinion, it's quite simple. And why spend money on booties when you can sew them yourself very simply.
These are the booties I made with my own hands. It can be worn both with lapels and full length.
Vologda lace Collar with strap Crochet video tutorials World catalog of ideas Pattern of a gingerbread house Pattern of a sleeve Pattern of a teddy dog Pattern of a sewing machine Pattern of a six-piece skirt Patterns Turban Patterns of a boho dress Vasilisa knitting of booties Waldorf doll Felting a scarf Felted vest Knitted mittens Knitted hedgehog Wadded toys Waffles classic from the USSR Miscellaneous
minion girl minion fleece with pattern candid photos of girls booties with a flower candid photos open loop crochet musical dolls pinkie moomin troll knitting donkey eeyore cartoons funny mini skirts pattern musical cards for christmas musical cards for men booties berries musical cards for your beloved mini sandwiches spicy appetizer sweet pepper crochet miniskirt miniature embroidery octopus crochet musical card happy birthday miscellaneous
Mitts on two knitting needles liver in bacon mitts with a valve postcards roses booties postcards for March 8 postcards for March 8 do-it-yourself postcards for Christmas postcards new year and Christmas penguin from felt postcards pies pajamas pajamas pattern remake of a men's shirt pajamas jacket chanel jacket boy mittens crochet patterns with a description of men's button-down pullovers handmade postcards cookies with a layer of cookies painted cookies unleavened panel paintings crochet miscellaneous
Booties from fur booties marshmallow postcard with children's hands postcard good night cookies \ Tubes postcards happy mother's day postcards happy hugs oatmeal cookies men's jackets pattern mascarpone cookies cards happy birthday with names cookies gourmet cookies karakum cookies oatmeal cookies cookies bunny cards happy saint nicholas day cookies Tubules cookies Bananas royal liver men's gloves knitting liver in orange sauce postcards happy birthday tatyana miscellaneous
Booties crochet shoes men's hats tie men's hats with jacquard postcards for February 23 do-it-yourself mitts pattern men's tunics minions crochet booties with animals booties with beads booties crochet postcard happy men's day booties strawberries booties sneakers crochet minions amigurumi minions crochet postcard pop up postcard vase with flowers Cardmaking Postcard Teacher's Day Postcard Mother's Day Fleece Booties Knitting World Postcard Forgive Me Miscellaneous
Making a meat pie bears from pompoms men's moccasins alteration of a screwdriver of a bear crochet tilda bears alteration of a bedside table postcards and congratulations on March 8 postcards-posters men's crochet pullover world of booties postcards February 23 master class postcards eternal memory miralda booties for boys crochet men's vest missoni pattern crochet and knitting postcards good evening do-it-yourself men's pullover men's scarves knitting booties pattern mystical melodrama miscellaneous
From the remnants of fur knitting a vest with a smell, we knit children's knitted knitting white dress summer top knitting pattern sundress boho Blouse with a heart crochet weed white tunic crochet poncho with buttons Santa Claus amigurumi summer coat crochet snood on the car Curls crochet baby hat made of thick yarn Snowflake dress knitting mint color arana with openwork knitting cardigan knitting with neckline booties boots knitting scarf triangular miscellaneous
/crochet fragments home dress pattern jacquard skirt with knitting needles women's pullover with a hood with knitting needles women vest boho style simple vest crochet cross sweater open back pullover
Mitts+on+two+knitting needles, liver++in+bacon, mittens+with+a valve, postcards+roses, booties, postcards+on+8+March, postcards+on+8+March+with+hands, postcards+on + Christmas, postcards + new + year + and + Christmas, penguin + from + felt, postcards + pies, pajamas, pajamas + pattern, alteration + male + shirts, pajamas, jacket + Chanel, jacket + boy, mittens + crochet + patterns +with+description, men+pullover+on+buttons, postcards+handmade+work, biscuits+with+layer, biscuits+painted, biscuits+fresh, panels+pictures+crocheted, .
Potato salad with bacon bat pattern Sleeves for a fur vest openwork knitting needles painting porcelain live cats Horseshoe from salt dough we knit with Mary cookies balls women's costumes with knitting needles COTTAGE BUNS - UNREALLY SOFT Hat cat flowers from felt solitaire kerchief online embroidery on jeans barbara beauty long braid samovar picture overalls for children Tomashevskaya Knitting technique Brioche Stitches WINTER BOOTOES outfits with jeans
o7oi6gr.blogspot.com#arodnyimi-sredstvami.-Kak-ubrat-pohmelnyiy?utm_campaign=transit&utm_source=main&utm_medium=page_9&domain=mirtesen.ru&paid=1&pad=1
 miscellaneous
 Jacket for a boy with knitting needles Irish lace crochet jackets boho jacket for girls boys lariat patterns lion lazy patterns petals summer berets hats jackets cardigans blouses booties dresses headbands pullovers summer boots crochet sundresses bags hats knitting schemes summer top knitting topic SCARF Summer blouse for girls tunic with pineapples shawl bat lily fox amigurumi fox fox fox fox toy patterns poppy leaf
Grandma's method of treating alcoholism! Alcoholics fear this remedy like FIRE! Home recipe, no doctors and expensive clinics The ability to cure an alcoholic without his knowledge, you just need to mix 1st spoon of this remedy into tea or food. From alcohol it just starts to turn back, cravings disappear within a week. It's all hard to believe, so read the story of our subscriber, how she cured of alcoholism in 2 weeks


