Do-it-yourself lanterns from corrugated paper step by step. DIY paper lanterns. New Year's lanterns: scheme
Flashlights do not have to be a source of light. For example, paper lanterns can be a wonderful decoration for your home in connection with any holiday: New Year and Christmas lanterns can be hung on a Christmas tree, and birthday or Halloween paper lanterns can be hung or placed around the rooms.
Such a decoration will go well with other holiday decor and fit into almost any style, since they can be different - it all depends on the flight of your creative thought if you want to make paper lanterns with your own hands.


Preparation
A flickering flashlight, like a tiny light, immediately evokes a fabulous mood, creates an atmosphere of magic, mystery and mystery. Paper lanterns are so easy to make that even kids can get involved and help you make these wonderful decorations.
In order to make a paper lantern, it is better to take plain office paper in different colors. Corrugated paper is also suitable for you, but you should not use cardboard, as it often breaks at the fold points, and the product may deteriorate.
In addition, in the process of work, you will need glue, scissors, jewelry (if you want your craft to be exclusive and original), a pencil and a ruler, as well as special templates for cutting.

A little patience, imagination and perseverance - and your do-it-yourself paper lantern is ready! You can decorate your house for the holidays.

Making classic paper lanterns
The base of any lantern is rectangular, and in appearance resembles a cylinder, open at the top and bottom. Already on this basis you will glue or attach various volumetric decorations and decorations.


- Before you make a traditional paper lantern of this type, you can think of how and how you decorate it. There are no special templates for a classic lantern, but there is a diagram that you can focus on.
- First you need to make a base. To do this, you will need to cut a rectangle out of colored paper (determine the dimensions, depending on what size the future craft should be).
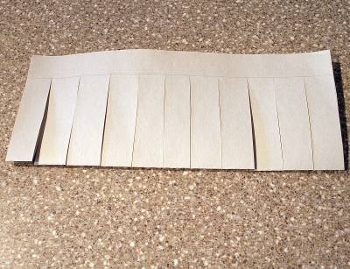
- Then this paper rectangular piece must be folded in half (in width), and stepping back a little from its upper edge, mark a horizontal line with a pencil.
- On the same blank, make markings for vertical stripes (take a small width, about 1-1.5 cm). Cut the paper along these lines, but in such a way that you do not cross the marked border line.
- Next, you'll need another rectangle. It can be cut out from the same colored paper, or take paper of a different color. The length of this rectangle should be the same as the first one, but the width can be slightly less.
- Also fold it in half, and then cut it into small strips from the side of the fold (as in the first case, do not make the cut to the end, because you need to leave at least a centimeter for gluing with the base).
- You can glue the blanks to each other (if you want, use a stapler). And to make it easy to hang the flashlight on a Christmas tree or elsewhere, attach a small strip of paper to the two sides of the top of the flashlight.
If desired, for decoration for the New Year, you can decorate the craft with stickers, sparkles, stars, snowflakes, rhinestones, etc.
Several of these lanterns make a wonderful garland.
And if you do not make a core in a flashlight, then with the help of such a product you can decorate vases or other objects in an original way, making them elements of New Year's decor.

Other manufacturing methods
By connecting fantasy and imagination, you can easily figure out how else to make unique lanterns to decorate your home. For example, if you glue corrugated paper into cylinders, as in the case of classical technology, but do not make a second layer, but simply attach these forms to ribbons, and glue them along the bottom edge with light colored ribbons that will sway and flutter at the slightest movement. Such New Year's lanterns also look beautiful in a large garland.
If you want a candle to burn inside the product, then take two layers of paper for the base: plain paper for the top, and white parchment for the bottom, which will transmit light. Or use safe LED candles.
Another simple craft is a flashlight made of multi-colored stripes. To make it, you need to cut a lot of paper strips (their length and width should be the same, the longer the strip, the larger the flashlight will turn out). These strips must be folded, and holes should be pierced at both ends. Then take a beautiful cord and fasten it first on one side, and then thread it through the other hole and pull it well so that the strips bend in a semicircle. It remains only to straighten the flashlight so that the stripes form the shape of a ball.
You can also make a beautiful craft in the form of an openwork lantern that will decorate any holiday table for the New Year at the Christmas tree, and for a birthday, and for other holidays.
- To make such a romantic decor element, you will need special cutting templates. If you are trying to make such a craft for the first time, then at first it is better to take a blank drawing in which there will be a minimum number of gaps, since cutting this part can take a lot of time and require some skills.
- The selected template must be printed and carefully cut along the contours.
- Choose glasses, goblets, jars or other transparent objects that will serve as the basis for the wrap (they should be able to put candles in them). Measure their height and width. You need to cut out the templates so that the containers can be completely wrapped.
- Try on the templates again and trim if necessary.
- If you want to make colored lanterns, then under the openwork patterns you will need to attach sheets of colored parchment (you also need to cut them to the size of the dishes). They are attached with adhesive tape.
- Then you can attach openwork patterns, also carefully attaching them with tape.
Light candles and enjoy the romantic atmosphere of a New Year's fairy tale.

Choose any way you like to make lanterns and create small crafts that will decorate your home in an original way for any holiday.
Option 1.
The easiest way to make a New Year's paper lantern is as follows.
Cut colored paper or old postcards into strips of the same width (eg 2cm) but different lengths. You should get one central shortest strip, the remaining strips should be paired, each pair a few centimeters longer than the previous one.

Lay the strips together in the correct sequence, lining them up at one end, then staple or glue them together. After that, align the strips from the opposite end and also fasten them with a stapler or glue. The flashlight is ready!
Option 2.

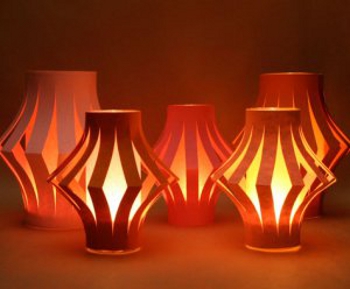
One of the most popular Christmas decorations is Christmas lanterns. It is very easy to make them, and thanks to the spectacular shape, the lanterns will become a real decoration of the Christmas tree.
We fold a sheet of colored paper of a rectangular shape along in half. From the fold line we make parallel cuts at an equal distance from each other (the cuts should end without reaching the edges of the sheet 2 centimeters). We unfold a sheet of paper and fold it into a tube, glue the ends of the sheet. Now, simultaneously from below and from above, we squeeze this tube a little - we get a flashlight.
But that is not all. For a flashlight, you can make a core. To do this, we glue a tube from thicker paper, but of a smaller diameter. We connect the two parts together (we place the core inside the flashlight) using glue or a stapler. The flashlight is ready.
Paper lanterns can be used in a variety of ways. And just like a Christmas decoration. And as a decoration for a small vase or glass (only in this case, you don’t need to make a “core” for a flashlight). And several New Year's lanterns, suspended on a ribbon or serpentine, will turn into a multi-colored garland.

You can insert a candle inside the New Year's lantern. It is better to use safe LED candles. If you are using a regular candle, be sure to place it in a glass jar for safety reasons. See link >>>>
Option 3.
A cardboard box of juice or milk is a wonderful material for making a New Year's lantern. The easiest way to make this New Year's toy with your own hands is as follows:
1. Take a box of juice or milk, cut off the bottom of it, glue it with white paper.
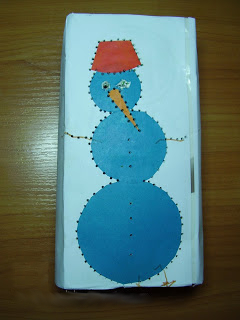
2. Make an application on the New Year theme on both sides of the package.
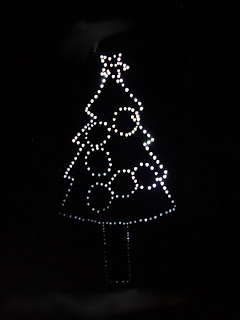
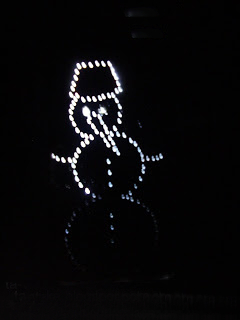
3. And now the adult must prick holes along the contour of the drawing with an awl. If you put such a box on a flashlight or LED candle, the picture will glow in the dark. Link>>>>
Attention! If you are using a regular candle, be sure to place it in a glass jar for safety reasons.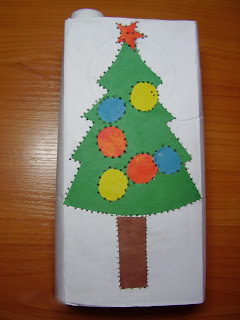
Such a New Year's craft with your own hands can also be made from a regular paper bag.
or tin can.
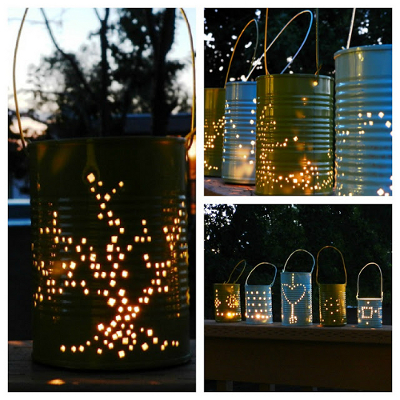
Holes in a tin can have to be made with a sharp nail and a hammer. Useful advice: so that the tin does not warp when making holes in it, first pour water into it and freeze it in the refrigerator.
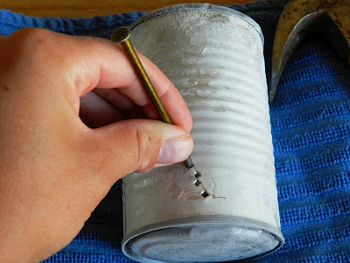
At the end, paint your New Year's lantern with spray paint and attach a wire handle to it. For a detailed New Year's master class, see the link>>>>
Holes in a paper lantern can be made not only round, but also, for example, in the shape of hearts or stars, as in the photo below.
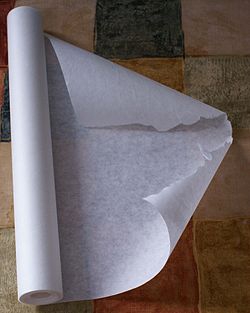
If the holes are large enough, then it is better to seal them on the back with special parchment paper. In another way, it is also called wax paper or baking paper.
Since we are talking about paper lanterns with large windows, it's time to move on to the next section of our article.
Option 4.
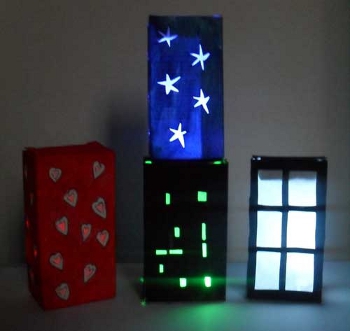
The house is a symbol of comfort, warmth, family hearth. That is why on frosty, winter days, a New Year's lantern in the form of a paper house will look most appropriate.
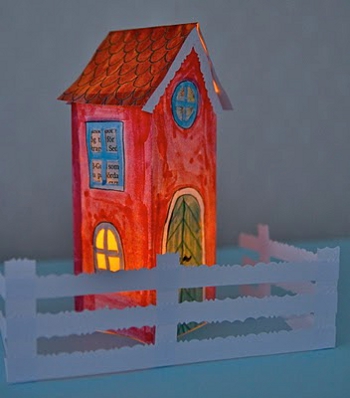
It is very easy to make a house out of juice or milk packaging. Just be sure to seal the windows with parchment (wax) paper. We already wrote about this a little higher.

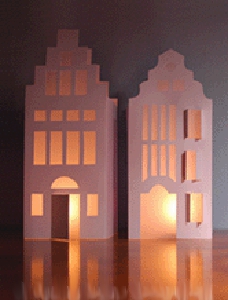
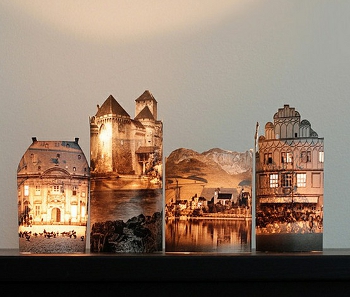
We suggest you use ready-made templates for making three magnificent paper houses as in the photo below.

Template download links:
- template-1
- template-2
- template-3
To make one house, you need to print the same template twice. Each house consists of two identical halves (front and back), connected to each other on the sides.
Cut out the templates, to do this, cut off everything that is marked in gray. Cut out windows. Seal them on the back with parchment paper. Connect the two parts of the house together. Place the house on a light source (LED or real candle). Attention! If you are using real candles, be sure to place them in a glass jar for safety reasons. For a detailed New Year's master class, see the link>>>>
Option 5.
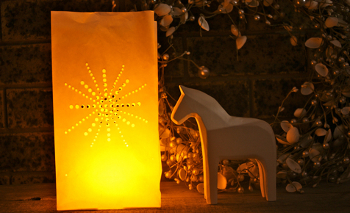
A New Year's lantern can be made not only in the form of a house. You can simply make holes in a homemade cardboard box and seal them with parchment. The lantern will be decorated with a New Year's applique.
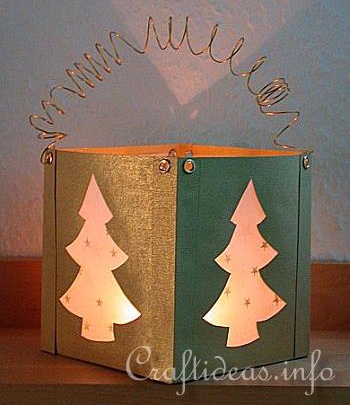
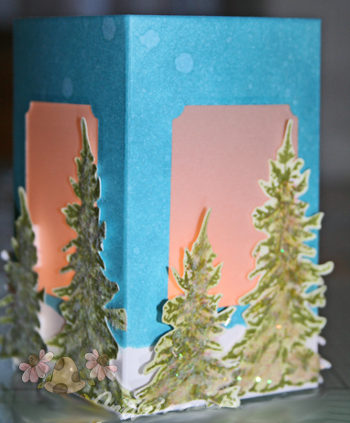
For detailed instructions on how to make Christmas tree lanterns as in the photo above, follow the links:
- link-1
- link-2
Option 6.
You can simply draw a castle on parchment paper with a black permanent marker and wrap it around a light source: a flashlight, an LED candle, or an ordinary candle in a glass jar.
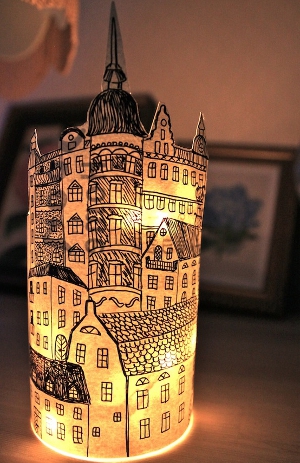
You can use a photograph of the castle, cut out along the contour. For detailed instructions on how to make such original lanterns, see. .
Option 7.
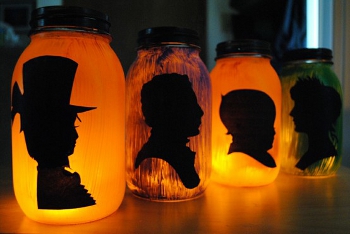
And on parchment paper, you can stick the silhouettes of some images cut out of black paper. see link>>>>
Option 8. 
To make these wonderful Christmas lanterns, you will need to cut colored paper into strips of the same length and width. The length and width of the strips depends on the size of the flashlight you want to make. To make one paper lantern, you will need an average of 14-16 strips of paper.
Fold the paper strips together in a pile and make a hole with an awl from one end and the other. Pass the thread through one of the holes, secure the end of the thread with tape, glue or a sticker.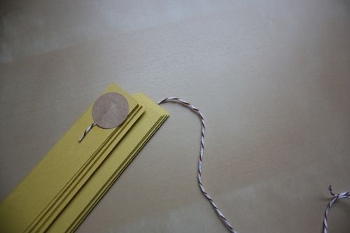
Pass the thread through the second hole.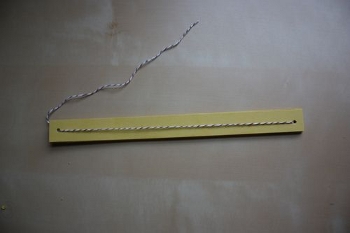
Pull the thread so that the strips of paper are bent. Tie the thread in a knot. The knot should be large enough so that it cannot slip through the holes in the paper strips.
Flatten the strips so that they form a ball shape. The flashlight is ready. It remains to find a place where it would be possible to hang it.

Option 9. 
We invite you to make an original paper lantern in the form of a bird in a cage with your child. To make this Christmas decoration you will need:
- colored paper and cardboard
- awl
- scissors
- double sided tape or glue
- plastic cover
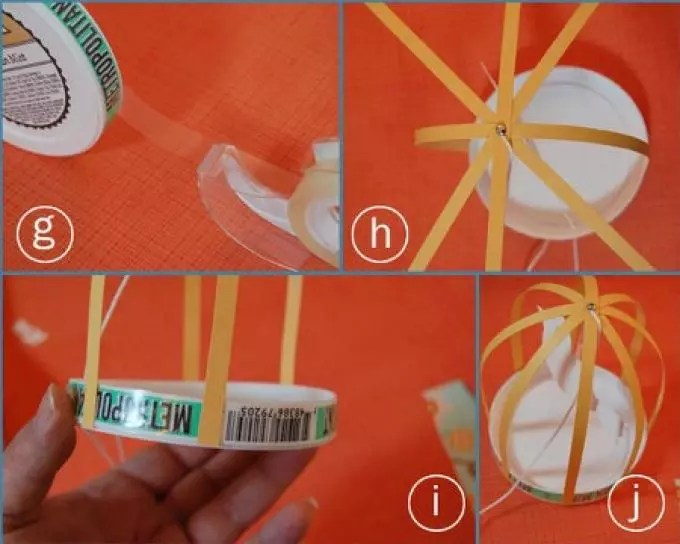
Work plan:
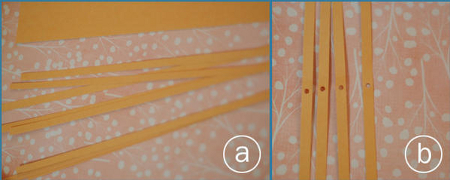
a. Cut colored paper into strips of the same length and width (for example, 1.5 cm - width, 30 cm - length). To make one lantern, you will need 4 strips of paper.
b. Make a small hole in the center of each strip with an awl.
c. On thick paper, print a bird ( download ). Cut it out. Make a small hole in the center of the back of the bird with an awl.
d. Pass a thread through it, tie the end of the thread with a knot. Make a second knot at a distance of about 4 cm from the bird.
e. Now you need to string paper strips onto a thread. Slide the strips along the thread to the top knot.
f. Tie another knot on top of the paper strips, on which you can put a bead for beauty.

Option 10.
A very original New Year's craft - a lamp made of lace.
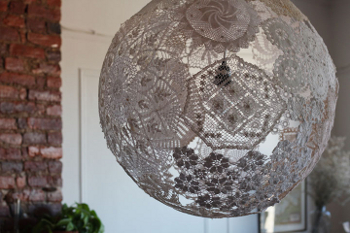
The technique of its manufacture is similar to the creation of balls from threads, only lace is used instead of yarn. How to make a ball of thread, see the link>>>>
To make a lace lamp, you need to find a large volume balloon, inflate it and hang it on a thread. Soak the lace thoroughly with wallpaper glue and stick it on the ball so that they intersect, overlap each other. Allow to dry thoroughly overnight, after which the balloon is pierced, deflated and removed. We insert a small light bulb into the resulting lampshade and hang it. That's all, a great DIY Christmas decoration for your home is ready! Read the detailed New Year's master class at the link>>>>
Notes:
1. To prevent the lace from sticking to the ball, you can pre-lubricate the ball with a fat cream or vaseline.
2. For safety reasons, it is better to use energy-saving light bulbs, because. they don't heat up.
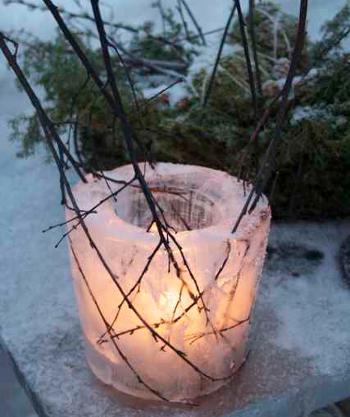
Option 11.
If you live in your own house, then New Year's ice lanterns will help you decorate the yard for the New Year. For a detailed description of how to make such Christmas decorations, see the links: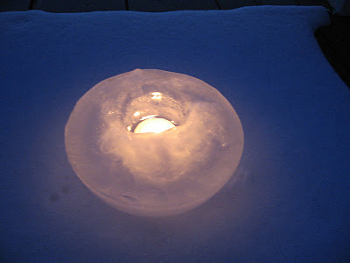
In China, paper lanterns perform a special function - they protect the home from an evil spirit. We use them for decor during the New Year holidays. We offer you to learn how to make paper lanterns with your own hands for the New Year. Further in the article there are several step-by-step photo tutorials and videos by which you can make such beauty!
Traditional lanterns for beginners
A fairly simple and spectacular decoration that you can make with your own hands with your children. Such paper lanterns can decorate an office, a class at school, a group in a kindergarten and a room in a house.


Let's look at how to make paper lanterns step by step with a photo for beginner craftsmen. Below is a detailed tutorial.
Such creativity will be interesting for children, so you can involve them in this simple and interesting work. The joint activity of children and adults creates a special festive atmosphere.
We will need:
- colored paper of any shades;
- scissors;
- PVA glue or ordinary stationery for paper;
Let's start creating:
- A sheet of paper must be folded in half lengthwise and cut from the side of the fold every 1 - 1.5 centimeters.
- We unfold the paper and fold it across into a circle, glue the joint at the top and bottom.
- Cut out a strip from a colored sheet of paper and glue the pen. The flashlight is ready, but a variation is possible here.
You can leave the flashlight like this for the New Year 2018, or glue a cylinder from another sheet of colored paper (you can use the same shade or take a different one) and insert it inside, gluing the cut sheet around this cylinder.

Paper lantern diagram
Make some of these simple and bright paper crafts and hang them on a thread to make a garland, or decorate a Christmas tree with them.


Flashlights in the form of a ball 2 options
The first option is a ball of stripes. To implement it, we need:
- Any colored paper or cardboard. You can use old postcards.
- Rivets or thread with a needle and a pair of beads.
- Rope for loop.
- Scissors.
- Awl.

PHOTO: Round Christmas paper lanterns
We do this:
- We cut strips, the width of which is 1.5 centimeters, and the length is 15 - 18 centimeters, if desired.
- We put the strips in a pile together and make a hole on both sides with an awl.
- We insert rivets or a bead strung on a thread with a needle into the hole.
- We spread the stripes around the circumference.
- Attach a loop on one side.

step by step
The toy is ready.
These stylish lanterns can decorate a Christmas tree or a room.
Another round shape
For the second version of paper lanterns in the shape of a ball, which you can make yourself for the New Year, a diagram describing the manufacturing process is given.

round flashlight
Let's prepare everything you need:
- thick colored paper, cardboard or all the same old postcards.
- hooks or unfolded paper clips for the loop. You can also use a textile loop of thin ribbons, jute rope, braid.
- satin ribbon.
- glue.

step by step photos
Such toys are made simply:
- Cut out circles of the same diameter from colored cardboard or paper. For one flashlight you need 10 such circles.
- Fold each circle in half with the colored side inward.
- We glue together all the circles, leaving the last 2 sides not glued.
- We glue the hook or loop from the braid, glue the remaining sides.
- We decorate the toy with a beautiful ribbon bow or attach any other decor to it to your liking.
But this is not all the options for this interesting and familiar to us since childhood New Year's toy. Let's take a look at a few more ideas.
See how to make lanterns for the New Year 2018 with your own hands according to photos and diagrams:


Figured paper lanterns
You can make curly paper lanterns for the New Year with your own hands, a description of which with a diagram is given below. The process of creating such a New Year's miracle is very similar to the previous description.

curly

How to make them step by step
First, let's prepare everything that is useful in the work:
Thick paper, cardboard or old postcards that we love.
- glue;
- double sided tape;
- scissors;
- needle and thread;
- tape, 0.5 cm wide;
- decorative elements: berries, beads.
And now we start, in the process of work you need to be careful and attentive. It is important to do everything according to the sequence and not to miss the details:
- We make a curly stencil of one side of the flashlight and cut out several identical parts. For one decoration, make 10 - 20 pieces as desired.
- Fold the blanks exactly in half.
- Now the most crucial moment - gluing. It is necessary to do this according to the picture at the right points. First in those marked with "1", then in those marked with "2".
- Now connect the edges of the ovals, sew with a thread. Can be glued with double sided tape.
- Now unfold the flashlight and fasten its edges.
- Attach a loop of ribbon and decorations on top.
Step-by-step photos of the New Year's product:


Make several of these lanterns, they will create an amazing festive mood. They can decorate a Christmas tree, a room, any room. And if you take laminated paper or thin plastic, then lanterns can also decorate a street tree.


Tissue paper lanterns
This type of flashlight is unusual, not the one we are all used to from childhood. But it is more reminiscent of Chinese lanterns, traditional for celebrating the New Year in this exotic country. Tissue paper lanterns are very easy to make.

They add brightness to the holiday. You can also use corrugated paper for them. Let's get ready for the process:
- thin paper. One flashlight needs 2 sheets;
- needle with thread;
- Double-sided tape;
- braid or jute rope for a loop.
That's all that might come in handy, now let's get started:
- We connect 2 sheets and bend in half lengthwise.
- We fold them with an accordion, carefully stroking the folds with the palm of our hand.
- Unfold sheets. We connect one edge along the folds, sew with a thread.
- Now, in the same way, we sew the second edge with a thread.
- We connect the junction with double-sided tape.
- Now we hang the flashlight on the ribbon.
You can make several lanterns of the same color, or choose beautiful shades for a bright multi-colored holiday.
Master class of imitation of a real lantern made of thick paper with decor
And now let's see how to make an interesting flashlight - an imitation of a real street lamp. We will make it out of paper and decorate it beautifully with decorative twigs and Christmas decorations.

For work you will need:
- thick colored paper or cardboard. The paper must be double-sided, that is, colored on both sides;
- ruler;
- scissors;
- pencil;
- a sheet of paper for the template;
- glue and brush;
- new year decor.

This decorative toy is made very simply, you just need to be careful when making a pattern and cutting out details, and the effect is amazing. It is quite possible to make such a flashlight with children.
Here are such beautiful paper lanterns you can make with your own hands for the New Year 2018! Follow the steps in the video and you will get an amazing decorative item that will add style and zest to your holiday!
Step 1. Take a sheet of colored paper 18 cm long and 12 cm wide. Draw a line along the short side of the sheet with a ruler and a pencil, stepping back from the edge 2 cm. Cut the paper along the drawn line. You will need this strip to make the flashlight handle.
Step 2 Lay the remaining sheet with the colored side up and draw a line along the long side of the sheet, stepping back from the edge of 1 cm.
Step 3 Now fold the sheet in half along the long side (colored side out). Measure 1.5 cm from the left edge and draw a transverse line with a pencil. It should end on the longitudinal pencil line we drew earlier. (step 2). Continue to move to the right edge of the sheet, drawing transverse lines at 1.5 cm intervals. Then make cuts along them with scissors.

Step 4 Unfold the sheet and glue its sides so that you get a pipe. Put this "pipe" on the table and lightly press the flashlight with your palm to give it the desired shape.

Step 5 Then take the cut off strip of paper and glue it on top to the inner edges of the flashlight.

Flashlight variations
Now let's improvise! You can make a pen of a flashlight from paper of a different color:

The flashlight can be decorated with paper strips:

But in this case, it is better to glue the colored stripes to the workpiece in advance, after step 3, because it is inconvenient to stick them on a finished flashlight and it will be difficult to do it neatly.
And you can complicate the technology a little. Let's go back to the very beginning. In addition to a sheet of 18x12 cm, it is necessary to prepare another sheet of a smaller size - 18x10 cm. This may be a sheet of the same color as the flashlight, or of a different color. Glue it into a cylinder.
In fairy tales, we often read about the path through a dark forest to a small source of light that suddenly appeared between the trees, or about a hall decorated with multi-colored lights, or about a mysterious kind person who lights lanterns in the evenings ... Maybe this is where our love for homemade flashlights - to those who have a living light inside or to those who remind us of this light?
Today we will talk about lanterns, which, if desired, you can make yourself or with the participation of children - for a room, for a garden, for a Christmas tree or a corner of dreams. Such magic lanterns can easily turn an ordinary evening into a fairy tale.
What materials can you make lanterns with your own hands? We have collected a lot of ideas for inspiration - here is a paper lantern, very simple, but a garden lantern - probably full of stars ... Here is an icy one, here is an orange one, and here is a lantern from what is at hand - for example, from clothespins ...
However, first things first…
Paper lanterns - simple and intricate
The simplest and most fun
Any child can make colored paper lanterns with their own hands. Look at the samples: the main thing is to have a desire to decorate it and stick light paper ribbons - let them sway at the slightest breath. Like fire!

The best children's books
The flashlight itself is such a cute symbol that some homemade flashlights are forgiven for their non-functionality: even if they do not shine, they are still beautiful! Also, imagine how fun it is to make them!

Transformations of classic paper lanterns
You can decorate those lanterns that you already have (for example, lanterns from Ikea are very grateful in this regard) - and bring a completely new note to the atmosphere of the room.


Paper flashlight: pierce more holes!
There are different models of paper lanterns that you can make with your kids. For example, such multi-colored polka dots with holes will decorate even a very simple model, and most importantly, it will easily and cheerfully replace a full-fledged developmental activity.

Paper lantern in the form of a house
Wonderful lanterns-houses (or palaces) will surely remind you of three bewitchingly beautiful ones, and it is very easy to make them. Probably, if you draw templates together with children, using all your imagination, it will turn out even more interesting than in the photographs. The main thing is to make grooves, and you don’t even have to get dirty with glue: everything will hold on!

DIY origami lanterns
You can also make paper lanterns using the origami technique. Here are the paper lanterns themselves in the shape of a flower (or a star?), And how to make them - you can see a detailed master class at the link.

If you want to let the wind of wandering into the house, then lanterns from photographs of beautiful buildings and castles will look very unusual and stylish. How to make them? It is not at all surprising if you already understood - but you can look at the source just in case.


magic balls
Home-made lanterns made of threads or narrow braid ... The authors assure that it is very simple - a balloon, glue, threads, a needle that will pierce a hole in the balloon ... Probably really simple. And the result looks so natural, as if these balls grow on trees on moonlit nights.


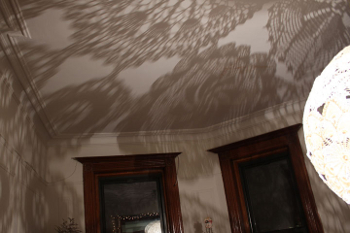
homemade lanterns, or patterned shadows
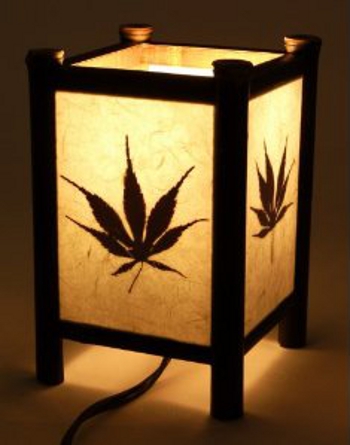
If this matches the interior, napkin lanterns will be a wonderful solution. How to make them?? By sewing a "lace sleeve" for a jar or a suitable vase. There is also the technique of staining from a spray gun through a napkin - but this is if you don’t feel sorry for the original handmade ...

Decorative lanterns from clothespins
Nice, very simple idea for those who have ... wooden clothespins. You will need: an empty tin can, a transparent glass, clothespins - and candles. A wonderful idea for a backyard party and any time of the year!


Gold-silver? Magic thick foil lantern
How to make a flashlight with your own hands - safe, shiny, fabulous? A very interesting technique you can try is making a flashlight out of thick foil. Extrusion of lines (almost like in chasing), cutting through windows ... We draw a house on a rectangular sheet of foil, and as a result we assemble a voluminous shining fairy-tale house! Who lives in the house? Of course someone is very nice!

Garden lanterns - add stars!
Homemade lanterns can give a fairy tale to those who have forgotten that peace, silence and magic come to the garden at night - if we invite it. Time-consuming, but not difficult - to make patterns with a nail, piercing metal cans - the more holes, the more light. Making holes is easiest by attaching each jar to a log or thick stick. And then you can paint the jars and create a magical atmosphere in the garden by placing candles in such homemade candlesticks in the evening. And we'll see things we've never seen before...


