Products made from plastic bottle caps. Crafts made from plastic corks for garden decoration
Crafts from bottle caps can be very diverse, with the help of this waste material you can make both children's “homemade products” and useful devices for the garden.

Bottle cap craft for kids
To make a figurine of a funny Martian you need to prepare:
1. A jar of soap bubbles
2. Covers - 2 pcs.
3. Plasticine (mass for modeling)
4. Rubber band
5. Container for shoe covers
7. Hook for threading elastic
8. Black marker
First make the torso of the Martian. Separate the container from the shoe covers, pierce the lid of the container and 2 plastic lids with an awl. Punch holes in the sides and bottom of the bubble jar to insert elastic for the limbs. Connect the lids with an elastic band. Thread a rubber band through the entire jar - the body is ready.

Pass the crochet hook through the side holes of the jar and thread the elastic band through them. For each leg you need to take 6 covers (make holes in the top of them with an awl). String them onto an elastic band, tie knots at the ends, and trim off the excess elastic.
Make the hands separately - make side holes in the lids, you will also need 2 holes on top (put an elastic band into the top ones, which will be used to put the hands on). For the hands you will also need 6 elements: make holes in 5 on top, in the 6th (palm) pierce 2 pieces on the side. String the elements one by one, the palm should go last, tie the ends with 2 knots, cut off the excess.

Attach the arms to the body, thread the elastic band into the side holes of the elements, and tie knots at the ends. Make a head, draw facial features with a marker, put on a helmet and put a stack in your hand. It turned out children's craft from plastic bottle caps, it's time to master it.
Garden crafts made from bottle caps
It has long become common practice, why not use it for this purpose? DIY bottle cap crafts done? To decorate buildings and fences, you can use large-scale panels, for the production of which waste materials are just useful.
Take to make a mosaic:
1. Plastic caps
2. Adhesive for polyethylene (BF-2 or BF-4)
Before starting production, carry out a number of preparatory work: collect a sufficient amount of raw materials, wash and dry, separate into groups depending on color.
Find a painting that you would like to recreate, print the image and create it crafts from plastic bottle caps diagram, dividing the image into segments by color. For each segment, select the desired color of the plastic material.

Paint the surface on which the mosaic will be located. Apply markings to the surface: mark the height and width, divide the surface into squares of the same size (this will allow you to control the proportions of the mosaic).
After preparation, proceed directly to production. Can be attached to almost any material: wood, cardboard, iron, plywood, etc. Use glue to fix it. In the case of a brick or concrete substrate, the plastic material is fixed at the plastering stage using a special solution. Secure to a wooden base with nails or self-tapping screws.
Attach the mosaic elements close to each other, they can be oriented on either side, keep in mind that if they are fastened inside out, very soon the entire image will become clogged with dust, and problems will arise with cleaning the panel. If it is attached with the front side, then at the last stage, seal the seams with a solution of cement and sand.
Do not apply stencils; it is better to be guided by the image divided into segments. The very first works are small pictures, then you can move on to large-scale “canvases”.
Admire what can happen after such hard work. Crafts from bottle caps - photo:

Crafts from plastic bottle caps can be very useful in the country. For example, you can lay out paths with such waste material - it will turn out very bright and original, when walking your feet will not get dirty, and the grass will not break through.
You can nail several caps in the shape of a certain flower or vegetable onto a small piece of painted plywood and place such an unusual sign near the beds. Plastic beets or carrots look very interesting and unusual. For work, use small screws and a screwdriver.
On a summer veranda you cannot do without a beautiful curtain that allows air to pass through and prevents the appearance of insects. It is done very easily - make a hole in a lot of plastic elements, pass a thread or fishing line through each (tie the tip into two knots, melt the fishing line with a match to prevent it from unraveling). The composition will be even more attractive if you select areas by color.
A border for plants would also be an interesting option - you can simply press in the covers at the stage of making the cement fence, or you can string them on wire, having previously made a hole. Nail the finished colored hoop to the wooden supports.
Crafts from plastic bottle caps – photo:
Don’t throw away plastic caps - make a lot of useful and interesting “homemade products”.
Interesting crafts made from bottle caps. TOP - 100 ideas


Nowadays it is quite popular to do handicrafts. Thanks to imagination, accessible materials and skillful hands, folk craftsmen create amazing things. At the same time, you can make a thing that will decorate the decor or make it special from the most ordinary and unpredictable option. Let's take plastic bottles, for example. These are simply excellent raw materials; from them you can create a variety of crafts and useful things for the household. Elements of furniture, garden products, pots, feeders, decorative elements - this list can be continued for a very long time. And the main thing is that such production is waste-free. The entire bottle is used in its entirety. After all, traffic jams that seem unnecessary at first glance can be used to create beautiful pictures.
Pictures made from plastic bottle caps look original and beautiful. And the main thing is that anyone can create such a product from corks. How to do it? What is needed for the work? What examples of paintings are there on the Internet? This article will answer these questions and also help you do it yourself.
Advantages of plastic stoppers
We can say that this is simply the ideal raw material for work. For many years this method has been popular and decorates the homes and gardens of many residents. What are the advantages of using plastic stoppers?

Indeed, the material has a lot of advantages. This is why corks are so popular in art. The good news is that everyone can start creating. All you need is desire, a clear pattern of the design and a large number of multi-colored corks. Let's look at some techniques for creating cork paintings.
Mosaic of traffic jams
The main challenge in creating cork paintings is finding the right amount of material. Sometimes it is possible to collect a lot of corks within a few months. That is why it is recommended to involve your friends and acquaintances in the search. Then everything will be much faster. This is especially important when it comes to large mosaics. Often compositions are made specifically as room decoration. This could be an old hut or agricultural buildings. You don’t see this kind of finish very often, but it all looks very nice. You can see this in the photo below.

To create a similar picture on the walls, you cannot do without a detailed diagram. After all, you can’t just create an image by eye. If we are talking about beginners, then it is recommended for them to first choose simple schemes in order to master the technique and “get better.” At the same time, you don’t need to immediately take on larger sizes. It is enough to start with a small mosaic that is easy to make. Here is an example of such a simple scheme.

Having done it, you can start creating new drawings. If you have a printer, then just print out one of the diagrams and get to work. It is clear that there are not many similar schemes for paintings on the Internet. But you can print any other one to create a semblance of a picture. Having studied one technique, you can move on to another. After creating a simple mosaic from bottle caps, you can take on a new one, more complex and larger.

There are several directions for making mosaics. It all depends on the location of the pattern and the method of its formation. Mosaic from corks is made as a panel or as an independent pattern that is not attached to the surface. To create a mosaic of corks, there are several main stages of work, which can be divided as follows:
- To begin with, a detailed diagram is applied to cardboard or paper, which is used as a guide in the work. By the way, there is one trick: you can use ready-made cross stitch options as a pattern.
- After which the corks begin to be formed according to color, preparing for work.
- That's all, all that remains is to place the plugs in their places, fixing them to each other with glue, which is intended for this purpose.
Interestingly, this technique is not used often. Many people believe that it is much more practical to fix the plugs immediately on the surface that is planned to be processed. One of the options for implementing a mosaic is to make it on a wooden fence. It is considered an ideal surface for such tasks. You can work directly on the fence, or first make a picture on wooden plywood and then place it on the fence. As an option, simply install a picture with a drawing on the site.

Note! Residents of apartments in multi-storey buildings often adopt similar tricks, thereby decorating their balconies. A pretty good method to make it original and highlight it against the general gray background.

However, cork mosaics have gained the greatest popularity for decorating a summer cottage. The decoration method is very simple, fast, cheap, original and beautiful. Just right for a dacha. The drawings are made in different ways. Some can serve as an ornament and be repeated at intervals, while others are full-fledged designs. If we talk about the fence, there is another option for fixing the mosaic:
- Pictures made from plastic bottle caps, namely diagrams, can be made on cardboard or directly transferred to the fence. To give the painting a deeper look and brightness, the outlines are applied with colored paint that will match the palette of the image;
- The corks are sorted by color and secured with nails. Their length is selected taking into account the height of the plugs and the thickness of the fence or plywood;
- Parts can be fixed both internally and externally. It all depends on the desired result.

Advice! If you have chosen the option of fixing the plugs with the bottom to the surface, then you need to be prepared for the fact that the recesses between them and inside them may become clogged. And this will ruin the whole surroundings. Therefore, from time to time you will need to clean the surface with water from a hose. Otherwise, it is better to fix them with the bottom up.
Cork rugs
Another popular option for using corks is to create rugs with different images or patterns. This invention is not only practical, as it can be used on the farm, but also useful. They can massage tired legs or back, relieve muscle tension and relax the body. Few people know that the feet contain unequal endings that are connected to all internal organs.

If this idea of creation interests you, then the work will require very little material, time and effort. The process is as follows:
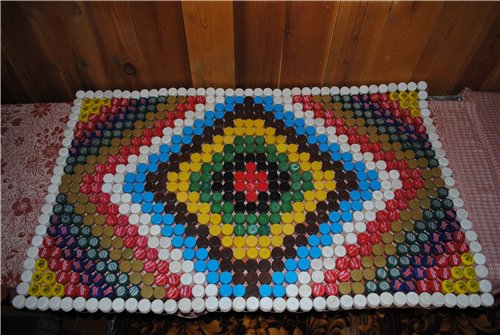

A visual video will help you see exactly how to do all the work. It clearly shows exactly how to implement the idea of a cork rug with a specific pattern.
Note! Garden paths made from cork can be similar to this. Look at the photo how original it looks.

Let's sum it up
As you can see, plastic bottle caps are a universal material that can be used to decorate your dacha, apartment or house. There are a lot of options for using a roof. This could be a mosaic on the walls or fence, beautiful paths made from plastic bottle caps leading to the garden or to the gazebo, rugs for the feet, back or hallway. But that's not all. Some even create incredible paintings from lids that they simply hang on the wall. The creation technology is practically the same. The same scheme is taken as a basis, and the plugs are fixed in place. You can see similar products in these photos.

Bottle caps are an ideal option for making various kinds of crafts and useful things for the garden. They come in different colors, are inexpensive, and are quite easy to work with.
- Design rafts, boats. The process requires persistence and skill. But in the end we get original products. There are various ways to place covers on a watercraft.
- Carports. By making a canopy using a variety of bottle caps, you can protect your car from direct sunlight. First, a wooden or wire frame is made. Then the covers are attached. Then they are simply painted.

- Furniture for the garden. You can decorate benches, ottomans, sofas, and beds with covers. In a country house, there will be a lot of trouble with cleaning. If you use plastic covers instead of traditional fabric upholstery, problems can be avoided. Cork tables and chairs designed for outdoor use look especially good.
- Decorating pots for plants. It is enough to take ordinary pots and glue colorful lids on them.
- Gates, fencing and fences. You can save a lot of money by making a fence at your summer cottage with your own hands. In this case, a mosaic of lids is laid on the finished frame of the structure.
- Decoration of flower beds. Landscape installations: figures of airplanes, birds and animals. Anyone can do these crafts.

Gazebos decorated with bottle caps
It is not necessary to make crafts from the lids. You can do something more meaningful, for example, a gazebo. At the same time, you can save a lot.
The frame can be made of any material. Experiment! The shape of the structure may not be the standard rectangular, but also hemispherical. After constructing the frame, covers are attached to the walls using nails or screws. You can use regular glue.
Using bottle caps you can lay out various ornaments. This will add variety to otherwise colorless walls.
First, a frame is made of dense wooden or other sheets. Then it is decorated with the products in question.

Manufacturing of lamps
You can also save on purchasing lamps. You will need: a canister of household chemicals, a socket with a light bulb, and caps.
- The neck of the canister is cut off.
- A socket with a lamp is installed inside.
- Lids are glued onto the canister as decoration.
The presented type of lamps look very beautiful. The lampshades for country lanterns are made in the same way.
How to decorate a dacha with plastic corks (video)
Despite the fact that at first glance it is quite simple to decorate a country house using bottle caps, there are some rules that should be taken into account.
- It is better to “plant” the lids on cement mortar.
- Cement does not react with plastic the same way as brick, so it is recommended to pre-make holes in the lids.
- Plastic breaks down under the influence of heat and frost. This must be taken into account.
- Bottle caps can also be used to decorate the roof. At the same time, the products are attached to self-tapping screws.
- If there is a building made of brick or wood on your site, you can easily decorate it with plastic covers, laying out any ornament you like. This could be: images of animals, geometric patterns, cartoon characters, flowers.
Corks are especially popular when creating country decor. From them you can create entire installations in the form of three-dimensional and flat figures of plants and animals, borders and flower beds.
- The outline for a flower bed in the shape of a ladybug made from lids looks original.
- Among other things, covers are actively used to create garden paths. Making them is very simple: cement is poured (immediately give it the desired shape), and then multi-colored or plain-colored plugs are stuck into it. Due to the corrugated sides, they are firmly stuck in the material. You can make paths in the form of original panels.

- If we talk about installations, the simplest option is to make a Christmas tree. A shape is cut out of plastic bottles. And then the New Year tree is decorated with multi-colored lids connected into garlands. You can make miniature Christmas trees from green corks.
- Using lids you can decorate the interior of your home. Curtains, panels, screens and partitions - all this can be done with your own hands. You definitely won’t see similar products from anyone else.
- Rainbow curtains made from corks of various colors look modern. Even a child can assemble them.
Ideas for a summer house made from traffic jams (video)
Almost anything can be made from bottle caps. Many summer residents skillfully use this. It is recommended to use corks of different colors and shapes, then the designer creations will look more original. You can combine the use of caps with plastic bottles and other seemingly unnecessary things. The main thing is to use your imagination and everything will definitely work out. The work will require patience, so you can involve your family and friends. It's more fun to act together!


Reviews and comments
(3
ratings, average: 4,33
out of 5)
Alice 08/26/2015
I recently started getting into Hade-made and my attention was drawn to plastic bottle caps and jar caps for children’s attention. Such pictures come out!) I decorated the whole dacha, the neighbors just gasped and went to take pictures) And most importantly, it turns out beautifully and effectively)
Stanislav 01/20/2016
I would never have guessed how many interesting ideas there are. I just found a use for creating a path by simply pressing corks into the sand, and my wife and I made the curtain. But to make a small picture on the wall with some kind of image - this is now our task, we’ll just collect the covers.
Olga 05/24/2016
But I’m somehow indifferent to crafts made from plastic bottles and caps. Although, some works are, of course, worthy of attention. But already as art objects :) Still, I prefer to decorate my summer cottage with more natural materials - wood, stones...
Olenka 06/14/2016
Great! I would never have thought that such beauty could be created from such material as lids. The downside is that the work is painstaking and the lids take a long time to assemble. And one color. But then no one will have such decor in their dacha. And the child should also like this activity. We will try!
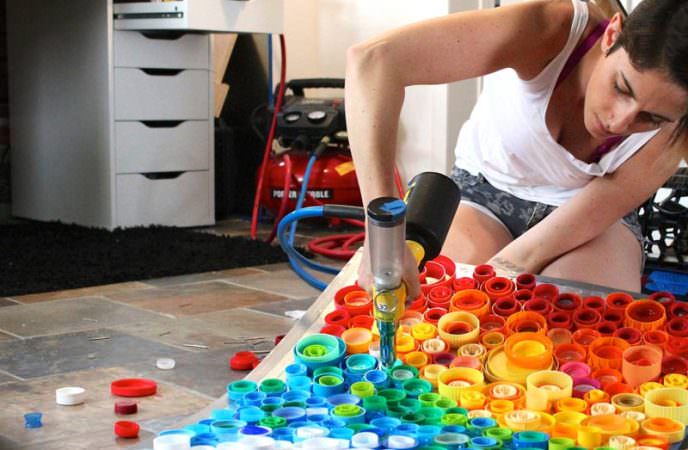
Add a commentCrafts made from plastic bottle caps. What can be made from plastic bottle caps? Plastic bottles are a familiar material, and you won’t surprise anyone with crafts made from them. Another thing is the caps, which many people unknowingly throw away along with the bottles. But you can make so many useful and interesting crafts from them, including mosaics, refrigerator magnets, wall panels and massage mats! Plastic cork magnets You will need: Lids; Small magnets; Glue or double-sided tape; Medical alcohol; Markers. Instructions: Degrease the plastic cover with medical alcohol, glue a magnet inside. On the front side, draw a funny face. If you glue special decorative elements with a moving bead in a plastic shell to the lid, the eyes in the image will turn out to be more alive. Mosaic made from plastic corks: manufacturing rules Greater skill requires a mosaic made from plastic corks, which can be either an independent craft or a decorative element. Thanks to the strength of the material, you can decorate your garden patio or the facade of your house with this product. During manufacturing, the covers are fastened together using a special glue for gluing polyethylene BF-2 or BF-4. For more complex drawings, it is worth making markings on a primed sheet of plywood in advance, and then using acrylic paints to draw the desired figure. When the paint has dried, you can begin gluing the corks using a glue gun. To make a cork mosaic you will need a large amount of material of different colors and some drawing skills. If you decide to make a mosaic on the surface of the wall, the technology for its implementation is somewhat different. First you need to choose a pattern or design that will be applied to the surface of the wall. After selecting a surface, it needs to be marked. When marking, place marks at the height and width of the pattern. It is also necessary to divide the proposed wall into equal squares - this will help control the shape of the pattern and design. Additionally, you can mark the colors of the plugs that will be attached in the marked squares. After applying the markings, you can begin placing the plugs. You can nail the plugs to the wall with the front or the inside. If you decide to attach the plugs with the front side, you will encounter difficulty in cleaning the wall surface, since debris and dust will collect in the plugs. Fastening with the inside is convenient because after work you can mask the mosaic seams using cement-sand mortar. If the wall on which you plan to lay the mosaic is concrete or brick, it is recommended to use special compounds for fastening. The wall surface is plastered at the same time as the covers are applied. After completing the mosaic, wait until it dries, then you can eliminate any defects. Nailing is considered the optimal method of attachment to wooden structures. You can use self-tapping screws or regular nails. How to make a rug from plastic bottle caps? You can make a massage mat from corks quite quickly. The finished product looks beautiful, especially if you use multi-colored lids. You can get a lot of benefits from a lid massage mat. Firstly, it is wonderfully relaxing. Secondly, doctors advise walking on such mats every day for about 10 - 15 minutes. It improves health. The effect of a massage mat made from lids is explained by the fact that the feet have a large number of sensitive nerve endings that are responsible for different organs and systems of the body. During the massage, the whole body is charged. You will need: Plastic bottle caps; Awl; Thick and durable line. Instructions: There should be approximately 10 - 15 caps on each side of the hexagonal mat. To correctly calculate their number, you need to multiply the number of caps on the 1st side by the number of sides and subtract the number of caps that are repeated. When you have collected the required number of parts, pierce six holes in each lid with an awl. All the extreme ones are collected on 1 strong fishing line. Then, the lids must be braided with a piece of fishing line so that they hold tightly. Thus, assemble the blanks into a hexagon, securing with fishing line. To make the massage mat beautiful, use multi-colored covers and lay out a specific pattern. You can design it in advance, and then just start assembling it.
Why throw away something that will still be useful? You can make excellent crafts from bottle caps for the garden and at home with your own hands. There are many options for using old household items in your home. And they talk not only about ordinary, but also seemingly completely unnecessary objects. For example, you can make interesting crafts using old tires, unnecessary bottles, and even create a whole creative idea using bottle caps.


Bottle Cap Craft Ideas
Since there are a wide variety of caps available in terms of color and sometimes shape, different uses can be considered. Here are a few of them.

There are all kinds of other ideas, and in fact there are a lot of them. The lids can be used in any decor of almost all items. And if you’ve already collected a bunch of caps, you probably still have the bottles themselves.
Read also:
1. Crafts from plastic bottles for the garden.
2. DIY greenhouse made from plastic bottles.
3. Birds and animals made from plastic bottles - craft ideas.
How to make crafts from bottle caps
There are several important points that are worth knowing before proceeding directly to the crafts from the lids themselves.

Use the material to decorate objects made of wood and brick. Remember that you can post any drawing you like. And it will look quite intriguing and beautiful.
Bottle cap decor options
An interesting fact is that crafts made from lids can be not only flat in shape, but also voluminous. Ask how? Yes, very simple! With their help, you can lay out any animal or, for example, a cartoon character in three-dimensional form.
You can use these other options for decorating your home and garden:

Panel, mosaic, painting made from plastic bottle caps
One of the largest projects that can be done using lids is mosaics and paintings. They usually decorate the walls of a building or fence. The most important point will be the correctly selected pattern and colors of the caps.


Progress:

Following the rules for drawing, you will need to go through everything step by step.
Read also: what else can you use to make a mosaic with your own hands and a mosaic in landscape design - there are also ideas for crafts from lids and corks.
Rules for creating a picture from caps
There are several unspoken rules that must be followed if we want to get the desired result.

Master class “Rug made of caps for relaxation”
Using bottle caps you can not only create interesting decorations for your home and garden, but also quite useful things directly for health and relaxation. We will talk about a mat, when walking on which the whole body benefits and relaxes. This is due to the fact that a person’s feet have a large number of nerve endings that need to be relaxed from time to time.


Materials that will be needed for work:
- Lids.
- Fishing line.
- Awl.
Progress:

Photos of crafts made from plastic bottle caps


Here our unique thing is ready. Use it every day for at least a few minutes and very soon you will get results that everyone will envy.


