Making Christmas decorations out of paper: the best ideas for creativity. paper Christmas decorations
Helpful Hints
To decorate a Christmas tree or a house, it is not necessary to buy a lot of toys and decorations.
If you have colored paper, cardboard, glue, and a few extra simple supplies, you can create a ton of Christmas crafts.
Here are just a small part of paper crafts for the new year:
On our website you will also find:
What can be made of paper for the New Year: tube decoration

You will need:
2 sheets of cardstock in different colors or 2 sheets of scrapbooking paper
Scissors
PVA glue
Ring with chain attachment (optional)
1. From one sheet of cardboard, cut out 14 squares with a side of about 2.5 cm.
2. From the second sheet of cardboard, cut out 14 squares with a side of about 3 cm.

3. Start folding the opposite ends of the squares as shown in the image - one end on top of the other. In the place where the ends overlap each other, add a little glue.


4. Cut out a circle with a diameter of 5 cm from any sheet of cardboard. Mark its center.

5. Apply glue to the circle and start gluing the prepared tubes - first large tubes, and then small ones - they are glued on top of the large tubes.

* Try to glue the tube evenly to the tube.
* You may not need all the prepared tubes for crafting - this is normal.


* Glue a few rhinestones to the craft as additional decorations (this is not necessary).
6. Add a ribbon - it can be glued or threaded into a ring attached to the decoration.
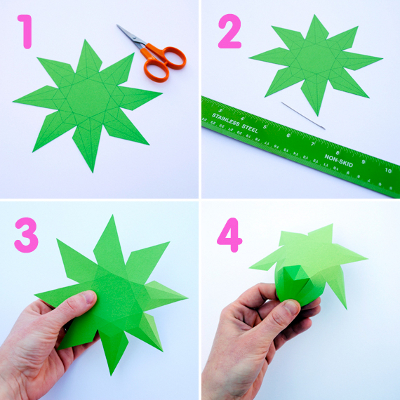
DIY paper cones

You will need:
Colored paper or cardboard
Ruler and pencil
Scissors
PVA glue or pins
Styrofoam ball
* If you did not find a foam ball, then it can be replaced with a crumpled sheet of paper in the form of a ball, wrapped with a thread that secures the shape.
1. Cut out strips 2.5 cm thick from paper or cardboard.

2. Cut each strip across into small pieces 2.5 cm wide - you will get several squares.
3. Fold each square as shown in the image - make an arrow by bending the opposite ends.

4. Prepare the ball and start gluing (or pinning) paper blanks to it as shown in the image. Do everything in layers - first the bottom row, then move up, creating new rows.

5. Glue a ribbon to the top of the head so that the tree can be hung on the tree, and you can also add some artificial leaves as a decoration.
New Year paper crafts in quilling style

You will need:
Pages from old magazines or newspapers
PVA glue
Baking tins (optional)
Thread or braid and bead.
1. Cut out strips 4-5 cm wide from paper.
2. Fold each strip in half lengthwise. Unfold the strip and bend again, but this time each side to the center, and then the entire strip in half again (see image).
2. Prepare the glue and start twisting the strips into circles, adding a little glue so that they do not come apart.


3. Take another paper strip and bend it as in step 2. Prepare a baking dish (in this example, it is in the shape of a star) and put a paper strip into it, carefully laying it out inside the mold.
4. Now start laying out the twisted paper circles inside the molds. Apply glue to them so that all the circles are connected to each other and to the strip inside the mold.


4. When the glue dries, remove the blank from the mold. You can add more glue to make the workpiece even stronger.
5. Pass the thread or braid through the craft and add a bead for beauty. Tie a knot.
* For such crafts, you can use different molds, a heart, for example.
Wall decoration made of colored paper for the New Year

You will need:
10 paper plates
20 sheets of green paper
stapler
Double sided tape
Scissors
Cardboard decorations (can be cut from old postcards or drawn and cut)
White braid (optional).

1. Cut out large squares from green paper - one square from one sheet. The square should fit inside the paper plate. If necessary, reduce its size.
2. Fold each paper square like an accordion, and then in half.
3. Fasten the ends of the accordion folded in half to get a semicircle.
4. Repeat steps 1-3 with other paper.
5. Connect the two semicircles together with double-sided tape or a stapler to form a circle.
6. Using double-sided tape, attach the circle to the middle of the paper plate. Glue double-sided tape or apply glue to the back of the plate so that you can stick it to a wall or other surface (you can stick it to plywood, a wooden tablet, cardboard and then put it on a shelf or hang it on the wall).
7. Make 10 similar blanks.
8. Start making Christmas tree decorations. Cut out paper Christmas decorations and glue them together to form a circle. After making several circles (3-4 pieces), they can be glued to the plates, like Christmas decorations.
* You can add a white braid to the top of the Christmas tree, on which the Christmas tree supposedly hangs on the wall.
Christmas decorations made of paper: 3D paper droplet

INwe will need:
colored paper
Pencil
Scissors
1. Draw a large droplet on cardboard and cut it out.
2. Use the drop template to create a few more - place a cardboard drop on paper, trace and cut out.

3. Put a few drops into one stack, fold the stack in half and cut out a circle in the middle (see image).
4. Start gluing the sides of each drop to end up with one voluminous drop. In this example, it took 16 drops to make one voluminous, but more can be done.
* You can add thread or ribbon to hang the decoration on the Christmas tree.

Christmas paper toys: cone balls

You will need:
Paper (can be old magazines)
Scissors
Thread and needle
Double sided tape or glue.
1. Cut paper circles of the same diameter (choose any size)
2. Make a cut along the radius in each circle.

3. Make two cones from each circle - twist the paper from one and the other end (from the notch) to the middle, and fix the workpiece with glue or tape (see image).
4. Also make two cones from each of the remaining circles.

5. Prepare a thread with a needle and thread them through each blank so that in the end a ball is obtained from 10 blanks. Tie a knot.

6. Add string or ribbon to hang the toy on the Christmas tree.

How to make Christmas lanterns out of paper

You will need:
Stationery knife
Pencil and ruler
Thick colored or decorative paper
Needle and thread

1. Prepare a sheet of paper, fold it in half and cut it into two rectangles.
2. Lay one rectangle on a flat surface that can be cut. Using a clerical knife, make several transverse cuts from one end of the paper to the other - the distance between the cuts is the same, and they should lag about 1.5-2 cm from the edges.


* You may need to first mark where the cuts will be. Use a pencil and ruler.
3. Roll the paper into a tube as shown in the image. Secure the ends with tape.
4. Take a needle and thread and start threading them alternately over and under the strips that formed after the cuts.
5. When you have wrapped the entire workpiece with thread, tighten it and tie a knot.

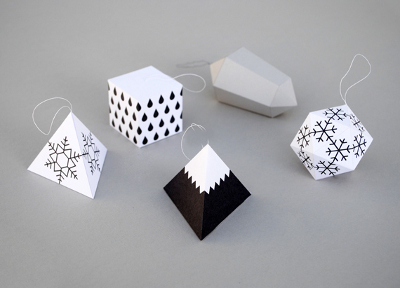
To decorate the Christmas tree with "precious paper stones", you just need to print out the ready-made templates, cut them out and glue the paper Christmas decorations.
Before you completely glue the craft, attach a loop from the inside, for which you will then hang the toy on the Christmas tree. Finished paper stones can be covered with sparkles for beauty.
Small size templates: template-1 template-2 template-3 template-4 template-5
On the same site, you can download a template for another, more difficult to make New Year's paper craft - a paper diamond. It can also be used as a Christmas toy or Christmas decoration. Download template >>>>

Print the New Year's diamond scheme on thick colored paper, cut it out. Before gluing the craft, carefully, along the ruler, scratch the fold lines (marked with a dotted line) with a needle to make it easier to fold the paper. Note: if you suddenly printed the template from the link above, but the dotted line is not visible on it, you can use this template. Here everything is the same, only there is no dotted line.
And more Christmas paper crafts from www.minieco.co.uk:
paper Christmas decorations

2. New Year paper crafts. New Year paper toys
paper bells

3. New Year's decoration. New Year decoration
The Creative Park site from Canon, which is probably already known to many, will help you decorate the New Year tree with handmade paper toys. Christmas toys - bells, hearts, candy canes, Christmas tree decorations in the form of Christmas boxes - all this and much more you will find on the Creative Park website.


4. DIY Christmas decorations. How to make New Year's
We suggest you make simple Christmas tree decorations out of paper, decorated with photographs of family members. To do this, you need to download templates for Christmas tree decorations from the link, cut out individual squares, bend their corners and glue them together. For a New Year's toy made of blue paper, it is necessary to cut off, round off the corners. See photo below.

In the photo below, a New Year's paper toy depicting Santa Claus is made in a similar way. You can download the template.

5. New Year's ideas. New Year's master class
Another interesting New Year's idea is an origami wreath Christmas decoration. To make such a paper wreath, you will need to cut beautiful paper into strips 4 cm wide and 8 cm long. You need 8 strips in total. Each strip must first be folded in half lengthwise, and then in half across. Holding the blank with the open edge up, bend its top corners down as shown in the photo. See the New Year's master class at the link >>>> From the resulting blanks, assemble a New Year's wreath by inserting them one into the other.

6. Christmas toys made of paper. How to make a Christmas toy
Most people associate ice cream with hot weather and summer vacations, however, Christmas decorations in the form of waffle cups with delicious treats look very festive and original on the New Year tree. To make these New Year paper toys, you will need Kraft paper (for cups) and corrugated paper of different colors for the ice cream itself.

Cut out circles from craft paper, cut them in half. From each semicircle, fold a cone, glue it. Crumple corrugated paper of different colors into lumps, for one Christmas tree toy you will need two such lumps. Now you need to string "cups" and "ice cream" on a thread, making loops on top, for which you will then hang New Year's paper decorations on the Christmas tree. See the New Year's master class at the link >>>>
7. Christmas toys made of paper. New Year's schemes
In Denmark, there is a tradition of decorating the Christmas tree with heart-shaped wicker paper baskets. The photo below shows traditional wicker baskets made of paper. They can be hung on the Christmas tree empty or filled with small sweets, nuts, cookies.

To make this Christmas paper decoration with your own hands, you need to print the following template on two sheets of paper in different colors. Cut them out, fold in half, make three cuts. You should get these two blanks.

Now you need to weave them together to make a paper heart basket. For a detailed New Year's master class on how to weave a paper basket, see the link >>>>

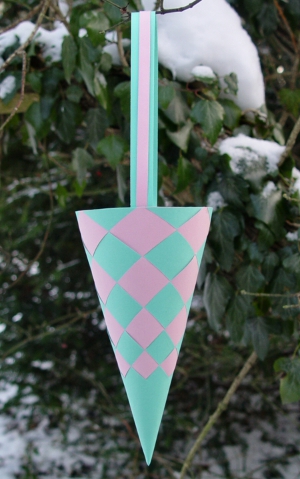

Here are a few more New Year's paper baskets for the Christmas tree:
With snowflakes


How to make beautiful Christmas decorations for the Christmas tree and New Year's interior with your own hands.
These Christmas decorations can be used to decorate a class at school, a kindergarten playroom.
spiny ball
From paper, cut out 14 circles of the same diameter. Divide each circle with a pencil and a compass into 12 identical sectors (Fig. a).
Roll each of them into a bag and secure with glue (Fig. b).
Do the same with all fourteen circles. Place them in two stacks of 7, face down. It is necessary to fold so that each upper petal-bag lies between the two lower ones (Fig. c).
.jpg)
Fasten the mugs in piles together with glue or thread (fig. d). You will get two hemisphere blocks. Glue them by laying a thick thread with a loop between them - the prickly ball is ready.
.jpg)
Spiral of stars
Put a sheet of blue paper on a plate, circle it, cut out a circle in a spiral (Fig. a). Make 8 holes. Circle and cut out 8 stars from yellow paper (fig. b).
.jpg)
On each asterisk, make a hole with a needle and thread through. Tie the stars to the spiral (fig. c).

Volumetric Christmas tree
On colored paper, draw a half-Christmas tree template (Fig. a). According to this template, cut out more Christmas trees from four double sheets (fig. b).
Glue them together on the wrong side. When gluing, put a loop of thread or decorative string inside so that you can hang the toy later.
.jpg)
The Christmas tree is ready (fig. c).
.jpg)
Christmas tree garland
Take colored, silver or gold paper of the required length. Fold the strip several times. Translate the drawing, cut it out. Decorate the Christmas tree with the resulting chain.
eight pointed star
Fold a square piece of white paper in half, then in half again, and cut out a circle. Draw rays with a pencil and cut out
Openwork garland
Fold a sheet of paper 4 times, make cuts alternately on both sides. Unfold and stretch the garland. It is best done with foil or gold and silver paper.
Christmas boots
Fold colored paper in half. Cut out the silhouette of a felt boot or boot in such a way that the back line of the shaft falls on the fold line.
Cut out a narrow strip from white paper. Unfold the card and glue it to the very top of the boot. Fold the card, cut off the excess white paper. Decorate the boots, thread them so that they can be hung.
Cone
Prepare three strips of paper 3x15 cm. Make cuts on each strip, small cuts from two edges of the strips. Fold the strips with a roll, one on top of the other, fixing the ends - the cone is ready.
Christmas trees accordion
Fold a sheet of paper measuring 14x20 cm with an accordion along or across the sheet. On the workpiece, make a “straight cut with gaps” element. Position the cuts as far as possible to the opposite edge. Turn the strip of paper over so that the cut out triangles are on top. Repeating the shape of the triangle, once again make a straight cut, leaving the edging of the same width. Expand and straighten the finished craft.
.jpg)
Rice. Christmas trees accordion
metallic paper star
Fold a square piece of metallic paper in half diagonally to form a triangle. Follow the template, attach it to the resulting triangle. Following the dotted lines, fold inward the right corner of the triangle, repeat this one more time until the next dotted line.
Flip the triangle over and repeat the same steps from the other corner. At the same time, make sure that the fold lines on one side run along the edge of the other. Redraw the pattern on the folded triangle according to the template. Cut along the edges with a cutter, and punch inside with a punch (Fig. a). Expand, smooth out the folds coming from each beam so that they are of the same type - with an inflection. All folds separating one beam from another should be turned in the opposite direction.
Make another star in the same way, using paper of the same or a different color. Cover the craft with paint with a 3D effect and, while it is still wet, sprinkle with glitter.
.jpg)
When the paint dries, connect the stars with double-sided tape with the reverse sides (fig. b). Cover the joints with paint. Pull the thread into the beam hole (fig. c).
.jpg)
Rice. metallic paper star
Pendant "Asterisk"
On colored paper, draw the outline of a five-pointed star, inside it - three more of the same outline. For each contour, mark with a pencil the lines that do not need to be cut (Fig. a). Cut out, excluding the marked places. The contour of each star will turn out to be linked to another (Fig. b). Attach the thread.
.jpg)
paper cascade .jpg)
You will need a cylinder made of food foil cardboard, patterned wrapping paper, foil, PVA glue, thin adhesive tape.
Wrap the cardboard cylinder in foil and fold the edges inwards. From the wrapping paper, cut out a 16x16 cm square and a 10x16 cm rectangle. Then cut out two 14x16 cm rectangles.
Step back from the edge 2 cm and draw a line on the sheet. Do the same for all four sheets.
From the opposite edge, cut strips 1 cm wide. Take a 10x16 cm rectangle.
Attach the paper to the cylinder with the right side inward, then glue the wider parts. Turn the cylinder over and shake it slightly so that the paper turns right side out (fig.).
Cut out various shapes from folded glitter paper and glue them to the ends of the strips.
Hang the finished decoration where the light will fall on it.
If spending on New Year's paraphernalia is not included in your plans, then do-it-yourself New Year's paper toys will be your way out. In addition, such an original gift for the Christmas tree will be remembered for a long time.
The sacramental meaning of the New Year and Christmas is in the rapprochement of family members. And what brings people together better than joint creative work?! Making New Year's toys with your own hands in the company of household members is an exciting activity in itself, not to mention its results - original New Year's decorations that can be hung on Christmas tree.
If you make toys with your own hands from glass, porcelain, beads, then it will take a lot of time and require certain skills. Against this background, paper toys are a simple option that you can make with your child and put on the Christmas tree. Here are step-by-step diagrams and videos of master classes - 2017 making such crafts with your own hands.
Christmas paper balls 2016
To make this Christmas tree decoration with your own hands, you will need a minimum of materials. The main thing here is patience and sleight of hand. Do not be discouraged if you do not immediately get a toy, as in the photo - such decorations require some skill, which will come with time. Therefore, immediately tune in that the first toys will not turn out to be the most accurate. But the result will exceed all expectations and justify your efforts!
Christmas paper balls 2016: making stencils
So, in order to make this christmas ball on the Christmas tree, you must perform the following sequence of actions:
- Print the stencil on the printer. We suggest using the following drawings:
- Then take thick sheets of colored paper and circle the stencil with a pencil.
Advice! If the printer allows, stencils can be printed immediately on colored paper. This will save time and effort.
- Carefully cut out the details of the future toy.
- Arrange the resulting blanks in the shape of a flower. Fasten the center with a circle cut out of colored paper, firmly gluing it, as shown in the photo.
New Year paper balls-2016: main work
To carry out further work will require sleight of hand.
- The most responsible and interesting step is weaving. To do this, successively weave one strip into another, as shown in the photo.
Advice! Use paper of different colors to make the toy more interesting and colorful. And so that the toy does not fall apart when weaving, use clothespins.
- When you are almost done weaving, then glue the ends of the paper ribbons.
- In the part of the ball where you glued the circle (see step one), make a small cut in the form of a line. Insert a beautiful ribbon into it and stick it with glue. P It is better to singe it beforehand so that it retains its original appearance.
The original New Year paper toys of the new 2017 are ready! Using different stencils and colors, you can create a variety of balls. Another interesting version of the 2017 ball with your own hands can be seen in the video:
Interesting New Year's paper toys for the celebration of 2017 can also be made in the form of lanterns. This version of New Year's decoration came to us from our grandmothers and was popular in those days when toys were hard to find on sale. The flashlight is even easier to make than the previous toy. Even a child can be involved in the process of its creation. An interesting version of crafts in the form of a flashlight can be seen in this video:
magic lamps
Lamps for the new 2017 can be made from improvised materials. To do this, you only need scissors, glue and colored paper or cardboard packaging:
- Take two sheets: one is yellow, the second is a contrasting one, for example, purple. Cut out two rectangles. Yellow - 100x180 in size, purple - 120x180 (with millimeters).
- Take the yellow rectangle and glue its edges into a tube shape. Next, set it aside and proceed to the purple part. You should fold the sheet in half and make cuts with scissors, leaving room at the edges. We also glue it in the form of a tube, like a yellow sheet of paper or cardboard. The photo shows how to make a red flashlight. The sequence of actions is similar.
- If you cut everything carefully, then the yellow tube should go into the purple one. At the same time, it must not be pushed through to the end. Its edge must be smeared with glue, and only then insert the resulting yellow flashlight into the purple tube completely. The same must be done on the other side. Slightly pull up the purple part to release the yellow. Coat it with glue. This will fix the yellow leaf in purple.
- To make the flashlight more realistic, you should make a handle. To do this, cut a narrow strip of purple paper or cardboard and glue it to the flashlight.
- Your magic flashlight is ready. This is one of the easiest crafts, even a child can handle it.

How to make a flashlight with your own hands for the celebration of 2017, you can see in this video:
Asterisk 3D made of paper
Another popular Christmas tree toy for 2017 is the star. Rare tree does without it. This toy is both spectacular and easy to make. To do this, you will need the same materials as in the manufacture of the previous decoration. It remains to add only a thread. Read the master class or watch the video.
- From colored paper, you need to cut out two squares measuring 10x10. You can use your imagination to the fullest: your stars do not have to be yellow. Use purple, red, blue, pink colors! And your Christmas tree will sparkle with different colors.
- On a sheet of colored paper, fold in half twice, and then two folds diagonally.
- Make small cuts on the edges of the paper and fold into the corners (as shown in the photo).
- Glue the corners in the center, leaving the rest of them free (this will give the future star volume). You should get some kind of rays.
Advice! Hold the corners while gluing with your finger. That way they stick better.
- Repeat the above procedure with the second sheet of colored paper.
- We glue the two halves of the star into one. Do not forget to put the edge of the ribbon between them, for which you will hang the star on the Christmas tree.
- Give the star time to dry. This will take approximately 20 minutes.
Guys, we put our soul into the site. Thanks for that
for discovering this beauty. Thanks for the inspiration and goosebumps.
Join us at Facebook And In contact with
Many people notice that the older they get, the more difficult it is to re-experience that magical feeling of a fairy tale and a miracle that always came to us in childhood on New Year's Eve.
But we are in website we are sure that the New Year mood will not keep you waiting if you make one of these wonderful decorations for the house and the Christmas tree with your own hands. Almost all, with the exception of two or three, do not require much time and some special materials - they can be made in half an hour from what is at hand.
Thread stars
A wreath of balloons and an old hanger
In just half an hour, you can make a colorful wreath by buying a couple of sets of inexpensive balloons. Blogger Jennifer, the author of this article, recommends unbending an old hanger, but if you don't have one, then a piece of strong wire will do just fine.
- You will need: a couple of sets of balloons (20-25 balloons of different colors and sizes), a wire hanger or wire, spruce branches, braid or ready-made decoration for decorating a wreath.
Snowflake tablecloth
A delicate and surprisingly festive tablecloth will turn out from snowflakes, on which we have stuffed our hands since childhood. You can sit down and cut snowflakes with the whole family, and then lay them out on the table and fasten them with small pieces of tape. A wonderful solution for receiving guests or just having dinner with the family during the holidays.
multicolored hats
The cutest colored hats can be made from leftover yarn, which can be used to make a garland for a Christmas tree or for decorating a wall. Or hang them on a window or chandelier at different levels. Children over five years old will also do just fine with this simple decoration. See details.
- You will need: a roll of toilet paper for rings (or regular cardboard or thick paper), scissors, multi-colored yarn and a good mood.
Lamp "Snowy City"
For this charming lamp, you need to measure a piece of paper around the circumference of the can with a small margin (to glue), depict and cut out the simplest urban or forest landscape. Wrap around the jar, and put a candle inside.
- You will need: a jar, thick paper of any color, white can be, any candle. Alternatively, you can cover the top of the jar with "falling snow" using a special "snow" spray, which is sold in hobby stores.
Balloons with photos
A great idea for decorating the Christmas tree or as a gift to relatives and friends. The photo must be rolled up into a tube so that it passes into the hole of the ball, and then spread with a wooden stick or tweezers. Small black-and-white rectangular shots will do, and you can also cut out the photo in the shape of a ball or silhouette (as in the case of a cat in the snow).
- You will need: plastic or glass balls, photographs, various things to fill the ball - tinsel, garlands, coarse salt (for snow).
Christmas lights
And this miracle is a matter of five minutes. It is enough to collect balls, fir branches, cones and put them in a transparent vase (or a pretty jar) and add luminous garlands.
embers
Luminous garlands hidden among cones, branches and coniferous paws create the effect of coals smoldering in the fireplace or a cozy campfire. They even seem to be getting hot. For this purpose, a basket lying on the balcony for a hundred years, a nice bucket or, for example, a wicker container for small things from Ikea, is suitable. Everything else (except for the garland, of course) can be found in the park.
floating candles
A very simple decoration for a New Year's table or for a cozy evening with friends during the New Year holidays is a composition with candles floating in a vessel with water, cranberries and coniferous branches. You can use cones, circles of oranges, fresh flowers and leaves from a flower shop - whatever your fantasy tells you. And as a candlestick - deep plates, vases, jars, glasses, the main thing is that they are transparent.
Snowman on fridge or door
From this, the children will definitely be delighted - fast, fun and very simple, because even a three-year-old can handle cutting out large parts. It is enough to cut circles, a nose and a scarf from self-adhesive paper, wrapping paper or colored cardboard and attach them to regular or double-sided tape.
Snowflakes on the window
An interesting use for a glue gun lying around idle. In order to stick these snowflakes to the glass, just press them lightly to the surface. See details in our video.
- You will need: a stencil with a snowflake drawn with a black marker, tracing paper (parchment, baking paper), a glue gun and a little patience.
Christmas trees-candy
Bright Christmas trees can be built together with the kids for a children's holiday or decorate a festive table with them. Cut out triangles from colored paper or cardboard, attach with tape to a toothpick and stick the resulting Christmas trees into sweets.
- You will need: Hershey's Kisses or any other truffle candies, toothpicks, tape, colored paper or cardstock with a pattern.
Garland with photos and drawings
New Year, Christmas - warm, family holidays. And it will come in handy with photographs, children's drawings, pictures. They are easiest to secure with clothespins that can be decorated with hearts or snowflakes.
origami star
painted spoons
Ordinary metal spoons or wooden cooking spoons are turned into interesting Christmas decorations with the help of acrylic paints. This idea is sure to please the kids. If you bend the handle of metal spoons, they can be hung on a Christmas tree. And wooden spoons will look great in the kitchen or in a bouquet with spruce branches.


