How to make a hedgehog from pine branches. Making crafts hedgehog from cones and bottles. photo ideas crafts from cones
Autumn is a great time to develop the creative abilities of children. At the same time, huge investments are not required. Gardens, courtyards and parks abound with natural craft materials. Chestnuts, acorns, walnuts or cones make great toys. It is good to do creative work in the company of older brothers or sisters. If something doesn't work, you can always contact them.
What animal can be made from one pine cone and plasticine? The answer is simple - a funny and cute hedgehog. A fairy-tale character is preparing to meet winter, picking mushrooms and apples in the forest. Here he pricked rowan berries on sharp needles.
For work you will need:
- - one large (blooming) pine cone
- - plasticine
- - leaves, berries and chestnuts to decorate the forest clearing around the craft.

To decorate the abdomen, you can use brown, yellow or white plasticine. It all depends on what color is available. From a small piece of plasticine, a flat egg-shaped cake is formed, which is attached to a pine cone - the body.

Real hedgehogs have an elongated pointed nose. It is not easy to make such a “horn”, it is quite possible that the child will need the help of parents. But to fashion brown balls - eyes, a black tip and a red oval tongue will not be difficult even for a three-year-old baby.
After attaching the details to the head of the craft, a certain picture emerges. Who does the animal look like? That's right, a hedgehog.

Here the hero is shown from all sides in close-up.

As for the limbs of the craft, you can make paws in different ways. For this purpose, it is good to use acorn caps, tree branches. However, if there are no other natural materials in stock, then the limbs will have to be sculpted from plasticine. The front paws are made in the form of tubes with pronounced palms, and the lower ones (for better stability of the hedgehog) are in the form of balls.

It remains to attach the plasticine parts to the cone and check if the craft is tipping over? A wonderful hedgehog.

Here is the hero posing for the guys, turning in different directions. On the paws, grooves made by the stack - claws - are clearly visible.

Helpful Hints
toy eyes
PVA glue.

To make sure that there are no insects in the cones, it is better to clean them.
1. Cut thin brushes into small pieces (3-5 cm) - these will be hedgehog needles.
2. Cut out a few small triangles from felt - these will be hedgehog ears.
3. Apply PVA glue to the ends of the cut brushes and insert them into the bump between its scales.

4. Glue felt triangles to the cones to make ears for your future hedgehogs. You can bend the triangles and then glue them to make the ears rounded.

5. Take a small pom-pom and glue it to the top of the bump - this will be the nose.

6. Take two small pieces of a cut brush, bend them in half and glue toy eyes to the fold. Let the glue dry for about 1 hour.


7. Insert blanks with eyes into the cone between its scales.

Hedgehog from fir cones and polymer clay (step by step)

You will need:
Polymer clay (black, beige or any light tone)
Black beads (in this example, their size is 4 mm)
Cocktail straw (optional)
Toothpick (for adding details)
PVA glue.
1. Roll a ball out of beige clay, and then make a cone out of it - this will be the muzzle of a hedgehog.


2. Attach the muzzle to the bud and smooth out the ends of the clay so that it adheres well to the bud.
3. From clay, roll two large "sausages" (for the hind legs), two medium ones (for the front legs) and two small circles (for the hedgehog's ears).
4. Attach large and medium clay sausages to the cone so that they form the legs of a hedgehog. Make sure the hedgehog is standing well and adjust the position of the legs accordingly. With a toothpick, add details - toes.


5. Squeeze small circles to make "pancakes" and attach to the cone in the place where the hedgehog's head is - these will be the ears.
* Instead of pancakes, you can just make small holes in the balls.
6. Roll up a small ball from black polymer clay and attach (press) it to the tip of the muzzle.
7. Insert black beads in place of the eyes.


8. If you want to make a hedgehog smile, you can do it with a toothpick or a cocktail tube cut in half lengthwise.
How to make a simple hedgehog from fir cones

You will need:
toy eyes
PVA glue
Scissors
Plasticine (if desired).
1. Cut out the muzzle of a hedgehog from felt - its shape resembles a triangle with one rounded crown.
2. Glue the muzzle to the bump.

3. Glue toy eyes to the muzzle. If there are none, then you can cut out two circles from black felt and glue them.
4. Cut out a small circle from black felt and glue it in place of the spout.
5. If you wish, you can make paws from plasticine or clay and attach them to the cone.
You can make a bunny in a similar way, only to create paws and ears you will need a thin white brush.


Hedgehog from cones and birch bark (instruction)

You will need:
Birch bark (it can be replaced with plain paper or cardboard)
Pompom (in this example, eucalyptus flower buds were used, but they can be safely replaced with a pompom, plasticine, clay, or even a button)
Plasticine or small buttons (for the eyes)
Scissors
PVA glue and glue stick.
1. Cut a piece of birch bark that looks like half a moon. Twist it to make a cone, and glue the ends - this will be the muzzle of the hedgehog.


2. Glue a pompom or plasticine on the tip of the cone - this will be the nose.
3. We make hedgehog ears. Cut out two small circles from birch bark, make an incision on each as long as the radius of this circle and twist into a cone. Glue the ends.


* To make ears, you can use plasticine or cut out two semicircles from paper, which you simply glue to the cone.
4. Glue all the details to the bump.
* If you want to make eyes for a hedgehog, use plasticine or small buttons that need to be attached to the birch bark (the muzzle of the hedgehog).
Hedgehog made of cones and plasticine

You will need:
Plasticine or clay
Toy eyes.
1. Twist from plasticine 1 large ball for the head, 4 medium balls for the paws, 3 small balls for the ears and nose.
2. Make a cone from a large ball and attach it to the bottom (smooth) part of the cone.
3. Attach the paws and use scissors to make a pattern on them to make the paws more detailed.

4. Attach the nose to the cone. For the nose, you can use black plasticine or clay, while for the muzzle, you should use a material of a lighter color.
5. Add artificial eyes and use scissors or a toothpick to make the hedgehog smile.
6. Attach the balls that play the role of the ears and make small holes in them for more detail.
Here is another version of such a plasticine hedgehog:


Hello everyone!
Boys and girls, as well as their parents, ShkolaLa invites you to the creative workshop again! Let's let our hands enjoy the creative process and find out how a charming hedgehog is made from a cone and plasticine. Not just one, but the whole team! And then we'll take them for a walk.
Let's start by preparing everything you need.

We will need:
- Pine cones (spruce cones are also suitable, but pine hedgehogs will turn out to be more prickly).
- Plasticine ordinary.

We pre-washed and dried our bumps, and then with a hard brush covered them with acrylic varnish. But this is not at all necessary. It's just that when the buds are sealed, they look prettier.

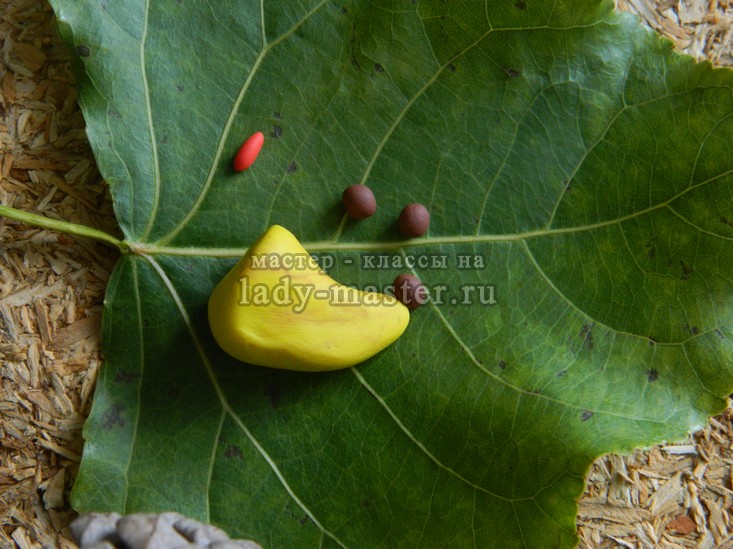
How to make a hedgehog muzzle? Very simple. Take a small piece of plasticine and mold a cone, and then slightly lift the tip of the cone (future nose) up. Then glue the muzzle to the blunt end of the cone.

And this photo shows how to make legs. Just roll up two small identical sausages and stick them where the hedgehog will have a tummy.

From the same plasticine as the muzzle, blind two small cakes. These will be the ears. Attach them to the hedgehog's head. Eyes and nose can be made from beads, pieces of cardboard or buckwheat. We used black peppercorns for this purpose.

Hedgehog is ready! Side view. One word: Handsome!!!

It's sad to live alone. Therefore, we made our hedgehog friends. Got a whole team!


As you know, hedgehogs are hardworking people. They carry something on their pins all the time. And our than worse? Complemented with mushrooms and apples. It immediately became more fun! Both us and the prickly forest dwellers.

Since autumn, birch knots have been lying on the balcony. We found them in the park and decided to take them home. We thought: "Suddenly come in handy." So they came in handy) These are knots for us, but real logs for hedgehogs!

We connect sticks with each other. We tie them with white woolen thread.

We decorate the logs with leaves, spikelets, rowan berries. At the same time we hide the threads with which we tied them.

Sending our prickly team for a walk! We plant on logs. And Done!
It’s not a shame to take such a craft to school when you need to build something from natural material.
We hope you enjoyed our tutorial. And you will also try to make these wonderful animals. The main thing is to do everything step by step and then you will definitely succeed!
For inspiration, watch the good old cartoon)
You can also make rainbow butterflies and even a bouquet of flowers from plasticine!
We will wait for your feedback in the comments to the article)
We wish you pleasant creativity and set off to make new interesting crafts!
All the best!
Autumn is a time of interesting and creative ideas for crafts. Variations can be very diverse, from single animals to fantasy cities. Today we will show you how to create the symbol of 2018 according to the Slavic calendar - hedgehog from improvised materials.
The main thing in the article
DIY step-by-step instructions for making a hedgehog from spruce cones
One of the easiest ways to create an original craft is to make a hedgehog from fir cones, thanks to their specific "needle" texture.
Required:
- cones;
- Plasticine.
Process flow:

How to make a hedgehog from pine cones step by step?

You will need:
- Plasticine;
- Cones.
Course of action:
- Roll into a ball the size of your palm.
- In one place, pull out the cone - this will be the muzzle.
- Roll one small ball for the nose, two for the ears, and two even smaller ones for the eyes.
- Attach body parts in place.
- Next, fix the small bumps, evenly distributing them throughout the body.
- Roll up four small sausages for the paws, fix them on the abdomen.
- Decorate the back of the animal with mushrooms and plasticine apples.
Master class on making a hedgehog from cones in the garden

Need to:
- salt dough;
- cones;
- Paints.
Process flow:
- Roll up a small ball.
- In one place, pull out a little cone - for the muzzle.
- Roll up a smaller ball and attach the nose.
- Cut the bump, taking out the scales.
- Insert the scales into the body of the future hedgehog, directing them from the muzzle.
- Roll up small balls for the eyes and fix them.
- Let the piece dry.
- Use paint to color in the nose and eyes.
Autumn craft hedgehog from cones to school: step by step with a photo

Required:
- Polymer clay;
- Paint for clay;
- Pine cone;
- Clay tool.
Process:

Craft hedgehog from cones and chestnuts

Necessary:
- chestnuts;
- cones;
- Glue;
- Black peppercorns.
Process:
- Lubricate the scales of the cone with glue and fix the prickly chestnut shell. The base of the cone will be the muzzle, so you need to glue it on the end of the cone.
- Glue the polka dots in place.
- Decorate the hedgehog's back with plasticine leaves and fruits.
How to make a hedgehog from plasticine and cones?
- To make a hedgehog out of plasticine and cones, you need to roll the body from the first one and fix the cones on it.
- You can also use the bump as a finished needle body. And glue the muzzle out of plasticine, adding the rest of the body.
- The third option is to use the smallest cones, fixing them around the entire perimeter of the back and on the sides of the animal.
Hedgehog from hay and cones 
Required:
- Hay;
- Eyes and nose;
- cones;
- tourniquet;
- Gun with glue;
- Scotch;
- Tree branches.
Process:
- Make the skeleton of the future animal out of branches in a sitting position.
- Secure them with tape.
- Wrap it with hay and secure with a tourniquet and glue.
- Glue the cones on the back of the animal with a glue gun - they will act as needles.
- Glue the eyes and nose.
- Decorate the hedgehog with rowan and mushrooms.
Original craft hedgehog from a plastic bottle with cones

Required:
- Plastic bottle liter;
- Black plasticine;
- Nylon sock;
- Eyes;
- cones;
- Clay Moment.
Process:

More ideas for crafts from plastic bottles find .
How to make a big hedgehog from cones and pine needles?

You will need:
- Cone;
- Plasticine - beige and black;
- Pine needles;
- Glue.
Actions:
- Roll up a plasticine ball, in one place stretch it with your hands into a cone shape.
- Fix at the base of the bump so that the scales look away from the muzzle.
- Roll a small ball out of black plasticine - a nose and two smaller ones - eyes.
- Fix them in their place.
- Apply glue to the tip of the pine needle and fix it between the scales.
- Do the same with the rest of the needles, distributing them evenly over the entire back of the hedgehog.
- You can put a maple leaf on the needles for decoration.
Craft hedgehog from cones and leaves

- Bottle;
- Eyes;
- tourniquet;
- jute bag;
- Black knitted thread;
- cones;
- Glue;
- Cardboard;
- Autumn leaves.
Algorithm:
- Cover the bottle with a bag and fix it.
- Lubricate the cover with glue and wrap with black thread.
- Lubricate the surface of the bottle and fix the bumps evenly over the entire body of the hedgehog.
- Glue your eyes.
- Lubricate the cardboard with glue and fix the leaves.
- Place the hedgehog on the cardboard with leaves.
- If possible, decorate the hedgehog with flowers, rowanberries or fruits.
VIDEO: how to make an interesting hedgehog craft from cones?
Hedgehogs are one of the easiest crafts to make. It can be made from any improvised materials, and especially in the autumn. The process of creating a funny animal is not only simple, but also interesting. Involve your child in the world of wonderful creations. Show how you can create something incredible and beautiful with your hands.
Autumn is a great time for creativity. Does your child need to prepare an interesting craft from natural materials for school or kindergarten? Then it will be nice for you to learn how to make an autumn hedgehog craft. Next, you will learn step by step how to make a miracle hedgehog from available materials. Photos will help you in creating a little animal from cones and a bottle.

We create with the child
Are you interested in the autumn hedgehog craft, do you want to bring it to life? Do not doubt your abilities, as you can easily make a hedgehog out of cones with your children. Then you will need the following materials:
Plastic bottle
Pine cones
Plasticine
Step-by-step instructions for making a funny craft
A hedgehog made of natural material will be an excellent craft for the garden. Now you will learn how to make a hedgehog out of cones with your baby. To do this, do the following:
1. The easiest way to make a hedgehog base is from a plastic bottle. Take any plastic bottle, carefully remove all labels. The neck with the cork will be the muzzle of the hedgehog, and the wide part will become the body.
2. To make the hedgehog as natural as possible with your own hands, use plasticine of a light color (beige, for example), close up that part of the bottle that will be the muzzle, that is, from the lid to the wide part. With dark plasticine (for example, brown), close up the body of the future hedgehog.
3. Now we imitate needles with the help of cones. Carefully stick a little plasticine on the base of the cone. And then attach it to the plastic bottle where the torso is. So you make several cone rows. Attach the cones only on top and on the sides, leave the bottom empty, so the craft will stand stably.
4. The cone hedgehog is almost ready. It remains to modify the muzzle. Make eyes out of plasticine. You can make plasticine berries that you put in needles. To complete the composition, take a tray, make a bedding out of the leaves and put the newly created hedgehog on it.
An interesting autumn craft hedgehog made of cones will surely attract the attention of all the kids, and your child will be able to win the creative contest. Do not be afraid to create, show your imagination and please your child!

Be sure to read the article on the topic of what you can do with your own hands. Work wonders with the whole family, share this article with friends in a couple of clicks, rate it high and write below in the comments, what did you end up with?


