How to make an egg stand from threads. DIY Easter egg stand. Master class with step-by-step photos. Felt Easter egg stand: chicken


To make Easter egg coasters with your own hands, you will need:
Corrugated paper in two colors
A roll of cling film (you can use rolls of toilet paper, but I think toilet paper should stay in the toilet)
Decorative rope, braid, lace, thread or lace
Kitchen knife
Scissors
Glue gun
As you can see, you need very few materials and tools that almost everyone has in their home. The glue gun can be REPLACED with a simple stationery glue stick, corrugated paper - crepe paper or any other soft paper, the base can be made of thick cardboard. What you definitely cannot replace are eggs, they must be real and preferably white.
So, we clean our reel of logos, then use a kitchen knife to divide the roll into equal parts. We already did this when we made napkin rings with our own hands. 
Then, cut a strip one and a half stripes wide from the white corrugated paper, and a strip one stripe wide from the yellow paper. Next, use your fingers to stretch the edges of the paper in different directions. This must be done with both white and yellow paper.
We wrap the ring with our strip, measure and cut off the excess. Now apply hot glue with a glue gun or office glue in the middle of the coil and glue the corrugated strip.
Then we proceed to decorating the egg stand. To do this, wrap the ring several times with a string and tie a bow. 
Easter egg stands in pink and green look very gentle. In order to make such delicate egg cups, gently do everything that was mentioned earlier, except that the lace is glued onto the strips, and then the strips onto the rings.
When gluing lace with a hot glue gun, you need to be extremely careful, as hot glue can cause burns. You need to wait a little for the glue to cool and then press the lace onto the workpiece with your fingers. You can use a foreign object, or even better, glue the lace with office glue.
 We made such wonderful crafts for Easter. Fast, easy, inexpensive.
 Easter is a very bright and kind holiday; it is best celebrated with family. Give each other smiles and gifts, even small ones, but made with your own hands. After all, how nice it is to receive from someone something that he did especially for you, thought about you and tried. Therefore, I believe that gifts made with one’s own hands are very valuable and memorable for every person.


There is very little time left before the celebration of the Resurrection of Christ. But we still have time to paint eggs, make greeting cards (you can see the options we offer and), and also make unusual ones with your own hands.
We offer you some ideas for inspiration
In order to do Easter bunny I needed:
Colored pencils;
A4 paper;
Scissors;
Easter eggs.
So, let's transgress.
First you need to make two even squares. We fold the paper as shown in the diagram. We cut off the excess part. Now we make the muzzle. To do this, take a triangle and unfold it diagonally up and turn the top two corners down as shown in the figure.

After all of the above, fold the corners halfway again. Next you need to turn the workpiece 180 degrees. Now we bend the muzzle and nose.

Again, turn the workpiece 180 degrees and bend the ears

To prevent the ears from bending, we secure them with one corner, bending them and pressing them from below as shown in Figure 11. Once again, turn the workpiece 180 degrees and straighten the muzzle so that it takes on a three-dimensional shape. Now all that remains is to decorate the face for the future Easter Bunny.

This will be the body for our Easter bunnies. We finish drawing the arms (or rather paws) on them and insert a muzzle into them (it is best to glue the muzzle in the middle of the body, as shown in Figure 20).
All that remains is to finish drawing a few elements (Figure 21) and gluing the hare’s paws, but first adjust their size to the diameter of the egg.

Egg stands decorated with a paper flower look original and elegant. Making them is quite simple.


Or you can make a bunny basket from the same photo according to the following scheme:

Making a beautiful Easter basket is quite simple. To do this, we make cuts on the cardboard according to the diagram, wrap and glue them, securing them with paper clips.


Then we come up with the design of our future gift basket and decorate the base to our taste.


Painting eggs for Easter is a common thing, but is it possible to make an original stand with your own hands? Or maybe just place the eggs on the dish as usual?
In fact, making a beautiful support will not take much time, but it will definitely add joy to the holiday. Especially for children, who, by the way, can also take part in this fun activity.
Of course, paper is the most accessible material, so it won’t hurt to learn how to make an egg stand for Easter from its varieties - ordinary sheets, cardboard, corrugated paper, etc.
Ship = stand
Again, let's start with the simplest. As children, we made paper boats and sailed them through the endless spring puddles. Perhaps someone played these fun games on Easter - fortunately, it always falls on a weekend. And hardly anyone thought that from such a boat (or rather, from two boats) you could make a very beautiful and stable egg stand with your own hands.
Step-by-step instructions for those who have forgotten how to make this toy:

The tongue can be bent well or carefully cut, but not to the very base, but a little higher, so that the craft does not “creep”. Of course, you need to draw circles, flowers and other decorative elements on paper. Or write "HB". In general, this task can be safely entrusted to the kids - they definitely won’t get confused. And making such a craft with the help of children is a pleasure!
Or you can simply buy paper with artistic design - preferably in light colors. Then the Easter table will sparkle with special spring colors: all household members will unconsciously feel this pleasant freshness.

Flower stand
Now let's move on to a slightly more complex paper egg stand, which, however, is also quite possible to make with your own hands and decorate the table for Easter.
We will need colored paper, as well as a cardboard tube, on which cling film and other similar materials are usually wound.

We will act like this:
- First, we cut out the part of the tube we need - about 7-8 cm (we base it on the size of the egg).
- We cover it on both sides with beautiful paper (you can use double-sided paper). And with the other sheet we do this: cut out a strip with a width corresponding to the tube, and cut it into a “fence”, with wide teeth that need to be bent (it’s convenient to use a pencil for winding).

- We glue our “fence” onto the base, after which we make the next layer - it will go a little lower. By the way, it is better for the teeth to point in the other direction - you will get a pronounced volume effect.

- Well, the lower part will consist of large petals - 4-5 in a row.

- It turns out to be such a flower.

- All that remains is to revive it and make a green base. We cut out a circle with a diameter slightly larger than the tube - the part that protrudes will turn into leaves when we cut them into strips.

- All that remains is to glue this part to the craft - it turns out so beautiful.

CREATIVE ADVICE
Of course, fantasy can go further, because that’s what fantasy is for. For example, an egg can be decorated with a butterfly, and the petals can be cut approximately the same to make a rose. The result is a composition with which you can even paint a still life. Here is an original do-it-yourself egg stand - by the way, it will certainly become a source of special joy for children.

Quick version of a flower stand
And here is another version of paper crafts in the same style. Quickly cut out a ring from a paper tube (or you can buy a ready-made one from plastic), paint it or cover it with colored paper. We cut out paper petals of different sizes and glue them to the ring base. Our stand is ready!

And one more piece of advice. If you make all the petals of a flower from corrugated paper, you will get a very cozy, visually soft and warm craft. Yes, and it looks more natural.

“Bird” - a quick stand
If you take an ordinary paper egg box in which they were sold and cover it with paint (preferably from a spray can), you will get a very simple and original option.
It can also be cut into smaller models - for example, three or four cells.

If you have enough time, then you can arm yourself with paint and decorative feathers to make such a beauty.

At first glance, it would not seem that this stand is made of a box. However, if you look closely, it is clear that we are cutting out one cell, after which we paint it and glue a feather.
Step-by-step instructions on how to make such an egg stand for Easter are as follows:
- We draw the boundaries of the future craft on the box - and don’t forget about the petals.

- Now cut along the line with scissors.

- We paint the future stand with paint of any color - the one you like. This must be done from all sides, including the inside.

- When the paint dries, glue the feather.

- Now you can imagine that we have a bird. And so that what we want becomes real, we bend its wings, cut out its beak and draw eyes.


Egg coasters made from improvised materials
Let's talk about those options for egg cups that can be easily and quickly made from other available materials.
Let's assume that there are only a few minutes left before the guests arrive. And then suddenly a thought came to mind - it would be nice to surprise your friends with something! And then this is what you can do in a hurry.
In the Provence style
Surely there is a shelf in the house on which fruits or sweets are placed. Let's try to temporarily remove sweets from it and add colored eggs. It would be nice to decorate them with straw or greenery - you will get an original decoration for the Easter table in Provence style.

You don’t have a bookcase at hand, but do you have artificial flowers? Wonderful! Take a salad bowl on a leg (or a bowl for ice cream) and decorate it as your imagination dictates. Here everyone has a chance to become a home designer - everything will probably turn out nice and cozy.

Of course, you can take a regular dish and decorate it with straw and artificial flowers. And also cut the grass from corrugated colored paper - and then the eggs will lie on the lawn.

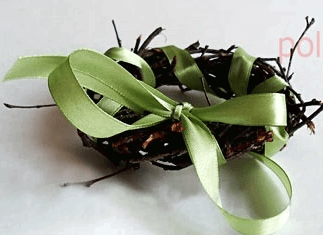
From birch branches
Yes, you can make such a stand. And we will end up with not just an egg stand, but a beautiful Easter wreath. And for this you only need thin branches, hot water and a satin ribbon.
We will proceed like this:
- First, the branches need to be kept in water for several minutes.
- And then you can easily weave a wreath from them.
- To do this, all the twigs are arranged in parallel, and with the help of others, winding is carried out. It is preferable to take birch - it is easier to weave.
- Well, now we connect it with a satin ribbon and knit a regular bow with large ears.


It turns out this is such a cozy, original craft for Easter.
Of course, it is better to take the dye with a shell in red or orange shades.

You can make an egg stand for Easter from paper and other available materials. Sometimes even the most inconspicuous household items find a second life, if only you apply a little imagination and creative effort.
And then the Easter holiday becomes even more cozy and homely, because such a pleasant reason for family conversations appears on the table!
Just a box
Photo: PinterestIf you succeed, they will look elegant even in the most ordinary cardboard box. Remove the lid, fill all the cells and place on the holiday table. Additionally, you can decorate the box with fresh green grass by placing a small bunch at the bottom of each cell.
DIY knitted egg stand

Can you knit? Then there are a lot of very cute ideas for you! For example, knitted baskets, hats and various knitted covers. The process is labor-intensive, but it’s a pleasure to do it.
Fun decor

Do you want to involve children in the holiday preparations? Invite them to decorate simple soft-boiled egg cups together. Make paper ribbons and bows, as well as Easter bunny ears and caps. Invite your child to draw faces. Great idea for a children's table for Easter!
Whatnot

A white cake rack makes a very convenient stand for Easter eggs if you add soft straw or dry grass to it. This will not only decorate the shelf, but also protect the fragile shell from breakage.
Grass nest

If you don't have similar shelves, just form a nest from grass or branches. You can put it on a regular plate.
Salad bowl on a leg

Eggs look very festive in a transparent salad bowl on a high leg. Additionally, decorate it with flowers and greenery - on top or on the sides.
How to make an egg cup out of paper

A spring basket can be made from cardboard and corrugated paper. Choose paper in soft, spring colors to evoke appropriate associations. Of course, this work requires time and effort, but there is no shame in presenting such beauty as a gift for Easter.
Ship

Another paper idea is a holder in the shape of a craft paper boat. You can also color it with your child. Even if you take a long time to make the first boat, then the process will go much faster.
It's just around the corner, which means that preparations for this holiday are in full swing. Easter paraphernalia has appeared in stores and markets: Easter cake molds, confectionery sprinkles, food coloring, Easter cake fondant powder, artificial flowers, candles and much more. In this article I want to tell you how to make a stand for Easter eggs with your own hands. This is a very simple tutorial and a great activity to do alone or with kids. And so, let's get down to business.
DIY Easter egg stand made from cells and felt
We will need:
- 1 paper egg container;
- colored felt sheets;
- yellow gouache and brush;
- glue;
- scissors or stationery knife.
How to make an egg stand with your own hands:
- We prepare the cells. We take a paper container and cut off all unnecessary parts from it.

- We paint the cells with yellow gouache and let them dry completely. If desired, the cells can be painted green.

- While the cells are drying, cut out the grass from the felt. It will be beautiful if the grass is made of different shades of green.

- We also cut out multi-colored flowers from felt.
- When the cells are dry, we begin to decorate them. First we glue the grass inside each cell, then around the perimeter.


- Then we take 2 strips of grass of different shades, coat them with glue and roll them into a roll. We glue this bush into the holes between the rows for eggs.

- At the end, we glue multi-colored flowers in a chaotic order. Let the finished structure dry completely and place the colored eggs in it. About
Good afternoon
On the agenda is again a very unusual question, namely how to put it beautifully on the table when Easter is around the corner. The answer is obvious, make an original stand for them. But from what? I suggest taking the tools at hand and starting making things. Are you surprised? Me too, but it turns out that our hands are not for boredom, and you will see this today.
Therefore, be on the wave too, and together with me, decorate not only pastries and eggs in an original and tasteful way, but also present it all beautifully. I hope this short note will help you find some new ideas.
In general, go for it, because soon the greatest holiday of the year is the Resurrection of Christ, prepare for it in advance. Wish you luck!
Friends, while I was surfing the Internet I didn’t even suspect that there were so many ideas for making egg cups from various things (available materials). But I think it would be more correct to focus on paper products to begin with, because materials such as cardboard and paper are found in every home. And most importantly, use your imagination in time and everything will work out. Or take advantage of these developments.
Well, start with such openwork works, take thicker paper and cut out using the cutout technique, like this.

To create such beauty, you need to print the templates or place a sheet of paper on the monitor of this layout and trace it with a pencil.


At first glance, cutting may seem quite difficult, but if you purchase a special cutter, everything will come out quickly. It will be useful to you later when you...

The lantern stands, which are also decorated with satin ribbons, also look original.

Keep stencils for this craft.

This is such a tempting souvenir that can come out of corrugated cardboard.

The chicken egg holder looks quite stylish and fashionable if the base is made of cardboard and then lined with felt.


Or you can build such a stand from a disposable cardboard plate:

It is also possible to use toilet paper rolls for work. Decorate them with all kinds of decors or corrugated, colored paper.


The next option is a funny snail, see the master class in these pictures:

You can also build the following: from an ordinary toilet paper roll, it is made of cardboard, which is easy to work with. The first craft is a flower meadow-basket.


The second craft is in the shape of a chicken.


How to make egg cups for Easter 2020 from paper and cardboard
I think this is the simplest and easiest way to build such a craft with children of different ages. Now you can see this for yourself. A wonderful idea, for which I was lucky enough to find templates for it on the Internet.

All you have to do is cut out a mold from the tray and cover it with paper pictures, which you can color at your discretion. I think that any child would be happy to get involved in such a creative process.

Well, print out a tiger, or a lion, a bird or a pig.

And get creative, friends, to your health, you can laminate the finished animals and tie them with tape.


The work in the form of wings looks very dignified, and in the middle there is an egg, as if an angel has descended. Try to do this too.


Or do you prefer bunnies and rabbits?


Choose from what I found and feel free to add your own twists and decorations.


With diligence and painstaking effort, you can make a house for Easter eggs.


The most primitive option is to make a basket according to this pattern.


The next option is in the form of a clearing and a rabbit.


The egg looks nice in the chicken. Moreover, the template can be printed and colored for children of preschool or school age.


I also met this wonderful bunny.


Here's another stencil.


You can also create something like this from ordinary colored napkins and put an egg inside.


Or wrap your Easter egg in your ears).


If there is another option in the form of a dove.


Or use ready-made stencils, simply print them out and glue them to cardboard with a glue stick.


Stand in modular origami style for Easter eggs
The favorite activity of kids and schoolchildren is origami, but not everyone prefers modular, it is more suitable for high school students. I decided to show a craft made from modules first, and then take the usual one.
So, you will first need to cut the leaf into rectangles. Take A4 format and make markings.


After which you will have to connect according to this scheme.

Thus, you should get a chain of two rows, each with 10 modules.


Then alternate colors and follow these tips.


And then lay out the white modules in the usual order.

Then double the white modules.


Make the second origami stand in the same way.

After that, glue the two works together with a glue gun and you’ll get something like this.

Well, as promised, now there are simpler coasters, which are made using the origami technique from paper.


Another option is in the form of a box.
Master class on making an Easter stand from plywood for eggs (drawings inside)
I searched and searched for such beauty and finally found it, now I’ll show you what happened. And here is a CBU module for the craft, which will need to be printed:
And then transfer the drawing of the cockerel through carbon paper onto plywood.
Then, using a hand jigsaw, cut out the internal parts first, and then the outside.
Go over it with sandpaper and file it.
For aesthetics, cover the cockerel with stain.
Then assemble the stand; if everything is done carefully, you can do without glue.
Source https://youtu.be/_PTlvwDYC_4Beaded stand for Easter eggs with a diagram
Now friends, I suggest you turn to the video from the YouTube channel, watch and learn, because the bead material itself is beautiful and very attractive. And the most important thing is that such coasters will be stored for years and nothing will get to them.
Crafts in the form of stands from trays (boxes) for eggs for Easter eggs
During Easter, I think many of you are making coasters using egg trays that are sold in stores. If you turn on your head, you can create quite bright products. For example, like this one, a children's masterpiece.
As you guessed, you will need trays or boxes, whatever is best to call them. Cut them like this, as shown in the picture, and make marks with a pen, cut holes in this place.
On a piece of paper, draw an image of a chicken or rooster and cut it out with scissors.
Then paint the blank and glue the eyes.
You will get a handmade souvenir.

Or use other ideas, they are shown in the pictures below.

It will be cool if you add fairy-tale characters.


By the way, souvenirs are also made from plastic cells.
Stand for painted Easter eggs and Easter cakes
I couldn’t pass by this creation, it was simple, beautiful, and most importantly, fast. It looks amazing and everyone will love it. Verified. Set a great festive table, friends.
We will need:
- Easter themed napkins
- cardboard
- plastic spoons
- PVA glue
- braid

Cut out circles from thick cardboard and decorate them with napkins.

Glue them to the back of the cardboard using a glue gun.

Then turn the craft over and decorate it with braid.

All that remains is to lay out the eggs and put them on. Good luck and bon appetit!
Basket for Easter eggs made of paper tubes
The next option that I found is to work from newspaper tubes and an egg tray. I suggest you look at these photos for step-by-step instructions. In addition to this on my blog, there are other ways of how and from what you can make baskets. That is, I mean different materials, if you're interested


There is also this plate (or tray), which is also original and simple.
I also advise you to watch the video from YouTube if you are interested in this type of activity.
Easter egg stand made of corrugated paper and sisal
I would like to show off another masterpiece souvenir, it is based on paper, and sisal is also used for decoration. The whole process of work is described in these pictures, you just have to repeat all the steps


Crocheted egg cup with work pattern and description
If you are an avid needlewoman, then you can easily cope with this work; knit a bunny stand with pockets. In general, in my other post there are a lot of ideas for doing it yourself.


Do you want to knit a chicken that will fit a pysanka? Looks cool doesn't it?


Take these descriptions with diagrams as a basis.


Well, the author created a whole clearing of unusual flowers.

Chicken from a plastic egg cup
For children's little hands, I would like to offer a souvenir in the form of a chicken or a cockerel using a plastic cup. Which any home has or will need to be purchased in a store.

To work, you must first cut four strips vertically with scissors.

Do this approximately at the same distance, but do not make the cuts to the base, about 1/3, the width of the strip is 3.5 cm.

On any strip that you like best, draw a bird's head with a marker.

Then cut out the image.

Now make the tail of a chicken or a rooster, depending on who you are planning to do. Cut the strip opposite the head into three parts.

And cut the ones that are left into four.
And start folding them and fixing them like this. They will cling to one another.

As a result, the wings and tail will be ready.
For the muzzle, cut out everything you need from paper or cardboard, a beak, a comb, paws and eyes.

Glue the parts onto the bird.
Ideas for egg cups made from various scrap materials
Well, I think that you will be interested in seeing what else you can build stands from and perhaps you will like these ideas more than the previous ones. For example, this is a decorative little thing that is made from modeling dough, or take salted dough.

For those who are fond of fabric, it is quite likely to fold something like this in the kanzashi style.
In addition, even ordinary pasta can be adapted and glued together into a large egg, and inside there is a hole for small Easter eggs. I showed you how to create this in more detail.

Also, something incredibly attractive can come out of dry twigs or sticks.
There are many ideas and they are all unique and delightful, choose and create.

I would like to wish everyone a sunny day and creative victories. I hope that you will definitely take advantage of the master classes on creating stands for Easter eggs, and also involve your children in this work.
Bye everyone and see you soon in other issues.


