How to make cute bracelets out of rubber bands. How to weave a bracelet from elastic bands without a loom? Simple but beautiful bracelets made of rubber bands on the fingers. panda rubber band decoration
This article is for those who want to learn how to make a bracelet out of rubber bands and learn how to create beautiful rainbow compositions.
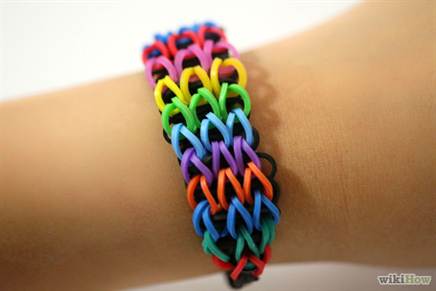
Bracelets made of ordinary colored rubber bands are a modern accessory that has gained unprecedented popularity among children and teenagers from all over the world.
Thanks to his original design and unprecedented accessibility, it has gained popularity in our open spaces. Thousands of girls and boys are happy to decorate their hands with bright multi-colored irises and wish to quickly learn how to weave rubber bracelets at home.
Today there is several ways of weaving:
- using a specialized machine;
In addition, bracelets can be given different styles, as well as weaving various intricate patterns:
In fact, weaving such irises is not difficult at all, it is enough study instructions or diagrams, as well as carefully watch the video - both the first and the second you will find on this page. These materials will be very useful especially for beginners who are going to weave rubber bracelets for the first time.
Rubber band jewelry has many advantages: bright, original, practical and completely safe for good health. It is impossible to get hurt with such bracelets, they are also hard to damage. Therefore, the question of how to weave rubber bracelets is of interest not only to children, but also to adults. In addition to the fact that you will receive an amazing decoration for memory, the weaving process itself will be very exciting for you, which will bring many pleasant minutes.
Even a child can cope with such a task. In addition, weaving such bracelets develops imagination and fine motor skills in children inspires them to be creative. Using irises made of rubber bands, you can easily teach your baby colors, tell him about different types of weaving, develop aesthetic taste and imaginative thinking.
For starters, you can try the simplest weaving- “fishtail”, “chain” or “American braid”.
You will need about a hundred small rubber bands, diagrams or video tutorials and most importantly - a little patience, imagination and desire.
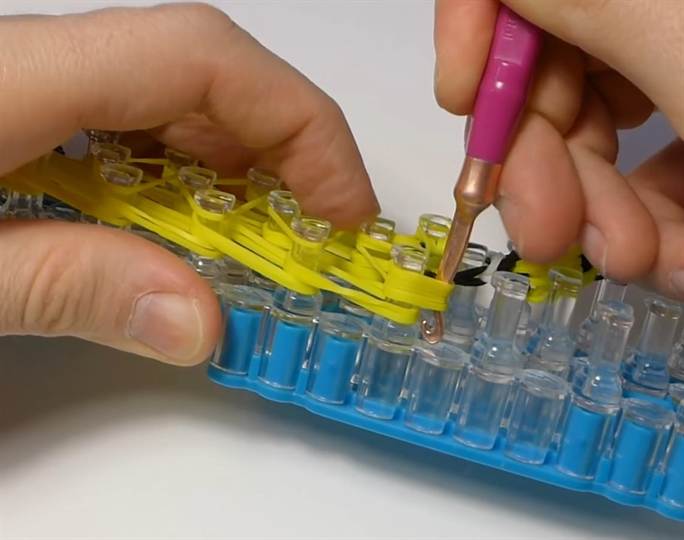
To make a bracelet you can buy a special set, consisting of small elastic bands of different colors, detailed instructions, fasteners and a weaving hook. Also in this set is a reinforced base or machine. This device greatly simplifies the process of making a bracelet and allows you to create new perfect patterns that can satisfy the aesthetic taste of any fashionista.
machine called rainbow loom, with which you can easily weave bracelets from elastic bands, was designed by the former engineer of the Nissan concern Chin Chong. His daughters were very fond of weaving rubber bands, but this brought them a lot of inconvenience. Having tried to weave a bracelet on his own, Chin Chong noticed that his large and clumsy fingers could hardly cope with this difficult task. Then an enterprising engineer built a kind of machine, which makes it easy to weave bracelets with the image of rhombuses.
Chin Chong's daughters liked the products so much that they started come up with more and more new variations. A rainbow wave called Rainbow Loom swept across America, and then Europe. Boys and girls, aged 5 to 16 years old, enjoy using this simple and extremely convenient device every day. Next, we will talk about how to make a bracelet out of rubber bands on the machine.
How to weave bracelets from rubber bands on a loom: a master class for beginners
If you are new to creating accessories of this kind, we will be happy to tell you how to weave a bracelet out of rubber bands on a loom. We bring to your attention step by step instructions, which describes how to weave the simplest pattern of a bracelet with a basic chain weave.
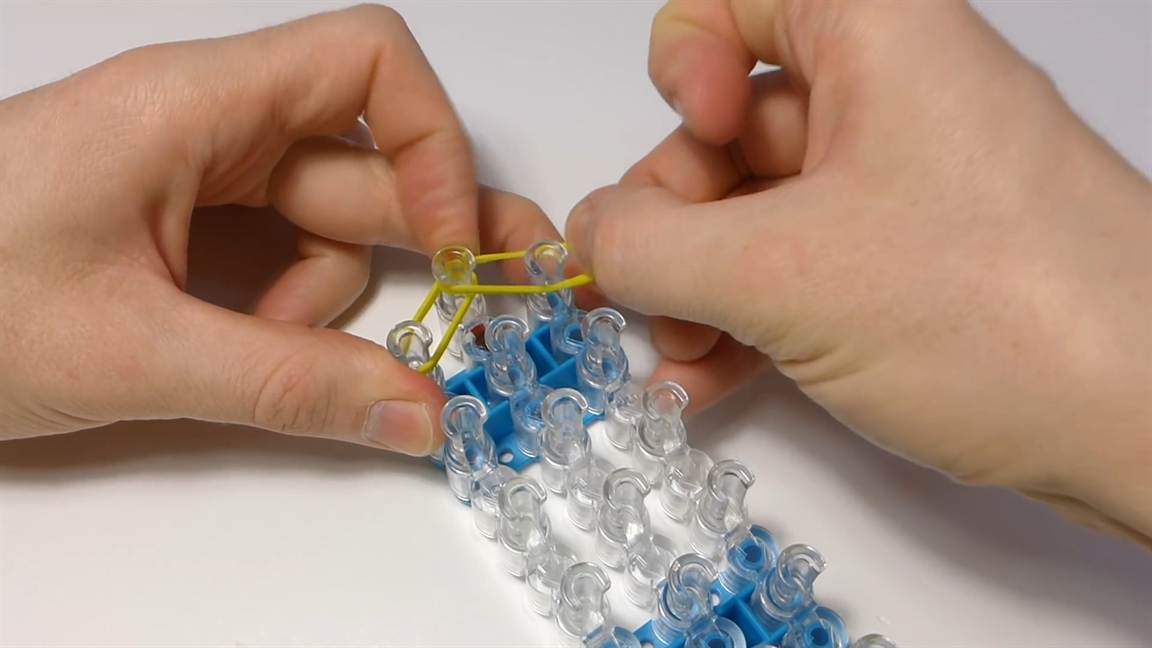
1 . Place the machine on a level surface with the U-pegs facing up with the teeth.
2 . We fix the first gum between two pegs diagonally. It is necessary to ensure that weaving begins with the first peg located in the middle of the structure. Try to stick to this recommendation, especially if you undertook to weave a rubber band bracelet on the loom for the first time.

3 . We place the second elastic band diagonally, but already so that its beginning coincides with the end point of the previous elastic band. Namely, they must intersect at one point, as shown in Fig. 3.

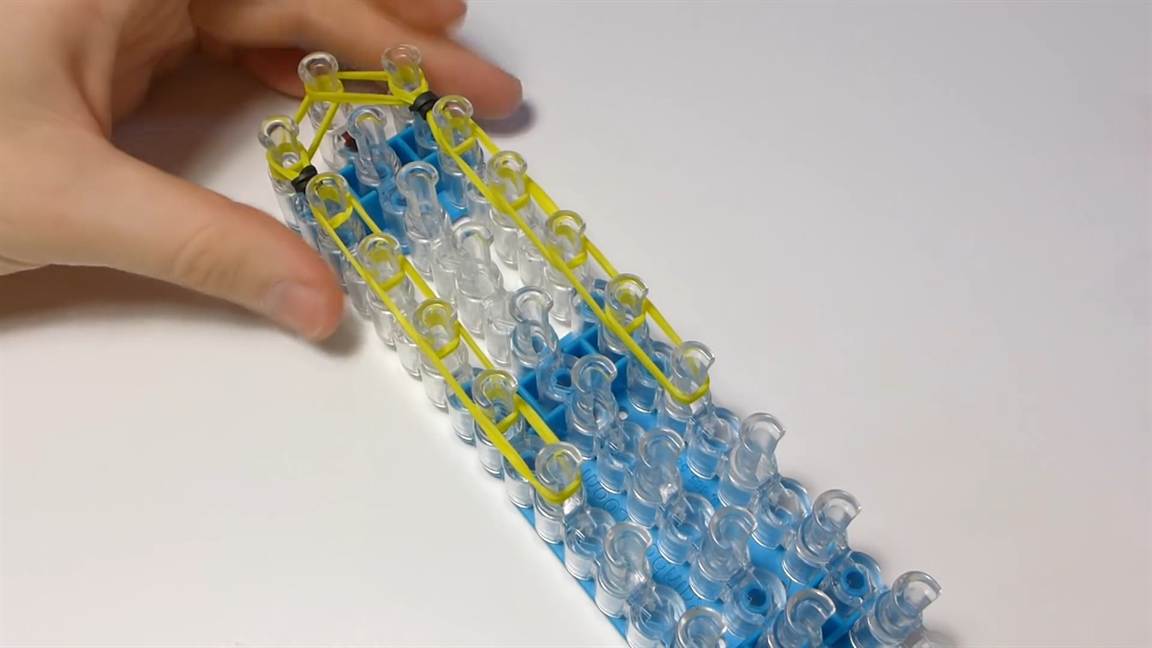
4 . Repeat the process so that you have a multi-colored zigzag. To do this, each time you need to change the direction of the diagonal so that the beginning of the next elastic band coincides with the end of the previous one. Fill the entire length of the machine.

5 . Turn the loom over with the teeth facing you. This position will help you easily weave a rubber band bracelet on the loom.

6 . Crochet the end of the elastic band, which is located through one from you. Pull the end of it, which is on the middle peg and "looks" straight at you, under the base of the first elastic.

7 . Turn the elastic band over with a crochet, it should fold in half, as if clasping the first rubber band. Place the folded ribbing on the second peg on the next row, to your right or left.

8 . Repeat the previous step, folding each subsequent elastic in the same way. You will get a series of connected circles like in fig. 8.

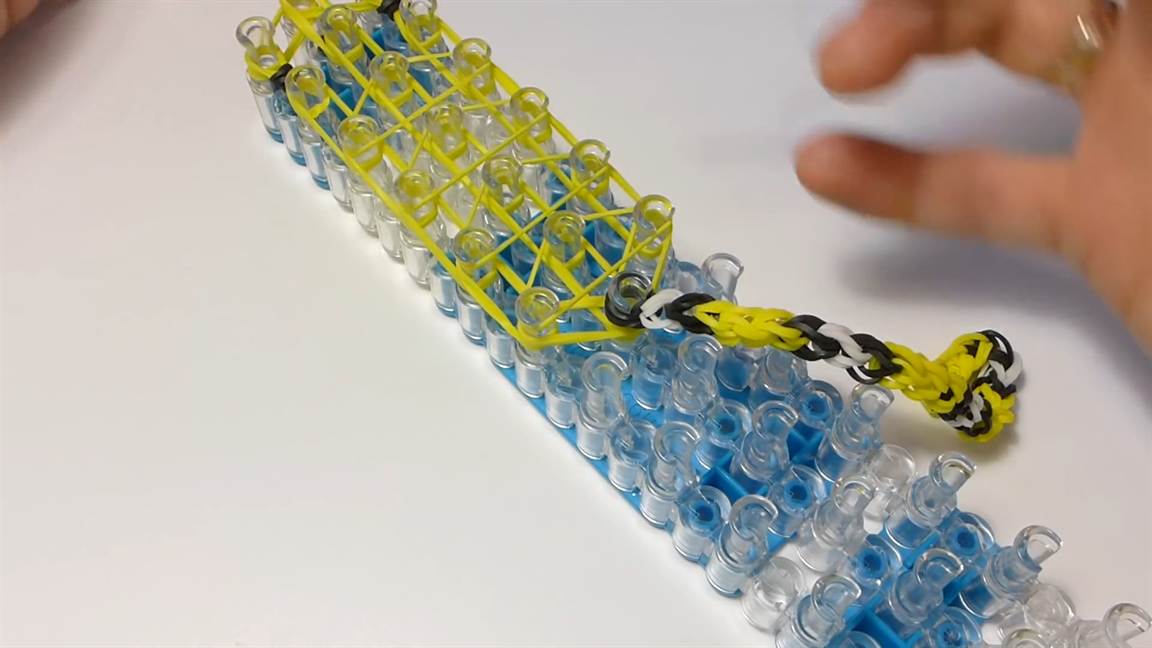
9 . Hook the fastener over the end of the last elastic band. It can be in the form of Latin letters C or S.

10 . Carefully remove each cell of the chain from the machine.

11 . Hook the ends of the bracelet to the edges of the clasp.

12 . Put the bracelet on your hand.
How to weave a rainbow loom bands bracelet on forks?
If you do not have a miracle machine for weaving irises from multi-colored elastic bands, do not be upset - to create original jewelry a regular table fork will do.
Weaving from rubber bands on a loom for beginners can be an interesting activity and a new hobby. Most likely, young needlewomen will like a new hobby. For weaving, you will need a special kit: a plastic machine, small multi-colored rubber bands, a special hook, fasteners. A complete set of necessary materials and accessories can be purchased at the art store. As a rule, the kit also includes instructions and easy weaving patterns.
From rubber bands with the help of a machine, you can weave jewelry and three-dimensional figures. It is worth understanding the principle of work, and then you can move on to more complex crafts. This activity is quite exciting for both children and adults.
Weaving basics
To work, you will need a special loom, small multi-colored elastic bands, a hook, fasteners, beads. All this can be bought separately or you can purchase a children's ready-made weaving kit (for example, "Monster Tail").

It is worth saying that there are two types of machines - professional and children's. They differ in size and functionality. Machines greatly facilitate the work, as all weaving is clearly visible. Professional machines are quite large and can be extended and take a convenient shape. On a small machine (for children) or on a slingshot, you can create small crafts and decorations. You can also weave jewelry without a loom, for example, on your fingers or with the help of forks.

Those who have never been engaged in weaving from rubber bands should start from the basics, namely, try to weave simple multi-colored bracelets. This is easy to do, you just need to follow the instructions step by step.
For work it is necessary to prepare:
- machine;
- colored elastic bands (black and rainbow colors);
- hook;
- clasp.
Progress:
- Install the machine with the open part away from you;

- Put on three elastic bands of the same color in each row on two adjacent columns;

- Alternating colors, repeat step 2 along the entire length of the loom;

- With a black elastic band, starting from the second column in the central row, hook the columns from the right and left rows (repeat along the entire length of the loom);

- Turn the machine over and start weaving: hooking a colored elastic band with a crochet hook, throw it on an adjacent peg (where its end is located);


- Repeat step 5 to the end of the machine;

- At the end, throw all the loops on the central column;

- Through the loops of the column, pick up a separate black elastic band and pass its loops through the hook;

- Carefully remove the bracelet from the machine;

- Make a strap according to the principle of paragraph 5, putting the end of the bracelet on the first column;


- Connect the ends of the bracelet with a clasp.

Woven rubber bands can make funny animals, dolls and various objects. They can be played with or used as a keychain.


cute snake
For beginners, in order to understand the general principle of weaving volumetric figures, a master class on creating snakes from rubber bands is suitable.
For work, you only need a machine, a hook and multi-colored elastic bands (in this example, yellow, black, white, red).

Weaving pattern:
- Pull out the center row and install the machine with the open side towards the master;
- Put on elastic bands, alternating different colors, for every two columns (12 elastic bands in total);

- Make the second layer on top with the same colors;

- Repeat steps 2 and 3 for the adjacent (central) row;
- Throw one elastic band on the extreme column of the adjacent row in 4 turns;

- Start weaving from the extreme column (point 5): bring the hook inward, pull and grab two loops;

- Remove the loops with a hook and transfer them to the next column (do all over the row);


- Carefully remove the resulting tourniquet and put on the extreme loop on the first column of the central row;


- Pulling the “tail”, thread the hook inside the column, pick up two loops and transfer them to the adjacent column (point 7);


- Remove the resulting tail from the posts;


- Throw two elastic bands crosswise through the extreme central column;

- Make eyes: wind a black elastic band around the hook in 4 turns, pick up the yellow elastic band and drag it through the skein;

- Put on the right and left elastic bands with "eyes";


- Pull four elastic bands in two layers on the extreme rows of the machine, as in paragraphs 2-3;
- Stretch the elastic bands along the central row and connect the two rows with elastic bands crosswise;


- Throw cross elastic bands through three columns in all rows (it should turn out like in the photo);


- Attach the tail to the future head: put on the extreme loop of the tail on the central column;
- Insert the hook inside the column, pick up the two lower loops and drag them to the adjacent right column;

- Repeat point 18 for all remaining loops (two for adjacent columns);

- Make 6-7 points for all rows (left, right, center), drag all the last loops to the central column;


- Make a tongue by pulling a red elastic band through all the loops of the central column and tying it in a knot;


- Using a hook, gradually remove the weaving from the loom.

The snake is ready!

Knitted toys
Weaving rubber toys - lumigurumi - is a rather laborious task that requires care, patience and some knitting skills. According to the technique, lumigurumi is similar to amigurumi - crochet figures. For those who know how to knit a toy using this technique, it will not be difficult to master lumigurumi.
As an example, it is proposed to weave a 3D owl. It looks very nice, and besides, it is well suited for the first acquaintance with lumigurumi.

For this you will need:
- colored rubber bands;
- Crochet hook;
- slingshot or weaving machine;
- stuffing (for example, synthetic winterizer).
If you plan to make an owl one-color, then you need to prepare 500 rubber bands for the body (main color). Accordingly, for a two-color owl, you will need 250 elastic bands of each color. In addition, for the eyes it is necessary to prepare 8 white elastic bands and 13 blue ones, and for the beak - 9 orange elastic bands.
It is best to learn to weave, or rather, knit an owl from the video, which can be viewed below:
Video on the topic of the article
To study weaving on the loom in more detail and more clearly, it is proposed to watch video tutorials.
Weaving a Spikelet bracelet is a good way to spend time usefully.
A bracelet made of colored rubber bands, made in the style of "Spikelet" is a bright, original accessory, the creation of which can be an interesting activity for any creative person. Made in colorful, summer colors, it will perfectly emphasize individuality, regardless of the chosen style of clothing. And so, in order to weave the Spikelet with your own hands, you will need:
a simple weaving machine - "Slingshot";
silicone rubber bands in 2 matching colors (the number will depend on the length of the bracelet);
hook;
S-clip for fastening.
Following the step-by-step instructions, you can learn how to create original jewelry yourself.
Step 1. It is necessary to turn the used machine towards you with the open side (in this case, it will be convenient to grab the rubber bands).

In this master class, small elastic bands of two colors are used: the sides of the bracelet will be orange, and the middle in the form of a spikelet will be light green. First you need to put on the first rubber band (orange), twisting it in the form of a figure eight.


From above, you need to throw another orange rubber band on both columns (you do not need to twist it).

Step 3. Pulling the green elastic band with the back of the hook, the lowest one (orange) is pulled out and thrown off to the center of the Slingshot.

A green rubber band is wound in two turns on the left column (over the rest of the rubber bands). A single orange is thrown on top.

Step 4. Pulling the green rubber band from the left column, the lower orange one is pulled out and removed to the center.


Starting from the next step, the technology of weaving the Spikelet bracelet changes slightly.
Step 5. Now, through the green rubber band folded in half, all the rubber bands located below are pulled out. They are still thrown to the center. It’s worth starting from the right column (it was on it that the green elastic band was put on before).


Step 6. Already from the left column, through the green elastic band, all the elastic bands are pulled out again and thrown off to the center.


Step 7. Without violating the sequence of alternating rubber bands, the bracelet is woven to the length of interest (depending on the girth of the wrist).

The longer the product becomes, the stronger its pattern will be drawn.

Step 7. When the desired length is reached, you can proceed to the final stage - close the bracelet.

At the end, green rubber bands are removed from both columns to the center.


From the left column, the two remaining orange elastic bands change into the right column. A fastener in the form of the English letter S is threaded through them.


The final look of the craft. Photo 1.

The final look of the craft. Photo 2.

The final look of the craft. Photo 3.
After you have already woven this beautiful bracelet, try to make another pattern, namely the Friendship bracelet. Link .
Today, everyone should weave a rubber band bracelet, regardless of gender and age. Children weave, because it is now fashionable and very simple, even the most restless child can handle it. Fine motor skills develop, simple needlework is equally suitable for both boys and girls. The resulting crafts can be given to each other. Moms are happy to weave rubber bands and come up with new interesting patterns. They like to do things that delight children.
- Sets of elastic bands for weaving at the rate of at least 50 pieces for each bracelet. It is convenient to store rubber bands on coils or on cut-off necks of plastic bottles - so they do not crumble.
- Crochet hook. A thin hook "2" or "3" will do. You can do without a hook, but it's inconvenient.
- Knitting pegs or your own fingers. Some knit on a special slingshot for weaving.
- Clasps. Sold with a set of rubber bands for weaving. If you run out, you can bend it from wire on 2 nails driven into a piece of wood. You will need pliers and wire cutters. Wire hooks are stronger than plastic hooks and can be bent more bizarrely.
How to weave the easiest bracelet
The simplest rubber band bracelet is woven in a double ring.
Put the first ring on your finger, twist it and put it on again. The first double ring appeared on the finger.
Take the next elastic band, folded in half with a double ring, pry it under the first one. Pass the remaining part into the resulting loop and tighten slightly. On the resulting loop, hook the next double ring. Repeat until the length is sufficient for you.
It turns out a fairly strong elastic rope, suitable for carrying keys, a telephone, a fountain pen. If you do not fold the elastic bands in half, the bracelet will turn out much faster, but it will look simpler. Might be a good option for kids.
Weaving on the fingers
On your fingers, you can weave a simple fishtail braid.
The technique is very simple. The first loop is twisted, nothing else needs to be twisted. The pigtail will grow by itself, as we weave.
Twist the first ring with a figure eight and put it on 2 rollers. One finger in each loop. Throw 2 more new rings on top without twisting. Pull out the first ring from below, pulling it up from your fingers. It will hang like a castle on the 2 remaining rings. Put the next ring on your fingers and tighten the bottom one again. Continue in the same spirit. Magic? No. The pigtail weaves itself.
What is a rubber band weaving machine
Sounds loud - loom for weaving. Sold in the departments of needlework at very childish prices. Indeed, the machine allows you to weave a bracelet out of rubber bands quite quickly.
Actually, it's not really a machine. There is no real automation of labor and moving parts. Just 3 rows of hollow posts with a wide slot on the side to make it easier to crochet elastic bands. The distance between the columns is approximately equal to a slightly stretched elastic band. The columns must be staggered.
The simplest patterns are woven on 2 rows, 3 rows are required for more complex patterns. You can build such a machine from a wooden stand and plastic dowels in half an hour. Of these, 15 minutes will be spent on marking, 5 - on drilling holes and another 5 - on fastening the posts from the dowels into the holes. Dowels as columns are more convenient, say, caps from felt-tip pens, in that they are immediately securely fastened thanks to special protrusions, and have 2 wide slots on the sides.
The hole needs to be drilled a little wider so as not to compress the dowel too tightly. This is not to say that this is a design for centuries, but it will last for some time.
Weave a star bracelet

Weaving a complex bracelet from elastic bands will only work on the “machine”. The Asterisk pattern requires a lot of patience and good skills. First, turn the machine with the slots in the pegs away from you and create the outline of the pattern. Tie the pegs in pairs, first on the left and then on the right side, to make a rectangle.

We create rays. The center of the stars becomes the middle pegs 2, 4.6 and so on in an even row. We throw loops in a circle, clockwise, starting at 2 o'clock (upper right peg). After the formation of all the stars, we fix the middle.

To fix the centers, we throw a double-twisted elastic band on each column of the center of the stars. Similarly, we fix the first and last column in the center.
Preparatory work has been completed. Now the hardest part. Crocheting and dropping loops.
Turn the machine over with the slot towards you - it will be more convenient to hook the elastic bands from the hollow center of the pegs. You need to remove and fasten the gum from the asterisks counterclockwise. Hook the elastic bands from below and string back onto the peg, forming a double loop. Do the same for the perimeter. How this is done exactly - it is better to look at the video.
Do not forget to fasten the first loop so that the finished product does not crumble. Remove the bracelet from the pegs. It turns out quite a spectacular decoration of rubber bands.
From rubber bands, you can quickly weave a comfortable elastic rope for attaching various things. It is convenient to hang a fountain pen or even a mobile phone on a tourniquet of rubber bands. It is safer than a non-elastic cord, and it is not easy to break a rope made of rubber bands.
Many girls love a variety of jewelry. Earrings, bracelets, necklaces... But, unfortunately, the prices for really worthwhile things are quite high. So why not do everything yourself? Of course, silver jewelry cannot be made at home. But why not weave gum bracelets? This is not only a very economical, but also an incredibly beautiful option, limited only by your imagination. Just look at such beauty!
Where to start weaving, making bracelets?
You can buy complete sets for weaving. They include a machine and a slingshot, hooks, clips for connection and a lot of rubber bands.
Bracelets of the same style, but in different colors.
On our site you will find several master classes with step-by-step instructions with step-by-step instructions with photos and videos on how to weave rubber bracelets. Here are collected both simple and more complex schemes. But they are all impressive. Start, of course, with things easier, gradually moving on to more unusual ones.
Fish tail

A fishtail rubber band bracelet is the simplest and most basic pattern of all.
Materials for manufacturing
To make a rubber band bracelet for beginners, you will need:
- 50 rubber bands;
- Clip;
How to weave fishtail bracelets?
- For starters, it is better to take one color. Otherwise, you can easily get confused. Later, when you gain experience, you will figure out how to weave bracelets from elastic bands of two or even three colors.
- Place a figure eight over your index and middle fingers.
- Do not twist the next two.

- Holding the bottom one, drop it off your fingers in turn. The elastic band forms a loop, hanging on others.


- Put on the fourth. And stretch the last one again. Repeat until you get the right length.


- To finish, fasten the ends of the product with a clip. Hook it on the last elastic band on one side, on the other for the second loop from the beginning of weaving. Cut the first one and put it away.

Now you know how easy it is to weave rubber band bracelets on your fingers in this style.
Dragon Scale

Materials for manufacturing
To weave bracelets from rubber bands you will need:
- rubber bands,
- Machine,
- Clips.
How to weave a dragon scale elastic band bracelet?

magic wings
Materials for manufacturing
To make beautiful rubber bracelets you need:
- Rubber bands of the same color 44 pieces
- Other 20 pieces
- If desired, you can take another third color, also 20 pieces,
- Slingshot,
- Hook,
- Clip.
How to weave bracelets from rubber bands "magic wings"?
- Hold the slingshot with the notch in columns facing you. Throw the first one on the bayonets with the number eight.
- Then just throw in two more.
- Lower the bottom one from all columns.
- Put another rubber band on two bayonets. On the left side, insert the hook under the second elastic band from the top and, having hooked the last one, discard it.
- Do the same for the right column.
- Put the elastic band of the second color under the rest.
- Crochet the second one from the top on the left side and discard.
- Do it on the other side.
- Follow the instructions until you get the length you want.
- Fasten with a clip.
- I suggest watching the video tutorial:
Caterpillar

Materials for manufacturing
To create beautiful bracelets from elastic bands, you will need:
- Rubber bands of different colors;
- Hook
- Machine;
- Clasp.
How to make caterpillar bracelets out of rubber bands
- Two elastic bands, twisting the number eight, throw on the columns. They must cross. Fasten two, but in the usual way.
- Repeat this for one more row.
- Crochet the last elastic bands up. They should hang in the center.
- Do this until the product is long enough.
- After that, tie a loop on one side, and attach a fastener on the other.
For ease of understanding, I suggest you watch the video:
Circular knot

Materials for manufacturing
- In order to make bracelets from elastic bands on a slingshot, you need:
- rubber bands,
- Slingshot,
- Clips.
How to weave bracelets from rubber bands "circular knot"?

french braid
This option is easy to work with and looks like a classic hairstyle. But really incredibly beautiful. How to weave such unusual rubber bracelets and what is useful for them?
Materials for manufacturing
- Rubber bands in two matching colors (orange and lilac),
- Machine,
- Hook,
- clip,
How to weave a French braid bracelet?
- Place the machine with a recess to the face. Arrange the columns in straight rows. You will need the first two, and you can remove the rest.

- Prepare an orange rubber band and draw the number eight on the bayonets.

- Lilac fasten without twisting.
- Repeat with the first color. Don't forget to alternate.

- Pull the last elastic band through one side and discard. Do this with the other side. The elastic should hang on the top two, creating a loop.

- Throw in another one.

- Drop the orange between the lilac and pull it through the bayonet. On the other hand, lower the last lilac and thread through the column.

- Notice the order: on one side, drop the elastic from the center, and on the other, lower.


And we continue...
- Repeat until you get a long enough piece. After that, connect with a clip. To do this, discard the last elastic bands from both sides.
- Throw the remaining orange on the bayonet and fasten the end of the clip.

Sidewalk

To make a pavement gum bracelet you will need
- 50 elastic bands of two colors,
- Slingshot,
- Hook,
- Clip.
How to weave rubber band pavement bracelets?
- Place the slingshot with open sides facing you. Two bayonets point upward.
- All rubber bands are wrapped in pairs. For greater convenience, distribute them in advance.
- Attach two rubber bands of the same color to the bayonets with a figure of eight.

- Do not twist the next ones.

- Crochet the last two on the left column, drop to the center.

We drop the lower elastic bands to the center.
- Make room for another pair by lowering everything to the lower level.

- On the right side, discard the last two.

- Continue to put on elastic bands and take off alternately to a suitable length.

- To complete the weave, lower the bottom two elastic bands.

- Move two pieces to the second column.

- Slightly pull the product to tension.

- Hook the clip on the two elastic bands and discard the product.

- On the other hand, hook on both parts of the starting gum, worn by the eight.

figurines
In addition to rubber bracelets, you can create various entertaining figures. They are used as toys, key chains, jewelry. Such a gift will decorate your home.
Below you will find one unusual master class.
Owl toy

The figurine is not simple, and the master class is voluminous.
What will be needed?
- Slingshot,
- Hook,
- 44 elastic bands of the main color.
- 8 rubber bands white
- 4 orange rubber bands
- 2 black,
- Scissors.
How to make your own owl
- Start with the elastic bands of the main color. Wrap the first three times on the bayonet on the right side. Throw two extras on both columns.
- Throw the first to the center.
- Move the rubber bands from the right side to the left.
- Wrap the orange elastic band 4 times on the right bayonet.
- Put it on rubber bands. On the left side, discard the last two pairs. The orange one should be on the right.
- Put on the main color again, discard the lower ones.
- Throw the second pair over two columns and omit the last ones.
- Throw the third on both parts, discard the lower ones.
- Move the rubber bands from the left to the right.
- Insert the hook into the starting elastic and throw it over the left bayonet.
- Wrap a pair of white elastic bands, throw off the initial to the center.
- Throw on the next two, lower the last ones from the bayonets.
- Weave the third and fourth pairs.
- Move everything to the right.
- Insert the hook into the original elastic band, throw it on the left column.
- Take your starting color. Throw on both bayonets.
- Throw the triple to the center.
- Move everything from the left to the right.
- Screw on the left bayonet 4 turns of orange.
- Throw in two more primary colors, and discard the orange from the column.
- Remove two pairs of main ones from the right bayonet. Orange should be on the left.
- Put on two more basic ones, omit the previous ones.
- Add a couple and lower the ones you put on before.
- Connect the next pair together by putting elastic bands on both parts of the slingshot.
- Drop all recent ones.
This completes the weaving of the owl's body. Then we start working with the head and other parts. But this is already much more complicated, so I suggest watching the video of the full master class, which was easier to understand.
Master class: we make a figurine - an owl bracelet
Here is your first rubber figure, and with it a gift to the house with your own hands, ready! For more clarity, you can watch a detailed video.
Now you know that a good gift can be made even from seemingly simple things like rubber bands. Create, gain experience, create new schemes and bring your ideas to life!
If you find an error, please highlight a piece of text and click Ctrl+Enter.


