How to make a fabric topiary. We learn how to make original artificial trees with our own hands. Topiary from napkins: delicate flowers
The art of topiary came to us from Ancient Egypt. In those days, the talent to give plants unusual geometric shapes was highly valued. An example of this is such a wonder of the world as the Gardens of Babylon.
Today, the topiary is a small tree made of natural and artificial materials. We will share decor ideas with you and tell you how to make a beautiful tree yourself.


Secrets for Beginners
Having created a tree of happiness, you can both decorate your own home with it and present it as a gift for a wedding, housewarming, anniversary. The dimensions of the product are different, depending on your preferences and range from 15 to 50 cm.
Important! Topiary has an exclusively decorative function. And it depends on your imagination whether you will make a small original tree in the shape of a heart, or unusual models of shells.


The simplest improvised materials for making topiary are as follows:
- pasta;
- money;
- branches;
- coffee beans;
- napkins;
- candies;
- cotton pads.


Advice! A popular option is a money tree. It is made for a gift using small bills. It symbolizes wealth, luck and success in business. Suitable for placement in the kitchen or any other room.
Typically, the money tree is made in mini versions for installation on window sills. Also, such a present can be in a small outdoor pot, which is placed near a coffee table or sofa in the living room.
How to make a do-it-yourself topiary
If you decide to decorate the house yourself, then before you make a composition, consider the design of the main components:
- bases for topiary;
- crowns;
- trunk;
- stands.
Paper, old newspapers, polystyrene foam, polyurethane foam, a children's ball are suitable as a basis. What to do, you decide.
Advice! Experienced craftswomen use foam plastic for figures in the form of letters, numbers, hearts.
To make a trunk simply from strong wire, branches, plastic tubes. When choosing what to make a trunk for a topiary, consider the size of the future product. If this is a small model, use a simple pencil, if it is a floor model, use one even thick branch.
The crown is the part of the craft that will attract the most attention. Suitable paper, polymer clay, beads, buttons, shells.
Depending on the size of the product and the idea, an ordinary flower pot, a toy bucket, a flat wooden board will serve as a stand. Decorate it with fabric, lace, decoupage or paint it with paints. How to do it is up to you.
Advice! An ordinary cup, which you no longer use in everyday life, is perfect for a stand.
Step by step instructions for crafts
For those who are carried away by this wonderful idea, we will tell you how to make a beautiful topiary step by step. Before you start crafting, think carefully about the idea of \u200b\u200bthe future tree and prepare all the necessary materials for the trunk, crown and stand.
When creating your topiary, follow the following sequence:
- prepare the crown. For manufacturing, use improvised materials or specially stocked shells, beads, beads. For a non-standard crown shaped like a number or letter, cut out the desired shape from the foam. Be sure to make a hole for the barrel;
- prepare the stem. Depending on the idea, use branches, sushi sticks, plastic straws. If you plan to make a large floor topiary that you will place in the garden or on the street in a private house, use wooden sticks wrapped with twine or varnished in the desired color. Install the crown on the trunk;
Advice! If the crown is round, just put the base on the trunk. If your topiary has a non-standard look, additionally fix it with glue.
- stand. Use pots or planters. Pre-place the foam in the pot and fill it with a weak cement mortar or alabaster, level and dry. This will serve as a reliable frame for crafts.
Advice! Since novice craftswomen do not always guess with the proportions of the solution, experienced needlewomen advise using the consistency of liquid sour cream - too thick a mass will not fill the space between the pot and the foam.
Such an interesting craft can be easily made with children to decorate the garden or any room in the house.
Simple master classes of topiary
Wonderful trees can be bought in souvenir shops, as well as made by hand. A common topiary model is created from foamiran. Master class on how to make an unusual tree, see the video
Gentle original foamiran topiary.
Make your own bead topiary. The master class includes the following steps:
- preparation of materials. Buy beads, ribbons, twine, barrel wire, pot, plaster, glue. Use tweezers to easily stick the beads to the base;
Advice! Use a regular ball as the basis for the crown or cut out another shape from the foam, for example, a heart. Such a topiary will be an excellent gift for St. Valentine's Day.
- glue the beads to the base;
- for the trunk, take the wire, wrap it with twine or ribbon, bend it as desired;
- insert the crown into the trunk and secure with glue;
- install the second end of the barrel in a previously prepared pot with pieces of foam;
- fill with plaster and leave to dry;
- decorate the stand.
The product is ready. This MK is used by many novice craftswomen.
The tulle topiary looks beautiful. Watch the video master class. You will be told step by step how to make a craft with your own hands.
A few more interesting ideas for tulle topiary.
Interesting do-it-yourself topiary from cotton pads. A step-by-step master class is presented in the video:
For advanced needlewomen, it is interesting to make a beaded topiary with your own hands. With this choice, various wood weaving techniques are used: knotted, French circular, dense oblique, American tourniquet. A detailed master class is offered in the video:
Below are two more works of art - beaded trees.
The easiest option is do-it-yourself pasta topiary. Indeed, in every kitchen there is pasta in the form of shells, horns, spirals. You can decorate the glued pasta on the base with various paints or spray it. The master class, according to the manufacturing principle, is similar to a tree made of beads.
Advice! Crafts from cones, buttons and threads look interesting and creative.
Which crown to choose
Among the common types of crowns, you can choose the option that suits you best. So, the shape of the crown of your topiary can be in the form of:
- hearts;
- flying cups;
- bicycles;
- Christmas trees;
- bird nests;
- ships;
- birdhouses;
- sun;
- apple trees;
- umbrellas;
- shoes;
- roosters;
- fairy houses with nests.
The craft made of beads in the form of a glued nest with birds looks beautiful. For lovers of non-standard solutions in any room or office, a floating cup will look great.
Flying cup idea
A heart-shaped design or a tree with dollars are suitable as a gift. For spring mood, make a fruit tree. For memorable events, build a product in the form of letters or numbers.
Marine crafts decorated with shells, sand and other natural materials look great. Craftswomen like to additionally decorate the crown with a nest of branches, flowers. An interesting option is a vintage burlap topiary decorated with a real small clock. Marshmallow topiary looks festive. If you don’t have enough indoor plants in your house, make a lagurus craft.
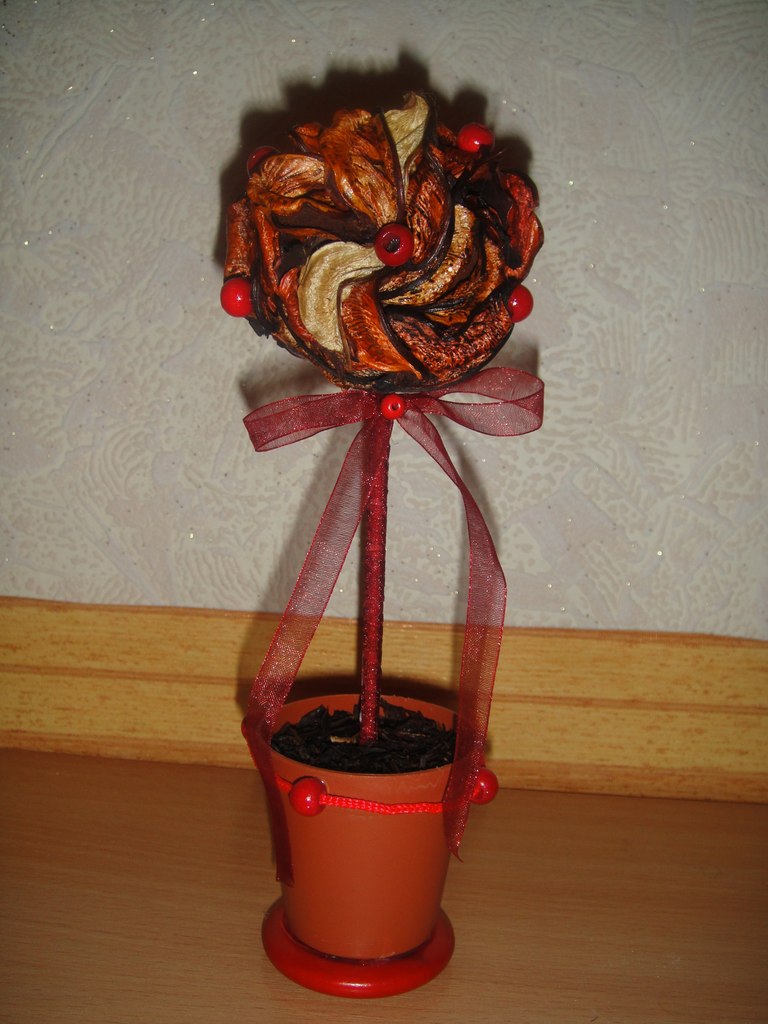
coffee tree


No wonder they say: "Every man should raise a son, build a house and plant a tree." But whether he can, one can only guess. But the fair sex can. She can even make a tree of happiness herself, with her own hands!
Topiary- direction of landscape design. The history of art has been known since ancient times. Today, the topiary is known as a clipped shrub, an elegantly decorated tree that will serve as a real decoration of the interior. Many are sure that the topiary attracts positive emotions and happiness, and if the tree is decorated with various banknotes or coins, then well-being in the house. This is where the name “tree of happiness” comes from.
As an element of decor, the topiary has gained worldwide popularity, and now every housewife dreams of seeing such a tree at home.
To create a topiary, you do not need to run around the shops in search of suitable materials, but use the materials at hand. Crowns can be decorated with paper flowers, ribbons or organza, multi-colored stones and pebbles, beads, sweets, etc., it all depends on your facts.
An interesting fact: Topiary, as an art, originated in antiquity. For the first time, bizarre and geometric shapes to trees began to be given in Daytime Egypt and Greece. A well-known example of that time that can still be observed is the Hanging Gardens of Babylon.
feng shui talisman
Topiary is a kind of talisman that can attract love and happiness, health and good luck. Topiaries sold in stores mainly look like flowering trees with stones. According to Feng Shui, talismans have Qi energy. In addition, the Chinese are convinced that a precious and semi-precious stone is endowed with a certain charge, so the tree of happiness can also improve health, bring good luck or make a wish come true. However, the influence of the topiary on a person will be felt only if the tree is located in the correct part of the room.

Many are sure that a talisman made with their own hands has a huge advantage. So the tree of happiness, made by hand, carries energy.
"Tree of happiness" do-it-yourself, manufacturing steps
Topiary (tree of happiness) is decorative. And it will depend only on your imagination how and from what materials you will form it.
Topiary includes three components:
- Crown
- Trunk
- Stand or Pot
Crown
A common form of the crown is a ball, however, fantasizing, you can choose any: in the form of geometric shapes, hearts, stars, etc. Popular base materials:
- Mounting foam. Such a crown can be of any shape and size. Foam is poured into an ordinary bag. After a little time, after complete drying, get rid of the polyethylene and give the crown the shape necessary for the composition. It is very convenient to work with such a crown.

Tip: Be sure to wear gloves when working with foam.
- Newspaper. It will take a lot of newspapers. From the material it is necessary to make a semblance of a ball of the required diameter and density. You can fix the base with a sock, stocking or other fabric. Additionally, cling film, threads and PVA glue will help form the base.
- Styrofoam. The desired shape of the foam can be given with a clerical knife. Styrofoam, as well as the base of polyurethane foam, is very easy to work with.
- Papier mache. Thanks to this technique, you can create the perfect shape for the crown in the form of a ball. An inflated balloon is glued layer by layer with pieces of paper. After complete drying, burst the ball with a needle and pull it out of the base. The form is ready.
- Any material. To work on the manufacture of a tree crown, you can use any material you like: a ball, a ball, spherical toys, etc.
Tree trunk
To create a tree trunk, you can take branches, a pencil, a stick, wire, or another similar element. The workpiece can be decoratively decorated with colored threads and paper, paints and ribbons, or any other material. To emphasize the structure of the tree, it is desirable that the trunk be longer. For a larger trunk, it is attached to the pot and to the crown. You can beat the composition by painting the trunk with different colors.
Tip: To make the tree of happiness look more sprawling, it is better to take a real shrub as the basis for the trunk.

pot base
The main element of the decor of the whole composition is a pot. It is he who is able to give the topiary a finished look. As a pot for a tree, not only a flower pot can act, but also a self-made pot, decorated with your own hands.
For example, if the talisman is made in the form of a bonsai, it is better to choose a rectangular pot, and if the topiary is a tall, rounded pot. For the stability of the crown and base, the bottom of the pot must be weighted. This can be done with a solution of cement or gypsum, gravel, polyurethane foam and other materials. To prevent cracks in the pot when pouring the solution, pieces of foam rubber, neatly laid on the bottom, will help. To decorate the base of the tree, various pebbles, sand, glass, beads, moss are suitable.
Tip: When choosing a pot for a tree, remember that it should be larger than the crown of the tree.
The crown looks more interesting and profitable from several materials that are designed in the same style. But remember that the combination of elements must be in harmony with each other, otherwise the topiary will look complicated and sloppy.

How to assemble and how to decorate?
When collecting topiary, the first step is to fill the pot halfway with filler. Next - insert a decorated trunk with a crown into the middle of the pot, firmly fixing it in the base of the pot with glue. After that, you can do the decor of the tree itself. To decorate the topiary, it is best to use a special glue gun or PVA glue. The final stage - the pot is completely covered with filler and decorated with various elements.
decor ideas
The most elegant and fragrant decor are coffee beans. An interesting option using pebbles, shells, stars and other symbols of the marine theme. The original idea of nut topiary: hazelnuts, walnuts, almonds and others. And the most popular decor today is coins and banknotes.
Tip: Dream up, turn on your imagination, and the topiary can become a real decoration for your home or an ideal souvenir!
Popular compositions
When starting to work on a topiary, consider your train of thought and the materials used. There are many ideas, as well as compositions. Here are some DIY ideas.

Corrugated Paper Tree of Happiness
The simplest decor. For registration you will need:
- Pot
- colored paper
- Spherical crown
- Barrel from any material
- colored beads
- Acrylic paint.
The pot is covered with paint, thick thread, better with twine, wrap the trunk around and fix it with glue in the center of the pot. And the last step is to attach the crown to the trunk.

Decor. For an oasis, plastic or cardboard is suitable. The size of the oasis depends on the diameter of the pot. To fix the stem in the pot, a small hole must be made in the oasis. To decorate the tree, corrugated flowers of various shapes and structures will appear. Each flower is glued to a spherical base with PVA glue or super glue. The top of the pot can be decorated with a border, and the oasis with beads.
Tip: Flowers can be glued with hot glue, or you can use skewers or wire.
Tree of happiness decorated with ribbons
An elegant version of the tree of happiness. For decor:
- Pencils
- Ribbons
- pot
- Invisibles
Rings are formed from the tape and glued to the base in turn, closing all the voids. After decorating, the crown is put on the trunk and attached to the bottom of the pot. The pot must first be weighted.
Tree of happiness from coffee beans
For decoration you will need:
- Coffee beans
- plastic glass
- tassel
- Ball
- 2 rubber bands
- Threads
- Rope
- Wand
The brush must be disassembled into individual hairs. Lubricate the stick for the barrel with glue and fasten the resulting hairs with rubber bands. We make a hole in the ball for the crown in order to put it on the trunk in the future. The base can be painted in coffee color, this will help hide minor defects in the composition. Using glue, glue the ball with coffee beans. It is better to alternate the grains with sinuous lines to give a more elegant look. Small flowers or cinnamon sticks look great with grains. The finished crown is covered with paint or varnish, but at the same time the grains lose their aroma.

For a pot, we use a glass, after weighing it with gravel, sand or other material. We glue the finished trunk with a crown to the bottom of the base of the glass. To decorate the cup, a prepared rope is suitable, which is tied around the entire diameter. You can complete the composition with a ladybug or a butterfly made of plastic, which can be fixed on the top of a tree.
An interesting fact: you can give the composition a spectacular look, nobility and relief due to the double coffee layer.
Tree of happiness from beads
Beaded topiary deserves special attention. Decorating such a tree can take a lot of time and effort, but it's worth it. Any product made of beads is painstaking work. To decorate a topiary, you can immediately buy a ready-made set of beads, and a jar of coffee or cream is also suitable for a pot.

Now each of you has an idea of what a topiary is and how to make it yourself. After all, it is much more pleasant to make a thing with your own hands, and if you try, you will definitely get a chic little thing for decor in the form of a fancy fantasy ball on a leg!
45 photos of happiness tree (topiary) ideas:

To make a real tree of happiness with your own hands is the dream of any child, but what is there a child, and an adult is not averse to mastering this task. And all masters of manual creativity have such an opportunity. Artificial flower topiaries - than not a tree of happiness, which can be created from simple materials, at random or for the fulfillment of a wish.
Look at examples of trees in the photo and video gallery, a master class - elegant, delicate trees with a beautiful crown, thin stem, and a cutely designed pot. And as a wedding decoration, and as a bedside souvenir, and as a gift to a friend - in whatever form you use it, such a topiary looks equally convincing and fresh.
There are several ways to make such a tree with your own hands. It all depends mainly on what kind of flowers you use. If these are ready-made flowers that can be bought in a store, the process of making a topiary is simplified. But after all, flowers from ribbons, and felt flowers, and silk, and paper can also be artificial.

An example is a master class on creating a paper rose topiary. Video and photo briefing will also be useful for those who are just trying their hand at this business.
You will need:
- Beautiful pot;
- Gypsum (or alabaster);
- Tree trunk - pencil, sushi sticks, drum stick, etc.);
- Music paper or book pages in English;
- Leg-split;
- PVA glue and glue gun;
- Base ball;
- Paints, brush;
- Decorative fixtures.
If you love the shabby chic style, then you can modify this master class a little, just a little, and get a stylish accessory just in the shabby chic aesthetic. But more on that later.

The first thing you need to do is gather all the materials together. First of all, what are you going to make roses from. It can be music paper or old music books, even if yellowed. You can also use the pages of English-language books and magazines. If here the pages are yellowed, you get a vintage topiary.
- You need to make your own flowers. To do this, cut out petals of different shapes from paper. Twist it into a tube narrow and long, and around it lay out the rest of the petals one by one until a bud is formed. The more loose it is, the better. Just bend the petals with your own hands.
- You can hold the petals a little over the flame of a candle or over a lighter so that their edges are brownish. Such a touch of antiquity will give more showiness to roses.
- Each flower is fixed with a thread at the base or by gluing the petals.
- Further, the master class follows the usual scenario for the topiary. The base ball, it can be, for example, a rubber ball, you paste over with paper according to the papier-mâché principle. If this is a foam blank, you can simply paint it the color of roses.
- With a glue gun, you fix on the basis of the rose, carefully, one at a time. They must fill the ball from all sides. Leave room for the barrel hole.
- If gaps are noticeable, then beige or mother-of-pearl beads will close them.
Now we need to make the trunk. You can take a thick pencil and wrap it with twine in several layers. Then the stem must be inserted into the base ball, fixed with glue, while not deforming the paper roses.

The master class will be the same if you use other samples than paper flowers. The photo and video show that the principle of creating a tree is the same.
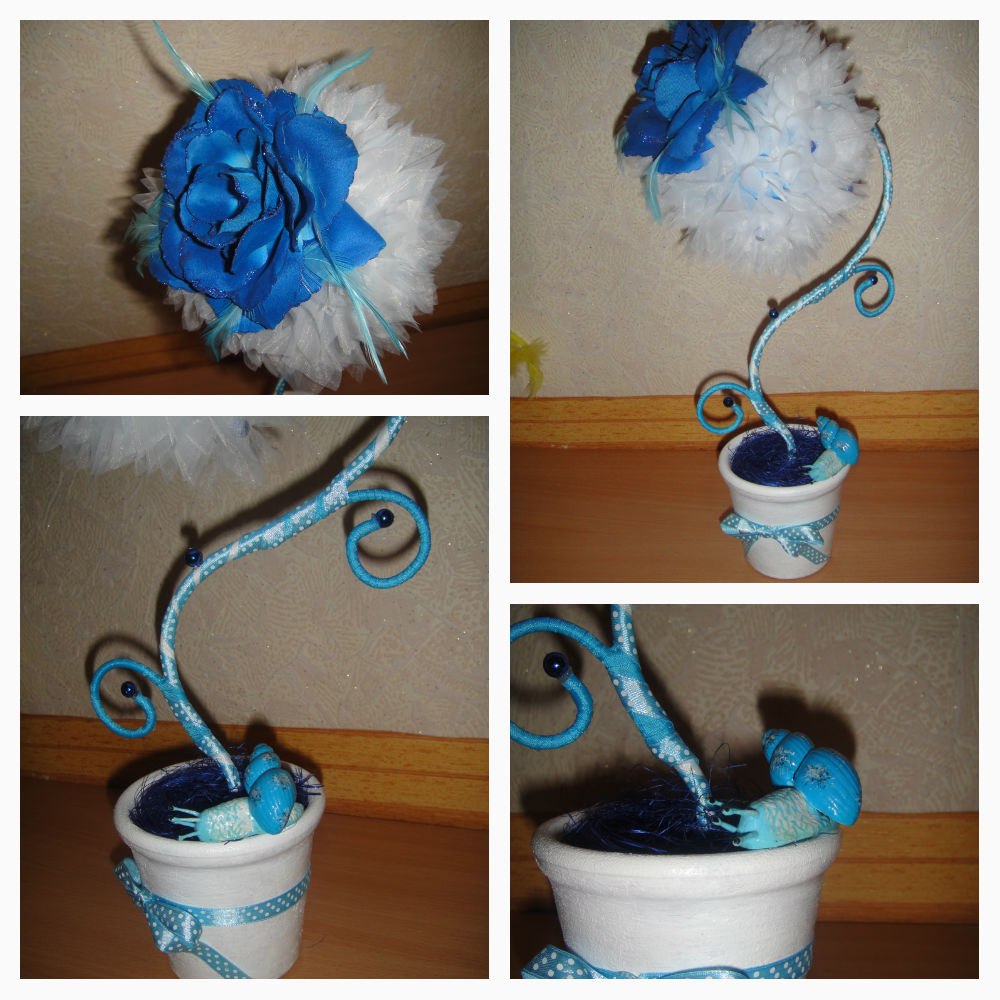
Topiary from artificial sisal flowers (video master class)
Artificial flower topiary pot
The pot can be decorated with your own hands, if it does not seem elegant enough to you. You can get inspired with the help of examples in the photo - there is decor with ribbons, and button decor, and beads, and twine, and braid.
And you can decorate the pot with your own hands like this:
- Fragment of canvas with embroidery. On the canvas, you embroider something consonant with the flower crown - the same roses, or maybe bugs in the subject, or maybe even some kind of statement. But the embroidery should be in the same style, if the roses are vintage, then the font is vintage.
- You can paint the pot- acrylic paints, a stencil, a little diligence and you get another hand-made little thing.
- The pot can be wrapped with coarse burlap, then tie with twine and decorate with another small rose, also made of paper with your own hands.

You can, of course, find both a video and a photo master class that will help decorate the pot.
As for the shabby chic style, just paint the pot with white paint with your own hands, allowing specially for scuffs and underpainting. Sandpaper will help with this.
How to decorate a topiary pot: creative ideas (video)
Artificial Grass Topiary
Artificial flower topiaries are no longer a novelty, but grass topiaries are a fresh idea.

They are definitely easy to make with your own hands. The principle is absolutely the same - the main thing is to carefully, repeating the shape of the ball, stick fragments of artificial grass on this very ball.
By the way, such trees can exceed ordinary topiary in size. This is worth doing, if only because they will look more convincing in this size: a real tree with a rounded crown in a pot. A more significant interior decoration, which can be located both in the living room and in the kitchen, and make it more comfortable, for example, a loggia.

This is a good decor for shooting a family video, and for photo shoots, and for a green corner in the house.
Topiary from artificial hydrangea petals (video master class)
Topiary - a tree in the house, small, neat, perfect. One master class, and you yourself are the author of such a souvenir tree. Try it, and making topiary can become not only your hobby, but also a way to replenish your family piggy bank.
Artificial flower topiary (photo)


Miniature topiary, without a doubt, are very beautiful decorative elements. However, they can only slightly complement the interior, but not be one of its key components. In fact, such crafts are cherries on the cake, and not the key ingredients of the cake itself. However, when using the technique of creating small trees, you can also create large or, as they are also called, floor topiaries.
By itself, the floor topiary has a lot of advantages. Such a craft immediately catches the eye, the scale of the product gives it greatness, and when selecting the necessary components, a large tree can become an excellent air freshener and even a kind of point for obtaining sweet snacks. Since there are really many advantages to these creations, we will devote this article to how to make a large outdoor topiary with our own hands.
A practical example of creating crafts
According to this master class, we will make a floor topiary with our own hands from decorative flowers. For work you will need the following tools and items:
- decorative roses of different colors (for example, red, white, pink);
- a foam ball with a diameter of about 30-40 cm;
- decorative stick 110-120 cm high;
- a roll of light brown satin ribbon;
- large flower pot;
- gypsum;
- snack skewers;
- secateurs;
- glue gun;
- stationery knife.

In general, creating a large flower topiary is extremely simple. The work looks like this:
- take a satin ribbon and tightly wrap it around a decorative stick (be sure to fix the ends of the ribbon with glue);
- then use a clerical knife to make a hole in the foam ball (bottom center);
- put the ball on a decorative stick (treat the junction with glue);
- after that, knead a gypsum mortar in a large flower pot;
- after bringing the solution to a creamy consistency, insert into it a structure from the crown and trunk of the future craft;
- hold the entire structure vertically until the “foundation” solidifies;
- after that, take decorative flowers and cut off their legs (however, leave about 10 cm from the legs);
- then make holes in the foam ball with a skewer (try to keep the holes more or less even; also try to keep the same distance between the holes);
- start inserting flowers into the holes (choose the planting depth yourself);
- additionally treat the leg of each flower with glue so that the components hold securely;
- finally, properly decorate the plaster surface with the remaining flowers.
That's all! Your large topiary on the floor is ready. The master class said that you can choose the depth of planting a flower yourself. To make it easier for you to understand which depth to prefer, we recommend that you familiarize yourself with the pros and cons of both options. So:
- with deep planting - the finished composition looks more dense, takes up less space, the likelihood of a gap between the flowers is excluded; however, with this approach, your creation will greatly lose in volume;
- with a shallow landing - the craft looks more elegant and airy, it has the necessary volume to fill the room space; however, there is a high probability that over time one or more flowers will break off and have to be replaced (often, energetic children or cats are the main culprits in such incidents).
Also, you can make a large do-it-yourself topiary from fresh flowers. The principle of operation remains the same. The main advantage of such a creation is that there will be a pleasant floral smell in the room. The minus is quite logical: after a certain time period, the flowers will wither, and they will have to be changed.
Other options and their advantages
According to the principle described above, almost all large topiaries are created on the floor. Exceptions apply only to double-barreled crafts and crafts without trunks. However, the principle is the same, but there are a lot of options for decorating the crown.

In particular, you can make a large coffee topiary on the floor with your own hands. With such a craft, the aroma of coffee will reign in the room for a long time. Your guests will think that they are not in an ordinary apartment, but in a real coffee factory. In addition, these creations look very solid, so they are perfect for rooms decorated in a classic style. The main disadvantage of such crafts is that to create them, you will need to spend a substantial amount on the purchase of hundreds of coffee beans.
Large fruit topiaries deserve special attention. If you use decorative fruit, you will end up with a colorful creation that will perfectly complement a room decorated in bright colors. There are no downsides to this version, by and large. If real fruits are involved, you will receive a unique stand from which guests can take the desired fruit. The disadvantage of such a creation is obvious - with a decrease in the amount of fruit, the original grandiosity will be lost. However, everything can be fixed by planting new fruits on the crown.
By the way! By a similar principle, you can make large topiary on the floor of sweets.
If you only need the topiary as a beautiful decorative element, cover the crown with one of the following materials:
- atlas;
- foamiran;
- stones;
- shells;
- Christmas tree decorations.
In such situations, everything will depend on your preferences or on the style of the entire room in which you plan to place the craft.
As you can see, there are many options for creating masterpiece large topiaries; the photos below will allow you to enjoy the beauty and grandeur of such handmade creations. In addition, you can experiment by using unusual materials or by combining those used in standard workshops. Don't be afraid to try something new! Perhaps this is how you create your own unique topiary.


