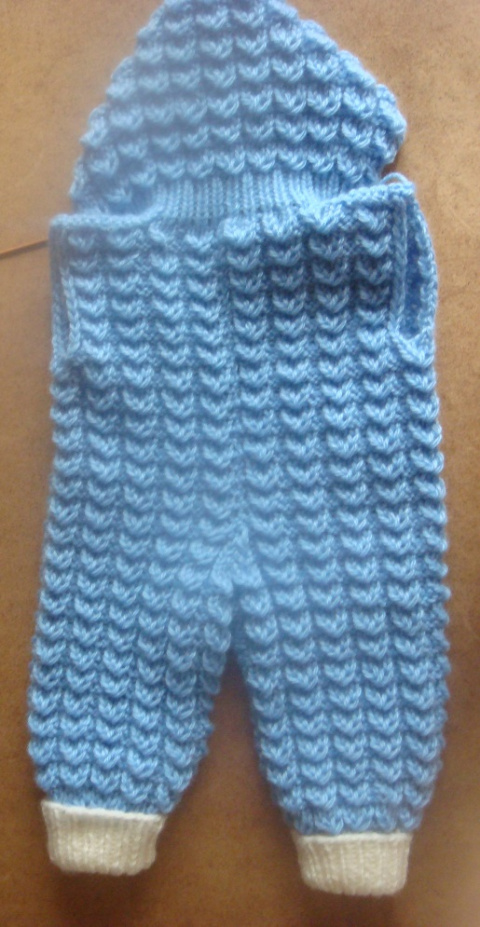
How to knit jumpsuit on knitting needles. Knitted jumpsuit for a newborn with knitting needles
Yarn - Caucasian C grade, it took about 400 grams, size - up to 6 months.


Description
Cast on 30 stitches with white thread and knit 8 cm with 1x1 rib. Change to a blue thread and in the first row cast on 15 more loops along the width of the fabric and distribute the pattern. You should have 11 rows of the pattern. then knit with a goose foot pattern to a height of 6 rows of the pattern.
Next, perform an addition, add 6 loops in total. And we knit 10 patterns to a height. Then, from the inside of the panties, immediately reduce 5 loops and 5 more loops through the row. then we knit in height 8 rows of the pattern.
We divide the fabric in half and knit the back and the shelf separately.
On the shelf, perform a decrease, as shown in the video. Also knit the second half of the jumpsuit. Sew both halves.
Neck. Cast on 46 stitches on the needles along the neckline and knit with an elastic band 2-3 cm. And immediately knit the hood with the HOOSE'S FOOT pattern. To make the Pattern symmetrical, add one more loop. There should be 47 loops on the hood in total. you get 11 rows of the pattern. Knit up 7 rows of the pattern. Then knit only the middle pattern, 7 loops, decreasing on both sides of the loop until 7 loops remain on the needles.
tie straps elastic band 1x1 leaving eyelets for buttons.
Draw a hood line
On the line of the hood, dial 62 loops, as on the shelves, from one hem 2 loops and knit 4 rows with front stitch, Then on the front side we knit 2 together front, yarn over, 2 together front, yarn over, etc. to the end of the row. On the wrong side, all the loops on the wrong side, yarn over so that there is a hole. Next, knit again 4 rows with front stitch. And then I showed.
Sleeves. Cast on 30 stitches on the needles and knit the cuff with an elastic band 1x1 8 cm. Next, knit with a pattern up 9 rows of the pattern. The width should be 7 rows of the pattern. Sew the sleeves to the armhole on the jumpsuit. Twist the decorative cord, make pompoms and insert into the trim of the hood. Sew on buttons.


Playlist with a step-by-step knitting lesson for this jumpsuit
Baby overalls are one of the most comfortable items in a child's wardrobe. For cold weather, these clothes are simply irreplaceable. The child has closed all parts of the body, except for the face, it does not blow anywhere, it is warm and comfortable. For the warm season, there are overalls open, with straps, light and comfortable. In addition to practicality and convenience, another advantage is that these things look very nice. You can make a jumpsuit using patterns. Then knit the details of the overalls and sew. In this article we will talk about how to sew a jumpsuit for a baby.
Patterns for children's clothing
In order for the jumpsuit to be comfortable and the child feel comfortable in it, you need to make a pattern correctly. There are many successful models that children will love. You can make a pattern especially for your baby by taking measurements from the child. Next, in accordance with these measurements, change the dimensions in the pattern. If the jumpsuit is knitted for a gift or there is no way to take measurements, then a table of sizes for children by age will help. However, it should be borne in mind that children have different builds and heights.
The pattern will be most accurate if the measurements are taken correctly. The photo below shows the correct position of the centimeter tape when taking measurements.
The tables below show standard measurements for children of different ages.
Table of sizes for children from birth to a year.

Tables of sizes for children of preschool age from one to 6 years and younger preschool age from 6 to 12 years.


Jumpsuit can be made with sleeves and a hood, short sleeves and shorts and straps. Bib pants are perfect for warm weather. The latter option is more suitable for children who are already 1 year old. As a rule, at this age they begin to walk and become more active, and clothing should not constrain movement. The advantage of the jumpsuit is that it does not slip, the elastic of the pants does not squeeze, the back is closed and drafts are not terrible. The straps can also be adjusted as the child grows. If turn-ups are made in such a model, then over time they can be turned off and worn for a long time.
Below are patterns and knitting patterns for different models of overalls.


Models and their features
For the smallest children up to a year, it is better to knit overalls with fasteners along the crotch. So it will be very convenient to change a diaper for a child without undressing him completely.
For knitting clothes for babies, you should choose high-quality yarn. Many manufacturers have an assortment of children's lines. Children's threads are very diverse in density, texture and color. Before buying, you need to make sure that the yarn is soft and not prickly.
You can knit jumpsuits both with knitting needles and crochet. The needles of the product are a little thinner, but softer. You can knit beautiful patterns with knitting needles. If you crochet, then the yarn goes a little less, the fabric is denser. You can also make a wonderful openwork knitting. The density of knitting depends on the threads and on the knitting needles or hook. They need to be selected in the appropriate thickness.
If the thread is thicker, then the product may turn out to be too dense and stiff. If the knitting needles or hook are thicker, then the knitted fabric will be too loose.


For children from one year old, there are many options, both warm closed and light overalls. From about one to three years old, the child is very active and inquisitive. Therefore, special attention should be paid to ensuring that the clothes are as convenient and comfortable as possible.


For older children, in addition to comfort, the appearance of clothing is also important. From about three to 6 years old, a child already has a taste, so the aesthetic appearance should also be paid attention. Sometimes children are ready to accept a not-so-comfortable thing if they really like it. But you can combine comfort and visual appeal in one thing if you make a comfortable and at the same time beautiful jumpsuit with your own hands. Among the models proposed below, there are also interesting models of overalls that children will surely like.


On the straps
With the help of step-by-step photos and descriptions, you can independently knit a very cute and comfortable jumpsuit with straps.

We will knit the jumpsuit with knitting needles in 3 sizes, and crochet the panda and lace 2.5. The main yarn is plush, the elastic bands will be from a wool mixture. You will also need scissors and a needle. The length of the finished product is 83 cm, its width is 32 cm, the inseam is 35 cm.
First you need to tie the pants. With a semi-wool we make an elastic band 2 × 2 of 16 rows for 42 loops.

Now we knit with plush yarn. You need to add loops evenly so that there are 58 loops by the 72nd row. First we make 8 rows in blue, then 2 rows in blue. Now 4 rows in blue and 2 rows in blue. Then we knit with blue flowers to the end of the leg.

In the same way we knit the second leg. Then we fold the legs the way they will look when finished, and press the front and back loops on separate knitting needles.

Now we will connect before. We knit 50 rows with the front stitch with blue plush threads.


We finish the shelf with an elastic band from a wool mixture. We make 6 rows with it and close the loops.
We turn to knitting the back. It is knitted in the same way as the shelf, but instead of an elastic band, we alternate 2 rows in blue and 4 rows in blue. By doing this alternation of colors, we will also form the armholes. To do this, we will decrease one loop on each side every 2 rows.

When 28 loops remain, 8 central loops must be closed. From the loops remaining on the knitting needles we will make straps.

We knit straps of 46 loops by alternating different colors of plush yarn, two rows each.

Before finishing the knitting of the straps, we close the two central loops and form a buttonhole.
We will also make a second strap.

Then you need to sew a jumpsuit and sew on a button.

Now you need to crochet a chain of air loops with white plush yarn.

Waiting for the birth of a baby is like waiting for a miracle. Future grandmothers and young mothers are happy to prepare a dowry. Many people want to do something with their own hands. In this article we will tell you how to make a knitted jumpsuit for a baby with knitting needles, a diagram with a detailed description.
Knitted jumpsuit "Frog" with a hood
This very original and comfortable jumpsuit can be knitted for a newborn baby or an older child. The model is designed for several sizes.
Baby age: 0-3 (3-6) 6-12 months.
Girth: 41 (46) 51 cm.
We will need:
- light green yarn - 250 (300) 350g;
- white yarn - 50g for all three options;
- remnants of black yarn;
- direct sp. No3.25 and No4;
- circular sp. No3.25;
- holder p.;
- a needle with a large eye;
- some filler for the eyes;
- buttons in the color of the yarn - 17 pcs.
Patterns:
- persons. smooth surface: with direct / reverse knitting in persons. R. - facial, in out. - purl, with circular knitting - in all r. all loops - facial;
elastic band: 1 person x 1 out;
- "bump": from 1p. knit 4p. (1 out., 1 l., 1 out., 1 l.), turn, 5 out., turn, 5 p. in 1l.
Density: knitting needles No. 4 22p. for 30r. are equal to 10 cm by 10 cm.
Description of knitting baby overalls
Back leg
We need to connect two such parts using the same pattern. We collect with knitting needles No3.25 with light green yarn 16 (16) 18p. We carry out knitting of an elastic band for 3 cm. The last row should be knit. Track. R. on the wrong side: 4 (2) 3p. rubber band, * add p., 1p. - gum * - from * to * repeat to the extreme 3 (2) 2p., add a loop, finish the p. rubber band. We have 26 (29) 32p.
We turn to knitting with needles No4. We knit faces. stitch to a total height of 20 (22) 24cm. We put off knitting.
Back
We transfer the loops of both knitted trousers to one joint. This is 52 (58) 64p. We knit faces. ch. up to 22 (23) 24 cm from the junction. We finish with the purl. For armholes, close on each side 1 time for 3p. Then we subtract more in every even p. several times for 1p. You should get 18 (20) 22p. at work. We finish next to the out. side. We postpone p.
Front leg
It is necessary to connect two parts using the backrest pattern.
We transfer the loops of both knitted trousers to one joint. This is 52 (58) 64p. We knit faces. ch. up to size 22 (23) 24 cm from the docking point. We finish next to the out. side. For armholes, close on each side 1 time for 3p. We begin to reduce the item of raglan at the same time with a roll-out: we slow down in even p. 1p., 18 (21) 24 l., turn, set aside the rest of the p.
We knit 1 row. persons. satin stitch.
Further, at the same time with a decrease in raglan, we reduce from the side of the rollout in each p. 4 (5) 6 times 1p. At 4 (4) 6p. We continue to decrease in even rows until 2p remains. Set aside p. From the front side, close 6p. in the center to roll out the front. Knit the second half with knitting needles in a mirror, using the same pattern.
Sleeve
We collect with knitting needles No3.25 with light green yarn 26 (29) 31p. Knit with a 3 cm elastic band. Finish with a front row. Further, the schemes of work for each size vary.
For newborn size from 0 to 3 months
According to out. side: 3p. rubber band, * add p., 3p. with an elastic band * - from * to *, repeat to the extreme 2p., add a loop, finish the row with an elastic band.
For baby size 3 to 6 months and 6 to 12 months
According to out. side: 3 (4) p. rubber band, * add p., 3p. elastic band * from * to * knit to the extreme 2 (3) p., add p., finish with an elastic band.
We have 34 (38) 40p.
We turn to knitting with needles No4. We knit 4p. persons. satin stitch. Then r. with knobs: 4 (6) 7p. persons. ch., * "knob", 4p. persons. ch. * from * to * repeat to the extreme 0 (2) 3p., 0 (2) 3l. We continue the 5th p. persons. ch. Next, we repeat knitting with a pattern from the last 6p.
At the same time we add on both sides in the second p. 1p., then in each 6 (10) 10 p. by 1p. 40 (44) 48p should remain. We knit 5 (7) 9r on them. by pattern. For raglan, close on both sides in the second p. 3p., then - in even p. by 1p. There should be 6 sts left. We postpone p.
On the front side, we raise with knitting needles No4 along the edge of the roll-out of the right half in front of light green yarn 10 (12) 14p., Then we knit the loops of the sleeves of the faces. p. of the back to the extreme p., 1l., then - tie the p. of the second sleeve of the faces., we collect 10 (12) 14p. along the edge of the left shelf. In total we have 71 (79) 87p. Knit 1 row on the wrong side. purl stitches. We continue knitting a jumpsuit with a hood for babies faces. stitch to a height of 18 (19) 20 cm. We finish with the purl. At the beginning of the trail. 2 p. close 22 (26) 30p. Over the central points we continue knitting. We do 4p. persons. ch. Track. R. we have with "bumps". His scheme is as follows: 3 (3) 4p. persons. ch., * "bump", 4p. persons. ch. * - from * to * repeat to the extreme 4 (4) 4p., “bump”, finish faces. We do 5p. persons. ch. We continue knitting a jumpsuit for a newborn with knitting needles, repeating the last 6p. After 11 (13) 15 cm, we finish the work on the out. side. We close the stitch. Sew the side edges of the central part to the previously closed stitches of the hood.
We tie the hood and front
Raise with circular needles No3.25 along the right sidewall evenly 17 (19) 19p., Then 42 (46) 50p. along the right side of the hood, 27 (27) 27 p. along the middle part of the hood, 42 (46) 50 p. along the left side of the hood, 17 (19) 19p. along the left shelf. We knit 3p. rubber band. For buttonholes: 3p. rubber band, * 1n., 2p. in 1l., 4p. rubber band * - from * to * repeat twice. We finish r. rubber band. We knit 3 more. rubber bands. We close the item according to the pattern.
We tie the legs
Side with holes for buttons: with knitting needles No3.25 we raise 45 (51) 57p. from the bottom of one leg to the loops of the back and 46 (52) 58p. from the back to the bottom of the second leg. We knit an elastic band for 3p. For buttonholes: 4p. rubber band, * 1n., 2p. in 1l., 5 (6) 7p. rubber band * from * to * repeat to the end. We knit 3 more. rubber band. We close the item according to the pattern.
Eyelids and eyes
We need to knit two such white parts and 2 light green parts for a jumpsuit with a hood for a newborn. We recruit sp. No3.25 with white (light green) yarn 18 (24) 30p. We knit 1 row. purl n. Then 6 (8) 10r. persons. ch. Track. R.: * 1l., 2p. in 1 l. * from * to * repeat on all p. of the row. Break yarn, pull through all sts, tighten and fasten off.
nostrils
We need to connect two such details. We recruit sp. No3.25 light green yarn 15 (18) 21p. We knit 1p. out. p. We knit 6 (8) 10r. persons. ch. Following. R.: * 1l., 2p. in 1l. * from * to * repeat until the end of the river. We break the thread, stretch it through the stitch, pull it together.
Assembling a hooded newborn jumpsuit
We grind raglan seams, side, on the sleeves. Sew on buttons. We sew the eyelid (light green part) and the eye (white part) together, fill it with filler to make the eye voluminous. The canvas of the century should stick out a little above the eye - see photo. We repeat the process for the second eye, using the same scheme. Sew the eyes to the hood. We sew the nostrils symmetrically with respect to the center of the hood between the eyes and the elastic. Embroider pupils in black. Baby overalls are ready!

Pink overalls with knitting needles: video MK for beginners
Selection of schemes


A do-it-yourself jumpsuit for a baby for the first birthday is a very important mission that any knitter can do, even if she recently tried her hand at this business for the first time. One has only to get acquainted with several important features of working with overalls for newborns, and you can start knitting.
Knitted jumpsuit for a newborn
In addition to hats, panties and vests, overalls themselves are versatile clothes for tiny children for any time of the year. In addition, they protect from cold and wind, they are easy to put on and take off, and the shapes and all kinds of cuts of overalls for newborns amaze with their cute beauty. They are crocheted or knitted, with or without sleeves, with raglan or in a classic way, with buttons or zippers, with or without a hood, and the variety of designs and all kinds of knitted patterns is amazing!
It is important not to forget about the convenience and practicality before knitting clothes for newborns. You need to choose a suitable soft yarn that will not irritate the baby's delicate skin, and knit a jumpsuit, taking into account the fact that the baby grows out of it quickly, so its size should be slightly larger than the initial parameters of a recently born baby.
In order to make the overalls easier to knit, and knitting errors could be avoided, we will consider in this article how to create knitted overalls for a newborn with a detailed description. This is useful for both beginners and more experienced craftsmen who are looking for the next model for a newborn.
How to tie a simple model for a baby?


There is enough time for mistakes and corrections ahead, so you should not be afraid of this, you need to get down to business as soon as possible. First you need to choose the most uncomplicated model of a knitted jumpsuit for a baby up to a year old, so that it is easier to get used to the specifics of work. Let's try to knit a jumpsuit for a baby from 0 to 6 months according to the master class with knitting needles.
Overalls sizes: 50/56 (62/68) 74/80.
Tools: yarn - (100% wool; 220 m / 50 g) - 150 (200) 250 g beige; knitting needles No. 3; short circular knitting needles No. 3; 7 buttons.
- Knitting
Front surface
Facial rows - facial loops, purl rows - purl loops.
In circular rows, knit all loops.
Wrong side
Facial rows - purl loops, purl rows - facial loops.
In circular rows, purl all loops.
Rubber
Alternately 1 loop with front stitch, 1 loop with wrong side.
Knitting density
27 p. x 39 p. = 10 x 10 cm, knitted with the front surface.
Pattern

- Progress
Pants
Cast on 44 (48) 56 sts on the needles and knit between the hem 2 cm with an elastic band, while in the last row add 1 (3) 1 p.
Then knit between the edging of the front surface, while noting the middle loop (= side seam).
For step bevels, add on both sides in each 8th p. 0 (4) 7 x 1 p. and then in every 6th p. 7 (3) 0 x 1 p.
After 13 (15) 17 cm from the elastic, cast on an additional 1 x 4 sts on both sides, then leave all the loops.
Repeat for the other leg.
Front and back of pants
Transfer the loops of the right and left legs to the knitting needles, while at the beginning and at the end of the row add 1 chrome each. loop (= middle of the front) = 136 (148) 160 p.
Then knit between the edge of the front surface.
After 16 (18) 20 cm from the elastic of the sides, close for the strap on both sides 1 x 4 p.
After 21 (23) 25 cm from the elastic, add at the marks in each 20th p. 2 x 1 p.
After 32 (34) 36 cm from the elastic, divide the work at the marks and the back part = 70 (76) 82 p. And the details of the front part = 31 (34) 37 p. Finish separately.
Left and right front parts
Left: For one-piece sleeves on the right edge, add in each 2nd p. 1 x 1 p., 3 x 2 p. and 1 x 3 p.
After 38.5 (42.5) 46.5 cm from the neckline, close 1 x 5 sts along the left edge and then in each 2nd p. close 1 x 3 p., 1 x 2 p. and 2 x 1 p.
After 42.5 (46.5) 50.5 cm from the elastic band, directly close the remaining shoulder loops.
Right: Knit in the same way as the left, but in a mirror image.
Back
For one-piece sleeves, add on both sides in each 2nd p. 1 x 1 p., 3 x 2 p. and 1 x 3 p.
After 42.5 (46.5) 50.5 cm from the elastic, close on both sides for the shoulder 1 x 29 (32) 35 p. And leave the middle 32 p. for the neck.
Assembly
Moisten the product slightly, prick on the pattern and leave to dry.
Run shoulder and crotch seams.
On the edges of the cuts for the slats, dial 81 (87) 93 sts on the knitting needles and tie 1 purl row with the front ones, then knit 2 cm with an elastic band between the edge ones, while on the left slat after 1 cm, evenly distributing, make 7 holes for buttons - 1 close and dial again in the next row. Close all loops.
Sew the lower short sides of the slats from left to right.
On circular knitting needles, in addition to the left 32 loops of the neck of the back, dial along the front edge of the neckline, without affecting the short sides of the slats, 17 sts each and knit 1 purl row with facial ones, then tie between the hem 2 cm with an elastic band. Close all loops.
On the edge of the sleeves, dial 57 (63) 71 p. on the knitting needles and knit 1 purl row with facial ones. Then knit 2 cm between the hem with an elastic band. Close all loops.
Sew the seams of the sleeves. When finished, lightly steam all seams. Sew on buttons.
Knitting pattern for girls


To make it more interesting to knit a jumpsuit for a newborn with knitting needles, you should experiment with cut, relief or patterns. For example, choose not an ordinary closed suit, but a jumpsuit with straps. This model of thin yarn is perfect for summer, and will look perfect on any baby. So, let's knit a jumpsuit for a girl in delicate yellow tones.
Overalls sizes: 0 (3) 6 (12) months.
Tools: yarn - Phildar Detente (93% acrylic, 7% elastane; 144 m / 50 g) - 1 (2) 2 (3) skeins of white (BLANC); 1 skein yellow (MIMOSA); knitting needles No. 3 and 3.5; hook number 3; 5 buttons with a diameter of 9 mm; 2 yellow buttons with a diameter of 15 mm.
- Knitting patterns
Front surface
Knit (needles No. 3.5): front rows - front loops, back rows - back loops.
Stripe sequence
Knit with front stitch alternately 2p. yellow and 2p. white thread.
Plank pattern
Knit (needles No. 3): alternately 1 facial, 1 purl.
Underlined Decreases
Right edge \u003d chrome, 1 person, then 2 stitches knit together with the front one with a slope to the left (= 1 stitch, remove as a facial, 1 person and stretch it through the removed loop);
left edge = when there are 4 stitches left on the left needle, knit 2 stitches together front, knit 1, chrome.
Knitting density
28p. x 40r. = 10 x 10cm.
Important: the thread is very elastic, it is necessary to let the sample lie down for several hours before checking with the dimensions.
Pattern


- Progress
Back and front
Start with a leg half. With a white thread on knitting needles No. 3, dial 29 (31) 33 (37) sts and knit with a pattern for the bar 1 cm = 4 rows, starting a row with 1 front.
Switch to needles No. 3.5 and knit with stockinette stitch, while in 1-mr. for the 1st and 3rd sizes add 1p = 30 (31) 34 (37)p.
For a bevel through 2 (3) 5 (6) cm = 8 (12) 15 (18) p. from the bar add 1 x 1p from the left working edge, then in each next 2-mr. 2 x 1p., 1 x 2p. = 35 (36) 39 (42) p. Through 3.5 (4.5) 6.5 (7.5) cm = 14 (18) 26 (30) p . from the bar work temporarily leave.
Knit the other half of the leg symmetrically.
Connect the loops of both halves of the legs, adding the appropriate number of loops between them, and continue knitting straight for 70 (72) 78 (84) p.
After 15 (17) 20 (22) cm = 60 (68) 80 (88) p. from the bar it is emphasized to subtract 1 x 1p on both sides, then after 4p. 1 x 1p and after 6p. 1 x 1p. (in each next 6-mr. 2 x 1p.) in each next 8-mr. 2 x 1p. (Through 8r. 1 x 1p. And after 10r. 1 x 1p.) = 64 (66) 72 (78) p.
After 19 (22) 26 (29) cm = 76 (88) 104 (116) from the strap, knit with front stitch, alternating stripes in the indicated sequence.
At the same time, for armholes, close 1 x 4p on both sides, then in each next 2-mr. 2 x 2 sts and 3 x 1 sts = 42 (44) 50 (56) sts
Then knit straight and through 26 (30) 35 (39) cm = 104 (120) 140 (156) p. close all loops from the strap.
Before knitting in the same way, but start the pattern for the strap from 1 purl.
Straps
With white thread on needles No. 3, dial 13 stitches and knit 8.5 cm with a pattern for the strap, while 1-d. start and finish 2 persons., then cast off all loops.
Knit the second strap in the same way.
Inseam trims
With a white thread on knitting needles No. 3, dial 41 (49) 63 (71) sts and knit 1 cm with a pattern for the bar, while 1-dir. and all front rows start and finish 2 persons.
Then knit 1 front row with knit and several rows with front stitch with a thread of a contrasting color.
Iron the rows connected with the front surface with an iron.
Dissolve these rows when assembling to the main color.
Assembly
Parts are slightly moistened, stretched according to the dimensions indicated on the pattern and allowed to dry. Run side seams. Sew on the crotch seam strips with a stitch on the front side of the fabric. Sew 5 buttons along the crotch.
Crochet the edges of the armholes and the neckline of the back and front with a hook No. 3 with a white thread 1p. Art. b/n.
Sew one end of the straps to the back. Make 1 hole for a button, spreading the loops 1 cm from the second edge of each strap. Sew buttons to the front. At the end of the work, all the seams are lightly steamed.
Overalls for a boy with a detailed description

Another important task for a future mother, sister, aunt or grandmother is to knit a jumpsuit for a boy. You can use the classic schemes, or you can link a more "joking" and interesting option. Considerhow to knit a jumpsuit for a newborn with knitting needles with short pants and a breast - a beautiful and very unusual model.
Overalls sizes: 68, 74 and 80.
Tools: yarn - (100% sheep wool; 120 m / 50 g) - 100 (150–150) g light gray; knitting needles No. 5; circular knitting needles No. 4, 100 cm long; 6 decorative buttons with a diameter of 19 mm.
- Knitting patterns according to patterns
Rubber
Alternately 1 person., 1 out.
structural pattern
Knit according to the above scheme in rows in the forward and reverse directions.
Read front rows from right to left. In out. rows not shown in the diagram, purl the loops.
Repeat 4 sts wide. In height, repeat from the 1st to the 8th rows.

Decorative reductions
From the right edge = chrome., 2 p. Tie together with a slope to the left.
From the left edge = knit to the last 3 p. of the row, then knit 2 p. together faces., finish chrome.
2 p. with a slope to the left
Knit 2 p. together with a slope to the left: remove 1 p.
Increases
Add 1 p.: From the broach between the loops, knit 1 front crossed loop.
Knitting density
20 p. x 28 p. \u003d 10 x 10 cm, knitted with a structural pattern with knitting needles No. 5.
Pattern


- Progress
Cast on 78 (82–86) sts on needles #4 crossed, purl 1st row (= purl row) and continue with rib.
After 3 cm = 10 p. from the beginning of the gum, go to the knitting needles No. 5 and knit with a structural pattern, while in the 1st p. evenly add 8 p. = on the needles 86 (90–94) p. After chrome. repeat the pattern in a row 21 (22–23) times, finish with chrome.
In the 5th r. from the gum, add on both sides, first 1 p., Then in each 4th p. 7 more times 1 p. = on the needles 102 (106–110) p. Include the added loops in the structural pattern.
After 13 (14–15) cm = 36 (40–42) p. from the elastic band, first close on both sides 28 p., then subtract (see Decorative reductions) in each 2nd p. 2 times 2 p. and 7 (8–9) times 1 p., in each 4th p. 1 more time for 1 p. = 22 (24–26) p.
After 9.5 (10–10.5) cm = 26 (28–30) p. from the beginning of the decrease, add on both sides, first 1 p., then in each 4th p. 5 more times 1 p. = 34 (36–38) p.
After 10 r. subtract from the last increase (see Decorative decreases) on both sides, first 1 p., then in each 10th p. 2 times 1 p. And in the next 8th p. 1 more time for 1 p. = 26 (28–30) p.
After 17 cm = 48 p. from the beginning of the decrease, continue knitting faces. satin stitch.
After 2 cm from \u003d 6 p. persons. smooth close for the neck medium 10 (12-14) p. and finish both sides separately.
To round the neck, close from the inner edge in every 2nd p. 2 times 1 p. = 6 p. At a height of 16 (17–18) cm = 46 (48–52) p. from the beginning of the neck, make a hole for the button: chrome., 1 person., 2 p. knit together persons., 1 yarn, 1 person., chrome. In the next out. purl a row of yarn over.
After 17 (18–19) cm = 48 (50–54) p. from the beginning of the neck, close all 6 p.
Finish the other side symmetrically.
Assembly
Prick the product on the pattern, moisten and leave to dry.
On circular knitting needles No. 4, starting from the left edge of the elastic band, dial 455 (473-491) points evenly along the contour of the product and knit in rows in the forward and reverse directions with an elastic band 3 p., Then close the loops. Fold the middle part with the side ones, as in the photo, and sew. 2 buttons sew on acc. places to the shoulder straps, 4 buttons - to the middle part as a decoration. Fasten the ends of the threads.
Video lesson
The diagrams and descriptions are very helpful, however, if the overalls are knitted by a needlewoman for the first time, it would be right to start by watching a video with the complete process of knitting a children's warm suit with knitting needles. For this, experienced craftswomen record their video master classes to help the young.
Knitted jumpsuit is a versatile baby clothes that will come in handy in any season. You can knit such a little thing for your crumbs with knitting needles and crochet. Depending on the knitting and yarn chosen, you can get a winter, summer or demi-season option.
How to choose yarn and knitting method
When it comes to children's things, you can not save! A knitted thing will turn out cheaper than a store-bought one, so it’s better to choose yarn of excellent quality. For newborns, cotton or soft woolen threads are suitable, a small amount of acrylic is allowed. The main thing is to check when buying that the yarn is pleasant to the touch and does not prick.
The color scheme can be absolutely any, the one that is pleasant for mom, but it is better to leave too bright acid colors on the store shelf. If not very high-quality dyes were used, then the product can cause allergies in the crumbs and the work will go down the drain.
A lot depends on the knitting method and the chosen pattern. The same model can be connected in different ways, and the finished things will be completely different from each other. In addition, if openwork knitting is chosen, then such a product will look great in summer, and tight-knit overalls will warm the baby in winter and in demi-season weather.
Romper for a newborn, crocheted
The model is convenient in that the clasp runs along the entire length from the throat to the heels, thanks to which it will not be difficult to dress and undress even a newborn baby who does not yet hold his head. And the hood is convenient because you do not need to put several hats on your baby.
Warm hoodie for cooler weather
For work you will need:
- Soft yarn "grass" - 200 g. You can use a thread that was originally dyed in different colors. So, the finished thing will be bright and boring.
- Contrasting bouclé yarn for edging - 50 g.
- Small buttons - 14 pcs.
- Crochet hook No. 3.5.
Note: If other yarn is used, then the hook must be selected individually, focusing on the knitting density - 16 loops in length per 10 cm of knitted fabric.
Scheme and pattern for knitting:

The pattern is designed for a product of size 56-62 (for children from 0 to 3 months)

Progress:

A beautiful and fashionable jumpsuit for a newborn is ready!
Knitted jumpsuit
If crocheting is not too attractive, then you can try to knit a beautiful jumpsuit for a baby with knitting needles. For this model, a pattern is not required.

Versatile and uncomplicated in execution, the model is suitable for babies of any gender.
For work you will need:
- Blue threads (AlizeBabySofty) - 2 skeins or 100 g.
- White threads (AlizeBabySofty) - 1 skein (50 g).
- White threads (AlizeBabyWool) for tying - about 20 g.
- Spokes. It is better to take knitting needles on a fishing line - this will greatly facilitate the work.
- Buttons for fastening - 5 pcs.
Progress:
- Knitting starts from the bottom of the legs. To do this, you need to dial 40 loops with an elastic band (2x2) and knit 10 rows.
- After that, you need to enter the blue thread into knitting and continue to knit the legs, making 8 additional loops in the first row.
- Next, you need to knit a leg, making increments evenly to reach 56 loops at the very top (total leg height 48 rows).
- Next, you need to tie the second leg in the same way as the first.
- Next, you need to turn over all the knitting so that the work goes in a single canvas.
- Now you need to make a shelf for the fastener. To the base, you need to dial 8 additional loops and knit them in stocking stitch.
- Now you need to break the product into three main parts: 2 front shelves (28 loops each + 8 additional strap loops on the right shelf) and back (65 loops).
- Now you need to separately knit the sleeves. First you need to dial 30 loops with an elastic band (2x2) and knit 10 rows.
- Then you can take another yarn or continue to knit with the same one, adding 6 loops.
- Further, a sleeve 22 cm long is knitted. Knitting is the front surface.
- Similarly, you need to tie the second sleeve.
- Now you can sew all the details. It is better to do this with the same yarn that knitted, then the seams will be invisible.
- You can add a hood to the item. To do this, you need to dial 88 loops and knit them with a double hollow elastic band. This is done so that later a drawstring can be inserted into the hood.
- Further, the hood is knitted with white threads of 22 rows.
- After that, the workpiece must be divided into three equal parts (25 loops each) and continue knitting the middle part of the hood, capturing the extreme loops from the side halves.
- So you need to knit until the loops on the adjacent halves of the hood run out. The finished product is designed for a child 2-4 months (approximate size 62-68)

The yarn used is white, folded into two threads

Pants are knitted in stockinette stitch

The knitted leg looks like this

And so the trouser leg will look in the finished product

This is what the end result will look like

We knit with a viscous “front surface” about 5 cm

When knitting shelves, you need to remember about the loops for the fastener (they are located approximately every 14 rows). You can make them like this: two loops close in one row, and in the next in this place you need to make 2 yarn over

This knitting continues to the armpit area (approximately 14 cm)

This is what the folded jumpsuit looks like at this stage

Each of the three parts should be knitted separately by 12 cm. Approaching the top of the knitting, several decreases should be made with the closing of the loops

This is what knitting looks like in expanded form

So, if you turn

It should turn out the same as the cuffs on the legs

It should turn out like this

Gradually, it is necessary to add loops so that by the end of the knitting of the sleeve they come out 44

You need to make sure that both sleeves are the same

This is how the almost knitted jumpsuit looks like

The elastic is knitted 12 rows, then the blue thread is turned on. 4 rows are knitted in blue and the loops are reduced so that there are 75 of them

It should turn out like this

Knitting should look like this
It took 5-6 hours of free time for all the work, but in the end we got a nice exclusive little thing. The finished jumpsuit must be washed, dried and thoroughly steamed with an iron.
No need to waste time! Just a few hours of work, and a knitted jumpsuit will definitely take its rightful place in the baby's dowry.


