A set of napkins with a crochet pattern. Large crochet doily: pattern, knitting principles, application. Crochet a simple napkin lesson
Craftswomen prefer to start their crochet training with the implementation of simple napkin patterns. Unfortunately, in the future, such ideas do not find application at home - well, let it be, but a napkin made with love can be an excellent gift for a person who will be delighted with tenderness. In the crochet article, doilies are presented in abundance. Here are not only ready-made schemes, but also instructions on how to put together this divine beauty with the help of your own imagination.
Simple napkins for beginners
It is necessary to take care of newcomers to this craft and offer simpler versions of napkins. Better than any description, diagrams will follow - this visual aid will help you deal with the most difficult task.
A selection of simple napkins with descriptions and diagrams:


Napkin "Poppies"

Now you can complicate the task and tie a product that is difficult at first glance, but simple in execution. This is the "Poppies" napkin shown in the photo. You should not complain about the complexity of combining colors - the entire napkin is presented in the form of a round cloth, where white and green thread are used, while poppies are knitted separately and simply sewn on with a thread using a needle. Experienced craftswomen make crochet connections, which will also be easy for beginners to do in the future.
So, for starters, according to the scheme, a white circle is knitted.

In the future, the white thread changes to green and knitting continues to the end.

The scheme for poppies is presented by hand. The first row is knitted with a yellow thread, the second is knitted with black - this is the core of the flower. Next, the knitting of the petals begins, so from the third row the thread is changed with a red tint. Knit each petal separately - all you need is 5 petals and 6 flowers per napkin.

Napkins with swans are very attractive, which will decorate any work - it is important not to be afraid to combine the birds with the canvas and arrange them correctly. The diagram shows the knitting of birds.
The first scheme is presented as a base in the form of a cup - first knit an oval, and then carefully “arrange” the bird’s wings. The thread can be torn off or the neck can be knitted with a single piece. The neck is presented in the form of a tube, which gradually decreases. The last two rows are knitted with a red or orange thread - this is a beak.

The second scheme represents a different knitting of swans: the wings of a bird are a detail with four petals. In the future, the knitting of the neck is also formed here in a similar way.


Napkin "Sunflower"

This napkin option is also suitable for beginners. There is no need to look for a special description here - just use a similar pattern and two shades of thread - black and yellow. For example, the following schemes for knitting a sunflower are given.


Napkins with bumps

The photo shows the original napkin with bumps, but it can be difficult to find a diagram. The fact is that there are practically no special schemes for knitting such products. But experienced craftswomen create a masterpiece with the help of a standard - to knit napkins, you need to take the usual options with the presence of "pineapples". Instead of pineapples, cones are just tied out. The main thing is to choose schemes with a suitable density. Although the fantasies of craftswomen are limitless, therefore, there are no rules to follow in crocheting.
A selection of schemes with pineapples, replaced by cones.


Combined wipes
With a simple fantasy and a few shades of thread, you can create a real embodiment of art. For napkins, it is enough to collect several motifs crocheted separately. It may seem difficult to someone, but experienced craftswomen resort to just this method of knitting for napkins with flowers.
A selection of combined napkins.


A selection of schemes for combining.


Schemes for independent work
Now you should present some patterns for self-knitting - this will allow you to show your imagination in terms of skill and experience. Use different threads, sew on flowers tied separately - enjoy knitting and the embodiment of beauty. Only your hands can create such grace, and your eyes and the admiring glances of loved ones will appreciate the work. 


Crocheted napkins can be a great addition to an existing interior. They are often used to create large products - tablecloths and even curtains. It is enough just not to be lazy and choose the right threads. By the way, cotton threads are selected for napkins - they hold the canvas in a given shape. If necessary, napkins are starched - so they take on the appearance of a full-fledged product.
For a long time, the TV, carefully covered with a napkin, remained one of the main attributes of any Soviet housing. Times are changing, and now it is rare to find a woman who decorates her house with knitted napkins. However, seeing such an ornament in a strange house, each of us admires the talent and skill of the craftswoman. So why not continue the tradition of knitting beautiful things that will bring new, interesting accents to your home? Crochet napkins– what could be easier? Especially if there is an article with diagrams- things get done simple but very beautiful!
How to understand the knitting pattern?
Crocheted napkins are really easy to knit, but the scheme of work is not always clear. We invite you to look at this picture - here the main designations that are most often used in weaving are deciphered.

We knit in a circle
The most simple and classic knitting is circular weaving. The schemes of such napkins, as you can see, are very simple - the main thing is to know the symbol and have at least a little experience.
As you can see, many patterns with German text are an echo of those times when it was possible to find a way to knit a beautiful thing only in German magazines. And now such napkins can be knitted according to patterns from the Internet - what could be more accessible and easier?


By the way, many needlewomen use patterns for knitting lace napkins to create interesting and unusual large things - for example, tops or dresses.
Figured napkins
Self knitting crochet napkins with patterns taken from our article will be excellent, simple and beautiful solution for non-standard surfaces. After all, it often turns out that you need to decorate part of a piece of furniture. A round napkin has its drawbacks, and then you should pay attention to such curly things. It is they who show your taste and ability not only to knit, but also to decorate the surrounding space.


Schemes for napkins in the style of fillet knitting
With the help of a hook, you can also crochet such unusual, but insanely beautiful napkins:


Experienced craftswomen know that this technique is called “loin knitting” and any thing is knitted very quickly and simply, although you cannot say this by the excellent result. Amazing work! Try to surprise your family and guests by decorating your home with these napkins.
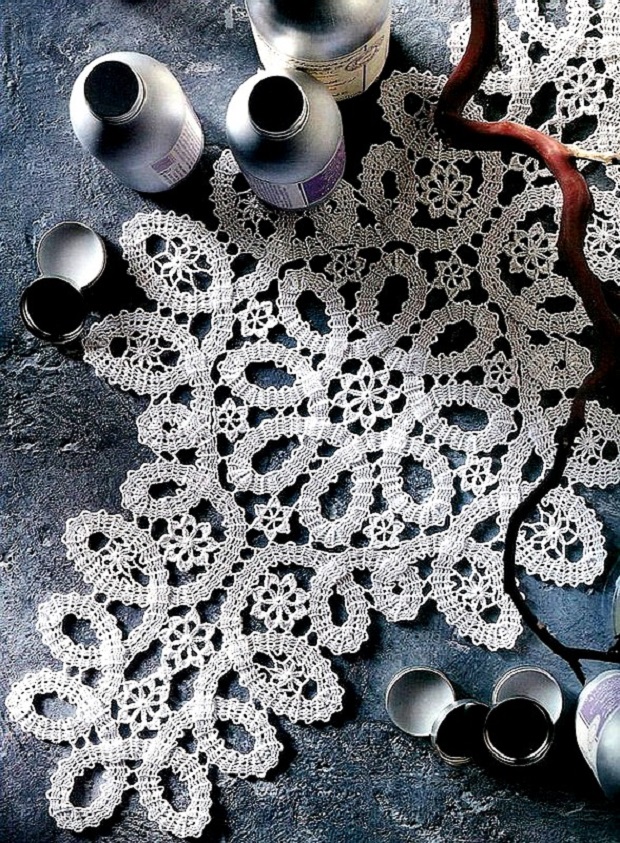
Bruges lace for napkins
There is also such an interesting way of knitting napkins with hook. Of course, this will not be easy for beginners, but more experienced craftswomen can easily find master classes describing such a technique on the Internet. We offer to admire the options for napkins that you can knit yourself (and they look like they are machine knitted!). For lovers of Bruges lace, we also offer schemes that are quite simple.


Napkins with the spirit of Ireland
We have already told you a little about Irish lace. . Crochet napkins with patterns in this technique to tie Just, and the thing turns out very beautiful. Such natural motifs will be a great addition to any interior.
Crocheting napkins is an activity that can captivate both beginners and experienced needlewomen. The article presents various patterns for knitting napkins with a detailed description of the work.
Crocheted doilies
Crocheted napkins are an extraordinary beauty, the embodiment of lightness and tenderness. The craftswomen who create these magical woven snowflakes do not just knit napkins, but give others a real fairy tale.
To learn how to knit napkins, in addition to a hook and a ball of yarn, you will need patience and attention. It is important that the needlewoman is able to correctly read the diagram and convey the pattern in her work.
IMPORTANT: You can knit a small napkin with a light pattern in a few hours, but it will take much more time to create a masterpiece with a complex pattern.
For beginner needlewomen, it is better to first knit small-sized napkins with simple, uncomplicated patterns. When the hands get used to the new work, and the loops and posts become slender and even, you can move on to more complex elements.
In descriptions and explanations for circuits, the following generally accepted abbreviations are often used:
- VP- air loop
- PS- half-column
- WITH- column
- RLS- single crochet
- C1H- a column with 1 crochet
- C2H- a column with 2 crochets.


Video: Simple crochet round doily
How to choose threads and crochet a simple doily for beginners: a diagram with a description
Experienced craftswomen choose yarn as thin as gossamer for work. Deftly wielding a crochet, they knit napkins of extraordinary beauty, more like lace. However, those who are just learning to knit should not start with thin threads.
- So that the thread does not get confused, choose yarn of medium thickness. Wool and acrylic perfect for first jobs.
- thread color choose depending on the interior in which the finished napkin will be used.
- Hook size usually corresponds to the thickness of the thread. But if you want the knitting to look tight, take a thinner hook, if you want to get a large knitted product, choose a thick hook. To begin with, it is better to take a hook number 1.5. If it turns out to be inconvenient to work with them, it can always be replaced with a thicker or thinner one.
- For the first napkin choose one of the simplest schemes It is better to finish a simple job than to quit a difficult one.
IMPORTANT: If you need to knit a thin openwork napkin, use bobbin cotton threads and hook No. 0.5 - 1. For napkins of medium thickness, Iris-type threads and hook No. 1.5 are needed.


Crochet a simple napkin lesson:
Prepare your hook and thread, study the knitting pattern.


Since the napkin is round, start knitting from the center. Knit a 12-stitch air chain.


Tie the ring according to the diagram.

Connect the last loop with the loop of the air chain, thus completing the circle.


Go to second row. Work 3 chain stitches, 4 stitches with 2 yarn overs in the stitches of the previous row.

Repeat the pattern.


Do not connect the last loop of the row with the first, if you connect them, the pattern will be broken.


In the third row, according to the scheme, alternate 4 air loops with 6 columns + 2 crochets. Knit 4 middle columns so that the hook enters the base of the columns from the knitted row, knit the first and last so that the hook goes under the chain of air loops of the knitted row.


Finish the 3rd row, like the previous one, go to knitting the 4th row.


In the fourth row alternate 5 air loops with 8 columns + 2 crochets.
Fifth- alternate 9 air loops with 10 columns + 2 crochets.
in the sixth- alternate 11 chain stitches with 4 columns + 2 yarn over, 11 chain loops, skip 2 columns of the previous row, 4 columns + 2 yarn over. At the end of the row, connect the last loop with the first.


In the seventh row tie 5 air loops, 15 stitches + 2 crochets. Insert the hook under the air loops of the last row. Then 5 air loops, a column under the air loops of the last row.


At the end of the row, work 6 stitches and join the last stitch with the first.
 Knitting a napkin, connecting the loops at the end of the 7th row
 In the eighth row work 6 stitches, stitch + 2 yarn over, small picot of 4 stitches.


At the end of the work, fasten from the inside out and carefully cut the thread. Work is over, the napkin is ready!
Video: Crochet napkins for beginners according to the pattern
How to crochet a beautiful white lace napkin: a diagram with a description
Openwork napkins look great on both serving and coffee tables. They can be placed under candy bowls, cups, plates or fruit bowls.
To make the napkins look light and openwork, take thin cotton threads and a thin hook (0.5 -1.2).
IMPORTANT: It is advisable for experienced needlewomen to use bobbin threads, and beginner craftswomen need to take into account that working with them is very difficult and time-consuming.


Description:
Knitting the middle part:
- Dial 10 air loops, connect into a ring.
- 1 row: Work 3 stitches (this will be a lift), 21 stitches + 2 yarn overs.
- 2 row: Work 6 stitches, 1 stitch + 1 yarn over in 2 stitches of the previous row, 3 stitches.
- 3 row: 5 air loops, 1 column + 1 yarn (thread for a chain of 1 row), 2 air loops, 1 column + 1 yarn in a column of 1 row, 2 air loops.
- 4 row: Work 6 stitches, 1 single crochet and 4 stitches.
- 5 row: Using connecting posts, move the thread under 1 arch, knit 7 chain stitches, 1 single crochet, 5 stitches.
- 6 row: Again start knitting from the middle of the arch, knit 8 stitches, 1 single crochet, 6 stitches.
- 7 row: Move to the center of the arch, to do this, knit 9 air loops, 1 single crochet, 7 air loops.
- 8 row: Start in the middle of the arch. Work 3 air stitches, 4 stitches + 1 yarn over, 3 air stitches, 1 stitch + 1 yarn over in the next arch. Next: 3 air, 9 columns + 1 yarn. At the end, you should get 4 columns + 1 crochet.
- WITH 9 to 16 rows: the pattern is similar to the 8th row, but carefully monitor the change in the number of columns in each row.
- 17 row: Connect the thread to the last column. Work 3 stitches, 4 stitches + 1 yarn over, 10 chain stitches, 5 stitches + 1 yarn over, 10 chain stitches.
- 18 row: Turn the napkin and knit in reverse order: 3 air, 15 columns + 1 yarn under the arch, 1 single crochet in the column, which is in the middle of the last row, 16 columns + 1 yarn.
Every flower knit separately:
- Connect 8 air loops with a ring.
- 1 row: 3 air loops, 14 columns +1 yarn.
- 2 row: 12 stitches, 1 single crochet in 6 stitches of the previous row, 10 chain stitches, 1 single crochet in 11 stitches of the previous row, 10 stitches.
- 3 row: knit the petals by turning the product over. 2 air loops, 1 single crochet under the first arch, 1 single crochet, 13 stitches + 1 crochet, 1 single crochet under 2 and 3 arches.
IMPORTANT: When tying the third petal of the flower, do not forget to connect it to the middle part of the napkin. In this way, tie and connect all the flowers.
Knitting borders- the final stage in the work. The border consists of 7 rows:
- 1 row: 2 chain stitches, 9 single crochets, 8 chain stitches, 10 single crochets in stitches 2 flowers. Further, the same for each flower.
- 2 row: 5 stitches, 1 stitch + 1 yarn over in 3 stitches above the petal, 2 chain stitches, 1 stitch + 1 yarn over in the next 3 stitches, 2 stitches, 1 stitch + 1 yarn over in the last stitch over the first flower, 8 stitches. Continue also over each flower.
- 3 row: 3 stitches, 7 stitches + 1 yarn, 2 stitches, 8 stitches + 1 yarn, 2 stitches.
- 4 row: completely repeats the 3rd row, however, if knitting begins to “pull”, you can add air loops yourself (it will be enough to add 1 loop each).
- 5 row: 3 stitches, 7 stitches + 1 yarn over, 10 chain stitches, 8 stitches + 1 yarn over, 10 chain stitches.
- 6 row: turn knitting, knit: 3 stitches, 15 stitches + 1 yarn over in the arch of the previous row, 1 single crochet between the stitches of the last row, 16 stitches + 1 yarn in the next arch, 1 single crochet.
- 7 row: the whole row - tying the received elements with single crochets.
Finish the job by securing the thread and removing the rest of it.
beautiful crochet heart-shaped napkin- a great gift for a loved one on Valentine's Day. Several identical small heart napkins can be used to create a romantic setting or for table setting.
Crocheting a heart napkin is not difficult. It is enough to carefully study the scheme, choose the right yarn and hook and follow the recommendations from the description in the work.
To knit a heart, use a thin cotton thread and hook number 1. Finished product size: 15 x 20 cm.


Circuit description:
- Dial 10 VP, connect with a ring.
- Dial another 50 VP.
- Connect the last 50th loop with the 10th from the end so that you get a ring.
- 1 row: 3VP (needed for lifting), 19С1Н (tie a ring with them), 3С1Н tie on three loops of the chain and three air loops that were knitted for lifting. Next, knit C1H from each loop of the entire chain. In the center of the chain, knit 3C1H on two loops. This will form the corner of the heart. Tie the rings at the end of the chain to C1H, connect the PS to the 3rd loop of the chain.
- 2 row: 3VP connect the PS with the three columns of the last row, turn the napkin. Further according to the scheme: C1H in every second loop of the last row over the rounding, over the straight element - in every third. Knit 2ch between stitches. When you reach the corner of the heart, tie the arch of 6 VP. Finish the row by connecting the last column with 3 loops of the chain.
- 3 row: Connect 3VP with 3 columns of the last row using PS. Turn the napkin and then knit according to the scheme C1H, one over each column of the previous row and 2C1H in arches over the straight section. In the arches above the rounds, knit 3С1Н. In the corner of the heart - 12С1Н. Connect the last column at the end of the row with the help of PS with 3 loops of the chain.
- 4 row: complete repetition of row number 2.
- 5 row: repeat row No. 3, only knit 2C1H over the arches and roundings, and 10C1H in the corner.
- 6 row: S1H, 1VP, pico, 1VP. Connect the rings when tying the second: 1 VP, 1 RLS, 1 VP.
As a result of the work, you should get such a heart:


You can connect 2 of these napkins together. Get a nice composition:


This is one of the easiest options for knitting a heart-shaped napkin, which even a beginner can knit on their own. Experienced craftswomen can choose more complicated schemes.
Video: Crocheted heart. How to crochet a heart. Master Class
To crochet a square doily 25x25 cm in size, you will need 20 g of cotton yarn and hook number 1.

 How to crochet a white openwork square and rectangular napkin: a diagram with a description

Description:
Main motive (repeated 16 times):
- Knit a 10ch chain. Connect in a ring.
- 1 row: 1 VP for lifting, 15СБН in the ring, the end of the row with the help of PS.
- 2 row: 3VP for lifting, 1 PS1N tie together with the last VP of lifting in the 1st lifting loop, 2PS1N tie together in the next RLS of the last row, 5VP, 2PS1N tie together, in the next RLS of the previous row, 2PS1N tie together, in the next RLS of the last row, 5 VP. Repeat 8 times. Finish the row with a connecting post.
- 3 row: 4VP to lift, 3С2Н into the arch from 5VP of the previous row, 4VP, 4С2Н into the same arch from 5VP, 4VP, 1 RLS into the next arch from 5VP of the previous row, 4VP, 4С2Н into the next arch from 5VP of the previous row, 4VP , 4С2Н in the same arch from 5VP, 4VP, 1СБН into the next arch from 5VP of the previous row, 4 P. Repeat only 4 times. Finish the row, as before, with a connecting column.
- Next, continue to work according to the scheme of the main motive, ending the rows with connecting posts.
- Connect the finished elements together, starch the finished product and leave to dry.
IMPORTANT: To get a napkin from rectangular motifs, knit not 16, but 20, 24, 28 or more repeating elements and connect them together in a certain order.
Fillet knitting or fillet knitting(fillet lace) is the creation of a grid, some cells of which remain empty, and some are filled. The drawing is created in a certain way, depending on how the grid cells are filled.
Filet knitting is very simple, and the patterns are easy to read and resemble cross stitch patterns. The elements of loin knitting patterns, as well as cross stitch patterns, are black and white cells, circles and crosses. Moreover, an empty cell in the diagram is always indicated by a white cell, and a filled one can be indicated by a black cell, and a cross, and a circle.
IMPORTANT: Before you start knitting a fillet napkin according to the chosen pattern, knit a small sample of 10 by 10 cells, by which you can evaluate the type and density of future work.
Cell knitting is performed as follows:
- Empty - С1Н, 2VP
- Filled - 3S1N.
Any sirloin knitting begins with a chain of VP.
Calculation of loops for dialing:
For 1 cell - 3CH chains + 6 loops to form 1 cell of the 1st row. In order not to carry out the calculation, you can link a chain of arbitrary length, start knitting cells from its beginning. Then the extra loops of the chain can be dissolved, and the missing ones can be tied.
Video: Fillet net. Addition and subtraction of cells. Crochet.
IMPORTANT: The place from which work begins (starting point) is marked with an arrow on the diagrams.
Sometimes work on a sirloin napkin starts from the bottom or from the top. Often the work starts from the center, and from there it moves up and down. When you have to knit a voluminous loin product, you can knit individual parts and elements, and then tie them together.
IMPORTANT: In order for a napkin knitted with a sirloin knit to turn out neat and dense, you should not allow “looseness” and stretching of the loops, otherwise the work will be uneven and the pattern will be blurry.


Knowing the decoding of the scheme (empty - C1H, 2VP; filled - 3C1H), you can immediately get to work.
Video: Napkin in loin technique. Knitting Secrets
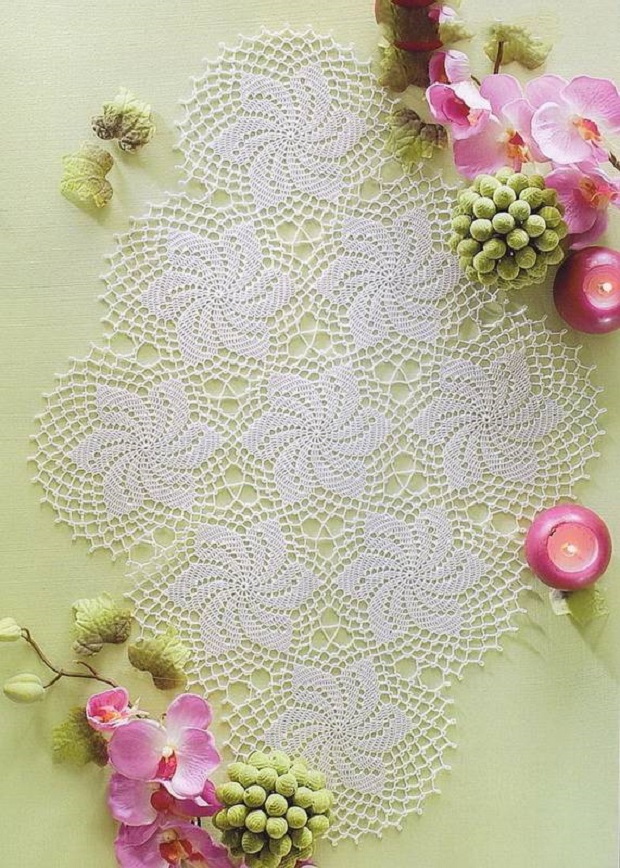
How to crochet a beautiful white openwork oval, round napkin: a diagram with a description
Openwork napkins not only decorate the table, but also give solemnity. The intricate weaves of thin white threads of openwork patterns look like fabulous airy cobwebs. To create magical thin napkins, a needlewoman will need good knitting skills, as well as patience and perseverance, because the thinnest threads and rather complex patterns are used for work.
Craftswomen who are good at crocheting and know how to accurately implement knitted patterns and drawings can start making openwork round and oval napkins, the patterns of which are presented below.


Video: How to knit a round napkin "Delicate patterns"
To knit an openwork oval napkin according to the scheme shown below, prepare hook No. 1 (maximum No. 1.5) and thin yarn of the Violet type.


How to crochet a beautiful New Year's napkin with Santa Claus: a diagram with a description
With the help of self-knitted napkins, you can decorate your home for the holidays in an original way. For example, knitted napkins with Santa Claus can become an unusual New Year's decoration, and it would be quite appropriate to present such beauty to friends or relatives as a souvenir for the New Year.

 How to crochet a beautiful New Year's napkin with Santa Claus
 In order to tie a napkin with Santa Claus, you will need:
- threads of 5 colors (red, green, white, pink, black), but of the same thickness
- hook number 1 - 2 (depending on the thickness of the selected yarn)
- beads

 How to crochet a beautiful New Year's napkin with Santa Claus, scheme
 Description:

Napkin-sunflower so bright and sweet that just looking at her lifts the mood, because she reminds of a warm carefree summer and bright sun.


IMPORTANT: Working on such a napkin will seem fascinating to an experienced craftswoman and will require attention and patience from a novice master.
For work you will need:
- COCO cotton yarn, two colors (black and yellow)
- Hook #1


Description:
- 8VP close the ring.
- 1 row: In the center of the ring - 20С1Н.
- 2 row: In each loop of the base C1H, dividing from 1VP.
- 3 row: С1Н in each loop of the base.
- 4 row: In each loop of the base, 2С1Н, separating them with 2VP.
- 5 row: In arches from 2VP, knit 2S1N, 2VP, 2S1N.
- 6 row: repetition of the 5th + 2ch.
- 7 row: repetition of the 5th + 3ch.
- 8 row: repetition of the 5th + 4ch.
- 9 row: repetition of the 5th + 5ch.
- 10 row: repetition of the 5th + 6ch.
This completes the knitting of the black center. Carefully fasten the end of the black thread and proceed to work on the sunflower petals.
IMPORTANT: It's not scary if the middle turns out to be a gathered wave. Subsequent rows and further steaming will help correct this.
Knitting in yellow:
- 11 row: Fasten the thread and knit in the arch of the last row of 2CH: 2C1H1, 2CH, 2C1H, 5CH, 9C2H, 5CH.
- 12 row: 2С1Н in the arch of the last row, 2VP, 2С1Н, 4VP, 9С2Н + VP in each loop of the base of the petal from the columns with 2Н of the previous row, 4VP.
- 13 row: 2S1N, 2VP, 2S1N, 4VP. Then tie 8 arches from 4ch into each vertex of the last row, 4ch.
- 14 row: full repetition of row 13, with the exception of the number of arches from 4VP. Here there will be 7.
- 15 row: Knit like row 13, only 4VP arches will be 6.
- 16 row: 2S1N, 2VP, 2S1N, 2VP, 2S1N, 4VP. There will be 5 arches here.
- 17 row: Knit a petal: in the extreme arch of the last row, tie 2S1N, 2VP, 2S1N, 4VP, 4 arches, 4VP, 2S1N, 2VP, 2S1N.
- 18 row: 2S1N, 2VP, 2S1N, 4VP, 3 arches, 4VP, 2S1N, 2VP, 2S1N.
- 19 row: 2S1N, 2VP, 2S1N, 3VP, 2 arches, 3VP, 2S1N, 2VP, 2S1N.
- 20 row: 2S1N, 2VP, 2S1N, 2VP, 1 arch, 2VP, 2S1N, 2VP, 2S1N.
- 21 row: 2S1N, 2VP, 2S1N, connect with the arch of the previous row, 2S1N, 2VP, 2S1N.
Petal completed. Carefully cut off the fixed thread.
For craftswomen who are not yet confident in their abilities, you can first knit a small sunflower napkin according to an easy pattern, a detailed description of the work on which is on the video.
Video: Sunflower motif
Even a beginner can knit a delicate daisy napkin, because the scheme of work is quite simple and understandable.


Video: Napkin Chamomile. Master Class
How to crochet a small white doily in the shape of a snowflake: a diagram with a description
You can quickly and easily crochet a small white doily in the shape of a snowflake. Such airy napkins can turn into Christmas decorations, New Year's decor or cute souvenirs. Also interconnected snowflakes will serve as an original tablecloth on the festive table.

Scheme of work:


Description:
- Connect the thread with a ring and tie 1ch for lifting.
- 1 row: 8СБН tie into a ring, tighten the ring, tie a connecting column, while inserting the hook into 1 column of BN of this row.
- 2 row: 3VP for lifting + 2VP according to the diagram. Further, in the next loop, tie 1C1H, then 2CH, in the next loop 1C1H, again 2CH.
- 3 row: 1 connecting column, 2CH, 3C1H with a common top, 5CH, in the next arch 4C1H with a common top, 5CH, continue to knit to the end of the row. Close with a connecting column, while inserting the hook into the common vertex.
- 4 row: 1ch lifting, 1sc in the same loop, pico from 3ch, 1sc in the same loop, pico from 5ch, 1sc in the same loop, pico from 3ch, 1sc in the same loop, 3ch to the common top. Continue in this manner to the end of the row.
- Cut the thread at the end of the work.


Video: Knitting a snowflake in 5 minutes. Crochet. Master Class
Beautiful voluminous napkin with violet flowers it will turn out if you fix several multi-colored violets on a white crocheted openwork base. You can take a napkin of any shape and size, so the main task is to learn how to knit violets for decoration.

Violets can be knitted in several ways. Consider one of the easiest:
- Dial the middle (preferably from yellow yarn) from 4VP, close into a ring.
- Knit 10 sc in the ring.
- Attach a thread of a different color. These will be the petals.
- Knit on the first 2 columns of the circle.
- 1 row: 3С1Н in each loop.
- 2 row: 2 dc in each column.
- 3 row: SSN in each column.
- 4 row: make 3 decreases - at the beginning, middle and end of the row.
- 5 row: make the same 3 decreases, cut and fasten the thread.
- Also tie the remaining 4 petals.
- Tie the entire flower with a thread of a darker shade.
As a result of the work, you should get such a flower:


You can knit violets according to the following patterns:

Video: How to crochet a violet flower
Napkin "Lady", one of the most unusual and original, which will undoubtedly arouse admiration among friends and acquaintances, is actually very easy and quick to knit. "Ladies" can be of any colors, sizes and shapes, but each of them is able to decorate the house and cheer up.


 Original napkin "Lady"
 Detailed description of work on one of the "Ladies":


- Start with a hat. For convenience, turn the diagram upside down.
- Dial 13VP, knit 3 rows in columns, knit VP1N between them.
- After you tie the hat, break the thread.
- Knit the upper part of the body with double crochets.
- Separately tie the arms and torso.
- Attach hands to the skirt on the 11th row.
How to crochet a voluminous napkin: description, diagram
Elegant light voluminous two-color napkins not only look spectacular, but are also very easy to knit. The “chip” of such napkins is precisely their two-tone. Similar plain napkins can be “lost” in the interior, and certainly will not attract so much attention to themselves.
To work, you need thin cotton yarn and hook number 1.

The “base” of the napkin is knitted according to an easy pattern with columns with 1 crochet and VP between them.

There is no point in describing this process in detail.
But knitting butterflies is very similar to knitting flowers.


This scheme will have to be slightly changed, otherwise the butterflies will turn out to be very large. Therefore, future butterflies will be knitted with 1 crochet.
- Make a ring out of 6VP.
- 1 row: 8 groups of 3С1Н and 3VP between them.
- 2 row: Turn knitting and knit: in the arches of the last row 2 times 5C1H and 5CH between them.
- 3 row: 1СБН between two groups of columns of the last row.
- Tie the arches: 7С1Н, 2VP, 7С1Н.
- 4 row: sc.
As a result of the work, you will get a flower with uneven, twisted petals. But by bending it in half, you get a beautiful voluminous butterfly in flight.
Seat the butterflies on a napkin, fastening with a thread and a needle, and enjoy the beauty and tenderness of your own creation.
A large crochet doily can decorate a table in the living room, hall, nursery or kitchen. This original and beautiful product is able to give comfort and warmth to the house. Of course, it is difficult to decide on such a large work, but its result will certainly please the craftswoman and justify the effort and money spent.
To knit a white napkin - tablecloth with a diameter of 180 cm you will need:
- hook number 2.5
- cotton yarn type Cotton Troy (280m in 50g), 1100g
 How to crochet a large napkin on the table: diagram

Napkin mandala, knitted from yarn of bright juicy colors, will be an excellent interior decoration in ethnic style. The mandala, in accordance with Hindu and Buddhist teachings, symbolizes the dwelling place of the deities. By decorating their house with mandalas, the owners hope to attract divine grace, good luck and happiness into their home.


IMPORTANT: Mandala can only be round, because even in translation this word means “disk”. The colored circles of the mandala mean the Universe and the dwelling of divine beings, and the square - the four cardinal points.
How to crochet a colored doily
Craftswomen note that work on these magical napkins is progressing very quickly and with pleasure, and after knitting, the mood improves. Most likely, this is due to the frequent change of bright colors. But what if the Hindu deities themselves help needlewomen? Be that as it may, but if the plans include the manufacture of a colored napkin, it is best to start with knitting a mandala.
Not all needlewomen can crochet a two-color napkin with intricate patterns according to a complex pattern. Beginners often give up knitting when they realize that they made a mistake somewhere and the pattern did not work out. To avoid disappointment and complete the work to the end, you need to start by knitting light napkins.
Even an inexperienced craftswoman can knit such a rectangular two-color napkin with diagonal lines.
The scheme of work is very easy and does not require special concentration and attention.
It turns out dense two-color napkin, measuring 25 by 35 cm, tied Tunisian knitting.
For its manufacture you will need:
- white yarn "Snowflake" - 50 g
- colored yarn "Iris" - 10 g
- hooks No. 2.5 (Tunisian) and 3 (regular)
Description of work:
- A regular hook number 3 is only useful for a chain of 50 loops.
- The rest of the work should be done with Tunisian crochet No. 2.5. Work them 100 rows in Tunisian stitch according to the scheme.
- Finish the colored diagonal napkin with a chain stitch.
- Tie the napkin with colored thread.
- When working on a white harness, end each row with a connecting post.
Video: Tunisian knitting. Tools and a simple post.
"Takes away the look" - so you can say about the "Grape Bunch" napkin. Working on it is so exciting that you want to knit these amazing napkins again and again.
The work is described in detail in the video:
Video: "Grapes", part 1
Video: "Grapes", part 2
Video: "Grapes", part 3

crochet napkin stand for hot so simple that one glance at this product is enough to reproduce it exactly. It will take quite a bit of time to make such a napkin, but with its brightness and originality it will decorate any kitchen.
When knitting hot napkins, you can give free rein to your imagination by changing and adding colors and elements. But a few rules must be followed:
- The napkin should not have convex parts, details, that is, it should be absolutely smooth and ensure the stability of the dishes. Otherwise, using it may result in injury.
- Threads for knitting should be taken thick enough, and the finished product should not have holes, mesh or loose patterns.
How to crochet a hot napkin? Ideas
How to crochet hot napkins?
Crochet money napkin - incoming money: diagram, photo
It turns out that prosperity, wealth, money and even large profits can be crocheted. To do this, it is enough to tie a small napkin (from 21 to 40 cm in diameter) and put it in the most visible place in the house with the words:
In order for the money napkin to “work”, it must be connected according to the following rules:
- The napkin should be white (beige).
- Work on the napkin should begin on the new moon.
- A money napkin cannot have any other shape than a circle.
- Insert or tie a gold coin in the center of the circle.
- Rays should emanate from the center of the napkin.
- Rays can be 3, 5, 7, 9, 11 or any other odd number.
IMPORTANT: Any scheme that meets the requirements can be taken as a basis. A distinctive feature of the napkin will be a small pocket in the center with a coin sewn into it.
When sewing a coin into the center of the circle, say:
If there is no suitable scheme in mind, you can use this:
Crochet money napkin - incoming money: scheme
The result should be something like this:
Crochet money napkin - incoming money: photo
Those who have experienced the magical effect of money napkins claim that the material condition really changes for the better as soon as this knitted talisman appears in the house.
Whatever napkin you choose for knitting, do not doubt that it will become an original exclusive home decoration. In addition, while working on a napkin, you can learn to read patterns faster and work out the basic knitting techniques.


The once forgotten art of knitting interior napkins is being revived today. This is an irreplaceable thing that will serve not only as a stand for cutlery, but also decorate the interior of the house. Even if you have never crocheted, doily, this is the subject from which you can start learning this needlework.
 How to crochet a doily for beginners, in detail from scratch
If this is your first crochet doily, then start with a simple, uncomplicated option. In order not to get tangled in lace, tie a doily from acrylic thread. The hook is selected according to the thickness of the yarn.

- if this is your first napkin, choose wool blend or acrylic threads so they don't tangle.
- focusing on the interior and design, where you plan to put the napkin, choose the color of your threads.
- the hook should be the same thickness as the thread, for fine knitting, take a hook that will be thinner than your thread to get a looser knitting, choose a thicker hook.
Needlewomen who have experience, threads for knitting napkins, choose the thinnest ones. In this case, the napkin is so tender. which looks like a spiderweb.
Symbols that are found in the diagrams:


The first thing with which knitting of a napkin begins is a set of loops - 12. Round napkins begin to knit from the center.

We look at the diagram and tie the ring.

We close the circle by connecting the air and the last loop.

Second row - three ch, 4 tbsp. from 2 n. and in a pole. the previous row.

We repeat

Do not connect the last p. of the row with the first, connecting them, you will break the pattern.

The third row is the alternation of four air loops with six columns plus two crochets. middle four - the hook must enter the base of the column from the row that is knitted. the last one goes under the chain of a row already knitted, from air loops.

The third row is the same as the second.

The fourth row is an alternation with five air loops, eight columns, plus two crochets.
The fifth row is the alternation of nine air loops with ten columns plus two crochets.
Sixth row - alternation of eleven air loops with four columns, plus two crochets, eleven air loops, two columns of the previous row, skip, four columns plus two crochets. The end of the row - the loop of the last .. connect with the first.

Seventh row - five loops of air fifteen columns plus two nak. Insert hook into st. air of the previous row. Next, five air loops, a column under the air loops of the previous row.

The row ends - we knit six air loops, connect the first and last.-

Row eight - six air loops, then a pillar. and two nak, a small pico of four air loops.

A column plus yarns two pieces in the third column of the previous row, then we knit as in the diagram. It should work, with pico (between the columns), eight columns.

The work is finished, the thread must be cut and fastened from the wrong side.
Description of crochet doilies for beginners, a simple doily step by step

If you are a beginner needlewoman, this version of the napkin will suit you perfectly. The diameter of such a napkin is fifty centimeters. Take cotton yarn - eighty grams, use a hook with a number - 1.75 or 2.
Start by knitting air loops - 8 pieces, then connect the resulting chain with a column (connecting) into a ring. Replace the first post. (with double crochet) on three pet. air. We knit in a circle fifteen columns (with a crochet), we finish - one connecting column in the initial third loop (air).
Continuation of knitting - look at the diagram. We start each next row in a circle with air loops, according to the number in the diagram, end with a connecting column. We knit the sixth and eighth rows in a circle, behind the previous row. Petals, in the fifth and seventh rows, are squeezed out. For the forty-first row - finish each fragment separately, attach the thread, each time, again at the arrow. We knit from the forty-second row to the forty-fifth, in reverse and straight rows.
The scheme is part of the napkin, the row in the circle must be completed according to the drawing. The numbers represent the rows in the circle.

Video how to knit a napkin for beginners
Beautiful crochet napkins for beginners, diagrams with a detailed description step by step
 The napkin will perfectly decorate a vase or glasses, its diameter is twelve and a half centimeters. We will knit narcissus from yarn, in one hundred grams three hundred ninety-five meters. Hook number two.

We collect - eight loops (air) and connect in a circle (connecting loop).
In the first row - three loops (air), knit fifteen columns (with a crochet) in a circle, a loop (connecting) into a column of the first of three air loops.
In the second row - five loops (air), pattern rapport * one column. (with nak.), in a pole. with nak. row of the previous one, two air loops * loop (connecting) into the third loop (air). Repeat the third row.
In the fourth row - we knit one loop (air), in a common top. pillar. one (with nak.) * in the arch of the previous row, five tables. (with nak.), one pole. (without nak.) in total. top * loop (connecting) to the post. (without nak.).
In the fifth row - three pet. (air.) * three pet. (air.), one pillar. (without nak.) in the third pillar. (with nakida) of the previous row), three loops (air), one column (with double crochet) in a column (single crochet) of the previous row * loop (connecting) in the third (air).
In the sixth row - two loops (connecting), in the fourth and fifth pet. (air) * one pillar. (without nak.), in the arch - five pet. (air), pet. (connected in a column. (without nak.).
In the seventh row - four loops (connecting) * one column (single crochet), into an arch, five loops (air) * connect the loops into a column. (without nak.)
In the eighth row - four loops (connecting) * one column (single crochet) in the arch, three loops (air), two columns (with double crochet), pico, two columns (with double crochet), three loops (air) * loop (connecting) in a column (single crochet).
READY!
Napkin, in the picture below, turns out to be very beautiful. It comes from two motifs. We need a thread of iris in pink and white. Hook number one.

 Work begins with knitting a white part. To do this, dial a chain of fourteen pet. air and combine into a ring semist. First p.: three air.pet. and twenty-seven pillars. with one nak. into the ring.
Second river: four air loops * column. with one crochet. one air loop *, thirteen columns with one stitch, knitted into each loop of the first p. At the end of the river dial three air.pet. and pull out one long one so that the work does not bloom. See photo.
Then dial a chain of fourteen air loops. with a pink thread and enter into a white ring, then close the chain into a half-column ring. The first two rows are performed according to the method described above. Then Comm. last pet. pink and the first pet. second r. white ring semi-column.
Third: over each air.pet. last r. white ring follow the post. with one nak., and between them one air pet., pico of three pet air. in one air.pet. At the end of the river pull out one long pet. and put off work.
Return to the white ring. Pair it with pink. Knit the third row. just as described above for the pink ring. Extreme pet. connect white to the extreme pet.rose, and pink to white. Perform twenty-five motifs in this way and sew them together with a needle and thread.
Crochet napkins are simple and beautiful for beginners, diagrams with a detailed description
napkin with Japanese motifs

Yarn color - white, 100% cotton (mercerized), 100 grams / 565 meters - in one skein, hook - number 1.
Scheme - for convenience, the rows are odd and even are marked with different colors. In total, there are twelve rows in the napkin, the size is 33 centimeters


Row three: ten pet. (air) column. with four nak., nine loops (air.), pillar. with five crochets .. in the fourth pet. (air) the beginning of the row (photo 1). Make two pillars. with three nak., in the center of the previous column .. with five nak. (photos 2;3).

Nine pet. (air), two pillars .. with four crochets, tied together in the fourth pet. (air). the beginning of the river (photo 1). We knit seven loops. (air) * seven pillars. with four nak., tied together (photo 2; 3)

Seven pet. (air) one column .. with six nak. and one pole. with four nak. in the third yarn of the previous column., tied together.

Nine pet. (air, one column .. with five naks, connected in the third nakid column .. with six naks. (photo 1). We knit two columns with three naks, knitted in the center of the previous column .. with five naks. (photo 2 ;3).

Nine pet. (air), two pillars. with four nak, knitted together, in the third nak. the same pole. from 6 nak. (photo 1). Then we make seven pet (air) * - repeat from * to * to the end of the river; then - seven pet. (air) and close the river. deaf pet. in ten pet (air.) the beginning of the river. (photo 2).

Row four: Jump to the top of the flower with semi-pillars. Five pet. (air.) * 2 columns .. with 3 crochets, tied together, eight pet. (air), one pillar. with four crochets., of which only three knit and make two more columns at the same point .. with three crochets. and, knit them together, and then finish the last. nak. column with four crochets. *.

Next we knit: * six pet. (air) - "Eiffel Tower" * - repeat three times from * to *. Next - seven pet. (air.), "tightening tower" - seven pet. (air.) "Eiffel Tower" * six pet. (air) - “Eiffel Tower * - repeat from * to * four more times. And then, again seven pet. (air.), "pulling" the tower and thus to the end of the river. Close river. pet. (deaf).


Row eight: seven pet. (air), pillar. without nak. around the next arc, seven pet. (air), one pillar. without nak.. around the arc (photo 1). Next - seven pet. (air) one pillar. with five points .. into the "Eiffel Tower" (photo 2; 3).

one screed with three hooks. in the center of the column .. with five nak. - then knit them together

six pet. (air) one pole .. with five studs .. in the center of the pole. with five nak. two pillars .. with three caps .. (in the center of the last pillar.). with five stitches, six loops (air) (photo 1). Two pole. with three nak tied together (to the center of the first column.). with five nak. (photo 2)

Repeat until the end of the river. all manipulations in the description of this river. Close river. pet. (dumb), go to the pillar. (without nak.). to the top of the arc.


We knit three "Eiffel Towers" together, we knit nak. the last, primary column., with four nak. (photo 1;2). Again four pet. (air). and we tie the flower with drawings "Eiffel towers". We finish r. pet. (deaf) (photo 3).

Row twelve: We tie r. pillar. with nak. We start r. so: four pillar, without nak. around the arc; four pillar. without nak. around the next. arcs, picot of four pet. (air) four pet. (air). + deaf pet .. in the first pet. aerial of this pico), four pillar. without nak., around this arc. We tie all the arcs in the same way, excluding the junction of flowers, here we knit four pillars for each arc .. without nak. and do not make pico (photo 1). We moisten, straighten, iron with steam (photo 2).

snowflake napkin


sc - single crochet
vp - air loop
ss - connecting column
n - nakid
- Connect the thread with a ring, tie one loop (air)
- row one: 8 sbn tie in a circle, tighten the ring, tie a sl-st, insert the hook into the 1st sbn (of this row).
- row two: 3 ch for lifting plus 2 ch, as in the diagram. Further, in the next loop - 1 s. 1 n, then 2 ch, in the next loop 1 s. 1 n., again - 2 ch.
- third row: 1 slst, 2 ch, 3 s. 1 n. with a common top, 5 ch, in the next arch 4 s. 1 n. with a common top, 5 ch, - so until the end of the row. Close ss, insert the hook into the common top.
- row four: 1 ch (lifting), 1 sb (in the same loop), pico from 3 ch, 1 sb in the same loop, pico from 5 ch, 1 sb in the same loop, pico from 3 ch, 1 sb in the same loop , ch 3 to the common vertex. So the whole line.
- the work is finished - cut the thread.


Crocheted oval napkin for beginners, a diagram with a description


- We knit a chain - eight air. pet., we close the connection. pillar. into the ring.
- We continue to knit in a circle, as in the diagram.
- Link four sockets, connect in the last row.
- Thread, next to the arrow, attach.
- Knit around the sockets, as in the diagram, in rows in a circle.

Crochet square doily for beginners, step by step diagram

From vozd.pet. form a ring. We carry out 6 pet. from the ring. We connect the first pet. with the last - we make 1-n pillar. without nak. It turns out a ring.
The first row is a pole. (single crochet) After three pet. (air). - fifteen pillars. (with nak.) - in the center. We connect the first and last column.
Second r. - three pet. (air), trace. two - in pet., from the chain.
We skip the pole with nak. from a number of previous So complete three pillars. Add 2 voz.pet. Repeat until no. won't end. The ends of the river connect with a half-column, without nak.
Openwork crochet doily for beginners, detailed diagram with a description
Openwork napkin, 35 cm in diameter, knitted from cotton yarn, crochet 1.5.

We knit a chain - eight pet. (air). Connect it with one pole. in a circle. Change the first post. with two nak. on four pet. (air) one pillar. with two crochets, knit in a circle * five air loops, knitted together with two pillars. with nak, Repeat from * ten times, finish five pet. (air), one connecting post. - in the first column. with two crochets of a radial river.
Continue knitting according to the scheme, each radial p. start with air. pet., the total number of which is in the diagram, and finish the connection. Art. As necessary, make connections. Art. to the subsequent radial river. The diagram shows only part of the napkin, radial p. finish according to the pattern
Tie a chain with ten air loops and close it. In the next river knit three air. loops, then 23 columns, knit with a crochet, finish with a loop conn. Then - look at the diagram and knit according to it. Reports are repeated in each circle - 12 from the first to the twenty-third. twenty four p. - ninety-six rapports. ; twenty-five rows - one hundred ninety-two reports; knit to the end - twenty-four rapports.
Crochet fillet napkin for beginners, a diagram with a description

Fillet knitting technique consists in knitting a mesh with empty and filled cells. The scheme is one column. double crochet + two air. loops, and filled - three columns with a crochet. In order for the napkin to turn out dense, it is necessary to tighten the loops tightly. Hook to take 1 number less.


Crocheted napkins have long ceased to be an attribute from a grandmother's chest and are actively used in interior design, for example, in the Provencal style that is popular these days. Even a beginner needlewoman can master knitting napkins, since a variety of techniques allows you to choose the work that you can do. Knowing just a few simple knitting techniques, you can create an original decoration with your own hands. Those who have long mastered crocheting can make fabulously beautiful napkins more difficult using patterns or descriptions from numerous magazines.
The most common forms of knitted napkins
Crocheted doilies come in different forms:
- round;
- oval;
- radiant;
- square;
- rectangular;
- diamond-shaped.
The knitting method depends on the shape of the future napkin.
Round napkin
We start knitting from the middle. We connect the air loops in a chain. In each next row, you need to make uniform increases, forming a pattern of circular rows.

Oval napkin
We start knitting from the central chain of air loops. All the following rows are knitted around this chain on both sides. Knitting takes place in circular rows, but the increase should be done only on the rounded sides on both sides.

Radiant napkin
As with knitting a round napkin, we start from the middle. We connect the air loops in a chain. We expand the canvas in circular rows, making increases in the same place.

The principle of knitting round, oval and beam-shaped napkins is not much different. You can often see how needlewomen knit napkins of different shapes from the same pattern, making this a variety of sets.
square napkin
A square napkin should be knitted, like a radial one, starting from the middle. To expand the circular rows, increases are made in four places, which will become the corners of the square.

Rectangular napkin
Knitting of rectangular napkins combines the techniques of square and oval.
We knit the central chain of air loops. All the following rows are knitted around it on both sides. Increases must be done on four sides (at the corners of the rectangle). But if in a square napkin the additions were made at the same distance, then in a rectangular napkin they add at the beginning and end of the central chain, thus forming two corners on each side.

Diamond napkin
A diamond-shaped napkin should start from a chain of air loops. Further expansion of the canvas occurs according to the example of a round or radial shape. After knitting several rows, decrease from two opposite sides of the napkin, continuing to knit the other two sides.

Sometimes, to give the napkin the necessary shape, it is not knitted in a circle, but starting from one side, such as napkins made with fillet crochet. In this way, you can achieve not only a square or rectangular shape, but also any other.


You can crochet a doily using a detailed description or diagram. The schemes are image of the future product, made with special icons. Symbols are attached to each scheme.

- Start reading the pattern, just like knitting, need from the middle- from the central chain. Sometimes the number of air loops in it can be counted, or it is indicated by a number.
- The beginning of each row is indicated by a number - this row number. After the figure, be sure to lift the loop.
- Sometimes the diagram shows arrow direction knitting.
- If the icons are interconnected at the bottom, knit them need from one point(air loop, column or arch of the bottom row).
- The icons connected to each other in the diagram at the top suggest that they have must have a common top.
- In each next row there should be more loops than in the previous one.
It is easier for beginner needlewomen to use a verbal description of the pattern.
Video about how to parse and understand diagrams crochet napkins with a detailed description.
Crochet patterns for napkins in various techniques
Crochet is distinguished by a variety of techniques and ways of making a fabric. Some of them are very simple and accessible even to beginners, as they use the simplest tricks: single crochets, double crochets and air loops. Others are "aerobatics" in crochet, but with detailed patterns or descriptions, they can also be mastered.
For knitting napkins, the following techniques are used:
- fillet knitting;
- openwork knitting;
- Irish lace;
- modular knitting using motives;
- Bruges lace;
- Romanian (cord) lace.

Simple crochet patterns for napkins
Professionally written descriptions of patterns use generally accepted universal abbreviations for brevity.
Dial 12 air loops (ch) and connect them in a circle.
- 1 row: Run 3 lifting loops (instead of the first double crochet), then knit 31 single crochet under the ring (st. s / n) finish with a connecting loop in the third ch. lift.
- 2 row: Run 3 lifting loops then 3 tbsp. s / n one in each st. s / n of the lower row; 3 vp, * 4st. s / n in the next columns of the lower row, ch 3 ** repeat the rapport * - ** 6 more times, finish with a connecting loop in the third lifting loop.
- 3 row: Run 3 lifting loops then 5 tbsp. s / n (the first in the lifting loops of the lower row, one in each st. s / n of the lower row and one in the ch of the lower row); 4 vp, * 6 art. s / n in the last ch, the next columns of the bottom row and the first ch, ch 4 ** repeat the rapport 6 times, finish with a connecting loop.
- 4 row: Run 3 lifting loops then 7 tbsp. s / n (the first in the lifting loops of the lower row, one in each st. s / n of the lower row and one in the ch of the lower row); 5 vp, * 8 art. s / n in the last ch, the next columns of the bottom row and the first ch, ch 5 ** repeat the rapport 6 more times, finish with a connecting loop.
- 5 row: Run 3 lifting loops then 9 tbsp. s / n (the first in the lifting loops of the lower row, one in each st. s / n of the lower row and one in the ch of the lower row); 10 ch, * 10 st. s / n in the last ch, the next columns of the bottom row and the first ch, ch 10 ** repeat the rapport 6 more times, finish with a connecting loop.
- 6 row: Run 3 lifting loops then 3 tbsp. s / n, one in each st. s / n of the lower row 10 ch, skip 2 st. s / n of the lower row, 4 st. s / n in the next 4 columns of the lower row; 11 v.p., * 4 art. s / n, 10 ch, 4 st. s / n, 11 ch ** repeat the rapport 6 more times, finish with a connecting loop.
- 7 row:* 5 v.p., 15 st.s / n under the arch from the v.p. bottom row, ch 5, half-column in the sixth ch the next arch from the vp ** Repeat the rapport 7 more times. Finish with a connecting loop.
- 8 row:* 6 vp, 1 tbsp. s / n, pico repeat 8 times (in each odd column of the bottom row), ch 6, half-column to half-column of the bottom row **. Repeat rapport 7 more times. Finish with a connecting loop.
Here is the diagram of this napkin:

And here are some more simple schemes:


Napkins made using the fillet crochet technique have patterns that contain the simplest knitting techniques: double crochets and air loops.


Video tutorials on crocheting napkins
Filet napkin with roses
Oval napkin "Larch"
A simple crochet doily. The lesson consists of two parts. The needlewoman explains how to increase the size of the napkin, if there is such a need.
(lesson continued)
Napkin "Sun"
This original napkin, thanks to its three-dimensional elements, can serve as a table decoration or a plate holder.
Caring for knitted napkins
All handmade products require proper care. After knitting, the finished napkin is smoothed and steamed to give it the necessary shape. If desired, you can lightly starch the product
The topic of knitting napkins is very wide and multifaceted. It is impossible to describe everything in one article. If you are interested in the above ideas, leave your comments. Especially valuable for readers will be the advice of experienced craftsmen.


