DIY cardboard ship. What gift for a child to congratulate dad and grandfather on Defender of the Fatherland Day Craft for dad on February 23 at school
For a child, a father is a real protector. Therefore, questions about whether it is necessary to congratulate him on February 23 do not arise, but the problem of what to give dad on Defender of the Fatherland Day is quite relevant. And while adult children can choose an original or useful, and sometimes expensive, present, children often try to please their father with interesting crafts. In this case, ideas and master classes for homemade gifts for your father on February 23rd, as well as options for symbolic inexpensive gifts, will come in handy.
Gift for Defender of the Fatherland Day for dad from preschool children
Kids attending kindergarten usually don’t have to rack their brains about what gift to give dad on February 23rd. After all, ideas are suggested by teachers, and crafts are made under the guidance of teachers.
Sometimes children in the garden are given a task to take home to make a gift for Defender of the Fatherland Day. Definitely, the child himself cannot yet come up with interesting options. Therefore, this is a creative task for mom. A child who does not attend kindergarten will also need help from his mother or older brothers and sisters. In this case, the main thing is to find an interesting idea for a thematic craft that will correspond to the age abilities of the child.
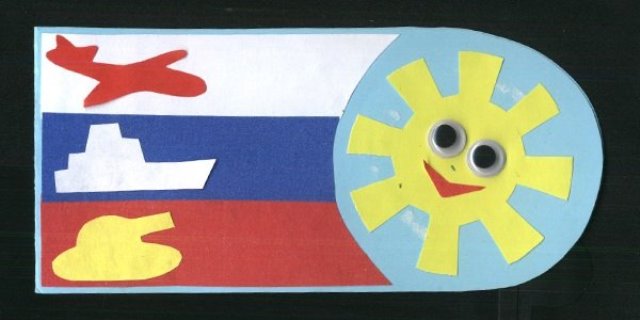
Children 3-4 years old are able to make a thematic applique. But you will need to prepare templates so that your child can trace and cut them out.
You can make an original card with symbols and congratulations for dad with a small child.
To make the base, you need to take a sheet of blue paper and line it to make 6 even parts. For the applique you will need 2 of these blanks.
We trace the shoulder straps according to the template and cut out the blank. Glue both blanks onto white paper.

We cut out strips of equal length from white, red and blue paper. We glue the stripes onto the shoulder straps, red at the bottom and white at the top, to create an image of a flag.

Cut out a sun from yellow paper and paste it on the right.

All that remains is to finish drawing the sun’s mouth and eyes, and on the other side to glue the boat, airplane and tank.

In the second chase, we help the child write a congratulation for dad on February 23rd. You can use a ready-made template - cut it out and paste it.

Cut out both shoulder straps and leave until completely dry. All that remains is to glue the shoulder straps together and you can give your beloved dad a gift on February 23rd.
You can make other themed applications with your child.
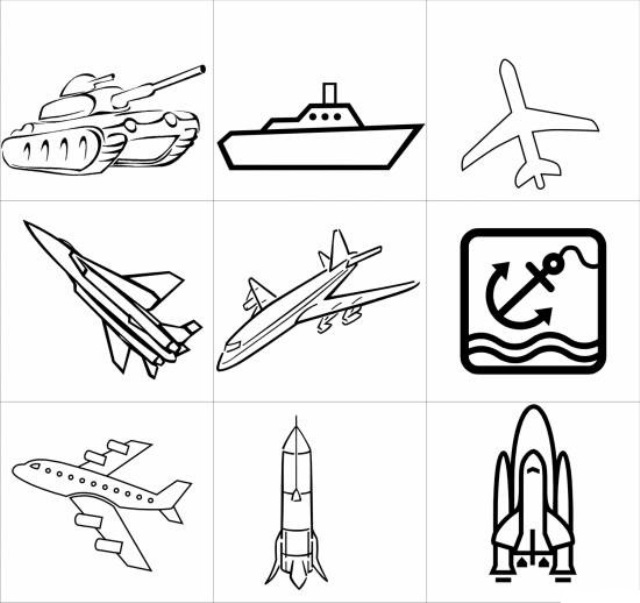
This is a battle tank.

Or shoulder straps with stars.

Combat helicopter.


Interesting flags.

Or ties with stars.

Interesting airplane.

Children of primary school age enjoy modeling. Plasticine crafts are a good gift option for February 23rd.
In this case, the main thing is to show the child themed crafts and help make complex details.
You can make an almost real tank out of plasticine or modeling mass with your baby.

You can use an ordinary matchbox as a basis.

Airplane made of fir cones and plasticine.

Or just plasticine.

Thematic templates will be useful for home creativity.
What can you give dad on February 23 from a preschooler or elementary school student?
Preschoolers and elementary school students already have experience working with various materials. And not only with paper and scissors, plasticine, but also with cereals, dough, and natural materials.
They are already capable of making more complex crafts. But even in this case, it is better not to leave the child with thoughts of what he can give to dad on February 23, one on one. You can give your child an idea for a craft. If he himself has decided on the sample, take part in the process itself. The child may need help and tips. Not every child at this age is able to finish what he has started. Therefore, control from the mother’s side does not apply.
Let's start with voluminous postcards. This is a simple craft option. But with some effort, you can make a rather original gift.

You can watch a detailed master class on making a three-dimensional star for a postcard for February 23 in the video:
Preschoolers can also make large-scale crafts. Definitely, such gifts should be themed, that is, related to military equipment and symbols of the Motherland.
But even gifts that are not related to the theme of February 23, but made by the baby with his own hands, will incredibly please dad.
Make a popsicle stick airplane for dad.
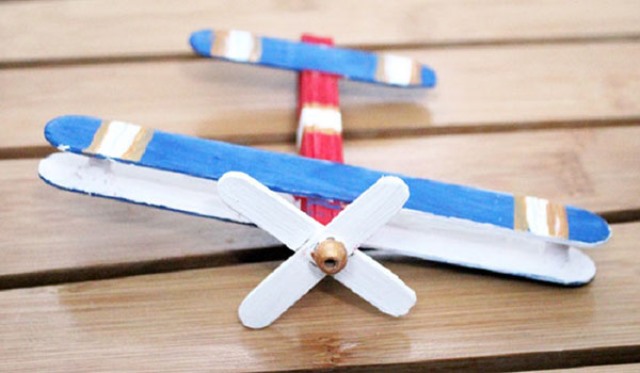
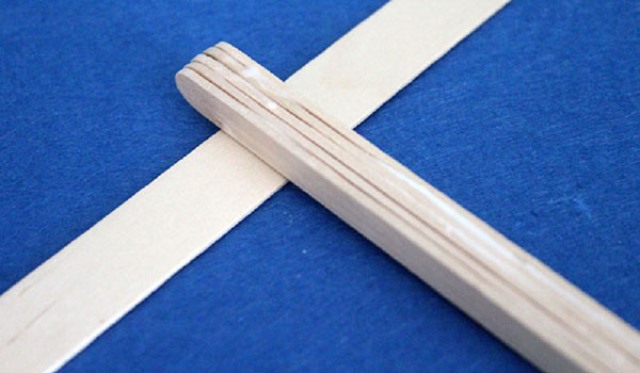
We make the frame for the airplane from 5 wooden sticks, gluing them together.
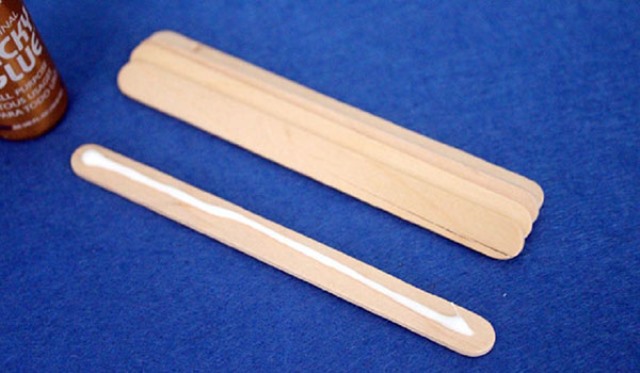
We also make the wings from a stick, for which we glue it across the base.
We cut two pieces from the water tube, the length of which is equal to the height of the frame.

Glue the blanks to the edges of the wings.
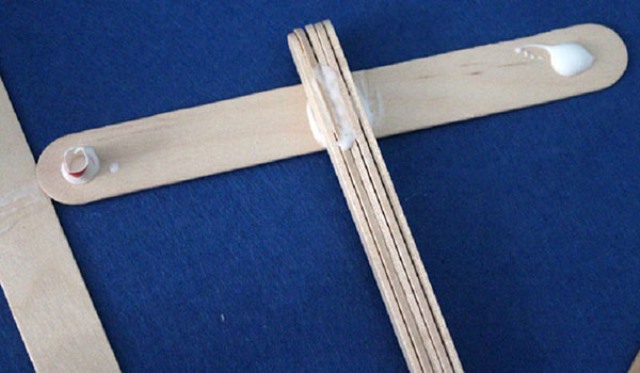
We glue another stick on top of the supports made of tubes and the frame - this will be the top of the wings.

We make a tail from half a stick, securing it to the tail part of the frame.

All that remains is to make a propeller. To do this, we glue together two halves of sticks crosswise, which must first be rounded. We will attach the finished propeller to the nose of the aircraft with glue after painting.

Now you need to decorate the airplane. You will need gouache paints and a sponge.

After drying, the finished craft can be opened several times with varnish.

The tank can be made from matchboxes or a regular sponge.

Greeting cards and appliques that are made using various scrap materials look interesting.
These can be either natural materials or corrugated paper, napkins, cereals, dough and even pasta.
The main thing is to use your imagination and not be afraid to experiment.
For example, postcards made from pieces of napkins.
You can get acquainted with the technique of making blanks and flowers from napkins in the video:
A beautiful applique can be made using regular cereals.

Small painted pebbles.
From coffee beans.


And even from ordinary matches.

Or an order for a fearless pasta dad.

Works using the origami technique are no less interesting than three-dimensional applications. Moreover, you can combine both techniques. You can make an interesting postcard in the form of a men's shirt and tie, which we will dress in a jacket.

Another option for making a cool card-shirt for a gift for dad in the video:
If a child is not too fond of making various crafts, this does not mean that he will not be able to give his father an interesting gift on February 23rd.
You can arrange a real congratulatory show with the participation of a baby or toddler.
The main prize of the home quest will be a gift from mom to her husband on February 23, which must be safely hidden.
Together with your child, you come up with a path to the surprise and draw the road on a homemade map.

At every stage of such a mysterious journey, dad should expect a surprise. This could be a small gift, for example, a postcard or a magnet, or the same socks.
You can arrange a real concert - let the baby sing and recite a congratulatory poem for dad.
At some stops, hold holiday-themed competitions or quizzes.
Such information will be useful for the child and interesting for parents. When dad completes the entire difficult quest, the intensity of emotions will be at its limit.
And here the main prize will be waiting for him, which the head of the family will be incredibly happy about. Moreover, the prize can be not only a gift from the wife, but also a festive table.
What to give a father from a schoolboy son on Defender of the Fatherland Day
A school-age boy can make for his dad not just a beautiful craft, but also a useful thing.
If a boy knows how to work with carpentry tools, he can build a box in which dad can store his tools and fishing tackle.

Homemade cup stands are also interesting.

It would be appropriate to give dad a photo from his son on February 23rd in a frame that you can decorate in an original way with your own hands.
Older kids can make a real hammock for their beloved dad.
Detailed instructions for making a hammock with your own hands in the video:
And even a rocking chair.

What to give dad on February 23 from his school-age daughter
Most school-age girls love to make various crafts, both themed and useful.
Girls who know how to knit can knit a long wide scarf or comfortable indoor slippers for their dad on February 23rd.

And it’s impossible to ignore delicious gifts. Moreover, you can make a themed tank or plane from candies and sweets, or decorate jars of sweets in an unusual way. Dad will be simply amazed by such a surprise.
You can please your dad with homemade goodies. A girl can ask her mother or grandmother for help to prepare gingerbread cookies decorated with icing for her dad.

Or bake Dad’s delicious favorite cake. Recipes for classic cakes are available.

It would be nice to take part in preparing a festive table for men. Moreover, the girl can cook on her own.

And also, which can be decorated with tomato stars.

Or from boiled beets.

Children's gifts are so heartwarming and cute.
When a child or teenager presents his father with a present in which a piece of his soul has been invested, it is impossible to say that it is a trinket or an unnecessary gift.
Such gifts are stored for a long time or must be used for their intended purpose.
Video: DIY gift for dad on February 23
We suggest making an original tank with delicious ammunition as a gift for dad on February 23rd. A detailed master class on making a gift for dad on February 23rd in the video:
You can make beautiful crafts for February 23rd with your own hands not only in kindergarten, but also at home. Both specially purchased and improvised materials are suitable for their manufacture. Depending on the level of complexity of the craft, the child can make it himself or ask his mother for help to cut out the parts of the card or glue them more carefully.
Under the supervision of the teacher, children in the middle and junior groups will be happy to make beautiful gifts for dad and relatives with their own hands.
Cardboard mug
This colorful mug will be a great surprise for the Defenders of the Fatherland holiday.
Required:
- colored cardboard;
- a sheet of white cardboard;
- colored paper;
- a simple pencil;
- regular and curly scissors;
- ruler;
- pen with empty core;
- tea bag label;
- glue stick.

Progress:
- We make blanks for the mug. Cut out a rectangle 15*10 cm from one color of cardboard and 15*21 cm from white. We draw a handle arbitrarily according to the size of the cardboard. To make the workpiece smooth and beautiful, we make it using two saucers or a compass.

- On a large rectangle, make marks 3 cm from the edge of the cardboard and draw straight lines. Draw along the bend line with a non-writing pen and bend the edges up.


- We cut out two strips of colored paper measuring 21*2 cm and make circles. They will be needed for decoration.

- Glue the blanks onto colored cardboard.


- Glue the handle on the inside of the white rectangle.

- We connect the colored and white blanks along the bend line.


- Glue the tea label inside the mug using glue or tape.

The flat part of the mug can be used as a postcard. Congratulations, handwritten in block letters or cut out from a printed sheet, will be the finishing touch to creating a gift mug. This part of the work can be done in kindergarten or assigned to mom as homework.

So, not only children, but also adults will be involved in creating crafts for February 23 with their own hands in kindergarten from paper.
If dad loves sweets, there is always the opportunity to please him with an interesting and unexpected surprise. Making it yourself is easy and simple.
Required:
- green cardboard;
- colored paper or for scrapbooking;
- a sheet of light green corrugated cardboard;
- ruler and simple pencil;
- scissors;
- toothpick or skewer;
- glue gun or PVA glue;
- thick thread and needle.

Progress:
- We make a base measuring 8*18 cm from thick cardboard.

- On the reverse side, mark with dots and draw straight lines from left to right: 6-2-6-2-6-2 cm.

- We apply a ruler and draw along the lines with scissors or a non-writing pen to make them easier to bend.
- We fold the blank along the bends and glue the box.

- We make a blank for the retractable part of the tank. To do this, cut out a 10*12 cm base from cardboard.

- On the white side, mark the points with a pencil and draw lines along them: 2-8-2 cm from the top and 2-6-2 cm from the left and right edges.

- We cut the resulting squares from the bottom and top so that they fold easily.

- We draw along the lines with scissors, slightly cutting through the cardboard and bending it.

- We form a rectangular retractable part from the workpiece.

- Glue it together, making a kind of matchbox.
- We cut out the backing for the retractable part, measuring 6*8 cm. We put it inside and glue it.
- We cut out 8 strips of 1*27 cm and 2 strips of 1*13 cm for the wheels.

- We wind the blanks one by one on a skewer, as when making bases for quilling crafts.

- Glue the tip to the resulting wheel base so that the workpiece does not unfold.

- We glue the tracks from four large wheels.

- We attach them to the base of the tank.


- We fix the small wheels at the front on the top of the track.
- We cut out 4 strips of 1.5*21 cm from corrugated cardboard.

- We wrap them around the wheels and fix them with glue.


- We measure and cut out a strip of colored cardboard 6*22 cm and paste it into the middle of the tank.
- We cut out a strip of 2*14 cm from corrugated cardboard and connect it into a ring.

- Cut out a rectangle measuring 4*7 cm from colored paper.
- We wrap it around the skewer and make a barrel. We glue the edges so that the paper does not unroll.
- We make the tip on the barrel by wrapping a strip of cardboard and fixing it with glue.
- Use a skewer to make a hole in the base ring and insert the barrel into it.
- Lightly cut the paper and glue the edges on the inside so that it does not fall out.
- Cut out 3-4 strips of 22*27 cm each. Wrap it around a skewer and glue the ends together.
- We insert the turret ring with the barrel inside and secure it to the tank.

- In the box for sweets we make a loop using a needle and thread. We insert it into the tank and pour the candy inside.
To make the craft look more festive and interesting, you can make inscriptions on it on the theme of Defender of the Fatherland Day and draw stars.
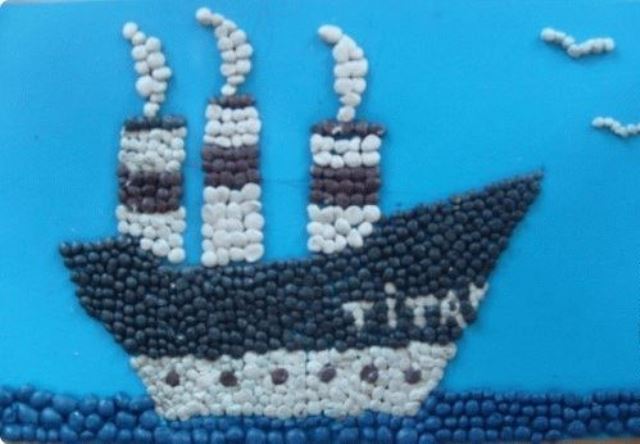
Crafts from scrap materials for February 23
Postcards and crafts made on a cardboard base made from plasticine and pasta will look very interesting and impressive. Here you can show your imagination by making not only inscriptions, but also putting together figures of military vehicles, planes and tanks.

Required:
- base cardboard;
- White paper;
- ruler and simple pencil;
- glue;
- scissors;
- paints and pasta;
- plasticine;
- confectionery sprinkles or decorative beads;
- printout with congratulations.

Progress:
- Fold the cardboard in half and measure 1 cm from the edge. Draw a straight line using a ruler.

- We cut the strip with curly or regular scissors.

- We draw up the future drawing with a simple pencil.

- We put plasticine on the sketch.

- We attach gouache-painted pasta or juice tubes on top.

- Squeeze glue onto the fireworks design and glue the decorative fireworks.
If you want to make a craft postcard from pasta, you must first paint it and dry it in a warm room.
Card for dad in the form of a jacket
Charming DIY crafts for February 23rd in the form of a jacket with a shirt with congratulations written on it will be an excellent option for entertaining children in kindergarten and in the senior group.
Required:
- ruler;
- a simple pencil;
- felt-tip pen;
- a sheet of colored cardboard for the base;
- PVA or stationery glue;
- a sheet of white A4 paper;
- eraser;
- black colored paper;
- buttons - 2 pcs.;
- needle and thread;
- thin tape.

Progress:
- We measure 9 cm on each side of the sheet, making dot marks with a simple pencil.
- We bend the edges along the ruler inside the future postcard.
- Leave the sheet folded and measure 3.5 cm on the left side.
- Open the folded sheet and make a 3.5 cm mark on the right side of the workpiece.
- We bend the lapel of the jacket outward.
- We make a shirt from A4 sheet. To do this, cut out a rectangle along the width of the first workpiece. Mark 11.5 cm wide, draw a line and trim off the excess.
- We place a white sheet in the jacket and make a collar. To do this, push it up 2.5 cm.
- We make marks along the edge of the jacket collar and draw lines on the right and left.
- Take out the rectangle and make cuts along the lines.
- We fold the strips towards each other at an angle at a short distance and bend them.
- We put dots at the intersection of the strips and cut off the excess paper along them. This way we make sure that the corners of the shirt collar touch each other and look like real clothes.
- Cut a strip of black paper 5*20 cm and make a tie. Fold it in half with the white side facing out.
- We retreat 1 cm from the fold from the top to the left side and put a dot with a simple pencil and measure 2 cm from top to bottom.
- Draw a straight line along the designated points.
- We retreat from top to bottom 14 cm.
- From this mark we measure 2 cm and place a dot on the right side. We connect both marks at an acute angle.
- From the bottom line we draw a segment to the top.
- Cut out the tie according to the intended pattern.
- Unfold and straighten the paper.
- We apply the blank to the shirt, slightly going under the collar, and glue it.
- We write congratulations for dad with a pen or felt-tip pen. Or paste in a printed version.
- Making a pocket for a jacket. To do this, cut out a rectangle from white paper measuring 4*1.5 cm and from black paper 6*2 cm.
- Place one strip on top of the other and glue the edge.
- We assemble the black rectangle with an accordion and fasten it with glue.
- We place it on the right side of the jacket and fix it with PVA.
- To prevent the card from opening, we sew buttons on both sides of the jacket diagonally. Before this, we thread a thin ribbon into one of them.
- We tie and fasten the edges of the bow.
- To make the card look more elegant, we draw a beautiful line with dotted lines along the collar of the jacket and pocket.
- Glue on the shirt and jacket. The gift is ready.
A DIY craft for dad for February 23rd will turn out more beautiful and interesting if you use satin ribbon instead of paper for a tie and scarf. This will give the card a festive and original look.
A simple and beautiful craft for February 23
As a gift for boys, you can make an interesting fortress with soldiers, which will be an excellent solution for participating in an exhibition or photo competition. Afterwards, you can play with these interesting soldiers, inventing adventures for the boys together with dad.

Required:
- a simple pencil;
- eraser;
- Gouache or Acrylic paints;
- napkins;
- glass of water;
- paint brushes;
- cotton buds;
- PVA glue;
- stones with a smooth surface.
Progress:
- We carefully treat the pebbles with PVA glue so that they are primed and the paint adheres easily to the natural material. Leave to dry completely.

- Cover the surface of the workpiece with white paint.
- Draw a sketch of a soldier on the stone with a simple pencil.

- We paint large parts with paints first.

- Then we move on to the smaller ones. We leave the soldiers to dry.


- Together with the child, we build a mini-fortress and place soldiers.
You can collect stones in the park or near the house with your child, giving him an unusual walk with an interesting task. You can also use stones that your child collected at sea for DIY crafts for February 23rd in kindergarten. This way they can be used in new ways, engaging your child in creativity and showing how else natural materials can be used.
Military star for Defender of the Fatherland Day
To attract children to creativity, you can make voluminous crafts for February 23rd for an exhibition or as a gift. The children, together with their teacher, will be happy to create an incredibly beautiful star with their own hands in kindergarten from napkins.

Required:
- base box;
- scissors;
- PVA and stationery glue;
- gouache paint (black);
- paint brush;
- ruler;
- a simple pencil;
- stapler;
- green paper;
- red napkins;
- St. George Ribbon.

Progress:
- Cut out a star and 5 blank strips of the same length from cardboard.

- Glue the strips to the star, making it three-dimensional. Leave to dry completely.

- Paint the inside of the star with paint.

- We make a blank for decorating the craft. To do this, divide a sheet of green paper into two equal parts and fold them into triangles.

- We fold the workpiece like an accordion, and then bend it in half with the tips up.

- We glue the edges together, creating a kind of petal.
- We make the required number of blanks from green paper and paste them over the outer part of the star.

- We create flowers from red napkins. To do this, fold the napkin in half, fasten the middle with a stapler and trim the edges. We crumple each layer of paper with our fingers, forming petals.
- Fill the inside of the star with flowers, gluing them onto stationery glue. We attach the St. George ribbon to the PVA on top.
To make the craft bright and interesting, it is better to use two shades of red napkins, creating contrasting transitions inside the star.
By doing crafts for February 23rd with your own hands, even the younger group in kindergarten will understand the importance of this day and the meaning that is put into the word “defender.” Especially if parents or a teacher tell interesting stories about the exploits of soldiers for the good of the Fatherland.
A boat made by a child with his own hands could be a good gift for dad or grandfather on February 23rd. Of course, this ship does not necessarily have to be a holiday gift. It can be a simple cardboard craft on a regular day off or a craft made during a craft lesson. In general, it doesn’t matter what this ship is intended for, the main thing is that your boy, or maybe a girl, wants to make such a miracle sailboat out of cardboard with his own hands. Your child may need your help to make a ship with their own hands. Find this time for your child and help him in his creative impulse if this craft is difficult for him due to his age.
Use the patterns to cut out the sides, back, bottom and deck of the ship from cardboard. Glue them together using tape.


After this, you need to tear or cut the paper into small pieces. This can be either regular printer paper or special corrugated paper for children's crafts. Dilute PVA glue with water in a 1:1 ratio. Then, dip each piece in diluted glue and attach it to the cardboard. Thus, cover your craft with 4-6 layers of paper. When the glue dries, paint and decorate your craft. Make sails from fabric or cardboard from used toilet paper rolls.


(craft made from waste material and colored paper).
Semenova Svetlana Petrovna, teacher of the 1st qualification category, MDOU kindergarten “Ladushki”, Kachkanar, Sverdlovsk region.
The master class is designed for children of senior preschool age and junior schoolchildren, preschool teachers, club leaders and parents.
Purpose: The craft can be used as a gift for dad on February 23 or a friend on his birthday. The craft looks very attractive, every child will want to have such a boat, so they will take on the work with great desire. By easily turning into a little captain, you can role-play a sea adventure or happily give a boat to a loved one.
So, go for it!
Mystery: The palace floats on the waves
People are lucky on themselves. (ship)
Target: teach how to do work using various materials.
Tasks:
1. Continue teaching children to work with paper and waste materials.
2. Strengthen the ability to use scissors and glue.
3. Develop creativity, fine motor skills, sense of shape, color, rhythm.
4. Cultivate perseverance, patience, the ability to complete the work started, the desire to bring joy to loved ones, accuracy.
Material.
To complete the work we will need:
- colored paper
- white paper
- 2 strips of colored cardboard measuring 5x30 cm
- toothpaste box
- PVA glue
- scissors
- threads

Progress:
1. Apply glue to the wide edge of the box and glue it to a white sheet of paper, starting from the edge.

Then we coat the remaining edges in the same way and cover the entire box. The base for the boat is ready!

2. Glue strips of cardboard to the wide edges of the box, placing them symmetrically. For strong bonding you need something
Press the workpiece down and leave until completely dry.

3. Meanwhile, we are making a pipe. Take half a white sheet of paper and, starting from the short side, twist it onto a pencil, fix the edge with glue. We take out the pencil - the pipe is ready.


4. To attach the pipe to the base, make several small cuts at one edge of the pipe and open them, as shown in the photo.

5. Coat the resulting “flower” with glue and fix it to the base of the ship.

6. Next, in the upper part of the pipe, we make 2 small cuts on opposite sides of the hole. We insert a thread about 60 cm long there.
We glue the strips of cardboard together along the edges, inserting the ends of the thread there. The thread should be tensioned enough so that the flags hung on it do not sag. Fix the ends of the cardboard strips longer for better bonding.

7. At the next stage of work, it is necessary to make blanks for the windows - the ship's portholes and flags.
For portholes, we select any contrasting color; in our case, yellow is suitable. You will need 10 circles with a diameter of 2 cm and 20-24 strips of colored paper 1x3 cm for flags.

8. Glue the windows along the sides of the ship, 5 on each.

9. We cut out flags of different shapes; to do this, we bend the strips in half (the flags will be double-sided) and cut out triangular, rectangular and flags with a cut out corner.

10. Glue the flags to the thread, alternating them in color and shape.


11. And finally, let’s hoist the Russian flag.
For the flag you will need a white square measuring 6x6 cm. Cut out the unnecessary part from it - a square 3x3 cm.

From the remaining part we will make a flag. For the shaft, you need to tuck the left side of the workpiece several times to make it strong.

Prepare 1x6 cm strips of red and blue. Fold the strips in half and stick to the base of the flag.

Coat the shaft with glue and glue it.

12. And the last step is to insert the Russian flag into the upper part of the pipe.
This is such a beauty we have!

Crafts for February 23. DIY gift for dad and grandpa
Summary: DIY crafts for February 23rd. Children's crafts for February 23 in the garden. Holiday February 23 in kindergarten. DIY gift for dad and grandpa.

The easiest option is to make a boat out of paper. Read how to fold a paper boat on our website using the link.

You can attach flags to the finished paper boat. The mast will be replaced by a regular toothpick.

An interesting craft for February 23rd that any dad will love is a paper boat filled with sweets.

If you make waves from strips of paper, you will get not just a paper boat, but a paper boat on the waves. This is a great gift for any dad or grandfather on February 23rd.

On our website you will find detailed instructions on how to fold a paper steamer. See link. If you make a seascape from colored paper and cardboard, you will get a wonderful DIY craft for February 23rd.


Dad or grandpa will definitely love this homemade airplane. In this article we want to offer you three simple options for making this craft for February 23rd.
Matchbox airplane

DIY airplane
From a regular clothespin and wooden ice cream sticks (or medical spatulas) you can make a craft airplane by February 23rd. When making this craft, we recommend using acrylic paints and a glue gun.

If you make a lot of these airplanes, you can actually make a whole suspended mobile. Please note that the photo below shows that the tail of the airplane can be made from cardboard.


Cardboard airplane

Airplane made from a plastic bottle
There is a special article on our website dedicated to crafts made from plastic bottles. See link. In it you will find instructions on how to make an airplane from a plastic bottle using the papier mache technique.

Here is another suitable DIY craft for February 23rd - a tank made from matchboxes. To make it you will need: a piece of wallpaper (or a notebook cover), matchboxes (3 pieces), magazine paper, corrugated cardboard, a plastic bottle cap. When preparing with your children for February 23 in kindergarten, you can make such a cute tank as a gift for dad or grandfather. For a detailed master class on making this craft from matchboxes, see the link.

Another version of a matchbox tank. This tank's cannon barrel is made of a cotton swab, its tracks are made of corrugated cardboard, and its rollers are made of buttons.

From corrugated cardboard you can make not only tracks for a tank, but the entire tank. Look what an unusual craft we made for February 23rd!

A small child will also be happy to give a gift to dad on February 23rd. Children cannot make complex crafts, so we are specially publishing here a very simple DIY craft for February 23rd - a cardboard car. You will need a cardboard toilet paper roll, cardboard, paints, glue. See instructions.

Very beautiful, but at the same time complex paper crafts are offered on the Creative Park website from Canon. Here you will find paper ships, airplanes, helicopters, all kinds of paper car models, as well as architectural buildings. Making such a craft on February 23 will be interesting for schoolchildren and adults.

You will find paper crafts for February 23rd from the Creative Park website using the links:
From the topic of transport we move on to robots. You can make cute robots from cans, plastic bottle caps, cogs, nuts, screws, dishwashing sponges and other things. Making such a gift for dad with your own hands is not at all difficult, especially if you have a glue gun (so-called “liquid nails”) on hand. But what scope opens up for the flight of children’s imagination and the development of creative thinking and imagination! Rest assured, dads will appreciate such a gift!


You can make a pencil holder in the shape of a robot.

Here is another interesting option for a stand for pencils and pens, made by yourself. How to make such a gift for grandfather or father on February 23rd, see.

An original pencil holder can be made from Lego Duplo.


If you want to make a pencil holder decorated with a photograph, then to make this craft by February 23 you will need such a designer part as a transparent door. The photo is inserted into the free space between the wall and the door.

Do you want to surprise your dad or grandfather with an original gift for February 23? Then make these beautiful cups for them. For this craft for February 23, you will need: cardboard, pasta of various shapes, gold spray paint in a can, glue (glue gun), as well as all kinds of jewelry. Cut out a cup from cardboard and make a stand for it. Now glue different shapes of pasta onto the cardboard. The most convenient way to do this is with a glue gun. When the glue is dry, paint the craft with gold spray paint. Finally, decorate the cup with family photo clippings and jewelry. For detailed instructions on how to make this craft for February 23rd with your own hands, see and read the link. By the way, it would be appropriate to give such a cup to your dad or grandfather not only on February 23, but also on his birthday. Don't forget to write: "To the best dad from loving children" or "To the best grandfather from loving grandchildren."

If your dad goes to work in a business suit and tie, then the following gift for February 23 would be appropriate for him. Help your child make a paper tie for dad as a gift. You can simply cut out a tie from thick paper and then decorate it.


Here is another detailed diagram of how to fold an origami tie from paper. Pay attention to the numbering of the photo on the origami tie diagram.

And these are ready-made origami ties.

Make a mobile made of paper airplanes for your dad as a gift for Defender of the Fatherland Day. Such a gift for February 23 will help create a festive mood. To make this craft on February 23rd with your own hands, you need to fold a lot of airplanes from colored paper or special paper for scrapbooking. And then hang them on strings from the chandelier. Read how to fold a paper airplane on our website using the link.

Concluding our article on children's crafts for February 23, we will tell you about one interesting craft made from waste material - a deer head made from a plastic bottle and plastic bottle caps. If your dad or grandfather is interested in hunting, then such a craft will be especially relevant for him.

Material prepared by: Anna Ponomarenko


