Beautiful little DIY boxes. DIY gift wrapping _ Layout diagrams and templates for cardboard boxes of various shapes
Gift wrapping is akin to art. The simplest and easiest way is to buy ready-made bags and boxes. But you can make gift wrapping yourself, spending some time on it. At the same time, the recipient of the gift will not only appreciate the packaging, but also the fact that it was made by hand. This article looks at three different methods: cardstock, cardboard, and greeting card packaging. All three methods, while relatively cheap and simple, allow you to make beautiful gift boxes that you will be sorry to part with.
Steps
Card paper
- Two sheets of landscape paper 30 by 30 centimeters.
- Glue: liquid glue, glue stick, etc.
- Scissors.
- Paint brush.
- Ruler.
- Paper cutter.
-
Draw two straight lines crosswise on the back of the paper, from corner to corner. These will be the fold lines; they should be drawn on the back (worst) side of the paper. These two lines should intersect in the center of the sheet. If the intersection point is not centered, the curves will be uneven and the edges of the box will not be flat.
Fold the corners of the paper towards the center point. Place a piece of paper in front of you so that one of its corners is directed towards you, fold the corners to the point of intersection of the two lines drawn earlier. The corners of the sheet should meet each other exactly in the middle and you should have a symmetrical design.
- It is important to position the sheet so that one of the corners (and, accordingly, the diagonal) is directed towards you, since in the course of further description the corners will be referred to as “upper”, “lower”, “left” and “right”. Having positioned the sheet of paper in this way at the beginning of work, do not turn it further.
-
Make additional folds. Unfold the top and bottom edges, leaving the other two (right and left) folded. Then fold the left and right edges again towards the center so that their edges coincide with the center line (diagonal).
- You should end up with an oblong shape with pointed edges at the top and bottom.
-
Unfold the side edges of the sheet and bend the top and bottom triangular edges. You will end up with a diamond-shaped shape with vertical edges about 5 cm long each. In this case, the vertices of the upper and lower triangular faces (which you made at the very beginning) should be directed towards the center of the sheet. These edges should be cut off.
- The bend lines should pass through the centers of the right and left sides of the corresponding triangles. Cut triangles along these lines. As a result, you will get two new triangles located on the sides of the main triangles (the resulting shape resembles the shape of a house).
-
Unfold the sheet of paper and fold the top and bottom edges inward. You've just cut out two main triangles on each side. Grab the edges of the two remaining triangles (their appearance resembles the shape of a house) and bend their tops (the roof) inside the sheet.
- Bend the triangular edges along the line of the previous bend so that their vertices meet at the center point. You will get a figure that resembles a “house”, with a “roof” separated from the floor by bends.
-
Fold the side triangles inward, also folding the smaller triangles located at the edges. Bend the two newly formed side triangles inwards. Then fold inwards the smaller triangles located at the vertices of the larger triangles. You should bend these triangles to the end until they rest against the opposite edge.
- Now that the side walls of the box are formed, its features can be discerned.
-
Glue the edges of the side faces. The side edges bent into the center separately form triangles and rectangles. Glue the edges of the rectangular surfaces together to form a “wall” around the center.
- You can use ordinary paper glue or PVA glue; do not apply glue in b O larger quantities than necessary so that it does not spill onto open areas of the paper, and after gluing, dry the paper.
-
Lift up the remaining unglued edges. Lift up the triangular edges of the faces; you will see that the rectangular bases form the sides of the box (being glued together, they are held in an upright position). This way you already have the bottom and walls of the box; bend the 4 triangular edges inward so that their vertices meet in the center.
- By bending the triangular edges towards the center of the box, you get its lid; Now all you have to do to seal the box is pin them together.
-
Glue the triangular edges at the top of the box. Glue not only their tops, but also the side edges that touch each other. The result is a rectangular box with an open top and four sides, i.e. the top half of a gift box.
Do the same for the bottom half of the gift box; use a square sheet of paper with sides 3 mm shorter than the previous sheet. The making of the box lid, which should be slightly wider than its bottom, was described above. Take the same sheet of paper as before, but cut strips about 3 mm wide from two adjacent sides.
- After that, repeat all the steps above. As a result, you will have a fairly durable gift box consisting of two parts, a bottom and a lid.
Cardboard
-
Take a sheet of thick craft cardboard measuring 23 x 23 cm and another sheet of 16 x 16 cm of the same cardboard. Please note that some types of craft cardboard are quite expensive. Skip the expensive varieties and find relatively cheap cardboard.
- This model of gift box has a higher lower part and a smaller lid, so sheets of cardboard of different sizes will be required. The size may vary as long as the lid and bottom fit together.
-
Make slits in a piece of cardboard that matches the bottom of the box. This sheet measures 23 x 23 cm. Use scissors. As a result, you should end up with something resembling an equilateral cross (or an addition sign). The cuts should be made as follows:
- Cut the sheet along the edges to a depth of 7.5 cm towards the center, also 7.5 cm away from the corners. Make 4 cuts on two opposite sides of the sheet. As a result, you should get 4 squares with a side of 7.5 cm at the corners of the cardboard sheet and 2 rectangles located between them.
- Draw a pencil line on both sides of the sheet (top and bottom), marking the cut locations. After cutting along the lines, you will have a shape that resembles a cross or an addition sign.
- At a distance of 4 cm from the edge, cut the side edges diagonally towards the center. After this you will have triangles at the top and bottom.
-
Cut a piece of cardboard for the box lid. Take a second, smaller sheet of cardboard. Cut it in the same way as the first one, but taking into account its smaller size. Do it like this:
- On two opposite sides, make cuts to a depth of 4 cm, also 4 cm away from the edges.
- Cut the cardboard from the corners of the sheet to the previous cutouts, thus removing the triangular sections at the corners of the sheet.
- You will again have a figure resembling a cross or an addition sign, with triangular notches at the corners.
-
Fold the corners. There are triangular cutouts at the corners. There are two such cutouts at the top and two at the bottom. Fold them, smoothing and fixing the fold.
- Once again, you should end up with a shape that resembles an addition sign, with small triangular cutouts at the corners.
-
Bring the sides of the cardboard sheet together, folding them toward the center. Grab the bottom of each “edge” and fold it up. In this case, the central part of the sheet, which remains flat (the bottom of the box), should form a regular square. This way you will have 4 side edges surrounding the bottom of the box on each side. Connect the side edges so that the triangular protrusions are located on the inside.
- After folding the edges of the box upward, make sure once again that the triangular cutouts are located on the inside of the walls. These cutouts will serve to connect the individual side edges of the box.
-
Perform the same operations with the lid. Take a smaller piece of cardboard and do the same with it. Fold the edges of the cardboard sheet in the same way as you did earlier. And in this case, you should end up with half a box, except that its dimensions will be slightly different.
- Fold the edges of the sheet towards its center, thus forming the side edges of the box.
- Pull up all four edges, making sure the triangular cutouts are on the inside.
-
Glue the triangular cutouts to the inside of the box walls. So, you have in your hands two halves of the box that can be easily combined. You can glue them together using any glue. Simply apply a small amount of glue to the top inner surface of the sides of the lid, then slide it onto the bottom of the box.
- Wait a few minutes for the glue to dry, pressing the edges of the sides of the box. Then place the lid of the box on its base and admire the results of your work.
greeting card
Cut the greeting card in half along the fold. In this article we will look at a standard rectangular greeting card. A square postcard will also work, but in this case there will be different sizes.
- If there is an inscription on the inside of the card, cover it with paper. This section of the card will go to the bottom of the box, so its appearance is not so important.
-
Cut about 3mm around the perimeter of half the card. This half will serve as the bottom of the box. It should be slightly smaller than the top of the box so that the latter fits onto the bottom.
Clean your work area and prepare the necessary materials. Prepare your desktop and be patient. Here's what you'll need:
Gift packaging is no less important than its contents. Just as you greet a person by his clothes, so do gifts by their wrapping. Seeing the sloppy wrapper, the thought immediately creeps in that the gift is no less cheap, even if there is expensive jewelry in the middle. The portal site invites you to make a beautiful gift box with your own hands, which will delight the gifted person’s eye for a long time.


DIY diagram of a box with a lid, master class
It’s quite simple to make a box with a lid, and the base can be multi-colored cardboard, scrap paper, cardboard from boxes, which can be covered with fabric or multi-colored paper, making it presentable. We suggest making a box with a hinged lid.
For the craft, prepare:
- cardboard;
- ruler;
- Moment glue or glue gun;
- pencil;
- scissors.
To get started, you'll need a template. You can print what we offer on a printer, use it as a stencil, or you can draw it yourself. To do this, you need to decide on the dimensions of the box and draw 4 squares vertically and add horizontal squares on both sides to the second square from the top. All squares must be the same size. Next, you need to add allowances of 1 cm to the outer squares horizontally. In our picture, the allowances are indicated by the letters A, B, C, D and E.

Then cut out the model of the future box. You should end up with the same blank as below.

We bend the workpiece along the lines. We form a box and glue the seams together. This is the box you should end up with.

How to make a small box with your own hands, templates with photos


DIY Valentine's box, step by step with photo
We suggest you make an open “Valentine” box in the middle of which you can put both a gift and sweets.
Materials:
- cardboard or thick scrap paper;
- pencil;
- glue (PVA or Moment will do);
- scissors;
- pencil;
- The marker is a shade darker than the cardboard.
Using a printer, print out the diagram below, which will serve as a template. If you don’t have a printer, you can draw the diagram yourself. The larger your hearts are, the larger the final Valentine will be.

Trace the outlines of the hearts with a marker on the back and outside. Work along the dotted lines (aka fold lines) with the blunt end of the scissors. This is necessary so that in the end the bends are even, especially if thick cardboard was chosen as the material.

Fold the box along the folds and glue the sides of the hearts together. After the box has dried, on the outside of it, write congratulatory words or confessions in a beautiful font with a marker. Place sweets or gifts in the box. Valentine's card is ready.

DIY box for a man, photo 5 options


DIY wedding box, photo 5 options


DIY round box diagrams, templates


How to make a heart box with your own hands, master class
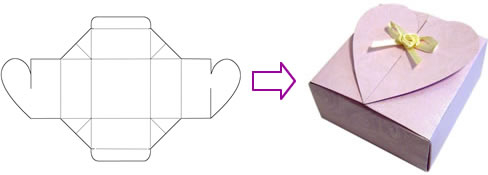
You can pack gifts for your loved one not just in a rectangular box, but in an impressive heart-shaped box, which you can easily make yourself. The decoration of the box can be anything that comes to hand, for example, beads, rhinestones, artificial flowers, pieces of lace, beads, etc.
To work you need:
- cardboard;
- Moment glue or glue gun;
- decorations;
- scrap paper;
- satin or grosgrain ribbon 2.5 cm wide;
- ruler;
- compass;
- pencil;
- paper clips;
- scissors.
First of all, you need to draw 2 identical hearts on cardboard. A compass will come in handy in this case. Draw 2 circles that are on top of each other (see picture), and then draw straight lines on the sides of the circle so that visually you get a heart. Exactly the same blanks need to be made only in a smaller size from scrap paper, which will serve as a substrate for subsequent decoration. For example, if you get large hearts 16 cm high and the same width, then make hearts from scrap paper 14x14 cm. Select the size of the heart according to the size of the gift or your personal preferences. Cut out the hearts.

To finish the sides of the heart, cut out 2 strips of paper from the same cardboard. The length of the strip should be equal to half a heart + 1 cm for sizing, and the width should be equal to the height of the box itself + 2 cm for the cloves for sizing. Select the width at your discretion; the larger it is, the higher the box. Then exactly the same strips need to be cut out of scrap paper, only without allowances for the cloves. Heart diagram with details in the picture below.

We bend the cut strips of cardboard by 2 cm and draw them with the blunt side of the scissors to form a bend line. Use scissors to cut triangles (teeth). Stepping back 0.5 cm from the edge, glue the strip to one of the cardboard heart blanks.

We glue the second strip onto the second half of our heart, gluing it onto the previous one in the upper and lower parts, slightly overlapping, and fix it with paper clips.

Cut 2 pieces of grosgrain ribbon approximately 5 cm (adjust the length at your discretion) and glue it in the middle of the heart. The tape is needed to connect the base of the box with the lid.

Glue the tops of the ribbons to the lid.

Now we paste the lid with the scrappaper heart cut out earlier, and the box from the middle and outside with stripes.

Decorate the box as you wish.

DIY gift box made of cardboard on March 8, step by step with photos
We invite you to make a small box for March 8th in the Tiffany style, which every girl will definitely like.
To create a box, prepare:
- cardboard;
- blank paper;
- compass;
- pencil;
- ruler;
- glue brush;
- glue;
- lace or lace doily;
- satin ribbon 0.5 cm wide.
The first step is to make a blank in the form of a circle with a diameter of 10 cm from any paper. Place the circle on a piece of cardboard and trace it with a pencil. Mark the center of the circle and use a ruler to divide it into 4 equal parts.

We apply the template to the circle we just drew so that it touches the 2 closest lateral points (see picture). In the same way, mark the center and divide the circle into 4 parts.


Apply the template to each section of circles so that it touches the 2 closest points and trace.


We cut out the part from cardboard and use the blunt end of scissors to work out the rounded lines.

We collect the box.


We decorate the middle of the box with a lace napkin, forming the number 8, applying glue with a brush. You can also use lace.

We decorate the top of the box with a satin ribbon, tying it crosswise, and form a bow. The Tiffany style box for March 8 is ready. In such a box you can safely present jewelry as gifts.

DIY scrapbooking box, master class
The gift box can also be made using the scrapbooking technique. Such gift packaging is distinguished by its originality and beauty. In addition, you can use the entire flight of your imagination to create it, timing it to coincide with a specific holiday, making it in the appropriate color scheme.
To work you will need:
- cardboard with a density of 250 grams;
- decorative elements in appropriate colors;
- scissors;
- pencil;
- glue "Moment Crystal".
1. For work you will need 2 cardboard blanks. We take the first blank measuring 24x24 cm and form the box itself from it. We retreat 6 cm from the edges and connect opposite points with lines. We cut each side square to a perpendicular line. We make cuts opposite each other.
2. In the same way, take a second cardboard blank measuring 25x25 cm, retreat 5.5 cm from the edges and do the same as with the first blank. This will be the lid. Press the fold lines thoroughly with a blunt object, such as a hook or scissors.

3. We assemble and glue both boxes with Moment glue.
Important: Given the parameters of the workpiece, the lid of the box will cover it completely. If you don't want the lid to be so deep, cut the edges to a length that suits you before you begin the gluing process.


4. Let’s start decorating the box lid. At this stage, you can use all your imagination. Glue a square of scrap paper onto the lid that is 0.5 cm smaller than the lid itself.

5. Apply the desired decorative elements, trying not to overload the composition, and once you are satisfied with the appearance, glue the parts to the lid.

The scrapbooking style box is ready.

DIY box for February 23rd, photo 5 options


DIY boxes with wishes, photo 5 options


DIY birthday gift boxes, photo 5 options


DIY triangular box, diagram with photo


How to make a surprise box with your own hands, master class
A box with a surprise looks impressive, and in its middle you can easily place several small gifts at once. To create a box, prepare:
- colored cardboard;
- colored paper;
- scrap paper or any other with a print;
- satin ribbons;
- decorative elements at your discretion;
- glue gun;
- scissors;
- ruler;
- PVA glue;
- pencil.
For this craft you will need several sheets of cardboard. It is advisable to use cardboard of one color for the lid and base, and another color for the remaining tiers. Let's make the first tier. To do this, take a sheet of cardboard measuring 36x36 cm. You will find such non-standard sheets of cardboard in craft stores. We divide each side of the cardboard into 3 equal parts with sides of 12 centimeters.

Connect the dots opposite. You should end up with 9 equal squares.


Using the blunt end of the scissors, we work out the lines of the squares, and then we fold all the squares into the middle, forming the walls of the future box.

From 2 sheets of cardboard measuring 33x33 and 30x30 cm we make exactly the same crosses, dividing the sides into equal sections of 11 and 10 cm, respectively.

We take the smallest cross, which will serve as the top tier, and decorate it with colored paper. For this, squares of scrap paper measuring 10x10 cm were taken.

We decorate each side of the cross at our own discretion. This master class used decorative clothespins purchased at a handmade store, decorative inscriptions, an envelope and stickers. You can use photographs, print wishes on a printer, glue flowers, ribbons, etc.

We will decorate the center of the cross with a pedestal on which you can place the main gift. To do this, we will make a small box. We take cardboard measuring 12x12 cm. Mark 3 cm from each edge. Connect the dots opposite and press the lines with the blunt end of the scissors.

We take a medium-sized cross-shaped blank and glue interesting printed paper onto the side squares.

We do the same with the largest workpiece. We leave the center in both blanks without decoration.

We collect tiers. We take the largest cross, glue the center of it with glue and glue the center of the middle cross to it. We do the same with the small piece, gluing it to the middle one.

Now you need to form the lid of the box. We take a square of cardboard 24x24 cm. We retreat from the edges by 6 cm, connecting lines with dots opposite. Thus, in the center you will get a square measuring 12x12 cm.

We cut the side squares in the same way as in the small pedestal box. We use scissors to work out the folding lines and, clockwise, fold and glue the lid in the same way. We glue a satin ribbon to the lid, tucking the edges of the ribbon into the middle of the lid and the bow.


Video: how to make a box from cardboard and paper
Video: how to make a heart-shaped box
While there is no need to make square boxes yourself, craftswomen always experience a shortage of round and shaped boxes. You can make packaging of this shape at home from ordinary scrap materials. Our article contains a unique master class on making round and shaped decorative boxes with your own hands.
DIY gift box: simple patterns
First of all, you need to prepare stencils for the paper box. There are a variety of schemes for creating this type of souvenir. Gift wrapping can be rectangular, round or shaped.
Today we use boxes in everyday life, for work, and as gifts. Meanwhile, these things appeared in our civilization relatively recently - in the 18th century. Their predecessors were bulky wooden boxes. Prefabricated structures were invented by the Scot Robert Geyer, who needed light, compact packages for seeds.
Square box diagram
The diagram shown in the photo will help those who need a classic square box. It is enough to make a paper or cardboard stencil and glue it along the fold lines.

Diagram of a polyhedral box
The original hex pack will not require a cap. It is easy to create such a product with your own hands, even without any special artistic or design skills. It is enough to use beautiful thick paper. Elements of this shape are often made from cardboard.

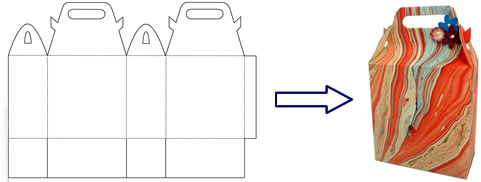
Scheme of the original box in the form of a handbag
We offer a simple scheme for making a gift box with your own hands. The product has the shape of a small handbag. Even an expensive gift made of precious metals can be packed in a box.


Scheme of a box in the form of pieces of cake
Are there any holidays coming up at work? Use the idea of decorating a gift in cardboard products in the form of cake slices. A gift made with your own hands, even if only partially, will remain in the memory for a long time. Your colleagues will definitely like this idea.


Heart-shaped box diagram
Romantic people will appreciate any gift made with their own hands. It is better to pack the gift for them in a heart-shaped box. Made from bright paper or cardboard, it will be an excellent gift idea. Use our pattern to make your own gift box in the shape of a voluminous heart.

DIY round box: master class with video
The most difficult thing is to make a round box out of paper with your own hands, because there are no diagrams for assembling it. To make such a product, you will have to cut out all the elements separately and then glue them together one by one.

First, make stencils for the box from paper. To do this, draw a circle and cut it out. You will apply the paper stencil to the cardboard, creating the constituent elements of the bottom and lid. Make the same blank for the sides. It looks like a strip, the length of which should correspond to the size of the bottom circumference. Now you can start the main work:
- Cut out the first circle for the bottom and the side from cardboard.
- On the side strip, cut off the extreme corner.
- On the other side of the strip, cut a corner of the same size and slope.
- Connect the cardboard blank into a circle and glue the cut.
- Glue the bottom to the circle.
- Wrap the outside of the structure with a piece of decorative material.
- Using a stencil, cut out the same strip, but shorter and higher in height. It is needed to create the inside of the product.
- Insert the workpiece inside and wrap it with decorative material.
- Cut a circle larger in diameter than the bottom of the box.
- Make a strip of the side of the lid and connect it to the new blank.
- Wrap the lid with paper or cloth.
You can decorate gift wrapping in any way. The most common option is tape. The product is wrapped several times, and a lush bow is tied on the lid. Decorating the top with artificial flowers, leaves, beads or small soft toys looks beautiful.
The product is used not only for decorating gifts. It can be useful to you in everyday life or to decorate your interior. The video shows a diagram of creating a round box with your own hands from cardboard and decorated with patchwork fabric:
Summary: DIY gift boxes. How to make a box out of paper. Box diagrams. Cardboard box. Origami box. How to wrap a gift beautifully. DIY gift wrapping.
Nowadays there is no shortage of gift wrapping options in stores. Helpful sellers will offer you gift boxes, decorative bags, gift paper for every taste. But you must admit that it is much more interesting to make the packaging yourself. And the recipient of the gift will be doubly pleased, because by taking the time to select and wrap the gift, you thereby showed attention to it. In this article we want to offer you different options for making boxes from paper and cardboard with your own hands. All crafts are accompanied by ready-made box patterns. You just need to choose the gift box you like, print out the diagram and glue the box with your own hands according to the instructions.
1. DIY box
We will start our article with the original pyramid-shaped boxes. Download the box diagram, print it on thick paper or cardboard, use a hole punch to make holes as shown in the instructions for making a box with your own hands. Collect the box and tie it with a beautiful ribbon. The gift wrapping is ready! Note: boxes made from corrugated cardboard will look beautiful.
2. How to make a paper box
Don't know how to make a box with your own hands? Then use our ready-made paper box designs.
Gift box with a heart. Such packaging will be especially relevant for a gift on February 14 or March 8.
Here is another version of a cardboard box with hearts >>>>
3. Gift boxes. Gift boxes
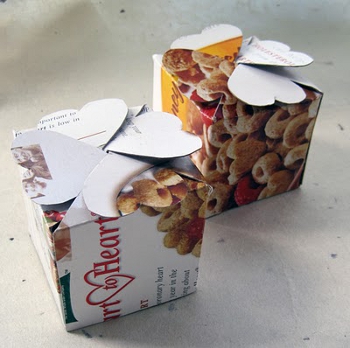
Pink and blue gift boxes with white polka dots. You can put cookies or candy in this gift box. It will be great if you bake the cookies yourself.

Pink box diagram >>>>
Blue box diagram >>>>
Instructions >>>>
4. How to make a box out of paper. Box diagrams
Decorative paper for scrapbooking is ideal for making paper boxes with your own hands. Make holiday packaging out of it according to the pattern. Use the instructions
5. Cardboard box for a DIY gift
We invite you to make a bonbonniere with your own hands. A bonbonniere is a beautifully decorated box for chocolates. Bonbonnieres are usually given to guests at a wedding as a sign of gratitude for attending the celebration. Also, such cardboard boxes filled with candies and nuts can be given to children who come to your child’s birthday. In the photo below you see a classic version of this handmade gift wrapping.

6. Do-it-yourself packaging. How to make a box
The largest selection of DIY boxes is presented on the Creative Park website from Canon.


8. DIY box. How to make a box
You will find original boxes for small gifts or sweets in the section
If you are going to a special event soon, and the gift wrapping service is far away, try making a beautiful gift box with your own hands from cardboard and paper, with or without a lid. It’s not that difficult, you just need to find ideas, master classes on how to create such crafts, stock up on the necessary materials and tools, and strictly follow the step-by-step instructions. Gifts and premium packaging collected with your own hands are always unique and priceless; the recipient will certainly appreciate them.
How to make a gift box with your own hands
A homemade do-it-yourself gift box will help you make a present truly original and unforgettable. It’s not difficult to make it, you just need to find a master class on creating suitable packaging or print a ready-made template. Next, all that remains is to transfer the drawing onto colored cardboard or craft paper, cut it out, fold it, and glue it together. If desired, a gift box already assembled with your own hands can be decorated with ribbons, rhinestones, bows, buttons or braid.
Materials for production
In order to make a gift box with your own hands, you will need good quality materials that will not tear or fall apart along the way and during gifting. Ordinary cardboard is unlikely to work here, it is not so dense, and its color is not festive. It is better to use a special one, and you can decorate gift wrapping using beautiful paper intended for handicrafts. There are stores that sell a variety of craft materials. There you can purchase a whole set of necessary accessories or buy something specific.
Box diagrams
How to make a gift box from a ready-made one
Even with an ordinary gift box made by yourself, you can surprise the recipient of the gift and everyone around you. If your imagination allows you, then it’s quite possible to create an original masterpiece that you won’t find in stores. One of the easiest ways is to make your own gift boxes from ready-made ones. For this purpose, the usual containers in which you, for example, bought shoes are suitable; find the appropriate size. Next, you need to decide on the theme of the holiday in order to choose the right color, design pattern and decor.
The prepared box must be covered with thick paper (fabric) using glue and tape. It’s best to do this on the inside too, using materials of different colors, so the packaging will look more beautiful and impressive. We decorate the lid of the box in the same way, they should complement each other. Decorate the finished packaging as you wish, in accordance with the holiday. To do this, use bows, hearts, fruits, funny figures, fabrics of various textures, paint, stencils, etc. Creative people can make figures themselves, for example, from polymer clay.
How to cover a box with gift paper
To do this, you will need a box, paper (colored, gift, self-adhesive, wallpaper, napkins) and tools (glue, scissors, ruler, brush, pencil). Next, proceed in the following sequence:
- Unfold the selected material and place the box in the center.
- Measure out the required amount of paper, it should be enough for the bottom of the base, the sides and a little for the bend. You can do this using a ruler.
- Cut off the excess part and cut four strips from it for the corner sections.
- Glue these strips, then coat the outer parts of the box with glue and cover with paper. Do the same on the inside.
- Cover the lid in the same way. Let dry and decorate further as you wish.
DIY gift box - master class
Making ordinary gift boxes with your own hands is not difficult, you just need a little patience, time, tools, and materials. If you have already stocked up on all this, follow these instructions:
- Draw a square in the middle of cardboard or thick paper - this is the bottom of the future product.
- Draw two lines perpendicularly from it in four directions. These will be the side parts of the box; determine the length of the lines based on the desired depth of gift packaging.
- On each side of the side parts, add 1.5-2 cm protrusions and cut off their edges at an angle of 45 degrees.
- Carefully cut out the resulting drawing, bend along the drawn lines, and glue with glue or double-sided tape.
- All that remains is to decorate the box and put the gift inside.

DIY surprise box
To give money for a birthday or jewelry, you don’t have to put it in a paper envelope or ready-made box. Show a little imagination, and the present will not look banal. It is much more impressive, for example, to present a small box glued together with your own hands. When the recipient finds a gift inside such a work of art, there will be a lot of impressions.
You will need: thick paper, scrap paper, scissors, glue, ruler, pencil, decorative materials. You can make such a package like this:
- From a plain piece of paper, cut out a base with sides 30 cm long.
- Draw the workpiece into 9 identical squares, cut off the corners.
- Using a ruler and a sharp object (toothpick, crochet hook), scratch the lines drawn in pencil. This way the folds will be even.
- Bend the side parts, glue the previously cut squares from the inside with a glue stick, retreating 2 mm from the base. File the edges with a nail file.
- Cut out 8 8.6 mm squares from scrap paper and glue them on both sides of the base.
- Next, it remains to decorate the box at your discretion: with flowers, ribbons and rhinestones, inscriptions with wishes, etc. The photo of the hero of the occasion at the top of the box will look very original and unusual.
- Place the surprise inside - money, a congratulations card, a small souvenir.
Candy box
It’s easy to make original candy packaging with your own hands using a ready-made template. You need to print it out or draw it on thick paper, assemble it along the dotted fold lines, glue it and place the sweets there. If you do not have this opportunity, then:
- Take a large colored disposable cardboard cup and remove the rim.
- Make 7-8 cuts 3 cm long on top, fold them inward, place them in the candy box, connect the edges together, and glue them together.
- Decorate the top with multi-colored pom-poms, beads or glue an interesting inscription: this will be an exquisite gift for women on March 8th.
DIY Christmas boxes
For New Year's themes, there are also ready-made templates in the form of Christmas trees, balls, which help you create boxes for gifts with your own hands, etc. Draw one of them, cut it out, glue it together. If your gift is large and will not fit into such packaging, choose any suitable container and simply decorate it with a New Year’s theme. For this:
- Cover it on all sides or simply wrap it with bright red paper of any texture.
- Glue a wide black stripe across the entire box in the middle.
- Next, make a square out of gold paper, cut out the middle in it, and attach it to the front of the gift on top of the black stripe. Look what happened, why not a Santa Claus costume?

Ring box
Ordinary velvet boxes for rings are already a thing of the past, but if you give your loved one a ring in a homemade package, it will be a gift-impression. It is made in the same way as a simple box with a surprise, only inside you need to additionally build a backing for the jewelry. To do this, follow this scheme:
- Cut a rectangle or square from foam rubber that fits the width and height of the box itself. Make a slot in the center, then a ring will be inserted into it.
- Take two satin or openwork pieces of fabric, first insert one piece into the cut, then the second.
- Gather the free edges into beautiful folds and secure with glue on the back side. Insert the backing into the box and the ring into it.
- Glue hearts, flowers, rhinestones onto the lid, and decorate the design with ribbons.
How to wrap a gift beautifully - diagrams and box templates
For those who don’t know how to do anything with their own hands, there are many different ready-made patterns and templates for gift boxes. You need to choose a photo of suitable packaging, print (draw), cut, bend along the dotted lines, glue, decorate. Choose the size and shape of the box based on the parameters of the gift - round, rectangular, in the shape of a heart, a cake, a Christmas tree, a baby shoe, etc. Believe me, such simple but cute boxes will make your congratulations original and unforgettable.
Rectangular box with double-sided cardboard lid
Making rectangular gift wrapping is the easiest way. To do this, stock up on cardboard, scissors, glue and follow the instructions:
- It is better to use double-sided cardboard, so the product will be one color inside and outside, with the same pattern. Draw a rectangle in the center; its size will depend on the size of the gift.
- Draw more rectangles on the top, bottom, right and left of the figure - these are the side parts, their height should be equal to the desired depth of the future box.
- Draw 2 cm allowances on all sides of the side parts, cut off their upper edges at an angle of 45 degrees.
- Bend the workpiece along the lines, glue using allowances.
- The lid is made in the same way, only its width and length should be 2-3 mm larger. So it will open and close freely.
- If you need a large box, but double-sided cardboard comes in a small format, cut out each part separately and glue it together using allowances.
Round
Making a round gift box will not take much time, but patience and perseverance will come in handy. So, follow these steps:
- Cut out four circles from porous cardboard, two of them should be slightly smaller in diameter.
- From beer cardboard, cut two strips the size of the mugs, one wide, the other narrow. Leave some overlap on them and cut them with cloves. This way the strips will stick more evenly.
- Next, glue together 2 large and separately 2 small circles - these are the bases for the box and the lid.
- Glue strips to them: wide to narrow circle, narrow to wide.
- Decorate the lid of the package with a ribbon bow, an original inscription, or a postcard.

Felt and paper cake
This packaging is often used not for gifts, but for wishes and consists of 12 “sweet” pieces. To create it you need:
- Print the presented template in the form of a piece of cake, cut out 12 identical blanks from paper (can be multi-colored), and glue each one.
- Cover the blanks with felt, brown or colored, creating the illusion of chocolate cakes or delicious cream.
- Put a wish or a small souvenir in each braid, decorate the cake in connection with the theme of the holiday.
Using origami technique
To create gift boxes using this technique, you will need: paper of any texture, scissors, glue, pencil and ruler. Next you need to do the following manipulations:
- Cut two squares, one 2-3 mm larger than the other.
- We take one of them, draw 2 lines diagonally from one corner to the other.
- We bend the bottom corner to the center of the intersection of the lines, and then we bend the same part again to the middle. Let's expand. We do the same with all corners.
- Using scissors to the left and right of the upper corner, make 2 cuts, up to the length of the first fold line from the center of the workpiece. We do the same with the bottom corner.
- We bend the left and right corners to the center, bend them again along the cut lines, lifting them. You should now have two side pieces.
- Bend them, glue them with allowances in the form of triangles.
- Place the top and bottom on top and glue. The box itself is ready.
- Assemble the lid in the same way.
Heart-shaped box
This packaging is made similarly to the round one, only the base is cut out in the shape of a heart. Use a ready-made template or draw the box shape yourself. Choose thick cardboard as the material. Make a box according to this scheme:
- Cut out 2 hearts (one is 2 mm smaller) and 2 strips, equal in length to our figures. The height of one strip is the depth of the package, the second should be smaller.
- On each strip, leave an allowance of 2 cm for gluing, bend them, cut them with teeth. Glue the strips to the bases.
- Next, select the material for decoration, paste it over the outer, inner, side parts of the box and the lid. Decorate it in the form of a bow.

Gift packaging “Diamond”
It is very difficult to draw a template for such an unusual box with your own hands, so it is better to find and print a ready-made one. Next you need to take cardboard of the desired color, scissors, glue and proceed according to the scheme:
- Cut out the template, attach it to the cardboard, trace it.
- Next, you need to cut out the workpiece with a stationery knife, and press down the folds with a sharp object (knitting needle, crochet hook) (using a ruler).
- Bend the workpiece along the lines, glue the product (it is better to use Moment glue). Before gluing the last part, place a gift inside.
Bonbonniere
These small unusual boxes are usually given to guests at a wedding; they often contain candy, nuts, coffee, lollipops, cookies, and also words of gratitude or wishes. The newlyweds decide for themselves when to give out such gifts, created with their own hands, but everyone, both women and men, will like the gift. If you want to make a bonbonniere from paper or cardboard, then:
- You need to print (draw) and cut out the finished template of the product of the desired shape.
- Make folds along the dotted lines.
- Glue it together, not forgetting to put sweets and notes with warm words inside.
Such packaging can be made not only from paper, but also from fabric. For example, tulle, chiffon, and silk are perfect for this. Make a pattern, purchase the material of the desired color, thin ribbons to match the color and proceed according to the scheme:
- Cut circles with a diameter of 23 cm from the material. For one bonbonniere you need 3 circles.
- Place them on top of each other, place a card with wishes and sweets in the center.
- Gather the fabric into a bag and tie it with a ribbon. Straighten the ends of the fabric. An original DIY gift is ready!
Video


