Patchwork for beginners: beautiful and easy. Original quilting: beautiful and easy for beginners Quilting beautiful and easy for beginners
Patchwork is a skill or as it is also called patchwork. Mastery arose several millennia ago, but today it has only gained popularity. The name patchwork literally translates as work and patch. That is, in fact, it is work with scraps of fabric. Masters in this field can create both a simple set of patches of fabric and sew a complex mosaic pattern. In technique - patchwork, you can create kitchen potholders, crafts, a blanket and much more.
In contact with
Classmates
Patchwork is beautiful and easy for beginners: schemes and patterns
Looking for the first time at the paintings created using the patchwork technique, it can give the impression that there is nothing complicated about it. It is quite enough to take a few flaps and sew them in any order.. But in fact, even in patchwork - crafts have their own rules of work. If they are not observed, then the work will not work.
Patchwork is not difficult, but before you start crafting, you need to familiarize yourself with the stages of future work.

Do-it-yourself patchwork patterns and patterns: what is needed?
In addition, you will definitely need material. And also, you need to prepare the tools. This must be done in advance. You will need the following patchwork materials.

In addition, you will need a needle and thread for stitching, as well as a sewing machine to speed up the process. You will need cardboard as a pattern template. Pins are required for marking. To measure the canvas, you need a centimeter or ruler. In a number of individual cases, a crochet hook may come in handy.
Patchwork for beginners schemes step by step: types of patchwork mosaic
Looking at the patchwork photo, you can see that each product differs from each other in manufacturing methods. This is due to the fact that there are different types of patchwork. For each product, it is worth using its own type of patchwork.


Patchwork quilt master class for beginners: do-it-yourself bedspread
 In order to perform a heavy creation, many resources offer step-by-step master classes that simplify work for beginners. The first job is always fun. And if you have the opportunity to devote some time to work and a step-by-step description of all the processes to create an interesting product, then you can create a thing quickly and efficiently.
Any kind of needlework will help decorate the room and give an atmosphere, comfort and warmth to your home. But where to start? A detailed tutorial is included. Take it step by step and you will succeed!
- It is necessary to determine the size of the future product - bedspreads.
- Choose the colors of the product that will harmoniously fit into the interior of your room and, of course, the furniture.
- Prepare strips, cuts, shreds and squares to create a future bedspread.
- Choose a good option for the wrong side of the future bedspread.
- Prepare all the necessary tools. You will need a template - a square, a sewing machine, scissors, thread with a needle and pins. To draw, take a simple pencil.
The bedspread can be made on the basis of any geometric patterns. But a square can be an ideal option for beginners. You can choose any pattern for the future product. But if it is possible to peep, then for the first work, choose the simplest version of the pattern.
Advice: Before you start sewing using the patchwork technique, prepare the fabric. To do this, soak it first in hot water. Rinse it in clean warm water and dry it. Ideally, the fabric should be starched. This method will make it easier for you to work with the material. After that, iron it well.
Master class: do-it-yourself patchwork quilt
For beginners, we offer a step-by-step blanket master class, consisting of only four stages.
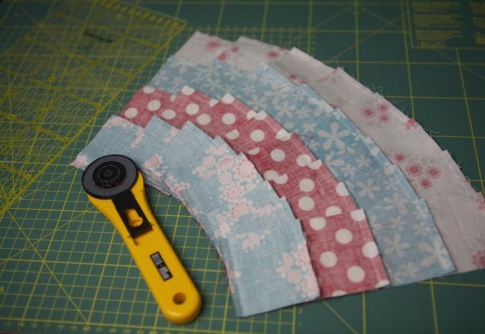
- From two different pieces of fabric, you need to cut two identical strips.
- Fold them from the wrong side and, securing with pins, carefully sew.
- Take the resulting workpiece as a basis. Measure its length and make the same strip from the next piece of fabric.
- Fold it over and sew the seams on the front side.
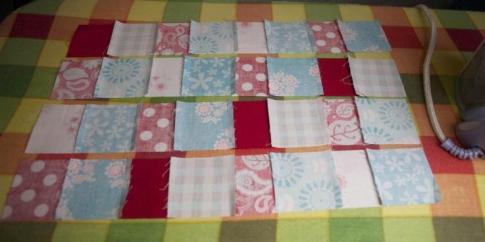
 You should be able to double sided sleeve. Lay this canvas on the table and cut squares from it, according to the template that you prepared in advance. With the help of a simple square stitching scheme, you can quickly get any pattern. At the same time, it is not necessary to sew the parts evenly and accurately. Many craftswomen deliberately make asymmetry in order to get a unique product.
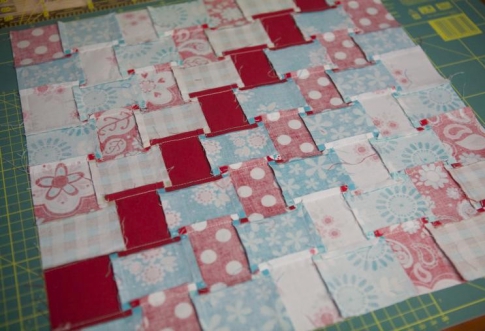
Once the drawing is ready, you need to sew each square. To do this, sew longitudinal stripes and iron each resulting seam. Thus, from the strips you will get a single canvas.
But that's not all that patchwork requires from you. To complete the final part, you need to sew the front part to the wrong side with your own hands. For the inside, we recommend choosing chintz. But any other fabric that you have will work for the first job. After that, stick to the following step-by-step work scheme.
- Lay out a piece of fabric for the wrong side and lay it face down on the table.
- At the top of the wrong side, lay out the padding polyester. But if you do not need it as a warming element, then this stage of work can be skipped.
- The next step is stitching the front side of the squares.
- Baste the fabric with pins and use a sewing machine to make quilted seams. In order to make quilted seams correctly, outline the borders of the squares or some kind of pattern. Sew along the seams using a sewing machine.
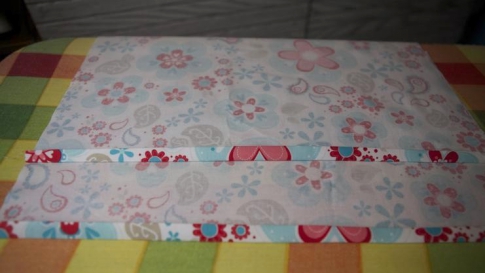
- The last, final stage is the edging. Take a separate strip of fabric, it should be larger than one side of the bedspread. Fold this fabric in half and sew to the front of your blank. Wrap the excess edges to the wrong side and sew on the other side. Thus, the entire product is edged on both sides.
Thus, in a matter of hours you will have the perfect, original blanket for your home. In the same technique, you can make bedspreads, hot coasters, potholders and much more. The resulting bedspread can be thrown over a bed or sofa. And also decorate it as home decor.
Do-it-yourself children's blanket using patchwork technique
In order to decorate the baby's bed, you can make an original bedspread with your own hands. The patchwork technique and our master class will help you make it quickly and efficiently.
For work you will need the following materials:

It is worth noting that, unlike an adult bedspread, a children's bedspread can be sewn from only forty-eight squares. In the children's version, the side of one square does not exceed eight centimeters. Such a colorful decor element will please not only you, but will also be pleasant for the baby.
- Get all the squares ready. As a base, you can use old bodysuits, pajamas, or any clothes you don’t need. It is important that it be made of natural fabric, since in the future this cover will be used by the child.
- The resulting squares must be sewn together and ironed well at the seams.
- On the resulting canvas of forty-eight squares, you need to lay out a piece of fleece. It should be two centimeters less in width and length of the main product. It will serve as the wrong side of the product.
- Excess parts need to be cut off, and the corners rounded off.
- Both canvases must be stitched along the edges. In this case, the indent should be equal to one centimeter.
 The main thing in creating a baby blanket is not to rush. Remember that you are making a product for a child, so each seam must be done neatly and evenly. And also we advise you to think carefully about the drawing. We do not recommend using too complex ornaments for the first work.
A cute and beautiful do-it-yourself patchwork blanket is ready. Such a rainbow and beautiful bedspread will decorate any children's room. And also, it will look good in the form of a cape on the stroller, while walking on the street. For older children, you can make a cape for a swing, as well as a bedding for walking in the fresh air!
If you have colorful scraps of fabric lying around - do not throw them away! Pieces can be used to create new interesting things, such as bright furniture upholstery, patchwork for beginners.
Product types
The patchwork technique is most often used for tailoring interesting furniture upholstery. Depending on the color scheme in which the work was done, it can be implemented in different designs: bright colors are perfect for a nursery, muted cold shades are best placed in the bedroom, and juicy greens and yellows will look great in the kitchen.
In addition, the patchwork style makes wonderful blankets, blankets, bed linens and kitchen towels. Depending on your idea, you can use fabrics of different shades of the same gamut, or you can give free rein to your imagination and combine shreds of different patterns and colors.

For novice masters, there are many interesting ideas, the implementation of which will train and prepare for more difficult master classes. For example, beginners are advised to pay attention to potholders, curtains and wall organizers using the patchwork technique.
Preparation for work
The main question for beginners to work in this technique is what tools are needed? Since patchwork is the same sewing, only from patches, you will need threads of different colors, needles that are comfortable for you to work with, and a sewing machine. You can do without it, but then the workflow will take a little longer.
If you like patchwork, pay attention to the kinusaiga technique - an interesting way to patchwork without using threads and needles.
Templates
Stock up on specialized patchwork templates. They come in regular geometric shapes, hearts, flowers, polyhedrons and semicircles. You can buy plastic templates at a craft store, or you can draw them yourself and cut them out of cardboard.
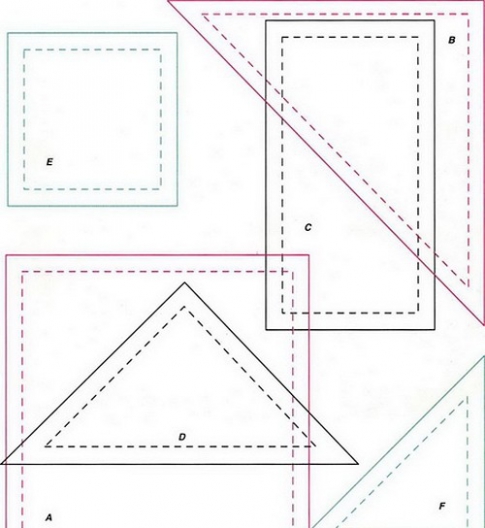
Please note that your homemade template should consist of two contours: the first - the inner one - outlines the shape of your patch, while the outer edge determines the seam allowances. Beginner Tip: Create a stencil with a blank center so you can easily outline both the inside and outside edges of the patch.
Beginning craftsmen can be attracted by such a type of needlework as a crazy patchwork. There are no special rules in this technique: take shreds, ribbons and lace of different colors, textures, sizes and start sewing them to each other in a chaotic manner. To do this, you do not need templates and a sewing machine.
The result is an interesting material that can be used as a material for other types of needlework or as artistically designed curtains, bedspreads.
fabrics
Most often, needlewomen use silk, linen, drape, cotton fabric to create products in the patchwork style. But bright synthetic fabrics will also look good in a common rag mosaic.
To facilitate the work, use the advice of professionals before choosing a fabric:
- linen is easy to cut, so it is used to create products from small patches of intricate shapes;
- cotton fabric will be a good base for a blanket, napkins, pillowcases and towels;
- from drape it is advised to sew blankets, bedspreads and rugs;
- silk is the most difficult to work with, so it is not always possible for novice craftsmen to cope with it. Silk panels and patchwork clothes look best.
Before work, be sure to wash the fabrics and iron them - it is harder to work with dirty wrinkled material than with prepared ones.
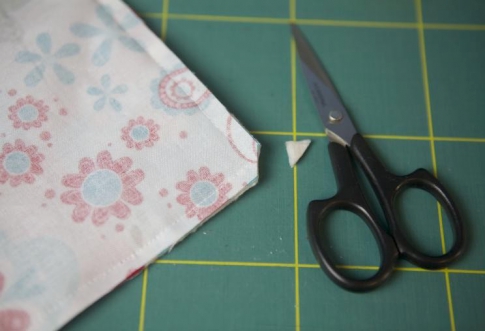
Cutting for beginners
Before starting work, decide on the plot of the future product - select schemes on the Internet or come up with them yourself. Prepare scraps of fabric that match your composition in color and size. Give preference to pieces from one type of fabric.
Draw a pattern with a simple pencil, soap or a piece of chalk - gel pens may not wash off. In addition, they push a groove on the fabric, which can no longer be eliminated.
Always place your templates in the direction of the grain thread of the fabric - then the patches will not warp during the sewing process.
If you do not have universal templates, first create a pattern of parts, and then outline it with an outer contour - seam allowances.
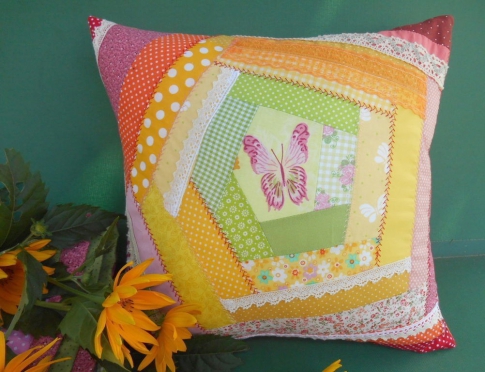
Master class: sewing pillowcases
In fact, patchwork work is very easy to complete in just 2 hours, even for beginners. To see this, try sewing a colorful pillowcase for a children's square pillow.
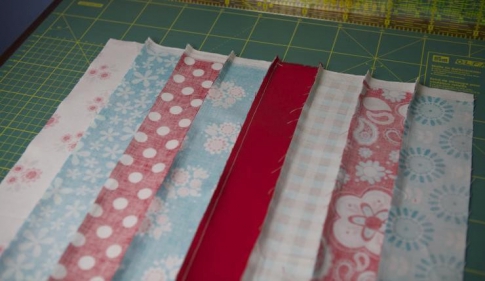
You will need 8 different types of matter, combined with each other in texture and pattern.

The master class provides approximate measurements of the product - they can be changed depending on what size pillowcase you need.
- From each fabric, cut out 1 strip measuring 6.5x55 centimeters. Arrange them as you wish, long sides facing each other.

- Sew the strips together with a simple machine stitch. Allowances of about 6 millimeters should remain each time. If you don't have a special patchwork foot, adjust the standard machine foot for a comfortable fit.

- All the resulting seams must be ironed so that the allowances look in one direction.
- Now sew the first and last strips together so that a "sleeve" is formed.
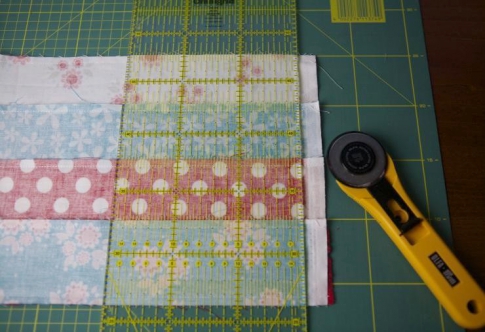
- Draw stripes along the sleeve, perpendicular to the seams, and cut. You should have 8 looped strips.
- Now start tearing apart the stripes, each time stepping back 1 square so that you get 8 ribbons with a different sequence of colors. Lay them out, forming the desired pattern.

- Take a picture of the resulting pattern so you don't forget it. Now take all the odd stripes - 1, 3, 5, 7 - and iron as follows: the first seam is to the left, the second is to the right, etc.
- With even stripes, do the opposite: the first seam is to the right, the second is to the left, etc.

- Put all stripes back in place. Fasten them together and sew on a typewriter with a simple stitch. You followed the 2 previous steps so that the stripes lay perfectly evenly to each other: you can check this by seeing the same “lock” of seams between them as in the image.

- After sewing, turn the pillowcase right side up and iron the seams again. You should get a similar pattern of seams.
The front side of the pillowcase is ready! You have a square with a side of 42 centimeters. You can start sewing the back of it - it will take you no more than half an hour.
- Cut out 2 rectangles with sides 42x30 centimeters. Wrap one edge of each rectangle 2 times 1 centimeter and iron.
- Attach the rectangles to each other as shown in the photo so that they form a square with a side of 42 centimeters. Pin the front of the pillowcase right sides together.

- Sew the square around the entire perimeter with a simple stitch, retreating 1 centimeter. Cut off the corners of the pillowcase and sew the edges with a zigzag stitch.
- Turn the finished product inside out and put it on the pillow.

You can learn more about this method of sewing pillowcases by watching the following video tutorial for beginners.
It is better to decorate the finished patchwork product with satin stitch embroidery, cross stitch or ribbons.
Patchwork or patchwork, patchwork mosaic - a type of needlework in which, according to the mosaic principle, a whole product is sewn from pieces of fabric (patchwork). In the process of work, a canvas is created with a new color scheme, pattern, and sometimes texture. Modern masters also perform volumetric-spatial compositions using the patchwork technique. All stitching seams in a patchwork fabric are located on its wrong side. Patchwork technique has long been used in Russia, in particular for the manufacture of quilted products (patchwork quilts) and other products.
In Russia, patchwork sewing became widespread in the second half of the 19th century with the advent of foreign calico on sale. Unlike homespun fabrics, which were about 40 cm wide, factory-made fabrics had a width of 75-80 cm, and when cutting clothes, a large number of scraps were formed from them. The applique appeared later: since English calicoes were expensive in Russia, it was considered inappropriate to cover one fabric with another. Patchwork reached its peak at the end of the century, when the production of cheap cotton printed fabrics was launched and sewing machines appeared. Basically, things (mostly patchwork quilts) created in the peasant environment had an exclusively practical function - they protected from the cold. They were mainly made from scraps of worn clothes, they were irregular in shape and connected randomly. However, in parallel, there was a tradition of sewing blankets for the wedding and the birth of a child. These products combined utilitarian and decorative functions. The shape of the flap (stripe, square, triangle) was determined by the shape of the lunge formed when cutting a straight Russian costume.
At the end of the 19th - beginning of the 20th century, patchwork in folk costume replaced lace, embroidery, and woven elements that were complex in execution. Traditional Russian patchwork is characterized by manual assembly without the use of a base, overlapping patches, and the use of parts of different sizes.
After the revolution, this type of sewing was not included in the list of types of arts and crafts supported by the state. Later, patchwork became a sign of poverty, a reminder of the periods of wars and devastation experienced by the country. Interest in this type of arts and crafts was revived in the 90s of the XX century, and its study began at the same time. It has become not only a common hobby, but also an independent genre of decorative art. In Russia, every two years (since 1997) the festival "Patchwork Mosaic of Russia" is held, where the works of the masters are demonstrated.
Cutting rules
Before cutting, remember the following things:
1. Before opening a new fabric, be sure to wash it, then steam it with an iron. This is done in order to prevent possible shrinkage and discoloration of the fabric after washing the finished product.
2. The flaps that have already been used before must be starched and ironed.
4. Cutting is always done in the direction of the shared thread, then during stitching, the patchwork parts will not warp.
5. When using a new fabric, be guided by its edge.
6. In order to cut the desired element, attach an indented template to the back of the fabric, circle it with chalk, then attach the template without allowances on top and circle the contour again.
7. After you have cut out all the necessary details, you can sew them according to the chosen patchwork pattern.
Types of patchwork
1. Traditional
Belongs to the Anglo-American type of needlework. Its main goal is to create a solid canvas from shreds. This creates geometric patterns. For this patchwork, you need schemes, patterns and large-scale patterns, for example, blankets. It's the big ones that look the best. Often there is a lining on the wrong side.
2. Crazy shreds
As a material, fabric flaps of different sizes and geometric shapes are used. Curved stripes, applications, irregular shapes. The seams are masked with braid or embroidery. An indispensable attribute is the generous decoration of the product.
3. Knitted
In the knitted style, the pieces are sewn together with a crochet hook. It is this patchwork technique that is embodied in bedspreads.
4. Japanese style
He combined eastern and western motifs. This style uses stitch, silk as a fabric. In addition to practical bedspreads or clothes, this type of sewing is often used in decorative panels. At the heart of creating a composition are geometric shapes - a rhombus, a triangle, a corner, a square.
5.Watercolor
A popular technique, it can also use squares that are sewn into blocks and a canvas is formed from them. The main feature is the correct selection of the color palette of shreds.
6. Stripe to stripe
In this style, strips of fabric of different colors and even textures are used. You can combine the stripes in any way you like. From such strips you can create a unique palette, and even patterns. For example, classic parquet, Christmas trees, wells.
7. Log hut
The style involves the formation of a pattern of stripes around the central element - a square. They stack in a spiral. There are variations of this technique - shifting the square into a corner.
8. Magic triangle
This is the most common pattern in patchwork, in particular, such patterns, patterns and patterns are used to create pillows, pot holders, bedspreads. In addition to the magical power of this figure, which many nations believe in, the triangle is also easy to use. With it, you can create a variety of shapes, including complex stars and simple squares. When using this technique, interesting combinations can be achieved.
9. Corners
The main difference between the style is that the corners are not made from cut blanks, but are formed from pieces of fabric of different shapes. The resulting stripes are sewn into canvases. The result is a voluminous canvas.
10. Chess
The main element is small squares or rhombuses. They are staggered in contrasting colors.
11. Russian square
The central part of the canvas is assembled from squares, and along the perimeter it is sheathed with isosceles triangles. There is also alternate sewing - squares-triangles - stripes.
12. Honeycomb or grandmother's garden
The basis of the canvas is formed by hexagonal blanks.
What are quilting patterns for?
If you start the patchwork technique and you need to create colored or textured blocks, then for this you will need to prepare a special template that will help you cut out small details faster. It is from small elements with certain sizes and configurations that blocks are formed.
The template is prepared for the part, taking into account seam allowances. If you have not purchased a special ruler for patchwork, then you will have to use a template, and for seam allowance, one size is usually set from 5 to 7 mm. The template for working with patterns is convenient from cardboard or plastic.
- Needlework, which is gaining surprising popularity, is based on the creation of a holistic composition from multi-colored patches of fabric. They are interconnected by hand sewing or a typewriter, forming drawings, patterns or colorful ornaments that adorn various household items. This is a difficult process that requires diligence and taste. But the result is worth it!
Where can you use patchwork and hand sewing in the manufacture of home textiles?
Needlewomen, craftsmen from the hand-made category and just zealous housewives who are not used to throwing away trimmings, shreds and other “waste” after sewing will find where to use them.
Reasonable frugality and the ability to apply patchwork and other techniques for hand-designing home textiles will help you build your own business.Someone is engaged in the manufacture of bedspreads from colored and motley shreds, sews children's blankets, and for someone, the creation of original textile bags, creative panels is closer.


Needlework, a creative approach to styling home textiles, will help you make original things for a comfortable home.
 Patchwork bed headboard
It is practical, profitable, will allow you to make original gifts for your friends, relatives and relatives.
 Children's soft toy made of scraps
Patchwork needlework is very beneficial for developing your own business.
In this direction:
- master all the subtleties and techniques of manual decoration, while simultaneously doing the main work;
- justify the workshop by highlighting a corner in your apartment or private house;
- Search for potential clients online.
 Extravagant accessories for girls in patchwork technique

 Patchwork pillows
Combining a creative approach, creativity and business to organize their own business, any woman or girl can become financially independent. Here it is important to correctly prepare a business plan for patchwork needlework, calculate how profitable it is, and also consider your activities for the future. Start a business with no start-up capital and build your brand.
 Patchwork - the perfect way to self-realization
The patchwork decor in the interior looks very organic, not only in the ethno style, but also in the romantic one, where the owners of the home want to create a special atmosphere of comfort and friendly atmosphere.
We suggest that you familiarize yourself with the original ideas for practicing patchwork, to which you can attach your children and relatives.
 Patchwork - a chance for business development
Having learned to build harmonious relationships with your potential and real customers, it will be easy to promote your business, eventually from a needlework corner, create a workshop and even an atelier.
Patchwork as a business has a number of advantagesTo do this, you do not have to allocate the amounts that will be spent monthly on:
- Direct costs (with purchase price).
- Taxes and wages.
- Fixed costs per month (room rental).
- Unjustified payments and expenses.
- Investment costs (for the acquisition of the necessary funds).
 Patchwork Starter Kit
With shreds, threads and needles available, build the basis for a profitable business with your own hands. This will help thoughtful strategies, the proposed action plan in the table.
Features of textile crafts: with your own hands it is proposed to make everything for interior styling
It is necessary to choose the simplest technique, then patchwork for beginners will not seem so complicated that it is used in the manufacture of quilted products - potholders, blankets and bedspreads.


Patchwork products are most often repetitive prints. These can be curly blocks or separate simple elements (stripes, squares, triangles, polygonal shapes from the mosaic category). Repeating prints are made up of certain parts that are pre-cut.
Special dimensional accuracy is observed so as not to disturb the harmony of the created motive. By cutting the components (flaps), this procedure will take more time, in comparison with subsequent operations - assembly and sewing.

Therefore, before proceeding with the assembly of the ornament: it is necessary to accurately cut; strictly adhere to the parameters for each block; carefully and manually control the accuracy of dimensions (up to 1 mm) in order to avoid distortion in the assembled web.
Important!
Quick work in cutting "by eye" is not appropriate!
Thoughtlessness and haste will only lead to the fact that individual fragments and blocks cannot be combined, and the fabric will only be cut in vain.
What are quilting patterns for?
If you start the patchwork technique and you need to create colored or textured blocks, then for this you will need to prepare a special template that will help you cut out small details faster. It is from small elements with certain sizes and configurations that blocks are formed.
 Patchwork template - an indispensable tool
The template is prepared for the part, taking into account seam allowances. If you have not purchased a special ruler for patchwork, then you will have to use a template, and for seam allowance, one size is usually set from 5 to 7 mm. The template for working with patterns is convenient from cardboard or plastic.

In the West, for professional quilters, who in their craft cover not only simple patchwork and patchwork, but also quilting, they sell specially made templates. To develop your own business, hobby, use quilting.

 Incredibly beautiful quilting
This technique combines patchwork with appliqué and embroidery. It is recommended to use it when styling decorative elements of the interior - panels, appliqués, ribbon embroidery.
Quilting or patchwork - for making home textiles and styling interior items
Representing a patchwork mosaic of textiles, quilling and patchwork techniques differ significantly from each other. Stitching through two fabrics of textile and getting a quilted base, the quilting technique in the middle of sewing has cotton wool or batting. To do this, you need a sewing machine and, unlike patchwork, quilting allows you to create original quilted and voluminous patterns on textiles.
 You can't do without a sewing machine in quilting
It looks very impressive, and based on this technique, it is proposed to make: blankets, pillows, holiday lunch mats, textile bags, blocks for storing things or children's toys, household containers for storing things from the wardrobe or accessories.
For these two techniques, upgrading old and worn denim items is ideal. In the house there are a dozen out-of-fashion models of jeans, jackets, skirts, sundresses. Sometimes it’s a pity to throw away and don’t know where to use old jeans? But it is ideal for tailoring fashion items in the boho style.

Exquisite bohemian style combined with a free hippie will help:
- cut beautifully decorated vests and skirts;
- create spectacular textile bags with patterned stitching using quilting and “crazy” techniques;
- as an additional decor, in combination with a denim base, use fur, lace, embroidery, which are appropriate in ethnic style, country.
If it is in an interior that is characterized by geometric prints, ethnic patterns, a variety of colors, spectacular ornaments, modern materials, then use patchwork upholstery for soft chairs, styling ottomans, couches. Patchwork for home
Patchwork pillow
Methods of patchwork in home needlework.
The simple needlework of our grandmothers from the remaining shreds of fabrics has now turned into a whole section of folk arts and crafts called patchwork. Various techniques for connecting multi-colored, diverse or regular-shaped pieces allow you to create unusually beautiful and extraordinary products. Very often patchwork is used for interior decoration.
Patchwork for beginners: different techniques
The first steps in mastering patchwork should begin with the simplest techniques:
- Traditional. The basis is a fabric canvas, on which sewn shreds are superimposed from the wrong side. The pattern, folded from pieces, is the front side of the product. Most often, potholders and thin blankets are made in this way.

 Bedspread decorated with shreds
 - Quick squares. The easiest way. Prepared multi-colored square shreds are folded into a specific pattern. It all depends on the imagination of the needlewoman.

 A very easy way to patchwork for students
 - Stripe to stripe. Variegated cuts from the strips are connected in different ways: in spiral or zigzag forms, in horizontal or vertical directions

 Soft handmade pillow
 - Magic triangles. Taking the first steps in the work, it is better to use isosceles triangles. It is very easy to build any pattern out of them.
 Triangular Patch Blanket
 Bargello technique in patchwork: patterns for beginners

 schematic drawing
 We prepare 6 cuts of different colors, selected length and width (depending on the desired size of the finished canvas)
  Cuts are distributed by tones
 We sew the strips first in pairs from the wrong side, then into one whole canvas
 Trim uneven edges
 Sew together: the first and last strip
 Cut off even strips of bargello
  We fold the strips according to the scheme, then we sew. We unpick the extra seams on the typesetting strips. We make the edging of the finished product with a ribbon
 If everything is done correctly, we get a beautiful blanket or cape
 Patchwork technique in patchwork: patterns for beginners

 Example 1
 Example 2
 Example 3
 Example 4
 Example 5
 Example 6
 Patchwork Pizza Technique: Patterns for Beginners
- A very convenient option, as it does not require any specific scheme.
- Made from pieces of fabric of any size
- On a piece of fabric, the selected size of the finished product, put shreds. The drawing is completely arbitrary
- Put a layer of organza on top
- ironing
- Putting another piece of scraps
- Cover again with organza
- We stitch the entire pattern on a typewriter
 Quilted patchwork option
 Crazy technique in patchwork from jeans: patterns for beginners
- An ideal opportunity to create original products from worn-out old jeans.
- Since this technique involves the use of various shapes of figures, decoration with buttons, beads, rhinestones, ribbons, lace and other unpredictable elements, labels, pockets, ready-made stitched seams that are present on old jeans will be used.
- The absence of requirements for any plan or plot allows you to create very unpredictable and useful products.
 We decorate the interior with the help of patchwork craftsmanship
 We make handbags from shabby canvas pants
 In the course are: frayed edges, pockets, stitched locks and other decorative elements of old jeans
 Boro technique in patchwork: patterns for beginners
- Ethnic fashion in the boro style is a prominent representative of Japanese arts and crafts.
- This technique implies imitating darning with scraps of rags and patches.
- The work is very laborious, since each patch is sewn by hand
- Any product made using this technique is very unique and decorative.
- Even a beginner needlewoman can turn an ordinary, boring bag into an exclusive wardrobe item.

 Cut rectangles of various shapes are placed on the front side of the bag.
 We sew each figure by hand
  An effective product is ready
 Lyapochikh technique in patchwork: patterns for beginners
The most common type of technology. Even our ancestors made carpets using this technology. Thin knitted stripes are sewn onto the base. The more varied the color scheme, the more interesting the product is.

 Decorative pillow in the style of a frog
  Traditional patchwork rug
 Beautiful patchwork of clothes: schemes, photos
- Creating patchwork clothes takes a lot of time and patience.
- You can make from pieces: outerwear, a dress, a blouse, and even boots and slippers
- Choose pieces that are approximately the same size
- With the maximum variety of colors, there should always be one dominant color.
- You can use shreds from old clothes, leftovers from new fabric

 Patchwork warm jacket
 Product formation scheme
  Jeans fantasies
 Harmonious patchwork outfit
 Another type of outfit using patchwork technique
 Boyarka from pieces of fabric
 Cozy house slippers decorated with patches
 Beautiful patchwork for children: diagrams, photos

 Pattern: chicken on a walk
 Finished bedspread made according to the template
 Schematic: creative chick under an umbrella
 Children's blanket according to the proposed scheme
 Patchwork girl's handbag
 Baby bib decorated with appliqué pieces of fabric
  Beautiful pano in patchwork technique
 Pillows for a children's room using a patchwork technique
 Beautiful patchwork of potholders
- A practical thing that does not require large expenditures when done in the patchwork style, it can serve as a wonderful gift for a close friend and relatives.
- Potholders can be made in different shapes and sizes, which makes it very easy for those who are new to the patchwork type of needlework.

 Diagram of a cat for kitchen utensils made from scraps of fabric
 Ready potholders with a cat
 Mitten variant
  Cheerful owls in the kitchen interior
 Patchwork leaves on kitchen tacks
  Bright Christmas trees for the hostess in patchwork style
  Another option for tacks made from pieces of fabric in the form of leaflets
 Video: Tack from scraps of fabric
Beautiful patchwork bags
One of the options for patchwork needlework bags is discussed above.
You can apply this type of folk art for any kind of bags.

 Exclusive DIY bag
 Beautiful patchwork decoration
 Gentle creative pattern in patchwork technique
 Stages of making an unusual wardrobe detail
 Patchwork beautiful sewing from socks
Patchwork techniques are very often used to patch holes in socks. But sometimes socks are used for the unique manufacture of homemade products.

 Birdie from end-of-life socks
  Fancy sock dragons
 Funny owls from leaky socks
 Patchwork from strips of fabric
Consider this technique in the following example.
- From a fabric cut 1.5 m long, we cut out two stripes of yellow coloring and the same number of stripes with blue flowers

 Preparatory phase 1
 - We cut using a ruler with an angle of 60 degrees or an ordinary one with a marking of an angle of 30 degrees
- We put a clean sheet of drawing paper on the cut cuts
- Aligning the bottom ends
 Preparatory stage step 2
 - Cut the top of the sheet to fit the width of the strip
- To the point of z0 degree markings on the ruler, we apply the side of the edge of the paper
- We bevel the top of the triangle a little, leaving allowances for the seams

 Preparatory phase 3
 - We draw a line along the intended line, cut off the resulting triangle
- Using adhesive tape, we attach the ruler, as shown in the figure.
 Preparatory phase 4
 Getting to the main work
- Stripes of the same color are folded inside out
- Cut off the first triangular piece
- We got two identical triangular shapes, from which in the future we will create a beautiful napkin
- Cut out the triangles for the rug in a similar way.

 Stage 1
 - Next, with the inverted side of the ruler, we measure the corner from the opposite side of the curb
- We cut along the measured line - two more details for the napkin
- Change the position of the ruler again, cut off the triangles for the track
- As a result, it is necessary to prepare two corners on one side of the strip for the rug and two on the other, for the napkin
- In a similar way, we do all the manipulations from the other edge of the strip, but in a mirror image
- We receive finished products
- Next, you can make a liner from synthetic winterizer and edging with a ribbon

 The final stage
 Patchwork knitted rug
- The best option for making knitted patchwork rugs is using the Lyapochikh technique discussed above.
- You can complicate the pattern by sewing on pieces of knitwear in the form of beaks.
Patchwork: magic triangles technique, napkins
 We decorate napkins with magic triangles
 - One of the most popular techniques in patchwork
- The use of triangles is very convenient for creating various patterns and ornaments.
- Very easy to work with isosceles triangles
- The creative process is simple: the triangles are sewn together with a short side - a pattern of long multi-colored stripes is formed, with a length - square drawings are obtained.
Patchwork from squares

 Cozy square pillow
 The affordable square patchwork technique is the best solution for beginners because it is simple and easy. To create such a pattern, you can use the bargelo technique above.
Patchwork products: photo

Video: Patchwork for beginners. Technique "well"


