A set of kanzashi hairpins for beloved daughters. Kanzashi for beginners, step by step photo lesson, elegant hairpin for girls Kanzashi on T-shirts for girls
DIY ribbon hairpins with photo workshopsDIY ribbon hairpins with photo workshops
Recently, it has become popular to make hairpins from ribbons with your own hands, as well as elastic bands and braid pigtails with ribbons. In such needlework, the kanzashi tsumami technique from satin ribbons helps. Our master class, as well as video tutorials, will be devoted to creating kanzashi tsumami hair ornaments. 


We make a hairpin from ribbons
We will start our master class by creating kanzashi hairpins for beginners. To do this, we need such accessories, namely:
- cuts of satin ribbons, you can also rep ribbons, orange and white;
- decorative material in the form of a rosette and a black bead;
- scissors;
- textile glue;
- fire candles or lighters;
- simple hairpin.
The scheme for creating a hairpin is simple. Take the ribbons and put markings on them with a simple pencil, 5 by 5 in size, in the amount of 16 pieces. We do this procedure with a white ribbon. Cut everything into squares and pour fire over candles or lighters so that the threads do not spread, and you could make kanzashi tsumami. Look at the photo, here's what you should get. 

For such a hairpin, we will make pointed petals. This technique is very common and on video, on the Internet, you can easily find it.
Pointed double petal, make it orange, inside it will be white. Take the orange square and bend it diagonally, then one more time and fire over the corner. Fold the white blank also diagonally, only three times. Look at the photo to see what happens. 

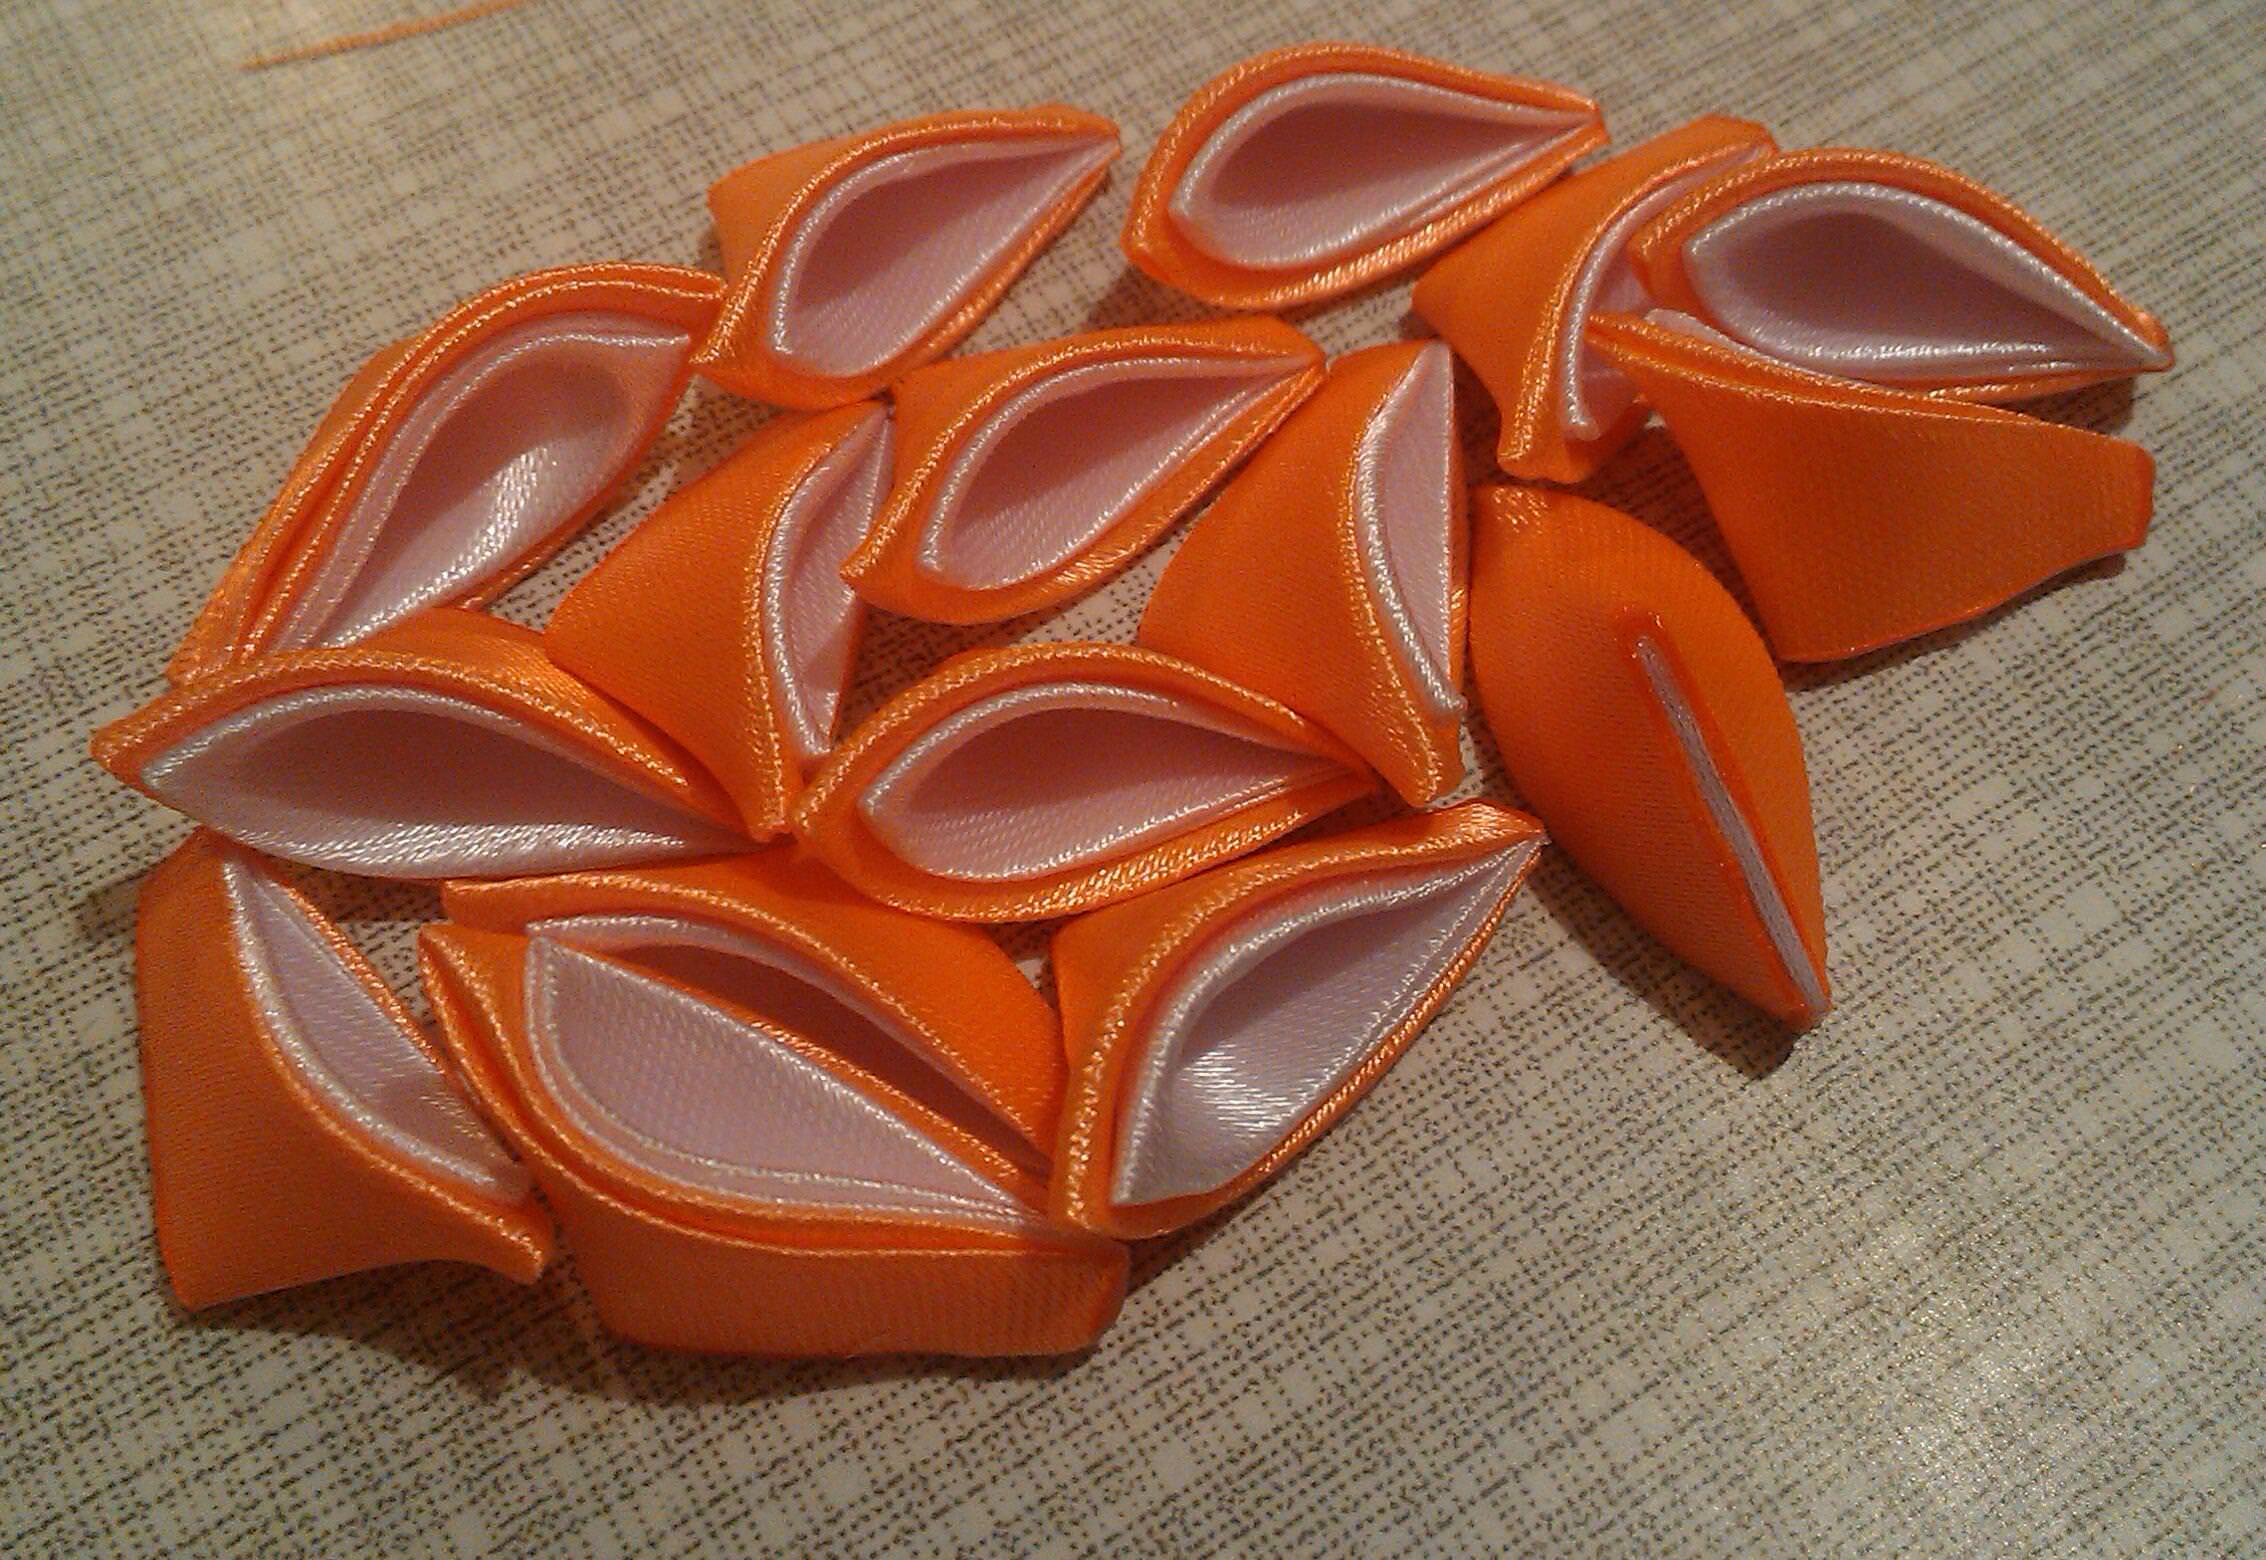
Attach the white blank to the orange one and make a petal. Remove the end and excess material and scorch with a flame. We should have 16 such elements.
To decorate the hairpin, we need a few more pieces of simple single-layer blanks. Do from a piece of tape, exactly the same actions that we did above in the text. 
Simple pointed petals are made in the same way as two-layer ones. Let's not repeat ourselves so as not to waste time. Such a process can be seen in the video or photo in the text. 
We need twelve pieces of such blanks.
Our master class continues, and we begin to make with our own hands, the main part of the hair clip. We cut out a circle with a diameter of 3.5 cm from thick cardboard and stick a tape on it. In the end, it should form, such an element. 
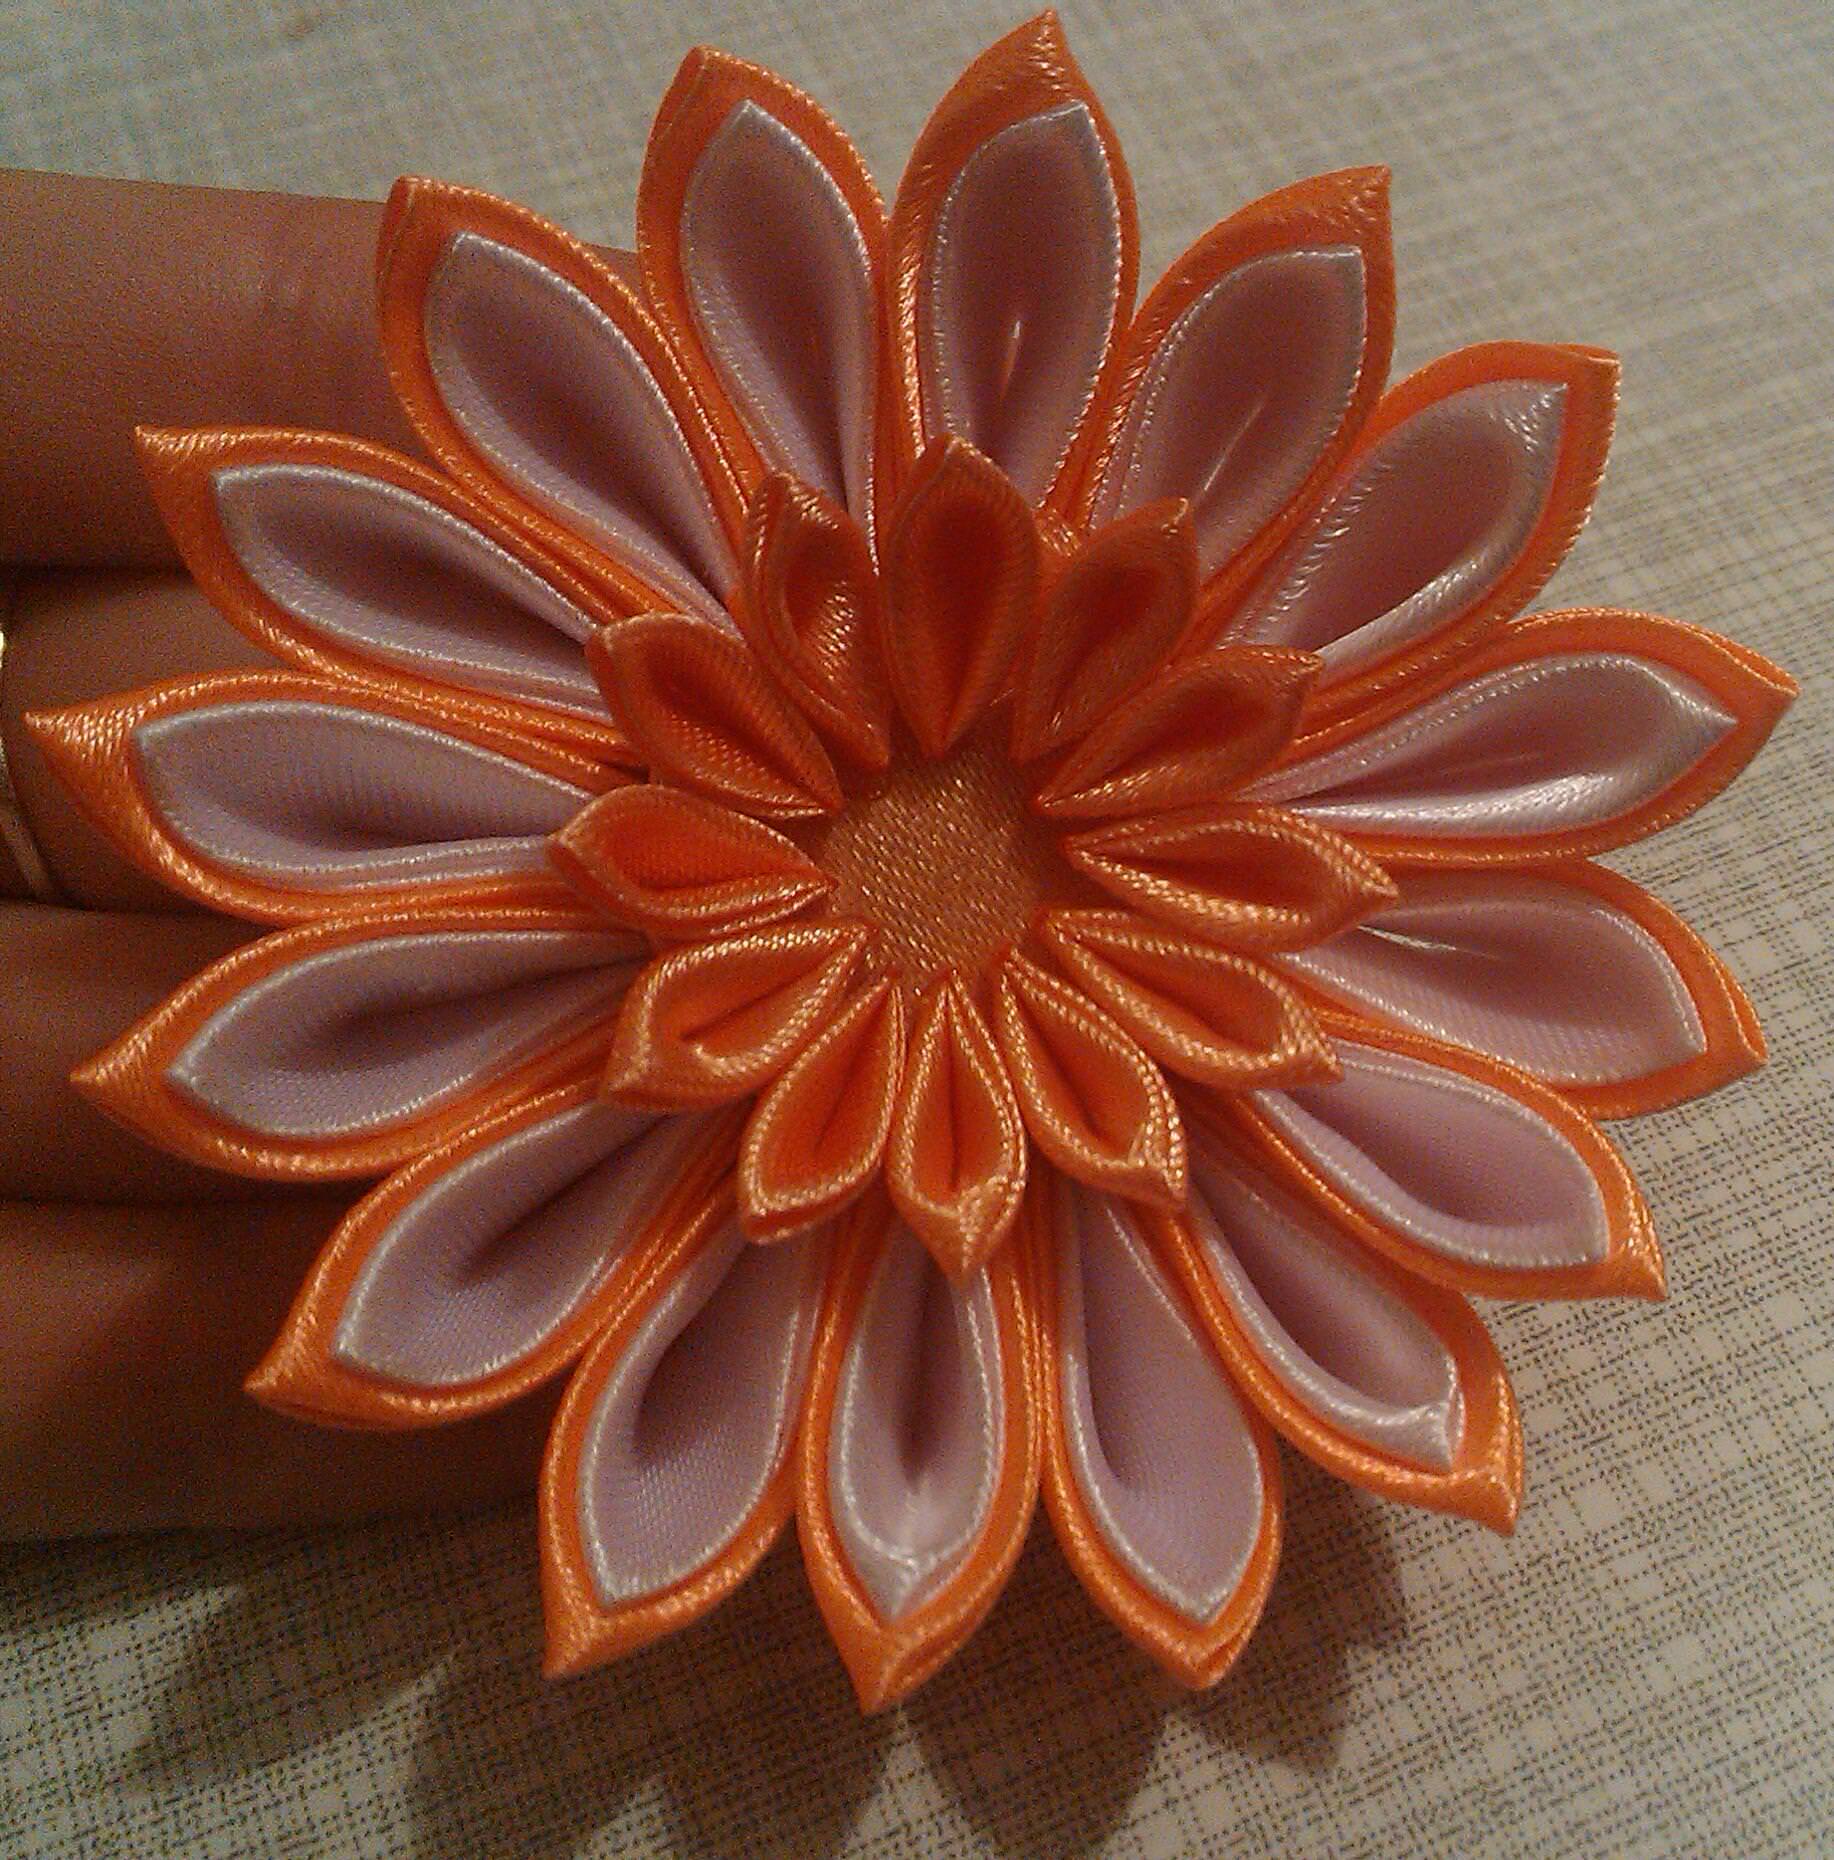
Now let's move on to connecting all the elements together. Take double pointed petals, and after smearing them with glue, we attach them to the round base. We do it in a circle. Do this technology, clearly along the edge, attaching tightly all the petals. This should be the first tier of the flower, as shown in the photo. 


Next, you need to cut out another circle with a diameter of 2.5 cm and also paste over with satin. Then, in a circle, glue simple petals. In the end, you should have such a do-it-yourself tsumami kanzashi blank. 


This small flower must be smeared with glue from the wrong side and carefully glued to a large bud. 
Our master class is coming to an end, it remains only to decorate the flower. For this, we need a socket with a black bead. 
Drop a drop of glue on the rosette, and then on the bead, paste this decoration into the center of the flower and press it with your finger. Look what a kanzashi tsumami we got. 
Now take a simple hairpin, crab or elastic bands, on which we will attach a flower.
We apply glue on a hairpin or crab, and press the flower to it, holding it a little with our fingers, for complete solidification. 


On the finished accessory, spray a little hairspray.
This master class for beginners is fully completed. In the same way, you can decorate hairpins or elastic bands. We hope that our video tutorials will be useful for you, and you will be able to create new hair jewelry with your own hands.
Kanzashi hair band
Such an interesting master class will be devoted to creating elastic bands using the kanzashi tsumami technique for hair. For this, we will need the following materials:
- narrow blue and blue ribbon. For use, it is better to take satin ribbons, but you can make an elastic band from rep ribbons;
- scissors;
- candle or lighter;
- textile glue;
- piece of satin fabric;
- rhinestones;
- regular gum or crab.
These rubber bands are for, we will make two-color ones. To do this, take the blue and blue ribbons. One is two meters long and the other is one meter long. Blue material, cut into cuts of eight centimeters, and blue material, into cuts of seven centimeters. 

Fold each flap in half so that you get an overlap and pour over with fire. 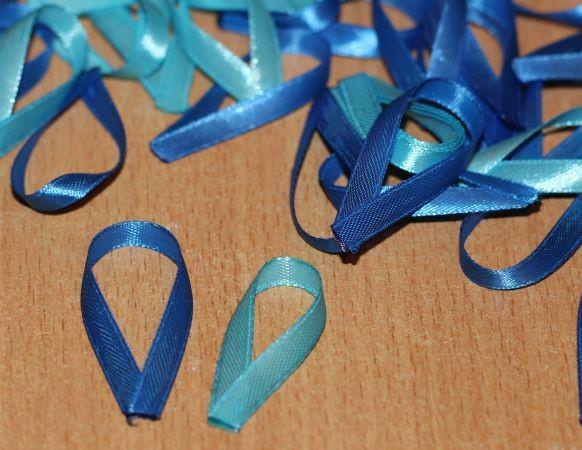
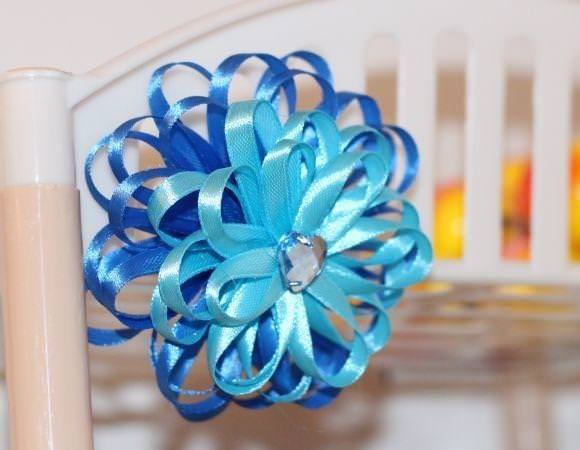
From a piece of cloth, it is necessary to cut a circle with a diameter of 2.5 cm and douse it with fire. Then, we begin to glue the blanks, symmetrically to each other. 


From the first to the third tier, the color of the petal will be blue. The next two tiers, you need to create a blue tint. Trim the topmost elements to make them shorter. 
In the middle of our kanzashi tsumami flower, which we made completely with our own hands, we glue a beautiful rhinestone, shaped like a heart. 
From the wrong side, we attach a simple elastic band for or a crab bought in a store for little money. Before that, make a small mount for her. 
Our simple master class on creating an elastic band is completed. We hope that these lessons for beginners on the kanzashi technique impressed you. The same method is used when decorating hairpins. A detailed video can be viewed on our portal.
Master class for weaving a ribbon into a braid
Since ancient times, shiny and beautiful hair has been counted as a sign of beauty in women. A braid with a ribbon was considered a symbol of chastity and wisdom. If your hair is well-groomed and shiny, then you are a wonderful hostess.
Nowadays, braids with ribbons have not lost their uniqueness. On the contrary, they have acquired many admirers. How to weave a ribbon into a braid, every representative of the weaker sex asks herself a question when she is going for a holiday or just to work.
Our lessons will help you master the art of weaving braids with ribbons.
Braids woven with satin ribbons make a woman more mysterious and tender. Especially interesting, the tape looks on dark and long hair. If you don’t have a suitable ribbon at hand, you can create a thread with beads with your own hands. Such an accessory will turn a simple hairstyle into an evening option. 
Prepare all the necessary materials to create a beautiful hairstyle, such as:
- crest;
- satin ribbon;
- crab and hairpins;
- decorative hair material, such as kanzashi tsumami flower.
You can insert the ribbon into a simple pigtail. If you want to create a bow at the end, then take a material that is longer. So, let's start our lessons:
- comb your hair well and make a ponytail with an elastic band;
- tie a ribbon on the elastic to hide it under you. The resulting edges of the tape should be the same length;
- divide your hair into three buns, and connect the outer strand with a ribbon. Then, weave a pigtail, as always;
- at the end of such work, tie an elastic band, and make a bow on top of it.
A hair style like a braid with a ribbon can be braided not only on the back of the head, but also on the sides or on the crown. If you have very long hair, braid around your head and secure it with a hairpin.
Now, let's do a French braid for beginners, also embellished with ribbons. Let's start the lessons:
- comb your hair and make an even parting. Braid the braid from one side, and then from the other;
- make three bunches of hair on top, grabbing auxiliary strands from the face and begin to weave a French pigtail. When your weave reaches the neck, secure it with bobby pins. On the other side, do exactly the same actions;
- connect the braids together and decorate with a ribbon. Then, start weaving a simple braid with a ribbon.
Our wonderful master class is completely finished, with the help of your imagination, you can weave beautiful braids, decorating them with ribbons of your choice. An interesting video on how to weave braids with ribbons can be viewed on our website or on the Internet.
Video: DIY kanzashi hairpin
Comments
related posts:
 DIY hairpins from beads in a master class (photo)
If you liked the charming daisies shown in the photo, then you can make them yourself by studying the detailed photo tutorial. Such daisies are a great gift for a girl, because little princesses love to dress up themselves and decorate their hair. A certain skill in this case will be needed to create beautiful miniature petals, so you will have to practice in advance.
Materials for creating elastic bands with daisies using the kanzashi technique:
- a satin ribbon of three colors 1.2 cm wide (24 pieces of 3 cm per chamomile);
- a piece of yellow felt for the core (one flower requires a strip measuring 20 cm by 1.5 cm);
- green satin ribbon 2.5 cm wide (6 pieces 10 cm long per elastic band);
- green brocade 2 cm wide (3 pieces 10 cm long per elastic band);
- circles of felt with a diameter of 2 cm for the base of the flowers;
- circles of felt with a diameter of 5.5 cm for the general flower arrangement;
- circles of felt with a diameter of 4 cm for attaching an elastic band;
- scissors;
- glue gun;
- lighter;
- cautery on wood;
- decorative ladybugs;
- hair bands.
Stages of making flowers in the form of daisies
1. To make the petals, take the prepared cuts and round one side with scissors. Run a lighter several times along the cut to singe the protruding threads and make the edge slightly concave. Glue the ends at the base.

2. Turn the workpiece with the back side towards you, the outer edge should be directed towards you.

3. Glue a layer of 12 petals, slightly overlapping the parts on top of each other.

4. Petals can initially be attached to a felt circle or later attached to this part to hide the junction.

5. Collect another layer of the same color. Attach to the previous flower, but move the details relative to the previous layer.

6. One chamomile bouquet will consist of flowers of three shades. Prepare the white component in a manner similar to the previous one.

7. And also prepare a blue two-layer flower.

8. Cut a long piece of yellow felt into a fringe.

9. Twist the fringe into a bundle to get the core for the flower.

10. Cut the prepared green ribbon obliquely. Fold two pieces right side inward. Run along the edge of the tape with a wood burner to get an elongated sheet with a fold in the center.

11. Do the same with pieces of green brocade.

12. Glue a yellow heart in the center of each chamomile.

13. Glue the flowers together.

14. Attach one common felt circle to make a single composition.

15. Leaves should be attached to a bouquet of three daisies.

16. Attach the green brocade pieces to the felt circle.

17. Add green leaves, distributing them evenly around the circumference.

18. Prepare a construction from an elastic band and a felt circle, fixing them with a felt rectangle.

19. Glue the elastic to the base of the flowers. Glue a decorative ladybug onto one chamomile.

20. If the task is to make a hairpin on a clip, then the elastic band can be replaced. The clip is also fastened with felt.

Thus, we got an original decoration that can be used as a brooch or glued to a hoop, hair band, belt, bag.


Hello friends!
For a long time, my hobby was also a source of income for me, almost all of my jewelry found their owners.
Unfortunately, I did not manage to photograph all my works, but despite this, I still accumulated a large baggage of photographs, which I will share today.
I would like to say right away that over the years of work, the quality of photographs has also constantly changed, so please do not be surprised by different photographs)
Perhaps I'll start with one of my very first works, I photographed it on 11.03. 2012 already more than 6 years ago it turns out.
Initially, I planned to make jewelry only for myself and my daughter, but unexpectedly for me, orders immediately poured in. Although I didn’t have any experience and skill at that time, I now look at my first works with a smirk, because they were crooked and oblique and did not last long. However, thanks to the commissions, my experience and enthusiasm began to grow, and as a result, I began to make jewelry for sale, and they sold like hot cakes.
Of course, the first photos, like the first works, left much to be desired, but gradually the quality grew with experience, but I want to say that the growth has not stopped yet and I am constantly trying to improve my knowledge and skills, only now I am developing not in one narrow direction, but in different ones.
And this is already a relatively new work, although it is also about 2 years old, but compared to the first one there is a significant difference in everything.

It is quite easy to make such a flower again when you have experience, but beginners can do it too, the only thing is it will take more time.
How to do:
For such a lush flower, you will need a ribbon 0.9 cm wide, I can’t say for sure I didn’t calculate the footage.
Just cut a lot, a lot of segments of 4.5 cm.

Approximate quantity is more than 100 pieces. I didn’t count the exact number either, because I did it until the moment when there were no large gaps left and it would be similar in the arrangement of the petals to a real flower. But it doesn't work the same here.
The size of the flower and the number of petals will also depend on the diameter of the base on which the petals will be glued.
For the base, I usually take a circle of felt, the diameter, as I said, can be different. I have a diameter of 2.5 cm.
To make a petal, the tape is bent in half and the angle is cut at an angle.

Then the corner is sealed with fire.

The lower edges of the tape are bent and singeed.

And the finished petal, or rather the petals, are glued with glue the “crystal” moment to the felt base in a circle. The first circle of petals is glued onto the base 3-4 mm, then the subsequent circles of petals are superimposed, as it were, in a checkerboard pattern, layer by layer, to the very end.

Such chic flowers are obtained from these petals.

back side

A similar flower idea with only rounded petals.

And you can also do it with a contrasting center or with a smooth transition to another color, in general, you have an idea for experimentation.

By the same principle, you can make petals from a tape 2.5 cm wide.

Such flowers are also very similar in terms of the assembly principle, only the tips of the petals here are not soldered together, but are scorched by fire and twisted a little with your fingers.

I used to make the same flowers from a 5 cm wide ribbon.

Although the principle of creation is similar for everyone, the flowers still turn out to be all different.

And so the flower looks on the hair


Lush flower with sharp petals.

And these petals are probably the simplest, the segment of the ribbon simply folds in half, the length of the segment can be different depending on what size and splendor the flower is needed. The width of the tape is 0.5 cm. The length is from 6 to 10 cm, but it can be more or less. Mine was 9 cm.

Kanzashi from a ribbon 2.5 cm wide.
How to make simple ribbon flowers.
Another very easy way to make flowers is with 2.5 cm wide ribbon.
This method is a great option for beginners, I showed it to my daughter, she is sitting now and making such flowers)
How to do:
For one petal you will need a square of tape 2.5 * 2.5 cm.

For a flower in 2 layers, you need 10 petals.

The petal folds in half

And the corners are cut off

lighter burns everything evenly

Petals are collected on a thread of 5 pieces.


The thread is pulled together and closed into a ring.

One layer sticks to another

The middle is decorated as desired, I made this one for a set with Mickey's bows.

The flower was attached to the hairpin with a piece of tape smeared with Moment Crystal glue.


Also from such simple petals you can make such beautiful poppies.


Or rosehip flowers

Or snowdrops

Simple and multi-layered kanzashi.
Kanzashi with sharp, round and other types of petals.
Now let's move on to the part that, in my opinion, is a little more difficult to manufacture. Even the simplest single petals must be made very carefully, they must be the same, and this requires a certain skill.
If in lush flowers it is allowed that the petals are not perfectly even, but somewhere even with a different bend, then here you need to try so that all the petals are one to one. And this, unfortunately, does not always work.
Detailed master class
I have already described, I will not repeat, see the previous article.
And here are some ideas for inspiration


From sharp petals you can make not only flowers, but also such funny butterflies
Round kanzashi petals master class
How to do:
To make such a petal, you need a square of tape.
You can make both large and small petals.
I have a square 5 * 5 cm, but 4 * 4 or 2.5 * 2.5 is also possible.
It all depends on the idea of what you want to do.
I often combine both large and small petals in one flower, and also combine with other types of petals.
Below you can see it in the finished works.
In the meantime, back to the round petal.

I usually always singe the edges of the tape to make it easier to work with the tape. Then I fold the square into a triangle.

The next step is to bend 2 corners on both sides to the bottom third.

Then the edge of the corners is cut off and soldered with fire.

From the bottom, the excess is also cut off and soldered.

We slightly straighten the middle with our fingers and all our petal is ready.

Such interesting flowers are obtained using round petals and not only ...


Kanzashi fan petals step by step
Another type of petals I call fan, perhaps it has a different name. My performance technique is different from what I have seen on the Internet now. It’s just that when I started doing this, there were few master classes and I didn’t find such a petal, so I learned to do it myself, mainly from photos of finished works.
So now I am sharing my way.
how to do:
For such a petal, a square is also needed. I have 5*5 cm.
I burn the edges with a lighter.

Fold into a triangle

Then one corner is bent and thus the first fold is laid

We bend the resulting fold back and fold it forward again, so the second and subsequent folds are laid.
In general, you should get 4 folds.

The ends are cut and scorched.


But most often I make decorations by combining different types of petals together.


And finally, a couple of ideas for bombing bows, they look just fire in hairstyles !!!


When I started writing this article, I thought all my work and all my ideas would fit in one article, but I was wrong!
I did a titanic job to put it all together, but there is still a lot of work left that, as it turned out, could not be placed in one article.
But on the other hand, this is an occasion to write a new one and probably not even one.
For example, I plan to write an article about beautiful ribbon roses using different techniques.
Don't forget to bookmark the article so you can come back to ideas again.
And that's all I have for now!
Join our group in contact, so as not to miss new master classes
You may have seen the delightful hair and clothing decorations made from silk flowers more than once. This beauty has a name - KANSASHI TSUMAMI.
Hairpins and combs are traditionally used in Japanese hairstyles, but nowadays Kanzashi jewelry has gained its popularity far beyond the borders of Japan. The so-called "kanzashki" now serve not only as an ornament for hair, they are used to make brooches, used as interior decor, etc.


Kanzashi candlesticks

Box in Kanzashi technique
If you figure out how to do Kanzashi, it becomes clear that this is not at all difficult.
Materials and tools
In order to make products using the Kanzashi technique, you will need the following materials and fixtures:
You can cut fabric or ribbons with scissors, as well as with a soldering iron. To do this, you need a surface on which we will cut. It may be an old unnecessary kitchen board, but I preferred the usual wall tile (remained after the repair), its soldering iron does not burn through and it is easier to clean. Some petals can be burned with a candle or a lighter.
Glue is better to use thick and transparent, so that after drying it does not leave marks. I opted for "Moment-gel": transparent, does not flow, glues well.
Many advise using tweezers when folding the petals.
I use tweezers when I fire the fabric over the candle.
- satin ribbons of any size, optimally 5 cm and 2.5 cm, but you can take any fabric: silk, satin, organza, etc.
- ruler
- pencil or chalk for marking even squares
- scissors (any, most importantly - sharp)
- lighter and candle or soldering iron (if you know how to use it)
- glue "Moment-gel" or glue (hot) gun
- tweezers (preferably long)
- long and not thick needle
- strong thread (such as monofilament)
- beads, sequins and any beautiful trifle
I think over time you will decide for yourself how and with what it is more convenient for you to work.
Types of Kanzashi petals
The Kanzashi technique is as follows: many small even squares of fabric are folded in a certain way and gathered into a flower. The petals themselves are sewn together or glued together.
No matter how strange it may sound, but there are only 2 types of kanzashi petals: round and narrow, and the rest is room for your imagination.
Using the example of such a flower, we will learn how to fold narrow and round petals:

Narrow kanzashi petal - master class
We use the same materials and tools as listed above.

We cut with a soldering iron or scissors even squares. I have a satin ribbon 5 cm wide, which means the squares are 5 by 5 cm. Their number depends on the size of the flower that you will collect. There are 7 yellow and 5 green.

Very often it is advised to fold the leaves with tweezers. To be honest, I feel more comfortable with my fingers, but who likes it better.
We fold into such an even triangle. The fold itself is on top.

We apply the right corner of the triangle to the left.

And fold it again, from right to left. Align the fold points.

We cut the ends of the fabric evenly:

And we burn a little over the candle, fastening the edges at the same time. This is done as follows: holding the edges with tweezers, quickly draw a petal over the flame.

It is better to burn at the very bottom of the fire, then the fabric will melt, and not burn.
The bottom edges are also cut off and melted. Here you can not glue them together, but simply melt the fabric so that it does not crumble.

Here's what we got:

Back view
By the same principle, we fold the rest of the green leaves.

For clarity, watch the video tutorial on narrow Kanzashi petals:
Front view
Round kanzashi petal - master class
Fold the yellow square into a triangle.

And now we collect the side edges in the middle, to the bottom corner. Folds are obtained from the top, on the sides.

We take the side corners back, check that the edges are evenly folded.

We also cut off the ends and melt them.

The bottom edge is also cut off evenly and melted.

Only here the edges must be burned and be sure to glue together.
While the fabric is warm, I simply pinch the edges with my fingers.
Here's what we got. On this side, drip a little glue inside and glue the sheet.

Back view

Front view
Here are the blanks we got. Here you can clearly see where the yellow petals stick together.

In the video master class, you can once again see how round petals are made, and also learn how to collect beautiful hair ties:
How to make kanzashi flowers
Let's start collecting the kanzashi flower. We string yellow petals on a needle and thread. I prefer monofilament because it is not visible.

And we knit in such a flower:

We cut out circles from cardboard and tape, put a cardboard circle on the tape, grease it liberally with glue.

And, turning the edges, glue the fabric to the paper. Let the glue dry a little and smear the surface with glue again.

Then glue the workpiece to the flower on the reverse side.

It is better to use glue here, and not a glue gun. Since our flower is voluminous, it is very difficult to immediately glue it evenly. And while the glue dries, you can correct the leaves to make it even. It is difficult to do this with a glue gun - the glue hardens very quickly and it is quite problematic to peel it back.
Here's what we got:

We apply glue to the tip of the green leaf (here I already use a glue gun)

And we connect it with the second leaf.

We make two double leaves.

We also grease a single leaf with glue and glue it between two already connected leaves.

In the same way, we glue already three leaves to the double.

This is what the thread should look like:

Lubricate the tip of the branch with glue

And glue it between the leaves of the flower.

Glue a bead or rhinestone in the middle of the flower.

With this kanzashi flower, you can decorate a brooch, a hairpin, and an elastic band for hair. And if you dream up a little, then you can create a lot of things from the 2 simplest kanzashi petals!
CategoriesHello dear friends! Recently in kindergarten, my daughter had an autumn matinee. I decided to make her a beautiful hairstyle, and to decorate her hairstyle, I needed small kanzashi hairpins.
Since our holiday was dedicated to autumn, I chose the appropriate colors for the small kanzashi hairpins: orange, yellow, green.
Today I will tell you step by step and show you how to make these for hairstyles. I apologize in advance for the extraneous noise in the video lesson))), this washing machine has just switched to the spin mode))), I try to do several things at once, while my son is sleeping, I need to do a lot, so I have to do several things at once.
Tools and materials that we need today to create small hairpins from ribbons:

- Ribbon of different colors 2.5 cm wide
- Scissors
- Candle
- Felt white
- Click-clack hairpins
- Ruler
- glue gun
- White plastic centers for flowers (you can use white half beads)
- Small rubber bands in case you want to make kanzashi rubber bands.
Small kanzashi hairpins
First of all, as usual, we need to prepare the tape. For the flowers that we will make, we need to cut the ribbon into pieces 6 cm long. For one small kanzashi hairpin, we need 6 of these pieces.

Now we need to make the petals of future flowers cut into ribbons. To do this, fold the tape in the middle so that you get an equilateral triangle.
Of course, it’s difficult to explain this in words, so I took a photo, it will make it clear how to fold the ribbon correctly, and at the end you will definitely find my master class on creating small kanzashi hairpins.

After all the petals for the kanzashi hairpin are ready, we can start assembling the flowers. If you want to make several hairpins at once, like mine, I recommend that you first make all the petals for them, and then just start assembling.
The assembly of this kanzashi flower is very simple, we spread glue on the side of the petal, apply another one to it and glue 6 petals together in this way. I made multi-colored flowers, alternating the petals, it also turns out beautifully.

Now you need to glue the middle to the resulting flower. In order for the middle to hold well on our small kanzashi flower, we cut out a circle from felt that will correspond in diameter to the middle or be slightly smaller than it.
We glue a circle of felt to the middle with hot glue, and then we spread the middle itself and glue it directly to.
Now it remains to glue the flower in the click-clack hairpin itself. Cut out a piece of felt 1 cm wide and 3 cm long and glue it on the tip of the hairpin. We glue the flower itself to this felt base.
Instead of a hairpin, you can use an elastic band, you need to select it in the appropriate size. The flower is small and the rubber is the same.

You can choose the color of the elastic band to match the color of your kanzashi flower, I used a white elastic band to show you and in general I often use white ones, they are universal.
To glue the rubber band, we use the same piece of felt, thread it through the elastic band, apply hot glue and apply it to the flower.
This is how we made small kanzashi hairpins and a small kanzashi elastic band for you, who needs exactly kanzashi on an elastic band.
Small kanzashi hairpins video master class
Now I want to tell you how to make a beautiful "basket" hairstyle with these small kanzashi hairpins. I shot a short video especially for you, because no matter how you show the stages in the photo, nothing better than the video lesson has yet been invented, except for live teaching, of course).
But I still took a photo.
This hairstyle is done on long or medium length hair. I show the sequence of creating a hairstyle on my daughter. If your daughter is still small and restless, then you may not be able to do your hair, because not all small children manage to sit quietly for 15-20 minutes.

First of all, comb your hair well. We divide them into two parts, starting from the middle of the head, we fold the separated part forward onto the forehead.
From about the middle of the head, we take a strand of hair and begin to weave an ordinary braid, picking up the strands only on the right side, weave in a circle, for this the child must sit on a chair, and you walk around him as you weave.

I think that from my video lesson, incomprehensible moments will clear up for you, in fact, it’s not difficult at all, you just need to try it once and you will understand that a hairstyle that seems difficult to perform is not so complicated.
If you want the basket to be larger and the braids to be larger in a circle, then pick up quite a bit of hair on the right side.

When there is no hair left to pick up on the right, we finish a simple pigtail and thread it through the rest of the pigtails, you can fix it with an invisible or rubber band.
I immediately used small kanshazi hairpins, attached them in a circle, and it turned out such a wonderful basket of autumn flowers. And now, to whom something was not clear from the photo, you can watch the video lesson.
how to braid a basket video
God bless you!
With respect and love, Elena Kurbatova.


