Origami box from a rectangular sheet. Origami box with a lid with your own hands. #33 Gift box "Cheerful bunny"
We bring to your attention a simple but interesting master class, which describes in detail how an origami gift box is made. This cute little thing made of paper is very easy to create with your own hands.
Tools and materials Time: 30 minutes Difficulty: 3/10
- scrapbooking paper;
- clerical glue or PVA;
- scissors;
- pencil;
- ruler;
- cutting mat.
This most interesting origami gift box is suitable for the case when you urgently need beautiful packaging, and you have neither the strength nor the desire to run to the store!
On the eve of the New Year holidays, we made a whole bunch of these boxes so that it would be enough to congratulate all relatives, colleagues and friends! However, these boxes can be used all year round and keep whatever you want in them!
Step by step instructions with photo
Let's start creating a beautiful origami gift box for loved ones with our own hands.
Step 1: Cut out the paper
Carefully measure and cut your paper to the correct dimensions.
To make an origami box, you will need 2 square pieces of paper, one of which should be 1.2 cm smaller than the second. Therefore, if you are using standard 30 x 30 cm scrap paper sheets, you need to reduce the second sheet to 28.8 x 28.8 cm. The larger piece of paper forms the lid, and the smaller one forms the bottom.
Step 2: Make the Folds
Place the paper in front of you, pattern side down, and fold it in half. Next, open it up, rotate it 90 degrees, and fold it in half again. Your folds should form a cross.

Step 3: fold the corners
Now fold each corner into the center of the paper square.
Your folded sheet should look like the picture in the top left corner of the photo below.
Step 4: Fold the Edges
- Take your square and fold its bottom edge towards the center.
- Repeat for the other side. Your folded paper should now look like a rectangle.
- Open it, rotate it 90 degrees and repeat. It should now look like the picture below on the right.

Step 5: Shape the Cap
Pick up 2 opposite triangles and turn them flat.
Take the top valve and begin to fold it inside the lid along the formed folds. This is the part where you may need to use some glue. If your triangle's shields don't fit very snugly, apply a thin coat of glue to each of them, press down and let dry.

Rotate the craft 180 degrees and repeat on the other side. As you can see, an origami gift box has already begun to take shape. Left just a little bit!

Step 6: make a bottom
Repeat steps 2-5 for the smaller scrap paper square.
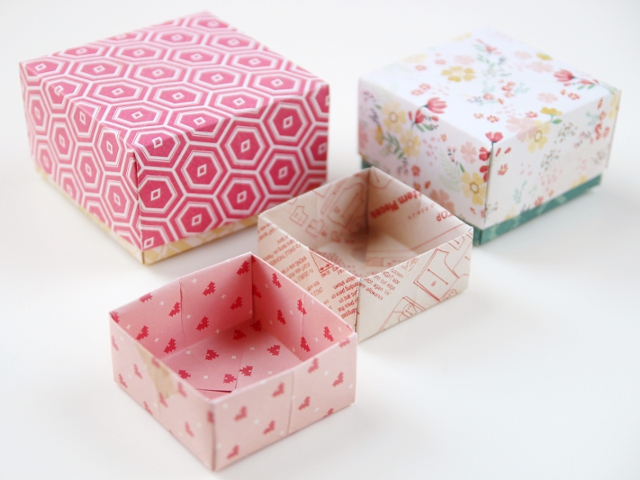
When completed, the larger box should easily fit on top of the smaller bottom.
An origami box is a versatile thing, it can be used in everyday life, for storing small trinkets, as a decorative element, and it is also well suited for a gift. The article contains master classes, in the form of instructions, photos and videos, helping to master the manufacture of this craft.
Step-by-step instruction:

Video: Origami Box Creation Workshop
Box with lid

Stages of work:
- A square sheet of paper is folded in half in two directions.
- All corners are folded to the center.
- Both edges are bent in half.
- The top and bottom corners fold out.
- The sides fold towards the middle.
- Once again, folds are made on the sides.
- Gather long sides.
- The remaining edge is wrapped - the figure is ready.
- According to this scheme, a cover is made.
Tip: it is better to build the model itself and the top to it from contrasting colors - then the craft will look more interesting.
Video: Origami creation options - boxes with a lid
original surprise box
It is a cube in which a face is placed, expressing different emotions.
Video: Workshop on making paper boxes that change faces
Schemes of muzzles for decorating crafts. The image is printed and glued or simply drawn in the desired size.


It is better to make figurines for the collection in various formats and colors, and it will also be interesting to give them human or cartoon features with the help of beads, feathers, straws, sticks, in general, everything that is found in the household.
Schemes for coordinating paper origami boxes


Surely many have experience of self-wrapping gifts. Stored surprises can be wrapped in beautiful paper, put in special paper bags, you can even glue a paper box yourself and decorate it to your liking. We offer another unusual option for needlework lovers. These are packages made using the origami technique. Detailed diagrams will help to cope with these with this figure, even for those who are just taking their first steps in mastering paper art. Let's create cute origami paper boxes of different sizes quickly and easily with our own hands.
We make origami paper boxes with our own hands using different techniques.
We will start with the simplest version of a paper box that you can make yourself. Even someone who previously made only boats and airplanes in their deep childhood can easily cope with it without much difficulty, and even then they have already safely lost this skill. Such caskets can be made even on the way to work in a taxi or during a lunch break.
We need only one square sheet of paper. Because the scheme is very simple and does not require a large number of complex folds; you can take ordinary colored double-sided paper. This option will be even better than special origami paper - our box will turn out to be denser and more suitable for putting something into it.
How to make a simple box:
In principle, all actions are clear according to the scheme, however, just in case, we will explain additional steps.
1) Fold the sheet in half and unfold it back. Rotate 90 degrees and repeat the same.
2) Turn the paper over to the other side. We outline the diagonals of the square.
3) Bend the corners to the center.
4) From the center of the resulting rhombus, we bend the corners of the top layer to the sides and return it back. Expand the upper right and lower left sides of the rhombus.
5) We bend the lower right and upper left sides of the rhombus along the marked parallel lines.
6) Raise the side of the box
7) Raise the second side of the box.
8) Our handmade origami paper boxes are ready! Now you can put sweets or some other small gizmos in it.
We are trying to make a paper box with a lid and in the form of a heart
Making a paper box with a lid follows the same pattern. First you need to make an ordinary box, and then make its lid in the same way. Do not forget that the sheet of paper from which the lid will be made should be slightly larger (about a centimeter) than the sheet for the base. This box looks like a real box and is more suitable for packing a small gift.
For Valentine's Day, a heart-shaped box will be a romantic gift wrapping. There are several ways to make such packaging, including using the origami technique. However, unlike a simple square box, this already requires some skills and perseverance. However, the result will undoubtedly please you and surprise your soul mate.
We make a glued version in the form of a heart with our own hands
If this option seems too complicated, but you still want to make a romantic gift with your own hands, we suggest making a similar paper box not using the origami technique, but simply using a special template.
To make a heart shaped box you will need:- Thick colored double-sided paper
- simple pencil
- Ruler
1) Transfer this diagram to paper in the required scale.
2) Cut out with scissors. Fold over the areas to be glued. If the paper is too thick, you can help yourself with a ruler.

3) Bend the main part of the heart along the lines, helping with a ruler. Fold the figure into one piece. Apply a thin layer of glue to the corresponding protrusions, glue the heart. If you want the box to open, you just need to bend the protrusions inward, and for convenience, glue a small “tongue” on the side of the lid.
Diagram of a box in the shape of a heart No. 2:1) Transfer this diagram to paper in the required scale and cut it out with scissors.
2) It is better to collect the figure from the bottom. After you connect the top, you can see the image of a heart on the box.

With the help of these simple schemes, you can surprise your family and friends with unusual gift wrapping. Or you can put in these boxes all the paper clips that have been lying around on your desk for a long time ... Or put a note with a love confession and then our box will definitely turn into a box with a surprise! For those who care about the environment, it is important to note the environmental friendliness of origami, because no synthetic substances or paints are required for their manufacture. Therefore, you can safely master new and new models.
Video on the topic of the article
In the following videos you can see in detail how to fold paper boxes using the origami technique.
On the eve of the New Year holidays, shop windows are full of gift boxes, decorative bags, wrapping paper for every taste. Smiling sellers helpfully offer to provide services for wrapping New Year's gifts. And all this seems to be great, because you must admit, it is much more pleasant to receive a New Year's trifle in a beautiful package. But on the other hand, the whole meaning of the gift is lost, the very gift that should be intended specifically for you.
The recipient of the gift will be doubly pleased if, in addition to choosing a gift, you spend a little more time wrapping it. In this article, we will teach you how to make gift boxes from paper or cardboard with your own hands. It is not at all difficult to do this, because all the crafts presented with us are accompanied by ready-made schemes, templates and step-by-step master classes. You just have to choose the appropriate box option, print the diagram and glue the paper box according to the instructions. By the way, some of the boxes presented by us are made using the origami technique, which means that you don’t even need glue!
So, before we get started, let's check if everything is ready for you. To make a paper gift box with your own hands, you will need: beautiful wrapping paper (you can get by with plain white paper and then decorate it), scissors, a pencil, a ruler, glue or double-sided tape, a clerical knife. Everything is? Well then, let's get creative!
#1 Box "Herringbone"
A great way to pack a small trifle to friends or relatives is such a themed New Year's box. By the way, it's very easy to do. You will need green paper and punching tongs (although you can do without them). Well, any rhinestones, beads, sequins, in general, to your taste are suitable for decoration!
#2 Gift box "Mint Lollipop"
And here is another original version of a gift box, which is very easy to make with your own hands, especially with our step-by-step master class. You will need red thick paper (for the box itself), as well as white paper for decoration. You can make the upper part of the box with an appliqué or just paint a white sheet with pencils or felt-tip pens. By the way, the top does not have to be a lollipop. You can fantasize about the New Year theme and decorate the box on top, for example, with a snowflake, a Christmas ball, or red M&M's.

#3 Box with lid (diagram)
Well, if there is no time or desire to fiddle with the box for a long time, you can use a simple ready-made template. You need to download, print, cut and glue it. Voila, the box is ready! Please note that we have prepared 2 schemes for you: square (5x5 in size) and rectangular (7x6x4 in size).

#4 Cup with a gift
But the option of gift packaging for those who want to surprise with originality is a gift box-cup. It's pretty easy to do, but it looks amazing! To create you will need thick paper, scissors and glue. And of course our step-by-step instructions!
#5 Christmas box "Cake"
If the New Year's party is planned in a large company, for example, in the circle of a large family, it makes sense to pack gifts for everyone in one large composite box. The cake packaging box consists of 8-10 pieces, each of which is a separate paper gift box.

#6 Gift box with lid for muffins and other little things
On New Year's holidays, edible gifts are quite common: various sweets and pastries. An original gift will be a muffin made by hand in an author's gift box.

#7 Christmas box "Diamond"
You can pack a New Year's gift in a gift box in the shape of a diamond. With our scheme, it will not be difficult to make such an intricate package. It is enough to print the box template, cut and glue it according to the instructions. Everything is simple!

#8 New Year's package "Santa"
A very cute New Year's package will turn out from an ordinary paper bag, decorated with a paper Santa. Download Santa's diagram, cut it out and glue it on the bag. Do-it-yourself Christmas packaging is ready!

#9 Harry Potter boxes
Fans of stories about Harry Potter will come to indescribable delight, having received a piece of their favorite hero as a gift. By the way, such a box with magical sweet beans can be a great addition to a set of books about the adventures of a young wizard.

#10 Box "Gingerbread house"
The well-known symbol of the Christmas and New Year holidays from Hollywood films is the gingerbread man. You can make a box of paper in the form of a gingerbread man's house. By the way, putting the gingerbread men themselves in such a house will be very symbolic, but if you also make them with your own hands, there is no price for such a gift at all! The Gingerbread House box is made according to a special scheme, which you can download below. Also below is a master class on making a box with your own hands.
New Year's time is coming - the time of miracles, when everyone can feel like a little helper ...
#11 Box "Heart of four parts"
A cute package of four boxes can be made using our scheme. Giving your loved one not one, but four New Year's gifts at once is a real manifestation of love. You can download the scheme with four boxes and the basis for them below.

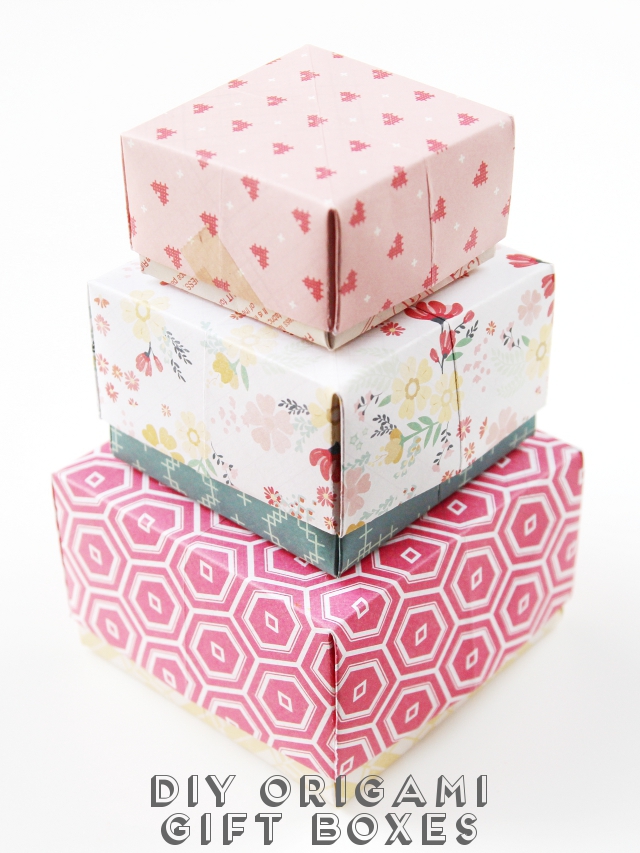
#12 Origami box
To make such a gift box, you will not need a diagram or a template. To make a paper box with a lid, you only need a piece of paper. The main condition is that the sheet must be square. Strictly follow the instructions of the master class and in 10 minutes you will have the cutest handmade origami gift box ready.

#13 And another version of the origami box
Such a box looks very similar to the previous one, but the manufacturing method is slightly different. In the manufacture of this box, you will need scissors, but the scheme is not needed: only a square sheet of paper. Follow the instructions of the master class and you will succeed!

#14 Origami box “Volumetric triangle”
If you want to get confused and ready-made templates are not for you, then be sure to pay attention to this difficult and very effective gift box. You will need paper and patience. Well, then follow the instructions and everything will work out!
If you like to make gift boxes without templates, glue and scissors, but only with the help of the correct paper folds, then you will appreciate this box as well.
#16 Origami resealable box
Well, another version of the origami box. It is quite easy to do, especially if you follow the instructions. By the way, the steps for making the box are described below in the photo instructions.
#17 Box "Cupcake"
The original gift packaging for a gift for the New Year will be a box in the form of a cupcake. It looks very impressive, but the creation will have to work a little. In general, there is nothing complicated in creating this box, all you need is patience and imagination! See the step-by-step master class below.

#18 And another cupcake
And here is another variation on the theme of a gift box in the form of a cupcake. The manufacturing scheme is very similar to the previous one, but you might like it!
#19 Gift box for cookies
A ready-made scheme for making a cardboard box with your own hands. All you need is to use our ready-made scheme, which you need to print, cut out of cardboard, and then glue in accordance with the master class.

#20 Chinese style gift box
In such a box, made with your own hands, you can put anything you want. And most importantly, it is done quickly and easily. You can download the box diagram from the link below.
Download scheme

#21 Gift box in the form of a cup

Really original wrapped gifts are valued much more than gifts in a regular gift bag. Pay special attention to this charming paper box, which you can make yourself using our scheme.
How to make a cup

How to make a lid

#22 Box "New Year sweater"
Here is such a beautiful gift box can be made by hand. To do this, you will need a diagram, which you can download on our website, scissors, glue and a little patience.

#23 Box with bow closure
Pretty simple to make, but very original gift box. You will need a square sheet of wrapping paper, glue, and instructions from the master class. 15 minutes - and your gift box is ready!

It is very easy to make a cardboard box for a New Year's gift, but for this you will need not only cardboard, but also scissors (clerical knife) and glue or double-sided tape (for secure fixation). Below is a step-by-step manufacturing master class, following which you can quickly and easily make a cardboard box with your own hands.

If you want to give a delicious gift in the form of cupcakes or muffins, then the ideal packaging for such a gift would be a paper egg tray. Cut out the desired number of compartments, decorate the top of the box with decorative elements, tie with a ribbon and Voila! The gift is ready!

You may be interested in:
#26 Original box "Package of milk"
Another incredibly cool Christmas box that will amaze anyone. You can pack a simple trifle in such an unusual box. It is quite simple to make it if you use the ready-made scheme, which you can download on our website.

#27 Box with lid
Using our simple scheme, you can easily make a gift box with a paper lid with your own hands in just a few minutes. You can put anything in such a box as a gift: from a cute trinket to handmade sweets. You can download the box diagram below.
#28 Packing box with flower clasp
A simple diagram of a cute packaging box with a flower clasp. Fast, beautiful, original. Surprise your loved ones with a handmade gift. You can download the finished scheme from the link below.

#29 Gift box "Petals"
You can make a wonderful box for a New Year's gift with a lid in the shape of petals with your own hands. In fact, the manufacture of such charms will not only take a lot of time, but will also delight you with its sweetest
#30 Gift box for New Year's cupcake
You can make a very cute cardboard box with your own hands. It will turn out no worse than the store. In the box, you can make a special bottom for the cake. Putting your little delicious gift in a special stand, you don't have to worry that all the cream will remain on the box. To make such a cardboard box with your own hands, you need to print out the template and follow the instructions of the master class.

#31 Gift box for children "Ice cream"
A New Year's gift should be packed not just well, but tastefully. In the gift box "Ice cream" your gift will be appreciated! With our scheme, making a delicious box will only bring pleasure!

#32 Packing box "Candy"
Another option for "tasty" packaging will be a box in the form of a candy. To create a New Year's atmosphere, the packaging can be slightly enlivened by adding eyes and a mouth to it. Download the diagram, print it out and glue the box in the right places.

#33 Gift box "Cheerful bunny"
Dear and close people always want to give a special gift. And best of all, when this gift is not only special, but also in a special package that emphasizes the importance of a particular person. It will not be difficult to make such a paper box with your own hands if you download the diagram from the link below.
Download scheme

#35 Box "Cheerful frog"
Another very cheerful and positive box for New Year's gifts is the "Cheerful Frog". Done quickly, gives a lot of emotions! Download the scheme and please your loved ones with a cheerful New Year's box.

#36 Box with a face
You can also pack a gift in an original way in a box of plain white paper, drawing on it some details in the form of an eye and a mouth, thus, as it were, reviving the gift. With our ready-made scheme, making such a box is not at all difficult. Just download the diagram, print and glue.

#37 Gift box "Birdhouse"
Let's start with perhaps the most unusual paper gift box. Making such a birdhouse is quite simple when there is a ready-made scheme. The scheme must be printed, transferred to suitable paper, cut and glued in certain places. Complex and intricate at first glance do-it-yourself boxes will be ready in 10-15 minutes. 
#38 Box "Apple"
The original will be a gift in a paper box in the form of an apple. With such a box, picking up a gift is quite simple - gelatin worms will come in handy. Making such a box with your own hands with the corresponding scheme is very simple, the manufacturing process will take no more than 10 minutes!

#39 Box "Christmas wreath"
There is no limit to your originality, we only give you direction, and then you create yourself. On the New Year theme, you can come up with a lot of boxes, for example, in the form of a Christmas wreath. Very symbolic!
Well, what is a real New Year without the Nutcracker and music from the famous ballet P.I. Tchaikovsky? An excellent gift would be a bag of nuts with a nutcracker tag attached. You can draw the most fabulous hero yourself, but if you have no inclinations for drawing, you can find the image of the Nutcracker on the Internet and print it out, then cut it out and attach it to the package.

Anyone who has small children knows how difficult it is to get a toddler to clean up scattered toys and keep the children's room in order. It is necessary to teach a child to observe order and accuracy from an early age, so that it becomes a habit. Children will thank you later, because these qualities will help them in the future not to waste time looking for the right things, but to use it for useful activities.
Small organizer box
If there is a student in your family, then you can help him competently organize the desktop space. First you need to sort all the small school supplies. To do this, it is most convenient to use organizers - containers of various shapes and sizes. A variety of organizer boxes for paper clips, buttons and other small stationery is easy to make with a child out of paper. In our master class, it is proposed to create just such a simple craft.
To make an organizer box, we will prepare:
- a sheet of colored paper;
- ruler;
- pencil;
- scissors.

The direct blanks for our box will be 6x6 cm squares. We will need 3 such blanks.

Each of these squares must be folded in a certain way. First, fold the square diagonally.

Then we need to bend the right corner of the resulting triangle to the top.

After that, we do the same with the left corner of the triangle, bending it to the top.

Let's straighten the folds we just made. We have obtained the following type of workpiece.

After that, we bend the top of our triangle down.

If we turn the resulting triangle over, we will see one of the three elements of the future organizer box.

From the remaining two squares, we perform similar modules.

Now we need to connect our elements. To do this, we introduce the side corner of one of them inside the corner of the other element.

It is required to connect our modules to the fold line.

Adding a third module.

Now the resulting construction needs to be closed in a ring. Thus, we got a small box with three walls and a bottom.

It is convenient to put any stationery small things (for example, paper clips) in it.

The master class was prepared by Marina.
Box-basket
In this master class, I will show you how to make a paper box using the origami technique. Such a decorative craft will help to beautifully pack a gift or act as a small box.

Materials for making the box:
- colored or decorative paper,
- scissors,
- glue.

First you need to make a square out of A4 paper (or initially take a square sheet).

Fold the sheet diagonally. Cut off the excess.

Now fold the square piece of paper diagonally, with the corner up. Fold the resulting triangle in half.

Open the right corner and fold.

Flip the shape.

Open and fold the right corner again.

Fold the top right corner down.

Do the same with the upper left corner.

Open up the corners.

Open and fold each corner, as in the photo.

Turn the workpiece over.

Bend the two corners to the center line again.

Open and fold the right and left corners.

Wrap the two right corner layers inside the workpiece.

Now fold the two left layers inward.

Fold the top corner down.

Now fold the corner up.

Fold the corner down again.

Open the corner - you will see two marked lines.

Bend the corner inward along the marked lines - into the pocket.

Now turn the workpiece over and repeat the procedure on this side.

Fold the corner down first.

Now fold the corner up.

And bend it down again.

Fill the resulting part into a pocket.

This is how the end result looks like.

Now holding on to two opposite corners, bend them to the sides. The blank will open and turn into a box.

Flatten all sides of the box well.


