Do-it-yourself pebble wall panel. Panel made of natural material. Don't despair, there is more than one way out! There are a lot of interesting options for using sea pebbles in the interior and in the landscape. Let's discuss some of them
Such works look very original in the interior, they can easily decorate not only an apartment, but also a summer house or a suburban area.
Crafts made from sea stones or pebbles will dilute the routine atmosphere of urban spaces with natural motifs, and will be appropriate even in the office.

craft ideas
The figurines built of stones are used for the design of premises and garden plots, including in various compositions. Works of this kind are harmoniously combined with water and shell products.
Combining with a fountain or aquarium will help you create the effect of some kind of refreshing oasis. Compositions in a marine style can be obtained by adding the appropriate paraphernalia with taste.

Photos of stone crafts found on various resources of the relevant subject will help you get inspired.
All kinds of accessories, jewelry, gifts made of medium-sized pebbles will also become a non-standard, elegant solution.

The most excellent decor in combination with shells will turn out for frames, vases with flowers, chests and caskets.

Also, with the help of glue, door handles, mirrors in the rooms are decorated, stands for various installations are made.

An interesting idea is to decorate bottles with small pebbles in combination with other decorative elements. And if you pour shells and multi-colored pebbles into empty glassware, adding a themed decor, you can get original candlesticks that match the style of the interior.
In addition, from approximately the same size pebbles glued to a wooden board, unusual heat-resistant coasters for food and drinks, trays are obtained.

And if you want to decorate the entrance to the room in an original way, you can take a simple silicone rug and stick flat pebbles on it, getting a stylish porch rug.

If you are really interested in such works, you can master professional skills, which will allow you to create real masterpieces in the future, and even organize master classes in stone crafts yourself.

Types of jobs
You can choose what you like from the most common techniques: mosaics, paintings or stone carvings.
In the mosaic technique, multi-colored pebble rocks are combined, gluing together on a solid basis - this technique allows you to get paintings, panels, rugs and original elements for decorating rooms. In this technique, it would be appropriate to use shells, multi-colored gravel and pebbles.

For painting you will need acrylic paints or enamels. This method is suitable for large products, and for small ones - for example, made for children.

With the help of painted stones, you can create a whole fairy-tale corner by arranging whimsical figurines of characters as you please.
Such a method as cutting for do-it-yourself stone crafts allows you to create small figures, and even a real sculpture from soft and pliable rocks.

Making crafts with kids
A great way to entertain children and instill in them artistic skills is to paint on stones and make small crafts from them. It is preferable to use gouache and acrylic paints for this, and the material itself should have a fairly smooth, streamlined shape.
Note!


The resulting crafts can be used as a gift or when decorating a children's room.

The simplest idea is colorful fridge magnets. On the one hand, the magnet itself is planted on a pebble with glue, and the other is painted.

It will be easy for children to create flower arrangements, paintings and mosaics from multi-colored pebbles glued to colored paper or cardboard.

Creating original flowers and trees, decorating pots for them, will allow children to realize their fantasies as much as possible.

Crafts from stones for your garden and plot
The material is universal, suitable for any style and, in addition to complementing and accenting landscape design, it can also carry a functional load: become a flower vase, flower bed, coasters. Its rough texture will emphasize the tenderness of greenery and flowers.
Note!


With the help of beautiful pebbles and boulders of an interesting shape, artificial reservoirs located on the plots are decorated, mainly the bottom and sides.

More complex ideas are also feasible - terraces with several levels, barbecues, rock gardens. Feel free to combine large rocks with small pebbles and sand, add colored gravel, ceramics and even bricks to your compositions.

A widespread option is paths in the garden lined with sea stones, separate areas for recreation, which helps to divide the space into several zones.

The idea is simple in execution: it is enough to level the desired area and lay the stone you have selected on the ground with your hands.

A rocky garden built with your own hands will help make your summer cottage cozier. It will be a great place to relax, creating the feeling of being in a wild corner of nature.
Note!


By combining large boulders with graceful plants, you can achieve unique combinations.

This natural material provides an almost inexhaustible resource for inspiration. Feel free to try yourself and create unique things!

Photo of stone crafts


DIY stone paintings are not only a wonderful and unusual decoration for your home, but also a fantastic gift! Surprise your loved ones with this stunning piece of art! Check out our selection of examples or make your own!

You can pre-paint the canvas and make the necessary background that will suit the chosen theme for the image with stones. In this example, the motif with birds is considered. Because they are celestial beings, a blue background color was chosen. And the addition was the blue sea.
Add colors!

It will be just great if you bring a handful of stones with you when you arrive from vacation! From which in the future you can make your own picture! The result will definitely please the eye! Firstly, a memory from a vacation, and secondly, a hand-made work!
DIY family stone paintings

The cohesion of your family can be depicted in a similar picture! Great idea with the addition of inscriptions! Such a picture will add some warmth and romance to your family!
Paint the stones for a more colorful picture!

The perfect gift for your significant other!

Real 3D effect!

romantic landscape

amazing peacock

funny pictures

Source: German interior and decor magazine "Deavita"
Translation author:
Chvanova Maria. Specially for the site


Friends, in the midst of winter, it is especially pleasant for us to think about summer, the sea, the beach. Let's remember those wonderful days when, after swimming and jumping in the sea waves, we and our children began to collect smooth, washed with salty sea spray and shining in the sun, varnished by the surf sea pebbles. Well, how could you part with them?! 
This is how a couple of kilograms of "marine rarities" migrated to our house. What to do? After all, not everyone has an aquarium. 
How to make sure that all this “sea beauty” is really useful to us, and does not fly into the garbage can in a month?
Don't despair, there is more than one way out! There are a lot of interesting options for using sea pebbles in the interior and in the landscape. Let's discuss some of them.
Sea pebbles in the interior
We all want to turn our home into a corner of rest and relaxation, hence the increased demand for natural materials in interior design and fashionable now ecostyle. 
And what about here without nautical pebbles? Thanks to its various shapes, sizes, pleasant rough or smooth texture, gloss, as well as natural shades, it is perfect for home decoration. 
sea pebbles looks great in the interior. In the Mediterranean, for example, this material has long been used as a floor mosaic or used in wall decoration. 
IDEA #1 - FOR THE KITCHEN AND BATH
Today sea pebbles also clad walls and floors in bathrooms, in addition, it acts as a protective material for kitchen panels.  There is a great idea: apply sea pebbles in the decoration of the festive table! Looks great in this case. decorative coasters for dishes. They are not at all difficult to make yourself.


IDEA #2 - PICTURES AND PANEL
Because sea pebble There are different shades and different degrees of transparency, there is no limit to experiments. Sea pebbles can be combined with other materials based on the similarity of color and texture and create amazing compositions, paintings and panels.  Small smooth pebbles go well with various materials, especially wood, glass, shells. Sea pebbles are great for creativity: the stones are flat, so they can fit under glass. And they are all so different that they ask to become part of an interesting panel. Check out examples of such work and you will surely want to create something similar!

IDEA #3 - PEBLE MOSAIC RUG
Let's try to make the interior more attractive and interesting with the help of pebble mosaic!
Floor mats with a massaging effect look great in the interior. In addition, it is pleasant to stand on them and feel at the same time like the sea, and the uneven surface of the coating will not allow you to slip. You can also make this rug yourself! 
IDEA #4 - TRAY FOR WET SHOES
Using waterproof trays, it is very easy to build a mat for storing wet shoes. Just fill up the containers sea pebbles and that's it - a functional and original thing is ready! 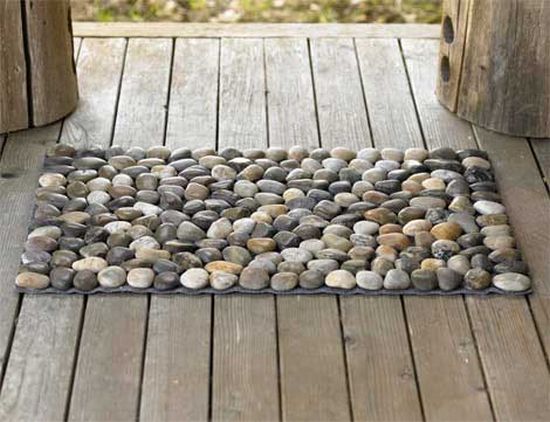
Sea pebbles in the landscape
IDEA #5 - GARDEN PATH 
Sea and river pebbles fits perfectly into the surrounding landscape, so it is especially popular in landscape design. And for creative people, this natural material is a real find! 

Sea pebbles make excellent and durable garden paths.
Making them is not so difficult, but here you need to have enough materials. I'm afraid that the suitcase with sea pebbles may not be enough, you will have to buy or collect everything that your friends have accumulated over many years of wandering! So the idea is only limited by your imagination and the size of your luggage... 
Let us dwell on how to make such beauty and try to lay out mosaic paths from sea pebbles with our own hands. It is not difficult, but with due patience and imagination, incredible masterpieces can turn out. 
Necessary materials:
- pebbles of various sizes
- sand
- plywood (cut film or tarpaulin)
- stone chips
- concrete mix
- wooden or rubber mallet
- level
- hose
- hard brush.
The work process is sequentially shown in the photo:


IDEA No. 6 - "DRY STREAM"
Let's continue the previous topic and show even more imagination. After all, sea pebbles can also be used as a basis for "dry streams" and gravel gardens. Laid out on edge, it remarkably imitates the water flow in a “dry stream”.  But in this case, it is important not to get carried away and show maximum artistic taste and “not overdo it” with the design!
In my landscape objects, I often use this technique: “dry streams” really enliven the landscape of the site and serve as drainage wells to collect excess water. You can see in more detail how such a combination of “beautiful with useful” looks at the link .


Another interesting "dry stream" turned out on my other landscape object. More photos see the link .

Mosaic decorative areas for a garden made of sea pebbles can also be bright and unusual.. The technology of their manufacture is similar to how garden paths are made (described in detail above). Get inspired and ... go ahead, do the wonders of garden design with your own hands!


IDEA #8 - COMPOSITIONS FOR THE GARDEN
From sea pebbles beautiful small sculptures and compositions are obtained that will decorate the landscape of the site. They, like elegant accessories, will add style and sophistication to your garden. Products from sea pebbles can decorate paths, ponds, flower beds. 


With crafts made from sea stones or all kinds of shells, you can decorate not only your house, but also the area adjacent to it. Of these, even children can create a huge number of toys and various things.
What you need to create crafts: tools and materials
Any stones that are collected on the sea or river bank are suitable for making souvenirs.
Pebble can be any:
- to size;
- smooth, like gloss, or rough;
- plain or painted with veins or inclusions;
- transparent or translucent.
They create panels from it, decorate frames for paintings or photographs, decorate a variety of containers, sometimes even large surfaces, create all kinds of characters, pave garden paths. They go well with other natural materials. They decorate the interior of the premises or the garden plot.
For especially valuable shells, you even have to dive to the depths. They are collected in the summer, however, on overseas beaches this can be done at any time of the year, and only empty. Some people buy them in souvenir shops. And although many unusual shells are found on the shore of a lake or river, it is sea shells that are recognized as the most attractive and suitable for crafts.
They will look great on all kinds of frames, you can create panels and paintings from them - real masterpieces.
Glue, paints and other materials for creativity
Sea stones and shells are not the only things that will be required in the process of working on crafts. Usually, the farm will find a lot of what you need, and if something is missing, you can always buy it.
What you need:
- plasticine ordinary and hardening, which is distinguished by the ability to harden after some time in the air;
- clay;
- paints - gouache, watercolor or acrylic;
- glue;
- nail polish (sometimes acrylic);
- salty dough:
- Take flour and salt in a glass, mix with half a glass of water and a tablespoon of starch or PVA glue. Glue is used when you need to sculpt thin figures.
- For storage, the dough is removed in a bag and in the refrigerator, no more than a month. Later, it is enough to paint it with gouache, watercolor or food coloring to give the product the desired color, varnish it, dry it in the oven and remove it completely cooled down.
- gypsum;
- any sand;
- shards of glass;
- flexible soft wire;
- scraps of fabric, leather, suede, fur, yarn or thread;
- cardboard (you can plywood);
- beads, beads, buttons;
- glass or ceramic containers.
Crafts from sea stones and shells with a similar set of very valuable things in the house will not be difficult to make.
Tools
For work, you will also need some tools:
- pencil;
- awl;
- brushes;
- various stacks;
- round-nose pliers for working with wire;
- drill;
- file;
- sandpaper.
Workplace and safety
The workspace must be properly organized.
You need to cover the desktop with an old oilcloth or newspapers. The workplace should be provided with a source of light. A work robe or apron will help keep your clothes clean. An old T-shirt is enough for a child. In summer and in the fresh air, you can work, sitting on the veranda or balcony.
You will have to use a portable box to fit the necessary materials and tools.

Safety precautions should be given special attention, especially if children are involved in the process of work:
| Job | Precautionary measures |
| With a drill | Goggles or eye protection, gloves (not for children) |
| With salt dough | Electric or gas oven (only under adult supervision) |
| With varnish | Do not keep the container open for a long time. You can pour some varnish into a plastic cup and close it again. The room must be well ventilated. After work, the brush should be washed in a solvent |
| Working with 10% hydrochloric acid solution | Work with acid using an old toothbrush and wearing gloves to protect your hands. Eyes should be protected |
Preparing shells and stones
It is enough to rinse the pebbles with boiling water, and it is ready to go. You have to work hard with shells.
The first thing is cleaning:
- It is enough to soak “dead” shells for half an hour in a chlorine-containing agent diluted with an equal part of water;
- too dirty shells are soaked longer, then they are brushed, rinsed in water;
- "Alive", in which the remains of mollusks are present, because of which they emit a disgusting smell, it is necessary to clean especially diligently. Boiling for 5 min. will allow you to easily remove the remains of mollusks with tongs or nail scissors, after which the shells should be treated with an agent containing chlorine.
Some crafts require drilling a hole. The main thing is that cracks do not appear on the shell, or it does not exfoliate at the point of drilling. It is recommended to pre-glue the shell with masking tape, put it on a flat surface and put a mark on the inside.
A hole in it can be made in two ways:
- Manual. If there is no screwdriver or drill, then there is a nail and a hammer. A nail is carefully placed on the mark and tapped with a hammer until the initial hole is formed. Expand it to the desired diameter, making translational movements inside the hole with the same nail.
- automated(drill or screwdriver). You will need a drill with a diameter not exceeding 0.8 - 2 mm. If the hole is drilled using tape, the shell will not be damaged.
How to remove chips and cracks on sinks and stones?
Treated sinks should be carefully inspected to make sure that they do not have any chips or cracks. Finding perfect shells without such damage is quite difficult.
To polish the surface of the shells, you can use:
- sandpaper;
- bar;
- disk.
Lacquer coating will hide even cracks invisible to the eye and give the material a shine.
Master Class
Crafts from sea stones and shells are not the only things you can do with your own hands. From these materials, interior items and elements of landscape design are created. You can involve children and all household members in this business.
DIY sea shell frame
Materials required:
- shells, pearls, starfish, or figurines of skates;
- waste paper;
- epoxy glue (if necessary);
- scotch;
- glue gun.
 Crafts from sea stones and shells can decorate any, even the most uncomplicated, interior
 Manufacturing instructions:
- The mirror should be covered with paper, use tape to secure it.
- By size, you need to disassemble the shells.
- Stick in the first row closest to the mirror, even shells from among small or medium ones.
- Now you can glue large ones, filling the voids between them with smaller shells.
When epoxy is used, the frame must dry first.
Panel of shells and sea stones
Materials required:
- shells;
- leg-split;
- cardboard;
- scissors;
- glue gun.
Video selection of pano from stones and seashells:
Manufacturing instructions:
- Draw the shape of the future panel on cardboard.
- Cut out the base from cardboard.
- Make two holes.
- Glue the shells on a cardboard base closer to each other, leave the holes for the loop open.
- Thread the two ends of the rope of the desired length from the inside into the holes. Double knots will not allow the loop to slip out of the holes.
In a product with sea shells, pebbles can be interspersed.
Shell painting
Materials required:
- shells;
- template or stencil drawing on paper;
- canvas on a stretcher;
- acrylic paint and brush (if necessary);
- glue gun.

Manufacturing instructions:
- You should create a background on the canvas using the paint of the desired color.
- Wait for complete drying.
- Fix the template on the canvas with masking tape.
- Trace the outlines of the drawing with a pencil.
- Glue the shells one by one, trying not to go beyond the borders of the picture.
Sea shell candlestick
Materials required:
- large shells;
- candles in molds;
- pot;
- water;
- PVA glue (you can use 2-sided tape).

Manufacturing instructions:
- It is necessary to remove the candle so that the wick, container and the candle itself are separate.
- Glue the wick in the center of the shell.
- Melt paraffin in a water bath in molds until it turns into a liquid.
- Carefully pour paraffin into shells.
The paraffin will harden completely after 20 minutes.
Candlestick made of bivalve shells
Materials required:
- flat shells;
- plate as a base;
- glue gun;
- beads, figurines of a marine theme.

Manufacturing instructions:
- You need to sort the shells by size.
- Glue one layer of shells to the base - the largest.
- Glue new tiers on top of the lower one, one after the other (it is recommended to overlap the shells).
- Close all free gaps with decorative elements.
- Coat the finished product with a colorless varnish (you can use white paint).
Wind music from sea shells
There should be a ring at the base, but this is not required. Forms may vary.
Materials required:
- shells, starfish, beads, corals, pieces of glass;
- jute twine or any other thread;
- wire for beads;
- willow branches;
- crochet hook;
- knitting threads;
- scissors;
- glue gun (you can use a drill with a small drill, nail scissors or a needle).
Manufacturing instructions:
- Willow branches must be boiled for 2 hours, then cool and remove the bark from them.
- Form a ring from the branches, braiding some branches with others (the branches must be wet), align it and leave to dry overnight.
- From transparent nail polish and wire, prepare flowers.
- Tie the shells (let them be openwork).
- Prepare several beads by stringing each on a wire and securing.
- Cut 8 ropes of 120 cm.
- Attach the details to the string: just tie some, glue some, and tie it to the base ring, leaving a hanging end. Do the same with the rest of the ropes.
- Collect the free ends in a bundle and tie it with a separate thread. If the ropes are loaded with parts unevenly, it is difficult to achieve balance. And this is necessary for the correct manufacture of crafts. So, when distributing beads, fragments, stars and shells along the rope, you will have to keep an eye on balance.
- From the resulting start, tie a pigtail up to 10 cm long and form a loop out of it. Wrap one of the threads around the base, and cut the rest.
Willow branches can be replaced with hoops and wrapped with twine.
Shell ship
The basis of the sailboat will be a large rapana shell.
Materials required:
- shells of different sizes;
- stone as a stand;
- wooden skewers;
- threads (preferably with Lurex);
- glue gun.

Manufacturing instructions:
- It is necessary to depict the ship schematically on paper (it is recommended to indicate the order of the shells in numbers).
- Fold the future sails of a sailboat from shells: there should be 2 masts, one lower than the other, in which there are 4 and 5 shells.
- The first larger shell must be glued to the skewer, it is recommended to apply glue in 2 places: at the top and on the side. Each next sink should be smaller than the previous one (or, conversely, all of the same size).
- Next, you need to make a nose for the boat - glue the skewer along the rapana.
- Glue the finished masts perpendicularly to the large shell, then the side sails.
- Apply a drop of glue to the end of the skewer and wrap the edge with thread.
- First, stretch the thread to the mast, wrap it around, lower it down and glue it with the shell. Then again lift the thread up and wrap one mast, transfer to another and repeat the steps. After the thread is glued to the rapana, the excess can be cut off.
- The ship must be fixed on the stone with glue - it must stand firmly on the stand.
A child will be happy to take part in the construction of such a ship.
shell flower
Materials required:
- shells;
- wire;
- frame;
- velvet fabric;
- beads and beads;
- glue;
- clothespins.

Manufacturing instructions:
- You need to make some flowers. For one, you will need to connect 3 shells of the same size with transparent glue. Flowers can be of different colors and sizes.
- Lacquer finished products, decorating in the middle of each of them with a large bead or beads.
- Glue the fabric to the frame.
- From the wire, you should build a semblance of a stem and leaves and attach it to the fabric.
- In any order, strengthen the buds along the wire.
- Wait until completely dry and cover with glass.
Applications for children
Crafts from sea stones and shells are best done with children. You can create applications on a variety of topics, for example, the underwater kingdom.
Materials required:
- shells, pebbles, feathers and dry moss;
- corrugated paper in blue and brown;
- wooden frame;
- plasticine;
- salt dyed yellow;
- PVA glue.

Manufacturing instructions:
- The paper needs to be fixed on the frame, it will become the background - blue water and brown seabed.
- Glue dry blades of grass - algae.
- For a crab figurine, pick up shells: 1 larger - torso, 4 smaller - paws, 2 very small - eyes.
- Transfer the crab to the paper, carefully gluing each shell.
- Make up a few fish (shells instead of a body, a feather tail and plasticine eyes), and “float” in the picture.
- Add dry moss.
- Glue shells to the bottom.
- Lubricate the free areas of the bottom with glue and cover with salt, painted with gouache.
- Decorate the wooden frame with a variety of shells.
Decoupage
If you managed to find a large stone, smooth and flat, on the seashore, you can decorate it using the napkin technique. It is called "decoupage".
Materials required:
- white water-based paint;
- napkins in 3 layers with a bright large pattern;
- PVA glue.
- acrylic paints.
Step-by-step instruction:
- It is necessary to paint the stone with water-based paint.
- Separate all layers of the napkin and cut out the pattern from the first.
- Saturate the picture with glue (it is recommended to start from the middle) and carefully glue it to the stone so that wrinkles do not form.
- Wait for complete drying.
- Perform drawing with acrylic paints, painting, if necessary, add sparkles, rhinestones, and other additional decorations.
- Varnish the surface.
- Dry 2 days.
- Varnish on the other side.
In total, up to 3 layers of varnish are required. You can decorate a flower pot with a finished product or simply leave it on a coffee table.
Decorations for landscape compositions
The pebble fits perfectly into the surrounding landscape, and therefore it is quite widely used in landscape design of various stylistic trends. For a creative person, this is just a godsend. A garden path made of sea stones will turn out to be quite strong.
Materials required:
- pebbles of different sizes;
- stone chips;
- sand;
- concrete mixture;
- level;
- plywood (can be replaced with a film or tarpaulin);
- water;
- hose;
- hammer (wood or rubber);
- hard brush.

Step-by-step instruction:
- Remove the soil layer, install curbs along the edges of the path.
- Lay polyethylene on the ground.
- Pour a layer of sand, and rubble on top of it.
- Prepare a solution: 4 parts of sand and 1 of cement, fill it with an embankment.
- Lay the pebbles, after wetting it.
Advice! The solution dries too quickly, so it is better to lay out the track in small areas.
- Tamp down the pebbles with a rubber mallet once the small area has been paved.
- Fill the space between the stones with a more liquid solution.
- After 3 hours, sprinkle water along the path and cover with a film.
- After a while, sprinkle with water again, but do not cover with a film anymore, wait for it to dry.
About ornament
Patterned paths look spectacular. First, you need to disassemble the stones by size, shape and color, then make a sketch of the ornament and its template, and lay the latter on the mortar. Pebbles look great whether laid flat or edgewise.
The path is the classic and most common option for decorating the site.
Make a backlight and it, created from a light stone, will become “moon”, and from a colored stone it will become contrasting. However, this is not the only design technique. Pebbles will help hide uneven terrain or not particularly attractive objects on the site.

It could be:
- high flower bed, steps or alpine slide;
- garden sculptures - no restrictions for creativity;
- fencing.
Crafts from sea stones and shells that you can make with your own hands are a source of countless ideas for creativity. Sea pebbles are easy to turn into marine life. The child can even manage on his own. The main thing is to tell him how, with the help of a brush and paints, you can make fish of various colors.
And then it will not be difficult to find a use for them:
- put in an aquarium
- make a mosaic on the plot;
- just play with them in the water.
You can collect a whole town of fabulous houses on the playground or, armed with a glue gun, transfer the pebbles to the panel, using as a base:
- cardboard;
- plastic;
- even a wooden fence.
You can lay out a flower bed in the form of a mosaic of stone flowers. Pebbles will make an excellent portrait of a friend. You can make several stone men and even lay out a whole scene from life. The child will rejoice, turning ordinary pebbles into funny animals.

You can not limit yourself to miniature crafts. This material can be used to create something more significant, such as a dry stream, a mosaic carpet at the house or pool. Having a cowrie shell and turning to a needlework store for accessories, you can make a boho-style bracelet.
If you do crafts with children, they will be happy to paint sea stones and glue shells. Such a joint pastime is sure to bring family members even closer.
Article formatting: E. Chaikina
A useful video clip about crafts from sea stones and shells
Video of a master class on making a rug from sea pebbles:
You've probably already seen all the wall art ideas except for one. Indeed, in this material we want to show you charming stories made from ordinary sea pebbles! These pebbles are great for this kind of creativity: they are flat, so they can fit under glass. And yet, they are all so different that they ask to become part of an interesting panel. Check out the examples of work and you will surely want to create something like this!
Several pebbles of different colors, a good frame, hot glue (from a glue gun) and fantasy - that's what you need to create such a masterpiece. Simply apply glue to the stone and press it down on the desired spot on the canvas. Add other stones - and get a concise, but very beautiful plot. For example, here is a wedding.
Or a great family "portrait", where the husband, wife and kids seem to be sitting on a branch. Of course, in addition to pebbles, you can add other materials to the work: the branch here is made from a dry branch with a fork.

Another wedding scene. Newlyweds in beautiful clothes (yes, and this can also be conveyed by ordinary pebbles) enjoy each other's company on the seashore. Please note that the pebbles almost do not step on each other, because otherwise the composition may become too voluminous and not fit under the glass.

Here is another family portrait. The focus is on the couple, on which the whole family depends. This married couple has two children, but despite this they carried their feelings through all the trials of fate. Such tenderness can be embodied in stone!

Here, too, additional material was used - a branch and a pencil, with which the birds' beaks are completed. Stone is a heavy material, but looking at this panel, on the contrary, there is a feeling of lightness, isn't it?

And even daisies can be made from pebbles! Just choose contrasting colors and lay out the petals with thin white pebbles. Draw the legs of the flowers - and you're done!

And here, for sure, different generations are depicted. You see - one pair of silhouettes is more monumental, and the second is more "alive". By picking up stones with curves, you can depict younger people.

On the next panel, people are depicted interspersed with stones, but for some reason there is no doubt exactly where the people are and where the stones are. It's all about the skill of the artist and the thoughtfulness of the details of the pebbles.

Here is the romantic scene. The lovers stand on the biggest stone - this is probably a hint of their feelings ...

A variation on the same theme, only with a different configuration of pebbles.

And here again the birds, but not on a branch, but on stones. Perhaps in nature there is such a small pebble with which you can display a beak, but it's easier to draw it.

And this is just a wonderful picture: a father and son fly kites into the sky! The threads stretching from the kites are also drawn in pencil. Everything is simple, but appropriate.

But not birds, but people are already sitting on a branch.

A couple on a walk climbs out onto the stones. Thanks to curly pebbles, it is clear who is a guy and who is a girl.

Again the birds. The smaller the pebbles, the more birds you can fit on one branch.

But this is just a great idea. The lovers "coo" on the bench, and the moon shines above them. So, thanks to one tiny pebble, the author makes it clear that the panel depicts the night.

This time the birds are depicted on the wires. The legs of the birds are drawn, but the wire is stretched real - wire.

Children enjoy balloons made of perfectly oval stones.

Another version of the kite is such a textured pebble. It looks like a small heart, and is very suitable for the image of a snake.

The bride and groom have climbed to the highest level of their relationship.

The bird flew into a nest made of additional materials.

And here is a lonely lighthouse in the darkness of the night. And by the light of the moon, which is represented by a small pebble.

And here it is a sunny day, and the girl is going to climb a tree to pick apples. Even such nuances can be shown in the picture with ordinary pebbles.

Well, did you like stone panels? There is just a little bit left: to dig out your stocks of pebbles (you bring pebbles from a seaside vacation, right?) and make a similar picture on any topic.


