Christmas tree craft made of cardboard. Photo according to the master class for self-made Christmas trees from threads at home. Photo-instruction for a master class of self-made Christmas trees at home and at school
To become the owner of a Christmas tree, you don't have to buy it- just look at the useful tips and find out how you can do it beautiful Christmas tree with your own hands.
Today you can find many Christmas trees in stores and on the street.
You can put in the house a natural Christmas tree or sprigs from a Christmas tree for smell, but you can decorate a house, or a gift for a loved one, knowing a few interesting tricks.
Learn how to make a Christmas tree paper, food, fabric and even pasta.
Make this craft quite easy, and your house will be decorated with a unique decor, and friends and acquaintances will be happy to receive a Christmas tree made by you as a present.
Christmas tree made of paper with your own hands. Christmas tree made from scraps of magazine pages.
You will need:
Unnecessary magazine or book with bright pictures
Cardboard or thick paper
Glue gun or PVA glue
Shaped hole punch, optional
Pencil or pen
1. Make a cone out of a thick sheet of paper and fix it with glue.


2. Prepare pages from a magazine with bright pictures and cut out many circles of the same diameter from them. If there is a shaped hole punch (the shape of a flower or a large circle) it will be easier.
3. Wrap the cut circles around the pencil so that they curl a little.
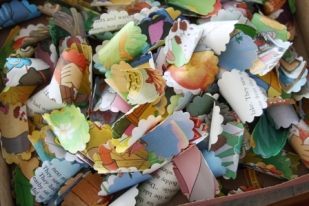


4. Starting from the bottom of the cone, start gluing the bent circles.
Make neat rows. The circles should be tightly glued to each other so that the cardboard is not visible.
5. From one circle, make a small cone, and glue it to the top of the cardboard cone.
The tree is ready!
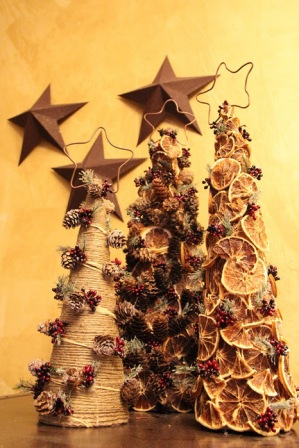
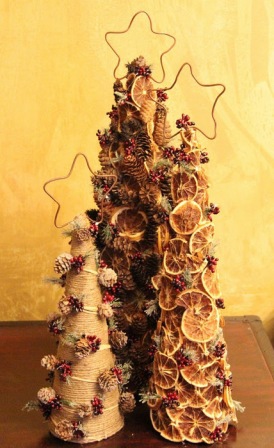
DIY Christmas tree made from cones and dried citrus fruits


Christmas tree with your own hands (master class). Trees from wrapping paper.


You will need:
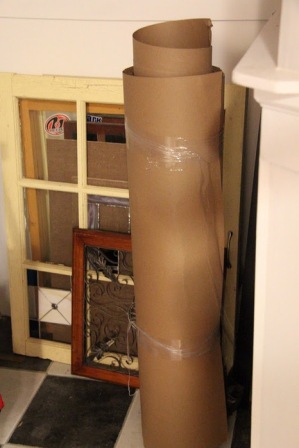
Large thick sheet of paper
Wrapping
double tape
Scissors
Decorations
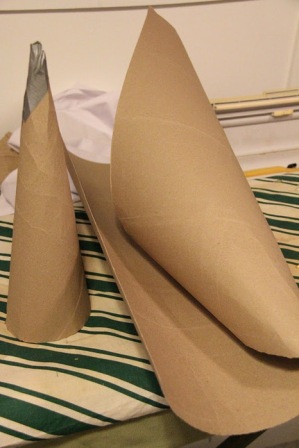
1. Make a cone out of a sheet of thick paper.
* If your wrapping paper is quite thick, you can bypass step 1 and make a cone out of wrapping paper.

1.1 Fold the paper diagonally, holding one end to keep it sharp.

1.2 Secure the folded paper with tape. You do not need to do everything too carefully, since you will cover the cone with wrapping paper.

1.3 Cut off the excess at the bottom of the cone to make a flat base.

2. Prepare colorful wrapping paper and cover the cone with it. To do this, lay the paper face down on a flat surface.

2.1 Using tape, attach the end of the colored paper to the top of the cone.
2.2 Start slowly twisting the cone, wrapping it in wrapping paper. You need to wrap the cone tightly.

2.3 Measure the paper and cut before wrapping the cone all the way around. Glue double tape to the edges and connect to the other end. At the base, you need to cut off the excess so that the paper is even.


3. It remains only to decorate the Christmas tree as desired. You can make paper stars, use glitter, stickers, glue on beads and/or buttons, wrap with ribbon, etc.

Similar trees:


Christmas tree made of fabric with your own hands. How to make a Christmas tree out of felt.


You will need:
Glue or double tape
Scissors
* Try using felt in two colors to make the Christmas tree even more beautiful. In this example, yellow and orange felt was used.
1. Make a cone out of cardboard. Secure the ends with glue or double tape.
2. Prepare the felt and cut out circles of different diameters from it, from small to large (see picture). You can use pre-prepared circle templates made of cardboard.


3. Glue Christmas tinsel to the bottom of the cone.
4. Now you need to make a criss-cross cut in the center of each circle cut out of felt. Do not cut too much so that the felt robe does not fall. Make an incision exactly such that you can tightly put the circle on the cone.
5. Start gradually putting the circles on the cone. If you use two colors, then put on the circles in sequence, first one color, then another. Also worth noting. That you need to put on the next circle not only on the cone, but also over the tips of the cuts of the previous circle.


6. We decorate the top of the Christmas tree. To do this, simply add tinsel, to which you will need to add a pre-prepared small cone of felt. Fix the tinsel and crown with glue.
* If you wish, you can hide a sweet gift inside the cone.


Original Christmas trees with their own hands. Glowing tree.
You will need:
Floral florist net (preferably several shades of green)
Scissors
Cardboard for the cone
PVA glue
Cellophane
pins
Garland
floral wire
Decorations on request

1. Make a cone out of cardboard.
2. Wrap the cone in cellophane.
3. Take any container and make a solution of PVA glue and a small amount of water in it
3. Prepare your floral grid. Cut it into small pieces and lower each into a container with a solution.
4. Start gluing the pieces onto the cellophane-covered cone. Glue different shades of mesh in different directions. The joints should be anointed with another layer of glue for a more durable fastening.
5. Secure the entire structure with pins and wait for the glue to dry.
6. You have the first layer of the Christmas tree. Now in the same style you need to make a second layer. After finishing gluing the second layer, leave the structure to dry.
7. Now remove the Christmas tree from the cone - the glue should quickly lag behind the cellophane.
8. Place a garland inside the Christmas tree, which you need to secure with floral wire.
9. It remains to decorate the Christmas tree according to your taste.
DIY Christmas trees (photo). Christmas tree made of pasta with your own hands.

You will need:
Plastic or foam cone (or you can make your own out of cardboard)
PVA glue
Pasta of various shapes and sizes
Spray paint, acrylic paint or gouache
Tassel.
1. Prepare the cone and paint it in the desired color. Wait for the paint to dry.
* If you are using spray paint, you can skip this step.
2. Prepare pasta. Start applying glue to each piece and stick the pieces to the cone. Create a Christmas tree design the way your imagination tells you.
After applying the glue, press the piece a little and hold it so that it adheres well to the cone. It's okay if glue is visible from under the pasta.
Continue until you have covered the weight of the cone with the pasta. Wait for the glue to dry.

3. Start painting on the pasta. In this example, acrylic paint was used. Try to carefully paint all the details so that there are no empty spots.
* It is desirable to paint in two layers.
* If painted with white paint, the Christmas tree will look like a porcelain product.
Helpful advice: if you want to remove the craft, then put it first in a plastic bag, so you can immediately find the part that could come off the cone.
We make a Christmas tree with our own hands. Bright paper tree.

You will need:
Colored cardboard or design paper
Thick cardboard
Glue moment or glue gun (with hot glue)
1. Cut out a square base for the Christmas tree from thick cardboard.
2. Insert the skewer into the cardboard and fix with glue.
3. Now you need to cut out circles of different diameters from designer paper or colored cardboard. You need to make 3 circles of the same size.
For example, if you want to make circles in 10 different sizes, then you will need to cut out 30 circles (3 for each size).


* If you don't want to cut out a lot of circles, just shorten the skewer and you end up with a cute mini Christmas tree.
4. Make a small hole in the center of each circle.
5. Before you start putting the circles on the skewer, grease the hole in the middle with glue.
6. Start putting the circles on the skewer, leaving some space between them.
7. Cut out stars from paper and glue them to the top of the Christmas tree. You can use another detail for the crown and not necessarily paper.
Crafts. Fir-trees from a thread with their own hands.


You will need:
thick yarn
Pile yarn
Cone (made of cardboard or foam)
pins
Decorations to taste.
1. Make a paper cone or buy a Styrofoam cone from specialty stores.
2. Take both strands and secure their ends with pins at the base of the cone.


3. Start winding the threads around the base of the cone, pinning about every 2 inches.
4. Now start moving towards the top of the cone, gently wrapping the future Christmas tree with both threads. At this stage, you do not need to attach the thread to the cone.
5. When you get to the crown, secure the threads again with pins, wrapping the threads several times around the crown.
6. Both yarns now need to be pulled down, also wrapping the cone with a second layer.


7. Cut the threads at the base of the cone and fasten them.
You can leave the tree as it is, or you can also decorate it.

In this example, artificial berries were used for decoration, but you can use multi-colored beads, buttons, buttons, etc.


Try also to make a decoration for the top of the Christmas tree. The crown can be decorated the way you like.
You can leave the tree as it is, or you can also decorate it.
You can make just a paper hat or a star, or you can make something more complicated. If you chose the latter option, then the instructions for you follow.
You will need:
flower wire
Wire cutters (for wire)
sequins
PVA glue
Fine wire (calibrated wire)


1. Bend the wire into a star shape (see pictures) and cut off the excess.
2. Cover the star with glue and sprinkle glitter on it.
3. Attach a thin wire to the star, as shown in the picture:
4. Attach a star to your Christmas tree.
DIY creative Christmas tree

If you want something original, or you just don't have enough space for a large Christmas tree at home, you can try to make such a simple design.
It is worth noting that such a tree is suitable for any room. It can be done both at home with children and at work.
This Christmas tree can rise by 1.5-2 meters and takes up almost no space in the house. In addition, it is a good background for New Year's photography.
You will need:
Foam base or matte cardboard
Scissors
corrugated paper
masking tape
adhesive tape
PVA glue
Stationery knife
marker, optional

1. Lay out the styrofoam or cardboard on a flat surface to get a large rectangle (see picture).
2. Use adhesive tape to connect all parts.
* In this example, black tape was used for better visibility, but white tape is better.
3. Mark the size of your future Christmas tree with masking tape.
4. Using a utility knife, carefully cut out the shape of the future tree.
5. Prepare the crepe paper, fold it in half and cut the fringe. You should have plenty of fringed paper to cover the entire Christmas tree.
6. Start gently gluing the crepe paper to the styrofoam, starting at the base of the tree. The fringe should hang just below the base to cover the styrofoam (or cardboard) and also slightly cover the top of the tree trunk, which we'll make later.

7. Move to the top, covering the entire tree with a bright green fur coat made of crepe paper.
8. On the back of the tree, add a hook so that the tree can be hung. Instead of a hook, you can use double tape to cover the perimeter of the Christmas tree.
9. To make the barrel, you need to cut a small rectangle out of foam or cardboard.
9.1 Cover the rectangle with brown paper in the same way as the Christmas tree, i.e. cutting fringes on paper strips and gluing them.
What kind of New Year can be imagined without the main symbol - the Christmas tree. Green beauties on the eve of the holiday are sold at every corner. However, for such a holiday it is not necessary to buy a live spruce. Try to make it yourself. Therefore, in this article we will talk about what you can make a Christmas tree from for the New Year holiday. It is worth saying that you can create the main symbol of the new year from completely different materials. And today we will talk about it in more detail.
Mini Christmas trees from cones.
If your children are just as fond of making crafts as you are, then they can also participate in the creation of such crafts. The next craft - a Christmas tree - consists of cones and plasticine. All your child needs is to learn how to roll small balls out of plasticine. At the same time, for this purpose, you can use plasticine of the brightest shades. As a base for a Christmas tree, you can use ordinary thread spools. But you have to wrap them in foil. The cones are attached to the coil with super glue.

If you like the next Christmas tree, then take acrylic paints and paint the bump with it. Remember that it is most reasonable to use green paint here. In this case, the tips of the Christmas tree are painted white with paint. Make a base for a Christmas tree from brown plasticine. Use an asterisk for decoration.

The next craft is a little more difficult to do. Here it is worth using beads. Therefore, if your child is small, then control this process yourself. Glue the beads to the cone with a glue gun.

All the above crafts from cones can not only decorate your home. It will be nice to present such Christmas trees as a gift to your loved one.
The next craft looks more voluminous. And to create it, you need a few cones. As a basis here, you should use a cardboard cone. After that, the cone is glued with cones on all sides. In this work, it is customary to use a cool gun. As soon as the glue dries, glue the Christmas tree with large beads.

Simple tinsel Christmas trees.
If you read this article, you will be able to learn how to make an artificial Christmas tree at home. Above, we offered you Christmas tree ideas that were made from cones. Now we suggest using tinsel for this work. Naturally, for such a craft, you must purchase the tinsel itself. For Christmas trees, make cardboard cones. Then, glue the tinsel to them. In this case, the tinsel should be glued to the cone in a spiral. While working, arm yourself with a glue gun.

Candy Christmas tree.
The next Christmas tree can be not only a beautiful decoration, but also a very nice gift. To make such a craft, make a cone. Fix the candy on it with adhesive tape, and then wrap the Christmas tree with tinsel.


A simple and voluminous Christmas tree made of paper.

The next craft is also very easy to make. It can be a great decoration for a child's room during the New Year holidays. For manufacturing, prepare:
- thick green cardboard
- markers, glitter, paints,
- scissors and glue
- scotch.
Progress:
- We bend a sheet of cardboard in half and cut along the fold with scissors.
- We put the two parts that you have turned together together and bend in half again.
- Opposite the fold, using a marker, draw a half of the Christmas tree.
- Now cut along the drawn line. As a result, you will get 2 trees that will not differ from each other in any way.
- Gently bend each tree in half. Mark the center.
- Next, make an incision on one of the trees. The incision should be long from the very top to the midline. On the other tree, the cut should be from the bottom to the middle.
- Now we connect the Christmas trees by inserting them into the resulting cuts.
- And to make the tree more stable, use adhesive tape.
- That's all, now proceed to decorate your Christmas tree. Use your imagination and handy materials here.

And here is another version of the Christmas tree, which you can do in the same way from an old cardboard box.

Elegant Christmas tree made of paper.

If you want to know how to make a Christmas tree beautifully, then the following idea was created especially for you. For such a Christmas tree, prepare:
- colored paper,
- scotch,
- glue and scissors.

 The most difficult thing is to cut strips of colored paper, which must have the same length and width. In addition, each strip must be glued with adhesive tape in order to get a loop. After that, all the loops are glued to a strip of adhesive tape.
You should wrap a cone of thick cardboard with similar garlands.
How to make a glowing Christmas tree.
If you have decided to learn how to make a Christmas tree with your own hands, then you are on the right track. Above we have described some simple crafts. Now it's the turn of serious creativity in order to do something original.
 For a creative Christmas tree, prepare:
- Flower floristic sphere. For this case, we recommend buying more than one shade of green.
- Scissors, PVA glue.
- Thick cardboard for the cone.
- Cellophane, pins, garland, floral wire.
- Various decorations.
Progress:
- First, we make a cone from cardboard.
- We wrap the cone with cellophane.
- In a container, dilute the glue with water.
- We cut the floristic mesh into pieces and lower each piece into containers with glue and water.
- Now stick the segments on the cone. At the same time, the joints are glued again for reliability.
- Use pins to keep your craft from coming apart at the seams.
- As a result, you have the first layer of the Christmas tree. Make the second layer in the same way. Remember that after gluing the second layer, the structure should dry well.
- If the glue is dry, remove your Christmas tree from the cone.
- A garland is placed inside the Christmas tree.
- Now just decorate the Christmas tree as you wish.
Tree of threads.
If you want to have something unusual for the New Year in your house, then in addition to standard decorations, decorate your house with various New Year-themed crafts.
The creation of the next Christmas tree is also quite easy to handle. Take a sheet of drawing paper and make a cone out of it. Coat the cone with glue and start wrapping it with green thread.
When the glue dries, separate the cone from the paper.
Decorate the finished Christmas tree with various accessories. Ornaments are also glued to the Christmas tree with glue.

Finally
Spend your New Year bright! Make a variety of different Christmas trees that can make the atmosphere in your home truly magical.
New Year's DIY Christmas tree. Tiny sesal tree.
How to make such a craft is shown in the photo. For crafts, you need the following: sisal cloth, wooden skewer, bottle cap, coin, piece of natural fiber fabric, glue and beads.
The tree stump will be made from cork.
We cut the cork from the bottle in half, glue a coin at the bottom for stability.
In the center of the upper part we make a small hole for the barrel. 

The trunk will be from a wooden skewer (any length to your taste - break off the desired size) We make the trunk. The skewer must be strengthened in a cork by 1 cm and glued with glue. 
We decorate our stump. On a piece of fabric, draw a circle with a compass, the radius of which is equal to: the diameter of the hemp + its height + 1 cm per assembly. We cut out the circle. We collect the edge of the fabric with a “forward needle” seam, stepping back from the edge of 0.5 cm. Leave the ends of the threads on the front side of the fabric. We put the trunk in the middle of the circle and tighten the thread around the trunk, tie a bow. Beads can be put on the ends of the threads.


We form a crown. We cut the sisal fabric into strips of different widths, depending on how “fluffy” the Christmas tree we want to make. We cut each strip into equilateral triangles and lay them out in size. 

Everything is ready to make our craft. We put triangles on a skewer, starting with the smallest. In order for the Christmas tree to be fluffy, the paws (corners of the triangle) must be directed in different directions, arbitrarily. 
Decorate the top of the Christmas tree with a bead and all the leaves too. To keep the beads, they are glued with glue.
The craft is ready! Let her make you happy on New Year's Eve.
Good afternoon, today I'm uploading the largest selection of Christmas trees made from paper. Here you will see the most interesting models- there will be Christmas trees from crepe paper, from napkins, from cardboard, you will learn how to make a Christmas tree from a paper cassette from eggs, from rolls of toilet paper and bags folded from book pages. In this selection of master classes we will consider only paper versions of the most beautiful do-it-yourself Christmas trees - both flat models and three-dimensional designs. Here are ideal options for crafts for the New Year's school competition.
So let's get started.
Idea #1
Beautiful Christmas tree FROM PAPER FANS.
Even children will be happy to make such a voluminous Christmas tree. The principle of addition is very simple - you must first make fan circles of different sizes. And then these mugs are strung on the SAME ROD BASE (which we used in the previous Christmas tree). Or you can do it without a rod - just stick the tiers on top of each other (dropping a drop of glue in the middle of each "floor" of the Christmas tree.

Below we see the principle of creating such fans. They are made from a long strip of paper. The strip folds into an accordion. We turn the accordion into a ring (fastened at the edges with glue). After the glue has dried sew one side of the accordion ring with a needle and thread- tighten the thread (very carefully so as not to break through the paper) - and at the same time lay the accordion ring in a flat circle. We press on the middle of the resulting circle with some object - thereby we crush the convex ribs of the accordion so that they wrinkle and become a little flatter.
Different sizes of Christmas tree tiers are achieved by a simple principle- the narrower the strip for the accordion we have, the smaller the circumference of the fan resulting from it will be. Below in the photo you can see a detailed master class on creating such a Christmas tree out of paper.

Such a beautiful Christmas tree is obtained from bright paper napkins or from sheets of gift paper.

And if we put a BEAD between each tier of a fan Christmas tree made of paper, then we will get air, the space between the tiers of the Christmas tree (as is done in the photo of the paper Christmas tree below).

Idea #2
Christmas tree-box FROM PAPER.
But this method is the most convenient for beginners. Convenient in that here a simple drawing guarantees a 100% result in the form of a neat volumetric Christmas tree made of paper. Moreover, this Christmas tree can be used as a package for small gifts, if you hide jewelry or a perfume bottle inside.

Since the layout of the drawing above requires a large square piece of paper - I give a more economical way to spend paper space (template diagram in the photo below). You can cut the blades of the Christmas tree separately in two pieces. And then fold, glue them cross to cross.

Idea #3
BLADED Christmas tree made of cardboard.
And here is a paddle Christmas tree made of cardboard or thick paper. It's also very easy to make your own. To create such a Christmas tree, you can use ordinary packaging corrugated cardboard (as in the photo below).

How many blades-wings can such a Christmas tree made of cardboard have.
You can make a four-bladed Christmas tree by criss-crossing two flat pieces. To do this, in each silhouette of the Christmas tree, you need to make a cut along the central center line to the center of the Christmas tree. On one part, the incision is made on the TOP HALF of the silhouette - on the second part, the incision is located on the LOWER HALF of the silhouette.
I found such a stencil of a Christmas tree made of paper, but you can take any other shape of a Christmas tree with any lines of legs (smooth, rounded, twisted up, etc.).

If desired, such a Christmas tree cross can be placed on the base in the form of a cardboard roll (a saw cut from a toilet paper roll is suitable). On such a roll, we make 4 cuts (south, west, north, east) - and insert each of the four blades of our Christmas tree into these cuts.

But the blades of the Christmas tree can be more than four - FOR EXAMPLE you can make two silhouettes - 2 with a notch at the bottom and 2 with a notch at the top.
And then combine them into such a Christmas tree with the photo below - it will have as many as 8 blades(as in the photo below). Each blade can be pasted over with a different shade of green colored paper. As decoration paper, you can use gift paper with polka dots, rhombuses, flowers (as in the photo below)

Using a similar paddle technique, you can make beautiful balls-toys for such a Christmas tree - also from paper.

Idea #4
Christmas tree from paper circles.
And here is another idea for a voluminous Christmas tree made of paper. We make this Christmas tree from ordinary flat paper circles. We fold each circle repeatedly along the DIAMETER LINES. We align each fold edge with alternation - one up, one down, one up, one down, and so on. Detailed master class in the photo below.

You can improve this tree model if, in addition to everything, you bend half of every second such rib upwards - as if forming ladle shape(how it's done in the photo of a Christmas tree made of paper below). And in each such bent ladle-foot he will put a bright bead. And we will get an already decorated Christmas tree made of paper with a beautiful three-dimensional shape.

Idea #5
Flat herringbone IN ORIGAMI TECHNIQUE.
And here is another simple one example of origami technique to create a modular paper Christmas tree.
Here we simply fold paper modules from a square napkin (the napkin folds 2 times along the floors, and then unfolds and folds again 2 times in half but already DIAGONALLY.
Then we lay the napkin back and bend it along the lines formed so that each corner of the diagonal fold is like a separate blade.
From several of these bladed modules-tiers, we fold the Christmas tree - simply by gluing it onto a flat base. Often such an origami paper tree can be seen as an application for a New Year's card.

Idea #6
Christmas tree made of PAPER,
strung ON THE ROD.
If we have a rod that we made to stand exactly vertically and not fall, then by stringing a variety of paper silhouettes on it, we can get a Christmas tree craft.
The main rule to follow is to make sure that the bottom paper silhouettes are larger than the top ones. That is, so that the size of the parts decreases as you move up to the top of the tree.

The most important thing is to MAKE A ROD. How to quickly and easily make an axis-base from a cocktail tube, so that it turns out to be strong and inflexible.
But what herringbone (pictured below), which is made of STRIPS of felt, but it can also be made from strips of colored paper or cardboard).
Everything is also very simple. MATERIAL: cut stripes the colors we need, we take tube for cocktail(it is better to insert 2 turbos one into one to make it longer), cardboard(for the base circle), hole punch and stapler(either glue or thread with a needle. Now I will tell you in detail how we will make such a Christmas tree at home - with our own hands.

STEP ONE. We are preparing the base-rod for the Christmas tree-crafts.
And cut out 2 identical disc circles from cardboard. Leave one cardboard disc intact. And in the middle of the second disk we make a round hole (we punch it with a nail and expand it so that the tube from the cocktail crawls through). Wrapped in a cardboard disc cut the tube with scissors from the bottom side(vertical cuts of 1 cm each - chik-chik - how we cut straws to blow soap bubbles). We push these cuts apart like rays of the sun. And we get such a "beam-like spread-leg". We put this spreading leg on the second cardboard disk (the one that remained intact, without a hole).
And now WE GLUE BOTH DISCS - and it turns out that the spreading leg is now with its rays, sandwiched-glued between the cardboard disks - and as a result, our cocktail tube stands EXACTLY VERTICALLY STRAIGHT.
STEP TWO. We string material for the “feathering” of the Christmas tree on the rod.
We cut the tape (fabric or paper or felt) into strips. Please note that the strips are not the same length. Each pair of strips is 1-2 cm smaller than the previous pair. In the center (middle) of the strips, we make holes with a hole punch (or cut with a nail or scissors). We string the strips onto a tube-rod - first long ones, then shorter ones and at the end the shortest ones.
And now we glue the strung strips (or sew them together with threads, or fasten them with a stapler) in pairs with an order such that we get an ACCORDING-ZIGZAG (as seen in the photo). We attach a star to the top of the tube - we also cut out two silhouettes of the star (front and back) - so that the top of the rod is hidden between the two sides of the star.
Idea #7
TIERED Christmas tree
from paper or cardboard.
And here is a nice voluminous Christmas tree made of cardboard. Here we also stocked up with paper circles of different sizes. The edge of the circles was made wavy. Then each circle was cut along the radius - and turned into a cone. And the cones were strung on a rod.

How exactly to string the cones on the rod so that there is air between them (and so that they do not fold like little bags into a friend) I will show using the example of white lacy Christmas trees made of paper, which we see in the photo below.

We will need a rod (wooden skewers will do). Large beads and paper lace napkins.

To make cones from round napkins, we make a radial incision. We cut along the radius of the circle from the CENTRAL point to the edge.


Beads between the cones will not let them run into each other. And our Christmas tree will be airy.

You can make cone Christmas trees from spare pieces of wallpaper.

You can use sheets of colored office paper.

Idea #8
Crepe paper tree.
Here is another beautiful children's paper tree. Here we need a BASIS for a Christmas tree in the form of a high paper CONE. We cut out a semicircle from paper - and fold it into a bag of consu.

Crepe paper cut on long wide ribbons. Then along the paper tape we make incisions-fringe. Next, we wrap our paper conse with this fringed paper tape - starting from the bottom and gradually spiraling, turn by turn, moving towards the top. Each notched twist the petal into a curl.


Such a Christmas tree craft is suitable for school or the Skillful Hands circle in kindergarten.
Idea #9
Crepe paper tree.
And here is a convex Christmas tree from a paper cassette from eggs. Cut out the cells of the cassette holder in the fork of the triangle. We paint them green with gouache. Spray with nail polish (so that the gouache does not stain your hands and the color becomes brighter). And on each bottom of the cassette cell we glue a circle of colored paper. We cut out the silhouettes of a star of different sizes from cardboard and form a puff star.

Such a children's craft is convenient for conducting classes in a school creativity circle.
Idea #10
Volumetric Christmas tree from the CONE
(6 ways to decorate)
And here is another Christmas tree made on the basis of a high cardboard cone. We buy whatman paper (a large sheet of paper) - cut out a semicircle - bend it into a cone from a semicircle.

Here the main monotony of labor is in cutting circles of many hundreds. And then there is a gradual pasting with these circles in the form of scales - starting from the lower rows of the cone and gradually moving up to the top of the Christmas tree-cone. Children who often toil around idle in anticipation of the New Year holidays will be happy to be distracted by such a New Year's children's tree craft. And this is to your advantage, no one will wander around the kitchen and prevent you from preparing the New Year's table.

Such a Christmas tree cone can be placed on a long stem. And put the rod on a plasticine pedestal. From plasticine we make a thick round cake. We bury the base of the rod in plasticine. We decorate the plasticine sole with cardboard and pieces of moss or other natural material (bark, peeled cone scales, etc.).

Pasting the Christmas tree-cone can be carried out loops from strips of paper. Or if you are too lazy to cut paper, you can buy a long roll of textile tape, cut it into segments, bend each segment into a loop and glue it on a cardboard cone - also in rows from bottom to top.


Can do from fabric (or from paper) triangular folds. Fold the square diagonally in half, and again in half. Layer the angles of the triangle on top of each other - so that the triangle curls up into a ladle. The barrel of the ladle will be glued to the cone-base of the Christmas tree.

As you understand, it is not necessary to use a fabric - you can take plain colored paper, crumpled crepe paper, or even newspaper (and then spray-paint it with paint).
You can also use it to decorate the Christmas tree. paper cups for baking cupcakes. As it is done in the picture below. Such a children's craft will be a real New Year's entertainment for your children. Simple and fast - and very beautiful.

Idea #11
Christmas tree with paper straw decor.
And here is another Christmas tree based on a paper cone. Here, fine paper shavings are used as the material for gluing the cone. You can find these shavings in fragile goods shipping boxes. Or cut such straws with your own office paper scissors - make a voluminous pile of shavings and decorate the Christmas tree with ordinary pva glue.

We also glue cones and Christmas balls on the cone - we put them on hot glue from a glue gun(sold in the construction departments of the store - it costs $ 5, the glue for it is very cheap in the form of rods).

The Christmas tree can be placed on a pedestal made of round log cuts. And crowned with a star. It is also not necessary to buy it - such a star can be made with your own hands from ordinary newsprint. How such a star is made, I told in the article

This is good too an option for a simple children's craft for the New Year. Because it's simple, easy and fast. Ideal for a 20-minute lesson in the Skillful Hands circle. The main thing is to prepare cones, straws and decorative material in advance.
Idea #12
Christmas tree
from paper rolls.
And here is a tree made of paper rolls. From ordinary sheets of paper (even from office drafts), we roll rolls, fasten them to a stapler or glue (so that they do not unfold).
In the photo below, we see that an ordinary glass goblet (or a vase for jam) was used as a stand for such a voluminous rolled Christmas tree.

According to this principle, you can make a bright Christmas tree if the rolls are twisted from colored table napkins.
You can put a rolled Christmas tree on a long stick-leg and stick it into a flower pot with earth.

Below is a classic way to create such a Christmas tree from paper rolls.

And here is a method where the bags are not glued to the base cone, but simply laid in radially circular rows.

Such paper bags can create a Christmas tree on any plane - on the wall or on the door to the office. A quick and easy way to make a beautiful office decoration for the New Year. I have collected even more ideas for New Year's decor for cabinets and office space in a special article.

Idea #13
Christmas tree in the technique of QVILLING.
(4 ways from flat to voluminous)
And here are paper Christmas trees made using the QVILLING technique. They can be flat as in the photo below.

It's simple.
STEP1 - paper is cut into strips.
STEP 2 - Each strip is twisted around a quilling rod (or a simple toothpick).
STEP 3 - The twist fits into the circle-hole of the stencil - and inside this round frame of the hole we relax the twist (so that it unfolds slightly, but within the specified size).
STEP 4 - Next, we carefully remove the twist from the stencil and glue its tail (so that the twist does not unwind further, but retains the size specified by the stencil. This way we get round twists of the same size.
STEP 5 - Then we take a round twist and with our fingers we set the FORM of the twist - it can be TEAR-SHAPED (as in the photo with the Christmas tree below). And from such twists we glue our Christmas tree out of paper.
Such children's crafts can be offered in the classroom in the circle of school creativity. It can be done together with grandmothers and children for a competition in kindergarten.

The corners of the droplets can be slightly bent up (as in the photo of the Christmas tree below).

You can make Christmas trees using the quilling technique for any fantasy shape.
DOUBLE-LAYER Christmas tree in quilling technique.
But a Christmas tree made of paper in the same technique - where the quilling modules are not glued to a sheet of paper, but to themselves - that is, they stick together side by side. And such gluing of paper strands is stacked in two layers

Paper quilling tree - ON THE ROD.
Quilling twists can be placed on the rod. From cardboard we make a rod on the edges of which we will glue the twists. Here we see a striped Christmas tree, where the twist modules are attached to a central cardboard rod.

But the Christmas tree where the central rod made of cardboard has a hexagonal section - that is, this rod has 6 sides and 6 edges. On these flat sides we attach the base of the paper droplets. Please note that here the droplets are of different sizes - at the bottom there are large twists (made according to a large stencil-hole), and at the top there are smaller ones. We attach a rhinestone to the tip of each droplet.


You can glue the twist droplets with the sides down, as is done on the Christmas tree from the picture below.

A quilling twist can be placed around a round rod - and put the modules in a horizontal plane (as in the photo of the quilling paper Christmas tree below).

Fastening modules to a round rod will serve another flat piece of paper the same color. First wrap the paper around the rod on glue- we leave the tails sticking out on both sides of the rod - and strips between these ponytails we put our finished twist, and hug it, wrap it around with tails - gluing them to the twist. In order for such fasteners to hold better – we repeat it with another strip of paper (and, if necessary, with another strip) - so our twist will ideally keep its horizontal plane.
You can make a simple quilling herringbone from weak looped and curlicue twists from cardboard or thick non-quilling paper (as is done in the photo below).

Paper quilling tree - ON THE BASIS OF A CONE.
You can glue the twist modules not on the rod, but on the classic cone base.

The cone can be round(as in the photo above). Or the cone may have rectangular section- that is, to have ribs and flat sides (as in the photo below). On such planes cone-pyramid It is convenient to apply any quilling patterns. And we will get a patterned 3d Christmas tree.

You can connect children to such a craft. They will happily wind up the modules. And then they will help you glue the pyramid-tree with them. A good children's Christmas craft.
Idea #14
Christmas tree craft from bushings
from toilet paper
And here is another idea for a Christmas tree made of paper. Here, rolls of cardboard and paper of different diameters are taken as material. You can use rolls of scotch tape and masking tape, supplement them with toilet paper cardboard sleeves (shortening them to the height of scotch rolls), you can use narrow tubes from office fax paper (also cut into short lengths). Screw homemade rolls of cardboard.
And from such a prefabricated material, fold-glue a Christmas tree. Rolls can be glued to each other with a glue gun, or with double-sided tape. A simple craft that kids will love to do.

Only toilet paper rolls of the same size can be used. And fold them into a Christmas tree in the form of a pyramid. Pre-paint the rolls green, dry, glue. So that the gouache paint does not stick to your hands and does not dye clothes, the dyed and dried rolls need to be sprayed with hairspray - the paint will fix and the color will become brighter.
Inside each roll we put a Christmas ball (you can just put it or you can hang it by a hole in the roll) - instead of a ball put a large candy in a shiny wrapper. You can decorate the side of such a Christmas tree made of paper rudons with New Year's glass beads.

If you start collecting rolls in advance and involve all the staff of your company, then you can make a very tall large Christmas tree to decorate the office.

And here is another way to design a Christmas tree from paper rolls. There is a more economical consumption of material, since the herringbone empty inside. Just made from rolls rings– (rolls just stick together in a round dance with their sides. And then such round dance rings from rolls are placed on top of each other and Christmas tree balls are put into their sockets. Pre-paint the rolls in the desired color.

These are the ideas for a do-it-yourself paper Christmas tree I have collected today in this article. Now you can choose an easy and beautiful way to make a Christmas tree for yourself. Good luck with your New Year's creativity and beautiful Christmas trees. May everything work out now and in your New Year.
Olga Klishevskaya, especially for the site ""
If you like our site, you can support the enthusiasm of those who work for you.
Happy New Year to the author of this article, Olga Klishevskaya.
A bright decorated Christmas tree is the most important symbol of the New Year. That is why on the eve of the holiday we will make a Christmas tree in various versions.
DIY Christmas tree crafts can be made in or at home.
Craft Christmas tree from plasticine
We mold the first Christmas tree from plasticine - the most popular material for creativity in kindergarten. Make three green balls and one brown from plasticine.

We turn two green balls into cakes with wavy edges. From the third ball we sculpt a cone with wavy edges. From green plasticine of a different shade, we roll two small balls.

We flatten the green ball and place it on a wavy cake. By the same principle, we connect the green ball and the cone.

From a brown ball we roll a small cylinder. We attach it to the second cake. This is the future trunk of the Christmas tree.

We combine all the plasticine blanks. We should get a Christmas tree with fluffy branches.

Look at the video - how to make a plasticine Christmas tree:
Salt dough Christmas tree
A Christmas tree in kindergarten can be made from salt dough. This craft will be possible even for the smallest children.

Materials for crafts "Christmas tree made of salt dough"
Cooking salty dough with the addition of green paint and sparkles. We roll it into a cake with a thickness of no more than 0.5 centimeters. We put a thick film so that the dough does not stick to the rolling pin.

We cut out a Christmas tree from the dough using a special baking dish. You can cut a Christmas tree with a regular plasticine stack.

We decorate the Christmas tree by pressing decorative beads and rhinestones into it.

Let the piece dry. Christmas tree made of dough - ready!


You can decorate a Christmas tree made of salt dough with sparkles and colored powders.

Christmas tree made of thread and cardboard
A spectacular New Year's souvenir can be made from cardboard, threads and beads. We cut out a Christmas tree from thick cardboard and paint it green.

We rewind the Christmas tree with threads with beads.

Decorate the Christmas tree with a star. It remains to fasten the loop in the upper part and our New Year's souvenir is ready!

You can use rhinestones or sequins to decorate such a Christmas tree - the craft will turn out to be very bright and festive.

Herringbone from corrugated paper
You can make a very spectacular Christmas tree out of corrugated paper. We need a base - a cone made of cardboard. We cut green corrugated paper into strips 2-3 cm wide. We take the first strip and, collecting it with an accordion, glue it to the cone.

We continue to fix the strips of corrugated paper on the cone. We should get fluffy spruce branches.

We twist the top of the Christmas tree out of paper and fix it on the top of the cone. We decorate the Christmas tree with beads.

We decorate the top of the Christmas tree with a small star. Easy to perform and elegant New Year's crafts "herringbone" - ready!

Herringbone applique from a disposable plate
A beautiful New Year's is obtained from a disposable plate. We color it green in advance, cut it into three parts, and glue it to the winter landscape drawn on a piece of paper.

Creating a landscape can be a preparatory step: first we fill the background of the sheet with blue,

and then, when the paint dries, we glue snowdrifts of white paper to the bottom.

You can draw or glue ready-made decorative falling snowflakes and a paper star on the main background.

It remains only to decorate the Christmas tree with a star and beads of multi-colored balls. Beads can be made in advance by stringing beads on chenille wire.


Herringbone lace appliqué
A herringbone using the applique technique can be made from lace. Cut the lace into small pieces. We glue the lace on the base, picking it up with folds.

Glue the pieces of lace onto the base one by one. To the top of the Christmas tree, the pieces become smaller and smaller.

We decorate the Christmas tree with beads, buttons and a ribbon bow.

We place the Christmas tree on a sheet of paper folded in half and we will get an amazing New Year's card!

Herringbone appliqué made of felt
The kids will also like felt appliqués. To make an interesting New Year's craft, we bring pieces of green and brown felt to the kindergarten, as well as small multi-colored pompoms.

We cut out a triangular crown from green fabric, and a rectangular tree trunk from brown fabric.

Decorate with pompoms like Christmas balls.

Glue the stem of felt.

Christmas decoration "Christmas tree made of felt"
You can make a charming Christmas tree out of green felt. We cut green circles of different diameters from felt. We make a hole in the central part of the circles.

We glue colored rhinestones on the circles.

We make a loop from chenille wire.

We string a bead in the form of an asterisk on the chenille wire.

We begin to string circles of felt on the chenille wire, starting with the smallest.

The last circle will be the largest. We tie a knot on the chenille wire so that the circles hold tightly.

A lovely Christmas tree made of felt - ready!

The Christmas tree made of felt turns out to be incredibly cute and homely. According to the paper template, we cut out two identical blanks from thick felt. We sew them on a typewriter, leaving a small hole. Don't forget to sew on the ribbon at the top of the Christmas tree. We fill the Christmas tree with cotton wool through the hole. Sewing up the hole. We can decorate such a Christmas tree with beads, sequins, beads, rhinestones, pompons - any available material.

Volumetric Christmas tree made of cardboard
But even with great interest, children will do voluminous crafts. They can also be quite simple. For example, by folding a piece of unusual green paper into a cone, we get a real fir tree.


If the bottom is glued to the cone, then it can be used as a package for a small sweet surprise, which we put inside in advance.


It remains only to hoist a traditional star on its top.

You can do without a star, replacing it with a pompom.

DIY tinsel Christmas tree
Another version of the New Year's beauty is made using tinsel. For crafts, we need a long green tinsel. From cardboard we fold the base-cone.

We wrap the cone with tinsel, fixing it with glue.

We wrap the entire cone to the base. Christmas tree made of tinsel - ready!

To decorate the Christmas tree, you can use sweets, beads or small Christmas decorations.

An incredibly beautiful and original pasta Christmas tree is obtained. To make it, we need to make a cone out of paper. Then we put the cone on the stand and start gluing pasta from the bottom row.

We try to use smaller pasta in the upper part. We fill the entire cone.

We color the Christmas tree. If we use gouache for coloring, then we try to take as little water as possible.

We coat the edges of the Christmas tree branches with silver gel. We glue on the Christmas tree decorations - bows and bells. Christmas tree made of pasta - ready!

In order to make a Christmas tree from foamiran, we need foamiran itself, an iron, glue, green cardboard, scissors, sparkles, beads and decorative bells. Cut the green foamiran into strips. On one side we make cuts. We will get a fringe of green foamiran. To give the fringe a bend, heat it on an iron.

We make a cone out of green cardboard. Using a glue gun, glue the fringe to the cone.

We glue the entire cone with a fringe of foamiran. The top is decorated with a red star.

We give the Christmas tree a festive look - we glue multi-colored beads and bells. Craft Christmas tree from foamiran to kindergarten - ready!

Craft Christmas tree from organza
A very beautiful Christmas tree is obtained from green organza. We will need to cut the organza into strips of different widths. Fold the strips in half and pull them together from one side in the center. We should get at least five round blanks.

We take the base of the Christmas tree. It can be any rod or cocktail stick. We string organza blanks onto the base, starting with the largest. We fix the organza with glue.

We decorate the upper part of the base with a green ribbon and a bow. We fix the lower part of the Christmas tree with plasticine in a glass or other decorative container. It remains to decorate our Christmas tree! We glue delicate sequins on its branches. Craft Christmas tree from organza - ready!

Topiary - do-it-yourself Christmas tree
Topiary is a tree of happiness. We came up with an interesting idea to make a Christmas tree topiary. This will be a wonderful New Year's wish of happiness. We make a cone from foam.

Wrap the cones in foil.

We twist one of the ends of the copper wire into a spiral. Attach double sided tape to the cone. We begin to wrap the cone with green yarn of different shades. The adhesive tape will fix the threads on the cone well.

We tie the ends of the threads with a bow and decorate with beads. We decorate the lower part of the Christmas tree with green cotton wool or yarn.

When the entire cone is wrapped with threads, we tie their ends and decorate them with beads. Glue beads onto the Christmas tree. We fix the Christmas tree in a decorative bucket using plaster or plasticine. Use wool to frame the bottom of the Christmas tree and the space inside the bucket. Christmas tree topiary - ready!

DIY Christmas tree made of cones


Look at the video for another version of the Christmas tree made of napkins:


