Paper crafts for children: interesting do-it-yourself applications. Colored paper crafts (106 photos): instructions and cutting patterns for creating amazing toys and decorations Paper crafts for 2 3 years old
Colored paper is an excellent material for crafts. You can make applications, various figures and many other creative things from it. In this article we will consider: how to make crafts from colored paper for primary school children with their own hands.
You will need: thick colored paper, glue gun, ruler, scissors, adhesive tape, stationery gum, pencil, pen spring.
Master Class
- Take a sheet of paper and a pencil, twist the tube diagonally from the corner, then fix it with tape and pull out the pencil.

- Twist the second sheet of paper around the first tube, then pull them apart. The second paper tube should be slightly larger in diameter than the first so that it can be fired from in the future.
- Fix the second tube with tape, then cut off the edges.
- Twist 2 more paper tubes in the same way.
- Cut the tubes into segments of this length: trunk - 2 tubes 15 cm long; handle - 7 tubes 5 cm long; trigger - 1 tube 8 cm long.
- Glue 5 cm tubes diagonally to make a handle.

- Glue the 8cm tube on top of the handle so that the remaining 3cm protrude to the right. This is a trigger.
- Glue two 15cm tubes together and glue to the top of the gun as a barrel.
- Twist two thin tubes from yellow paper.
- Bend the thin tube into a "U" shape and insert one end into the trigger and the other end into the top tube of the handle. Cut off the excess. This will be the trigger.
- Make a trigger guard from the second thin tube. To do this, place one end of the tube in the handle (in the second tube from the top) and glue the rest of the tube to the bottom of the barrel.

- Twist the pink paper tube, flatten it and tape the handle as shown in the image. It is worth noting that the rear hole in the trigger must be open.
- Remove the trigger from the top tube of the handle and insert the spring. It is worth noting that the spring should rest against the tube covering the back of the handle. Reinsert the trigger.
- Twist a thin thick tube of yellow paper, secure with tape and cut off the edges so that they are even.

- Bend the edge, put on an elastic band and fix with glue.
- Insert the tube with the rubber band into the down tube of the gun barrel and pull the rubber band forward, hooking it between the two tubes.
- Roll up bullets out of paper, load the gun and shoot.
You will need: colored cardboard, scissors, glue stick, cotton wool, stapler.
Master Class

The rainbow in the clouds is ready!
Binoculars
You will need: yellow cellophane, scissors, adhesive tape, black paint, brush, green and black paper, glue, rubber band, wine cork, string or elastic band.
Master Class
- Cut out 2 circles of yellow cellophane and stick with tape on the circumference of the bushings as binocular lenses.

- Paint the circumference of the wine cork with black paint and cover it with green paper.
- Tape the sleeves with green paper and glue the black stripes as shown in the image.

- Glue the bushings together and fix by putting on a clerical gum. After a while, remove the gum.

- Glue the glued cork between the bushings.
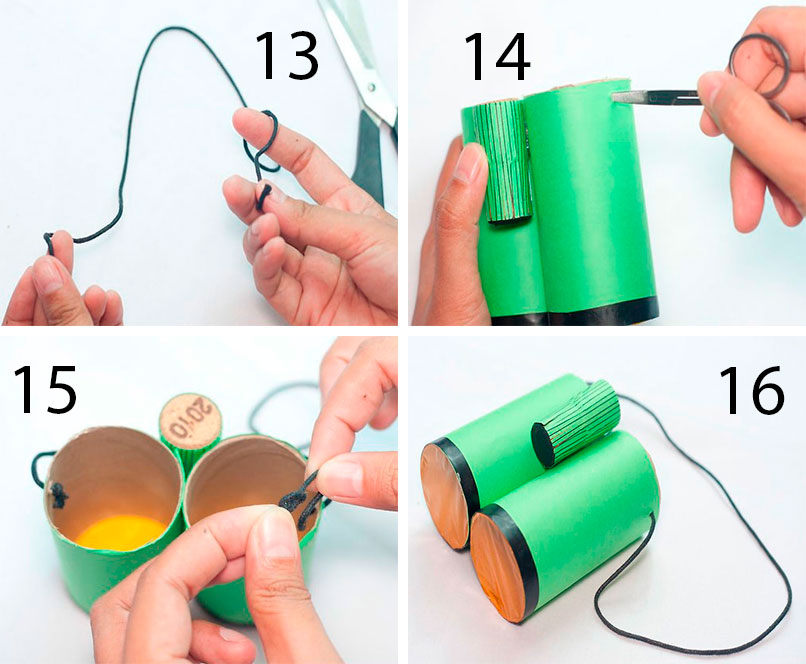
- Prepare an elastic band or rope of the desired length, make a hole on the side of the bushings and fasten the elastic band.
Binoculars are ready!
Origami rose
You will need: double-sided colored paper, scissors, a simple pencil.
Master Class
- Fold a sheet of colored paper diagonally as shown in the photo and cut off the excess strip to make a square.
- Bend the square to form a second diagonal.

- Bend the square in half to form lines like a snowflake.
- Move the sides of the workpiece in this way: the top - from the right side to the left, and the bottom - from the left to the right, to make a triangle.
- Bend all 4 peaks to the middle and run your fingers along the folds.
- Expand the workpiece to a double triangle and fold the top corner back.

- Spread the bud and bend the folded corner inward.
- Gather the double corner back and run your fingers through the folds.
- Raise 4 side corners to the top.

- Flip over, then fold each side to the center to the middle. You should get a blank with a hole at the bottom.
- Blow strongly into the hole from below to straighten the bud.
- Twist the petals using a simple pencil.

- Take the strip of paper cut off at the beginning.
- Fold the stem and insert it into the bud.
The origami rose is ready!
Moving 3Dfish
You will need: colored paper, scissors, glue, pencil, black felt-tip pen.
Master Class
- Take a sheet of blue paper and make a square.
- Fold the sides to the fold line, then open the paper.

- Fold the paper in half in such a way that you get a triangle, as shown in the image.
- Make cuts along the fold line, then open the paper and glue the overlapped parts that are not cut.
- Flatten the fish's face by cutting off a corner.

- Cut out the fins and tail from the pink, then draw stripes with a felt-tip pen.
- Cut out the eyes from white paper and draw the pupils with a black felt-tip pen.

- Glue the fins, tail and eyes, also do not forget to draw eyelashes.

- Cut out an elongated semi-oval and glue it as the lower jaw.
You will need: a sheet of colored paper, a felt-tip pen and scissors.
Master Class
- Fold a sheet of colored paper in half.
- Place your palm on the piece of paper so that the thumb and forefinger touch the edge of the piece of paper, thereby forming a half heart.
- Circle your palm.
- Cut out the palm and unfold the craft.
The heart in the hands of colored paper is ready!
You will need: colored paper in white and yellow, a simple pencil, ruler, glue, coin or compass.
Master Class
- Cut 9 strips of paper to the same size.
- Make 2 circles on yellow paper.
- Cut them out.
- Glue the ends of the strips to form petals.
- Glue the petals to the yellow circle, then glue the second circle on top.
You will need: red colored paper, a simple pencil, scissors, a round object.
Master Class
- Trace a round object on colored paper.
- Draw a spiral in the circle.
- Cut out the circle.
- Cut the spiral in such a way that you get a "spring"
- Twist the rosette, in the same way make the desired number of roses.
Original colored paper roses are ready! I recommend watching the video tutorial!
You will need: double-sided colored paper, glue gun, stick or skewer as a stem, button.
Master Class

A creative flower made of colored paper is ready!
You will need: 4 sheets of colored paper, double-sided tape.
Master Class
- Fold each sheet into an accordion.
- Fold each harmonica in half to form a fan.
- Glue 4 sheets together in such a way that you get a circle.
A fan flower made of colored paper is ready!
You will need: colored paper, stapler, cut out butterfly (from a magazine, notebooks, pictures), felt-tip pen.
Master Class

A case for surprises made of colored paper is ready!
You will need: colored paper in black and yellow, a simple pencil, scissors, ruler, glue, compasses, sequins.
Master Class

Colored paper owl is ready!
You can also make a cute bunny out of colored paper, but see how in this video!
colored paper sisters
You will need: paper of two colors, 2 wooden sticks, buttons for the eyes, rubber bands or ropes for hands, pencil, glue.


- a great way to fill walks on the street with delight and emotion. This summer craft is easier to make than you think. And how much joy!

Most likely, after relaxing at sea, you brought with you a lot of “treasures”: shells and sea pebbles. But do not rush to throw away this treasure, but turn it into children's toys. - This is an excellent training of fine motor skills and imagination of the child. Color, play and even use in the interior.

A glass of lemonade is a great summer craft for kids at kindergarten or summer camp. For children of different ages, applications of varying complexity can be offered.


What is summer without insects! Invite the children to make crafts from paper or plasticine about the life of insects. Invite them to fantasize about what ants drag into the anthill, cut out ladybugs, glue multi-colored wings to butterflies, leave prints of plastic caterpillars and beetles on plasticine.


For the sake of ice cream, children are waiting for summer. A simple craft on the theme "Summer" from colored paper will make the child happy until the end of the day, at least.

Strawberries, cherries, watermelons and other berries, vegetables and fruits that are so abundant in summer can also be ideas for summer crafts. They can be made from paper and cardboard, buttons or plasticine.


These summer paper plates are also unique in that you can play with them. Both the octopus and the boat are separate crafts glued to wooden sticks that are threaded through a horizontal slot in a paper plate.

Another idea that can be made from plasticine on a marine theme is a jar with plasticine marine inhabitants: fish, jellyfish, starfish, shells, pebbles and algae.

Now you have 17 great summer themed craft and appliqué ideas that kids can easily make at home, kindergarten or summer camp and have fun. We hope you find something interesting to do with your child to extend his summer a little more. If you have more ideas for summer crafts, share them on our forum.
Cover photo source: www.thehousethatlarsbuilt.com
How bright and varied such creativity as an application for children of 3-4 years old can become. The main thing is simplicity, convenience and safety in work.
It is recommended to select scissors with rounded ends and, of course, take into account the mood and wishes of young creators. You need to teach how to make, starting with simple options: the sun, a house, butterflies. You can come up with a lot of interesting crafts on the theme of "summer". The child will be happy to display what he has conceived on paper, and share his impressions of what he saw on the street: a river, a bright sun, juicy strawberries, green leaves. Maybe yesterday morning there were drops of dew on them. I wonder how they will look on paper?
What to make?
For crafts, children will need:
- colored paper;
- cereals;
- plasticine;
- glass pieces;
- shells;
- leather;
- beads;
- cotton wool;
- newspaper;
- threads;
- stones;
- paints.

Interesting models are obtained using:
- Colored napkins.
Tear into small pieces, roll into balls. Then draw the outlines of any object on paper, glue the balls in the center. This is a great activity for kids to develop motor skills.
- Papers.
Various figures are cut out, which are glued to the base or to the drawn contours.
- Dry leaves, for playing compositions on an autumn theme by gluing to cardboard in the form of butterflies, birds, trees, leaf fall.
- Cereals.
Not many parents think about how many different exciting summer crafts you can come up with by gluing grains to paper or cardboard in the form of animals, insects, butterflies.

- Cotton wool, from which you can roll small balls, draw on a cardboard base, for example, a lamb, and glue cotton balls that look like wool to its body.
- Eggshells, which are enough to paint with bright colors, is not a material for creativity? Can be glued to the drawn templates on paper in the form of different compositions: flowers, leaves, Christmas trees, mosaic figures.
If you dream up, then the summer application can be made voluminous and lush using cotton wool, fringe, woolen colored threads. The volume makes crafts on paper more alive and real.
So, let's make chickens:
- for weed, cut a strip of green paper 6 cm wide;
- cut along the edges in the form of a fringe;
- grease the cut part of the paper with glue;
- glue gently to the base;
- straighten the fringe with your hands;
- cut out 3 circles of different diameters from yellow paper for the future chicken;
- make small cuts on each mug;
- start sequentially gluing a large, medium and small circle, lubricating the middle of each with glue;
- paint on the chicken's eyes, paws and beak with a pencil, or simply cut and paste using red paper.
The chicken sketch is ready. It remains to add liveliness to the application and feed the birds by scattering a few grains, gluing grains on the glue in a chaotic manner.

Kids should be given the opportunity to dream up - maybe there is not enough sun, a house, a stream, a green lawn in the picture, which should be painted on with colored pencils or paints, or cut out of colored paper.
Usually, by the age of three, kids speak well on their own, so a joint creative process in the form of an application for children from 3 years old can become very fruitful.
Summer Options
Crafts on the theme "summer" are always relevant in kindergartens. It is important to give the child the opportunity to display on paper what he has recently seen, thus expressing his emotions and impressions. As an option, you can make an application-street.
You need to prepare cotton wool, scissors, colored paper, cardboard, glue stick.
- Take cardboard as a base, glue asphalt from a black strip in the lower part, and a white strip in the middle to make a dividing strip.
- Glue the green one on top of the black stripe. It will be weed.
- Cut rectangles out of brown paper, make cuts in each for windows - you will get high-rise buildings.
- Glue the houses to the lawn, and to them the roofs in the form of a trapezoid made of corrugated cardboard.
- If you take a brown corrugation and cut tree trunks from it, and leaves, Christmas trees from green corrugation, then you will end up with green spaces.
What else can be added? A traffic light, cut out of black paper and glued near the road, also cars, using paper of different color palettes in the work.

Other variations of paintings
For children 2, 3.4 years old, such simple application options are suitable as:
- bridge over the river;
- sea, waves, rocking boat;
- a pyramid on paper, by cutting and gluing circles of different diameters on top of each other;
- different geometric figures in the form of a kitchen, which will appeal to any little girl;
- mushrooms in the picture, but if you paint on their eyes, mouth and nose, they will start to smile, and the summer sun painted at the top will enliven the mushroom clearing;
- chickens on the lawn in summer: white and yellow, and butterflies fluttering nearby;
- spring flower meadow (various small figures for petals, leaves, stems are cut out of colored paper).
The kids will diligently stir all the parts on the base, folding them into a single whole. Well, such an application instills a love for nature from an early age.
On sale for kids there are ready-made application kits containing everything you need to conduct creativity lessons at home or in kindergarten.
What does the application give for the development of children 3-4 years old?
Of course, it develops logic, thinking, perseverance, attentiveness, quick wits. It remains for the educator or mother to choose an acceptable topic for creativity, captivate the child, explain the features of the work and use of objects, give complete freedom for imagination and fantasy.
Experts recommend carrying out the process together with the child, helping in the work, unobtrusively pointing out mistakes, prompting if necessary. Doing all the work for a baby in three or four years is not necessary. Let him independently try to capture something on paper using various materials at hand. Children of three or four years old usually already have their own opinion.
The task of parents and teachers is to help a little in the process of work. Children will be happy to share their emotions and impressions on paper.
In chapter:
Volumetric crafts made of colored paper have been and remain the most popular type of children's creativity. Paper is one of the simplest and cheapest materials, often used in kindergartens and school groups. You can interest a child in paper crafts by choosing a topic that is interesting to a particular baby. In addition, even paper crafts can be made using different techniques: scrapbooking, origami, voluminous applications, quilling.
Volumetric crafts - paper animals
If we talk about paper crafts for children 4, 5, 6 years old, then one of the popular topics for creativity is the animal world. Volumetric animals made of colored paper, birds, insects and fish seem to come to life, acquiring not only a bright color, but also a bizarre shape.
We have selected voluminous paper animal crafts, master classes, templates and step-by-step instructions especially for you.
In this article, we will consider not just examples of finished works, but also templates for voluminous crafts, which you can print directly from the site.
In addition to the paper and cardboard itself, we will also need scissors, a glue stick (or PVA), a simple pencil, some additional details, such as toilet paper rolls and doll eyes. By the way, you can make toy eyes yourself by cutting out a small circle from white paper and drawing a dot on it with a black marker.
Please note that some instructions contain not only colored paper, but also cardboard, paper cups or disposable paper plates and napkins, but do-it-yourself voluminous paper crafts made from these improvised means look no less impressive.
An original solution would be a do-it-yourself voluminous paper craft for a preschooler as a gift or a small present to a close relative (grandmother / grandfather / dad). It can be a themed figurine for one of the holidays or some memorable day. So, 3D animals are a huge success with children, the schemes and patterns of which we will now consider.
This simple colored paper craft is not only easy to make, but also fun. Any child can do this task in 15 minutes. For a paper shark, you need a sheet of double-sided blue or blue paper, white and red, scissors and a glue stick. We will work according to the following scheme:


Another interesting work is a voluminous giraffe made of yellow paper. To work, you need a yellow sheet and a brown strip. Cut and glued as follows:

Approximately in the same technique, the following three works are performed - a caterpillar made of paper, a mouse and a bird. Blanks of the required size are cut from the sheets, folded and then glued together.


Interesting in terms of manufacturing can be a butterfly made of colored paper - that's where the child can show all his imagination and imagination. Butterfly wings can be completely different, moreover, a colored sheet is taken as the basis, and you can stick different patterns on it or just paint it.

Volumetric fish made of colored paper - such an interesting and simple craft will take the child for 15-20 minutes:

Funny elephant made of black velvet paper - a simple craft will require some participation from an adult. In order for the child to make an elephant, an adult must draw an outline for him on black paper, along which you need to cut out the outlines of the animal:

And we will make this elephant from a toilet sleeve (it is also paper) and glue it with green paper (you can take any other color:

Another funny creature from a paper sleeve is a chicken:

For voluminous animals, paper is not the only possible material. The original craft can also be made from paper cups:

Templates for voluminous paper crafts can be printed on white office paper, cut out and painted, but if we are talking about a specific living creature with a certain color (a frog, for example), then it is better to print the blank on paper of a specific color (in the case of a frog - green). Rate paper animal templates for a child from 4 years old:


Crafts for children 3-4 years old, made of paper with their own hands, can be completely different. These are various applications, souvenirs, educational toys. Children with the help of their parents are able to create real works of art.
original apple tree
Any child can make an unusual tree. To work, you need a minimum list of materials and a little patience. As a result, the kid will spend time with benefit, he will be able to make an apple tree on his own. Such a tree will become a real decoration in the room, remind you of an interesting master class.
Materials for work:
- scissors;
- toilet paper roll;
- green paper;
- paints;
- brush;
- glue.
- The toilet paper roll will act as the trunk of the future tree. First of all, it must be prepared. We cut the roll from above into several parts, thereby forming the branches of the tree.
- On the sheet we draw small circles with paints, these will be apples.
- Gently crush the sheet, glue it on top of the trunk.
- The apple tree is ready, you can look for a prominent place in the house for it. If you wish, you can make a few trees and make a real apple orchard.
Do you make paper crafts?
Vote
puzzle tree
Each child will have pieces from the old puzzle. They, of course, can be thrown away, but it is best to give things a new life. Using imagination, you can create paper crafts for children 3-4 years old from unnecessary details with your own hands. It is desirable to connect the kids to the work. They will be delighted with the creative process.

Materials for work:
- puzzle details;
- green, brown paint;
- sequins;
- rhinestones;
- fishing line;
- beads;
- glue.
Execution sequence:

- We paint the puzzle pieces with green paint, sprinkle with sparkles.
- We glue the parts together in the form of a Christmas tree.
- We make a stem. To do this, paint the details with brown paint. We attach the trunk at the base of the tree.
- As soon as the tree is assembled, we proceed to decorate it. To do this, we use various decorative elements.
- We make a loop of fishing line, decorate it with beads. We attach the fishing line to the finished product.
- You can hang this craft on a Christmas tree and enjoy the work done.
Funny mouse on a plate
Paper crafts are very popular. They are of particular interest to young children. Kids are happy to participate in the creative process and enjoy the work. Making a mouse on a plate is quite simple. It is enough to prepare the necessary tools and be patient. Such a toy will take pride of place in the house, even become a decoration in the room.

Materials for work:
- paper;
- markers;
- disposable plate;
- scissors;
- glue;
- threads.
Execution sequence:

- We cut out a circle from paper, decorate it with felt-tip pens.
- The resulting figure is wrapped in a cone and glued.
- Cut out ears and eyes from paper. We decorate them with other colors. Glue the pieces to the cone.
- We attach a thread to the mouse. This will be her tail.
- We fix the resulting product on a disposable plate.
Suitcase with a secret
DIY paper crafts are of particular interest to children 3-4 years old. Kids are happy to cut, glue, decorate paper products. To make the master class interesting, parents should also join the work.

Materials for work:
- matchboxes;
- glue;
- markers;
- colored paper.
Technique:
- You need at least 4 boxes to work. It is best to prepare more of them, 10 pieces will be enough.
- We glue the boxes.
- We wrap the fixed part with colored paper, carefully glue it.
- We decorate the received product at our discretion. The drawings made by felt-tip pens look original. You can add decorative elements.
funny hares
Children 3-4 years old already know how to cut with scissors. This means that they will be able to create funny hares on their own. Funny toys will be a wonderful decoration at home, remind children of an interesting pastime.

Materials for work:
- colored paper;
- scissors;
- glue;
- ruler;
- markers.
Technique:
- We draw the contours of the stripes on colored paper, carefully cut them out. The stripes must be the same width.
- Collecting rabbit. We glue the strip with a ring - this will be the head.
- Cut out the ears, attach them to the head.
- To make paws, we take wide stripes, make cuts from below. Attach the legs to the body.
- Draw on the eyes with a felt-tip pen.

You can supplement the work with the help of grass. To do this, it is enough to cut it out of green paper, and plant a hare in the grass.
Application on the theme of fishing
To please the child with colorful characters, you can make paper fish. This will not take much time. It is enough to take the necessary materials and interest the baby. The child will be happy to do all the work on his own.

Materials for work:
- cardboard;
- colored paper;
- plate;
- ruler;
- scissors;
- pencil;
- confetti;
- glue.
Execution sequence:
- Draw a circle on paper. To make the figure even, you should use a plate. It is enough to put it on a sheet, circle it with a pencil.
- We mark the sector. It should be about 1/6 of the entire circle.
- Cut out the marked sector. This will be the body of the fish.
- We cut out a heart from paper, attach it to the bottom of the body. This will make a tail.
- Decorate the fish as you wish. You can smear it with glue, sprinkle with colorful confetti.
paper frog
Master classes for children 3-4 years old allow you to make paper crafts with your own hands. The toy in the form of a frog will bring great joy to the child. With its help, you can arrange a theatrical performance and gather all the household members in the family circle.

The frog has deserved to be called the simplest origami model. Just a few fold lines, and the product will be ready.
Materials for work:
- sheets of green and red paper;
- glue;
- markers.
Execution sequence:

- We take a sheet of green color, place it on the table in a vertical position.
- Visually divide the sheet into 3 parts, making imaginary bending lines.
- Fold the rectangle in half. It should be folded up.
- Bend the bottom edge up, turn the figure over. We repeat the action until a kind of accordion is obtained.
- Cut out the tongue from red paper, glue it to the product.
- Draw the eyes with a black felt-tip pen.
Crumpled Paper Chicken
Making a craft is not difficult. Even small children who have never participated in the creative process can make it. Toddlers will happily begin to crumple paper. This is an interesting and exciting activity for them. It would seem that what can be done with crumpled sheets, how not to throw them away. But the needlewomen came up with a more interesting way, they used paper to make toys.

Materials for work:
- double-sided colored paper;
- glue;
- moving eyes.
Execution sequence:
- We take a sheet of paper. Since we are making a chicken, it should be yellow. Do not choose dense sheets, the child will not be able to work with them on his own.
- We wrinkle the paper, turn it over to the other side, and wrinkle again. We roll the paper into a ball.
- We do the same with green sheets, but at the end we give them the shape of a clearing. Next we will put a chicken on it.
- Cut out a triangle from red paper, glue it to the body.
- We attach eyes to the product.
- Cut out 2 wings from even sheets, glue them on the sides.

The chicken is ready, you can come up with an entertaining game with his participation.
paper lanterns
DIY paper crafts are very popular. For children 3-4 years old, many master classes have been developed. Parents can easily pick up an entertaining lesson and make an original toy with the baby.
Paper lanterns have been known to everyone since childhood. Bright rings, fastened together, were an excellent decoration for the house. They could be met at a New Year's holiday or a children's celebration. Flashlights do not lose their relevance today. Kids are happy to get to work and make fun decorations.

Materials for work:
- colored paper in two shades;
- thin tape;
- glue;
- pencil;
- cup;
- scissors.
Execution sequence:
- Draw circles on colored paper. To do this, just put a cup on a sheet, circle it with a pencil.
- Carefully cut out circles.
- We fold the resulting figures in half.
- Let's start collecting. We unfold the circle, smear with glue on one side. We attach 2 bent circles to it, again coat with glue. Thus we make a garland.
- In the center we place the tape, glue the expanded circle. Next, glue 2 bent blanks again.
- We straighten the petals.

- To make flashlights, you have to be patient. It is best to involve the whole family in the process. This will allow you to complete the work much faster, and the result will be a real New Year's garland.
- To prevent the lanterns from rolling during use, you can string pasta on a string. This will help make the structure stronger and extend its service life.
- Paper crafts for children 3-4 years old can be completely different. Doing them yourself is not difficult. It is enough to prepare the necessary materials and you can get to work.
If the whole family is involved in the creative process, it will be possible to make much more original products. As a result, it will be possible to spend time with benefit, decorate the house with interesting crafts and allow the baby to show his abilities. The child with great pleasure will take part in the work, offer a lot of his own ideas for creating toys.


