Rose blue gold from beads. Roses: bead pattern. Weaving roses from beads: a master class
In this master class, we will learn how to weave a wonderful beaded rose.
To make a rose from beads, we need:
- Czech felling or ~ 40 grams (for roses) and 10 grams (for leaves) (colors depend on your imagination);
- Wire 0.3 mm;
- Gerbera wire 0.8 mm and 1.6 mm for the axis;
- for winding;
- Threads ordinary for assembly;
- Pliers and wire cutters;
- Clay Moment;
- for stringing beads
- Sisal
Rose consists of the following elements
4 rows of petals(round top, round bottom):
1 row - 2-3 petals - 1.5 cm beads on the axis - 5 pairs of arcs
2 row - 3 petals - 1.5 cm beads on the axis - 6 pairs of arcs
3 row - 4 petals - 1.5 cm beads on the axis - 7 pairs of arcs
4 row - 5 petals - 1.5 cm beads on the axis - 8 pairs of arcs
5 sepals(sharp top, sharp bottom) - 1.5 cm beads on the axis - 1 pair of arcs
3 leaves(sharp top, sharp or round bottom) - 1.1 cm beads on the axis - 4 pairs of arcs
3 leaves(sharp top, sharp or round bottom) - 1.5 cm beads on the axis - 4 pairs of arcs
Weave petals and leaves for a rose using French weaving technique. How to weave petals with this technique can be seen in the section " Beading for beginners ".
We make the basis for weaving from wire 0.3 mm or 0.4 mm. Short wire - axis, long - working.
Rose petals are woven - round top, round bottom.

We collect beads on the working and axial wire.

Beads on the working wire should be under the beads of the axial wire. We fix (make one turn) the working wire on the axial one perpendicular to each other.

We continue in this way to fix the working wire for the required number of rows.


We cut off the axial wire from above, leaving the tip ~ 2-3 mm, bend it.


We sew a petal.

For this rose, we need to weave the following amount petals:

Sepals - 5 pieces
French weaving technique - sharp top, sharp bottom (we fix the working wire on the axial, not perpendicular, but at an angle of 45 degrees). 
Leaves - 3 small and 3 large
Weaving similarly to sepals.

Rose assembly
We collect leaves
We attach three small sheets to the gerbera wire with a diameter of 0.8 mm (with floss threads or floral tape).

In the same way, we collect the second branch of leaves from three large leaves. The leaves were collected.
We make three loops of 7 beads each (you can make two such blanks so that the middle is more magnificent). We attach them to the rod and successively wind the 1st, 2nd, 3rd and 4th rows of rose petals. Next, we attach 5 sepals. 


We wrap the rod with floss threads down. At a distance of 5-7 cm from the flower we attach a branch with small leaves, at a distance of 2-3 cm from it we attach the second branch of leaves. We wrap with threads to the required length. We fix the end with a drop of glue. The rose can be planted in a pot or in a vase.
Congratulations! Our rose is ready!


I hope you enjoyed the master class.
Ask questions and comment!
With love for you and creativity, Elena Kazakova.
A rose woven from beads can be almost indistinguishable from a living original. A beaded rose master class is inherently a very exciting activity and can be a lot of fun. Those who are familiar with this type of needlework know firsthand how exciting the process of creating a flower from beads is and how it can captivate. Such a flower will be a wonderful decoration for your home.
To begin with, consider a beaded rose master class, most suitable for beginner needlewomen. In this case, flowers are woven easily, and anyone can handle this business.
Workplace preparation
Before learning how to make a beaded rose, you should prepare your workplace for the beading process. A table should be chosen as such a place. Cover this table with a soft cloth to prevent the beads from rolling off the table. Of course, you can not cover the entire table entirely. Take, for example, a box of sweets or something else suitable and lay a piece of material on its bottom, on which you will lay out the beads. This can be done in turn, or you can place several flowers in piles at once. The fabric is better to choose light shades. This helps reduce eye strain. Lighting plays an important role. It must be very good. Especially in the evening. We should also not forget that, while learning how to make a beaded rose, you should still stop and take breaks to give your eyes a chance to rest. You can also use special containers for beads, especially if you have several colors in your work.
Tools and materials
What may be needed to make a beaded rose? Beaded flowers, the master classes of which will be discussed below, require beads, as well as wires of various thicknesses. Thinner wire is used for weaving. But thicker segments will be needed to create stems of roses and all other flowers. Also, green tape or threads are usually used, which are needed to wrap the stems and twigs. Do not neglect the descriptions and patterns of weaving. After all, a rose is a rather complex flower. And, of course, it's good to have small pliers or round-nose pliers in your arsenal of tools, as well as tweezers and good adhesive glue. Such as, for example, "Crystal Moment". It is useful in case of using threads or other winding for gluing the tips.
Rose from beads. Master Class. Scheme
To create rose petals, you should first use the parallel weaving technique. One bead is drawn onto a thin wire and placed in the center. This will be the first row. The second row consists of two beads. For the third, four beads are collected, for the fourth - six, then eight, ten and eleven.

After the last row is completed, on each of the wires you should collect beads in such a quantity that the length of the beaded thread is equal to the side of the petal, and now stretch both edges through the bead of the first row. Twist the wire edges to a length of about one centimeter and cut off the excess. One rose needs eight petals.
How to make sepals
To weave sepals for a rose, you should use the same technique as when creating petals. You will need green beads and thin wire. The first row consists of one bead, the second - of two. Then four rows of three beads are woven, and again - two and one. For one flower, you need to make six such sepals. They are located around the flower.
Making rose leaves
The beaded rose, the master class of which is now being considered, in addition to the flower, also has leaves. Each leaf is made up of five pieces that fit together into one piece. They are also woven in a parallel weave. In each part in the first row there are two beads, then three, four, three rows of five - and in the reverse order. The last row consists of one bead. When all five leaves are ready, you need to take three of them and twist them together. Using the wire of all three sheets, make a stem, and just below attach two more sheets to it. To make everything look nice and neat, wrap the stem of the leaf with green thread or floral tape. For each rosette of such leaves, you will need two, or even three.
We collect a flower
As soon as all the details of the future flower are ready, the beaded rose, the master class of which has just been considered, should be assembled into one. To do this, you will need a thicker piece of wire, on which all the already completed elements will be attached.

This segment will imitate the main stem of the flower. So, first we combine the petals into one whole and surround them with sepals. We twist all the wire edges together and wind the finished flower to the stem. A little lower we attach the leaves in the amount that you see fit. To make everything look beautiful and as natural as possible, the stem is also wrapped with threads or green floral tape. That's it, the flower is ready.
Weaving petals with plasticine
The beaded rose master class is not always the same. The process may differ not only in the color or shape of the beads, but also in the principle of performing certain elements of the flower. There is an option to make petals from beads using a plasticine base.

To do this, separate blanks are molded from plasticine, imitating rose petals. Such a blank is smeared with petroleum jelly, and beads strung on a thread are placed on it and smeared on top with transparent varnish.

After the varnish has dried, remove the petal from the plasticine blank, wipe off the Vaseline and lubricate it with varnish on the other side. In this way, all the petals are made and then they are already combined into one flower.
What are beaded roses
Flowers from beads (roses), the master class of which is considered in this article, although they are similar to each other, they still have some differences.

It can be a large single flower with solid or openwork petals, or it can be a branch that successfully accommodates several small specimens. Yet they have a common foundation. Solid petals can be made in parallel, looped or French weave. The same can be said about the leaves of this plant. French weaving is most often used to create single large roses. But the looped method is most suitable for a spray rose, since the size of its flowers is small. Having thus completed several buds of various sizes, it is necessary to collect them on one branch. To make an openwork petal, a fabric is woven from loops connected to each other. And both vertically and horizontally. Simply put, in the end, the petal looks like a grid. In such work, the main point is that the wire should be tried not to tighten. If you tighten too much, you will not be able to achieve the effect of airiness, flexibility and tenderness. Of course, in such a flower, both the leaves and the sepals should have an openwork appearance.
Having considered more than one beaded rose master class, you understand how exciting and interesting this lesson is. After all, just with the help of a certain amount of beads, wire and your own imagination, you can create a copy of a natural masterpiece that is practically indistinguishable from its original. And all it takes is just a little patience and effort.
Flowers are a traditional addition to almost every gift for the beautiful half of humanity. Delicate, fragile, unsurpassed, like every woman, they cheer up, delight the eye and attract attention. It's just a pity when a beautiful bouquet fades the next day, losing its charm.
artificial alternative
No matter how sophisticated florists are, even the most exquisite bouquet will delight its owner for a maximum of a week. That is why they began to look for an alternative to fresh flowers, creating them from various materials. Paper embroidery - the most common types of crafts as a gift. But flowers made of beads turned out to be as close as possible to the original. Due to the size of the material used, various weaving techniques, the products are so realistic that it is sometimes very difficult to distinguish them from a real flower.

Masters of beading have developed many techniques, they came up with various roses in these developments is quite common. Which is not surprising, because she is deservedly considered the queen of flowers.
Work materials
What you need to create a weaving pattern, beads (at least two colors, but more are possible), weaving wire, scissors or pliers. Such a simple set will help create a real beaded miracle, which will certainly become the best gift and will delight its owner for a very long time.

For the convenience of a set of beads, you can use a small, shallow container. It is convenient to pour grains of material into it, preventing it from scattering. In general, the working area of the needlewoman should be well lit, stable and comfortable for work.
Weaving basics
If you carefully study the master classes presented in special beading tutorials, it becomes clear that there are several methods for creating a rose. A bead pattern, even the most sophisticated one, in any case becomes understandable if you carefully work on its decoding.
So, there is a parallel scheme for weaving a pink bud, a master class for the manufacture of which will be presented below (it is also the simplest for beginners than everyone else). This technique is based on elementary knowledge in this area, so work on the product does not take much time and effort.

The second pattern of a beaded rose flower is based on the French technique. It is also called circular. This technique is a little more complicated, since not every novice needlewoman will understand the creation of flower parts the first time. But as a result of several attempts, you will still get a blank for a future rose, which, undoubtedly, will be somewhat more elegant than the previous one.

There are also techniques that are very similar to French weaving, but they all require more detailed study and consideration.
Making petals
In order to start work on creating a rose (the bead pattern is presented above), you should prepare the materials. So that everything is at hand, does not stop work and does not risk crumbling, it is better to immediately start working on a stable surface.
For a rose petal, it is necessary to cut a wire about 70-80 cm long (since our petals are small). String 1 bead on the center of the wire. Next, dial 2 beads and thread them through 2 ends of the wire, tightening to the first. That's what we get at the very beginning.

After this step, each row requires an increase in the number of beads (4, 6, 8, 10, etc.). So it is necessary to complete 9 rows, typing on the last 16 beads. After that, it is necessary to collect 9-11 beads on each end of the wire and stretch them through the very first one. Then twist the ends of the wire tightly. It looks like this:


In the end, we have a finished petal. For a small rose, you need about 4 petals according to the indicated pattern, 5 petals, in which there are 1 more row (that is, the last row ends with 18 beads). The larger you want to get the product, the more larger petals you need to weave.
Making leaves
The technique also creates rose leaves, the bead pattern of which is now being considered. To do this, you need to make 8 rows, the number of beads in which is 1, 3, 4, 5, 4, 3, 2 and 1, respectively, in each row. According to this pattern, sepals are woven, which are attached directly under the petals. The number of sepals varies from 3 or more, depending on the size of the bud.

The rose leaves themselves are slightly different from the sepals. The bead pattern of these parts is similar in the way of weaving, the leaf consists of 11 rows. The following is a scheme for increasing the number of beads in rows: 1, 2, 3, 4, 5, 7, 9, 8, 7, 5, 3.

Product assembly
So, all parts are ready, you can start assembling a rose from beads. The schemes, as can be seen from the step-by-step photos, are very simple and accessible for beginners.
For the center of the bud, you need to take the two smallest petals and use a round felt-tip pen to bend them almost in half. Then you need to insert them into each other.

After that, all the other petals must be tightly wound to the main stem to make a bud. The last petals, if the size allows, can be beautifully curved.

It is immediately necessary to attach the sepals to, evenly distributing them below. After that, leaves are attached a little lower along the stem. Further, the product can be wrapped with green threads (for example, floss) or floral paper. Everything, a beaded rose, the weaving patterns of which we have considered, is ready.

Conclusion
As you can see, the creation of flowers from beads is a simple and quite exciting task. In addition, handmade products are very valuable, because in addition to painstaking work, time, soul and inspiration are invested in them. With a little effort and insignificant expense, a lovely beaded rose can be born. Weaving patterns, as you have already seen, are completely simple and easy to read. Well, as a result, you can be sure that your gift will be the most unexpected, interesting and unique.
The rose is a very popular and almost everyone's favorite flower. But, unfortunately, all her beauty quickly fades. You can make this flower with your own hands from beads. A beaded rose will delight you with its blooming appearance all year round. If you do not know how to make a rose from beads, then this master class with step-by-step photos will help you master the technique of weaving roses from beads.
To weave a rose you will need:
- Beads of three colors - pink, white, green. Size 11 or 10 (Czech beads), and if Chinese beads, then size 12.
- For a bud in general 140 gr of beads, for leaves 80 gr.
- Wire diameter 0.3mm, 0.4mm and very thick for a rod.
- Floral tape.
- Glue (transparent polyurethane).
The rose we will weave will turn out big. The diameter of the bud is 12 cm. The height of the whole rose depends on the rod from which you will make the trunk.
So, let's begin.
Beaded rose bud
Let's start weaving a rose from beads with its petals, from which we will collect a rosebud in the process of weaving. We will weave.
- Petals of the 1st row.
Round-shaped petals are made according to the following scheme: it is made of wire with a diameter of 0.4 mm, we attach a piece of wire 55 cm long and 0.3 mm in diameter to it. We place 5 pink beads on the axis and make 8 arcs (4 turns). The last row (this is the 4th turn) is woven with white beads. Such petals of the first row need to be made 3 pieces.

To give the desired shape, you need to turn the petal leg 90 degrees and bend the petal along the axis.

- 2nd row.
We weave these petals according to the following scheme: we make an axis from a wire with a diameter of 0.4 mm, we attach a piece of wire 75 cm long and 0.3 mm in diameter to it. We place 5 pink beads on the axis, and weave 8 arcs (4 turns) with the working end of the wire.

We give each petal this shape. To do this, the tip must be bent outward, and the petal itself must be bent along the axis.

- Petals of the 3rd row.
Weave according to the scheme: 5 beads on the axis and make 16 arcs (8 turns). We take a wire 95 cm long. We also pay attention to the fact that we also use a modified technique in these petals.
It is necessary to make 8 arcs according to this principle: the first 4 turns of the arcs should go around the axis on top of the petal, and the remaining 4 turns of the arcs should go around from the inside.
The last two rows are made of white beads. You also need to weave 3 of these petals. Next, they need to be shaped.

- 4th row.
The petals of the fourth row are woven according to the complicated technique of French weaving - weaving on two axes. We take a wire with a diameter of 0.4 mm, cut off two segments 17-18 cm long and twist them together from below, leaving an axis of 10 cm on each segment. Next, we take a wire 150 cm long and wind it to the axles.
Weave according to this scheme: we string 2 beads on the right axis, and 3 beads on the left. Between the axes in the first row we make 3 beads, then in ascending order.

We make 5 turns around the axis on top, and 6 around the inside. In general, the petal should have 11 turns. We make the last two turns using white beads. We make 4 such petals. After we give everything a shape, bending the tip, and bend the petal inward.

- 5th row.
These petals are woven on three axes. We take a wire with a diameter of 0.4 mm, cut off three segments 18-20 cm long and twist them together from below, leaving an axis of 12 cm on each segment. Next, we take a wire 200 cm long and wind it to the axles.
Next, weave according to this scheme: we string 1 bead on the first of the axes, 2 beads on the middle one, and 3 beads on the left. Between the axes in the first turn we make 3 beads in each arc, further in ascending order.

We make 5 turns, bending around the axis on top and 8 bending around from the inside. In general, the petal should have 13 turns. We make 4 such petals.
We give shape to our woven petals by bending them along the central axis. The central seam with loops should be inside, and the tips of the petal should be bent outward.

Everything, the blanks of the petals are ready, let's start assembling the rosebud.
Assembling a rose bud from beads
We take a thick wire (rod), fasten the first row of petals to it, fastening them in a circle. Next, we attach the second row, when assembling the petals, you need to put them into each other.

Further, according to the same scheme, we attach, 3 rows of petals, then 4 and 5 rows. The petals will turn out to be heavy and will hang down, and no matter what the bud breaks up, glue them from the inside at the base to the petals of the previous row. You should get such a bud.

Now we need to weave the sepals for our rose.
Rose beaded sepals
We take 75 cm of wire, make an axis 10-12 cm long and string beads on it. The bead row should be 6 cm (you can measure it with a ruler), this is about 40 beads. The sepal weaves along.

We attach the finished sepals to the rosebud. After the sepals are attached, you need to wrap the pedicel with 10 rows of beads strung on a wire. Next, wrap the stem with green floral tape.
Bead weaving for many needlewomen is not only a favorite pastime, but also an opportunity to create an incredible beauty product. A beaded rose in this regard is a real dream for art lovers, but lack of experience or proper knowledge stands in the way of its implementation.
On the Internet, there is often a question of how to make a rose from beads with your own hands, but only real experts can answer it. They advise not to despair, because even a beginner can weave a beaded rose if he follows several important steps.

Necessary materials
To make a large rose, you will need: cutting and ordinary beads of size 11 and 10, respectively, in the amount of 150 gr, 34 meters of metal wire 0.4 mm thick and 30 meters 0.3 mm thick (preferably the same color as the beads), about 10 meters of thin copper wire, three pieces of rigid aluminum or steel wire for the base (you can choose iron knitting needles), thread in the color of beads (about 10 meters), sewing thread, a small vase or flower pot (beautiful bowl), plaster, regular glue and foil.

Of the tools you will need wire cutters, scissors, pliers and round nose pliers, as well as a couple of brushes. That's all the simple rose weaving patterns for beginners include, which is presented below.

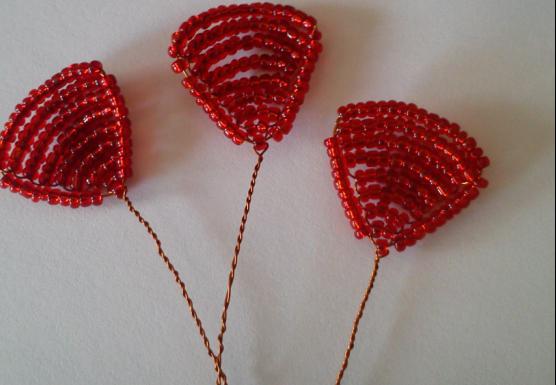
First circle of petals
There are many options for weaving roses from beads, but the most popular technique for this business is circular (French).

At the first stage, 5 petals are made. First you need to pick up beads on a wire 0.4 mm thick, without cutting them off from the coil.

The length of the beaded thread should be 1-2 meters in order to work in the future without being distracted by a set of beads. This can be done both manually and with the help of a bead putter. It will be the main working wire.

After that, a piece of wire of the same thickness, 10 cm long, is taken, on which five beads are typed. This segment is the axis for the future petal, so the end of the working wire from the previous stage is fixed on it. The working wire is simply wrapped around the axis of the segment, while leaving an edge of 4 cm.

As a result, 5 beads are in the middle, and the working wire is wrapped around them, being fixed on one side, then on the other. Each of the three required petals will have five arcs around the axis on both sides.

The rest of the wire from the top can be cut off, but at the same time you need to leave 2-3 mm, which are bent inward, but you can also pass through a few beads or the entire last arc.

The second option is more difficult, but eliminates the risk that the petal will fall apart. This is the principle of circular weaving, which will be used throughout the entire workflow.

The finished petals are inserted into each other, imitating a real rose, and a piece of wire 5 mm thick must be attached to the remains of the wire from below and wrapped with threads in the color of the stem. The base for the rose is ready.


Second circle of petals
In the photo of the beaded rose, you can see that it includes five circles of petals. The second circle is performed in the same way as the first, but the number of arcs will be 9 and the last of them are not performed perpendicular to the axis, but under a sharp petal. This allows you to create petals of an acute type.

In the process of weaving, you need to pay attention to how the working wire lies. In the first 4 arcs this will happen from above (on the axis wire), and in the next five it will happen from below, which gives purl loops. It is important not to forget about this so that the petal turns out exactly as the appearance of the future rose requires.

After making all the petals, they must be bent inward so that the upper tip protrudes a little, and then alternately wound to the base of the rose. This must be done in such a way that the curved tips protrude above the petals of the first circle, creating a bud.

Third circle of petals
There are many ideas and instructions for making roses from beads, and they all have their own characteristics, including this scheme. The third circle of petals is made of 10 arcs and 4 beads on the main axis. The upper part involves 5 rows of front and 5, respectively, wrong side, which were mentioned above.


This type of petals should have an acute angle and a cup-shaped shape, which is attached after being made by hand. The top part needs to be bent so that it looks up.

The finished petals are applied one by one to the bud and tied with threads for strength, while the previous circles of the petals should not be touched and the general appearance of the bud should not be disturbed.


Fourth circle of petals
To make the fourth circle of petals, and there will be 4 of them, you will need two axes and one working wire, which is fixed around two segments. 2 beads are typed on the right axis, and 1 on the left, after which the first arc is created by the working wire.

Before you make the second arc, you will have to dial one bead on each axis. In total, the axes at the fourth stage of the master class for making roses from beads will be 13 circles (8 facial and 5 purl).

The lower part is made round, and the upper part can be either sharp or any other shape. The remains of the wire at the top of the two axes are removed in the same way as in the first circle of petals.


The finished petals need to be shaped: bend the lower part inward and pull the upper outward, then wrap it with threads to the rest of the rose.

Fifth circle of petals
The fifth circle of petals includes 4 petals and is woven on three axes. They are typed from 3 to 1 beads from right to left, but after the first circle on the middle axis you will have to dial one more bead. Before the third circle of arcs, you need to dial 1 bead on the extreme axes, and in total you should get 15 arcs (8 facial and 7 purl).

The bottom part needs to be made round, and the shape of the top does not really matter. At the end of weaving, the petals are cup-shaped and alternately tied to the base of the future rose with threads.

At the last stage, it is necessary to fix the position of the petals with glue, preferably acrylic. It is applied in small drops at the points of contact of the petals, so that in the future they do not fall apart under the weight of their own weight.

In addition to the rose, you can weave a couple of buds, the weaving process of which includes the first two steps listed above. You can make the second circle of bud petals both sharp and round.


Sepal
Various ideas and designs for making a beaded rose may or may not include sepals.


For a rose, you will also need to weave 5 sepals. To do this, you need to take a cut for the axis and a working wire with a different color of beads. To begin with, 6 cm of beads are collected on the axis, which are wrapped in two pairs of arcs.

The third arc will be slightly different, since it needs to be passed through 1 cm of the beads of the top row, then unfold the working thread and make a second such arc.

On the other hand, also perform two similar arcs. The sepal is threaded to the rose and buds, but in the second case, not 5 pieces are needed, but 4.


Leaves
The leaves are made in the same way as the round petals. In total, there should be 18 pieces for the composition, and for one rose, the number is chosen at your own discretion.


Leaf scheme: 7 beads on the axis and 11 arcs on each side (large), 7 beads on the base and 9 arcs on both sides (small). The leaves are collected in three pieces per branch, after which the whole composition of roses and buds is prepared. You need to assemble it by wrapping each part with threads so that nothing dangles and all the elements hold tight.


To give a finished look, you need to plant a rose in a pot or bowl on plaster.

Photo of roses from beads


