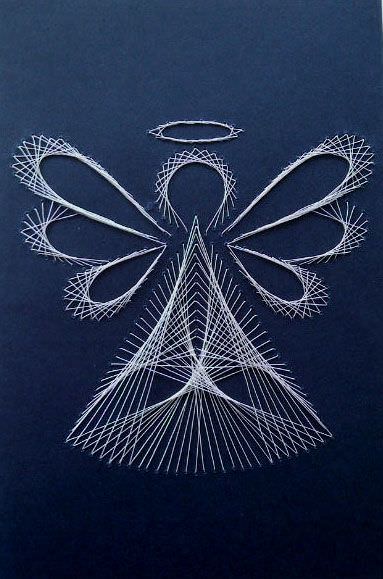
Templates for embroidery with threads on cardboard. Sewing on cardboard. Master class on dandelion embroidery using thread graphics technique
Sewing on cardboard (cardboard) can be used in a variety of areas of church embroidery. Having emerged in the second half of the 16th century, continuously developing and improving throughout the 17th century, this technique in the 18th-19th centuries became one of the leading ones in decorating embroidered church utensils and liturgical clothing. Sewing on cardboard is used mainly for dense, heavy fabrics and on products that require lining. In ancient times, birch bark, leather, and paper in several layers were used as “flooring” for embroidery. Modern embroiderers use thick, smooth cardboard (electric cardboard) of various thicknesses. By using cardboard of different thicknesses, several shades of gold and silver threads in one work, and using various card sewing techniques, you can create a precious embroidery texture rich in nuances.
Preparing cardboard forms
Cardboard parts are cut out with a special sharp knife with a beveled blade. The edges of the cardboard parts are treated with fine sandpaper or a file (nail file), removing unevenness, roughness and rounding the upper edges of the edges so that the gold thread does not deteriorate (break or fray). In Fig. 1a you see a simple cardboard piece with a raw edge, in Fig. 1b - with processed.
Transferring the design onto fabric and attaching cardboard parts
When sewing on cardboard, you can use the usual methods of transferring a design onto fabric (through carbon paper, with a snare, “in powder”). In these cases, cardboard forms are either glued to the fabric with PVA or Moment glue, or sewn on. The stitches should be positioned perpendicular to the threads of the future embroidery. The parts should be attached with a thin but strong thread, after piercing the cardboard with an awl. Particular care must be taken to ensure that sharp and protruding edges are well attached. (Fig. 4).

In addition to the general methods of transferring a design onto fabric, sewing on cardboard also has its own special techniques. If embroidery is done on velvet, then when simply gluing or sewing on the parts, they may move due to the mobility of the velvet pile. When making a complex design consisting of many parts, you can use the following method: the embroidery design is transferred to tissue paper or tracing paper. Pre-cut and processed cardboard parts are glued onto it. This blank is placed on the fabric at the place of embroidery and attached along the edge (basted). Then they lay snares along the remaining lines of the design (if any), intended for use in other techniques (this could be cords, gimp, pearls, etc.). The work is performed in the following order:
- cardboard parts are sewn to the fabric as described above;
- embroidery is done on cardboard;
- then the tissue paper is removed;
- embroidery is performed using other techniques along the lines of the snares;
- At the end of the work, remove the basting stitches if they are visible.
In our workshop, we almost always use this method, as it ensures the accuracy of the placement of the details of the design, and tissue paper or tracing paper protects the surface of the fabric from contamination during the work process.
Embroidery technique
As when mastering any other technique, in cardboard embroidery you should start with the easiest sample. Sewing on cardboard belongs to the “attached” sewing techniques: only the front surface of the embroidery is covered with gold thread; the gold thread does not extend to the back, being sewn to the fabric with a single attached thread (silk, LL, cotton) in the tone of gold or silver.
To make training samples, you can first use simple, less expensive threads, such as “Iris” instead of gold threads. This material is softer, and it will be easier for beginners to master this technique.
When sewing on cardboard, you must use an awl: it ensures precision and accuracy of sewing and significantly increases the speed of work.
1. “Strip” (straight stitch)
As a first sample, we suggest sheathing a strip 8-10 mm wide. The cardboard must be processed in the manner described above and attached to the fabric (glued or sewn with several stitches perpendicular to the direction of the gold thread).
Method A(single thread). We fasten the working (fastening) thread in the usual way at the edge of the cardboard part, trying to hide the fastening under the cardboard. Then, using an auxiliary needle with a large eye, the tip of the gold thread wound on a twist or spool is brought from the face to the wrong side next to the fastening and secured with two short stitches of the fastening thread at the point where it exits the fabric. We cut the tip of the gold thread on the wrong side to 1-1.5 cm. Then the thread of the attachment is brought out from the wrong side onto the face at the opposite edge of the part and, grabbing the gold thread, is again brought out on the wrong side. In this case, a small stitch is made so that the gold thread does not pull out to the wrong side. Then the needle with the attached thread is brought out again at the opposite edge of the part, but not close to the previous stitch, but at a distance the thickness of the gold thread. Next, the needle grabs the gold thread, as shown in Fig. 6, and is stitched close to the previous stitch (i.e., a step is taken back). If the technique is performed correctly, the golden thread itself will turn in the right direction. 

Method B(double thread). You can sew on cardboard using either single or double gold thread. For sewing with double thread, another fastening method is more suitable; it is shown in Fig. 8 (in this case, you need to make sure that the two gold threads do not twist together; in the figure they are shown as one). The attachment stitch is located perpendicular to the edge of the cardboard, its length is slightly less than a millimeter. 
The gold thread is laid in dense parallel rows strictly perpendicular to the edges of the cardboard. The threads should not be crowded, otherwise they will push each other out and the surface will not be smooth, but at the same time, the sewing should not be sparse, otherwise the cardboard will be visible.
In card sewing, there are two different ways to remove a needle with an attached thread: 1) the needle always passes through the fabric strictly perpendicular to the latter, as in all other gold embroidery techniques (Fig. 9a); 2) the needle is brought out onto the face at a slightly angle, from under the cardboard, and moved to the wrong side in the same way, under the cardboard (Fig. 9b). In our workshop we mainly use the second method. 
When sewing, both the gold and fastening threads need to be tightened so that they do not dangle on the cardboard, but fit tightly to it. The thread tension should be uniform.
2. “Stripe” (oblique stitch)
When embroidering straight stripes, it is sometimes more convenient to lay the gold thread on the bias (this technique can be used when sewing letters or a cross, where straight strips are joined at different angles, see Fig. 3). In this case, it is necessary to ensure that the angle of the threads does not change. 
3. "Festoons"
The embroidery technique for this pattern is exactly the same as when sewing in a straight line. You must always ensure that the gold thread lies strictly perpendicular to the edges of the cardboard, its tension is uniform. There should be no gaps between the threads, but they should not be cramped.
4. “Wave” (fan technique)
If the cardboard part has curves, you can use the following sewing method: lay the stitches of the gold thread not parallel to each other, but in a “fan” pattern, and you need to make sure that they remain perpendicular to the edges of the cardboard at all times. For training, we offer the following sample - “wave”. In Fig. Figure 14 shows how to lay the gold thread: the stitches are always perpendicular to the edges of the cardboard part. On the inner side of the roundness, the stitches are placed as closely as possible to each other, and on the outer side they are evenly distributed so that the gaps between them are small and equal, in this case the embroidery will look neat and beautiful. 
The ring around the cross in Fig. 17 and the curl in Fig. 12 were made using this technique. 
5. "Coin"
It is more convenient to start sewing this pattern from the middle of the part. First, one half of the “coin” is sewn up, then the other. The edges can be smeared with “Moment”. To prevent the gold threads from slipping from the cardboard onto the fabric, a small securing stitch is made. To do this, a hole is pierced in the cardboard, at a distance of approximately 2 mm from the edge, with an awl and a securing stitch is made from the edge of the part with gold or fastening thread. The stitch should lie perpendicular to the gold threads (Fig. 19). Oval parts, “grapes,” are sewn in the same way, and the gold thread can be laid either perpendicular to the edges of the cardboard or at an angle (see Fig. 18). You can also fasten the rounded tips of other parts (crosses).


6. "Leaf"
If the embroidered part has a pointed tip, as in the “leaf” pattern, it is more convenient to start embroidery not from the beginning of the element, but slightly backing from the edge. First, the middle part of the sheet is sewn up with gold thread, and then the remaining unsewn ends are covered. If it is difficult to do this delicate work “in the fastener”, you can finish the work with a seam “on the opening”. To do this, thread the gold thread into the needle (the thread should pass freely into the hole left by the needle without being damaged) and finish the work with stitches “on the opening” (as in double-sided satin stitch). The tips of the leaf can be greased with Moment glue, then the thread will not slide off the cardboard (Fig. 20). 
Leaves, like any other details, can be sewn up with both a “straight” and “oblique stitch”. Gold thread can be used either single or double. But it is more convenient to sew the sharp ends “at the opening” into one thread.
7. Complex leaves
Often when sewing on cardboard you have to embroider leaves of more complex shapes, having several sharp or rounded tips. In this case, all the techniques described above are used: “fan”, “coin”, sewing sharp ends “on the opening” (Fig. 21, 24). Even before you start embroidering, you need to think about in which direction the gold threads should lie in “problem” areas: as a rule, where the clove separates from the sheet, the cardboard has the greatest width. In these places, the optimal direction of the thread is outlined with a pencil (Fig. 25a). 
Embroidery begins, as in the “leaf” pattern, slightly retreating from the tip of the part; Having reached the place where the sheet is divided in two, one of the cloves is sewn up, and the tip may have to be sewn “on the opening.” Sequentially sew up all parts of the sheet, introducing new pieces of gold thread, or make broaches along the wrong side, bringing out the same gold thread in the right place. Finally, the tip that was left unsewn at first is closed.
8. Sewing with a split
Sometimes, according to the design, or if the cardboard piece is too wide, additional attachment stitches are required along the cardboard itself. Since each gold thread is attached, the stitches of the attachment line up in lines, which can serve as an additional decorative element of the embroidery if it is thought out in advance where they should be located (Fig. 27). Often this sewing method is used to embroider complex elements consisting of several parts (Fig. 28, 30). 

First, the element is cut out of cardboard along the contour, processed and attached to the fabric. Then it is drawn with a pencil in accordance with where the lines of additional attachments will be located. Grooves are carefully scratched along these lines with an awl. This is done so that the needle does not slide across the cardboard, but hits the drawing exactly.
After this, we begin to sew up the element with gold, while in the places of the pencil lines we split the cardboard with an awl, take out the fastening thread from the inside, wrap it around the gold thread and take it into the same hole, pulling it to the thickness of the cardboard so that it is not visible. In this case, the gold thread should not be pulled inside out. The stitches of the attachments should fit tightly to each other, while you need to ensure that the needle does not slip into the hole of the previous attachment. It is also very important to ensure that the awl needle splits the cardboard strictly at a right angle.
Often the resulting grooves are filled with gimp, a chain of sequins, thin lace or just thread.
9. "Bagel"
This method of sewing with a split is used if the “fan” technique cannot be used in the work, i.e. if, when embroidering complex rounded parts, the angle of rotation of the threads is very large. In this case, the cardboard has to be split in order to insert shorter stitches that close the gaps between the long ones. You need to ensure that the gold threads always remain perpendicular to the edge of the cardboard. Depending on the steepness of the bend of the part, the ratio of long and short stitches varies - 1 long and 1 short, 2 long and 1 short, etc. Long stitches are performed in the usual way, i.e. from edge to edge of the cardboard part, and in that place , where you need to make an additional short stitch, use an awl to make a hole in the cardboard (closer to the concave edge of the part), the thread of the attachment comes out from the inside to the face through this hole, grabs the gold thread, pulling its turn into the hole. The next long stitch of gold thread overlaps the reversal of the short stitch, making it almost invisible. Long stitches along the inner edge of the piece should fit as close to each other as possible (Fig. 31). 
10. "Crosshair"
This technique is often used to embroider the middles of crosses. The junction of the four wings of the cross is sewn up with one gold thread. The crosshair (middle square) is drawn diagonally, and grooves are made with an awl. 
Having embroidered one wing of the cross and reaching the place where it connects with the other sides (point A), we unfold the gold thread 90° and attach it to the opposite edge of the adjacent wing (point B). We make two more of the same stitches, closing the square (points C, D). Next, the gold thread will constantly turn in a spiral towards the center, attaching to the cardboard along the drawn lines. To do this, use an awl to make punctures in the cardboard for each attachment stitch. At the end of the embroidery, i.e. in the middle of the part, the gold thread is secured with two small stitches of the attaching thread and brought out to the wrong side. Next, you can continue to sheathe the remaining wings of the cross.
11. “Cross” (feather technique)
Another way to make a crosshair is shown in Fig. 34. 
All four wings of the cross along their axes have longitudinal grooves and are sewn up separately, starting from the middle of the cross. The gold thread is attached at point A, then the cardboard is split with an awl at point O and the attachment thread, coming out into this hole, grabs the gold thread and pulls it away. The next attachment is made at point B, that is, the gold thread is bent at a right angle. This is similar to a feather stitch. The entire wing of the cross is sewn up in this way, and the method of sewing up the tip of the cross depends on its shape. In our case, the “fan” and “donut” techniques were used. Threads placed at an angle reflect light differently, which gives the work an additional artistic effect.
12. “Double cardboard”
An interesting effect can be achieved by using cardboard of varying thicknesses in embroidery, sometimes even within the same piece. Samples in Fig. 35 are embroidered on cardboard made of two layers. 
An element of a larger area is cut out of cardboard, attached to the fabric, then parts are glued onto it, which, according to the plan, should be more convex. A groove is scratched close to them with an awl. When sewing, the gold thread is attached along the contour of the superimposed parts and at the same time is pulled by the attachment thread to the thickness of the cardboard. If the embroidery is done carefully and the attaching thread is not visible, the effect of additional volume is created. You can cover the entire area with one thread (Fig. 35d), or you can sew up the parts separately (Fig. 35a, b, c, e), then both the threads and the direction of sewing can vary.
13. “Cardboard with flooring”
Another option for making embroidery on a card more voluminous is to attach additional flooring on top of the cardboard. This can be one or more cords, threads, ropes, sewn or glued on top of the caton part. In Fig. 36 letters are sewn on cardboard with an additional cord covering in the middle. This gives the sewing more prominence and light reflects off it differently. 
14. “Cardboard with a string” (with a “dissolve” effect)
Another option for using flooring on top of cardboard parts is to sew at different heights with an overflow effect, as if one part of the design is lying on top of another. In facial sewing of the 18th-19th centuries. This technique was used when embroidering clothes with gold on a card, when it was necessary to depict folds of fabric. As a training example, we suggest embroidering leaves lying one on top of the other. 
The cardboard part is cut out in one piece, grooves are scratched on it according to the design with an awl (as when sewing with a split). A string is laid along the edge of the petal that is visually on top. It should be quite dense (you can make it yourself by waxing any threads you have on hand and twisting them with your fingers). The rope is sewn with a thin strong thread using transverse stitches. Next, we begin to sew up the element with one thread, making attachments along the lines of the pattern. To do this, we split the cardboard piece with an awl along the scratched groove.
Craftswomen from Penza introduced us to this method of sewing at a Moscow conference at PSTBI in January 2003. In Fig. 39 you see the icon frame they made.
15. “Basket”
This sample is performed in 2 stages. First, a thick needle or knitting needle is placed on the cardboard, processed and attached to the fabric, and covered with gold “into the attachment” as described in the “strip” pattern. The knitting needle lies perpendicular to the gold threads, leaving a gap between them and the cardboard. The threads should be well stretched and arranged in dense parallel rows (Fig. 43). After removing the knitting needles, they find themselves lying freely on the surface of the cardboard. 
To perform the second stage, a gold (or colored silk) thread is inserted into a needle and intertwined with the threads of the first layer of the “basket” in a checkerboard pattern. Having thus reached the edge of the part, a broach is made along the wrong side to the opposite edge (as in double-sided satin stitch). The braid can be square, for example 4×4 threads, or it can be more complex, 4×2, etc. Using this technique, you can create various ornamental compositions, as in a mosaic (Fig. 44, 45).


As can be seen from the examples given, the technique of sewing on cardboard gives us quite rich possibilities in decorating liturgical sewing items. It can be used in both ornamental and facial embroidery. The latter is especially clearly represented in church embroidery in Russia and Ukraine in the 18th-19th centuries.
Torzhok gold embroidery techniques
Since the second half of the 19th century, gold embroidery has been actively developing as a folk craft in the city of Torzhok, Tver region. The Torzhok Gold Seamstresses factory still operates there, and there is also a vocational school for gold embroidery. Torzhok embroidery has a recognizable style, close in character and spirit to folk embroidery, and uses well-established traditional artistic motifs and technical techniques. For example, in Torzhok card sewing, the working thread comes out to the front side of the sewing and is pulled into the same hole, pulling the gold thread to the wrong side. In addition, our terminology is somewhat different from that accepted in Torzhok: smooth sewing on cardboard is called a “cast seam”, sewing with a split and “attached” on cardboard or flooring is called a “split” seam (that’s what we call one of the silk sewing techniques ). The “bug” attachment has two names, depending on the pitch of the attachment: “woman” and “goose” seams. Sewing “in the pin” shape is called “flat overlay stitch”. More details about the techniques of Torzhok gold embroidery can be found in the book by N.V. Babushkina “Golden Embroidery” (see in the “Bookshelf” section).
One of the features of the Torzhok gold-embroidery school is also the use of sewing techniques “in a pin with a split” on a card with the formation of various geometric patterns on the surface of cardboard densely covered with gold. The patterns of these attachments are the same as with ordinary gold embroidery “in the attachment” (“town”, “berry”, “money”, “cut”, etc.).
"Isothread- no less exciting and entertaining needlework technique. You can also find other names: thread graphics, thread image, embroidery on cardboard, thread design, isographics. The main thing is an openwork pattern on clear geometric lines.
When you look at the finished works, in which the threads are intricately intertwined, you might think that it is very difficult to repeat. But when you master the basics of embroidery on thick paper or cardboard, then any complex pattern can be done. Beginning craftswomen should hardly take on complex compositions; it is important to learn how to make basic motifs; there are not so many of them compared to other techniques.
Main motifs of isothread
The first motive is corner filling .
To begin, take a sheet of cardboard and draw a right angle. The length of the sides is 8-10 cm. Place a dot every centimeter and make a hole with an awl. Beginners are advised to immediately enter the numbers along which the needle will move.
So, the first round! The needle enters the cardboard from the wrong side (the knot remains there) at number 1, and moves along the front side to number 2. 
Then from the wrong side go to number 3.

Go along the front side to hole number 4.
Move from below to 5 and make a turn into hole 6.

Next you can see segment 7-8.

And using the same principle, you must fill in all the segments in the graphic drawing.

When the principle of filling is clear, you will not need to draw numbers; you will start working from memory.
Angles can be of different lengths and any degree, but the principle of filling them is the same, but the result is different.
To reinforce your learning, watch this video lesson:
The second motive is filling the circle .
There are also some nuances here that beginners should know about.
You need to draw a circle and put points on equal segments. The more dots, the denser the pattern. Then everything depends on the distance at which the turns of the threads will lie. The examples in the photo show the options!
The longer the piece of thread, the closer the filling is to the center of the circle. If the turn lies shorter, there will be interlacing threads near the edge of the line.


When working with circles, you also need to write down the thread stroke in numbers at the first stages.
The oval and drop are filled according to the principle of the circle or angle motif. You will understand everything in practice.
Another principle of the iso-thread technique, when all the work is done from one point . For example, a graphic drawing is a heart. There are two options for filling it out.


The movement takes turns.
Here the turns are laid back a step.
These fill options can be used for any design. When you master the basic motives, then you will combine and combine them at your discretion.
Helpful information
Beginners will be interested in some tips and subtleties of the iso-thread technique . Let's look at them in more detail.
— For the base It is better to use thick paper or smooth cardboard; works on velvet cardboard are less common.
— To draw a drawing, you need a simple pencil, preferably hard and well sharpened, so that the line of motifs is thin.
- You will also need a ruler for drawing lines and angles, and a compass for forming circles of different diameters.
— Awl It is better to use short but sharp. They need to pierce the cardboard from the front side to make the work look neater.
— Needle It is recommended to take one with a large eye so that the thread can pass through easily.
— Threads You can use any, but floss and iris are considered the best for this technique. Works made with woolen thread look great on velvet paper.
— Holes should be pierced on the backing so as not to damage the table covering. It is recommended to use a piece of cardboard from a packaging box or thick foam.
— To secure the thread on the reverse side you can use narrow tape or PVA glue.
— To prevent the thread from getting tangled while working, cut off a piece that is not too long.
The isothread technique is used to make postcards, panels, paintings, notebook covers, and bookmarks.
— At the initial stages, it is important to monitor the density of the embroidery. If you pull too hard on the coil, you may tear the cardboard. A weak thread clamp will sag and look sloppy on the finished work.
— To hide flaws on the reverse side, the work must be glued to cardboard or placed in a frame without glass.
Painting “Butterfly” using isothread technique (master class)
Now let's move on to practical work. When all the basics of the technique are clear, you can begin embroidering a separate item. For example, butterflies. It will consist of the simplest patterns, when the entire image is completely filled.

For work you need the following materials:
- set of colored cardboard;
- graphic image of a butterfly (in which all the points are drawn);
- floss threads of two colors (yellow and green);
- awl;
- needle;
- scissors;
- thin tape.
Step by step
Take colored cardboard of such a shade that the threads you have chosen are clearly visible. For example, purple if the embroidery is with yellow and green threads.
Place an image of a butterfly on the cardboard and make holes with an awl. Don't forget about the backing so as not to spoil the work surface.

In the graphic drawing, use numbers to indicate the direction of movement of the needle.

This is the base with holes you need for work.

Take a needle, insert a thread into it and start forming segments.


This is what the openwork weaving should look like.

Do not forget to secure the edges of the threads with tape on the wrong side of the work.
The second yellow wing needs to be made symmetrically.


When you embroider the lower wings, you can change the color of the threads to make the work more vibrant.
You can even embroider the base in one color, and then add a different shade from shorter sections along the edge.

To form the body and antennae of the butterfly, you just need to sew the sections in a straight line and return.
This is what the finished work looks like.
It is better to cover the reverse side with a white sheet of paper to hide embroidery errors.
Agree, it will be nice to receive such work as a greeting card.
I hope that my detailed story about the iso-thread technique and a successful example of work will inspire you to come up with original ideas and soon beautiful embroidered items will appear in your home.
Regards, Tatiana!"

When you master the iso-threading technique, you will be able to create such beautiful paintings as in this video with your own hands:
Schemes and templates
For beginning needlewomen, ready-made diagrams and templates with numbers may be useful. You can print pictures from the Internet and embroider by numbers.
Hearts:


Flowers:


How to make something original panels made of threads and nails
And another story from Tatyana about the practical application of this technique:
“We have creative people working in our office, both boys and girls. Our department is located on the second floor. You have to climb one flight of stairs. And he is so dull and monotonous. On a rainy morning, my co-worker suggested we “revive” the wall on the stairs. We did not risk painting on it, since our office rents this room for rent. Therefore, it was necessary to make some kind of large panel or, as a last resort, paint a picture.
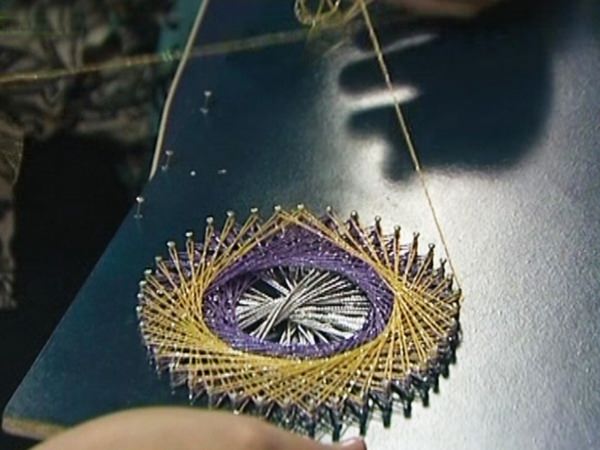
We found some interesting technology on the Internet. string art. It is based on the use of nails and threads. An image is created when the turns of threads are intertwined in a certain pattern between the heads of the nails. Everyone appreciated the idea and began to implement it.
After the renovation, there was a piece of drywall measuring 1 by 2 meters in the pantry. We decided not to cut it into pieces, but to use it whole. The girls drew a bird of happiness (essentially an ordinary peacock) in the center of the base, two trees on either side of it, and improvised bushes of grass at the bottom of the work.
The guys bought large nails with wide heads and drove them at a distance of about 2 cm from each other throughout the graphic image. Moreover, the carnations on the bird itself are dotted very densely, about 0.5 cm thick. This is so that the pattern is filled out and the turns of the threads fit well.
When all the men's work was completed, it was again the girls' turn to show the dexterity of their hands. We have selected amazing threads for all elements of the work. Lilac on the feathers and red on the body are thin threads of the “iris” series, and thick threads on the circles of the tail and tree crowns are textured threads for knitting.
The weaves had to be done in isothread technique, strictly according to the drawing. What a gorgeous bird!

 The trees were easier to form, since it was only necessary to hide the base a little, so the turns of threads were intertwined in a chaotic manner. Notice how the threads on the trunks are shaded and how the textured ones look good on the crown.


 Then the guys suggested making a frame for the panel to make the work look more interesting. They nailed a piece of wood around the edge of the base.
The work was complex and painstaking, but the result was worth it. The result was a beautiful and bright panel made of threads and nails.

Now our stairwell is the most colorful in the entire building. And if fate takes us to a new place of work, then the picture will go along with our team.”
We will be glad to see photos of your work!
Did you like the product and want to order the same from the author? Write to us.
More interesting:
Send your photos
Do you also make beautiful crafts? Send photos of your work. We will publish the best photos and send you a certificate of participation in the competition.See also:
DIY wedding card
What could be better than the brightest holiday in life than a wedding? On this day I want everything to be...
DIY cards - scrapbooking
The girl, who signed the name Tradicia, told how she makes cards with her own hands. "Recently...
Wood burning technique
Pyrography - wood burning Currently, the art of wood burning (pyrography) has become...
How to make salt dough, recipes and secrets
All about salt dough My statement may seem strange to some, but salt dough can...
Making a Valentine's Day card using quilling technique
Another master class on making an original card for Valentine's Day using the quilling technique from...
Quite unusual is needlework, which involves creating pictures using threads on a solid base. For beginners, we note that this needlework is called isothread, or thread graphics. This type of art first appeared in England. This method of weaving threads was invented by English weavers. They drove nails into the boards and pulled threads on them in a certain sequence. The result was openwork lace products that became home decorations.
Thread embroidery on cardboard or paper is an easy task even for beginning embroiderers; special attention is now being paid. For this handicraft, a diagram is required. Such diagrams are available in our lesson. Using the techniques, you can make a gift card or a painting, or you might want to decorate your own home with the work. Your relatives and friends will definitely like the picture or postcard.


We bring to your attention a master class for beginners, in which we will try to learn the techniques of embroidery on paper. To do this you will need:
- scissors;
- needle;
- pin;
- paper clips;
- foam;
- scotch;
- cardboard;
- threads (any).
Embroidery on paper or cardboard is akin to drawing with threads on a solid base. We select the cardboard according to the size of the drawing, and we will definitely take care of having a diagram for the work. For beginners, we explain that embroidering figures with threads is done along the pierced points.
Now let’s do the necessary exercises to learn. Embroidery with threads on a solid base begins with placing a small piece of cardboard on foam rubber. We randomly pierce six points with a pin, and determine the wrong side of the cardboard, on which there are tubercles from the puncture. The front side remains smooth.
Straight line embroidery with threads on paper
Our master class is intended for beginners. Note that thread embroidery on cardboard or paper is based on a simple straight line. Let's start with the simplest thing and embroider a line on paper. In our case, the line represents two points connected by a thread. To embroider with threads on cardboard, it is advisable to take ready-made drawings in the form of dots. And we will make two points that do not have a number, so the embroidery can start from any one. We take cardboard, apply a pattern in the form of dots to the front side of it, and secure it with paper clips.


We put it all on the foam rubber and pierce the marked points with a pin. Let's lift the cardboard and look at the punctured places in the light. After that, remove the paper clips, put the thread in the needle and start sewing. We bring the needle and thread out from the wrong side, securing the tip of the thread with tape. Now we take the needle and thread from the front side to the wrong side, secure it with tape and cut off the thread. We tighten the thread so that the pattern on the front side does not sag.
Embroidery of a mushroom with threads on paper
Having explained the primary material for beginners to study thread graphics, you can complicate the patterns and try to embroider a mushroom. From the diagram of the mushroom it follows that there are many lines, but there are no numbers at the points. Therefore, we can embroider a mushroom from any point, and the lines will tell us which one needs to be connected to which. Let's start embroidering from top to bottom. Insert the thread into the point (hole) on the wrong side, secure the end with tape and embroider the first line. Then, on the wrong side, insert the needle into the point adjacent to the thread exit. On the front side, insert the thread into the point opposite, embroidering a line.
We continue this technique until we finish the work, or until the thread runs out. If the thread runs out, secure it with tape and cut off the excess. We insert a new thread into the next hole and continue embroidering.
The main and basic elements of string graphics
The basis of string graphics are three elements:
- corner filling;
- circle filling;
- filling arcs.
Having mastered the three basic elements, you will be able to embroider any paintings with thread graphics, even the most complex ones, and thread embroidery on paper will become understandable and accessible to you.
Filling a corner when embroidering with threads on cardboard or paper
Draw an angle with a pencil on cardboard, and mark the angle lines at equal distances. For training, we select a marking distance of approximately one centimeter. In the future, you need to know that the finer the markings, the more beautiful the embroidery; for small markings, choose a thin needle and thread. For our lesson, the threads can be thicker, but their brand and type do not matter. After marking, we make punctures in the cardboard at the marked points. We make the holes small, otherwise they will be very noticeable on the paper.
 We will start embroidering from the last point of one of the corner lines, bringing the thread from the wrong side to the front side. Then we insert the needle into the first point of the opposite line, turn the cardboard inside out and insert the thread into the next point from the thread. Now we bring the thread to the front side and send it to the opposite line, into the penultimate hole. We turn the work over again and go to the next highest point. We bring the thread to the front side and cross the corner, passing to the third point from the top.
 We continue the work of filling the corner using the same technique until the very end. To complete the angle, from the last lower point we must pass the thread to the upper one, and then from this upper point transfer the thread to the lower hole of the opposite line. Now the filling of the corner is completely finished. Let's add to what has already been said that the angle can be acute, obtuse, or even reversed. By connecting different angles together, you can get very beautiful and varied shapes.

Filling a circle
We draw a circle with a pencil and make markings on it. We carefully ensure that the markings on the circle are carried out strictly through identical segments. The beauty of embroidery on cardboard depends on this, and this is the meaning of the scheme of our work. We bring the needle and thread from the wrong side of the work to the face, from any marked point. We cross the circle along the diameter, and send the thread to the intersection, going to the wrong side of the work. Now we bring the needle to the next point, go out with a thread to the face of the work, and again cross the circle along the diameter. We always move in the same direction.
 The more holes we make when marking, the tighter the threads lie, and the greater the filling of the circle. I would like to note one more feature of filling the circle. The fact is that it can be done not only along the circle diameter line, but also along the chord. Getting started is the same as in the first case. A blank circle is made, and we pierce holes at equal distances on it. The needle is passed to any point on the wrong side and brought out onto the face. And now we draw the thread not along the diameter of the circle, but through one point from it (for example). You can choose any distance.
 We bring it to the wrong side of the work, and stick the needle into the nearest hole. Then we bring the needle back to the front side and perform the same chord as the first. It is necessary to count the number of points between the beginning and end of the first chord, and maintain this interval throughout the entire work, embroidering each line. This type of embroidery is not like filling a circle along a diameter line. The first difference is that some points have to be pierced twice instead of once. In addition, another smaller circle is formed in the center of the circle. This second circle is not filled with threads.
Video: Learning string graphics
We embroider a rose using the isothread technique
What can you embroider with threads on cardboard or paper? Considering the finished works made using the thread graphics technique, we note the huge variety of objects and themes that are embroidered on them. These are landscapes and flowers, human figures and magnificent temples. But today we will tell beginner embroiderers how to embroider a simple rose using thread graphics techniques. To do this, you need to learn how to make simple arcs from which a rose flower will be made.
An arc can consist of an even or odd number of points. We take 14 and 13 points as an example. Let's draw an arc on the cardboard and pierce points on it. You can embroider an arc from any side, from the first point. We embroider an arc using the circle algorithm. We can do this by skipping one point and getting the thinnest arc. In our case, we can make lines through a maximum of six points. The more points we skip, the wider the arc will be.
There are no numbers in the rose drawing; there are even and odd numbers of dots on the arcs. Decide for yourself how many points you will fill in each arc. Once you learn how to embroider roses, you can make greeting cards. Any postcard will be an excellent gift for family and friends. All explanations for rose embroidery are available in one of the videos that is attached to the lesson. There you will also find a rose pattern for your embroidery.
Embroidery patterns using isothread technique


Teaching embroidery to children 5-7 years old in kindergarten
Master class “Magic crosses”
Author: Shabunova Lyudmila Aleksandrovna, teacher of the municipal government preschool educational institution, kindergarten No. 12 “Solnyshko”, r.p. Yurta, Taishet district, Irkutsk region.This master class is designed for children 5-7 years old, for teachers of preschool educational institutions.
Purpose: this master class is intended for teaching cross-stitching to children of senior and preparatory groups.
Target: introducing children of senior preschool age to Russian folk culture, developing the child’s artistic and creative abilities through embroidery.
Tasks:
*form in children an idea of the technique of cross stitching.
*Teach basic embroidery techniques (preparing fabric, threading a needle, securing thread to fabric, cross-stitch techniques; safe techniques for working with embroidery materials and tools).
*Develop manual skills, attention, interest in Russian folk art.
*Cultivate perseverance, hard work, independence, the desire to do something nice for loved ones - give a gift.
1. Materials: hoop (diameter 18 cm), floss threads (for embroidery we use 4 folds), needles with a wide eye (no more than 3 cm long), scissors (about 140 - 170 mm in size), a needle bed for each child , fabric – thick waffle fabric with square checks, strips of cardboard with markings for making a series of horizontal crosses. (photo 1).

2. Embroidery is one of the oldest and most widespread types of arts and crafts, distinguished by a variety of execution techniques and a wealth of patterns. It is interesting and accessible not only to adults, but also to children of senior preschool age.
“They rang the bell -
And they got to the palace!
The chamber opens
Look how rich she is:
Is there a monster there?
Are there treasures there?
This one is the best of all the chambers!
Here lies a countless treasure -
Not for feisty white-handed girls,
And for grandma’s granddaughters!
We'll give it to her on her birthday
We are our works:
lace collar,
The roosters are in trouble! (photo 2).

3. Consider embroidery patterns. (photo 3)

4. You can invite the children to complete the second half of the diagram according to the model. (photo 4).

5. Strips of cardboard with markings for making a series of horizontal crosses for embroidery exercises, children’s ability to see the square on the embroidery. (photo 5)

6.We start embroidering from the bottom up by determining the place for the first cross. Cross stitch refers to counted embroidery, that is, you need to count the cells. We look at the diagram, find the longest horizontal row of crosses, find the middle on it by counting the cells. We draw a straight line with a simple pencil using a ruler and enclose the pattern in a square or rectangle; when embroidering, it will be convenient to count the cells. (Photo 6)

7.Now you need to find a place for the first cross on the fabric. Find the middle on the fabric: fold the fabric in half (you can count the cells). In the diagram we find the bottom horizontal row, count to the right the required number of cells from the middle of the pattern. This is the location of the first cell! (Pay attention to embroidering the sun: we start embroidering with the sun itself, then the rays, do not forget to leave room for them at the bottom). You also need to remember to leave space at the edges of the fabric for a frame and for braid.
(photo 7, 7a, 7b)


8.Insert the fabric into the hoop, fix the tension of the fabric. (photo 8)

9. Starting to embroider, you need to secure the thread to the fabric. We do not make knots on the thread when embroidering! We pierce the upper right corner of the first cell and bring the needle to the lower left corner (photo 9)

10. We stretch the needle and thread and leave the tail of the thread, the thread went along the wrong side of the work. (photo 10)


11.Then we insert the needle into the same corner next to the tail and bring it out again into the same lower left corner of this cage, the thread will lie on top and the thread will be secured. Cut off the tail with scissors. (photo 11)

12. The cross stitch consists of diagonal crossed stitches of the same size. The cross is made in the following sequence: first, inclined stitches from right to left, then they return in the opposite direction, overlapping the previous stitches crosswise (diagonal crosses are obtained). (photo 12, 12a, 12b).


13.When the thread ends, it must be secured: on the wrong side, next to the remaining thread, we find a stitch and pull the needle and thread into it, and into the resulting loop we pull the needle and the remaining thread again. Get a knot. You can repeat it again for strength. And cut the thread. (photo 13, 13a, 13b)


14. We cover the embroidered picture with bias tape or insert it into a frame. The gift is ready!
I embroider cross by cross,
And behind the stitch I put my stitch,
So the sun is shining,
And a beautiful flower blossomed.
Butterflies, hearts, cheerful cockerels
I embroider for you with love, my friend!
(photo 14)

15. Gift ideas: for Valentine’s Day - a heart, Maslenitsa - the sun, a Christmas tree - for the New Year. (photo 15)

16.Napkins with letters (the first letter of the name) can be given to yourself and friends on their birthday. (photo 16)

17.Embroider hens, chicks, and cockerels for Easter. (photo 17)
18. We use embroidered tablecloths, towels, and napkins for role-playing games in “Home” and “Birthday”. (photo 18, 18a, 18b, 18c)


19. We use embroidered tablecloths and towels based on Russian folk patterns to decorate a mini-museum in the “My Russia” group. (photo 19)

Cross stitch patterns for children


This technique of decorative and applied art, such as working with isothread, has two easy-to-perform techniques: mastering embroidery using geometric shapes - a circle and an angle. Thanks to your wide imagination and uncontrollable imagination, you can create masterpieces worthy of an exhibition hall from two figures. Paintings created using the isothread technique are an unusual gift for a loved one, an excellent addition to the interior style and just a good mood on a dull day.
Paintings created using the isothread technique are an unusual gift for a loved one
In practice, there are two types of schemes.
For a circle
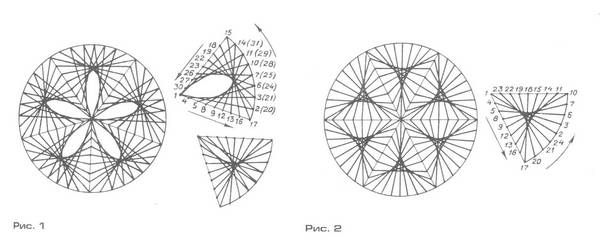
- On a sheet of thick cardboard, select a starting point - the center of the circle. Use a compass to draw a circle. To determine the equal distance between future holes, we use a protractor. We make an equal number of holes on the circle according to the markings.
- Conventionally, we number clockwise with numbers from 1 to 16 without missing holes. Following the instructions, pass the thread in the following sequence: from purl 1 to 3, return purl to 2, from 2 to 4, back to 3, from 3 to 5, and so on until the end of the circle. The pattern is good for embroidering the outline of figured images. To create an arc, use a semicircle as the base.
- The following pattern is made with long stitches, convenient for making ovals in the design. From designation 1 we count seven punctures, along the front side we make a stitch in the eighth. From the purl we go to the seventh and the front one we go back before the designation 1. The movement of the thread is counterclockwise. The ornament is ideal for embroidering a New Year's snowman, decorative elements in images of animals, butterfly wings and bows.
- Now we make the same pattern with long stitches with a distance of five punctures. The center circle will be slightly larger, which makes it possible to make the internal ornament with stitches “alternately” or diagonally.

For corner
- Draw a corner of any shape on thick cardboard from the inside out. On both sides of the figure, mark the same number of points at equal distances. Puncture the markings with a pin, 5 punctures on each side.
- We number the points on one side from top to bottom from 1 to 5, on the other from bottom to top from 6 to 10, respectively.
- Filling out the diagram. From point 1, stretch the thread to 6, along the purl to 7, from there the front thread to 2. Then down 3 and along the outer 8. Complete the pattern by fastening the end of the thread with a sketch to the purl 10.

Gallery: isothread (25 photos)


How to embroider a circle with isothread: master class
Making a circle with isothread requires concentration and consistency of actions.
Necessary:
- A sheet of thick cardboard;
- Iris threads, floss;
- Compass, needle, awl;
- Scissors, glue, protractor.
How to do:
- Turn the cardboard wrong side over and draw a circle in the center with a compass. Using a protractor, accurately distribute the points around the circumference with a pencil, using a degree ruler as a basis. For example, every 10 degrees we put a designation.
- Carefully pierce the markings with an awl. To avoid damaging the work surface, place a cloth or wooden board under the cardboard. To make the holes smaller, you can use a needle.
- Now mentally imagine a watch dial. Where the number 12 should be, put the number 1 above the puncture, then clockwise we number all the holes with numbers.
- Start the work with designation 1. From the wrong side of the paper, through the number 1, we stretch a needle and thread to 5 on the front side. Then to 6 from the wrong side to 2. Observing the numerical order, from the wrong side you get a seam around the circumference, from the front side - a circular pattern like a polyhedral star.
- You cannot tie knots; when pulled together, the thread deforms and spoils the image of the painting. Secure the ends of the thread with glue.
There are options for other circle patterns:
- A stitch equal to the diameter: Measure the center inside the figure and put a dot. Pierce a hole from the inside with an awl. Then, from purl 1 through knit to the central point, stretch the thread, return to purl 2, from it along the front to the center and again return below to 3.
- Equal length stitches: Mentally divide the circle into the dial. Where the number 12 should be, we retreat along the wrong side to 11, from it the front thread up to 5, along the wrong side from 5 to 4, from 4 right up to 10.
It is very important not to go astray with the sequence of symbols; before making a seam, think about the location of further numbers.
Isothread embroidery on nails for preschoolers step by step: how to do it
Such crafts look impressive, creating visual volume by raising the thread above the surface of the base.
You will need:
- Small carnations with caps;
- Floss threads;
- Wooden board or plywood sheet;
- Drawing template, hammer.
Such crafts look impressive, creating visual volume by raising the thread above the surface of the base.
How to do:
- Having chosen a drawing for your future masterpiece (print out new diagrams), secure it with a strip of tape on the work surface.
- To maintain the exact distance between nails, use a pencil to mark the base. Drive nails at the points of the contour boundaries. Remove the drawing.
- Form a loop at the end of the thread, place it over the nail of the first corner, and twist it around the fastener. Then stretch it diagonally to the opposite stud. The isothread technique on nails allows you to form a pattern both in a certain sequence of thread application, and in a chaotic manner.
- Work in a clockwise direction without disturbing the order of the threads.
At the end of the execution, secure the end of the thread with glue.
Isothread: star for children
You will need:
- A sheet of thick paper;
- Iris threads or floss;
- Pencil, ruler;
- Needle, awl.
What to do:
- Draw a symmetrical star on the wrong side of the sheet. Let's take the top ray of the star as the initial basis of the drawing. Let us conventionally denote the apex point of the ray by the letter A. From the designation downwards along the sides of the angle, count an even number of points. For example, five on each side, for a total of ten. Let's denote them by numbers from left to right.
- Make holes with an awl where the points are marked. The result is a drawing diagram.
- From the inside of the 9th point, stretch the thread to the top of A. Then from A return to 2nd and down to the 7th point. Accordingly, from 7 to 5 we move along the wrong side, along the front side from 5 to 4. From 4 to 6 down the wrong side. From 6 to 3 on the front, from 3 to 1 on the back and to 8. From 8 to 10 and to top A. Using this scheme, make all the rays of the star step by step.
- After finishing the embroidery of the corners, you can come up with an original image in the middle of the star. For example, here we use the embroidery technique of equal length stitches.
Just keep in mind the obligatory nuance - to prevent mixing of graphic styles of the drawing, it would be more advisable to make some deviation from the pierced holes of the original image.
How to make a snowflake using isothread
The snowflake pattern will be very easy for inquisitive and restless needlewomen.
The thread graphic of the image is a circle or square, covered with thread from the middle to the edges. Here the size of the seam can be varied, for example, make one larger, that is, outside the figure, the next seam is smaller, respectively, not reaching the edges of the image.
When starting to work on a snowflake, your child will need adult help. Draw a square on a piece of paper with a central point O inside. From it we measure segments of equal distance to the edge of the figure and beyond, alternating one at a time. In the marked places we put designations from 1 to 10. From 1 we pull the thread to O, then from O to 2, from 2 to 3 and back to the central point. If you follow the sequence of the pattern, you get a small snowflake in the picture. After finishing the drawing, use an eraser to erase the square shape with light movements.
The snowflake pattern will be very easy for inquisitive and restless needlewomen
The second version of snowflake embroidery involves covering the contours of the design with a stitch “every other” (1-3,2-4). Inside the contours, you can decorate the image with beads or sequins, weaving them into the stitches.
The idea of making a snowflake using the principle of corner embroidery is more complex. You will need:
- Cardboard or velvet paper;
- Scheme of an octagonal snowflake (from the Internet);
- Colored threads of wool, acrylic, iris;
- Pin, needle, tape, paper clips.
How to do:
- Attach the drawing diagram to the cardboard with paper clips, and use a pin to pierce holes along the image.
- Conventionally, we number the angle of the snowflake, number one is the end of the segment from the beginning of the angle, then down to the beginning of the angle. The other side of the number from bottom to top, for convenience, we denote from 9 to 1.
- We make the first seam from the wrong side 1, securing the tail with tape. From 1 we go down with a thread to 9, return to 8 on the same side and to 2 on the next side of the corner. Fill the corner sequentially, without disturbing the order of the threads.
- Follow this principle to complete the remaining corners of the snowflake.
Monkey isothread
To make an image of a monkey you need:
- Threads for embroidery or floss, iris in appropriate shades;
- Colored cardboard (lawn green), a sheet of thick paper;
- Needle, scissors, glue, pencil, pin.
How to do:
- For the picture you need to take a drawing of a monkey. You can copy it using a carbon copy from a coloring book or find it on the Internet.
- To make the drawing have a reverse side, copy the monkey’s figure through the glass. Transfer the inverted image through carbon paper to the back of the background cardboard.
- Pierce the contours of the figure with a pin.
- Embroider the tummy, inner parts of the paws, ears with yellow thread like a circle. We sew the contours of the pattern with brown threads using an alternate stitch. The peculiarity of this stitch is that the distance between its beginning and end is one puncture. That is, if we conditionally divide the punctures by numbering, we get a stitch length of 2 -4, skip 3, skip 5-7, skip 6. In the second circle we grab the missed holes, skipping 2, 4, 5, 7 respectively.
- We embroider the nose and eyes with black thread.
You can add decorative elements to the picture, for example, embroider a ball next to the monkey with beads or make eyes in the form of black buttons.


