Antique Dolls - Twitchers (mobile toy made of cardboard)
Actually, I don't really like jerks. But once I saw a picture from an old book, where there was a description of how to make a children's hanger - an Owl. She opened her eyes when clothes were hung on her. And I wanted to make such an owl-twitch.
Most of the time, this owl sleeps peacefully, but as soon as you pull the thread, it will open its eyes and flap its wings. And maybe even shout “Whoo!”.

Materials and tools:
- Thick cardboard or packaging corrugated cardboard (boxes are made from it)
- colored paper
- Colored cardboard (yellow)
- PVA glue
- Scissors
- Thick threads
- Marker or marker
A4 pattern sheet.

We cut out the body of an owl and two wings from cardboard (in mirror image).

Cover them with brown paper. Dry under pressure (put a heavy book on top).


We glue the details of the head from colored paper, dry it.

Cut out a piece with pupils from yellow cardboard. We outline the location of the pupils and eyelids with a pencil.

Glue on it the lower eyelids of paper of the same color as around the eyes.

With an awl we pierce the shoulder and wing at the junction. It is convenient to do this on a hard rubber mat or on an unnecessary album (magazine).

We make a wing mount. You can use special scrapbooking clips, or make your own from a button and a piece of wire. We fasten the wings, they should move freely.

We stretch the first thread through the holes in the upper part of the wings and in the lower part of the part with the pupils. We stretch the second thread only through the holes in the lower part of the part with pupils.

We fasten the upper part of the part with the pupils with an elastic band. Securely sew it to the "ears" of the owl.

By adjusting the size and tension of the threads, you can tie them together. To the end of the thread we tie a button or a ball, for which we will pull.


With a black marker or felt-tip pen, draw feathers on the wings and finish drawing the eyes.

Twitch toys have been known since ancient times. These mechanical figures of people or animals, which, thanks to a simple articulated mechanism, have funny jerking arms, legs or paws, have always enjoyed special love among kids.
Initially, jerks were made of wood, in Rus' they were called "dancers". Subsequently, the manufacturing technology was greatly simplified due to the use of paper and cardboard. With the advent of color printing, twitch patterns drawn by artists began to be published in magazines, which made it possible for everyone to make colorful toys.
Well, the Internet has made the possibilities for creating a variety of jerks almost limitless. :) I invite you to make together with me a mechanical toy made of cardboard in the form of the famous fairy-tale hero - Puss in Boots, according to ready-made templates. And at the end of the master class, another version of the twitch awaits you - the Monkey.
Master class: cardboard toy "Puss in Boots"
Materials and tools:
- sheets of A4 office paper (for printing templates);
- packaging microcorrugated cardboard (1.5 mm thick) or cardboard for children's creativity;
- a sheet of thick white paper A4;
- standard (clerical) knife;
- scissors;
- awl;
- paracord (4 mm in diameter) or other fasteners;
- kapron thread, narrow ribbon;
- glue stick;
- glue "Moment Crystal";
- double sided tape.
So, we start with the preparation of cardboard parts for the base of the twitch toy.
We print contour templates on office paper. Cut them out with small allowances.
We stick pieces of double-sided tape on the wrong side and glue the templates to the wrong side of the cardboard.

In this case, microcorrugated cardboard with a thickness of 1.5 mm is used. But now I want to draw your attention: the contours of the parts here are quite curly, with small elements, so it can be difficult to cut out of microcorrugated cardboard out of habit. And here you can go two ways:
1. neglect small elements and smooth out the contours when cutting;
2. use thin cardboard (for example, cardboard for children's art; for greater rigidity, you can make 2 layers); the toy in this case will also be quite functional, below you will see an example of such a performance of a twitch.
Next, with an ordinary clerical knife, we cut out the details of the base. We immediately make holes for fasteners. I used a 4mm punch. If a punch is not available, you can cut holes with a knife or awl.
The diameter of the holes may differ from the original, depending on what kind of fasteners you will use.

On thick white paper (on the front side) we print out color templates of Puss in Boots. Cut out.

Alternatively, the cat can be colored with pencils or felt-tip pens along with the child. For this, a special set of templates is provided.
Using a glue stick, glue the colored parts onto the cardboard bases (on the front side of the cardboard).

We fold the paws in pairs (on top of each other). And with an awl we pierce small through holes on the upper edges, as shown in the photo. These holes will be used to control the paws.

For attaching the paws, a white paracord with a diameter of 4 mm is used here. Cut off 4 small pieces (the length is such that you can tie 2 knots).
We tie a tight knot at one end, melt the tip with a lighter. We pass the cord through the holes of the body and paws.

The legs should be under the body.

This is just one of many mounting options. For a movable fastening, you can use, for example, brads, buttons, wire, etc. - whatever you like best. The main thing is to make sure that the limbs of the twitch toy rotate freely in the same plane!
We proceed to the most important stage - the creation of a paw control mechanism. In fact, everything is extremely simple here. It is necessary to tie the paws in pairs with a nylon thread through small holes. With the thread stretched, the limbs should be in the lower position.

And now we tie a long thread (you can fold it in half) or a thin cord to the horizontal threads, both to the top and to the bottom, as shown in the photo.
We tie knots on the paracord from the wrong side of the toy. We check whether the paws rotate freely enough. We melt the ends of the cord.

We cut out 2 circles with a diameter of 2.5 cm from cardboard. If you are using microcorrugated cardboard, make a slit in the middle on the wrong side of one circle and place the end of the thread there.

We glue both circles with Moment Crystal glue.

Alternatively, instead of cardboard circles, you can attach a large bead - for convenience and beauty.
We glue a cardboard circle with a diameter of 3.5 cm to the head from the wrong side on a loop of a narrow ribbon. 
The cardboard twitch toy is ready!

Here is such a cheerful and agile puss in boots turned out. The kids will be delighted! :)

A set of templates (contour, color and for coloring) for making a Puss in Boots twitch toy can be purchased at the Kartonkino store:
I already mentioned above that such toys can also be made from thin cardboard for children's creativity. These charming monkeys, created, are made in just such a way.
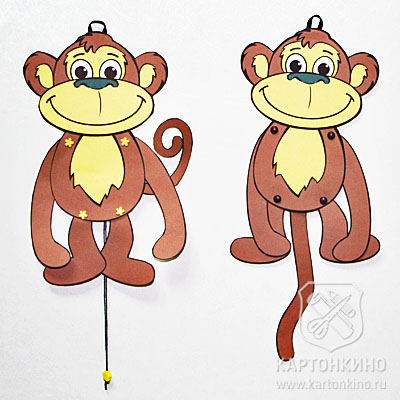
Please note that the monkey on the right does not use a string to control its paws, but a tail. Rather, the lace is also there, it's just glued between the halves of the tail. A very interesting option, you will agree.
And this is what the underside of the monkey looks like. Everything here is quite traditional.
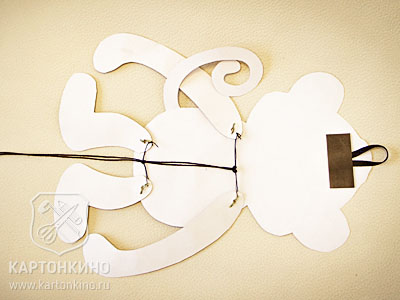
The paws are attached with the help of brads. It looks very good, and the attachment process itself is easier than with paracord. Do not forget that when using brads, the holes need to be made smaller, it is enough to pierce with an awl.
It is worth noting that the tail on the side was not the best solution - it interferes with the movement of the paw. But there is a choice: if you want - do it with a tail on the side, if you want - from below or without a tail at all (not completely, of course, without a tail, it seems to be in the background and simply did not come into view).
Templates for the monkey toy-twitch can be downloaded here:
By the way, Anya Shidenko has many other interesting patterns for making various products for children, as well as holiday accessories. You can find them by clicking on .
Well, now you know a simple and working way to make a do-it-yourself cardboard twitch toy. By analogy, you can even draw the character you like on your own - some hero of a folk tale or cartoon.
Or use ready-made templates. I have already shown you two variants of the toy. And one more - Kitty - you will find in the 9th issue of the electronic magazine "Masterklassnitsa".

We wish you pleasant creativity, fun and useful games with children!
Yours, Inna Pyshkina and the Kartonkino team.
Make interesting cardboard puppets with your child: “dressers”, twitchers, puppets, on hinges, for a puppet theater.
Even today, when dolls and baby dolls of various modifications have flooded toy stores, paper and cardboard toys continue to be popular. It is difficult to say what gives the child more pleasure, making home-made puppets with clothes, puppets and characters for the finger theater together with their parents, or playing with them. Set aside an hour or two, get creative with your child. In our article you will find templates, diagrams and instructions that will help you.
How to make a doll with cardboard clothes with your own hands: schemes, stencils, photos
Dolls and baby dolls made of paper and cardboard with interchangeable clothes appeared in the 18th century, they were especially popular among girls during the Soviet Union. Perhaps the lack of toys had an effect, perhaps, in the absence of a computer and the Internet, children needed to spend their time somewhere and fantasize.
Modern spoiled children are also not averse to playing with cardboard crafts. They can come up with the design of the dolls themselves, “dress” them according to their own taste, at their discretion, in clothes of various styles and even eras.
In book and stationery stores, you can buy ready-made cardboard dolls with clothes, accessories, furniture, and even houses. But isn't it more fun to do something similar yourself?
IMPORTANT: Making cardboard dolls with clothes is a very economical activity. Most of the tools and materials for this type of craft are already in your home. At the same time, you and your child will be able to realize even the most unexpected ideas.
For creativity you will need:
- a few sheets of cardboard
- simple pencil
- ruler
- eraser
- PVA glue
- colored pencils, felt-tip pens, markers and glitter pens, everything that is suitable for the design of doll clothes and accessories

So, you can make a cardboard dress-up doll in several ways:
- Buy a paper doll with clothes that you and your child like in the store. Reinforce it with cardboard. To do this, you need to cut out the doll, which, as a rule, consists of two halves, front and back. First, cut out the doll that is facing you. Cut with a margin, stepping back a little from the contour. Glue the paper blank onto a sheet of cardboard, then cut it out along the contour. Carefully, also already along the contour, cut out the back of the pupa, glue it on cardboard. Where necessary, trim with small nail scissors. Get a toy with a dense frame.
- Choose in our article or on the Internet the pupa template you like, print it on a color or black and white (then you still have to color) printer, then do the same as described in paragraph 1.
- Draw your own doll. The way you or your child likes it. It will turn out unique, you yourself will create the whole image from scratch.
IMPORTANT: Absolutely any character can be a cardboard dress-up doll: your daughter's favorite hero from a cartoon and a fairy tale, a famous actress, singer or model (then you will need to find her full-length image, preferably in a swimsuit or tight-fitting clothes, in a magazine or on the Internet), as well as the girl herself and her family members (then you need a full-length photo). And who said that it should be only a man? From cardboard with clothes, you can make a Mini Mouse, one of the Little Ponies, etc.

 Cardboard Mini Mouse with clothes.
 Cardboard Lalaloopsy with clothes.
 Will the child draw the doll or you yourself? You can do this directly on cardboard if it is white, or on a sheet of office paper.
- Divide the sheet in half horizontally.
- Divide one of the halves in half with a vertical line.
- Look at the picture how to make the body of a child, teenager, adult proportional to the head.
- Accordingly, divide the vertical line into 4, 6 or 8 identical segments. If you are drawing a girl from Monster High or another cartoon, you do not need to keep the proportions.
- Draw horizontal rays from each point on the vertical line so that the doll's body is proportional on the left and right. Remember that all these lines are auxiliary, they will be removed later. Therefore, draw them thinly, barely touching the paper.
- Draw the doll - front view. Carefully cut out, attach to the second half of the sheet. Outline and draw the doll - rear view. Cut out.
- Glue both halves of the doll, optionally make a stand.

 proportions of the human body.
 The scheme of drawing a doll from cardboard.
 You might like one of the templates below.
 Template for a cardboard doll: a boy and a girl.
 Template for a cardboard doll: a girl.
 Template for a cardboard doll: a boy.
 Template for a cardboard doll: a guy and a girl.
  Template for a cardboard doll: a man and a woman.
 Template for a cardboard doll: monster high girls.
 Dresses for cardboard dolls. Suits for cardboard dolls
Dresses and costumes for cardboard dolls are best made from paper. Then the valves will bend better, not break and better hold.
- Take your chrysalis, attach it to a piece of paper and draw thin lines around the outline. You will have to circle as many times as the items of clothing you plan to make for her.
- Draw the clothes. It can be in any style, for any season. Fantasize!
- Draw flaps on the clothes on the shoulders, forearms, waist, hips, legs. Dresses and costumes should adhere well to the doll.
- Color and decorate clothes.
- Carefully cut out the dresses and suits you have.
You can also use templates.
 Clothes for a girl doll made of cardboard.
 Clothes for a doll-guy made of cardboard.
 Clothes for a boy doll made of cardboard.
 Clothes for a girl doll made of cardboard.
  Clothes for a woman doll made of cardboard.
 Clothes for a male doll made of cardboard.
 VIDEO: How to make a paper doll?
Guitar for cardboard dolls
With cardboard on hand, you can make a voluminous guitar out of cardboard, which will suit not only paper dolls, but also baby dolls, dolls like Barbie or Monster High.
Prepare:
- guitar cutting template
- white office paper or landscape sheets
- white cardboard
- pencil
- ruler
- marker
- scissors
- floss or silver thread
- beads

- Guitar template download or draw. You will need to break it down into parts.
- Transfer the guitar deck to cardboard. You need to do this four times: two times without a socket (round holes on the guitar), two times with a socket.
- For the neck of the guitar, two parts are needed.
- Draw three to four parallel lines on the cardboard. The distance between them is about 0.7 cm. Draw teeth between the two extreme ones. This detail is needed to make the deck voluminous.
- Carefully cut out the guitar pieces. Start assembling the musical instrument as shown in the picture.
- Glue the piece with teeth between the two pieces of the deck - with and without a rosette.
- Glue two more deck pieces on top.
- Glue the neck of the guitar, attach it to the deck.
- Paint the guitar with paint or nail polish of your choice.
- When the paint dries, draw horizontal stripes on the fretboard - frets.
- Using thread, beads and glue, make guitar strings.
- Decorate the guitar with stickers, patterns, sparkles of your choice.
 Cardboard guitar: materials, tools and blanks.
 Assembling a guitar out of cardboard.
 Cardboard guitar decor.
 Guitars made of cardboard for dolls.
 VIDEO: Cardboard guitar
Glasses for cardboard dolls
For Barbie, Monster High and baby dolls, you can make bright and unusual accessories - cardboard glasses with colored lenses.


Prepare:
- cardboard
- transparent color film
- pencil
- scissors
- scotch
- felt-tip pens, markers, glitter pens, nail polishes, other
- ruler and measuring tape

- The shapes of the faces and sizes of the heads of the dolls can be completely different. To make cardboard glasses fit, you better measure the distance between the eyes of a particular doll, the size of the eyes themselves, the distance from the eyebrows to the lower eyelid, and so on.
- See what the shapes of lenses, frames, eyeglasses can be, choose the one that you like and suits the style of the doll.
- Draw a sheet of cardboard according to your size, draw glasses and temples.
- Carefully cut out the glasses. If the cardboard is thin, duplicate the parts and glue them together.
- From a transparent colored film, cut out the details to fit the lenses of the glasses.
- Glue the "lenses" to the glasses.
- Color and decorate the glasses as you wish.
- Bend the temples of the glasses.
Cardboard briefcase for cardboard dolls
To make a cardboard briefcase for a Barbie doll or a cardboard doll:
- download and print the template (or redraw it to the size you need)
- transfer the contours of the portfolio to a sheet of cardboard
- cut the workpiece
- fold the workpiece, glue in the places you need
- color and decorate the briefcase

 Cardboard briefcase: template.
  Blank for a doll briefcase made of cardboard.
  Portfolio made of cardboard for a doll.
 VIDEO: How to make a backpack for dolls?
Movable doll twitch
It is easy to make a movable doll with hinges of any configuration from cardboard. It's so convenient to play. It is also suitable for home puppet theater.


Prepare:
- doll templates (you can take them from this article, download them online or draw them yourself)
- cardboard
- hole punch or awl
- rivets (smallest)
- scissors
- materials and tools for drawing and coloring
- materials and tools for sewing, if you plan to make clothes for the doll from their fabric


- Print out your doll template. If you are drawing him, remember that every detail must be finished. Usually, mobile pupae articulate at the neck, shoulders, elbows, hips, knees, and ankles. You may have more or less joints.
- Transfer the blank to cardboard, if necessary, paint and decorate the doll's clothes.
- Carefully cut out the doll.
- Connect the joints with rivets. Make holes with an awl. Small screws, like in eyeglass frames, will also work for you.
- If you are making clothing for the doll out of fabric, skip this step.
- Collect the doll, if you want, make accessories for her.
 Movable cardboard doll: step 1.
  Movable cardboard doll: step 2.
 Movable cardboard doll: step 3.
  Movable cardboard doll: step 4.
  Movable cardboard doll.
 You can get such cute dolls:

 A family of articulated dolls made of cardboard.
 Articulated cardboard dolls.
 You can choose from one of these templates.

 Template for a hinged doll made of cardboard.
 Template for a mobile doll made of cardboard.
  Movable cardboard fairy: template.
 Movable girl doll: template.
 Articulated cardboard clown: template.
  Cardboard twitch dog: template.
 Cardboard twitch cat: template.
 IMPORTANT: If you want to turn your cardboard articulated doll into a twitch, attach the arms and legs from the back. In each of them, make holes, as shown in the figure, thread the connecting thread into these holes. Hang a bead on the end of the connecting thread. You can also attach a stick holder to the twitch.

 Details of a twitch doll.
 Scheme of fastening parts and connecting threads.
 Cardboard jerks.
 You can attach a stick holder to the twitch.
 VIDEO: Teddy bear made of paper
puppet puppet
Turning the articulated cardboard doll into a puppet is also very easy.
- Take two sticks from balloons, for sushi, or just two simple pencils. Fold them crosswise - crosswise and fasten with tape.
- Make holes in the arms and legs of the cardboard doll (on the hands and shins), thread the threads through them.
- Tie the ends of the thread to your makeshift handle.

 The doll is a puppet made of cardboard.
 Finger theater puppets
Finger puppet theater is a great entertainment for a child from 2 years old. You can make your own doll characters of his favorite fairy tale and stage it. And if the baby is already 3 years old or more, he will be happy to take part in the creation of pupae. Cardboard puppets for finger theater: animals. 
 Cardboard puppets for the finger theater: the characters of "Kolobok".
  Cardboard puppets for finger theater: princesses.
If you want to make cardboard finger puppets yourself, prepare:
- cardboard
- simple pencil
- eraser
- ruler
- stationery and nail scissors
- materials and tools for coloring and decorating dolls

- Draw the characters of your future production. Their size should be such that you can make 2-4 holes for your or the child's fingers.
- Color and decorate the dolls, then cut them out.
- If the cardboard is thin, make the toy in two layers.
Shrovetide doll
For a scarecrow - Maslenitsa from cardboard, take:
- colored cardboard
- colored paper
- white paper
- simple pencil
- ruler
- colored pencils, markers, paints
 Cardboard dolls for Maslenitsa.
 - Fold two sheets of colored cardboard carefully, using a ruler, with an accordion, and then in half.
- Connect them together by laying one on top of the other.
- From colored and white paper, make a doll face, hairstyle, headdress.
- Connect the parts of the doll.
Doll made of cardboard and fabric
Cardboard dolls can be "dressed" in fabric dresses and suits. Get one that doesn't flake. Then it will be enough for you to cut out the details of the clothes and simply glue them to the doll body.
You can also make beautiful Japanese-style kimono dolls from cardboard and fabric. Take:
- scraps of fabric
- cardboard
- scissors
- pencil
- ruler
- compass

 Doll made of cardboard and fabric: blanks.
  Doll made of cardboard and fabric: step 1.
 Doll made of cardboard and paper
Use the templates below or similar to make 3D toys out of cardboard and paper.
 Volumetric dolls made of paper and cardboard.
 Volumetric princess dolls made of paper and cardboard.
 Elsa doll made of paper or cardboard.
 VIDEO: Doll-twitch "Santa Claus"
Twitch toys are very popular not only among children, but also among adults. It seems a mystery how they move. Today we will unravel it. Most of the time, this owl sleeps peacefully, but as soon as you pull the thread, it will open its eyes and flap its wings. And maybe even shout “Whoo!”.

We will need:
Thick cardboard or packaging corrugated cardboard (boxes are made from it)
colored paper
Colored cardboard (yellow)
PVA glue
Scissors
Thick threads
Marker or marker
We cut out the body of an owl and two wings from cardboard (in mirror image).

Cover them with brown paper. Dry under pressure (put a heavy book on top).


We glue the details of the head from colored paper, dry it.

Cut out a piece with pupils from yellow cardboard. We outline the location of the pupils and eyelids with a pencil.

Glue on it the lower eyelids of paper of the same color as around the eyes.

With an awl we pierce the shoulder and wing at the junction. It is convenient to do this on a hard rubber mat or on an unnecessary album (magazine).

We make a wing mount. You can use special scrapbooking clips, or make your own from a button and a piece of wire. We fasten the wings, they should move freely.

We stretch the first thread through the holes in the upper part of the wings and in the lower part of the part with the pupils. We stretch the second thread only through the holes in the lower part of the part with pupils.

We fasten the upper part of the part with the pupils with an elastic band. Securely sew it to the "ears" of the owl.

By adjusting the size and tension of the threads, you can tie them together. To the end of the thread we tie a button or a ball, for which we will pull.
With a black marker or felt-tip pen, draw feathers on the wings and finish drawing the eyes.


Template for making an owl twitch:

Here is such a funny toy-twitch in the form of a dog, you can make it out of plywood, or you can make it out of thick cardboard. The principle of such a toy, in general, is simple - you need to pull the rope down and the toy starts to move. We already had such toys on our site: "Circus Strongman" and "Jack Dancing Bear".
The dog template is absolutely purebred, so you can color it as you wish :)
This toy won me over with its ease of manufacture, because with such a master class, which was published by the author Tatyana Pirozhenko, even a child can do the work.
A small master class on how to make such a twitch with your own hands. And for those who want the same toy dog for themselves, there is download template.
So, to make a jerk, you must first decide who you want to make and which parts of the figure will be movable. We decided that our Dalmatian would have paws and a tail.
Then you need to draw your figure, divide it into parts. And cut out the resulting details - we get a template.

We will need:
cardboard, scissors, paper glue, adhesive tape, wire and three buttons (or bards), string, rubber band (or Hungarian), bamboo skewer.

Progress:
1. Cut out parts of the template, trace them on cardboard and cut out the resulting parts.
2-3. In the places marked on the template, we pierce through holes with an awl.
4. In order for the parts of the dog's body to move, you need to connect them movably. For this, it is best to use carnation bards. But I didn’t have them at hand, so I made fasteners with my own hands from a button and a piece of wire (I once spied this option from Veronika Podgornaya).
5. We string parts on the fasteners - first the body, then the limbs (note that for this we use those holes that are circled on the template with a double circle).
6. This is how our dog will look from the inside out after attaching all the details.
7. Before you fix the wire, you need to tie the limbs sequentially with each other with pieces of elastic thread, threading its ends into the remaining holes. Tail - with a hind leg. Hind leg - with front leg.
8. To the middle of the elastic band passing between the paws, it is necessary to tie one end of the rope, for which we will then pull the toy.
9. At the very end, you need to fix the dog on a stick with adhesive tape.


