Knitting English knitting pattern. English knitting: knitting the front and back loops in the English way
Many who have been knitting for more than a year have heard such a thing as an English gum. What is its peculiarity and how does it differ from a simple single gum?
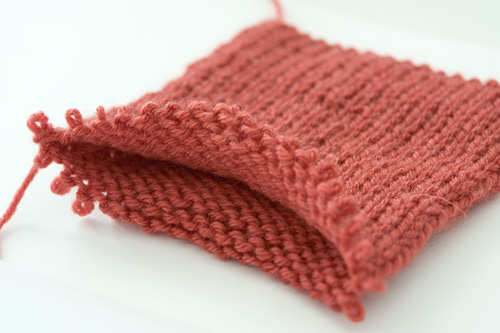
A simple elastic band, consisting of alternating purl and front loops, is most often used to obtain an elastic edge of the product. It can be processed neck, cuffs or bottom. This pattern does not give much volume and stretches well. And here English gum knitting- a knitting pattern for a pattern that gives volume to the loops, special elasticity to the fabric, and a beautiful texture. It is great not only for processing the edge, but also used independently, as the main pattern of the entire product. By English rubber band pattern knit pullovers, cardigans, it is good for hats, snoods and scarves.
So, let's highlight the main properties of the knitting pattern English gum, made with knitting needles:
- exquisite texture, creating a beautiful canvas even in large products;
- excellent elasticity, thanks to which it is well suited for decorating the edge of products;
- looseness and splendor of the pattern, formed due to the peculiarities of knitting, allows you to create a warmer fabric.
But this pattern also has its own small drawback. For example, it is recommended before starting execution knitting patterns with English rib knitting, knit several rows with a simple elastic band. Otherwise, the edge of the fabric may stretch during wear.
It is also worth noting that English gum, unlike a simple single, requires more yarn consumption. Yes, it is not quite economical, but how impressive it looks in products.
Knitting technique and pattern pattern of English gum with knitting needles
Rotary knitting pattern "English gum" 1x1
We said earlier that a single simple elastic band consists of alternating purl and front loops. English elastic in its essence also consists of purl and front loops, but with the addition of a crochet and throwing loops, not knitting. Let's look at the diagram in more detail:

It is worth mentioning another important feature - the number of loops cast on for knitting a pattern should be odd. This is done to create a more accurate edge edge of the canvas.
So, on the knitting needles we collect the required number of loops. For example, 15 + 2 hem = 17 stitches.
1 row: Remove the first edge loop without knitting (). Next, alternately knit 1 purl, 1 facial loop to the last loop. Knit the front loop.
2nd row. Slip off the first loop as a hem loop. Then * 1 front loop, yarn over, remove 1 purl loop without knitting *. Finish the row with an edge loop.
3rd row- yarn over, remove 1 loop without knitting (thread behind the work) *, knit the loop and yarn over of the previous row together with the front one, yarn over, remove 1 loop without knitting *.
4th row- * knit the loop and yarn over of the previous row together with the front one, yarn over, remove 1 loop *, knit the loop and yarn over of the previous row together with the front one. Then alternate the 3rd and 4th rows.
If you complete the fabric with an English rubber band, then knit the 3rd row from the above description last, and then close the loops in a way convenient for you. Then your edge will be neat.
Circular knitting pattern "English gum" 1x1
At its core, circular knitting is practically no different from rotary knitting. The purl and front rows, for example, in the front surface or in a regular elastic band, go one after another, without any changes in the technique of making the pattern.
But now you are going to knit yourself a snood or a sweater with a raglan sleeve with an English elastic band. And here you may have difficulty knitting yarns or loops together. But do not panic, everything is solved redistributed simply, you just have to figure it out.
- In the first row we knit: 1 front, we make a crochet, and remove the loop without knitting.
- In the second row: Nakid, not knitted loop, we knit the wrong loop.
- Third row: we knit two loops together, then there is an unknitted loop.
- Important! In circular knitting, do not forget to highlight the beginning of the row with a marker. So you will not get confused in the alternation of rows!
Types of English gum (step by step lessons for beginners):
Above, we have considered a standard English elastic band with knitting needles. In fact, it is the only correct one. But since the pattern is quite popular, many simplified versions of it have appeared.
False English gum (fake or simplified)
 One of the most famous imitations of the knitting pattern of English gum with knitting needles is called false or fake. Purely visually connected in this way, the canvas is practically indistinguishable from the original. But working on it is much easier.
To begin with, you should dial the loops, their number should be a multiple of 4 + 2 edge. The entire rapport of this pattern consists of two repeating rows:
Row 1: Edge st, *knit 3, purl 1* - repeat to end of row, end with edge st.
Row 2: Edge st, *knit 2, purl 1, knit 1* - repeat to end of row, end with hem st.
As you can see, in this version of the false English elastic band, there are absolutely no yarn overs.
Volumetric two-tone English rib knitting
If you like experiments and just adore the color variety in clothes, then pay attention to the possibility of knitting a two-color English gum pattern. The technique may seem a little complicated, but the result is worth it. You will receive a voluminous and elastic fabric, which can be used as a pattern for knitting a hat or even a pullover.
The whole uniqueness of the two-color pattern lies in the fact that each row is knitted twice - 1 time with a thread of one color (color A), 2 times with a thread of another color (color B).
Important!
All purl loops of this pattern should be knitted in the classic way.
The principle of knitting with a two-color English elastic band with knitting needles:
Cast on an odd number of stitches on the needles.
1 row: knit with thread A - * 1 facial, 1 yarn over, remove 1 loop without knitting *, 1 facial
2 row: knit with thread B - * 1 yarn over, remove 1 loop without knitting, knit 1 loop together with the yarn over with the front loop *, 1 yarn over, remove 1 loop without knitting
3 row: knit with thread A - Attention! Knitting is moved to the opposite end of the knitting needle * 1 loop together with the crochet, knit with the wrong loop, 1 yarn over, remove 1 loop without knitting *, knit 1 loop with the yarn with the wrong loop
4 row: knit with thread B - * 1 yarn over, remove 1 loop without knitting, knit 1 loop together with the yarn over with the wrong loop *, 1 yarn over, remove 1 loop without knitting
5 row: knit with thread A - Attention! We move the knitting to the opposite end of the knitting needle * 1 loop together with the yarn over, knit the front loop, 1 yarn over, remove 1 loop *, 1 loop together with the yarn over, knit the front loop. 2-5 rows are repeated.
Double English elastic
 It is logical that if there is a classic variation of the English gum 1x1, then there should be 2x2. Just this way of knitting will definitely look good in pullovers, especially in oversized models. To perform it on the knitting needles, you need to dial the number of loops a multiple of 4 + 2 edge loops.
- The first row is knitted with a standard elastic band 2 facial, 2 purl. There is one caveat: the last two loops must be facial.
- We start the second row with a crochet, then two loops are transferred to the right knitting needle not knitted, two front ones. At the end of the row, a yarn is made and the last two loops are removed without knitting.
- Third row. We knit the yarn over and the loop of the previous row together with the front one, knit 1, yarn over, leave two loops not knitted. At the end of the row, we knit the penultimate loop with a front crochet and the last one also front.
- Fourth row. We knit according to the rapport: yarn over, two not knitted loops, the next loop is knitted together with the front yarn, then again the front one. The row ends with one crochet and two unknitted loops.
Repeat rows 3 and 4 until the size of the fabric reaches the desired size.
Methods for decreasing, adding and closing loops in English gum
To preserve the beauty and integrity of the pattern in the canvas, reduce, add and close the loops of the English gum should be in a special way. This is an important point, especially when working on large items - cardigans or pullovers, where the evenness of the reduced loops along the armhole or sleeves when knitting from top to bottom determines the beauty of the entire product.
How to reduce the loops of the English gum:
Decreases are carried out in 3 loops, this allows you to keep the sequence of running loops of the pattern.
So, we knit an edge loop. Then the loops from the previous row (knit 1, purl 1, knit 1) are knitted together as follows (decrease on the right): Remove the first loop as a front loop, knit the next two loops together and stretch the removed loop through the resulting loop. Then knit in pattern until 4 loops remain on the needles. Decrease left: Three loops together knit. Edge loop.
How to add English Ribbon loops.
To add loops in the English Ribbon pattern, you first need to knit a sample. It is enough to knit 5-7 rows. In the next front row, in a convenient way for you, add 1 loop on each side. Then make uniform increases according to the sample.
Closing the loops of the English elastic band
In order for the edge of the product connected with an English rubber band to look neat, the loops should be closed correctly. For this you should:
- Knit the product to the last row.
- Then knit a row with a simple elastic band 1x1. This is done in order to remove the yarn over loops so that holes do not form on the edge.
- Since the density of an ordinary elastic band is less than that of an English one, it is necessary to make the edge thicker. To do this, you can close the loops in the usual way, but with a double thread.
A video on how to decorate a raglan line with English Rib shows how to add loops in a pattern:
Products connected with an English rubber band with a detailed description

You will need: 250g blue-green or 200g in Schachenmayr Mouline Art green-red (55% acrylic, 45% wool, 50g/55m); knitting needles No. 5, 6, 7, 8, 9 and 10; hook number 6, 1 button.
Knitting density, English rib, knitting needles No. 5: 12 p. and 28 p. = 10 x 10 cm. Knit from top to bottom.
English gum: odd number of p. 1st p. (outside): chrome, 1 person. * remove 1 p. as out. with a crochet, 1 person., repeat from *, chrome. 2nd p.: chrome, remove 1 p., as out. with a crochet, * 1 p. with a crochet knit faces., remove 1 p. double crochet, repeat from *, chrome. 3rd p.: chrome., 1 p. with a crochet, knit faces., * remove 1 p. as out. with a crochet, 1 p. with a crochet, knit faces., repeat from *, chrome. Run 1 time 1st - 3rd p., repeat 2nd and 3rd p.
Blue knitted vest with a hood

Size: 42-48
You will need: 350 g blue yarn in 4 additions (30% mohair, 70% acrylic, 50 g / 275 m); circular knitting needles No. 5.5; a large button in the color of the yarn; 2 buttons.
Weave
Front surface, garter stitch,
English gum:
1st p.: chrome., * 1 person. p., 1 out. n. *, chrome.
2nd p.: chrome., * 1 person. p., straight yarn over, 1 p. remove without knitting, like a wrong side *, chrome.
3rd p.: chrome., * 2 p. together faces., straight yarn over, remove 1 p. without knitting, like a wrong side *, chrome. Repeat 3rd row.
Knitting density: 10 p. x 16 p. = 10 x 10 cm.
Knitted poncho with knitting patterns and mitts

Poncho sizes: (38)40(42-44)
Finished product dimensions: width of the lower part - (117) 129 (142) cm, length measured from the neck - (44) 48 (50) cm.
You will need: Sandnes Alpaka yarn (100% alpaca, 110 m / 50 g) - (250) 250 (300) g white for ponchos and 50 g for mittens, (50) 50 (100) g each in gray and black, Sandnes Silk yarn Mohair (60% kidmohair, 15% wool, 25% silk, 280 m / 50 g) - 100 g white for ponchos and 50 g for mitts, 50 g each in gray and black colors, circular knitting needles No. and No. 7.5.
Attention! Knit with a thread in two additions: Alpaka + Silk Mohair in the appropriate colors.
English gum:
1st row (front): * 1 persons. p. remove, without knitting, with a crochet, 1 out. *, repeat * - *, at the end remove 1 person. p. with a crochet.
2nd row: * knit a loop with a crochet from the next person. remove the loop with a crochet *, repeat * - *, finish 1 out. n. Repeat 1st - 2nd rows.
Facial surface: persons. rows - persons. loops, out. rows - out. rows - out. loops; with circular knitting - only persons. loops.
Knitting density: 17 p. persons. satin stitch and 11 sts with English ribbing on needles No. 6 = 10 cm.
Cap with pompom knitting with English ribbing

head circumference 50-53 cm.
You will need: 50 g of LANG YARNS Maxi Tosca purple melange yarn (55% natural wool, 45% acrylic, 92 m / 50 g); a set of stocking knitting needles No. 7.
Main pattern, circle, r.: 1st p.: * 1 persons. p., 1 p. with a crochet, remove as out., repeat from *. 2nd p.: * 1 persons. p., 1 p. with a crochet, knit together out., repeat from *. Repeat 1st and 2nd p. Knitting density, main pattern: 16 p. and 18 p. = 10 x 10 cm. Attention! The hat is knitted on the wrong side.
How to tie a hat with an English rubber band:
How to do the job: cast on 72 sts, distribute them on 4 needles (= 18 sts per needle) and knit with the main pattern. After 13 cm from the typesetting edge in every 2nd circle. R. at the beginning and end of each knitting needle, knit 8 x 2 sts together. Pull off the remaining 8 sts with a working thread and turn the hat out.
Assembly: make a medium-sized pom-pom and sew on top of the hat. Tip: The typesetting edge will be very beautiful if you perform the "Italian set"
Knitted hat and scarf from Drops Design studio

Hat size S/M - L
Head circumference ~ 54/56 - 58 cm.
Scarf size: 33x 180 cm.
Yarn: (wool; 100 g/36 m)
For a hat: 200-200 g
For scarf: 600 g
Knitting density: 6p.x8 p. (Eng. Elastic band) = 10 × 10 cm.
7p.x 8p. (face. surface) = 10 × 10 cm.
For knitting you will need: circular knitting needles 15 and 10 mm
Plat. knitting with straight and reverse rivers: we knit all the items.
English gum: straight and reverse p.
Description
1 row: p. boards. viscous, * persons., nakid, reshoot the trace. n. as out. *, repeat from *-* to the last 2 sts, then sts of persons. and p. boards. viscous.
2 row: p. boards. viscous, * double crochet, remove the item as out., we knit faces together. nakid and removed in the last row p. *, repeat * - * until the last 2 p., finish: yarn over, remove the p. as out., p. viscous.
3rd row: p. boards. viscous, * we knit faces together. nakid and sts removed in the last row, nakid, remove sts as out. *, repeat *-* until the last 3 sts, we knit faces together. nakid and removed p., p. boards. viscous.
We repeat 2-3 p.
We attach a new ball, wetting and twisting the ends.
We knit a hat with straight and reverse p. to the circle. spokes.
Cast on 27-29 sts on 10 mm needles. We knit a row of out. with IS, then continue with an elastic band with drugs: p. boards. viscous, elastic faces. / out. until the last 2 p., persons., p. boards. viscous. We knit, thus, an elastic band 7 cm (we knit the last row with IS). Switch to 15 mm needles and continue knitting in English. rubber band with LS. At a height of 26-28 cm, we knit a row of faces. with drugs, knitting 3 persons each. together along the line. We get 14-15 p.
We cut the thread, stretch it through all the stitches, tighten and hide the tip.
We carry out the back seam.
We knit a scarf. Cast on 23 sts on 15 mm needles and knit the boards. viscous 10 cm up straight and reverse p. In the last row with IS, we evenly add 4 sts. We get 27 sts. We continue with RS: 6 sts of boards. viscous, out., M.1 (= 6 p.), out. M.2 (= 6 p.), out. and 6 p. boards. viscous. We get 27 p. Thus, we knit up to 170 cm up (we lay the pattern completely vertically), then boards. viscous in all p. up to 180 cm, while evenly decreasing in the 1st p. 4 p. We get 23 p. We close all the p. You will find all the necessary knitting patterns
July 15th, 2016 Anna Supper

Good afternoon dear friends! I am extremely glad to welcome you to the new master class of the site! I hope that it will be useful and interesting for you, because, which we will talk about today, we love not only the needlewomen of Foggy Albion, but also ours, domestic ones, that is, all of us.
So, we will talk about the English gum. And, to be honest, when preparing this master class, I fell into a stupor. After all, the fact is that the English gum is a very specific pattern, and speaking about it in detail, you need to tell which typesetting methods are suitable for this pattern, tell (and show!) How to make a neat edge for open parts, and which one for stitching , how to close an English elastic band so that it is elastic, or vice versa, inelastic, how to knit an English elastic band in a circle. But it can still be knitted in several ways! In general, if I started to show you all this in one master class, then in 100 photos, I definitely wouldn’t fit in. And I decided to do several master classes, where I will tell not only about all of the above, but also show how to add and decrease loops for English gum, that is, to give the fabric connected by this pattern a shape, how to knit English gum in two colors (and even how to pick up and close loops beautifully when knitting with this pattern in two colors), for the most skewed (like me), I will show you how to pick up loops when knitting with an English rubber band, and, most interestingly, we will talk about an interesting technique, or even a subspecies of patterns, which are called "brioche" (brioche), and are formed precisely from English gum, I will teach you how to knit such patterns, and we will even try to knit some product with such a pattern. So it will be interesting soon on the Magic Threads website, so I advise you to definitely subscribe to new master classes at the end of the article.
Well, today we will talk exclusively about the basics of knitting an English gum, or a classic (full) patent pattern. And first, let's move on to practice.
 We collect the number of loops, a multiple of 3. I scored loops.
 In this master class, I will knit an English elastic band without edge loops, I will immediately start with a pattern. This method, by the way, is great for open edges, for example, for a scarf. We make a straight line (the thread is in the direction “away from you”).
 We remove the first loop untied, the thread after knitting. (In some pattern descriptions, you may see "slip a loop with a crochet", this is exactly what we did just now.)


 facial.


 Now we need to knit a loop together with the crochet from the previous row. It's pretty easy - because they "lie" quite side by side. We pass the knitting needle into the loop along with the crochet.


 We knit a loop together with a crochet. And these three steps (yarn over, remove the loop untied, knit the loop with the crochet from the previous row together) you will need to repeat until the end of the row, and in each subsequent row (English elastic band - double-sided pattern). Is it really easy?


Symbols for the scheme:

Well, for those who like to knit with purl loops (I'm sure there are some), the second way to knit English gum.


 And we knit two loops together.


And finally, a little theory.
The loop that we have just knitted with you is called English loop, in foreign literature it is called patent loop, and patterns containing such loops - patent(English gum - classic or full patent pattern).
The patent loop is knitted in two rows: in the first row we remove the loop with the crochet, and in the second we knit the yarn over with the loop. The fact that the English loop is knitted in two rows is very important and will come in handy when building brioche patterns.
Patent patterns are not only English gum and brioche, but also a whole large group of patterns that I have already shown on the site Magic threads, and I will definitely show them both in the Master classes section and in the Patterns section (where I show patterns , and I give them diagrams and descriptions). Here are links to those articles:
Due to the fact that its properties are similar to English, although it does not contain patent loops, but is formed only by front and back, they call false patent.
And once again I advise you to subscribe to new master classes, because very soon I will be doing a master class on one of the most popular patent patterns - mesh patent(it is found under the names Honeycomb pattern, Honeycombs, Small honeycombs, etc.).
The fabric, knitted with patent patterns, is elastic and voluminous, thanks to which it retains heat well.
But you need to take into account what the fabric is, with too loose (not tight) knitting, it can turn out to be loose, so if you knit freely, use smaller needles.
Also, the elasticity of the fabric must be taken into account when knitting samples, you need to measure the sample in a slightly stretched state so that the product is not too large.
Due to the volume of patent patterns, they require a lot, the fabric often comes out heavy, this must be taken into account when knitting large products, and when knitting outerwear, side seams must be used (refuse), otherwise the fabric will “sag”.
For knitting patent patterns, it is preferable to use woolen yarn.
And, of course, you should not steam such patterns - they will lose their shape.
Watch my video - English gum!
That's all, I hope I didn't forget to tell you anything, and that my master class was useful to you, and if you have any questions, you can ask them in the comments. See you!
By winter, you have to knit a lot: here you have warm socks, mittens, and sweaters. And almost every product needs an elastic band. And, perhaps, knitting gum is just the most boring and boring part of creating a product. How can this be fixed? In a simple way - try knitting different rubber bands!
Yes, there are different ways to knit elastic. There are not two or three, and not even ten - much more. In this article, we tried to collect a large collection of descriptions of all kinds of rubber bands with knitting needles - try them all!
Types of elastic bands
Knitting a simple elastic band Perhaps everyone knows, but it is with a simple one that it is worth starting. There is nothing complicated here: we alternate front and back loops in a small elastic band 1x1 or a pair of front and back loops in a 2x2 elastic band. In subsequent rows, we knit over the facial facial, over the wrong side of the wrong loops. You can play with sizes - try rubber bands 1x2, 1x3, 2x3. But these are still simple types.
English rib knitting- it's a classic. Outwardly, this is one of the most beautiful types of gum. One of the conditions is an odd number of loops.
It is knitted in this way: in even rows, knit, yarn over, remove the loop without knitting. In odd rows, yarn over is in front of the purl loop, and the purl is removed. The loop with the crochet is knitted together with the front loop. Knitting a patent gum and an English one is one and the same. English gum is sometimes called patent.

Knitting a semi-English gum differs in even rows. It is knitted like this: purl, front (yarn over + slipped loop) and so on. This look is a little simpler than the classic English gum. By analogy with the previous paragraph, knitting semi-patent elastic bands and semi-English are one and the same.

Double rib knitting- This is a very tricky option that perfectly holds its shape and base. The edge loops of the elastic band are common, but then it is stratified into two - internal and external. It knits like this: front, thread in front of the canvas, the next loop is not knitted, purl, thread behind the canvas, the loop is not knitted. This method is also called "knitting hollow gum", because there is a void inside.

Similar to English, but easier to perform and consumes less yarn.
1 row: 3 facial, purl.
2 row: 2 front (first for the back wall, second for the front), purl, front for the front wall.

Relevant for those who knit a lot for kids, and also love self-knitted scarves. Why? Because it is very light and soft gum. It resembles the English version in appearance, but it fits differently. For her, you need to dial the number of loops, a multiple of 4.
odd row- This is a simple elastic band 2x2, 2 facial, 2 purl.
Even row knit like this: purl, 2 facial, 2 purl, facial.

Knitting French Rib great for decorative items - this is one of the most beautiful types of elastic patterns. She needs a number of loops that is a multiple of 4, plus 2 edge loops.
Rapport of an odd row: 2 facial, 2 purl.
Rapport of an even row: purl, 2 facial, purl. Sometimes also called it "Swedish gum".

Also suitable for elegant products - in appearance it is very similar to French elastic. But the knitting pattern is different.
1 row: 2 purl, 2 facial.
2 row: 2 facial, 2 purl.
3 row: 2 purl, 2 facial - and first the second loop is knitted, and then the first.
4 row: 2 facial, 2 purl - first the second, then the first.
It is famous for the fact that it is very dense, windproof. Perfect for a hat, right? The number of loops is a multiple of three, plus hem.
First row: purl, 2 facial.
Second row: front, nakid, two facial, which are stretched into this nakid. Sometimes you can hear the names Bulgarian or Scottish gum It's all about her too.

Knitting baby gum also suitable for especially warm clothes. For this type, the number of loops is a multiple of 4.
1 row: nakid, remove the loop, facial.
2 row: we knit the purl loops with the purl ones, and the loop with the crochet is knitted with the front one. Beautiful ornament - very dense, two-layer, warm. Ideal for baby items.

- incredibly decorative and unusual. It needs a number of loops, a multiple of 3, plus hem.
We knit 1 row: front, 2 purl.
2 row: 2 facial, purl.
3 row: front, front loop from the broach between the loops, 2 purl.
4 row: 2 facial, 2 together (purl and loop from the broach) purl.

Openwork gum- A great option for elegant things. There are quite a few types of them. We will consider one, some simple one. Here is one, for example: 2 purl, 2 facial, nakid, facial, remove the loop, facial, put the removed loop on the front, 2 purl. All rows of this simple gum are the same.

Fluffy elastic bands come out loose and thick. Yarn consumption, however, is a bit big, but it looks beautiful.
1 row: front, back.
2 row: by drawing.
3 row: front from the loop of the previous row, purl.

So, we have studied quite a few types of rubber bands. But to know exactly what they are good for, you need to try them all. This is not always convenient, so we have compiled a small guide to rubber bands.
- If your work requires knitting elastic, choose simple types.
- Knitting gum in the round will be needed for socks, mittens, hats. For this, a simple, English, double elastic band is suitable. Ribbon is knitted on the front side only.
- A double-sided elastic band is needed if both sides of the product are equally important. Double-sided are simple, English, double, as well as some openwork elastic bands.
A reliable way to close an elastic band
Since we are talking about elastic bands, let's consider one more question: how to close the elastic band. Sometimes it happens that knitting turns out to be elastic, but the closing row negates all its elasticity. There is a way to maintain elasticity if you close knitting in a special elastic way. Remove the hem, yarn over (purl or front - depending on the loop). Then knit a loop according to the pattern, throw a yarn over it first, then an edge loop. There is one loop left on the needle. Yarn over again, knit a loop, throw a yarn over and an extreme loop on it. That's the way.
So, today we have done a great job: we have studied knitting gum with knitting needles in all sorts of ways. Now you know what types of knitting gum exist, where you can apply them. We hope that now needlework will become even more interesting for you - after all, all the variety of this simple and functional ornament is available to you.
There is one elastic band, when knitting which many have doubts: what kind of elastic band is this and am I knitting it correctly? At the same time, it can be knitted in different ways and as a result get the same result.
English gum
This gum is called English. Classic English rib 1 * 1 is knitted like this:
We collect the first row with a set with a thickened edge, if you want the edge to be loose, the number of loops should be even.
1 row: edge, * 1 yarn over, 1 loop is removed without knitting, 1 front, * edge.
2 row: hem, * 1 yarn over, remove 1 loop without knitting, we knit the loop with the yarn over together with the front one, * hem.
Repeat row 2.
This knitting method is the easiest and is accessible even to those who have not yet learned to knit purl loops. I knitted my first scarf for a doll with English ribbing.
fluffy elastic band
Another elastic band that looks exactly like the English one, but differs in the way it is knitted, and is sometimes called fluffy:
The number of loops is even.
1 row: edge, * 1 person., 1 out., * edge.
2nd row: edge, * front loop is knitted from the loop located one row below, 1 out., * edge.
Repeat row 2.
I like this knitting method more than others, in my opinion, with this knitting, the fabric turns out to be more even.
Patent gum
Another type of gum, about the name of which there are different opinions. Some call patent gum, which knits in a completely different way, and on this site it is called. This description of the patent gum is taken from the Natalya magazine No. 1 of 2013, as well as the description of the hat and scarf below.
So, for knitting, we collect an even number of loops.
1 row: hem, * purl 1, slip 1 loop with a crochet, * hem.
2nd row: hem, * loop, not knitted in the previous row, knit together with the nakida with the purl loop, remove 1 loop as the front one, together with the nakida, * hem.
Repeat row 2.
Hat knitted with a patent rubber band
Yarn Adelia “JUSTIN” (75% acrylic, 25% nylon, 246m / 100g), needles No. 5
We collect 68 loops with white yarn and knit the lapel of the hat for 52 rows with a patent elastic band, then we continue to knit another 30 rows with pink yarn. Having knitted 30 rows, we knit 2 rows with an elastic band 1 * 1, keeping the loop pattern. And the next front row is knitted 2 loops together so that each front one is on top of the next one behind it. We knit 3 more rows, then we knit all the loops two together and tighten the rest with a working thread. We sew the seam, make a pompom from white yarn and sew it to the hat.
Scarf
We collect 34 loops with white yarn with a thickened edge and knit with a patent elastic band 20 rows of white, 230 rows of pink, 110 rows of white, 230 rows of apricot and 20 rows of white yarn. We close the loops. From pink and apricot yarn we make brushes 8 cm long in finished form and fasten them at the ends of the scarf: pink on one side, apricot on the other.
A very light and elastic product is obtained by knitting it with an elastic band. Such knitting is often used for knitting the bottom of sweaters, blouses, product necks, as well as scarves. In the collection of hand knitting, there are several varieties of the elastic band pattern, which differ not only in the way of knitting, but also in appearance. In order for the fabric to turn out more accurate, it is better to knit an elastic band with knitting needles with a diameter either equal to the thickness of the thread, or no more than 1.5 more. The most common types of this pattern are:
- Simple: 1x1, 2x2, etc.
- English,
- double,
- Polish,
- french
How to knit a simple elastic band
 A simple elastic band is knitted using a different combination of basic loops, that is, knit and purl. Due to the fact that the fabric knitted with this pattern turns out to be elastic and well stretched, knitting with a similar pattern is used in cases where it is necessary to achieve the effect of fitting the product itself, for example, a turtleneck, or its individual parts, such as a cuff, collar, edges neckline and bottom. Simple elastic bands are usually conventionally indicated by the numbers 2 × 2 or 1 × 2, where the first number indicates the number of front loops, and the second number of purl loops in the report. Thus, you can knit an elastic band with simple knitting needles with almost any combination of basic loops, the main thing is to keep the proportions that will allow the fabric to be elastic. Consider several options for pattern patterns simple gum:
- Elastic band 1×1. We knit all the front rows in a sequence of loops: front, back. We knit all purl over the front front, over the purl purl.
- Elastic band 2×2. The number of loops should be a multiple of two plus two edge loops. In all odd rows, two facial, two purl are knitted, and in odd rows, to comply with the pattern, as well as for 1 × 1 elastic, purl over the facial ones are knitted over the purl.
- Elastic band 2×1. The number of loops for such an elastic band should be divided by three plus two loops for hem:
- 1r. We knit to the end of the row 2 facial, 1 purl.
- 2r. Throughout the row, a report is knitted: 1 purl, 2 facial.
- From the 3rd row, the knitting pattern is repeated from the 1st row.
An important point when choosing the option of knitting a simple elastic band is the size of the product itself, so, for example, for a large one, you can take a combination of 4 × 4, as well as the scheme of the main pattern, since for a harmonious look of the product it is very important that everything in it is combined.
How to knit English Rib
 English gum is the most popular among all representatives of this pattern. It also has a second name pearl. At present, due to its lush and embossed appearance and soft texture, it is widely used in knitting products such as jumpers, scarves, hats and other bulky products. It is not advised to knit English ribbing for cuffs and edges of the product, since the fabric knitted with this pattern turns out to be soft and not very elastic. An English elastic pattern is made using the main loops and yarn over loops. The scheme for creating a pattern English gum 1 × 1 is as follows:
- We collect an odd number of loops, after which we knit the first row according to the report: 1 yarn over, 1 loop removed not knitted, the working thread is thrown behind the canvas, 1 front.
- 2 row. Yarn over, 1 st removed not knitted, 2 sts are knitted as one front st.
- 3 row. Two loops are knitted as one front, yarn over, 1 loop is thrown over not knitted.
Closing the loops of the English elastic is a little different from the completion of a simple canvas. To make the edge beautiful and even, the preparatory row is knitted first. To do this, the following steps are performed:
- The fabric is knitted according to the same pattern, where the single crochet loop is thrown not knitted onto the right knitting needle, and the double crochet loop of the previous row is knitted as one front, so the actions are repeated until the end of the row.
- After that, you can close the loops of the product as usual.
If English ribbing 1×1 is knitted in circular knitting, then the sequence of loops will be slightly different:
- 1r. front, nakid, not knitted loop.
- 2p . Nakid, not knitted loop, purl.
- 3r. Two loops together, not a knitted loop.
 The English elastic band 2 × 2 also looks very good, for it the number of loops is taken, divisible by 4 plus two hem:

 In order for the fabric on such elements of the product as the neck or cuffs, as well as when knitting scarves, belts or hats, to be denser and better able to keep its shape, one of the varieties of the elastic pattern, called double elastic, is used. Learning to knit such an elastic band for beginners will be as simple as for more experienced needlewomen:
- The set of loops for a double elastic band should be equal to an even number and divisible by four and plus two hem loops.
- We knit the first row as follows: the front one, knitted behind the front wall, 1 loop is removed not knitted, the working thread moves in front of the canvas and so on until the end of the row.
- 2 row. 1 purl, 1 loop is removed not knitted, we throw the working thread behind the product.
- In the third and subsequent rows, knitting is repeated from the first row.
You can more clearly familiarize yourself with how to knit a double elastic band using the following video:
For belts and scarves, double or hollow elastic is best done in circular knitting, using special knitting needles. But in this case, all rows are knitted according to the same pattern: front loop, 1 re-shot not knitted.
How to knit Polish rib with knitting needles
 Polish ribbing is an excellent solution for creating items such as snoods or a scarf collar, as well as for children's things, thanks to its loose and airy structure. You can knit the Polish gum in one of the two following ways:

The following video will help knitting a Polish gum with knitting needles for beginners:
 In order to knit a French elastic band, the number of loops must be dialed so that it is divided by four plus two loops for the hem. The elastic is performed by the following alternation of the main loops:
- 1r. We alternate 2 purl loops and 2 facial loops behind the back wall.
- 2r. We repeat the sequence: 1 purl loop, 2 facial loops behind the back wall, 1 purl.
- The next rows are knitted again from the first.
You can knit French elastic in the following way:
- We collect loops, the number of which should be divisible by three plus 3 loops for edge loops and symmetry.
- In all odd rows, we knit sequentially to the penultimate loop: 1 purl loop, then remove 1 loop not knitted, then we knit the next loop behind the back wall, again return the removed loop to the knitting needle and also knit it behind the back wall with the front loop, the last loop of the row is knitted purl.
- We knit even rows as follows. We knit a sequence of loops 1 front loop, re-shoot the loop not knitted, knit the next one from the wrong side, return the not knitted loop to the left knitting needle and knit it from the wrong side. We end the row with a front loop.
There are a lot of types of rubber bands, so when choosing a particular model, in order for the product to look harmonious, you need to take into account the following nuances:
- The density and pattern of the elastic should correspond to the main pattern of the fabric and the type of product for which the elastic is made.
- Not all types of elastic bands can be used in circular knitting, as many of them have a patent, that is, a double-sided pattern. These are, for example, such elastic bands as French or English 2 × 2.
CIRCULAR KNITTING OF ENGLISH RIBBON
English elastic band 1x1 round
Two-tone English elastic band aroundFor the sample, we collect 33 loops. We distribute them 8 on each knitting needle. There should be 9 stitches left on the 4th needle. We transfer this 9 loop to the 1st knitting needle and knit one from the first two loops(on the 4th knitting needle there are 8 loops).
1 circular row - ( 1 front, 1 purl);
2 round row - (Knit 1, 1 reverse yarn over, purl 1 remove without knitting);
3 circular row- (1 reverse yarn over, remove 1 front yarn without knitting, knit 1 wrong loop together with the adjacent yarn over with the wrong loop);
4 circular row- (Knit 1 knit together with the adjacent yarn over with a front loop, 1 reverse yarn over, remove 1 purl without knitting);


Front side Wrong side For the sample, we collect 33 loops with white thread. We distribute them 8 on each knitting needle. On
The 4th needle should have 9 loops left. We transfer this 9th loop to the 1st knitting needle and knit one of the first two loops (there are 8 loops on the 4th knitting needle). So we closed knitting in a circle. Now you can start knitting the main pattern:1 circular row (white thread)- (1 facial, 1 purl);
2 circular row (blue thread)- (1 knit, 1 reverse yarn, 1 purl yarn off without knitting);
3 circular row (white thread)- (1 reverse yarn over, remove knit 1, purl 1 together with adjacent yarn over);
4 circular row (blue thread)- (knit 1 knit together with adjacent yarn over, 1 reverse yarn over, remove 1 wrong yarn without knitting);
http://babush-klubok.ucoz.ru/publ/vjazanie_spicami/rezinki/anglijskaja_rezinka/6-1-0-10
Scottish gum.

 Scottish gum. One of my favorite knitting patterns. It looks great both on hats and on vests, sweaters. Thick and dense pattern. Perhaps someone will call it a Bulgarian rubber band, but the technique is the same, but the density of the pattern is different.
So let's start:
we collect the number of loops a multiple of three (3x ...) * + 2 edging.
1st row: remove the border, * 2 facial, 1 purl *; and so on until the second border.
2nd row: edging, * 1 facial, yarn over, 2 facial. We throw the yarn over the last two facial ones. *, edging.
We repeat everything from the beginning. Row after row until you get bored.
source - http://www.livemaster.ru/topic/403395-shotlandskaya-rezinka?msec=24


