Animals quilling flower craft. How to make quilling flowers. Overview master class. Miniature flower in a quilling pot
Paper rolling - this is what the common people call the type of creativity quilling. Which means "bird's feather" in translation. Quilling is divided into two types: three-dimensional and flat. In this article, we will consider the technique of performing volumetric quilling with our own hands.
Volumetric quilling is a type of needlework, the modules of which are assembled into a three-dimensional composition. That is, the product can be independently on any surface. With the help of volumetric quilling, you can create everything that has any volume: balls, toys, flower vases, dolls, various figures or geometric three-dimensional figures.
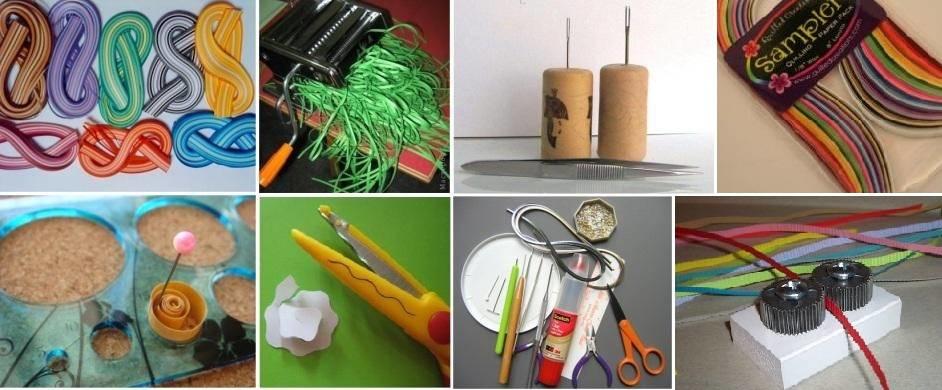
To get started, you will need the following tools:
- Scissors;
- PVA glue;
- A set of strips for quilling in different colors;
- Quilling tool;
- Pins, beads and other stationery.
To create original quilling crafts, it is enough to have imagination, accuracy and perseverance.
Creating volumetric quilling: a master class.
With the help of simple volumetric quilling techniques, you can make crafts of extraordinary beauty.
For example:
- Animals;
- Birds;
- Figurines of people;
- Fairy tale characters.
Consider a couple of master classes.
How are angels created using the volumetric quilling technique? To get started, you will need scissors, PVA glue, special strips of colored paper in white, brown and blue, as well as a quilling tool. Let's start with the torso for the angel. Take a white strip, twist it into a roll with a quilling tool. Then, with a pencil, squeeze out the middle of the roll to form a cone.
Angel handles are made from brown stripes. We fold it in half and twist the ends a little, glue it to the body.
For the head we need two strips of white paper. We make two rolls, squeeze out the middle with a pencil, coat the inside of each module with glue and connect the two parts. Eyes can be made from beads. From small pieces of brown stripes, three are enough, we make hair. We fold the strips, wind the edges and glue to the head. The final stage of work is the wings. Take white stripes, make 20 rolls. From them we will form the eye module. We glue 10 modules for each wing, then glue them together and the whole structure to the back of the body. Angel is ready.

Volumetric cat for beginners. We use all the same tools as in the manufacture of an angel. For the cat figurine, we will use orange strips of paper, 7 mm wide. We twist several strips glued together into a 25mm roll. With a pencil, gently press the center until a cone shape is obtained. So that the cone does not fall apart, we coat it with glue inside and let it dry. It turned out the body of a cat.
For the head we make two rolls of 25 mm in diameter. With your fingers, shape the module into a bowl shape. Lubricate both figures with glue and connect, holding tightly. The head is ready. We will use two orange 5 mm stripes to create the ears. To do this, we wind two rolls with a diameter of 0.5 cm, slightly dissolve and create a triangle shape. Glue the ears to the head.
Take two black buttons and make the cat's eyes. Instead of a nose, glue a bead or beads. For the mustache, take two strips of white color, bend in half and twist the ends slightly on each side. We adapt to the nose.
We will make paws for a cat in a simple way, we will wind two orange stripes on a pen or pencil to make spirals. Glue to the body. For the legs, we take two orange stripes and make rolls, form them into cups with our fingers. Attach with glue to the body. For the stability of the cat on the surface, varnish and leave to dry. The cat is ready. Such simple crafts can be original gifts for children.
Making quilling: a figure as an element
Any quilling product consists of modules.
Known main types:
- Roll. The most basic element in quilling. To make it, you will need a strip of colored paper and a quilling tool. We clamp one end of the strip with tweezers, and wind the other around. Then remove and glue the tail of the strip.
- A drop. We make a standard roll. Slightly dissolve it and pinch one end.
- Eye. We make a roll, dissolve and clamp on both sides.
- leaflet. We form an eye, but we clamp one side.
There is a wide variety of shapes in quilling. Square, rhombus, star, triangle, crescent, heart, various curls and spirals. To simplify the preparation of complex modules, you can use the so-called curly ruler, in which there are many geometric shapes, ranging from a square to a six-pointed star.

Having mastered the basic elements of quilling, you can freely use various schemes.
The diagrams look like a stencil. Contour with filled volume modules. By practicing on simple patterns, you can soon achieve amazing, individual compositions. The geometry of figures for creating original expositions is quite extensive, it all depends on how developed a person's imagination is.
Quilling: volumetric snowman
Russia is a country in which the New Year is the most beloved and long-awaited holiday. Christmas tree, Santa Claus and Snow Maiden. All these attributes delight both children and adults. Let's take a step-by-step look at making quilling, a volumetric snowman.
For work you will need the following materials:
- PVA glue;
- Scissors;
- A set of colored stripes for quilling;
- Quilling tool;
- Pencil;
- Beads;
- Cones.

For the manufacture of the torso and head, take white stripes. We twist 2 rolls and with a pencil squeeze out the middle of each until a cone is obtained. We process with glue and glue the two parts together, very tightly. We do the same for the head. With the help of beads we make eyes and buttons on the snowman. We twist the nose out of red paper.
For a bucket on the head of a snowman, we need black stripes. We twist on the roll tool. Carefully form a bucket with a pencil, coat with glue and glue it to the snowman's head.
We take a bump, break off two scales and glue them in place of the handles. For a broom, take brown stripes. We glue two strips into one and twist them with our hands, right clockwise, left, counterclockwise. Take 3 brown stripes, fold in half. We twist the edges with a quilling tool and glue to the broom. We strongly press the broom against one of the handles. The snowman is ready. With a little imagination, you can make schemes for various figures and animals for volumetric quilling yourself: monkeys, a cat, a hare.
Quilling stripes: how to make figures (video)
Volumetric quilling is the embodiment of all the fantasies of making crafts using ordinary things: paper and a quilling tool. Perseverance, attentiveness, accuracy are all that is needed to create unique volumetric compositions. Imagine and dare.
The Crafts Fair is hosting a Purple themed week. I decided to take part in it. And we have prepared a master class for you.
The card will be a wonderful gift for the holiday and will make a great impression. And in the future it can be inserted into a frame and it will delight more than one day.
We will need:
- Quilling paper (2 mm - yellow).
- Quilling paper (3 mm - three shades of purple).
- Quilling paper (3 mm - green).
- PVA glue.
- Scissors.
- Quilling tool.
- Thick paper - (white and purple). You can use pastel paper.
- Double sided tape.
Let's get started:
1. We twist the petals of the flowers.
For the petals, we take purple quilling strips 3 mm wide (three shades).
We take a strip and with the help of an awl we make 1-2 turns. We remove the awl and get a strip with a wrapped end, it is already ready to start twisting itself.


Then we begin to twist the strip into a roll with our hands.


When the roll is twisted, carefully let it unwind, holding the shape with the thumb and forefinger of the right hand. Then with two fingers of the left hand, index and thumb, we pull the middle to the side. On the opposite side, we squeeze the spiral with two fingers of the right hand. Then you need to compress along the entire length.


We apply PVA glue to the end of the strip and glue it. We get such a “droplet” module.

We twist the required number of “droplet” modules. We need to twist 3 “droplets” of dark purple color, 3 “droplets” of light purple color and 3 “droplets” of purple color on one flower. Total: for one flower we will need 9 “droplets”. We will have three flowers on the postcard, which means we need to wind 27 “droplet” modules.

2. Twist the centers of the flowers.
For the middle we take strips for quilling 2 mm wide yellow. Glue the two strips together.
We take a strip and with the help of an awl we make 1-2 turns. We remove the awl and get a strip with a wrapped end and begin to twist the strip into a tight roll with our hands.
When the strip is twisted into a tight roll, apply glue to the edge of the strips and fix it.
And so we twist the three middle ones.

 3.
Collection of flowers.
3.
Collection of flowers.
We collect flowers from petals. We alternate colors. If we like everything, we begin to glue the petals. We pull out the petal from the flower, coat the sharp part of the “droplet” with glue on both sides and insert it back. It turns out that other petals are glued to this petal on both sides. And so we alternate.


When all the flowers are glued, glue the middle.

Here are our flowers ready.
 4.
Preparation for a postcard.
4.
Preparation for a postcard.
Cut out two rectangles from pastel paper. The first rectangle of white pastel paper - size 29.0 * 14.5 cm. The second rectangle of purple pastel paper - size 30.0 * 15.0 cm. Fold each rectangle in half.


We glue double-sided tape on the inside of the white base of the postcard. Glue the purple part on top. We get a blank for a future postcard.


We draw a barely noticeable circle with a diameter of 9 cm on the top of the postcard.

We apply glue from the bottom of the flower and glue it, evenly distributing the flowers around the circumference.


5. We twist and collect leaves.
For the leaves, we take green quilling strips 3 mm wide. Cut the strips in half. We twist the leaves in the same way as the petals for the flower (see above).


When we have wound up a sufficient number of “droplet” modules, we proceed to the assembly of the leaflets. Fold the green strip in half and glue it with glue. When the stalk dries, we begin to glue the “droplet” modules on both sides. We will have a sheet.


We need to collect these three leaves.

Let's move on to the final moment. We cut off three green strips 4 cm long. Apply glue to the edge of the strip and glue it along the contour of the circle. So glue all the branches to the flowers.


Glue the leaves to the stems.

There is a space between the colors, if you like, you can leave it like that. And I wanted to fill this empty space. From green stripes we twist loose spirals “curls” 6-8 pcs.

We apply glue to the edge of the “curls” and glue it, filling the empty space.

And now the card is ready. Congratulate your friends and family beautifully!

I wish you good luck and creative success!
Report to moderator
Hello, friends!
It's no secret that paper flowers are one of the most popular quilling decor elements. They can serve as a spectacular decoration for gift boxes and boxes, postcards, panels, all kinds of 3D compositions, and so on. At the same time, the methods for making flowers using the quilling technique are very diverse, each with its own rules and nuances. And today's master class is designed to help beginners figure out how to make quilling flowers with their own hands, clarify their classification for themselves and master the basic practical techniques for making them using “live” examples. As usual, the lesson was prepared for you by Ekaterina Shkodovskaya, and she has the floor.
Materials and tools:
quilling paper,
scallop,
PVA glue.
Quilling flowers can be divided into several categories:
1. Flowers made using ordinary quilling elements.
2. Volumetric flowers made using ordinary quilling elements.
3. Openwork quilling flowers.
4. Flowers without using quilling elements.
So, let's look at all these categories in order with specific examples.
Flowers made using ordinary quilling elements, such as "drop", "eye", "wave", etc. (for more information on the manufacture of basic quilling elements, see).
The colors of this group include quilling cornflowers produced as follows:
- first we make 6 “drop” elements of bright blue color and with our finger we give them the shape of an “arrow”;

- then we make the middle of the flower: cut the fringe on a paper strip 1 cm wide and twist the strip into a roll.

After gluing the middle and petals, you should get such a cornflower:

From the same elements from which the cornflower quilling petals were made, and a convex roll, you can make charming carnations for a postcard by February 23 or Victory Day:

And if you twist tight yellow rolls and glue several white “drop” elements to them, you get quilling chamomile:


By the way, you can also make a three-dimensional composition from these daisies, for example, a bouquet.
Generally speaking, you can create a wide variety of flowers from quilling elements. The main thing in this business is observation and imagination.
As you can see, making such quilling flowers as a tulip or iris will also not be difficult at all.

Bulk flowers are technically more complex. The peculiarity of their manufacture is to use such a paper cone as a base:

For clarity, I propose to do orchid quilling. First of all, we need to prepare one “eye” element and two “crescent” elements (from white paper strips). We glue them, as shown in the photo, to get a large petal.

We will need two such petals.

In addition, you will need two "wave" elements.

From a tightly twisted small roll we will make a small cone (simply squeezing out the middle with your finger).

And before proceeding with the assembly of the flower, we tint the cone with a red stamp pad.
This is how the whole set of quilling orchid details looks like:

And now we assemble: we glue the largest petal to the inner surface of the cone base, glue two smaller petals on top, then glue two “wave” elements and a small tinted cone in the center of the flower.

You can decorate a greeting card with quilling orchids, for example, like this:

Another flower that can also be made on a paper cone is a water lily. It will be a beautiful lush flower. It is easier to make it than an orchid, because for this, in addition to the cone itself, only the “drop” elements will be required, although in quite large quantities.

When all the components of the flower are prepared, we begin to glue the petals to the convex surface of the cone (in one row). We let it dry thoroughly, after which we turn the workpiece over and glue the petals inside the cone, filling the entire space.

The number of rows of petals is individual and depends on the size of the water lily.
You can complement the floral decor with quilling leaves and curls.

If, instead of the usual petal, a small fringed flower is placed in the center of the water lily, you get a gerbera :)

Openwork quilling flowers - these are flowers with the use of openwork elements made of loops - the so-called elements of looped quilling. Such elements can be performed on the hands, using a comb or pins. How exactly to do this, let's look at the example of poppy and fantasy quilling flowers, which do not yet have a name :).
For the manufacture of poppy quilling take red stripes. First we make one loop with a pinch at the end,

then we add a few more loops in the same way until there is a piece of the strip with which we will wrap these loops. If you release the workpiece at this stage, you get such an “accordion”:

But we will not do this, but wrap the loops with the rest of the strip and glue it.

The result is an openwork element that will serve as a poppy petal.

We need four such petals. We also twist a tight black roll, which we wrap in a small fringe (also black).
We glue the petals with the cores - and the quilling poppies are ready, you can decorate postcards or other handicraft creations with them.
And now I will show you how to make looped elements on the comb. We take a strip and begin to wrap the comb teeth, making loops that increase in size with each turn. Covering four cloves on one side and four on the other, we remove the workpiece from the scallop ...

And fold in half.

We wrap the element with the remaining tip of the strip and glue it.
A two-color looped element (made of paper of similar or contrasting tones) will look especially impressive. In this case, you must first glue 2 halves of strips of different colors and wind the two-color strip on the comb.

Give the petal a pointed shape at the end. It turned out an interesting and unusual flower.

And here is another version of an openwork quilling flower made of looped elements.

* * *
Let's break this for now. Ekaterina will talk about how to make quilling flowers from the fourth group next time (subscribe to updates so as not to miss the continuation of MK). Another acquaintance with fringed flowers awaits you, as well as 2 ways to make paper roses.
See you soon in KARTONKINO! :)
Stunning canvases are created by needlewomen using the quilling technique. In quilling paintings, flowers and bouquets will wonderfully decorate the interior or become a wonderful gift for the holiday.


Creating such a picture is quite painstaking and requires a lot of time and accuracy. But the beauty that is obtained as a result delights with its grace and is worth the time and effort spent on it.


Simple elements
To create paintings, you first need to learn how to make basic quilling elements.

They are made from multi-colored paper strips. Using a special tool or a toothpick, twist the strip into a roll. Then, using a special ruler-template, the desired diameter of the element is selected. The free edge of the strip is glued to the roll. By giving the desired shape to this blank, a certain element is obtained. From such small elements, magnificent openwork paper flowers are created.
For beginner needlewomen, it will be useful to learn how to make different colors. Step-by-step photos show the most common ways to create flowers.
The easiest way to make dandelions and daisies. For dandelions, cut a wide paper strip two-thirds along the edge. You will get a fringe on one side of the strip. Wind this tape with the whole side onto a stick, glue the edge of the strip. Press on the center of the roll from the back so that the shape becomes concave. Now straighten and fluff the fringe, and the dandelion is ready.

If you glue an ordinary strip to the edge of the fringed strip and twist it into a tight roll, you will get daisies.


Knowing how to make a “drop” element, you can make a camomile.

On a note! If you make a fringed roll and place it between the petals, then the chamomile will be with a fluffy center.
The basis of almost every petal is a tight roll. And depending on how much to “free” it, the petal will be more openwork or less. A weakened roll can be safely given any shape by squeezing one or two of its sides with your fingers. By changing the shape of this universal blank, different types of petals are created and various flowers are glued from them.
The buds and bases of flowers are made from rolls, the middle of which is pressed inward. This results in a cone or funnel. Also, this element can serve not only as part of the bud, but also as a “skirt” of a narcissus or a lily of the valley flower.

By gluing the edges of the strips of different colors and making a roll, you get a two-color blank, from which a beautiful petal of two colors will form.


Beautiful petals are created from several rolls of the same color, glued together and connected to a border of the same or another color.


The petals of some flowers are made from dense rolls, the centers of which are concave inward. This allows you to give a natural shape to the petal and become even more like a real one.


lush flowers
This master class will help, using the proposed example, to show the step-by-step production of beautiful flowers and combining them into a bouquet for a picture.

To create flowers, you will need paper strips of green, light green, peach and orange. From these strips, you need to make blanks for petals and leaves in the form of weakened rolls.

To make the centers of flowers, you need to cut strips from colored paper of light green and peach colors, three times wider than usual. Then cut the fringe on one side of the paper ribbons.

Glue the ends of the strips of different colors and twist a tight roll, starting with a peach strip. Glue the resulting roll and straighten the fringe from the center to the edges.

Now petals. Three orange blanks are formed in the form of a leaflet and glued together at the base.

Four peach blanks are formed in the form of drops.

Now we place the peach elements between the orange ones, as shown in the photo.

Then the resulting part must be glued around with an orange strip.

For smaller petals, details are made not from seven elements, but from three.

Now from the details you need to glue the flowers. Make a tight roll from a strip of paper and, pressing the center, make a funnel. Glue the details in a circle into it.
Each flower will consist of five such details.

Glue the prepared centers into the center of the flower.
Make cones for buds from light green strips. Spread them from the inside with glue and attach small parts.


Between these elements we glue four teardrop-shaped elements.

Then glue three more elements in the form of a drop as in the photo.

When creating flowers and leaves, you can change the combination of colors, this will make the bouquet of flowers look more interesting.
It's time to glue the flowers and leaves on the base. Cardboard is suitable for her, on which to stick a piece of embossed plain wallpaper. Flowers and leaves should be arranged in tiers, fixing only some details to the base. Tiered paintings look more realistic and attractive.
Video on the topic of the article
In the video you can see the creation of various flowers from paper strips and the formation of paintings from flowers.
Another article by Tatyana Yablonskaya (the author of the story about the technique "") -" Quilling for beginners". We have various works in this technique on our site, but it is much more convenient for those who are just starting to master it, to collect in one article all the initial shapes of figures, useful tips and subtleties with photographs.
And perhaps in the future you will be able to create such masterpieces:
But, of course, it is better to start with the basics. Our step-by-step description of the manufacture of the main elements will help you with this.

« twig” is obtained if the spirals are twisted to one side.

« Curl"- an element when the two ends of the strip are twisted in an S-shape.

This is an incomplete list of open items.

When you learn how to make all these modules, then any craft will be within your power.
Examples of work in the quilling technique for beginners
Now move on to making simple images. At the first stages, you can use ready-made graphic schemes, where all the necessary elements are painted for beginners. Or you can turn on your imagination and start experimenting!
For example, butterfly. It consists of three main elements: the head is a tight roll, the body is an eye, and the wings are a drop. All modules are glued together with glue and a mini craft is obtained.

All sorts of flowers. We need the elements "free spiral" and "eye". They are combined into a chamomile (chrysanthemum).


This is what a gorgeous bouquet looks like!

If we take the elements “free spiral” and “drop”, then the flowers look a little different.


Composition for May 9 - 


