Quick craft for February 23. What a gift for a kid to congratulate dad and grandfather on Defender of the Fatherland Day. Panel "Cup to the best grandfather"
Helpful Hints
Handmade cards are always a pleasure to give and receive. By February 23, you can cook several different postcards and crafts made by hand. You can make them yourself or with children and give them to dad, grandfather, uncle, friend, colleague.
To date, the holiday of February 23 has ceased to simply be a holiday for military personnel. On Defender of the Fatherland Day congratulations to all the men you love.
To make a card or a gift, you need to prepare a few details, but first you need to think about the design, about what exactly you would like to do.
In this master class, you will learn how to make several types of cards and gifts with their own hands.
DIY crafts for February 23. Origami shirt

Video Lesson (below it is a diagram in pictures)
To make a paper shirt you will need rectangular sheet of paper any color.
You can also choose shirt size. When choosing a size, you need to take into account several details: the ratio of the length and width of the rectangle is 2:1; the sides of the shirt after it is assembled will be 2 times smaller than the sides of the rectangle.

* You can try to fold an origami shirt first, using a regular sheet. Thus, you will learn where and how you can avoid mistakes when making a direct gift.
1. First you need to fold the rectangle in half, but along and not across. Next, you need to unfold and bend the edges of the paper to the middle (see picture).


3. Prepare your sheet face down again. Once again, fold the corners to the fold lines you just made. This time you do not need to unbend these small corners.


4. Now fold the top of the sheet with the folded corners in the part of the paper where the edge of the sheet intersects with the fold lines of the corners.


5. The next thing to do is fold two ribs towards the middle of your paper shirt and make the sleeves (see picture) while holding the ribs with one finger.


6. You have made the sleeves and now it's time to move on to the collar. You may have already guessed that the collar needs to be started from the other end of the folded rectangle. To do this, fold the bottom edge of the sheet so that the collar is about 2 times shorter than the sleeve.

7. Turn over the folded sheet and make the corners of the collar.


8. Finally, fold the resulting sheet so as to align the edge with the sleeves and collar. Straighten the corners of the collar and use glue to secure them.

You have made the base of the shirt. Move on to decoration. Add buttons. You can also add a corner of a handkerchief, a bow tie or a tie.

How to make a paper tie for your shirt:

Using an origami shirt as a base, you can easily decorate your postcard. You can make a large shirt and use it separately as a gift.
You can also make several small shirts in different colors and attach them to one postcard.
On any holiday, the most important gift is a reminder that the man you love is important to you. For this, a handmade gift is what you need.
If you know how to knit, then here is one idea for you - a knitted butterfly.

DIY postcard frame for February 23
And if you are not inclined to knitting, then you can prepare such a colorful postcard frame that not only looks original, but is also very easy to make. In principle, anyone can make such a frame.

You will need:
Wooden photo frame 10x15
* It is better to choose white color. And if you have a dark-colored frame, you can repaint it in a light one, using white acrylic paint and a sponge.
Colour pencils
Glue hot gun
* It can be replaced with a transparent strong adhesive.
Colored paper (in the form of a square), for the manufacture of a boat or airplane.
1. Prepare a light frame, and pick up colored pencils of the right size.
*To paint the frame with white acrylic paint, dip a sponge into the paint and gently spread evenly over the frame. Then leave the frame to dry.
* Pencils need to be selected so that they look beautiful on the frame.
2. Glue the pencils to the frame using a hot glue gun.
3. Draw a postcard and make a boat that you need to glue on the postcard, and glue that in turn to the frame.
Cool congratulations on February 23
Men also like sweets, and therefore you can cook and decorate chocolates beautifully.

You will need:
wooden skewers
colored paper
Double sided tape
Multi-colored thick cotton threads
PVA glue
Two wrapped chocolates
Scissors
Side cutters for cutting skewers
1. To make a sail, you need to cut out an isosceles triangle from paper with sides equal to 10 cm and a base of 12 cm.
2. Fold the triangle in half and insert a piece of skewer into its fold. Make sure that the end of the skewer protrudes only 1 cm above the sail.
3. Now you need to glue the structure using PVA glue.
4. Stick double-sided tape along the entire length of the chocolate bar.
5. On the other side of the adhesive tape, remove the protective film and glue the mast with the sail as shown in the picture.
* The mast must be pressed between two chocolates.
* You can decorate the mast with colored paper flags!
Congratulations to the boys on February 23. Photo frame "Order"
With this gift, you can reward your hero for all his merits. Such an order, made by hand, is suitable not only for an adult man, but also for a little boy. And most importantly, he will be pleased.

You will need:
Cork stand for hot
Thin plexiglass
Satin ribbon (color blue, width 4cm)
Cardboard (heavy paper)
Metal ring (2pcs)
Acrylic paint (gold color)
colored paper
Eyelet 0.4 cm, 1 pc (you can do without it)
PVA glue
glue gun
Punch
1. Using PVA glue, prime the cork hotplate and paint over it using gold acrylic paint.
2. Cut out an eight-pointed star out of cardboard or heavy paper, large enough to fit the cork stand as shown in the picture.
3. The star now needs to be covered with two layers of acrylic paint.
4. Use the glue gun to connect the base and the star. In this case, the recess in the stand should be on the outside.


5. Prepare the plexiglass and cut out a circle from it, the diameter of which should be 0.1 cm larger than the diameter of the stand. Thus, you will ensure a good fixation of the plexiglass in the photo frame.
6. Using a universal punch, make a hole in one of the arms of the star.
7. Insert the eyelet, which also needs to be fixed, using the same punch, but with a special nozzle for installing eyelets. Insert a metal ring into the hole.
8. Prepare a satin ribbon, thread it through the ring and make a bow.
9. Now you need to glue the second metal ring on the back side. It will be needed for fasteners.


10. It's time to decorate the rays with triangular elements made from colored paper.
Do-it-yourself gift for February 23. Keychain - shoulder strap.
In this master class, you can learn how to make a military attribute with your own hands and give it to a man. Namely, you will learn how to make a felt keychain, with embroidery as a decoration.

You will need:
Burgundy felt (thickness 0.1cm)
Green felt (thickness 0.5cm)
Mouline threads (different colors)
Copy paper
Eyelets 0.4cm (quantity 2pcs)
Chain ring (as part of a keychain)
Universal Punch
1. Find a picture of a soldier. Use carbon paper to transfer the design to the felt.
2. Slowly pull the felt over the hoop. Use the "simple double-sided stitch" technique and try to embroider a picture on felt. Next, you need to remove the hoop and cut out the image, while leaving allowances of 1.5 cm.

3. Prepare a green felt and cut out 2 parts from it in the form of a small shoulder strap (both should be the same size). Now you need to make holes on both parts. To do this, you need to install the nozzle on the punch, and punch.
Use a special nozzle to fix the eyelets. You can also try to process this hole by hand - just wrap the edges with threads of a suitable tone.
4. With the help of a blind seam, tediously sew the felt with embroidery to one of the blanks made from green felt.

5. As for another workpiece, here you need to make a slot in the form of a window.
6. For now, fold all the pieces, and sew by hand using an over-stitch.

7. The top part needs to be decorated. To do this, sew it with red threads.
8. Insert a chain with a ring into the hole.

Postcard for February 23 in quilling technique

You will need:
Paper
simple pencil
Scissors
Quilling tool (can be replaced with a toothpick or awl)
Quilling paper
If you do not know about quilling, then watch two short video tutorials on quilling for beginners.
Quilling for beginners (video)
1. Fold a sheet of paper so that one half is longer than the other.
2. Using a simple pencil, mark the numbers 23 (see picture). You can simply draw the numbers and cut them out, or you can cut strips, from which you can then carefully fold the number 23.
It's great that among the abundance of holidays, our men have, in addition to their birthday, one more personal reason for accepting congratulations - February 23! Surrounded by a child, as a rule, there is at least one man - dad, grandfather, brother, friend, ready to accept the gift with joy.
This article contains some simple and not very ideas for children's crafts for February 23. Of course, in the process of preparing a gift, a child cannot do without the help of his mother, but an extra reason for joint creativity with children is always pleasing.
Dad's toolbox
For young children, such a “masterpiece” may not be easy, but if you are ready to help the child, then the result of joint creativity will be an original and “useful” craft for dad for the men's holiday.
It is better to use a cardboard box as a material for making a saw, the rest of the tools can be cut out of thick cardboard. If the child does not have enough drawing skills, you can make it easier for him and print out a ready-made tool template, which should be cut out, put on cardboard and outlined.

With an awl, knitting needle or crochet, make one hole for each tool, and five in the saw.

Paint tool handles. If necessary, after the paint has dried, use a toothpick to clean the holes from the paint.

After drying, we begin to wrap the "metal" parts of the tools with foil. For a child, this may not be an easy task, so as an alternative, you can use silver paint to create a "metal" surface.

With the help of a thick thread or twine, we hang the rest of the tools from the saw.

Application for February 23
Colored paper crafts are a classic of children's creativity, it really captivates the child. Even if you suddenly run out of colored paper, you can use clippings from a glossy magazine for such a collage. To make the process of creating crafts by February 23 not only exciting, but also useful for the development of children's motor skills, invite your child not to cut the paper with scissors, but to pick up many small pieces.

For work you will need:
- colored paper or magazine;
- scissors;
- glue;
- template - 2 pieces for each picture (templates for printing these crocodiles are offered below)

We print two templates. We leave one sheet with the pattern as it is, we will stick paper on it, and cut out the silhouette of the animal from the other.

On a sheet with the image of a crocodile, we paste pieces of colored paper in random order. In the work, it is quite possible to go beyond the contour, after imposing the upper silhouette, all errors will be hidden.


You need to wait until the collage dries. Then we glue a sheet with a cut-out silhouette on top, draw the details with a felt-tip pen - eyes, mouth, nose.


If it is not possible to print the templates, just copy any silhouette you like from the book, duplicate the image on the second sheet, making sure that the arrangements of the drawings on the sheets completely match.
To print the template, click on the desired picture - a printable version of the picture will appear in a new window.
Textile bookmark for a book
Among fans of reading who prefer a paper version of a book to an electronic one, older people predominate, so the bookmark will be an excellent option for do-it-yourself crafts for February 23 just for grandfather. He will not have to grab the first piece of paper that comes across to lay the page, because he is unlikely to lose such a homemade gift from a child.

For work you will need:
- felt;
- ribbon;
- glue;
- scissors.

Cut out a strip of felt.

At an angle of 45 degrees, we combine the short side of the rectangle with the long one. We place the scissors in the center of the fold, clearly perpendicular to the fold. We make an incision, leaving about 1 cm to the edge.


Similarly, at regular intervals, we make cuts along the entire length of the fabric.


Starting from the bottom edge, we pass the tape through the slots in the strip of felt.

We throw the tape over the top edge of the fabric, and pass it through the fabric again, starting this time from the wrong side. You can throw the tape close to the fabric, but the bookmark looks more effective if you leave a small loop at the top.
The tape will hold securely in the fabric, but if desired, you can add a few dabs of glue to the top and bottom of the tape.

Trim the ends of the tape at an angle.

And the bookmark is ready!

Postcards for February 23 do it yourself
With the help of an adult, a child can easily make a “male” postcard by February 23. To facilitate the work, templates of the necessary "accessories" are placed below.

We fold a sheet of cardboard of the desired size in half. Stepping back about 3 cm from the fold line, we make cuts on both sides parallel to the fold line.

Fold the top edges towards the middle of the card so that the "collar corners" meet in the center. Cut and glue the tie, decorate the "collar" with buttons. To make the tie look more realistic, voluminous, you can stick a button folded with several layers of paper under the “knot” of the tie.

Of course, a tie or bow tie can be carefully cut out of beautiful colored paper, but if you let your child show their imagination and color the tie at their discretion, the effect will be amazing.

You can diversify the decor of the “male” postcard with other simple elements accessible to the child - a bow tie, strips of colored paper as suspenders and a belt.

Here are free templates for the applications illustrated above. To print a template - click on the picture you like, and a full-scale image will open in a new tab.


For older children familiar with the origami technique, there is a more interesting version of paper crafts for February 23:
Diarama in a tin
Of course, when creating such a diorama, one cannot do without the help of an adult, but the craft for dad by February 23 turns out to be very unusual and spectacular. To create a diorama, you can use kinder surprise toys and tin cans. If you are unable to accurately cut the lid of a metal jar and you are afraid that the child will cut himself, use any other box or safe jar of a suitable size.

For the background of the diorama, you can use fabric, felt, paper, or simply paint with paints. Cut out the background and glue to the bottom of the jar.


For a forest theme, we twist cones from felt or paper, glue the resulting “trees”. Pompoms for the caterpillar are glued together or strung on a wire.


Gift for a young defender of the fatherland
Let's not forget about the little "men" who are also waiting for gifts by February 23rd. The young musketeer will be pleased with the sword, which can be used to "fight" safely for one's own and others' health.

The basis of such a sword can, for example, be an internal rigid cardboard tube from a roll of wrapping paper.
Cut out the hilt of the sword from an additional cardboard strip, wrap the “blade” with foil.

At your discretion, the hilt can be decorated with "precious stones".


We hope the suggested options for children's crafts were useful to you. Leave your feedback and comments below.
We wish you creative success with your child!
Useful articles
Ideas for children's crafts and gifts for February 23
The participants of the "Holidays" contest shared with the readers of the site the ideas of these wonderful crafts that children can make with their own hands for the Defender of the Fatherland Day (February 23) as a gift for relatives and friends.
Tank (corrugated cardboard craft)
The corrugated paper craft was made last year with the help of glue and scissors from colored corrugated cardboard for children's creativity. For tank tracks, multi-colored strips of corrugated cardboard of the same width and different lengths are folded into rolls and glued in the middle of the strip, then glued into a ring. The middle part, the tower and the muzzle are also made of rolled strips of corrugated cardboard. The flag is a piece of wooden stick (skewers) with a triangle of red colored paper.

Tanker (sand painting)
The painting with a tanker on a tank is made of colored sand.

Tank (colored paper application)
Earth - tear-off application (several strips are torn off from brown colored paper and glued at the bottom of the application). Details of the tank are cut out of green colored paper according to templates, the wheels are made of brown paper. The sun is a circle of yellow colored paper with cuts - rays. The star on the tank and the face of the sun are drawn with a red gel pen.

Tank (postcard - application)

Tank (postcard - application)
Postcard for dad "From February 23" with a tank and the Russian flag on the front side in the "application" technique from colored paper and colored cardboard, author - Anastasia (5 years old) from Moscow.

Inside the postcard - a sailboat and congratulations in verse.

Congratulations text:
The country gave me the Fatherland -
The house is endless, forests and mountains.
Well, you, father, gave me a patronymic -
The strength of the family and support in life.I wear your name with pride -
Your path is glorious with great deeds.
I need your strict wisdom
And your experience that grows stronger over the years.
A series of voluminous or curly postcards for February 23

Postcard for February 23 with Russian flag and tank
To make such a voluminous postcard with a tank inside, on the basis of a postcard (a sheet of cardboard or thick paper bent in half), you need to draw a background and glue a strip in the form of a step onto the fold. Glue the tank cut out from the printed and colored coloring to this strip.


Postcard for February 23 with figured edges in the form of numbers


Postcard for February 23 with a steamer and a dolphin
The manufacturing method is the same as for a postcard with a tank.


Postcard for February 23 with a symbol of peace - doves - and with a boat (steamboat) using the origami technique


Sailboat (painted postcard)

A gift for dad on February 23 with a sailboat and a pattern
Yaroslav (2 years 5 months) from Moscow made this gift to dad on February 23rd. For crafts you needed: colored and white paper, colored cardboard, felt-tip pens, decorative stickers, satin ribbon. The gift consists of a greeting card with a sailboat, which also plays the role of an envelope containing a child's drawing. The pattern is folded into a tube and tied with a ribbon.


Frigates (craft)
The craft was made by George (6 years old) from Moscow. Frigates are made of sponges for washing dishes, wooden sticks (skewers) and colored paper. A detailed step-by-step master class for this boat is in the article.

Helicopter (shaped postcard)
The description of the production was sent by Olga, Dima's mother: "A postcard for dad. The simplest application, but in the form of a helicopter. And now it seems that the child cannot do it. But no, everything is simple: I cut it out, glued it, and instead of a string - corrugated paper flagella".
The work is really simple, although very effective. How to do it, it is clear from the photo. To make this craft from colored double-sided cardboard, you need to cut out two identical parts in the shape of a helicopter, in the part that will be front, cut out a window and paste over it with pieces of multi-colored colored paper. Cut out circles (wheels) from black cardboard and make two holes in the middle of each with a hole punch. On the helicopters themselves, also make a hole punch along the edge of the hole and use a lace, rope or corrugated paper flagellum to connect the parts to each other, starting from the tail. Tie the ends of the lace or rope with a bow.

Postcard "Tie"

Postcards from the smallest with footprints
The next two works were made by Artur (1 year 10 months) from Indonesia, from Bali. These works show that even kids can take part in making postcards or congratulatory drawings for the holiday for relatives and friends.
Panel "First of all - airplanes"

Panel "Cup to the best grandfather"

Wall newspaper for dad "Dad can do anything"
The work was done by Daniil Moskvin, Yoshkar-Ola (last year's work, he was 1 year and 9 months old then).
A description of the production was sent by Marina, Dani's mother: "This newspaper seems complicated only at first glance! In fact, everything is simple. From my mother's work, there is only a background. The rest was done by Danya. To begin with, we made several separate applications (from ready-made sets) in the form different types of transport. Then Danya glued them to the background in the right places. He glued the cut-out "portraits" of dad so that it seemed that dad was driving a car, a helicopter, etc. Well, pre-prepared details for decorating the background: leaves, flowers, birds - Danya pasted it at his own discretion. As a result, we got a beautiful and interesting wall newspaper called "Dad can do anything!".

Craft for February 23 from the disk
Craft for dad by February 23 "The best dad" was made by Elizaveta (8 years old) from Dzerzhinsk. The work used: an unnecessary disk, an old postcard, colored cardboard and glue.

Gift for February 23 for a brother
By the holiday of February 23, Masha (10 years old) from Ukraine made a gift to her brother - dumbbells. She poured colorful salt into a half-liter bottle. The dumbbells turned out to be not heavy, and it is convenient to hold them for the child.

Crafts "Tanks"

The holiday of a strong, firm and courageous part of the population is approaching. Our children are asked to make crafts to choose from and show their imagination. How can we not help them? In this article, we have created for you and your children a selection of simple and original crafts for Defender of the Fatherland Day, which you can easily do with your own hands.
You will need: toilet paper sleeve, half an Easter egg mold, cardboard, pencil, scissors, paints, glue, brush, black marker, twine.
Master Class

Soldier ready!
Binoculars

You will need: yellow cellophane, scissors, adhesive tape, black paint, brush, green and black paper, glue, rubber band, wine cork, string or elastic band.
Master Class

Binoculars are ready!

You will need: colored cardboard, a simple pencil, a ruler, scissors, glue, a hole punch, a rope.
Master Class

An officer's tie for dad is ready!

You will need: matchbox, colored cardboard, scissors, a simple pencil, glue.
Master Class
- Take a sheet of cardboard and cut a strip 2 cm wide along the length of the sheet.
- Bend it in half and glue it perpendicular to the matchbox as an airplane body.
- Cut 2 strips the width of a matchbox for future airplane wings.
- Round off the wings with scissors, then glue them on.
- Cut 2 narrow, short strips for the tail of the plane, fold in half, then glue them.
- Cut out the propeller and sprockets, then glue them on.

You will need: white frame or cardboard and white paint, colored pencils, colored paper, felt-tip pens, glue gun.
Master Class

The original photo frame made of pencils is ready!

Stones are a symbol of firmness and courage, so feel free to make crafts from such natural material. Thus, you will emphasize the strengths of any man.
You will need: photo frame or cardboard and paint, stones, glue gun.
Master Class
- Take a photo frame or cut it out of cardboard, and then paint it.
- Arrange the pebbles on the frame, matching them in size.
- Glue each stone to the frame using a glue gun.
Photo frame made of stones is ready!

You will need: black cardboard, a simple pencil, scissors, glue.
Master Class
- Fold a sheet of cardboard in half.
- Draw half of the mustache.
- Cut them out.
- Trace the mustache on the cardboard and cut it out again.
- Glue the 2 pieces together.
- Cut the strip to the size of the mustache.
- Glue it to one side of the mustache so that the bookmark clings to the corner of the page.

You will need: deep cardboard box, disposable paper plates and cups, acrylic paint, pencil, ruler, tape, stationery knife, long wooden spatulas, 2 orange corks, red flat button, colored paper, felt-tip pens.
Master Class


You will need: sweets, paper, double-sided tape, pencil and scissors.
Master Class
- Draw 2 stars of the same size on paper.
- Cut them out.
- Tape one side of 2 stars together.
- Put the candy inside.
- Close the bonbonniere with tape.
You can make quite a lot of such bonbonnieres and treat the entire kindergarten group!
Sock tank

You will need: 4 pairs of socks of the same color, satin ribbon and muzzle stick.
Master Class
- Roll the sock into a tube.
- Repeat step 1 with 4 more socks.
- Wrap 5 tube socks in 1 sock.
- Fold up a pair of socks and lay on top.
- Tie a ribbon around the sock tank, making a cute bow at the top.
- Make the barrel of a tank out of a stick.
The sock tank is ready! Such an amazing craft will not only earn a good mark in kindergarten, but will also become a really necessary gift!
If you want to make the best crafts with a child in kindergarten, then this video is especially for you!
Postcard "shirt and tie" in the technique of origami

You will need: colored paper, felt-tip pens, decoration elements (buttons, sequins, threads).
Master Class

Choose the craft that your child likes the most. Let him choose colors, dream up and enjoy creating small masterpieces with his own hands!
Men are the stronger sex, without whom you can’t even imagine your life. And now their holiday is approaching - Defender of the Fatherland Day! Every year we are faced with thoughts of what to give on February 23 to a husband, father, grandfather, son, brother ...? In this article, we have prepared original gift ideas for our Defenders.
You will need: 7 sheets of A4 format with the image of various banknotes (euro, dollars, hryvnia, rubles), white sheets of A4 format, silicate glue, scissors, glue gun, thick cotton threads, skewers 20-30 cm long, polystyrene, flat box on half as wide as the bottom of the ship.

Master Class
- Fold the boat from a sheet of paper, as shown in the photo.

- Carefully turn the boat inside out so as not to tear.
- Fold and iron the boat.
- Outline the boat on another sheet, then draw a dividing line and cut out 2 pieces.

- Coat them well with glue and glue them to the inside of the boat to make two-layer sides.
- Cut the money sheets into strips 1.5 cm wide.

- Tape the boat with money stripes.
- Thoroughly coat the entire boat with glue for strength and leave for 2 hours to dry completely.
- Fold the same bills side by side and glue them. Make 3 of these - out of five, out of three, and out of four bills. These will be the sails.

- Carefully thread the sails onto the skewers and fix the joints with glue so that they do not slip.
- Take the boat and glue 3 pieces of Styrofoam inside.
- Insert skewers into foam for front and rear yards. The front yard should be 1/3 longer than the back. Make sure the lines are even, then secure with a glue gun.
- Insert skewers with sails, placing them at the same distance. It is worth noting that the deck should be smaller than the stern.

- Fold the threads in 2-3 layers the length of the sail and additional centimeters for the ties.
- Tie the threads to the skewers as shown in the photo.
- Cut 2 bills diagonally and fold the edges 0.4 cm.
- Glue banknotes (sails) to the rail threads.

- Make the sails to the stern in this way: do not twist the bill into a tube, bend the edge, then glue it.
- Fold 3 bills in half, shape them into flags, then glue.
- Cover the deck with banknotes.

- Make a ship stand out of a flat box.
- Glue the desired background onto the box.
- Glue the ship.
Box with a surprise

You will need: black cardboard, gray leatherette, scrap paper, hat elastic and black eyelets, a ruler, a creasing tool (not a writing pen, a crochet hook), a chipboard (cardboard cutting figures for decoration), a sewing machine, black threads, glue, a decorative inscription, a gift set - a bottle of alcohol, a screwdriver, a pack of cigarettes, a pill for the morning or something else ...
Master Class

The men's box with a surprise is ready!
shooting gun

You will need: thick colored paper, glue gun, ruler, scissors, adhesive tape, stationery gum, pencil, pen spring.
Master Class

Smoke grenade

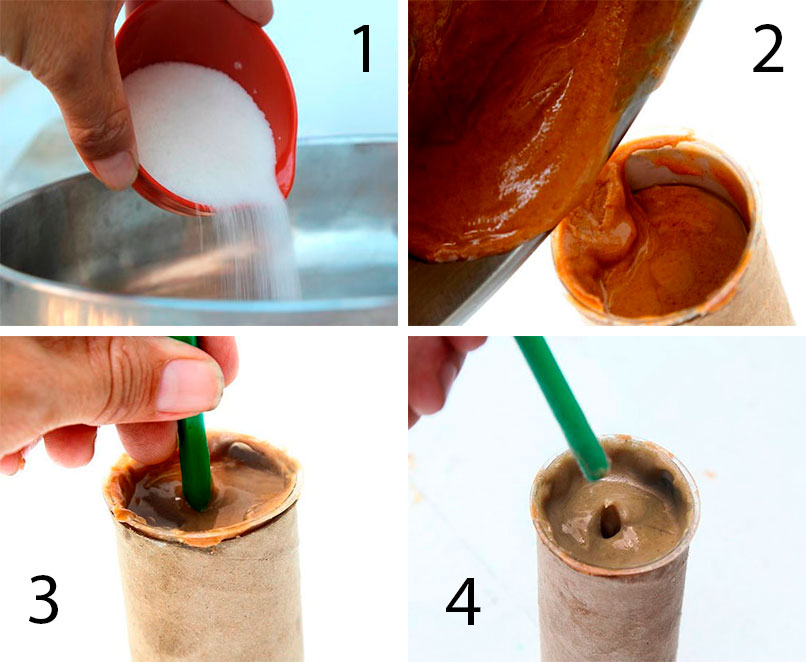
You will need: saucepan, potassium nitrate (KNO3), sugar, spoon, cardboard tube, dye, pencil, fuse (fireworks wick), duct tape, lighter or matches.
Master Class

You will need: 11 popsicle sticks, black marker, small image, glue, utility knife, satin ribbon.
Master Class
- Lay the sticks on a flat surface, placing them close to each other.
- Glue the image, then leave to dry.
- Turn the sticks face down.
- Write a wish with a marker.
- Separate the sticks from each other using a utility knife.
- Place sticks together and tie with ribbon.
The original mosaic gift is ready!
creative indoor flower

You will need: pot, styrofoam, skewers, artificial grass, glue gun, candy bars, chewing gum, gift cards, etc…
Master Class

Creative indoor flower is ready!
coffee mug

You will need: mug, coffee beans, cotton pads, thick white thread, brown acrylic paint, superglue.

Master Class

DIY IDAD

You will need: black cardboard, scissors, felt-tip pens, segment knife, white cardboard, white sheet of paper, spray glue or glue stick, printer, cutting mat, silver gel pen.
Master Class

Book safe

You will need: book with a hard cover, pva glue, water, stationery knife, brush, simple pencil, ruler.

Master Class

Tank in modular origami style

You will need: sheets of colored paper, scissors, 6 matchboxes, glue, a round blank for the base (for example: a perfume bottle).
Master Class

Dachshund from salt dough

You will need: salt dough, simple pencil, scissors, cardboard, paints, brush, rope, toothpick, foam sponge, clear varnish, PVA glue.
Master Class

Salt dough dachshund is ready!
Handmade soap

Benefits of this soap: has antibacterial and scrubbing properties, ideal for oily and problematic skin, has a pleasant aroma.
You will need: 100 grams of soap base, zest of half a lemon, a teaspoon of liquid honey, a teaspoon of dried lavender flowers, 5 drops of lavender essential oil, 2 drops of lemon essential oil, mold, dishes.
Master Class

Lavender-citrus handmade soap is ready! I recommend watching this video!
themed pillow

You will need: pillow, white pillowcase, inkjet printer, photograph, thermal paper, iron.
Master Class
- Print a photo on thermal paper.
- Attach the image to the pillowcase.
- Iron the pillowcase well.
- Wait for the pillowcase to cool completely.
- Remove the thermal paper from the fabric.
- Put a pillowcase over your pillow.
The pillow is ready! This gift option is suitable for any holiday.

You will need: open cones (from 50 to 300 pieces), wire, glue gun or superglue, varnish.
Master Class


February is considered the coldest month of winter, which is why it was called fierce. Tie a helmet to your hero and he will keep him warm in the bitter cold.
Knitted slippers


