Corrugated paper flowers for topiary. Do-it-yourself spring topiary made of corrugated paper for beginners. Master class with step by step photos. Corrugated Paper Topiary Materials
Creative corrugated paper topiary is a stylish decoration for a living room, living room or office space. It is believed that it brings prosperity to the owners. In the East, it was called a symbol of new life and prosperity. To work, you need a small amount of crepe paper and a little imagination. The composition will be an unforgettable gift for loved ones.
The creative process begins with the choice of a foam ball. In a wide range it is presented in the store for needlework. If nothing suitable could be found there, then blanks are easy to make at home. To work, you need a thick wire, which is curly bent. The main thing is not to break the base during partial deformation.
Then the bent wire is wrapped with fabric tape. Its color should be in harmony with the overall style of the composition. During wrapping, it is necessary to fix the tape at several points with a glue gun.

Further instructions are as follows:
- Carefully cut strips of colored paper, the width of which is 1 cm.
- Grind the cut ribbons to the size of squares of different colors.
- It is desirable that the squares are the same size.
- The barrel is made from skewers or sushi sticks.
- Each square is applied to the base of the structure.
To work, you will need a lot of small twisted squares, so it's best to make them with a margin. After that, you need to heat up the electric glue gun and fix the twisted squares on the ball. Designers recommend making sure that the corrugation fits snugly against the base and the adjacent element. It is easy to form a word or a shape from colored pieces, for example, a heart.

The production of the composition is completed by choosing a stand. In this quality, a small flower pot will perform, whose color is in harmony with the style of the topiary. To prepare the container, it is necessary to carefully insert a foam bar to the bottom. The leg of the composition is made from a colored stick (the color scheme is chosen taking into account the style of the craft) or wire, which then needs to be wrapped with tape.
Once the leg is ready and decorated, you need to carefully plant the ball. It remains to fix all the parts in the pot and decorate the space around. For this, moss, flax or tinsel is used. If the topiaries are created in a marine style, then small pebbles are used to decorate the free space.
We make flowers from corrugated paper for topiary
A flower bought or made by yourself will help to give the composition a greater personality. It is better to choose the second method for several reasons. In addition to the opportunity to get a decorative element of the desired color, the master independently creates a form. Certain difficulties may arise at the stage of choosing a creative concept. In this case, you need to turn to different sources of information.
For example, thematic photos of finished works will offer many options.

After that, you can proceed to the practical implementation of the idea:
- Purchase sheets of corrugated paper of the desired color.
- Cut off a strip, the width of which is 3-4 cm.
- Turn any of the edges 2/3.
- Form a spiral from the tape.
- It is desirable that the resulting spiral be stronger along the inner, and not along the outer contour.
- Cut off excess tape and fix the free edge with glue.
- Unhurried movements need to straighten the petals.
Flowers created from corrugated paper are fixed on with a thermal gun. It is recommended not to overload the composition with a large number of paper flowers. Given the size of the ball, it is necessary to cover the entire surface .
How to make a topiary paper ball: practical tips
Far from always, blanks presented in the trading network allow to fully realize the creative idea. In this regard, it is not difficult to make a ball for a future composition on your own. This will not require significant skills, taking no more than 1 day. For work, you will need mounting foam and a standard inflatable ball. The color and texture of the latter does not matter.
Learn how to make a beautiful coffee bean topiary in the following article:
Designers suggest using polystyrene as a starting material, but not everyone agrees with such a formulation of the issue. The material is quite fragile, so without significant work experience it is better not to take it. That is why mounting foam is preferable.

The order of work with it is as follows:
- Moisten the inside of the balloon with water.
- Drain off the liquid carefully.
- Inflate the balloon to medium size.
- Fix the inflated balloon on the tube of the cylinder with polyurethane foam.
- Fill up the balloon.
- It is necessary to take into account the class and density of the product, otherwise it will burst.
- Wait for the composition to harden for 9 hours.
- Cut the balloon with a knife.
- Extract the resulting workpiece.
- Peel off the dense top layer of mounting foam.
The result was a blank with the necessary parameters. If a custom size or shape is required, then creating it is easy with your own hands. To do this, it is necessary to place a balloon with mounting foam that has not yet dried up in a mold with the required parameters. In the future, the workpiece is used as described above.
We decorate the topiary from corrugated paper flowers
It seems erroneously that the step-by-step execution of all stages is the most difficult part of the work. Problems begin just after the completion of the main part, when there is free space. Watching themed videos is a good opportunity to learn how to use it. The flight of fancy should not be limited, but one rule must be strictly observed - do not overload the space, otherwise the abundance of crepe paper will negatively affect the stability of the composition.

- It is allowed to use toilet paper for individual items.
- It is undesirable to use too dark color schemes for crafts.
- When using corrugations, you must make sure that your hands are dry, otherwise the material will not retain its shape.
- The blank in the form of a ball can be changed to a heart, a square, and so on.
- During the execution of complex elements, the instruction should be in front of your eyes.
How to create a beautiful corrugated paper topiary (video)
A self-made topiary is a great addition to the interior. The main thing is to sketch out a sketch of the future composition before starting work on paper. Preliminary preparation will allow you to make the necessary changes in advance, as well as determine the list of required materials. Direct work with materials will require careful and adherence to technical recommendations.
Options for homemade corrugated paper topiary (photo)


Corrugated paper has become almost the subject of mass needlework insanity. This, of course, is a joke, but the popularity of crepe paper cannot be ignored. More than one photo and video master class is dedicated to corrugated paper crafts: flowers, berries, leaves, stylish packaging and, of course, topiaries. With your own hands, you can make a tree of happiness with flowers from this textured paper, or a tree-heart as a gift to your loved one.
Any topiary begins with the fact that you need to make a sphere or ball. The ball is the basis of the crown of the future tree. Of course, you can just buy a foam blank and not suffer. But if you are interested in the purity of the experiment, you can do almost all the steps that make up the master class with your own hands.

How to make a ball - step by step instructions:
- To make a base balloon, you will need a balloon and polyurethane foam.
- The balloon should be slightly inflated and put on the tube of the foam bottle.
- Fill the ball, keeping an eye on its size, and then wait for the foam to harden. After five to seven hours, you can see the result.
- If you try to moisten the inside of the ball with water, the process of hardening of the foam will accelerate.
- When the foam has dried, you need to remove the top layer from the ball. This work in every MK is compared to peeling an orange - you really have to cut off the top layer, as if you were peeling a fruit.


Removing the top layer of the ball is necessary in order to give it a more regular shape and remove all irregularities on the surface of the sphere.
Master class: corrugated paper asters (video)
Corrugated paper heart topiary: do it step by step
Since further the master class will develop in almost the same direction, it’s worth talking about how to make the base of the heart right away. If your crown is held not by a ball, but by a heart, you must create this shape with your own hands.
Instructions: how to make a heart base:
- This MK suggests following the good old papier-mâché technique. Tear the paper into pieces of different sizes, then soak it in a mixture of water and PVA glue.
- Wrap a film around a shape in the shape of a heart - a soap dish, a powder box, a children's toy, etc.
- And you work according to the rules of technology - you stick paper layer by layer, closing the joints of one layer with the paper of a new one.
- The greater the number of layers, the better, although, of course, the instruction does not require fanaticism.
- Next, the structure must be allowed to dry well. If you have already seen a similar photo or video master class, then you probably noticed how the masters are in no hurry to proceed to the next stage.
- With a clerical knife, cut the structure very carefully in the middle, take out the item used for the base, and see the two halves of the heart that you made with your own hands.

Corrugated paper roses (video master class)
Crepe paper topiary: delicate decor
Most often, flowers are made from corrugated paper. Roses and peonies are the most favorite choice of masters. Of course, making flower arrangements is a separate issue. If you want to make beautiful roses, watch more than one video, or let the photo instruction guide you in the technique.

So, let's say you watched a video or photo master class, learned how to make roses. With your own hands, you need to make at least a dozen flowers that will decorate the topiary crown.
As for color, such paper topiaries can be both cheerfully colorful and delicate. For example, cream or greenish-white topiary will be relevant in a light, soft interior. In the girl's room, pink shades will certainly be appropriate, and if you want freshness, a deep cornflower blue color will bring it.
MK: corrugated paper topiary: we form a tree

For this:
- Prepared roses Alternately, very carefully, row by row, glue hot glue onto a ball base.
- Leave a hole for the barrel in advance. This is a strong tube that can also be wrapped with corrugated paper. And not necessarily green. For delicate topiary, it can be white or pale pink. The barrel is inserted into the hole in the ball, fixed with glue.
- The tree is ready, it remains to make for him the same beautiful vase. You can, of course, buy ready-made - with exquisite decor, stucco, etc. You can go further, today even on a flower pot you can print a photo, for example, of you and your soul mate. Why not an option? Well, you need to fill the pot with gypsum, into which the tree is planted.

Such paper topiaries can also be decorated with small lollipops wrapped in the same paper and scattered over the top layer of gypsum in a pot.
And you can also create a whole composition from crepe paper. For example, hang a beautiful ballerina next to the topiary. It is made simply: the silhouette of a ballerina is twisted from the wire, it is carefully wrapped around with a mixture of toilet paper and glue. And then the ballerina needs to be dressed up in a fluffy dress made of corrugated paper.
She can stand by a tree, sit next to her, in a word, the situation can be beaten. If you decide to create such a composition, shoot the process on video, and do not hide your master class - it can inspire others too!
Corrugated paper topiary: video master class
This master class will show in detail how you can make a corrugated paper topiary with your own hands.
Part 1: crown decor (video)
Part 2: supporting structure of the topiary (video)
Part 3: Final design (video)
Promotional videos or videos on the creation of topiary motivate beginners in this business to try themselves in this technique. And if you doubt whether you can create such a topiary yourself, be sure that the process is exciting, interest is only increasing, and the result will please you for a long time.
Corrugated paper topiary (photo)


Topiary "Rose - the Queen of Flowers" made of colored paper for students in grades 1 - 4. Master class with step by step photos.
Lapatina Svetlana Vasilievna, teacher of the GPA MOU Tumskaya secondary school No. 46 Branch "Oskinskaya OOSh", Klepikovo district, Oskino village.
Purpose: Such a topiary can be made as a gift to your loved ones, friends or to decorate the interior. The master class will be of interest to elementary school students,
GPA educators, primary school teachers and all those who love to do needlework.
Target- Making a topiary from colored paper.
Tasks:
1. To develop students' interest in creativity.
2. Learn to make roses from colored paper.
3. Develop imagination, aesthetic taste, compositional skills.
3. To cultivate accuracy in work, the ability to bring what has been started to the end.
Materials and tools:
1. Paper colored tinted two-sided.
2. Green yarn "grass", plasticine.
3. Cup of cotton buds, green ribbon.
5. Two foam balls, a checkered napkin.
4. Scissors, PVA glue, glue - pencil, needles.

The course of the master class.
Educator.Good afternoon guys, today I want to tell you an interesting legend.
Once, in the evening, a prince was walking in a palace park. He was very surprised when he met a beautiful stranger there. They walked in the park all night long, but at dawn the stranger told the prince that she had to leave, because she was a princess that an evil sorcerer turned into a rose. And only for one summer night she becomes a girl again.
There is only one way to disenchant her - from the first attempt to recognize her among a thousand other roses. In case of a wrong choice, the girl will die. The princess disappeared, and the prince, with the first rays of the sun, went to that part of the park where hundreds of roses grew and immediately found her. The question is, how did he recognize her? Answer: There was no dew on it.

The rose, the queen of flowers, has been loved and sung since time immemorial. In ancient Greece, the bride was decorated with rose flowers, the path of the winners who returned from the war was strewn with rose petals, roses were planted around many temples.
In ancient Rome, a rose adorned the homes of wealthy people, and at their feasts, guests were showered with rose petals, and wreaths of roses were put on their heads. Wealthy Romans bathed in baths with rose water, made wine and sweets from flowers.
Educator.
And I suggest that you make the topiary "Rose - the Queen of Flowers" with me. So, let's get to work.
Progress
1. Making roses from colored paper.We cut colored paper into rectangles 10 centimeters wide and 14 centimeters long. Cut off the corners of the rectangles.

Draw a spiral with a pencil, cut along the drawn line.

We take a pencil and wind the end of the bottom strip onto it. Next, we form a rose,
glue in the center. It turns out such a beautiful rose.

Here's how many roses we got.

2. Preparation of the trunk, installation of the tree.
We take a foam ball of a smaller diameter, pierce it with a pencil, decorate a glass of cotton buds with a napkin.

We connect two balls with a pencil, wrap the trunk with a green ribbon.

We insert a small ball into the cup. For strong stability, we use plasticine.

3. Decorating the crown with flowers.
Now the most interesting creative work begins - we begin to decorate our ball with beautiful roses. We pin the roses in a circle with the help of needles.


We decorate the surface of the pot. Inside the pot, put paper napkins, green yarn “grass” on them, tie a bow with a green ribbon.

What a beautiful tree we got.
Educator.
Topiary "Rose - Queen of Flowers" is ready, let's read such a wonderful poem about a rose.
"Queen".
The rose is a symbol of perfection
Wisdom and purity.
Her supremacy is acknowledged
In the midst of a flowery patchwork.

The queen keeps in the petals,
The secret of tenderness, love.
Everyone can enjoy
The standard of beauty.
Rose bouquet - charm,
Grants a symbol each color:
Red - the path to love, recognition,
White is a promise of purity!
Thank you for your attention, I wish you all a creative mood!
What is a topiary? A topiary is either a curly trimmed hedge (which is also very interesting, but not within the framework of this master class), or an original small tree made from natural (and not so) materials.
Its production is a wonderful opportunity to have fun and usefully spend time with your child. After all, working with corrugated paper develops fine motor skills and instills a sense of beauty. In addition, if your child encounters a similar task in kindergarten or school, then it will no longer cause much stress and will bring much more pleasure.


How to make a rose topiary? You will learn this from the master class, and step-by-step photos and an explanation of each step will help you complete the product at the highest level.
This is what the finished piece looks like:

Corrugated Paper Topiary Materials
1. Corrugated paper.
2. Transparent glue "Moment".
3. Stick for the trunk.
4. Rope for winding the trunk.
5. Thread for tying roses.
6. Gypsum (If there is no gypsum, then you can use alabaster or cement).
7. A pot (or any other container in which a tree with roses will grow).
8. Scissors.
9. Newspaper (paper) for the ball.

Progress:
1. Cut out strips of corrugated paper 3 cm wide, bend the end twice and twist like a candy wrapper, repeat to the end of the strip.

2. Loosely twist the strip and fasten it with a thread. It will take about 20-30 of these roses.


3. Let's make a trunk. In our master class, we will use 4 sushi sticks. Wrap them with thread and glue with PVA glue, as in photo.

4. Let's make a crown. You can use newspaper, paper, or plastic balls. Shape the paper into a ball and wrap it with string for strength. Make a hole in the center, fill it with glue and insert the barrel.


5. Let's create the foundation of the future product - take alabaster or gypsum, dilute it to a state of sour cream, and then fill it with a pot and insert the barrel in the middle.

6. Now glue the roses to the ball.

7. Beautiful, but something is missing. Perhaps leaves? Let's make them from green paper and glue them between the roses.


A lovely tree is ready. It can serve as an original and unusual gift that will please both the representatives of the weaker sex and the representatives of the stronger sex who are not prone to sentimentality. As an interior detail, the topiary will fit perfectly into any style - from Provence to Art Nouveau, it will find a place in the bedroom, in the office, in the living room or hallway. At the same time, your child will get great pleasure working with corrugated paper, and you will be able to spend time together not at the TV, but as if in a real art workshop.
Video selection on this topic
To cope with the most difficult part of the topiary - with flowers - and to help you master the technique of working with corrugated paper, step-by-step video master classes will help you, covering in detail the aspects of working with the material.
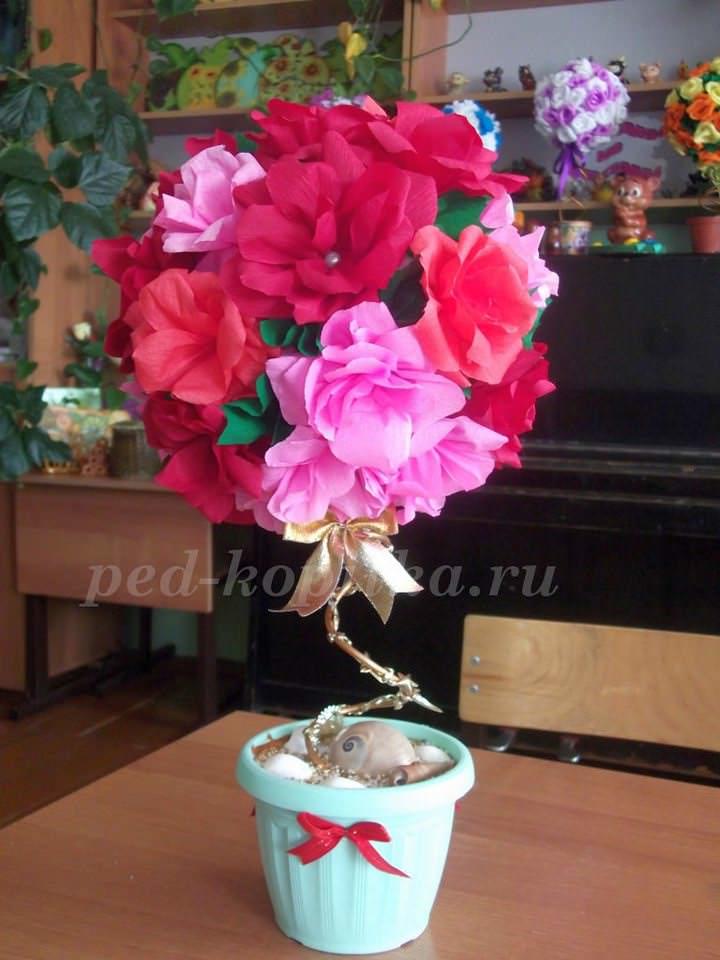
How to make a topiary with corrugated paper flowers step by step with a photo
Do-it-yourself spring topiary made of corrugated paper for students in grades 1 - 4. Master class with step by step photos.
Lapatina Svetlana Vasilievna, educator of the GPA MOU Tumskaya secondary school No. 46 Branch "Oskinskaya OOSh", Klepikovo district, Oskino village.
Purpose: Such a spring topiary can be made as a gift to your loved ones, friends or to decorate the interior. The master class will be of interest to primary school students, GPA educators, primary school teachers and all those who love to do needlework.
Target- Making a spring topiary from corrugated paper.
Tasks:
1. To develop students' interest in creativity.
2. Learn to make roses from corrugated paper.
3. Develop imagination, aesthetic taste, compositional skills.
3. To cultivate accuracy in work, the ability to bring what has been started to the end.
Materials and tools:
1. Corrugated paper.
2. Green ribbon.
3.Lace, a ball of strong threads.
4. Scissors.

1. Thermal gun.
2. Flower pot.
3. Paper, newspaper.
4. Stick for the trunk.
5. Alabaster, water, jar, spoon.

The course of the master class.
Educator.Guys, it's spring! It's a wonderful time of the year! And I suggest you listen to such a wonderful poem about spring.
"The days are fine"
The days are fine
Similar to holidays
And in the sky - the sun is warm,
Cheerful and kind.

All the rivers overflow
All buds open
The winter has gone with cold,
The snowdrifts became puddles.
Leaving the countries of the south,
The birds have returned.
On each branch of the starling
They sit and clean their feathers.

Spring time has come
It's time for flowering.
And so the mood
All people have spring!
M. Plyatskovsky.
Educator.
In the spring, the sun began to warm up, the birds began to fly in from the south, they began to sing funny songs, but there are still no flowers to be seen at all. So, let's get to work.
Progress.
1. Making roses from corrugated paper.
We take corrugated paper of different colors and cut it into strips 7 centimeters wide, 50 centimeters long.

With the left hand we hold the strip, with the right hand we bend the upper right corner of the strip.

Then we fold it a second time, then we take it with our fingers in the middle and raise the lower fold with our right hand, as if we are twisting a candy wrapper on a candy.


And we hold the top of what is bent with the finger of the left hand. We move the thumb of the left hand to the middle and hold it so that the strip does not move, bend it again with the right hand.

And so we do until the end of the strip, these are the strips we got.

We form a rose - we begin to gradually twist the strip.

We wrap the roses with thick threads, tie and carefully straighten the edges of the rose.

We need to make 45 such beautiful roses.

2. Preparation of the crown.
From paper and newspaper we form a ball of the desired size. We wrap the ball with thread to fix the shape.

We make a hole in the ball, add glue and insert the barrel. The ball is now firmly in place.


3. Tree installation.
We breed alabaster in a bucket to the state of thick sour cream and pour everything into a pot.

We put the stick in the pot, hold it and wait for it to solidify completely.

4. Decorating the crown with flowers.
Now the most interesting creative work begins - we begin to decorate our ball with beautiful roses. We glue the roses, alternating them in color with a heat gun.

Admire the ball, fully decorated with roses.

We fill the empty spaces between the roses with green triangles.

We wrap the trunk with a green ribbon.

Decorate the surface of the pot - cut green corrugated paper into squares, it will be grass, tie a bow, glue ladybugs.

What a beautiful tree we got.

We admire our spring topiary and sing a song.
"If freckles smile"
Words by M. Plyatskovsky, music by E. Ptichkin.
If on the snowy edge
Snowdrops break through the forest
If freckles smile
Girls and boys on the nose.
What is new in nature.
It means, it means, it means
That spring has come again.

If on country roads
Merry streams scatter,
If in the trees with a strict look
Busy rooks build nests.
If the sky turns blue
And there were more radiant sonorous days,
If the boys' classmates
Became a little more gentle.

It means, it means, it means
What is new in nature.
It means, it means, it means
That spring has come again.
Thank you for your attention, I wish you all spring creative inspiration!


