How to make different paper crafts. How to make paper crafts with kids
In modern schools and preschool institutions, much attention is paid to working with paper. Both kids and schoolchildren love to create original paper crafts. Working with her, the child develops his imagination, learns to think creatively, and also develops fine motor skills of fingers.
Simple voluminous gift boxes or voluminous figures can be made by hand by drawing a diagram on a piece of paper. Many crafts are almost impossible to put together without diagrams. Thanks to the templates, you can create complex voluminous fakes from colored paper or cardboard. Beautiful knick-knacks, furniture models and much more - any art lover can do.

To do this, you need to find on the Internet, for example, on the website of the Country of Masters, any template you like. Animals, birds, toys - everything can be created using ready-made templates and schemes.
Each template comes with instructions on how to assemble the craft. The template needs to be downloaded, printed on a printer, cut out a figure along the contour. On each figure on the template, dotted lines will be drawn along which the model should be folded. Glue the finished model with glue.
Easy paper crafts for kids
Children show interest in paper from childhood. To instill a love of creativity, parents should captivate the child with the creation of a variety of paper crafts. You can make a beautiful bright bird craft that a child can play with or use it to decorate a bedroom.
A simple cardboard bird:
- According to the template, cut out the shape of a bird, draw a beak, feathers, a tail.
- Fold an accordion from a square sheet of colored paper.
- Make a hole and fasten the wings in it.

If you cut out a few birds, you can make a Chinese breeze according to Feng Shui. By hanging the birds on a wooden stick, you can steal the entrance to the children's room with such a craft.
All cutting work must be carried out by adults or under their close supervision!
After working with paper, the child should put the entire tool in a box. This is how precision is developed.
Stylish cardboard and paper crafts: three-dimensional paintings
Application is considered the simplest paper craft, it is often studied in elementary school. A beautiful three-dimensional picture of bright flowers will be an original gift from a child to a mother or grandmother. Flowers can be made from white toilet paper or napkins.
If you take toilet paper for crafts, it is better to use expensive white perforated paper, which can then be slightly painted over.
Working with napkins is very simple, but you need to be careful not to accidentally tear it. Therefore, you should be especially careful when creating such crafts.

Progress:
- Fold the napkin in four, fasten with a stapler in the middle. Cut out a circle from a napkin
- Raise each layer of the napkin in turn, forming a lush flower.
- From green paper, cut 6-7 leaves according to the template.
- Cut out a basket from brown paper, stick it on a thick red sheet of cardboard. Arrange flowers and leaves in the basket.
The basket can be made from corrugated paper of any color, but it is advisable to stick it in a couple of layers. Instead of paper, you can use foil for baking or from chocolate bars.
Interesting paper crafts: weaving
There are a lot of ways to weave paper crafts, this is a very interesting and original way to create crafts.
The simplest thing is to plait strips of paper between each other in a checkerboard pattern, creating an object. A more complicated way is weaving from paper twisted into tubes.
Depending on which paper you choose, your craft will have special properties.

There are several options:
- Newspaper;
- Glossy magazine;
- Tape for cash registers;
- Plain paper.
Note that it is easier to work with paper, which is durable - the craft will accordingly come out more durable. An original drawing will come out of glossy magazines.
Do not intertwine different types of papers. Thick paper may not be intertwined with thin paper, and sometimes it can tear it.
Finished products can be decorated with ribbons, beads, quilling flowers, everything that your imagination is capable of.
How to make paper crafts: preparing paper tubes
Weaving from paper tubes is a very entertaining art. You can make tubes from magazine sheets - the material is quite dense and bright pictures will become an original pattern on the basket.
For manufacturing you will need:
- Paper;
- Scissors;
- Pencil;
- Ruler;
- Glue;
- Knitting needles.

First, let's prepare the tubes. Ribbons with a width of 90 mm of any length are simply wound on a knitting needle. We glue the edge, take out the knitting needle, leaving a couple of centimeters inside the tube, glue the second edge.
It is desirable to wind tightly, the accuracy of the product depends on this. Do not be distracted by extraneous matters, so the progress of work is lost.
By gradually pulling out the needle and building paper on it, you can lengthen your tube to the desired size. To weave a basket, the length of the tube should be such that it is convenient for you to bend it.
Beautiful basket: paper crafts in stages
So, we made blanks, in addition to this, you will need a piece of durable cardboard, scissors and glue. From the cardboard you need to cut the bottom of the future basket. To do this, according to any template, cut out two cardboard circles.
Now you can start weaving baskets:
- Glue paper tubes around the circle on the first cardboard circle. Glue the second circle onto the tubes.
- We lift the tubes up and fasten with an elastic band.
- Glue the end of one tube to the base, then grab the standing tube from the outside, lead it inward and grab the second tube from the inside.
- We alternate "outside-inside" until the tube ends.
- To lengthen the tube, you need to insert a new vine at the end of the previous one.
- In order for the basket to have a certain shape, when weaving it is better to insert a bottle or jar inside.
- Weave all rows to the required height.
- If there is a piece of vine left, do not cut it, it is better to fix it inside the finished basket. For fidelity, you can stick to one of the tubes.
- Frame tubes can be glued to the walls of the basket.
- We paint the finished product with acrylic paint, wait for complete drying and paint over again.
42.jpg)
The decorative basket is ready, you can put a small artificial flower there or adapt it for hairpins and rubber bands.
Simple paper crafts: an angel on a Christmas tree
For the New Year, I really want to decorate the house with beautiful decor. The easiest way is to make beautiful paper crafts yourself with a little effort. Even a child of 4-5 years old can make an angel craft under the supervision of their parents.
How to make a Christmas angel step by step:
- Cut out two squares of 10x10 cm from colored paper. Fold them like an accordion.
- Make a bend on the accordions, stepping back from the end of 3 cm. Bend one accordion to the right, the second to the left.
- Glue the bent fold to the bottom of the fan.
- To make the head, you need to cut 4-5 strips of paper as wide as the edge of the fan. We wind the strips on top of each other, forming a tight circle. Fix the size of the head with glue.
- Place the rest of the paper down.
- Glue the halves together. Angel is ready.
17.jpg)
If you want to decorate a Christmas tree with an angel, you can tie a serpentine to a halo and hang the craft on a branch.
You can also plant it on top of the tree. To keep it, just attach the craft to the branch with a regular clothespin.
White Paper Crafts: Volumetric Snowflake
Volumetric snowflakes look spectacular, besides, they can decorate an apartment before the holiday and decorate a Christmas tree. To create such a craft, you will need paper, scissors, glue.
How to make a three-dimensional snowflake step by step:
- Cut out 6 squares from sheets of paper.
- Fold the square in half to make a triangle. Make cuts from the bottom fold towards the top corner. The cuts should not meet, you need to leave a small gap between them. Thus, make 3 triangular cuts.
- Unfold the sheet and place it in front of you in the form of a diamond.
- Fold the first inner row of strips together, fix with glue.
- Turn the craft over, repeat step 4 with the following strips.
- Turn over and fasten all remaining strips.
- In a similar way, make 6 parts of a snowflake.
- Fasten together in 3 parts with a stapler.
- Glue the two halves together.
When working, it is better to use glue with a brush or a glue stick.
If, when gluing, a loop-ribbon is placed in the center, the finished craft can be hung anywhere.
White and colored paper is suitable for work. A snowflake made of paper will look very unusual, where one side is colored and the other is white.
The easiest children's paper crafts without scissors
Easy and beautiful craft for kids - "The Universe through the eyes of a child." The figure can depict the month, stars and other celestial bodies. This craft can be done without cutting.
To work, you will need very few materials - glue, confetti (or small pieces of torn paper) and a dark blue sheet of cardboard.
How to do:
- Collect confetti from crackers or cut out a bunch of small circles of multi-colored paper with a hole punch.
- Take a stencil and apply a drawing on a sheet - a crescent, stars and planets.
- Paint over the drawn figures with PVA and, until it is dry, sprinkle with ready-made confetti.
The finished picture can be decorated with a shiny frame, for it you need to finely chop the New Year's rain and stick it along the contour of the picture in the same way.
7.jpg)
Work with such crafts can be carried out even with preschool children - in kindergartens or early development circles.
Applications can also be decorated in this way. Decorating, for example, a Christmas tree cut out of a green leaf, you can make a beautiful New Year's craft.
Fascinating paper crafts for children: mobile toys
Such toys are very interesting for children. You pull the string, and the arms and legs of the animal or doll move. In fact, making such a figure is quite easy.
An entertaining puppet toy can also be made from plywood, but since cardboard is more malleable in manufacturing, we will analyze this option better.
To work, you will need cardboard, a couple of buttons, thin wire, scissors, strong thread and bards.

How to make a puppet dog:
- Moving parts (paws and tail) are drawn on cardboard separately and cut out.
- Subsequently, at these points, we make fastenings with wire or bards. Buttons can be used as a stopper.
- We glue the torso and head with adhesive tape or glue to a bamboo stick.
- We insert into the pre-made holes in the paws along the mount and combine with the body. We tie the paws together with a thread or elastic band. To do this, we make two additional holes in each foot so that they are located closest to each other, and the thread is not visible from the front side.
- In the same way we fasten the tail and connect it to the hind leg.
- After we tie another long thread to the one between the legs, it will set in motion all the moving limbs.
- The final stage of painting, at your discretion.
Having performed a cat, a fox, a hare using a similar technology, you can arrange a puppet theater for kids. Every child will like a play based on their favorite fairy tale with the participation of animals.
Paper crafts without glue: simple origami for kids
The origami technique is quite complicated, but you really want to make your child an interesting voluminous toy with your own hands.
This chicken is one of the most interesting and relatively simple crafts. The sheet of paper must be square.
Tip: if you go when tearing off to avoid severely torn edges, fold the sheet in both directions.
For cutting, you can use scissors or a ruler with a sharp clerical knife.
Origami chicken step by step:
- Fold the square sheet diagonally. Unfold, fold in half.
- Having unfolded, we bend the left and right corners of the square inward, combining them in the middle of the square. The result is a pentagon.
- We bend the top of the cone in the middle. Then we bend the same cone in the opposite direction, so that a small corner protrudes beyond the border of the sheet - the future beak.
- We combine the left and right sides of the whole craft, put it so that the beak is on the left.
- We bend the upper right corner into the middle of the product.
- The lower right corner, it consists of two sheets, we bend them outward of the product. We do this by combining the lower sides, while we bring a small corner beyond the extreme left border - these are the legs of the chicken.
- We turn out a small corner-tail.
- We lower the beak a little. You can paint over with a regular red pencil for more realism. Draw eyes.
Such a craft can surprise a child, intrigue him. Having aroused interest in the toy, you can enlist the baby to help create a similar origami next time.
Master class: do-it-yourself paper crafts (video)
In fact, you can make so many crafts out of paper and cardboard that you can’t list them - animals, birds, cars, dolls. They can be voluminous or simple, colored or white. The richer your imagination, the more interesting the craft is.
For the creative, intellectual education of kids, a huge number of programs and techniques have been invented and used.
Paper crafts for children rightfully occupy a leading position in children's creativity. This is due to the availability of material for creative work and the variety of techniques.
Paper crafts help develop a child's creativity. They instill perseverance and purposefulness. Working with scissors teaches the baby to be attentive, scrupulous. Creating paper masterpieces, little fidgets simultaneously develop fine motor skills of fingers. Working with glue, paints teaches the baby to be neat and clean. Children as young as 1 year old can already create simple children's paper crafts.
All known do-it-yourself paper crafts can be divided into the following large groups:
- Planar, which include applications.
- Volumetric works. Cardboard is also used to create volumetric crafts.
- Paper toys.

According to the technique of using the material, the following types can be distinguished:
- Created using scissors.
- Made without scissors: origami and kusudama.
- It can be distinguished into a separate type and crafts using a variety of techniques.
Getting ready for work
Working with paper always requires accuracy and cleanliness. A crumpled sheet of a postcard or paper toys smeared with glue, or applications look unaesthetic, ugly and sloppy. The little man must be taught in advance to keep order in the workplace. It is better to remove excess pieces of paper immediately in a separate box.
For paper crafts, you should prepare:
- Paper: color, white, and also corrugated. Paper napkins. Now they are available in different colors. Napkins are one of the main materials in paper-plastic technique.
- Cardboard. Often they use colored sheets of cardboard so as not to paint the base of the craft with paints.
- Glue. It is best for a child to prepare a PVA glue stick for work.
- Scissors are one of the most necessary tools for creating crafts.
- Paints, felt-tip pens, colored pencils, plasticine, cotton pads, buttons, pieces of fabric (often paper is combined with other materials in children's crafts). For decoupage work, you can prepare old magazines with pictures or ready-made drawings.

Application
In children's creativity, the main thing is the initiative of the kid. The child should not be forced. Children's initiative should be supported by adults. The very first paper craft available to a baby from an early age is an applique. Let the kid not know how to work with scissors, but he crushes paper lumps so well. Create with your baby his first creative masterpiece, for example, an autumn tree:
- Take a thick sheet of colored paper or cardboard as the basis of the craft.
- Prepare several sheets of thin colored paper or colored napkins so that the child can easily tear it. For an autumn tree, red, yellow, orange colors are well suited.
- Cut out a tree trunk from brown paper or draw on it.
- Show your baby how to use the glue stick.
- The fool does not know how to stick pieces of paper while holding the edge of the craft. The mother must come to the aid of the child. Hold the edge of the paper, show the place where the crown of the tree will be and where the torn pieces should be glued.
In this way, you can make an application of a fungus or flying snow. Fantasize with your child. Look out the window. Create your own sun or a cloud from which it rains. A simple application is done quickly enough. The baby will not get tired.

For children 3 years and older, it is already possible to offer not such a simple task, but more complex topics for applications. The kid can already create not only light crafts, but voluminous compositions and toys. When creating their work, children combine different materials. For example, cotton pads and colored paper. Halves of cotton pads are glued instead of the roof of the houses. It turns out a snow-covered roof. Snowdrifts can be made from halves of white circles.
Volume application
In children's institutions, classes are often held to create voluminous applications. Postcards, panels with three-dimensional figures always attract attention. Children of 4 years old are happy to create the simplest crafts. Kids use paper circles, ovals in their work. The technique of working with circles consists in the partial gluing of a workpiece - a circle.
An adult can make a funny cow out of paper circles together with a child. Make a meadow out of green crepe paper. Flowers can be drawn with a felt-tip pen or glued from colored paper. Spots on a cow can also be glued from paper of a contrasting color.
You can make a three-dimensional image of a sheep. To add volume, use paper strips twisted at one end or lumps of corrugated paper.
Separately, it is worth highlighting applications from napkins. The soft delicate texture of the napkins allows children to create extraordinary works. Lumps of napkins keep their shape well. Beautiful, voluminous and unusual works are obtained. The yellow napkin dandelion is simply adorable.
Beautiful postcard in paper-plastic technique
Step one.
On thick paper or cardboard, stick a crumpled salad, blue or pale pink napkin.
Step two.
We make dense lumps for the core of the flower from a yellow napkin, for the petals we take white napkins. The stem and leaves will be green. Teach your child right away. Let the baby put lumps of different colors in separate containers.

Step three.
Let the kid glue the core of the flower along the contour of the drawing or template. Then petals and leaves with a stem. The edging of the postcard can be made with contrasting lumps of other colors from a napkin.
The basis of the paper-plastic technique is the use of lumps of colored paper for crafts. You can take corrugated paper or plain colored paper. Most often, colored napkins are taken for work of this kind.
Crafts from stripes
With the help of colorful paper strips, children also create many compositions. For example, create a rainbow applique from colored stripes.
Step one.
Prepare a blue base for the sky and 7 colored stripes for the rainbow. Also take a narrow transparent adhesive tape for application.

Step two.
Carefully glue the colored strips with adhesive tape to the base of the appliqué on one and the other side. The rainbow will look unusual if the fidget fixes the ends of the ribbons with tape so that the middle of the rainbow rises above the base.
Step three.
Cover the tape strips with clouds on one side, and a rainbow may appear from the rays of the sun. You can remember the fairy tale about a magic pot from which a rainbow appears. The pot should be a contrasting color. It can be decorated with buttons.
With this craft, you can teach your baby to remember the order of the color spectrum. "Every hunter wants to know where the pheasant sits" - this phrase is used to remember the colors of the rainbow and its sequence.
Quite easily, a kid can, with the help of adults, make a bird out of multi-colored paper strips. The length of the strips is different. They are assembled into a ring and inserted one into the other. Rings must be fixed with glue in one place.

paper toy
The simplest toy can be considered paper cones. An adult should prepare cones for toys in advance. You can either buy pre-made templates or make your own. Usually toys in the form of cones are made to decorate the Christmas tree. Snow Maiden, Santa Claus or an important gnome - such a bright toy will give a festive mood.
A simple voluminous toy is available for preschool children. For her, you need to prepare several colored paper sheets. For a chicken, take yellow, a bunny can be white. A preschooler can draw eyes with a felt-tip pen or cut them out of paper and glue them. If the baby is still small, he needs to be helped to cut out small elements of a paper toy. It is enough only to control the child, to help him, but not to take the manufacture of the toy into his own hands.
If a child is interested in making paper toys, then the templates are on sale in a wide range. The idea of a kid to create his own toy should find understanding and support among relatives. Children's imagination must be stimulated with new ideas, not only with simple crafts, but also with the study, development of new techniques for working with this material.
Weaving from paper strips
Weaving is one of the oldest types of needlework. With the help of weaving paper strips or tubes, rugs, bookmarks for books are created. You can weave a colorful box for stationery or a decorative basket. Weaving develops the eye and spatial thinking. Simple products turn into more complex works. Children of 6 years old are already creating real works of art.

Paper crafts for children 5 years old already have more complex elements. The creativity of preschool children is a combination of several different techniques. The baby will not only make a postcard with an application for mom, but will decorate it, for example, with a bow. At this age, preschoolers can already master the technique of origami, as well as quilling.
Quilling in paper crafts
An interesting type of creativity that may interest children is quilling or paper rolling. From twisted strips, kids make panels, funny toys. The quilling postcard looks very beautiful and extraordinary.
You can make beautiful paintings using this technique. In kindergarten, the kid can learn the basics of working on this technique, and at home teach his mother.
Kusudama
This is one of the types of modular origami. In ancient Japan, special healing balls were made, when dried medicinal herbs were hidden inside each part. Now preschool children from 4 to 5 years old can create products using this technique.
Kusudama are colorful balls from separate modules. It can be triangles, flowers. Small modules are inserted into large ones to create volume.
Many master classes are devoted to the kusudama technique. Volumetric-spatial compositions made using the Kusudama technique require special care and accuracy.
Paper is the most common craft material for several reasons: low cost, availability, ease of use. Of course, paper cannot be called a very simple material, because it all depends on your skills, the type of paper, as well as the complexity of the craft. It can be a simple application for children, or it can be an origami from modules that young children cannot handle. In this article I want to offer 10 crafts of varying complexity for children and adults. They are made from several types of paper: plain white A4, colored, corrugated, crepe. He even eats one piece of paper for notes. Let's start looking at the various options.
3D postcard for March 8
You always want to surprise with a gift for the holidays, and such an unusual postcard will not leave anyone indifferent. This craft can be quickly and easily done by a child from 9 to 11 years old with their own hands and presented to their mother or grandmother for the holiday. To learn how to make a 3D postcard, you can watch the photo and video description with step-by-step instructions.
You will need:
- Colored paper (4 white sheets and 1 pink sheet)
- Scissors
- PVA glue
- Ruler
- Pencil
- Double-sided tape
- Paint (lilac and green)
Progress:
- Divide the white sheet in half with a line, and then fold 4 sheets together and cut along the line. We need 7 halves, put the 8th aside.
- Take half of the sheet and fold it in half 2 times. We get a rectangle, two sides are closed, and two are open.
- We bend the corners to the closed long side outward. We do this on both sides.
- Now the folded corners need to be bent again in the opposite direction, so we do this only on one side.
- We get a guideline by which we will cut off. Cut along the folded line on one side, then flatten the corner once and cut along the line on the other side. Thus, we get a shape similar to a leaf.
- So we do with the remaining six sheets. So that the shape remains the same for all colors, simply attach the first blank and cut it out.
- Take the resulting flower and cut out one petal from it, and then glue the gap by overlapping the side petals exactly one on top of the other. You should have 6 petals. We do this with all the flowers.
- Fold the flowers in half. Glue pieces of adhesive tape on the side petals of the 1st flower, on the very top of the petal.
- We glue flowers on the side parts, only the side petals, gently applying the petal to the petal.
- Now we glue the 4th flower on 3 flowers, also only the 4th one should have all the petals glued.
- We glue the 5th and 6th flowers on top like 2 and 3 (only on the sides).
- We glue the 7th flower on top of all the others on 3 petals.
- Fold a pink sheet in half, like a postcard, now we will finish our composition.
- We put the flower on half of the postcard and attach adhesive tape to the upper central petal and close it with another sheet of the postcard. Glue the other side in the same way. Make sure that the sheet lies clearly near the fold line.
- The card is ready, it remains only to color the middle of the flowers. You can sign the postcard.
Colored paper caterpillar
Such a caterpillar is easy to perform and will take very little of your time. The craft is designed for children from 2 years old and their parents. You will be able to spend time with your child pleasantly and usefully, you will also develop the motor skills of children's hands. Let's start doing the caterpillar with our own hands. 
You will need:
- Colored paper in different colors
- PVA glue
- Scissors
- Ruler
- Pencil
- felt-tip pens
Progress:
- Make strips of paper 6 cm long and 1 cm thick (red, green, blue, yellow, purple, brown, blue). The colors should be different so that the caterpillar turns out to be iridescent and bright.
- We glue each strip to make circles.
- When the circles are ready, glue them together alternating colors. You should get a strip of circles. We glue the last one a little higher than the rest, this will be the head.
- Draw a mouth and eyes with a felt-tip pen.
- Cut thin strips from colored paper and twist with scissors. Glue them in place of the antennae.
- From a green sheet, cut out the shape of a leaf in size, focusing on the caterpillar. Our funny caterpillar is ready!
Corrugated paper valentine
For Valentine's Day, ordinary heart-shaped cards are always given, but if you want to make a more original card, make it from corrugated paper. And now I will tell you how to make a valentine with your own hands step by step with step by step instructions. 
You will need:
- Cardboard
- Red corrugated paper
- Scissors
- Match
- PVA glue
Progress:
- Cut out a card in the shape of a heart from cardboard.
- Cut corrugated paper into squares a little more than 1 cm in size.
- We apply the square with the central part to the tip of the match and crumple the paper in a circular motion. Do this with all the squares.
- We apply glue to the valentine and begin to glue our crumpled blanks. When the glue dries, fluff up the paper to make it more fluffy. The holiday card is ready, you can give it to your loved one.
Bunny in 5 minutes
If you need a craft for kindergarten that does not take much time, then a voluminous bunny is the perfect option. The most important thing is that you can connect your baby to the execution process. Let's see how to make a simple bunny with your own hands using detailed instructions. 
You will need:
- Sheet of colored paper
- Scissors
- Ruler
- Pencil
Progress:
- From a sheet of paper, cut out 2 strips about 1.5 cm wide along the length.
- Cut one strip into two different strips. The difference is about 3 cm.
- We glue both strips so that we get 2 circles.
- Glue them together.
- Cut the second strip into 3 equal parts. Cut one piece lengthwise. We fold each thin strip in half and glue the ends together. This will be our ears.
- We glue the ears on our blank of two circles, on a smaller one.
- The remaining strips are also cut lengthwise. Paws are made like ears. Glued to the bottom circle.
- From one more strip we make a small circle and make a tail.
- Fold the last strip in half and round the edges with scissors. Spread and glue to the back of the bottom circle and scissors twist them forward. Bunny is ready!
Video how to make a paper bunny in 5 minutes
Beautiful flower
To decorate the interior, you can make an unusual flower from note paper with your own hands. For this, you do not need special skills, a child of 4-7 years old can also help with the implementation. To complete the craft, we have made a detailed description for you with step-by-step instructions. 
You will need:
- note paper
- PVA glue
- Cardboard
- Scissors
Progress:
- Note paper is best used without a sticky edge. Take the sheet with the corner up and fold the side corners and sides together. Glue them. You get buns. Do this with all the leaves.
- Cut out a circle of about 7-8 cm from cardboard. So we get a small flower.
- Now glue the 1st row of petals on the circle with the short side up. Petals should be close to each other.
- In the next row, glue the petals into the gaps of the previous row.
- So we do the subsequent rows gradually reducing the number of petals in a row.
- We fill the middle with petals, no longer focusing on the rows, see that it is beautiful and voluminous. The flower is ready, you can hang it on the wall or put it on the table.
Videos flower diy
DIY book
If you want to make an unusual craft that will also be useful for use, you can make a small origami book out of paper. You will not write down your poems or compositions in it, but it will come in handy for small notes, and besides, it will not take up much space in your bag. It is very easy to make such a craft, just follow the instructions with a step-by-step description. 
You will need:
- Sheet of A4 paper - 2 pieces of different colors
- Scissors
Progress:
- Fold A4 sheet in half lengthwise. Open the sheet back.
- Next, fold the sides to the center fold.
- Cut the sheet into 4 strips along the folds.
- Take one strip and fold it in half 3 times. You get a small rectangle.
- Do this for all stripes.
- Open the resulting triangle and now fold it with an accordion. Do the same with the rest.
- Now glue all the pieces together, stacking the last pages of each harmonica one on top of the other.
- When gluing, fold the sides that face each other and glue. This is how we make pages.
- We fold an A4 sheet of a different color in half in width, and then in length. You will have 4 rectangles. Cut out one of them.
- At the rectangle, fold the side long sides towards the center, but not reaching the center by about 0.5 cm.
- Fold the rectangle in half and lightly mark a cent. Now, focusing on the center, make two folds in the central part about 0.5 cm wide. The cover is almost ready.
- Now, trying on the sheets of the notebook on the cover, fold the sheets inward according to the size. Then insert the last pages of the notebook into the cover. For better fastening, you can use glue. Our unusual notebook is ready.
Video how to make a mini book with your own hands
Butterflies for decoration
Paper butterflies can be used to decorate walls, windows and gift wrapping. They create a romantic and light mood, because butterflies are so graceful. A child from the age of 3, as well as any beginner, can make butterflies with their own hands. There are many options for making paper butterflies and we want to offer you one of them, quite interesting. And now let's create a beautiful decoration in the form of a butterfly with our own hands. 
You will need:
- Sheet of A4 paper - 2 pieces (yellow and pink)
- Large needle
- Beads and beads
- thin wire
- Scissors
- double tape
Progress:
- We take one sheet and fold it in half, but the fold does not need to be highlighted too much.
- We cut off the corners, more on the lower side, and less on the upper side with a smooth bend in the middle.
- We open the sheet and, moving along the fold line, fold it with an accordion. We made the top wing.
- For the bottom, we do the same, only we will cut the corners of the same size. Next, fold with an accordion.
- We pierce the wings of butterflies in the center with a needle, so that in the future it will be easier to fasten them.
- We fold the wire in half and string the wings on it.
- We put a white bead on the wire at the upper wings, on both fibers. Then two gold pieces for each tendril.
- The rest of the wire is decorated with golden beads. To finish the antennae, we need to insert the tip of the wire into the last seed beads twice. We cut off the excess. We also do with the second mustache.
- Tape the top and bottom wings together.
- On the bottom of the wire we put on white beads of a larger size, about 4 pieces, and then 2 more beads of a smaller size.
- You need to finish the ponytail like the antennae, but for reliability, you can make a few twisting movements and cut off the excess.
- Now spread the wings of the butterfly and you can decorate the interior.
Paper origami tree
To decorate a home, office or kindergarten for the new year, you can make an interesting and unusual Christmas tree out of paper with your own hands. For those who love origami, this Christmas tree will love it. To complete this craft, read the step-by-step instructions, as well as the photo and video description. 
You will need:
- colored paper
- Scissors
Progress:
- From a sheet of green paper we make a square.
- Connect two opposite corners so that you get a triangle.
- Unfold the triangle back into a square and fold the other two opposite corners into a triangle.
- Along the folds along the sides, fold them into the middle, when you fold you get a triangle.
- Now we bend the sides of the triangle to the center, from the beginning on one side, and then on the other. And straighten it again.
- We straighten each resulting triangle along the fold, straighten it along the central fold and fold and make a new fold to the left.
- Divide the resulting structure into equal sides.
- Bend the bottom corners up, and then hide inward.
- We get a blank already similar to a Christmas tree. We make three cuts on the sides a little before reaching the center.
- Now we need to bend the corner to the inside of each incised piece. Thus, we will get the corners of the Christmas tree. We do this work with all the pages of the Christmas tree.
- The Christmas tree is ready to decorate your home.
Daisies from paper
If you want to bring a summer and sunny mood into the interior, make paper daisies with your own hands. They can be used not only in the interior, but also as a gift to family and friends. Such interesting and beautiful daisies will not leave anyone indifferent. 
In this article, we will explain in detail how to make paper crafts. These are simple and affordable designs even for an inexperienced beginner. Thanks to the explanations given in this article, everyone can learn how to quickly fold original shapes from a sheet of paper.
Folding a paper airplane
This is probably the most popular paper design among children. But this airplane differs from the usual ones in its flight qualities and shape, similar to a predatory fighter. To get a beautiful airplane, you should fold it out of colored paper or make it out of white paper, and then paint the design.
The drawn diagram shows how to fold such an aircraft. It will fly very far if you launch this paper fighter in a slightly upward direction.
So, you need a rectangular piece of paper. And then:
Bend the sheet to the center line, in half;
Wrap the left and right edges at an angle to the center;

Once again we bend the corners on both sides, as the diagram suggests;

Now, the already bent edges should be slightly turned to the outside;

Bend the airplane in the middle and connect the bottom edges;

On a line that is one third of the height of the resulting triangle from the bottom, we bend the edges down and get the wings;

Now we turn out the previously bent edges and straighten the “fender liner”.
The aircraft is ready for launches and games.
Delicate paper lantern
For this design, prepare colored paper, a ruler, scissors, glue and a simple pencil.
Take a piece of colored paper and fold it in half. Now, with a simple pencil, draw lines perpendicular to the fold, which start from the edge of the fold and do not reach the opposite edge for about two centimeters (all lines should be the same). The interval between these lines is a centimeter - one and a half. Now cut along these lines.

Next, unfold the sheet and bend it into a tube along the length of the cuts, with the colored side of the paper outward, glue the edges of the tube. It remains to make a handle for hanging a flashlight - a loop from a strip of the same colored paper, which must be glued to the top of the resulting notched cylinder and the craft is ready.
Let's make a carnation out of paper
You will need: straws for drinks (preferably green), beautiful paper napkins of bright red color and attentiveness.
We cut off a strip about a centimeter wide from the napkin, you will need this ribbon later. Now fold the entire napkin with an accordion and tie with the prepared strip in the center. Turn the napkin over, knotted down, and gently fold the sheets of napkin to the side, forming fluffy carnation petals. Bend the workpiece in half and “fluff” the petals again.

It remains to attach a tube to the “flower” and the paper carnation is ready. If there are only white napkins, then paint their edges and ends with a bright red felt-tip pen. If you do not have a suitable straw, you can take a stiff wire and wrap it with green floral tape.
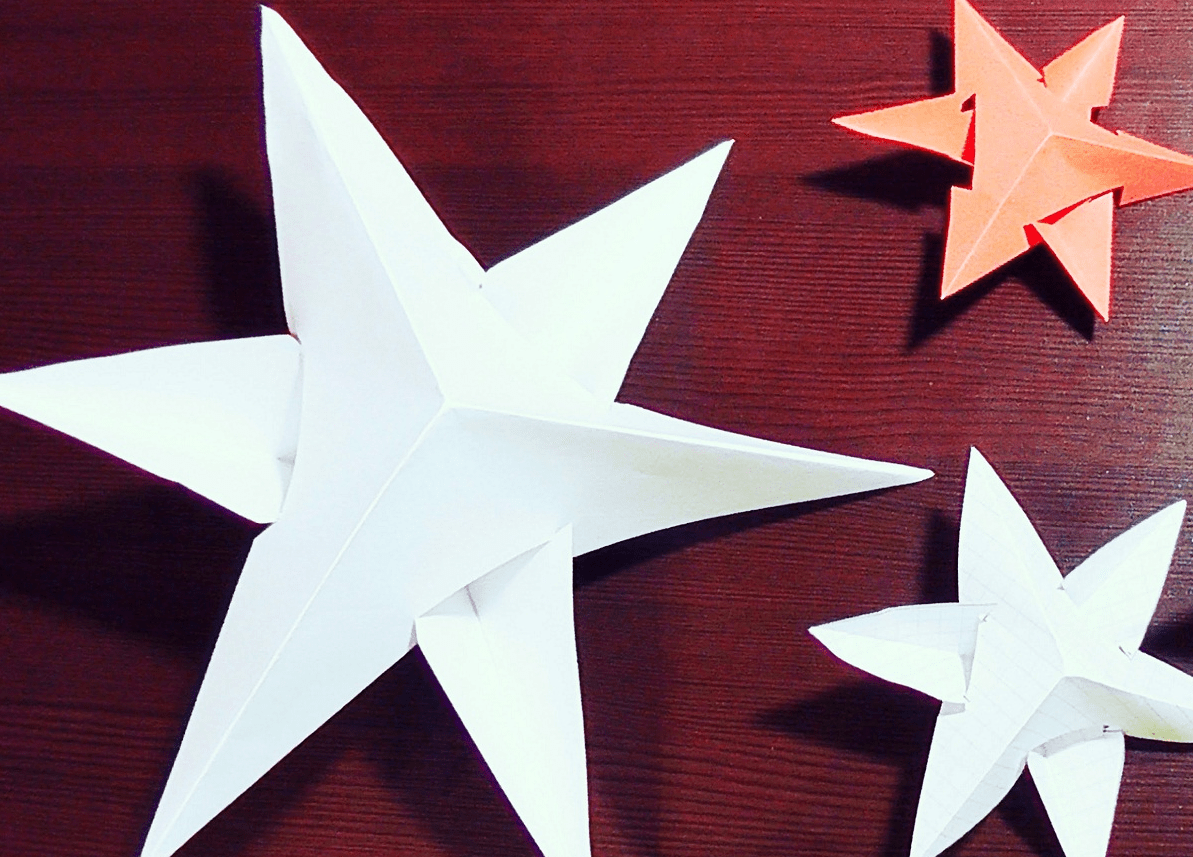
How to make a star out of paper
This paper star is a beautiful, easy to make and cute craft. To make it, you will need several paper squares with a side length of ten centimeters.

We bend the upper part of the rhombus - the triangle slightly to the side so that its edge runs exactly along the edge of the lower one, wrapped towards the middle of the triangle. In this way, both sides are bent in turn to make fold stripes;

Turn your design over and bend it along the fold lines formed in the previous paragraph;

As a result, you should get a figure of two nested triangles, so that the internal corners remain inside;

Such blanks will require at least four;
Connect these figures by tucking one of the triangles of each blank into the "pocket" of the inner triangles of the next;

Move all the shapes to hide the traces of the connection - the paper star is ready.
How to fold a paper clapperboard
For those who are learning how to make paper crafts, such a curious figure as a clapperboard will come in handy. You will need a sheet of paper large and rectangular. The best thing is to carefully pull out a double sheet from the middle of the notebook. Or a sheet of A4 office paper for a printer, even a regular newspaper may do.

Fold a piece of paper in four. When you unfold it, you will see two fold lines of different lengths. Bend all four corners of the sheet to a long fold line, this will look like two roofs of houses;
Now, fold this figure in half along the line of a long fold and you will have a paper trapezoid in your hands;
Bend the corners of the trapezoid at the long side to the middle, you will get a square-shaped figure;
Fold this square in half again so that the folded triangles are inside (they will create cotton);

Your clapperboard is ready to use, grab the sharp end with your fingers and swipe the clapperboard down sharply. Cotton will occur when the structure opens sharply, then you can fold the clapperboard and repeat everything again until the paper structure breaks.
Please note that when folding this cracker, it is not recommended to particularly smooth the paper.
paper envelope
The envelopes sold in the store are completely standard and monotonous. Although, if you search, you can buy original envelopes, however, exclusive handmade envelopes are much more valuable. And store envelopes are boring, too bland to be used for special occasions.

- Take a sheet of standard A4 paper and cut a strip from it to make a square, it must be folded diagonally;
- Now fold the sheet so that the folded corner touches the diagonal fold line. Use a ruler and fold exactly one third of the length of the square;
- Also, from the opposite, first fold, side, you need to bend the sheet and also by one third. Make sure the corner goes all the way to the edge;
- Where the left and right third parts of the sheet, which you have already folded back, converge, you need to bend the corner of the sheet to the left and back;
- Next, this corner can be opened, it will be a pocket that secures the edge of the top flap of the envelope that you are making. After a postcard or letter is inserted into the envelope, the edge of the flap will be fixed.
- Now the top of the envelope can already be bent, it goes straight into the pocket prepared for it.
A handmade envelope is not just a beautiful craft, but also a part of a solid design for your correspondence, postcards or letters.

If the envelope itself is made of white paper, then it can be decorated with stickers or painted with felt-tip pens and pencils. An envelope folded from double-sided colored paper has a special chic. The recipient will be pleasantly surprised. Opening the envelope and discovering that another beautiful color is inside.

As it is now fashionable to say, a 3D ball can be made from velvet paper, cardboard, colored paper, or pastel paper. Whatever you have available or want to buy, then use it. This ball looks great both in color and in white.

It will be easiest to print ready-made templates, you will need 12 blanks of their characteristic rounded pentagons. If you are doing this for the first time, then it will be easier to assemble a large ball - take the appropriate blanks. Cut out twelve pieces and make cuts exactly along the lines.

If you plan to hang the ball, then before assembly, you need to fix the rope on the first part (if the ball is lying somewhere, then this step can be skipped). To do this, stick a piece of adhesive tape on the back of the workpiece and then pierce the hole with a needle, the paper will not tear. Glue the end of the rope and you can start assembling.


The ball itself is assembled quite easily, the slot of each blank is inserted into the previous one, and so on in a circle. Easy to assemble even for a first grader.
Beautiful paper box
The box consists of a lid and a bottom, which are made in turn:
Take a square piece of paper and draw lines along its diagonals.
Bend one of the corners so that its tip is directed to the intersection of the lines, in the center. Fold this side over again. The edge of the fold should be located exactly along the diagonal strip. If you fold this side, there will be folds that will be used later;

Repeat the operation described in point 2 for all corners of the square;
On both sides, along the fold lines, parallel to one of the diagonals, we make two cuts, stopping at the last fold in front of the second diagonal;
We bend the other two sides along the notch lines, wrap the corners and fold the rectangular lid of our future craft.

The bottom of the box is made in the same way as the lid, but a square blank should be taken with a side size three millimeters smaller than the one from which the lid was made. Then the cover will be easy, but tightly dressed on the bottom.

So, the examples above have demonstrated how to make paper crafts. It is not difficult, but interesting and allows you to fold very original little things from plain paper. All materials are readily available, and the original crafts themselves will delight you or your child.
How to make a paper carnation


Paper crafts can be made both for yourself and for sale In modern schools and preschool institutions, much attention is paid to working with paper. Both kids and schoolchildren love to create original paper crafts. Working with her, the child develops his imagination, learns to think creatively, and also develops fine motor skills of fingers.
Simple voluminous gift boxes or voluminous figures can be made by hand by drawing a diagram on a piece of paper. Many crafts are almost impossible to put together without diagrams. Thanks to the templates, you can create complex voluminous fakes from colored paper or cardboard. Beautiful knick-knacks, furniture models and much more - any art lover can do.
Schemes and templates for creating paper crafts can be purchased online or at a craft store.
To do this, you need to find on the Internet, for example, on the website of the Country of Masters, any template you like. Animals, birds, toys - everything can be created using ready-made templates and schemes.
Each template comes with instructions on how to assemble the craft. The template needs to be downloaded, printed on a printer, cut out a figure along the contour. On each figure on the template, dotted lines will be drawn along which the model should be folded. Glue the finished model with glue.
Easy paper crafts for kids
Children show interest in paper from childhood. To instill a love of creativity, parents should captivate the child with the creation of a variety of paper crafts. You can make a beautiful bright bird craft that a child can play with or use it to decorate a bedroom.
A simple cardboard bird:
- According to the template, cut out the shape of a bird, draw a beak, feathers, a tail.
- Fold an accordion from a square sheet of colored paper.
- Make a hole and fasten the wings in it.
Paper craft in the form of a turtle is good for children
If you cut out a few birds, you can make a Chinese breeze according to Feng Shui. By hanging the birds on a wooden stick, you can steal the entrance to the children's room with such a craft.
All cutting work must be carried out by adults or under their close supervision!
After working with paper, the child should put the entire tool in a box. This is how precision is developed.
Stylish cardboard and paper crafts: three-dimensional paintings
Application is considered the simplest paper craft, it is often studied in elementary school. A beautiful three-dimensional picture of bright flowers will be an original gift from a child to a mother or grandmother. Flowers can be made from white toilet paper or napkins.
If you take toilet paper for crafts, it is better to use expensive white perforated paper, which can then be slightly painted over.
Working with napkins is very simple, but you need to be careful not to accidentally tear it. Therefore, you should be especially careful when creating such crafts.
A volumetric castle made of paper is a great toy for a child.
Progress:
- Fold the napkin in four, fasten with a stapler in the middle. Cut out a circle from a napkin
- Raise each layer of the napkin in turn, forming a lush flower.
- From green paper, cut 6-7 leaves according to the template.
- Cut out a basket from brown paper, stick it on a thick red sheet of cardboard. Arrange flowers and leaves in the basket.
The basket can be made from corrugated paper of any color, but it is advisable to stick it in a couple of layers. Instead of paper, you can use foil for baking or from chocolate bars.
Interesting paper crafts: weaving
There are a lot of ways to weave paper crafts, this is a very interesting and original way to create crafts.
The simplest thing is to plait strips of paper between each other in a checkerboard pattern, creating an object. A more complicated way is weaving from paper twisted into tubes.
Depending on which paper you choose, your craft will have special properties.
Thanks to paper, you can make a practical chessboard
There are several options:
- Newspaper;
- Glossy magazine;
- Tape for cash registers;
- Plain paper.
Note that it is easier to work with paper, which is durable - the craft will accordingly come out more durable. An original drawing will come out of glossy magazines.
Do not intertwine different types of papers. Thick paper may not be intertwined with thin paper, and sometimes it can tear it.
Finished products can be decorated with ribbons, beads, quilling flowers, everything that your imagination is capable of.
How to make paper crafts: preparing paper tubes
Weaving from paper tubes is a very entertaining art. You can make tubes from magazine sheets - the material is quite dense and bright pictures will become an original pattern on the basket.
For manufacturing you will need:
- Paper;
- Scissors;
- Pencil;
- Ruler;
- Glue;
- Knitting needles.
To prevent paper tubes from tearing, thick paper should be used in their manufacture.
First, let's prepare the tubes. Ribbons with a width of 90 mm of any length are simply wound on a knitting needle. We glue the edge, take out the knitting needle, leaving a couple of centimeters inside the tube, glue the second edge.
It is desirable to wind tightly, the accuracy of the product depends on this. Do not be distracted by extraneous matters, so the progress of work is lost.
By gradually pulling out the needle and building paper on it, you can lengthen your tube to the desired size. To weave a basket, the length of the tube should be such that it is convenient for you to bend it.
Beautiful basket: paper crafts in stages
So, we made blanks, in addition to this, you will need a piece of durable cardboard, scissors and glue. From the cardboard you need to cut the bottom of the future basket. To do this, according to any template, cut out two cardboard circles.
Now you can start weaving baskets:
- Glue paper tubes around the circle on the first cardboard circle. Glue the second circle onto the tubes.
- We lift the tubes up and fasten with an elastic band.
- Glue the end of one tube to the base, then grab the standing tube from the outside, lead it inward and grab the second tube from the inside.
- We alternate "outside-inside" until the tube ends.
- To lengthen the tube, you need to insert a new vine at the end of the previous one.
- In order for the basket to have a certain shape, when weaving it is better to insert a bottle or jar inside.
- Weave all rows to the required height.
- If there is a piece of vine left, do not cut it, it is better to fix it inside the finished basket. For fidelity, you can stick to one of the tubes.
- Frame tubes can be glued to the walls of the basket.
- We paint the finished product with acrylic paint, wait for complete drying and paint over again.
A paper basket is a great decor element for any room.
The decorative basket is ready, you can put a small artificial flower there or adapt it for hairpins and rubber bands.
Simple paper crafts: an angel on a Christmas tree
For the New Year, I really want to decorate the house with beautiful decor. The easiest way is to make beautiful paper crafts yourself with a little effort. Even a child of 4-5 years old can make an angel craft under the supervision of their parents.
How to make a Christmas angel step by step:
- Cut out two squares of 10x10 cm from colored paper. Fold them like an accordion.
- Make a bend on the accordions, stepping back from the end of 3 cm. Bend one accordion to the right, the second to the left.
- Glue the bent fold to the bottom of the fan.
- To make the head, you need to cut 4-5 strips of paper as wide as the edge of the fan. We wind the strips on top of each other, forming a tight circle. Fix the size of the head with glue.
- Place the rest of the paper down.
- Glue the halves together. Angel is ready.
Using paper, you can make original decorations for the Christmas tree in the form of angels
If you want to decorate a Christmas tree with an angel, you can tie a serpentine to a halo and hang the craft on a branch.
You can also plant it on top of the tree. To keep it, just attach the craft to the branch with a regular clothespin.
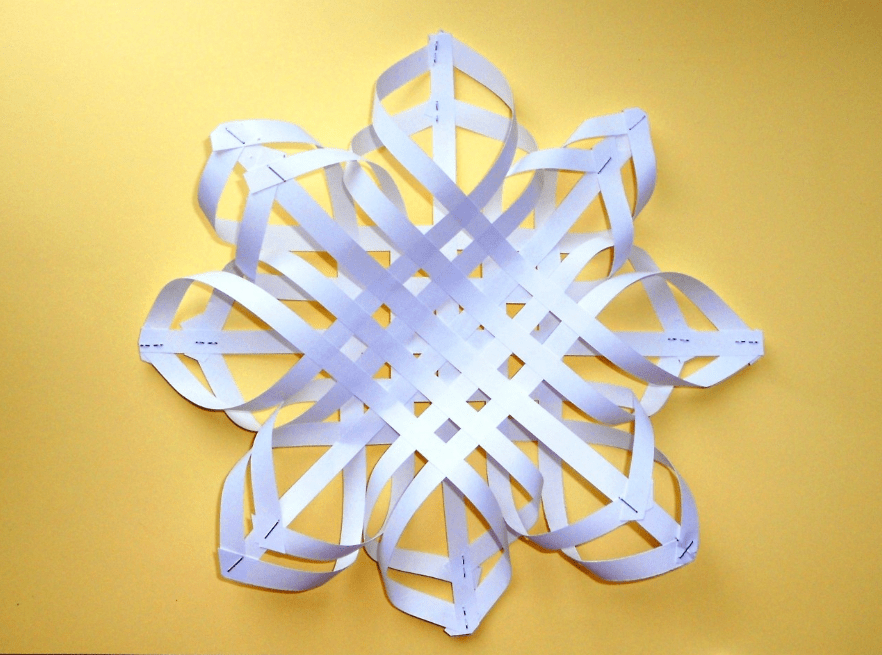
White Paper Crafts: Volumetric Snowflake
Volumetric snowflakes look spectacular, besides, they can decorate an apartment before the holiday and decorate a Christmas tree. To create such a craft, you will need paper, scissors, glue.
How to make a three-dimensional snowflake step by step:
- Cut out 6 squares from sheets of paper.
- Fold the square in half to make a triangle. Make cuts from the bottom fold towards the top corner. The cuts should not meet, you need to leave a small gap between them. Thus, make 3 triangular cuts.
- Unfold the sheet and place it in front of you in the form of a diamond.
- Fold the first inner row of strips together, fix with glue.
- Turn the craft over, repeat step 4 with the following strips.
- Turn over and fasten all remaining strips.
- In a similar way, make 6 parts of a snowflake.
- Fasten together in 3 parts with a stapler.
- Glue the two halves together.
Volumetric snowflakes made of white paper are well suited for decorating a house for the New Year.
When working, it is better to use glue with a brush or a glue stick.
If, when gluing, a loop-ribbon is placed in the center, the finished craft can be hung anywhere.
White and colored paper is suitable for work. A snowflake made of paper will look very unusual, where one side is colored and the other is white.
The easiest children's paper crafts without scissors
Easy and beautiful craft for kids - "The Universe through the eyes of a child." The figure can depict the month, stars and other celestial bodies. This craft can be done without cutting.
To work, you will need very few materials - glue, confetti (or small pieces of torn paper) and a dark blue sheet of cardboard.
How to do:
- Collect confetti from crackers or cut out a bunch of small circles of multi-colored paper with a hole punch.
- Take a stencil and apply a drawing on a sheet - a crescent, stars and planets.
- Paint over the drawn figures with PVA and, until it is dry, sprinkle with ready-made confetti.
The finished picture can be decorated with a shiny frame, for it you need to finely chop the New Year's rain and stick it along the contour of the picture in the same way.
There are a wide variety of paper crafts you can do without scissors.
Work with such crafts can be carried out even with preschool children - in kindergartens or early development circles.
Applications can also be decorated in this way. Decorating, for example, a Christmas tree cut out of a green leaf, you can make a beautiful New Year's craft.
Fascinating paper crafts for children: mobile toys
Such toys are very interesting for children. You pull the string, and the animal or doll moves arms and legs. In fact, making such a figure is quite easy.
An entertaining puppet toy can also be made from plywood, but since cardboard is more malleable in manufacturing, we will analyze this option better.
To work, you will need cardboard, a couple of buttons, thin wire, scissors, strong thread and bards.
Movable paper toys are a great gift for a child.
How to make a puppet dog:
- Moving parts (paws and tail) are drawn on cardboard separately and cut out.
- Subsequently, at these points, we make fastenings with wire or bards. Buttons can be used as a stopper.
- We glue the torso and head with adhesive tape or glue to a bamboo stick.
- We insert into the pre-made holes in the paws along the mount and combine with the body. We tie the paws together with a thread or elastic band. To do this, we make two additional holes in each foot so that they are located closest to each other, and the thread is not visible from the front side.
- In the same way we fasten the tail and connect it to the hind leg.
- After we tie another long thread to the one between the legs, it will set in motion all the moving limbs.
- The final stage of painting, at your discretion.
Having performed a cat, a fox, a hare using a similar technology, you can arrange a puppet theater for kids. Every child will like a play based on their favorite fairy tale with the participation of animals.
Paper crafts without glue: simple origami for kids
The origami technique is quite complicated, but you really want to make your child an interesting voluminous toy with your own hands.
This chicken is one of the most interesting and relatively simple crafts. The sheet of paper must be square.
Tip: if you go when tearing off to avoid severely torn edges, fold the sheet in both directions.
When choosing a future composition for creating origami, you should choose crafts without complex elements
For cutting, you can use scissors or a ruler with a sharp clerical knife.
Origami chicken step by step:
- Fold the square sheet diagonally. Unfold, fold in half.
- Having unfolded, we bend the left and right corners of the square inward, combining them in the middle of the square. The result is a pentagon.
- We bend the top of the cone in the middle. Then we bend the same cone in the opposite direction, so that a small corner protrudes beyond the border of the sheet - the future beak.
- We combine the left and right sides of the whole craft, put it so that the beak is on the left.
- We bend the upper right corner into the middle of the product.
- The lower right corner, it consists of two sheets, we bend them outward of the product. We do this by combining the lower sides, while we bring a small corner beyond the extreme left border - these are the legs of the chicken.
- We turn out a small corner-tail.
- We lower the beak a little. You can paint over with a regular red pencil for more realism. Draw eyes.
Such a craft can surprise a child, intrigue him. Having aroused interest in the toy, you can enlist the baby to help create a similar origami next time.
Master class: do-it-yourself paper crafts (video)
In fact, you can make so many crafts out of paper and cardboard that you can’t list them - animals, birds, cars, dolls. They can be voluminous or simple, colored or white. The richer your imagination, the more interesting the craft is.


