What kind of bracelets can be made. Men's bracelets: ideas, examples, master class
When a holiday approaches and the choice of outfit has already been determined, it suddenly turns out that there is not enough necessary decoration, some little thing that will add charm to the image, add zest to the overall look. DIY bead bracelets can become such an ornament.
Ways and options
The easiest way is to string the beads on a strong thread or fishing line, attach a clasp and you can put it on.
There are many different accessories sold in craft stores. By choosing to your taste, you can make original decorations.
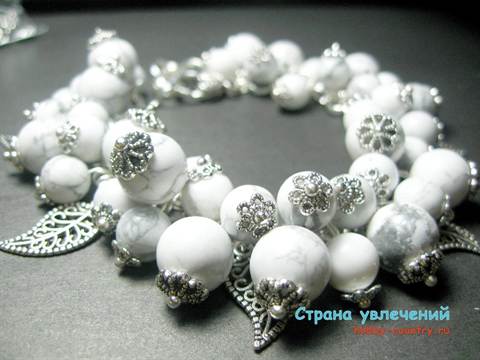

The basis for such a bracelet is a chain with a lock, to which beads are attached, strung on pins.
For work, you will need wire cutters, round nose pliers and pliers. Beads should be of medium size to fit on pin 2 beads.
This is how it should look like:

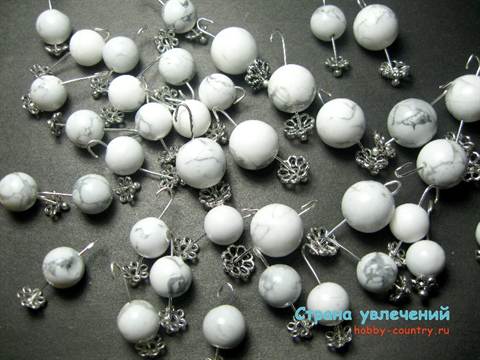
Beads for such a bracelet are selected in two types: medium and faceted. The color of the beads should be in harmony with the color of the beads. Before you start, they can be laid out on the table to choose the right play of light and shadow. Having typed the required number of blanks, you can begin to assemble the bracelet.
With the help of tools, pins with medium beads are hung on each link of the chain in a checkerboard pattern. Pins with faceted beads are attached between them. The result is a voluminous bracelet.
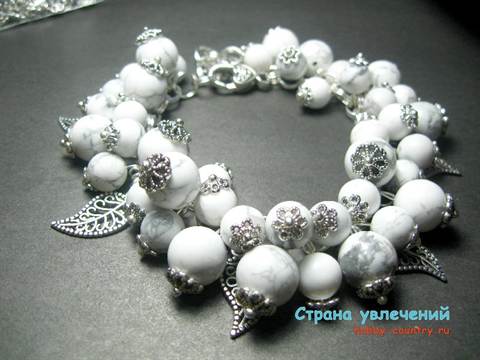
This bracelet is made according to the same principle, only pins with figured cups and pendants in the form of leaflets are added.
From scattered beads, you can make such a bracelet:

Cords and beads
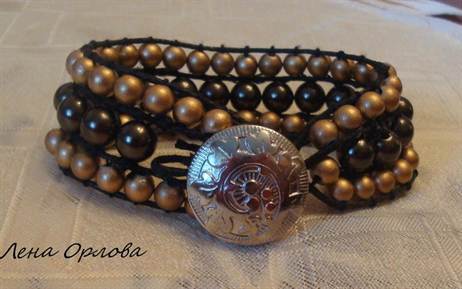
Original jewelry is made from cord and beads. Even some men wear them. For such bracelets, large beads with large holes are selected.
You can see a master class on making a bracelet below.
This bracelet is made of thick cotton cord and beads of two types, 8 mm each.

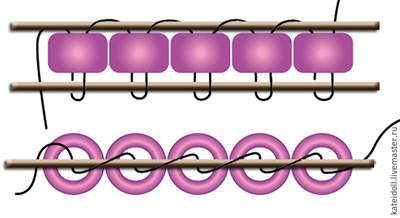
Beads are attached to the cord in the following way:
A decorative button is used as a fastener.
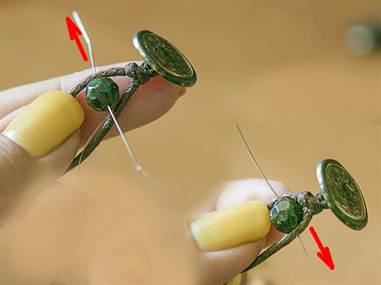
The bracelet will be smoother and stronger if you flash it a second time.

Beads are attached to the cord with monofilament.
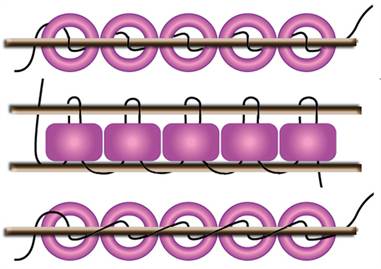
Using this scheme, you can weave a wide variety of bracelets.


Another example of weaving a cord and beads bracelet:

Everything is simple here: an ordinary pigtail is woven from a cord - a spikelet, and beads are woven into it.

colored beads
There are endless possibilities for creating unique masterpieces!

All these bracelets are woven according to the same pattern.

Here is the same diagram.

Weaving is carried out in two needles, the thread is taken with a large margin, because beading does not like knots.
The second way to weave beaded bracelets is a mesh. It floats quite easily.
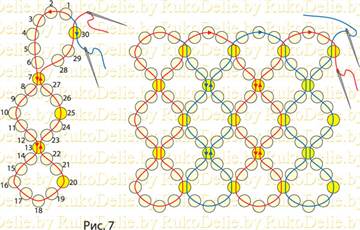

By weaving beads into the mesh, you can create beautiful jewelry.


A master class on beadwork for beginners can be seen in the video at the end of the article, and now read its brief description.
To make such a bracelet, you will need Czech beads and 3-4 mm beads.
The thread must be at least 70 cm long. A thread is threaded into a beaded needle and a carabiner is first attached, leaving about 15 cm at the tip.
A bead, 15 beads, a bead, 15 beads, and so on, are strung alternately on the thread until the desired length of the bracelet.
A ring for a carabiner is attached to the end of the thread.

15 beads are typed, and the needle goes in the reverse order.

In this way, as many rows are typed as needed. This item has 5 rows.

The thread is fixed in the same way as when sewing, but for the strength of the knots, at least 3 are made, each through several beads.

Delicate lace
When creating bracelets, other materials are also used. They can be made from ribbons and beads, as in the photo.
Helpful Hints
It takes quite a bit to create a beautiful bracelet with your own hands - a few tools, patience and a few simple tips.
DIY nut bracelet (master class). Option 1.

You will need:
Hex nuts
Jump rings (you can use wire)
long nose pliers
Satin cord
Lighter (if necessary)

1. Arrange the nuts the way you want your bracelet pattern to look.
2. Using long nose pliers, open the rings and start connecting the nuts with them. You should have a pattern for the bracelet.
3. When you have connected all the nuts with rings in the order you need, get ready to make the bracelet itself. To do this, take the cord and cut off about 60 cm.
4. Fold the cord in half and cut it.

5. Now, again, fold each half in half and thread it into the extreme nuts.
6. Gently melt the ends of the cord with a lighter. It is not necessary to lean the fire against the cord, just bring it close.
7. Insert the ends of the cord through one nut and tie the ends.

DIY bracelet made of threads and nuts. Option 2.

You will need:
3 cotton threads
Small hex nuts (18 in this example)

1. Prepare three threads and tie a knot at the end.
2. Start braiding.

3. When about 5 cm of the "braid" is woven, with each further turn, start threading one nut.

4. When you have used the last nut, you need to continue braiding the way you did at the beginning.
* Check the length of the bracelet on your wrist. The length should be such that you can wrap the thread around your wrist 2-3 times.

5. After weaving, tie a knot at the end and cut off the excess.


DIY leather bracelet. Option 1.

You will need:
Leather or leatherette
waterproof paint
tassel
Scissors
Punch tool

1. Cut the leather or leatherette into strips - the length of each should exceed the size of the wrist by about 4-5 cm. In this example, the width of each strip is about 3-4 cm.
2. Using waterproof paint, paint geometric patterns or any other designs on the leather strips.

3. When the drawing is ready, apply a second coat of paint and leave to dry.
4. Make a hole for the button where you feel most comfortable (measure at the wrist) and insert it.


Leather bracelet with your own hands. Option 2.

You will need:
piece of leather
Scissors
Superglue or leather glue
Button for clothes (clasp-latch)
1. Cut out an oval from a piece of leather, approximately 22 x 10 cm in size. Depending on the size of your wrist, you can make the oval longer or shorter.

2. Make a butterfly and secure it with a thread - just tie it with a thread, at the end of which then tie a knot.


3. Cut out a small rectangle of leather - approximately 4 x 1 cm.

4. Wrap this piece of thread and secure with superglue.

5. It remains to insert the latch and you're done.


DIY zipper bracelet (photo). Option 1.

You will need:
Super glue
Thread clips with jewelry rings
tonkonosy
Scissors

1. Prepare some zippers and cut off the sides of the fabric.
2. Measure to your wrist size and cut off the excess, but make sure the zipper still works.
3. Using thin noses, attach thread clips to the ends of each zipper, and using a jewelry ring, connect the clip and carabiner.
4. Make several of these bracelets of different colors and you can wear it on your wrist, and you can do everything at once.
Beautiful zipper bracelet. Option 2.

1. Prepare 3 halves of zippers of the same length. In this example, all halves are the same color, but you can choose different colors.
2. Use a clip to connect all three halves of the fasteners.

3. Start braiding the zippers.
4. When the braid is ready, secure the ends of the zippers with a clip.

Weaving a zipper bracelet. Option 3.

1. Prepare a denim zipper, measure the desired length and cut off the excess.

2. Attach a thread clip with a jewelry ring or Velcro.
3. You can put on, unfasten and fasten the bracelet.

Making a zipper bracelet. Option 4.

1. Cut off the fabric from two long zippers. Choose the length of the zipper yourself - you can use a zipper that can be wrapped around the wrist several times.

2. Fasten both zippers at the ends. You can use both clips and Velcro.
Sequin bracelet (for beginners)

You will need:
sequins
Elastic cord (0.5mm)
Embroidery threads
Scissors
Needle or pin

1. Prepare about 30 cm of elastic cord and tie a double knot at the end.

2. Pull the elastic cord through the sequins. You can use sequins of any color and put them on the cord in any order.

3. Wrap the blank around your wrist to check the size. Please also note that the bracelet will stretch, because. it has an elastic cord.
When you have put on the number of sequins you need, tie the ends of the cord into a knot and tighten. Make a double knot and cut off the excess.

4. Prepare embroidery thread and cut off several pieces about 5 cm long. Tie each piece to an elastic cord with a double knot.


Bracelet shamballa with their own hands. Video 1.
How to weave a shamballa bracelet with your own hands. Video 2.
How to make a Shamballa bracelet (photo instruction)

You will need:
beads
satin thread
Adhesive tape (adhesive tape, electrical tape)
1. Prepare a thread about 1.30-1.40 m long and fold it in half.
2. Cut 2 more pieces of satin thread 50 cm long and put one of them between two strands of folded long thread (from point 1). Set aside the other thread.
3. We start working with three parallel strands.
Tie a knot at the bottom of the strand that is in the middle (50 cm) and put a bead on this strand.

* To make it easier to work, you can fix the center thread with adhesive tape.
4. Begin to "knit" loops, as shown in the image. You need to make 5-6 loops and then add one bead again.


* You can occasionally add superglue to keep the design well.


5. Connect the ends with extra thread (see image) and cut off the excess thread.


DIY bead bracelets

You will need:
Beads (in this example in the form of cubes)
Elastic thread (cord)
Super glue
1. Cut a piece of thread to a length that fits your wrist, be sure to leave a lot of stock.

2. Prepare several strands of the same size. The width of the bracelet depends on the number of threads.
Always in price, sometimes they look more impressive than jewelry


Learning to make 10 beautiful bracelets
Summer bright bracelet.
Pairs well with a jacket and jeans

you need a brown leather cord, a blue waxed cord, a chain of metal balls and a golden bolt.

Fold the leather cord in half (each side must be at least 50 cm if you want to make a bracelet in two turns). Attach the blue cord.

Now fasten the metal chain with a blue cord, and then thread the beads of the chain between the turns of the blue cord. If you couldn't find a metal chain with beads (usually sold in stores selling accessories for creating jewelry, you can string beads on a thread and use it instead of a chain).

Measure the diameter of your wrist, add 2-3 cm and wrap the blue cord around the leather to this length.

8.
At the end, fasten the metal chain with a few turns of blue cord (as at the beginning), tie a knot along with the leather cord.
Put the bolt on the resulting cord in the knot area, secure it again with a knot.
Cut off the excess length of the cords, the bracelet is ready!


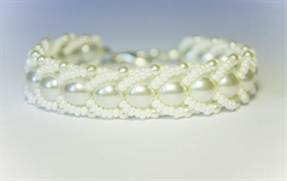
Imitation pearl bracelet

You will need two leather cords about 50 cm long (they can be purchased at any hardware store for making jewelry).

Now we sew artificial beads between two leather cords with a thread and a needle.

So we continue to sew gradually bead by bead.

Sew in the beads to the number that you think is necessary. Don't worry about the stitching threads being visible, we'll hide them for now.

Now with an openwork braid (0.5-0.7 mm wide) tie each cord. So you and the threads will hide under the cord. 
This is what you should end up with - in the middle of the bead, and at the edges of the lace braid.
At the ends, knot both the braid and the cord together.

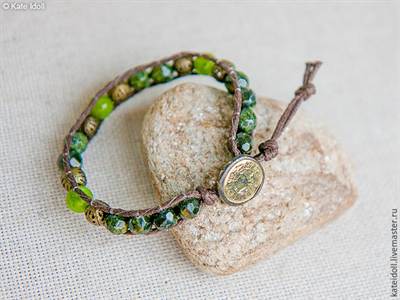
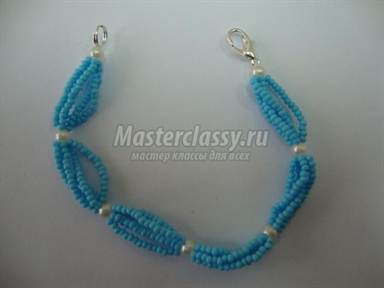
TURQUOISE BRACELET
Jewelry with turquoise always brings back memories of the blue sea, sunny beaches, hot evenings and even a little “oriental”.
I don’t know what it is connected with, and each person has different objects that cause completely different emotions.
But I can say one thing - turquoise jewelry leaves only a few indifferent.

For an artificial turquoise bracelet, we need 2 brown leather cords of 80 m each, artificial turquoise 0.5 mm (about 100-120 pcs), thin brown leather thread 100 cm, a needle, a decorative button, Moment Crystal glue.
1.
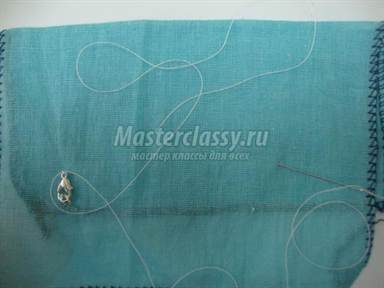
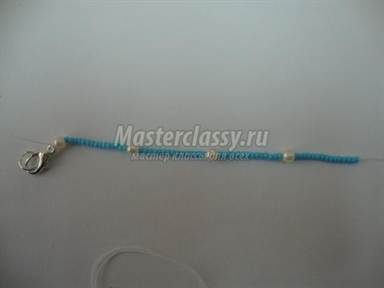
We put leather cords on a flat surface parallel to each other at a distance of 1 cm. We thread the leather thread into the needle, fix it on the cord and begin to sheathe the cords, and insert turquoise between the cords.

When the entire length of the cords is sheathed with threads and beads, carefully glue the leather thread on the wrong side (to prevent it from shifting). Wait for complete drying.

On one side of the leather cords, make a ring at the end, and sew a decorative button on the other - this will be the clasp on the bracelet.

5.
Chanel style bracelet
Perfect for a little black dress


We will need artificial pearls, jewelry fishing line, two types of chain, two connecting jewelry rings, a piece of satin black ribbon (1 cm wide, 20 cm long), scissors.
String faux pearls on a jewelry line. How many beads to string is up to you, but it depends on the diameter of the beads and the width of your wrist, usually 18 to 24 beads are enough.
.
Now put one end of the chain on the fishing line.

Measure the length of the pearl, cut off the same amount of chain, put the second edge on the second edge of the fishing line.
Carry out the same procedure with 2-3 more types of chains.

Now put the edges of the chains on the jewelry connecting rings (the rings can be from 0.8 to 1.4 cm in diameter).


Pass a satin ribbon through the rings.

Elegant bracelet
Sometimes our outfit is quite modest for a festive exit, and there is no time, money, and no point in acquiring any bright accessory. Make this accessory with your own hands, like this bracelet.
We will need:
- Watch or bracelet with a fixed base.
- Satin ribbon (2 cm wide, 1.5-1.8 m long).
- Brooch.
- Wire.
1.
From a satin ribbon, we begin to make a beautiful large bow with a large number of petals.

We fix the petals at their intersection with wire. We attach a brooch in the center of the flower. We fix the bow on the watch (or bracelet).


A universal decoration for military and casual clothing is a denim bracelet. It is easily combined with both denim and white cotton and natural linen.
DENIM BRACELET

To begin with, take a small piece of brown leather and print out any inscription with printed letters (although special metal printed letters are needed for this). If you don’t have them, then just cut a 5 * 2 cm segment from the leather.

From old jeans, cut off the belt, measure the width of your wrist. From the side of the belt where there is a hole for the button, cut the width of the wrist along the length. Sew a piece of leather in the middle of the workpiece, sew up the side seam.

Sew on a beautiful button (it is desirable that it be in the same color scheme as a piece of leather).


Bracelet in 15 minutes
Fast, cheap, attractive - all this can be said about this guipure bracelet, which can be sewn in just under 30 minutes.

We will need:
- Guipure.
- Spandex.
- Beads.
- Thread, needle, scissors.
- Sewing machine.
We sew the spandex to the guipure (if the width of the wrist is about 20 cm, then cut the guipure 40 cm), and only after that sew the spandex.
Sew the edges, wrong side inward.
Sew on decorative elements and beads.


Victorian bracelet
The Victorian style, both in architecture and in clothing, was distinguished by luxury and beauty. in some quarters of London (and of course the English colonies), entire blocks of the Victorian era have been preserved. The clothes included velvet, lace, shades of gold and warm pastel colors, precious and semi-precious stones. And even today, some jewelry like Victorian-style bracelets are more relevant than ever.
We will need several types of braid in gold and pastel colors (guipure, satin, velvet), a thread of beads, gold-colored metal buttons, superglue.

.
We take a cotton base 20 * 10 cm. Fold it in half in width, determine the middle.

We put a braid on one part of the base of the bracelet: in the middle in a pleat, on one edge golden velvet, and on the other body guipure. We wanted to sew on dark pink imitation pearls, but they don't fit very well.

We settled on white beads. We sew the braid with hidden seams to the base. White beads are sewn onto flesh-colored guipure.
.
Now we bend the edges of the braid, glue it on the wrong side. Now we glue the edges of the base inward in width. The edges are sewn by hand with a hidden seam.

On one side of the bracelet we sew a metal button in gold.

And on the other side there are two strips of body guipure braid. 

The bracelet is ready 
FABRIC BRACELET
Reincarnation of old grandmother's beads into a modern accessory - that's what the next master class offers you.

We will need:
- Wooden or plastic beads (you can even buy them at a flea market).
- Fabric calico with floral print.
- Threads.
- Satin ribbon for ties.
We free the beads from threads, fasteners, fasteners. From the fabric we cut out a strip 7 cm wide, 20 cm long. The length is the length of your wrist + the volume of each bead, but the width of the strip is the width of the widest bead multiplied by 2.


We sew the strip from the wrong side along the length, turn it right side out, iron it.

Now we insert a bead into the inside of the fabric tube, after passing a satin ribbon for a tie into it (into the core), then we tie it with a thread. So we continue until the fabric tube is completely stuffed with beads.

At the end of the bracelet, we cut off the excess fabric (if any), carefully sew the fabric by hand on the last bead.

Creative success!
Knitly.com
And every year such products are gaining more and more popularity, because each product has its own soul, its own history, its own charm.
DIY bead bracelets
Probably one of the easiest jewelry options is a beaded bracelet. After all, it is very easy, and most importantly, the scope of imagination is not limited. Beads can be purchased at any needlework store, as well as the rest of the accessories - clips, clasps of various types, blanks for bracelets and much more.
For the base, you can use a thread, a metal fishing line, a fishing line that stretches, a chain, ribbons and much more. And beads can be made of glass, acrylic, metal, pebbles, pearls, plastic. For example, a simple option is to string any identical or different beads onto a stretching fishing line. For such an ornament, you don’t even need a fastener, just tie a knot, cut off the excess length and hide the ends of the fishing line in a bead. 
Even in stores you can find beads with hooks, you can say pendants. These can be easily attached to a beautiful chain in a different order. Moreover, you can hang only 5-7 beads on a chain, or you can hang a bead on each link. Thus, you get a very voluminous and unusual bracelet.
Shamballa bracelets are now very popular. It is believed that they carry great meaning, help the one who owns it. Such decorations are made of dense threads, large beads, beads with small rhinestones are often used, sometimes elements in the form of crosses, faces of gods, animals are added. Such bracelets can be made in one row, or in several.
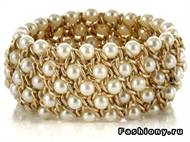
By the way, about bracelets in several rows. They look very beautiful, and, despite the massiveness, gracefully. For such an ornament, you will need a fishing line, a lot of beads, a thread separator to make rows. 
You can complement bracelets with beads with various pendants, beads, satin ribbons, or organza bows and much more.
DIY leather bracelet

It is not so difficult to make a decoration on your hand from a piece of leather. First, decide what your future bracelet will be. It can be just a strip of leather with a clasp on your arm. It is easy to make a braided leather strap - a piece of leather needs to be cut into three or more stripes, but not completely. Now, from the shreds, start weaving a pigtail, its tip must be sewn or pressed with a special clip. 
For rock lovers, the ideal option would be a bracelet with all sorts of rivets, bones, skeletons, spikes and other metal fittings that can be found in any needlework store. Such elements are easily attached. 
You can make a multi-colored leather bracelet - first a strap is made, for example, from black leather. From a piece of white leather, you can cut a butterfly, a heart, a star, a flower, and anything else. This decoration can be large or small, in which case you can cut out several small figures. The decorative element is attached to the black strap with glue, a needle and thread, or riveting. Do not forget that the edges of the cut out jewelry must be burned with a lighter. 
If you have leather laces, then you can weave a pigtail out of them, adding beautiful beads when weaving. There are special devices for processing leather. With the help of such tools, you can make a carved pattern on a piece of leather, printed stamps with a variety of images.
DIY beaded bracelets

is far from a new feature. An ideal option for jewelry, not gold with stones, of course, but such jewelry looks quite expensive, unusual, very beautiful and dignified. There are many books that allow even the beginner to reach unrealistic heights in this art, so if you have never worked with beads, then you can make even the simplest bracelet by picking up a fishing line with beads for the first time. 
By the way, the simplest version of the bracelet, but the resulting jewelry is suitable for a party, a simple walk, and even for a beach holiday. You will need a thin metal fishing line, a lot of beads of any shade, you can, for example, take amber, brown and golden. It is desirable that the beads are transparent. The fishing line is twisted around the hand and measured depending on the chosen size of the future bracelet. After that, a knot is made at one end, and beads are strung from the other end. The result is a snake bracelet. 
For more experienced people, there are many different options for weaving bracelets - jewelry with flowers, stars, waves, in several rows, and generally whole works of art. It all depends on experience, desire and skill.
In stores you can buy a metal base for the bracelet. This can be decorated with a variety of beads, rhinestones and beads. Most often, decor elements are simply glued to a special glue or resin. 
Another simple but interesting option is a pin bracelet. A lot of pins are taken, beads are strung on them. After each pin is strung on a fishing line, at the end it is fixed with a clasp.
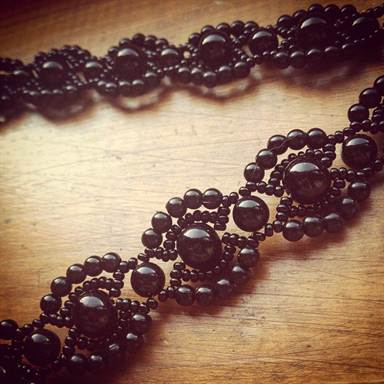
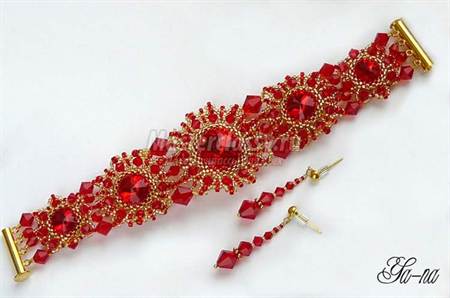
You can also embroider a piece of lace with beads, black lace and black shiny beads would be ideal. You can add medium shiny beads and rhinestones.
Interesting DIY bracelets

In fact, DIY bracelets can be made from absolutely anything. You have old zippers - so make a creative decoration for your hand out of them. You can cut a pair of zippers into three parts and make a pigtail out of them, and the zippers can be plain or multi-colored. 
Or sew beautiful beads on the zipper, a large chain, if there are metal rivets, then they are perfect. The advantage of this decoration is that the zipper can be fastened or half unfastened, which will give a little zest to the bracelet. 
You can make a beautiful bracelet using different-sized buttons, strong thread and a clasp. Smaller buttons are sewn to large buttons, and all this is attached to a thread. 
By the way, about the threads, you can use a simple floss thread for the bracelet. It can be absolutely any color, and for decor, you can add a thread with a flat decoration. 
For a summer “delicious” decoration, you can purchase beautiful pendant beads in the form of summer fruits or berries. Most often they come with fastening, all that remains is to attach them to the chain, make a clasp and the bracelet is ready. 
In addition to accessories for handmade, you can find blanks for bracelets in stores. They can be made of metal, plastic, wood and, in principle, they can already be worn as a finished piece of jewelry. But many needlewomen supplement these blanks with stones, beads, medallions and other things. From such a blank, you can make a knitted bracelet, provided that. If you don’t know how, then the blank can be decorated with pieces of old unnecessary jeans, lace, suede and everything that comes to hand. 
Summer is that happy time when everyone wants to be light, young and happy. It turns out that simple, unpretentious jewelry can help this, which you can make yourself and now bright colors have come into fashion. thread bracelets.


Thread bracelets
These funny pieces of jewelry are also known as friendship bracelets. Most often they are made by hand, and they are suitable for both men and women. The weaving of these bracelets originated at the dawn of the formation of the North American Indian tribes. Later, American hippies borrowed the bauble from the Indians. After the hippies exchanged baubles, they began to be considered brothers, albeit named ones. But over time, the concept of brotherhood began to be perceived as something without further ado, and the meaning of such a symbol as a bauble was forgotten.

Initially, baubles were given only as a sign of friendship, love, sincere emotional affection.
At the beginning of this century, the situation took a rather ambiguous turn. Firstly, everyone remembered that baubles have a traditionally complex symbolism. Different colors and their different patterns convey different information about the person who wears them, related to his musical tastes and many other aspects of his life. Secondly, the hippies do not have a unified system of symbolic meaning of the bauble, and therefore different groups within even the same subculture can interpret the same bauble in different ways, sometimes even reaching the absolute opposite. Because of this, and even because of the disdain for rigid rules common among hippies, today baubles are increasingly worn as a simple decoration, and not as a sign of belonging to a particular subculture.

If the hippie style is not entirely your thing, you can weave beautiful bracelets by adding a chain or any other decorative element to the threads.


Make a stylish bracelet yourself. Take a chain, multi-colored threads, stealth and scissors

Tie two bundles of threads at the base and with the help of stealth weave into the chain as shown in the figure.

This is the beauty you should get

Each color of the threads of the baubles has its specific meaning.
- White is associated with innocence, purity, freedom, sophistication, truth and ideals. It is correlated with religiosity, accuracy, dear. Also, a white bauble is endowed with goodness, light, faith and independence of the owner of the jewelry.
- The blue color of the baubles carries information about calmness, openness to everything light and new. He broadcasts about love for God, peace, long memory, harmony and friendliness. The blue color reflects thoughts about the sky, infinity, purity and innocence of man.
- The green color is given the power of youth, nature, plants. He is the embodiment of hope, harmony, eternity, faith, life, the search for love.
- And red is the color of love, passion, fire, blood, joy, affection and energy.
- A black bauble speaks of attachment to magic, the occult, sadness, loneliness. It is appropriate when its owner wishes to declare strong energy, mourning, freedom, unwillingness to communicate, mysticism, detachment, fearlessness and independence.
- It's funny that the scarlet color is a manifestation of aggressiveness.

If you meet a real hippie, pay attention to the color of his baubles 🙂

Now they do not adhere to color classification and make baubles from those colors that they simply like.
How to do it yourself
Baubles, or just bracelets made of floss threads, have long been no longer perceived as a distinctive sign of non-formal people. They have become just a stylish original decoration available to everyone, regardless of gender, age and social status. In addition, thread bracelets have ceased to be an attribute of only hippies or rastamans. But the original function of the baubles remained - to be a keepsake. Baubles can be presented to a loved one as a sign of gratitude, affection and even love. According to tradition, you must by all means tie a bracelet on your friend's wrist, so that it will surely bring him happiness and always remind you of who gave the bracelet and why. During the donation, you need to tie a bauble with three knots, and on the third knot make a wish for the one to whom the bracelet is given. This bauble should be worn without being removed, until it itself flies off or breaks.

Chain and thread bracelet. It looks like the one above.

Divide the threads into two bundles

Tie the threads and thread through the first link of the chain

Start weaving threads into the links of the chain ...


It turns out a pigtail

At the end of weaving, tie the threads and cut off the ends. It remains to attach the clasp

It is best to make such a bright, memorable decoration-gift yourself. What's more, it's not difficult at all. There will be no significant costs either. But you need to stock up on multi-colored threads and scissors. Not very coarse threads, which are usually used for knitting, or floss threads will do. The color can be chosen according to your taste and discretion. By the way, it is not necessary to be guided by the interpretation of flowers from hippies: the best symbolism is considered to be the one that is understood only by the one who gives and the one who receives the bracelet.

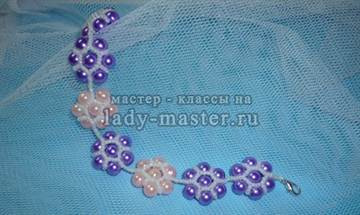
For this bracelet you will need threads, clasps and beads.

Tie 4 threads at the base and put beads on the middle two

Now separate one bead alternately on each thread and weave the two extreme threads, as shown in the diagram. Raised a bead - twisted threads

You should get such an interesting weaving
Learning how to make a bracelet out of thread is not at all difficult. The simplest classic bauble is woven from eight separate threads. The length of each must be taken four times the estimated length of the finished product. It is also necessary to add a little more to the ends, which will later need to be tied on the arm.
- For example, the first bauble will need eight threads approximately one meter long. The threads are fixed on a conditional stand - the back of a chair, bed or cabinet door. Otherwise, the bracelet will begin to twist during weaving.
- All the threads are gathered together, and a loose knot is tied at one end. At the same time, small ponytails remain at the top for future ties. Such a knot can be attached to a safety pin just to the curtain or to the back of the sofa.
- Then you need to straighten the threads in the order in which the colors will be located. The rightmost thread must be tied with two knots on the nearest adjacent thread on the left. So the threads will change places.

You can attach the threads to a vertical surface using adhesive tape.

We divide the threads into two equal parts and separate the extreme thread on the right

We connect it with the nearest thread ...

... and tighten the knot

So in turn we tie knots on all the other threads. We stop in the middle
- Then, with the same threads, a knot is knitted at the next ends, and thus to the edge. The first row is obtained in the form of a diagonal strip of knots of the same color. Then, with the help of a new thread, which turned out to be from the right edge, the same procedure is done, and until such time as a bracelet of the desired length is obtained.
- After that, the bauble is removed from the mount, the knot is untied and the ends are braided into a pigtail, which will give them a neat look.

Now we take the extreme thread on the left and do the same manipulations. We stop in the middle

We tie the central threads into a knot (they used to be extreme)

The first row of the bracelet is ready

We continue weaving in the same way - from the edge to the center


At the end, weave a pigtail out of threads and tie them into a knot.


Everyone can weave such popular ones. But when it’s not scary to take on more painstaking, even meditative weaving from knots, then you can experiment. For example, weaving can be performed not only in the direction from the right side to the left, but also vice versa. In this version, actions are performed in the same order, but as if in a mirror image. Such a task may seem difficult at first glance. However, once you get used to it, you can weave knots without thinking at all.
More complex and interesting way - weaving bracelets from threads, resulting in a kind of arrow. The usual way is woven to the middle of the row, and then weaving begins from the other edge, but only again to the middle of the row from left to right. The threads meeting in the middle are tied together to form an arrow.

Another option is a bracelet with a metal base.

You will need such a base (sold in needlework stores) and threads of different colors


Of course, there are an unimaginable multitude of patterns for weaving baubles from threads. However, they are all simple combinations of those elementary patterns that were discussed above. If you get a taste, then on the vastness of the boundless Internet you can easily find a huge number of photographs, drawings and patterns for making thread bracelets. There will also be friends who share this interesting hobby, and for whom a bauble is not just a beautiful thing. And then, undoubtedly, this handmade bracelet will be able to seal the bonds of new friendship for a long time.

Another option is a bracelet in the form of a flagellum. Take a bunch of threads, tie and fasten on a vertical surface

Separate three threads to be used first

Make a loop out of one thread and grab the rest of the threads

We tighten the loop at the top ...

... and begin to braid around the warp threads. Note that all this time we do not touch other separated threads.

Now wrap the other two threads around part of the bracelet crosswise

Now we draw three new threads from the base and proceed in the same way.

Periodically change the color of the braid threads, and you will get such a multi-colored flagellum

Video


